Colorado’s San Juan Skyway – An RV Trip in Dazzling Fall Color!

September 2016 – During the last ten days of September each year, the San Juan Skyway in the Colorado Rocky Mountains becomes one of the most dazzling places we have ever visited with our RV.

RV on San Juan Skyway Colorado Rocky Mountains Aspen trees in autumn

Astonishing color on an autumn RV trip along Colorado’s San Juan Skyway. WOW!!

Beginning around September 20th and continuing through the first few days of October, this 235 mile long drive comes alive in utterly spectacular color.

San Juan Skyway Colorado Rocky Mountains Colorful valleys

Colorado fall color.

Towering mountains on either side of the road are covered in swatches of vivid color as the aspens don their golden cloaks.

Colorful hillside San Juan Skyway Colorado Rocky Mountains Autumn Leaves

Autumn splendor in the Colorado Rockies

Patches of yellow spring up in every direction, and as the days go by, green becomes yellow and yellow turns to vivid orange.

Fall color in Colorado Rocky Mountains

Patches of brilliance.

Color patterns San Juan Skyway Colorado Rocky Mountains Autumn Leaves

.

The trees join together and form patterns in the Rocky Mountains, and visitors carrying cameras of all shapes and sizes gape in awe at the splendor of Nature’s majesty.

 Leaf patterns in fall San Juan Skyway Colorado Rocky Mountains

.

In places, lakes reflect the glory of the mountains on their glassy surfaces, mirroring the stunning fall colors in their depths.

Crystal Lake in Autumn San Juan Skyway Colorado Rocky Mountains

.

Along with dozens of other grinning, camera wielding tourists, we stopped along Colorado’s jaw dropping Million Dollar Highway to take in the views and take some photos. It was early morning on a grey day, and we watched a duck swimming across a small lake.

Colorado Rocky Mountains Autumn Color San Juan Skyway Colorado

Vivid colors brighten a grey morning at Crystal Lake.

As she headed towards the shore, she swam into the reflected colors.

Duck Autumn color San Juan Skyway Colorado Rocky Mountains

.

The undulating surface surrounded her in golden ripples as she quietly floated across this magnificent backdrop.

Duck Fall color reflections San Juan Skyway Colorado Rocky Mountains

.

She stabbed the silky water with her beak, seeking out yummy morsels, and tiny water droplets fell from her beak as she turned.

Duck in autumn San Juan Skyway Colorado Rocky Mountains

.

The lake mirrored the vivid, patchwork hillsides in the water, creating a breathtaking image.

Aspens in fall San Juan Skyway Colorado Rocky Mountains

.

On the side of the lake, tourists set up camp chairs to admire the mountain views.

Leaf peepers San Juan Skyway Colorado Colorful valleys

.

And what a view they had.

Rocky Mountains Fall Color San Juan Skyway Colorado Colorful valleys

.

Both from a distance and from up close, the colors of the trees were awe-inspiring.

Mountains of gold San Juan Skyway Colorado Rocky Mountains

.

Fall color San Juan Skyway Colorado Rocky Mountains

.

Like Utah’s Scenic Byway 12, the San Juan Skyway is an All American Road. It is a loop drive that passes through some of Colorado’s most charming mountain towns.

Rico Colorado San Juan Skyway Rocky Mountains

Rico is one of many cute towns along the San Juan Skyway.

Beginning in Dolores, Colorado, the San Juan Skyway follows SR-145 northeast through the village Rico to the trendy town of Telluride.

Autumn color San Juan Skyway Rocky Mountains

Right from Crayola!

From Telluride, the San Juan Skyway continues northwest on SR-145 to the town of Placerville where it heads northeast again on SR-62 to the town of Ridgway.

Trees in autumn San Juan Skyway Colorado Rocky Mountains Autumn Leaves

.

From Ridgway, the autumn colors intensify as the San Juan Skyway turns south on US-550, also known as the Million Dollar Highway, and travels through Ouray and Silverton to Durango.

Starburst golden aspen autumn leaves San Juan Skyway Colorado Rocky Mountains

A fish-eye lens and a starburst – what fun!

This portion of the San Juan Skyway takes RVers on tight hairpin turns and 10% grades to climb over three mammoth mountain passes that range between 10,000 and 11,000 feet.

Reflections golden aspen autumn leaves San Juan Skyway Rocky Mountains

Stunning reflections and post-processing fun.

This is an extraordinary road that is easily traveled in an RV that has a strong engine or is towed by a strong truck (semi-tractor trailers traverse the Million Dollar Highway 24/7 in large numbers).

For first-timers, is worthwhile to drive the road in the toad or tow vehicle at least, just so you know what is in store. And who wouldn’t want to do this drive multiple times during those magical autumn days?!

San Juan Skyway Colorado Rocky Mountains Autumn Leaves

Heading up the Million Dollar Highway.

We have been fortunate to sample various portions of the San Juan Skyway on three separate occasions since we started RVing full-time. Each time we have been wide-eyed with wonder at the sensational scenery all around us.

Motorcycle in fall colors San Juan Skyway Colorado Rocky Mountains

San Juan Skyway – An INCREDIBLE drive!!

For RVers planning an RV trip on the San Juan Skyway, there are various informative links below.

Subscribe
Never miss a post — it’s free!

Further Resources:

During the holiday shopping season, we would LOVE for you to visit Amazon via any of our links. What happens is anything you put in your shopping cart immediately afterwards results in a small commission to us at no cost to you, no matter what it is and no matter when you complete the purchase. This is a huge pat on the back for us, and the small trickle of referral fees from appreciative readers makes it justifiable and possible for us to put the time into this website that we do. Thank you!!

Info for Colorado’s San Juan Skyway:

Other blog posts from our RV trips to this part of Colorado:

More blog posts from our RV trips to Colorado:

Our most recent posts:

More of our Latest Posts are in the MENU.
New to this site? Visit RVers Start Here to find where we keep all the good stuff!!

<-Previous || Next->

The Burr Trail – A Fabulous Side Trip on Utah’s Scenic Byway 12

September 2016 – One of the most beautiful side trips along Utah’s Scenic Byway 12 is another scenic drive that branches off of Route 12 at the small hamlet of Boulder, Utah. Its called the Burr Trail.

Overlook Burr Trail Scenic Byway 12 Utah

Looking out across the beginning of the Burr Trail

We first heard of this scenic back road from an old rancher who was a retired high school teacher and former football coach in Tropic, Utah, just outside of Bryce Canyon National Park.

As we leaned up against a fence with him, admiring his cows grazing in the distance, and listening to his tales of teaching and coaching back in the 70’s, he suddenly asked us if we’d ever driven the Burr Trail.

Boulder utah Post Office Burr Trail Scenic Byway 12

The post office in Boulder, Utah, where the Burr Trail begins.

We’d never even heard of it! But the more he talked about it, the more we knew we needed to check it out!

The little village of Boulder, Utah, has just a few buildings in it, so it is easy to drive right through it while barreling along on Scenic Byway 12.

But there’s a little store and an RV park, and there’s a post office that puts the town on the map. The turnoff to the Burr Trail is at the big 90 degree bend in Route 12 right by the Burr Trail Grill.

Boulder Utah RV Park  Burr Trail Scenic Byway 12

The Shopping District in Boulder, Utah

As soon as we drove onto the Burr Trail, the scenery went from ordinary to extraordinary in a matter of minutes.

Burr Trail Scenic Byway 12 Utah

Heading down the Burr Trail

The road is narrow. It’s fine for passenger vehicles but is not recommended for RVs. We drove it with our truck on a weekday, and during the morning to midday hours we were on our own and didn’t see any other travelers.

Scenery Burr Trail Scenic Byway 12 Utah

Views along the Burr Trail.

The rock formations became more and more dramatic with each mile that we drove.

Rock formations Burr Trail Scenic Byway 12 Utah

Gorgeous views at every turn!

Dead tree Burr Trail Scenic Byway 12 Utah

.

And then the canyon walls began to get very steep on either side of us as we drove down the middle of Long Canyon.

Canyon Walls Burr Trail Scenic Byway 12 Utah

.

The entire Burr Trail is 69 miles from end to end, but only the first 30 miles are paved. So, we drove until the pavement ended and then turned around and came back.

Cliffs Burr Trail Scenic Byway 12 Utah

Long Canyon has towering rock cliffs on both sides of the road.

On our way out on the Burr Trail, we had noticed a few cars parked on the side of the road at one spot. On our return trip, we stopped there to see what was going on.

It turned out to be a lovely but very short slot canyon!

Trees Long Canyon Slot Burr Trail Utah Scenicy Byway 12

Beautiful shade trees lead to a slot canyon

The first hundred feet or so of the slot canyon had a fantastic canopy of trees covering the trail, providing wonderfully cool shade at midday.

Slot Burr Trail Scenic Byway 12 Utah

These trees are actually very tall!

Then, after another few paces and a slight turn in the trail, the slot canyon suddenly ended.

Long Canyon Slot Burr Trail Utah Scenicy Byway 12

End of the trail.

Sometimes this canyon is called the Singing Canyon, and we quickly found out why.

A group of hikers was just coming out of the slot canyon as we approached, and they passed by us on the way to their cars out on the road. When we got to the far back end of the slot, out of sight of the road, the hikers had made it to their cars and were standing around in the road talking with each other.

Starburst Long Canyon Slot Burr Trail Utah Scenic Byway 12

The sun shines through the slot.

Amazingly, we could hear everything they were saying, as if they were on the opposite side of us, beyond the impenetrable back end of the canyon!

I didn’t believe the sound could bounce around like that at first, but as soon as they drove off in their cars, the echoes of conversation at the back of the canyon fell silent.

Singing indeed. You’ve gotta be careful what you say out loud by the road when your friends head into this slot!

The Long Canyon Slot Burr Trail Utah Scenicy Byway 12

This canyon has incredible echoes!
Here a starburst from the sun dwarfs me… cool!

At the mouth of the sot canyon there are some beautiful red rock formations that beg to be climbed. We obliged, of course!

Red rock formations Long Canyon Slot Burr Trail Utah Scenicy Byway 12

.

As we were leaving, we spotted the first signs of fall down on the ground. Yellow leaves were lying at the base of the tree trunks here and there.

Fall leaves and tree trunk

A golden harbinger of fall.

Back out on the Burr Trail, the rock formations were bright white and a rich burgundy red set off by dark green trees.

Red rocks and trees Burr Trail Utah Scenicy Byway 12

.

We drove back through Long Canyon and watched in awe as the canyon walls rose up around us once again.

Red rocks Burr Trail Scenic Byway 12 Utah

.

Motorcycles Burr Trail Scenic Byway 12 Utah

A pair of motorcycles takes in the view.

And then we were back in the open, sweeping vistas of the beginning of the Burr Trail.

What a drive!!

Wide vistas Burr Trail Scenic Byway 12 Utah

The Burr Trail is a wonderful excursion off of Scenic Byway 12 in Utah.

The Burr Trail is a really easy sidetrip for RVers traveling along Utah’s Scenic Byway 12, and is well worth taking a few hours to do.

Jewels like this are so easy to miss in this part of the world because the bigger, more famous stuff gets all the attention.

Thank goodness we met that old rancher in Bryce Canyon and hung out with him for a while by his fence, chatting about his cows, his former students and his football team, or we never would have learned about this beautiful place!

RV on Utah Scenic Byway 12

There are lots of gems for RVers on Utah’s Scenic Byway 12!

Subscribe
Never miss a post — it’s free!

More info about the Burr Trail :

Other posts from our RV trips on Utah’s Scenic Byway 12:

Blog posts from nearby Bryce Canyon National Park:

Our most recent posts:

More of our Latest Posts are in the MENU.
New to this site? Visit RVers Start Here to find where we keep all the good stuff!!

<-Previous || Next->

Grand Staircase Escalante Nat’l Monument – Lower Calf Creek Falls Hike

September 2016 – Scenic Byway 12 in Utah is an All American Road that makes for a truly spectacular RV adventure. There are lots of sidetrips and things to do along the way, and one that we just loved was the hike to Lower Calf Creek Falls in Grand Staircase Escalante National Monument.

Waterfall Lower Calf Creek Falls Grand Staircase Escalante Utah

The waterfall at Lower Calf Creek Falls

This is an easy 6 mile roundtrip hike that can be very hot at midday, so we started just as the trail was beginning to get light enough to see.

Trail to Lower Calf Creek Falls Grand Staircase Escalante Utah

We began our hike very early.

The Lower Calf Creek Falls Trail goes along Calf Creek. After passing through areas where very thick and tall underbrush not only surrounded us but rose above us on all sides, the trail emerged alongside a fabulous rock wall that was naturally striped with desert varnish.

Hiking to Lower Calf Creek Falls Grand Staircase Escalante Utah

Enormous cliffs covered with the vertical striping of “desert varnish”

Gradually, in places, the sun began to rise, and we found ourselves amid beautiful red rock formations.

Hike to Lower Calf Creek Falls Grand Staircase Escalante Utah

.

The trail cut across open grasslands.

Hiking trail to Lower Calf Creek Falls Grand Staircase Escalante Utah

Sun and shadow on Lower Calf Creek Falls.

And then it wandered across wide flat expanses of red rocks.

Lower Calf Creek Falls Grand Staircase Escalante Utah Hike

.

Birds were singing in the underbrush down by the creek, and at our feet we saw little lizards scurrying around.

Lizard Lower Calf Creek Falls Grand Staircase Escalante Utah

.

The canyon walls surrounding Calf Creek towered above us, and a lush valley of thick green vegetation grew along the banks of the creek.

Hike Lower Calf Creek Falls Grand Staircase Escalante Utah

.

Finally, after three miles of walking, we emerged at Lower Calf Creek Falls.

Waterfall Lower Calf Creek Falls Grand Staircase Escalante Utah

Lower Calf Creek Falls, Grand Staircase Escalante National Monument.

This is a fabulous waterfall that plunges straight down from a notch in the cliffs above, forming a narrow vertical stream of water.

Hustling out on the trail before sunrise had ensured that when we got to Calf Creek Falls we were the only people there.

Waterfall of Lower Calf Creek Falls Grand Staircase Escalante Utah

The waterfall plunges into a pool at its base.

So we did the thing you just have to do in scenic places these days and we got a selfie!

Lower Calf Creek Falls Grand Staircase Escalante Utah

Towering canyon walls and their waterfall embrace us on the sandy beach.

How fabulous it was to have the entire place to ourselves and to be able to play with the waterfall’s reflections in pools and puddles along the sandy beach.

Lower Calf Creek Falls Grand Staircase Escalante Utah

Reflections…

Lower Calf Creek Falls Grand Staircase Escalante Utah

.

Gradually, the sun rose higher in the sky, lighting the upper parts of waterfall and the rocky walls.

Waterfall reflection Lower Calf Creek Falls Grand Staircase Escalante Utah

.

Sunrise on Waterfall Lower Calf Creek Falls Grand Staircase Escalante Utah

.

And then bright sunshine lit up the entire waterfall and we stepped back into the shadows of the natural arch formed by trees over the creek downstream.

Shadows Lower Calf Creek Falls Grand Staircase Escalante Utah

.

As the sun shone brighter and brighter, gradually illuminating the trees that seemed to be kneeling in reverence at the base of this magnificent waterfall, hikers began to trickle in from the trail. What an incredible view greeted them!

Sunshine waterfall Lower Calf Creek Falls Grand Staircase Escalante Utah

.

Eventually, we were ready to hike back out again, and we began to traverse the slabs of red rocks.

Hike to Lower Calf Creek Falls Grand Staircase Escalante Utah

.

The scenery was exotic…

Red rocks Lower Calf Creek Falls Grand Staircase Escalante Utah

.

And we were joined on the trail by lots of other hikers.

Hikers Lower Calf Creek Falls Trail Grand Staircase Escalante Utah

.

We noticed beautiful wildflowers growing here and there. Some were trailside down by our feet…

Wildflowers Lower Calf Creek Falls Grand Staircase Escalante Utah

.

And others looked out across the lush creek valley at the enormous cliffs on the other side.

Wildflowers hike Lower Calf Creek Falls Grand Staircase Escalante Utah

.

For RVers that have an RV with a strong engine, an RV trip on Utah’s Scenic Byway 12 is an absolute must, along with a hike to Lower Calf Creek Falls.

RV campground Lower Calf Creek Falls Grand Staircase Escalante Utah

Calf Creek campground has some very cool campsites in the red rocks.

The BLM’s Calf Creek Campground is a fabulous place to camp for small and medium sized RVs. Bigger RVs can find a nice spot to stay in RV parks that are in the towns along the way. There are links below.

Subscribe
Never miss a post — it’s free!

More info about Lower Calf Creek Falls and Camping on Scenic Byway 12 in Utah:

More blog posts from our RV trips on Utah’s Scenic Byway 12:

Other posts from our RV trips to Southwestern Utah:

Our most recent posts:

More of our Latest Posts are in the MENU.
New to this site? Visit RVers Start Here to find where we keep all the good stuff!!

<-Previous || Next->

Lumintop SD75 Flashlight Review – A Car Headlight In Your Hand!

This flashlight is no longer available. However, a comparable flashlight can be found HERE.

We’ve been doing a lot of night photography lately, catching the Milky Way at Waterton Lakes National Park in the Canadian Rockies and hiking in the dark out onto a rocky point to catch sunrise at Deadhorse Point State Park in Utah. We even hiked the Fairyland Trail in Bryce Canyon National Park after midnight.

Stars at Fairyland Point Bryce Canyon National Park Night Sky

The Lumintop SD75 flashlight brightens the rock formations at Fairyland Point, Bryce Canyon National Park

We’ve also played with creating ghostly images by doing Light Painting in old buildings in Ouray Colorado.

Ghostly image in a ghost town

Mark gets a selfie of his own ghost.

A key piece of gear we have relied on for all of this is a Lumintop SD75 4,000 Lumen flashlight.

In the past we used Maglites and smaller LED flashlights to find our way in the dark and to cast light on the surroundings during a long exposure of the night sky. However, even the best of these flashlights was hopelessly dim.

Lumintop SD75 LED flashlight

Our Lumintop SD75 flashlight next to our Maglite.

Mark is a huge flashlight junkie, and he searched for a long time for a big and powerful flashlight to use for our nighttime photography excursions and to use when we roam around our boondocking spots at night.

He decided on the Lumintop SD75 flashlight.

This is a “search” flashlight similar to the ones used by law enforcement.

There are three power levels, and at max power it is a whopping 4,000 lumens.

The light it throws at max power is astonishing — it goes 0.4 miles!!

Walking in the dark with this flashlight is like holding a car’s headlight in your hand!

Lumintop SD75 flashlight low power

Low power.

Lumintop SD75 flashlight medium power

Mid Power.

Lumintop SD75 flashlight high power

High Power.

  • At low power, it can run for 50 hours
  • At mid power, it can run for 8.33 hours
  • At max power (4,000 lumens), it can run for 2.68 hours

Fairyland Point Bryce Canyon National Park Night Sky

Light painting the rock pinnacles at Fairyland Point, Bryce Canyon National Park

There is a strobe mode as well, and at max power strobe, it can run for 50 hours!

The Lumintop SD75 is made of heavy duty aerospace aluminum and has a hard-anodized anti-scratching HAIII military grade finish. The LED bulbs are the latest CREE XHP70 LED technology.

This is a serious piece of gear that comes in an equally serious suitcase!

Lumintop SD75 flashlight suitcase

The flashlight has its own suitcase. Don’t worry, it’s about the size of a very very big lunch box.

This aluminum suitcase has foam cutouts inside for all the goodies that come with it.

Lumintop SD75 flashlight suitcase open

Foam cutouts for all the extras.

The flashlight comes with four lithium-ion batteries that are rechargeable. It also comes with a wall charger as well as a 12 volt car charger.

Lumintop SD75 flashlight parts

The flashlight packs into the suitcase in two halves. The battery pack is shown in the middle.

So, we can charge the flashlight batteries either in our RV or in our truck, whichever is more convenient.

Lumintop SD75 flashlight charger

Wall charger and 12 volt charger.

There is a battery charge indicator light on the back end of the battery, so we know exactly how well charged the batteries are.

There are also two USB connectors for charging cell phones or other devices FROM the flashlight battery! That’s how much charge these batteries can hold!

Lumintop SD75 tactical flashlight back end

Cap off: Battery indicator light, 2 USB ports + slots for a strap.

There are also two slots on the cap that covers the back end of the flashlight that can be used to attach a carry strap or piece of line.

One very handy feature for when we are setting up our tripods and camera gear in the dark is an LED taillight that attaches to the back end.

Standing the flashlight on end, this taillight illuminates the area all around the flashlight. This would be ideal in a tent or doing emergency truck or RV repair work in the dark too!

Lumintop SD75 Flashlight with LED taillight

LED taillight
Handy in a tent, setting up photo gear or working on the RV.

There is a quarter inch tripod socket on the side of the flashlight so it can be mounted on a camera tripod as well.

Lumintop SD75 tactical Flashlight tripod mount

Unscrew this cap to access the standard 1/4″ tripod mount.

One feature we haven’t taken advantage of — because we haven’t been caught out in the rain or gone swimming with this flashlight just yet — is that it is water resistant to 2 meters!! It comes with extra O-rings to help keep it watertight as well.

Overlook night stars North Rim Grand Canyon

My camera aims at the stars at the North Rim of the Grand Canyon.

I wish we had had this flashlight when we cruised Mexico with our sailboat. We had a 12 volt “4 million candlepower” spot light that we kept on deck during every overnight passage just in case one of us slipped overboard.

Of course, we wore harnesses and clipped ourselves to the boat at sunset and stayed clipped in until sunrise as long as we were outside the cabin. But there was always the chance that the quick release mechanism on the harness might accidentally undo itself or some other catastrophe might happen that would send one of us into the drink.

Milky WayLodge at North Rim of the Grand Canyon starry night and fifth wheel trailer RV

The Lodge at the North Rim of the Grand Canyon.

Frankly, there is no way in any conditions but the calmest seas that our spot light would have been bright enough to illuminate a bobbing head in the water.

This flashlight is so much more powerful, we both would have felt a lot more comfortable it we’d had it aboard with us!

Milky Way and fifth wheel trailer RV

The Lumintop SD75 flashlight brightens up our buggy.

If you are looking for a high quality flashlight for walking around your RV campsite at night, or for hiking in the dark, or for light painting old ghostly buildings in the wee hours of the morning, the Lumintop SD75 is a terrific choice.

It’s also a neat gift idea for that sweet hubby who loves gadgets and is so hard to buy for!!

You can buy the Lumintop SD75 flashlight at this link.

If this flashlight is a little big for your needs, we have also written a detailed review about two excellent pocket flashlights:

Pocket Flashlight Review: Lumintop EDC25 and Lumintop SD26 1000 Lumen Flashlights

Subscribe
Never miss a post — it’s free!

Below are some of our most POPULAR POSTS (also in the MENUS above)

Buddy - A Journey in Spirit - The story of an event that changed our lives forever.

ARTICLE INDEXES
  • RV Tech Tips Articles - A one page index of links to all our RV Tech Tips, RV Upgrades & RV Maintenance articles.
  • RV Lifestyle Tip Articles - An index of links to all our RV Lifestyle Tips (finances, boondocking, major repairs, work/jobs, etc.)
  • Solar Power Articles - Overview and tutorial articles for how to design and install solar power on an RV or boat
  • Product Reviews - An index of links to all of our Product Reviews
RV UPGRADES, SYSTEMS & TIPS MONEY FULL-TIME RV LIFESTYLE GEAR STORE
  • Gear Store - A list of the goodies, equipment and gear we've found useful in our RV lifestyle!
 

Our most recent posts:

More of our Latest Posts are in the MENU.
New to this site? Visit RVers Start Here to find where we keep all the good stuff!!

Utah Scenic Byway 12 RV Trip – Driving An All American Road!

September 2016 – One of America’s most dramatic and beautiful scenic drives goes between Bryce Canyon National Park and Capitol Reef National Park in Utah.

Scenic Byway 12 Utah RV trip

Utah’s Scenic Byway 12 is an All American Road

Classified as an All American Road by the (now defunct) National Scenic Byways Program, this drive is an awe-inspring drive through 123 miles of the most spectacular scenery anywhere.

RV trip Scenic Byway 12 Utah

.

We began our drive just outside Bryce Canyon National Park and drove between towering sandstone walls that rippled in whites, greys, and pinks.

RV Utah Scenic Byway 12

.

At the beginning of the drive we passed farmland and ranches that stretched across the vast landscape to cliffs in the distance.

Farmhouse on Scenic Byway 12 Utah

.

Occasionally a cow standing by the side of the road watched us pass.

Cow on Scenic Byway 12 Utah

.

Soon, the ranch land gave way to exotic red rock formations that rose up on either side of us.

Red rocks on Scenic Byway 12 Utah RV trip

.

The road climbed and fell and swooped this way and that in big wide bends and tight hairpin turns.

Red rocks RV trip Scenic Byway 12 Utah

.

There wasn’t a lot of traffic, as this road goes between tiny communities in a vast area. Many of the vehicles on the road were RVs.

RV motorhome on Utah Scenic Byway 12

.

But this drive isn’t for the faint of heart or for RVs that are underpowered. One of the climbs we did was a 14% grade! We stopped at the top to get a photo of the sign for cars and trucks that were starting the descent.

14 percent grade Utah Scenic Byway 12

Utah Scenic Byway 12 is not for the faint of heart or for underpowered RVs.

Last year, we upgraded to a more powerful truck just so we could tow our 14,100 lb. trailer on roads like this and climb double digit grades without worrying about whether the truck could handle it.

RVing Utah Scenic Byway 12 in the red rocks

.

As we had hoped, the truck didn’t even flinch even once on this stunning scenic drive. Lighter on their feet, lots of motorcycles were having a blast!

Motorcycle Utah Scenic Byway 12 RV trip

Scenic Byway 12 in Utah.

This would also be a stunning road for riding a bicycle, and we saw a van from Trek Tours providing sag support to their riders.

Trek Bike Tour Scenic Byway 12 Utah

.

The patterns of colors on the red rocks were just gorgeous, and we stopped many times to look out across the incredible landscape and soak it all in.

RV motorhome Utah Scenic Byway 12 red rocks

.

RVing Scenic Byway 12

.

We had driven this route years ago with our popup tent trailer, but this is a road that is worth driving many times. Such views!!

RVing Utah Scenic Byway 12

.

Red rocks Motorhome RV trip Utah Scenic Byway 12

.

There are many things to see and do along the way on Utah’s Scenic Byway 12. Kodachrome Basin State Park, which was named for the film because the colors are so magnificent, is a true highlight.

RV motorhome Utah Scenic Byway 12

.

We didn’t stop at Kodachrome Basin State Park this time, but we did the jaw-dropping Burr Trail drive, which we’ll share in an upcoming blog post.

Motorhome Scenic Byway 12 Utah RV trip

Don’t miss Utah’s Scenic Byway 12 in your RV travels!!

We also hiked to the majestic Lower Calf Creek Falls, which we’ll share soon too (smile).

RV motorhome Utah Scenic Byway 12 road trip

.

But for RVers who don’t have the time to make any stops on Utah’s Scenic Byway 12, the road itself is so breathtaking that it is well worth a detour to experience.

To help you plan an RV trip on Scenic Byway 12 in Utah, there are some links below.

Subscribe
Never miss a post — it’s free!

More info about taking an RV trip on Scenic Byway 12 in Utah:

More blog posts from our RV trips on Utah’s Scenic Byway 12:

Other blog posts from our RV travels about magical and historic scenic drives:

Our most recent posts:

More of our Latest Posts are in the MENU.
New to this site? Visit RVers Start Here to find where we keep all the good stuff!!

<-Previous || Next->

Bryce Canyon – Rainbow Point – Bristlecone Pines and Sweeping Vistas

September 2016 – Our stay in Bryce Canyon National Park had been a wonderful immersion in orange and pink spires along the Rim Trail and on the new bike path that runs between Red Canyon and Inspiration Point. We’d even found a waterfall at Mossy Cave.

Shelter at Rainbow Point Bryce Canyon National Park Utah

Visitors’ shelter at Rainbow Point in Bryce Canyon National Park

At the far south end of the Bryce Canyon National Park, we hiked the Bristlecone Loop around Rainbow Point. We didn’t see a rainbow over the canyon, as we had at Fairyland Point, but the views were sensational.

Hiking Rainbow Point Bryce Canyon National Park Utah

What a view! Rainbow Point at Bryce Canyon National Park in Utah

Rainbow Point View Bryce Canyon National Park Utah

Rainbow Point, Bryce Canyon National Park.

The orange and red rock cliffs had interesting windows and holes carved in their sides. Mark nudged me as we stared across the canyon and said, “See the Alice Cooper eyes over there?” Sure enough!

Alice Cooper eyes at Rainbow Point Bryce Canyon National Park Utah

Alice Cooper eyes…

This end of Bryce Canyon is the highest point in the whole National Park, about 9,100 feet in elevation, and it is just the kind of wind blown, rocky place that ancient bristlecone pines love to make home.

Brislecone Pine Rainbow Point Bryce Canyon National Park Utah

A bristlecone pine at Rainbow Point in Bryce Canyon

As we walked out on a bluff, we came across a large stand of bristlecone pine trees that had finally given up the ghost. Unlike the living 1,600 year old bristlecone pine we’d seen a month earlier at Cedar Breaks National Monument whose gnarled branches were vibrantly alive and covered with soft pine needles and pine cones tucked into its craggy skeleton, these trees were totally bare.

Three bristlecone pine trees Rainbow Point Bryce Canyon National Park Utah

Ghosts of bristlecone pine trees

They stood together, as if continuing an ageless conversation that had begun long ago, and their wood was bleached by the sun.

Bristlecone Pine Rainbow Point Bryce Canyon National Park Utah

.

When I touched their branches and knocked on the trunks with my knuckles, their wood was as hard as rock and felt very dense.’

Bristlecone Pines Rainbow Point Bryce Canyon National Park Utah

.

The stand of bristlecone pines numbers just a few dozen trees, but each raised its branches to the heavens in its own graceful way.

Bristlecone Pine Rainbow Point Bryce Canyon National Park Utah

.

At our feet, the trees cast beautiful shadows across the ground.

Bristlecone Pine Shadow Rainbow Point Bryce Canyon National Park Utah

A bristlecone plays with its shadow

The trees stand near the edge of a sheer cliff, and as we walked along the rim and looked back, we got an eye-popping view of the scale of people standing on the cliff, the tree skeletons, and the huge drop down.

Cliffs Rainbow Point Bryce Canyon National Park Utah

People get a selfie by the bristlecone pines and cliffs at Rainbow Point

The National Park Service wisely warns people not to go too close to the edge, but it’s hard to resist…

Overlook Rainbow Point Bryce Canyon National Park Utah

.

Back near the start of the trail we came across a group of people staring intently into the woods, their cameras and cell phones held high.

People photography a buck deer at Rainbow Point Bryce Canyon National Park Utah

Nature’s paparazzi

Tip-toeing over to join them and see what they were looking at, we saw a beautiful buck nibbling on leaves in the bushes. He paused to stare at us all and then went back to munching the tender leaves.

Buck deer at Rainbow Point Bryce Canyon National Park Utah

A buck becomes the star of the show at Rainbow Point

We wrapped up our hike around the Bristlecone Loop and began to say our sad goodbyes to Bryce Canyon National Park.

We’d had an extraordinary visit this year, and we’d had a chance to take in some of the most beautiful spots in the Park. But we still haven’t seen it all, and we’ve made notes of the places we want to visit next time…

Posing Rainbow Point Bryce Canyon National Park Utah

Bryce Canyon’s siren song will lure us back again and again.

If you are planning an RV trip to Bryce Canyon National Park, there is an awful lot to see and experience. Below are some links to help you plan your adventure:

Subscribe
Never miss a post — it’s free!

Here are some more links for planning a visit to Bryce Canyon National Park and doing the Mossy Cave hike:

More blog posts from our RV trips to Bryce Canyon

Related posts from our RV travels:

Our most recent posts:

More of our Latest Posts are in the MENU.
New to this site? Visit RVers Start Here to find where we keep all the good stuff!!

<-Previous || Next->

Immigrants Flood California’s & Arizona’s Borders – Surprise in San Luis AZ!

This blog post is a departure from our normal fare of cheerful travel stories, but as documenters of what we see in our day-to-day travel lives, it is something we encountered that we believe is worthy of sharing. This is not intended to take a political side or offend anyone.

October 2016 – A few days ago, we crossed the border between the US and Mexico at San Luis, Arizona. We were returning to the fun, small town of San Luis Rio Colorado, Mexico, for checkups with our dentist and endodontist whose excellent work we describe here.

After quite a few visits to this Mexican border town, we now know it pretty well. We like to make this border crossing by bicycle, because that gives us great transportation around town in Mexico. It also makes it super easy to return back across the border into the US, because bicycles bypass all the lines and go straight to a gate set aside especially for them and for holders of the US Sentri pass.

After wrapping up our dentist appointments, we rode our bikes back to the border to cross back into the US. As we approached the border gate, we stopped dead in our tracks when we saw dozens of people sitting on the sidewalk right outside the US border gate on the Mexican side.

Illegal immigrants waiting in Mexico to cross the border in Arizona

.

How bizarre! We’ve never seen anyone sitting on the sidewalk in this area before.

Pedestrians always simply walk up to the border crossing gate, show their passports and walk on through into the US. Often there’s a line of people, but everyone stands in the line, rather than sitting on the ground, and the line keeps moving.

These folks appeared to be settled in for a while. They were leaning against the fence in the border crossing zone that separates the US and Mexico. They had hung some blankets up to shade themselves from the intense sunshine, and they had bedding and luggage around them.

What the heck was going on?

800 Undocumented migrants wait to enter the United States in Arizona

.

Two US border patrol agents in front of the gate asked us for our passports before we even got to the actual US Immigration booth. That was weird too. Usually you present your passport to the agent in the booth, not to agents standing in front of it on the sidewalk.

We asked them who all these people were and what was going on.

“They are from Haiti, Africa, Central America, Asia, even Russia — lots of different countries — and they’re waiting to come into the US,” he told us. “But they don’t have any documentation, so they are waiting for an appointment with an agent.”

He went on to explain that his job was crowd control. Fortunately, this was a quiet crowd. On the other side of the street several Mexican soldiers in camo gear held rifles and stood watch as well.

He told us there has been a huge increase in migrants since last spring, and there had been so many at the San Ysidro/Tijuana crossing in recent months that the area in front of the US border there was quickly turning into a Tent City.

So, the migrants were moving to other, less crowded border towns in Mexico at the California and Arizona ports of entry. More and more were coming to the San Luis port of entry on the Arizona border.

“But this is nothing,” he said, sweeping his hand in the direction of all the people. “You should have seen this place a few days ago.”

721 Illegal immigrants wait to enter the United States in Arizona

.

We have crossed the border between the US and Mexico many times. We spent the better part of four years cruising Pacific Mexico on our sailboat, and we have crossed the border at least 25 times, by car, on foot, by bicycle and by boat.

We’ve crossed at the massive San Ysidro/Tijuana border crossing south of San Diego, the busiest port of entry in the Western Hemisphere. It resembles a mammoth freeway tollbooth plaza: 25 or so regular booths and perhaps 10 or so other booths for buses, commercial trucks and “Sentri Pass” holders who cross the border frequently.

And we’ve crossed at the smaller border crossings in Tecate (in rural southern California), Nogales (south of Tucson, Arizona), Los Algodones (western Yuma, Arizona), San Luis (south of Yuma, Arizona) and Boquillas del Carmen (at Big Bend National Park in Texas). At sea, we crossed just off the Pacific coast of southern California and northern Baja California, Mexico.

Going into Mexico is always very simple, and when on foot or bicycle, no one ever checks out passports. Returning into the US, however, is always an adventure. The wait in line to get into the US by car is usually at least an hour and is generally closer to two hours. It can be as much as four hours.

771 Undocumented migrants wait to cross from Mexico into the United States in Arizona

.

The fun thing about this mind-numbing wait in an idling car, creeping along inch by inch, is that entrepreneurial Mexicans make the most of their captive audience. They walk up and down the road between the cars and provide crazy entertainment for tips, and they sell things, from food to cold drinks to trinkets of various kinds.

Crossing into the US from Canada with an RV at Calais, Maine, and Chief Mountain, Montana, in the early morning avoids the lines, but you don’t want to have any fruits or veggies in the RV’s refrigerator!

Sailing across the border from Mexico into the US was quite different. Helicopters buzzed our boat and border patrol boats zoomed out to get a good look at us through binoculars. US Customs and Immigration came down to inspect our passports, boat documents and the boat itself when we tied up at the dock in San Diego.

But we’ve never, ever seen people hanging out on the sidewalks a few feet from the border gates setting up tent cities.

What had brought all these migrants here in such huge numbers? Even the agents themselves expressed shock at what was going on!

Illegal immigrants wait to enter United States from Mexico

.

Researching things a little bit, we discovered that after the big earthquake in Haiti in 2010, many Haitians moved to Brazil and stayed there for a few years. Many worked in construction-related jobs in the lead up to the 2016 summer Olympics. Unfortunately, Brazil’s economy has gone into a deep recession, so the Haitians began leaving Brazil this past year to come to the US.

It is a long journey to get through all of the Central American countries and Mexico, and without documentation, they can’t cross the borders in these countries legally. So, they pay smugglers to get them from one border to the next. The cost for them to get from Brazil to the US has been estimated to be at least $2,350.

When they reach Mexico’s southern border, many claim they are from Congo or other countries with which Mexico has diplomatic relations. This allows them to get a 20-day permit to remain in Mexico, which gives them enough time to get to the US border and wait for admission.

Illegal aliens wait to cross the border from Mexico into America

.

Haitians aren’t the only immigrants that are arriving in large numbers. Central Americans, Africans, Asians and others are taking this same route to America’s southwestern borders too.

Apparently 5,000 have arrived, and US Immigration and Customs Enforcement Director Sarah Saldaña says 40,000 more are on their way. This movement of so many people is putting huge pressure on the Central American countries and Mexico as they try to find places to sleep and eat along the way.

Will they be deported?

Would they make this long journey and pay all that money if they knew they had no chance?

People arriving at the US border can ask for asylum. Held in detention for a short time until their request to apply for asylum is approved, they can then file their actual application for asylum.

Once this application for asylum has been filed, they can legally live in the US while their case goes through the court system until they are either granted or denied asylum. The time period is generally three to five years, and if asylum is denied there is an appeals process which allows them to stay longer.

This is different than people who are outside the US that are classified as refugees before they arrive. Both refugees and people granted asylum status are eligible for the same cash and medical benefits.

The Border Patrol agent commented, “The vetting process starts with figuring out if they are actually from the country they say they are from.”

I asked him how they do that. He said he had no idea.

Undocumented migrants waiting to enter the United Sates from Mexico

.

Coming face to face with “the immigration issue” like this was startling and disturbing, to say the least.

For most of us, it is something that’s happening “over there,” beyond our neighborhood, at least for the moment.

I have wrestled with this post for three long days now, unsure if I should share this tale on my usually very upbeat website.

However, I was shocked that the Arizona Republic (the Phoenix, Arizona, newspaper) hasn’t mentioned a thing about it in their online edition and that the Arizona Daily Star (the Tucson, Arizona, area newspaper) has reported it online only once…two days ago. It doesn’t appear to be on the Arizona TV news networks either.

Many Arizonans are unaware that the state of Arizona is taking in more Syrian refugees per capita that any other state in the union. In raw numbers, it is taking in more refugees than all but two other states, California and Michigan!

I think this story is important for people to know about. So here it is.

More info:

Update – April 16, 2017

After Donald Trump was elected president, things changed dramatically not only for asylum-seeking immigrants at America’s formal ports of entry, like the border crossing (“port of entry”) in San Luis, Arizona, described on this page, but also for illegal immigrants sneaking across the border in between the formal ports of entry.

During the month of October, 2016, when we saw these prospective American immigrants seated on the Mexican side of the border in San Luis as they waited to plead their cases to US authorities, a total of 66,000 “inadmissible” migrants showed up at America’s ports of entry or crossed the border illegally in between.

During the month of March, 2017, the total was down to 16,400, a drop of 75%.

The flow of Haitians into the US dropped from 3,000 in October to 100 in March, a drop of 97%.

Reports in November and December, 2016, indicated that many of the Haitian immigrants were being released in the US to live freely while their cases moved through the courts.

Reports in February and April, 2017, indicated that many of them are remaining in detention centers, are being deported, or are now living in northern Mexico and seeking legal status there so they can remain in Mexico.

Mexico has no plans to change their immigration policies to allow the migrants to stay within their borders.

For those who are unaware, simply obtaining a temporary residency-only visa in Mexico can be challenging. When we decided to upgrade from a standard, automatic 6-month travel visa to a one-year “FM3” non-working residency visa in Mexico in 2010, we had to supply the following:

  • A letter of recommendation from the manager of our marina
  • 6 months of bank statements translated into Spanish showing a minimum income level of $2,000 US per month
  • A set of black and white photos of ourselves that met very stringent hairdo and clothing and size requirements.

It took us several weeks to obtain the visa the first time, including several trips to the immigration office, and it took no small amount of effort to renew it a year later. The Mexican FM3 visa has since changed to a 3-year Residente Permanente – No Inmagrante visa, but the requirements are similar.

Unlike these migrants, we were not seeking to work in Mexico or to stay indefinitely.

Here are some follow-up articles:

Subscribe
Never miss a post — it’s free!

Our most recent posts:

More of our Latest Posts are in the MENU.
New to this site? Visit RVers Start Here to find where we keep all the good stuff!!

Comments are disabled on this post. Other internet forums are better suited for discussion.

Power Inverters – Exeltech’s Pure Sine Wave Excellence

An inverter, sometimes called a “power inverter,” is a piece of electronic gear that converts DC power to AC power, and it is what enables RVers to use regular household appliances in an RV without hookups to an RV park power pedestal relying on a generator.

The September/October 2016 issue of Escapees Magazine features our detailed article about inverters: what they are, how they are sized, what flavors they come in and how to wire one into an RV.

Power inverter for an RV - an Exeltech XPX 2000 watt inverter

.

For RVers who enjoy dry camping in public campgrounds or boondocking on public land, an inverter is the key piece of the puzzle that gives their RV traditional 110 volt AC power — like the power in the wall outlets of a house — without plugging the RV into a power pedestal at an RV park or a noisy gas-hungry generator.

WHAT IS AN INVERTER?

For beginning RVers, it is easy to confuse a converter with an inverter, because the words are so much alike. The difference is actually very straight forward:

  • A converter converts the 110 volt AC power coming out of a wall outlet, RV park power pedestal or generator into 12 volt DC power, and charges the RV’s 12 volt battery bank.
  • An inverter converts the batteries’ 12 volt DC power into 110 volt AC power so household appliances like the TV, blender, microwave and vacuum can run.
Exeltech XPX 2000 watt pure sine wave inverter living off the grid in an RV

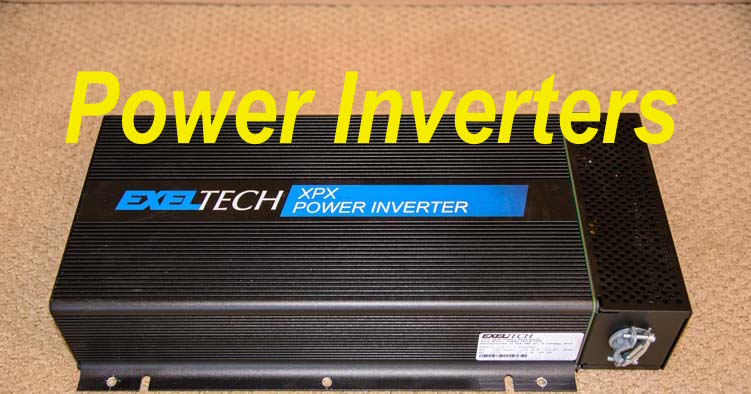
Our “house” inverter – an Exeltech XPX 2000 watt inverter.

RV FACTORY INSTALLED CONVERTERS

Most trailers and some smaller motorhomes come with a factory installed converter. Frequently, these factory installed converters are inexpensive units that are not multi-stage chargers. So, for RVers who want to dry camp a lot and keep their batteries in tip-top shape, or charge them up efficiently with a generator while dry camping, it is a good idea to replace the factory installed converter with a better quality converter (we did).

More info on upgrading an RV power converter here: Converters and Inverters in an RV

RV FACTORY INSTALLED INVERTERS and INVERTER/CHARGERS

A few high end trailers and most higher end motorhomes come with a factory installed inverter.

In many cases, especially high end trailers, the inverter is dedicated to powering a residential refrigerator that runs exclusively off of 110 volt AC power (unlike an RV refrigerator that can run on propane). The inverter is there so the fridge can continue to run off the batteries while the rig is being driven from one RV park to another without a connection to 110 volt AC electricity. This inverter is sized to support the refrigerator and is not intended to be used for any other purpose in the rig.

So, for most trailer owners that want to do a lot of camping without hookups, an inverter is an extra piece of gear that must be installed.

In contrast, many higher end motorhomes come with a factory installed inverter/charger that can do two things: 1) provide the RV with household 110 volt AC power at the wall outlets via the batteries while dry camping and 2) charge the batteries when the RV is getting its 110 volt AC power from an RV park power pedestal or a generator. These inverter/chargers essentially do the work of both a converter (charging the batteries from shore power) and an inverter (providing AC power via the batteries while dry camping).

So, for folks with a higher end motorhome, an inverter is usually already installed in the motorhome at the factory in the form of an inverter/charger, and it does not need to be added later. However, it may not be a pure sine wave inverter (see below).

INVERTER SIZES

Inverters come in all shapes and sizes and all price ranges too, from little biddy ones that cost a few bucks to big beefy ones that cost a few thousand dollars.

They are rated by the number of watts they can produce. Small ones that can charge a pair of two-way radios or a toothbrush are in the 150 watt range. Huge ones that can run a microwave and hair dryer are in the 3,000 watt range.

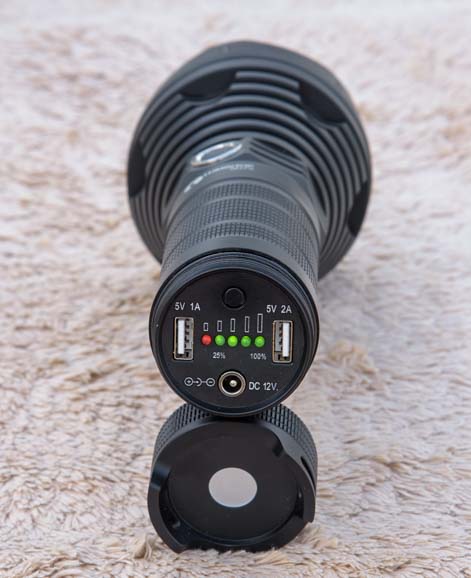
  • Small inverters (400 watts or less) can be plugged into a cigarette lighter style DC outlet in the rig. Mark has one that he uses for his electric razor every morning.
  • Larger inverters (500 watts are more) must be wired directly to the batteries and require stout wires that are as short in length as possible.

Our RV has a “house” inverter that is 2,000 watts. It can run our microwave and hair dryer and vacuum comfortably (we don’t run those appliances all at the same time, however, as that would overload it). Our small portable inverter lives in our bedroom and gets used for a few minutes every day before we head downstairs:

RV power inverter with electric razo

Mark uses this small inverter to power his electric razor every morning!

MODIFIED SINE WAVE vs. PURE SINE WAVE INVERTERS

Inverters also come in two flavors:

Modified sine wave inverters are cheaper than pure sine wave inverters and are the most common type of inverter sold in auto parts stores, Walmart and truck stops. Many inverter/chargers on the market are modified sine wave inverters.

Our sailboat came with a 2,500 watt inverter/charger that produced a modifed sine wave. It was wired into the boat’s wall outlets, including the microwave outlet. We used this inverter when we wanted to run the microwave but not for anything else (we preferred using a pure sine wave inverter instead).

Some vehicles now ship with an inverter installed in the dashboard. Our truck has a small modified sine wave inverter in the dashboard, and I use it all the time to plug in our MiFi Jetpack and get an internet signal for my laptop as we drive.

Exeltech XP 1100 Inverter

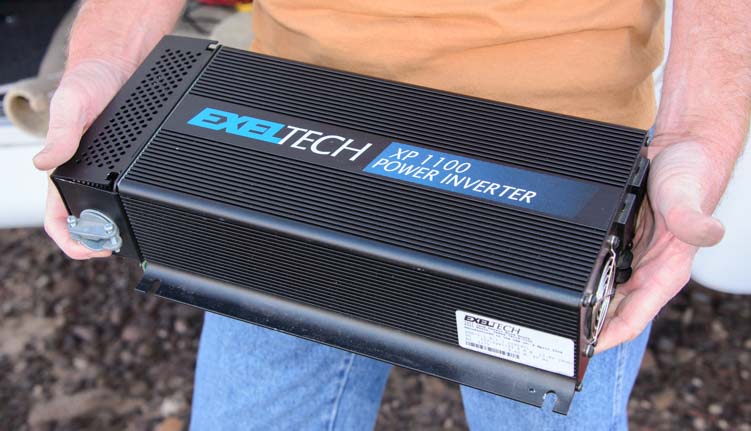
Our first pure sine wave inverter: an Exeltech XP 1100 watt inverter. We keep it now as a backup.

WIRING AN INVERTER INTO AN RV – DC SIDE

As mentioned above, small inverters can plug into a DC outlet in the RV wall (these outlets look like the old cigarette lighters found in cars).

Large inverters must be wired directly to the batteries. The wire gauge must be very heavy duty battery cable and short to support the big DC currents that will flow through it. If possible, the length should be less than four feet. A wire gauge chart gives the correct gauge of wire to use for the current that will flow and the length the wire will be.

To determine the maximum possible DC current that might flow through these wires, simply divide the maximum wattage the inverter is rated for by the lowest voltage the inverter can operate at. In our case, we divided our inverter’s maximum 2,000 watts by the minimum 10.5 volts it will operate at before it shuts off. This yields 190 amps DC. Our cable connecting our inverter to the batteries is 2 feet long. So the proper wire size is 2/0 gauge (“double ought”) and can be purchased here: High quality Ancor Battery Cable.

Heavy duty battery cable on Exeltech XPX 2000 inverter in an RV

We used 2/0 Gauge Ancor Battery Cable to wire the DC side of our inverter.

WIRING AN INVERTER INTO AN RV – AC SIDE

All inverters have at least one household style female 110 volt AC outlet. Usually they have two. These outlets look like ordinary household wall outlets.

One very simple way to wire the AC side of the inverter is to plug an appliance directly into it, for instance, plug the power cord of the TV into the inverter. We did this with a 300 watt inverter and our 19″ TV in our first trailer. The inverter was plugged into a DC outlet on the trailer’s wall, and the TV was plugged into the inverter right behind where it sat on our countertop.

If you want to plug more than two appliances into the inverter at once, then plugging a power strip into one or both of the inverter’s AC outlets is one way to go. We did this on our sailboat. We had a 600 watt pure sine wave inverter on the boat. Plugged into one of the inverter’s AC outlets, we had a power strip supporting our TV and DVD player. Plugged into the other AC outlet, we had a power strip supporting everything else: two-way radios, toothbrush, and laptop charging cords and camera battery chargers.

Exeltech XPX 2000 inverter and Trojan Reliant AGM Batteries in an RV

Our inverter is placed as close to the batteries as possible by being suspended above them.

Obviously, you have to be careful not to run too many things at once, or they will overload the inverter. Most inverters will shut down when overloaded or sound a beeping alarm if your appliances demand more from it than it can give. We ran into that a lot when we lived on our portable inverter for a few days while our house inverter was being repaired.

A more sophisticated way to wire an inverter’s AC side so it supplies power to all the wall outlets in the RV is to wire it into the rig’s AC wiring using a transfer switch.

WHICH INVERTER TO BUY for a BIG INSTALLATION?

Because we live off the grid and never plug our RV into a power pedestal (we’ve lived this way for nine years and hope to do so for many more), we rely on our trailer’s house inverter to run all of the AC appliances we own, every single day.

For this reason, we invested in the highest quality inverter we could find on the market: an Exeltech XP 2000 watt pure sine wave inverter. This is a very pricey unit, but it is our sole source of AC power day in and day out. It is the brand that was selected for both the American and Russian sides of the International Space Station, and its signal is pure enough to run extremely sensitive medical equipment.

Exeltech power inverter manufacturing

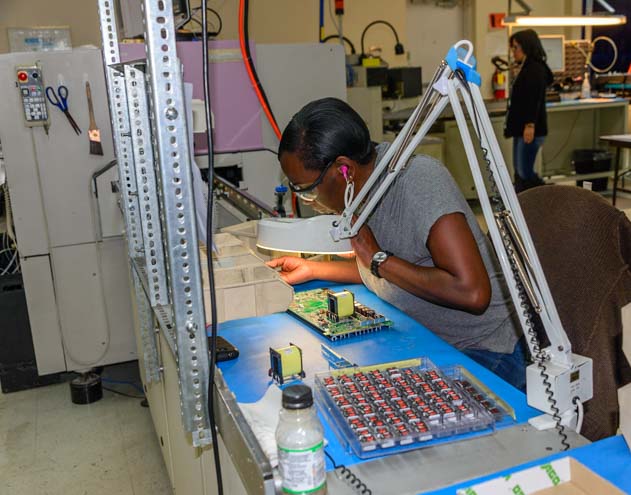
We visited the Exeltech manufacturing plant in Texas and saw first-hand how meticulously these inverters are made and tested prior to shipping.

Exeltech is a family run company with electrical engineering PhDs heading up their R&D department. All manufacturing is done in-house at their headquarters in Fort Worth, Texas. They have phenomenal tech support and an excellent warranty.

When our beautiful new Exeltech XP 2000 inverter was inadvertently blown up by a welding snafu at a trailer suspension shop during our trailer’s suspension overhual (the plastic sheathing on a bundle of AC wires got melted onto the trailer’s frame, bonding the wires to the frame and creating an electrical short — ouch), they got it repaired and back to us very quickly.

And thanks to our RV warranty, our failing suspension was rebuilt completely at no cost to us, and has worked flawlessly for 12 months now.

Power inverter

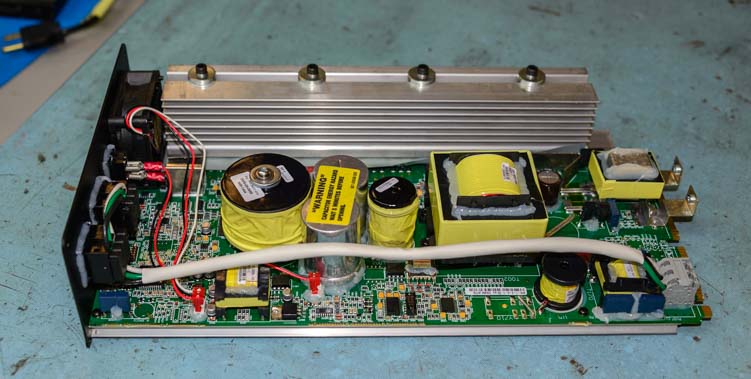
This high quality Exeltech inverter is a serious piece of electronic gear!

Many RVers like the Magnum brand of inverters. These inverters have a built-in transfer switch which makes them easy to wire into the RV’s AC wiring system.

There are many other brands on the market from Schneider Electric / Xantrex to Go Power, Power Bright and others. If you are going to dry camp a lot, then installing a high quality and expensive pure sine wave inverter makes sense. But if you are going to dry camp for just a few days, week or month here and there, then a cheaper one may make more sense.

MORE INFO ABOUT INVERTERS and SOLAR POWER

All of this info and more is covered detail in our feature article in this month’s Escapees Magazine. We also have loads of other info about inverters, converters right here on our website. Links to our many RV electricity related articles are at the bottom of this page.

ESCAPEES MAGAZINE and RV CLUB

RV Power Inverters

Inverters – AC Power from DC Batteries
Escapees Magazine Sep/Oct 2016
By Emily Fagan

Our five page article on inverters in this month’s issue of Escapees Magazine is typical of the kind of detailed technical articles the magazine publishes.

I have been publishing articles like this in Escapees Magazine since 2008, and I have written about anything and everything we’ve learned in our full-time RVing lives, from solar power to photography to batteries to the importance of fulfillling our dreams.

What makes Escapees Magazine unique is that it is written by RVers for RVers.

The magazine article topics come from real life experiences that RVers have encountered in their lives on the road.

Just as my article in this issue of Escapees Magazine is about what we’ve learned about inverters since we started RVing (and believe me, back in 2007, I was the one asking trailer salesmen what the difference was between inverters and converters, and I got some wacky, wild and very wrong answers!), other RVers write articles for Escapees Magazine about things they have learned.

When I sat down to read the September/October issue, I was impressed — as I am with every issue — by the quality of both the articles and the presentation.

Besides including some cool travel articles about RVing Alaska via the Alaska Marina Highway ferry system, and visiting the Very Large Array that listens to the cosmos in New Mexico, and traveling on the Natchez Trace in Mississippi, this issue has two wonderful profiles of full-time RVers doing intriguing things as part of their RV lifestyle.

RV by ferry on the Alaska Marine Highway

RV Alaska by Ferry!
Escapees Magazine Sep/Oct 2016

One article this month is about a full-time RVer who lives in an Airstream trailer and has dedicated himself to ensuring that the original silkscreen art prints created by the WPA artists in the 1930’s for the National Parks remain in the public domain, owned by the NPS rather than private collectors. It is a fascinating tale, written by Rene Agredano who has been full-timing since 2007 and writes the very informative blog Live, Work, Dream, a terrific resource for anyone who wants to learn the ins and outs of work camping.

Another article this month shares the stories of three very long term (10+ years) full-time RVers who have flourished as artists on the road. One RVer/artist specializes in watercolors and has held many exhibitions of her work around the country. Another RVer/artist discovered the fun craft of decorating gourds and teaches classes at her home RV park. A third RVer/artist has self-published a photojournal about her travels specifically for her grandchildren. This insipring Escapees Magazine article is written by full-time RVer Sandra Haven who shares the same home base RV park as the artists.

There is also a detailed article written by a lawyer on what it takes to establish a legal domicile and register to vote when you’re a full-time RVer without a sticks-and-bricks home built on a foundation that stays in one place.

These kinds of articles aren’t found in most RV industry publications!

Full-time RV traveler artist

RVers take their art on the road
Escapees Magazine Sep/Oct 2016

And what’s neat for would-be writers and photographers who are Escapees RV Club members is that the magazine’s editorial staff is always eager for new material from members…click here!.

Escapees Magazine is just a tiny part of the overall Escapees RV Club, however.

Founded by full-time RVing pioneers Joe and Kay Peterson, the Escapees Club strives to serve the varied interests of all RVers and to alert RVers to changes in government policies or the RV industry itself that might affect us as consumers of RVs, RV and camping products and RV overnight accommodations.

They also work as tireless advocates on behalf of all RVers at both the local and national levels.

RVers BootCamp at Escapees RV Club

RVers BootCamp – A training program for new RVers

One of the most interesting articles in this month’s magazine alerts members to corporate consolidations in the industry that will affect our choices as RV consumers in years to come. It also reveals that the Escapees advocacy group is investigating possible changes at the Bureau of Land Management that will affect RVers ability to use their RVs on BLM land nationwide.

In addition to the magazine, the Club offers discounts for RV parks, regional chapter groups, national rallies, bootcamp training programs for new RVers, and assisted living for retired RVers who are ready to hang up their keys but not ready to give up living in their RV.

One of the most charming articles in this month’s magazine is about Nedra, a woman in her mid-80’s who was once an avid RVer but now lives at CARE, the Escapees assisted living facility in Livingston Texas. I had the good fortune to meet Nedra when we visited the Escapees headquarters at Rainbow’s End, and she took me on a fun tour of the CARE facilities. Escapees is like a big extended family, and it was very heartwarming to see her story in this month’s issue.

We’ve been members of Escapees RV Club since 2008 and highly recommend joining if you are a current or future RVer, whether you plan to travel full-time or just occasionally. Supporting their advocacy work benefits everyone who owns an RV and ensures we consumers and hobbyists have a voice in this very large industry.

You can join Escapees (or Xscapers, the branch of Escapees dedicated to younger, working age RVers) here:

Join Escapees RV Club

If you mention this blog, Roads Less Traveled, when you join, they put a little something in our tip jar. We began recommending Escapees RV Club to our readers many years ago, and this friendly gesture from Escapees is a brand new development in the last few months. So, this is not a sales pitch from us to earn tips, by any means. We simply believe in the work Escapees RV Club does to support RV consumers and hobbyists and hope you do too!

Subscribe
Never miss a post — it’s free!

SOLAR POWER OVERVIEW and TUTORIAL

BATTERIES and BATTERY CHARGING SYSTEMS

LIVING ON 12 VOLTS

Our most recent posts:

More of our Latest Posts are in the MENU.   New to this site? Visit RVers Start Here to find where we keep all the good stuff. Also check out our COOL NEW GEAR STORE!! *** CLICK HERE *** to see it!

Bryce Canyon National Park – “Mossy Cave” – Mystery Waterfall!

September 2016 – Just as headlines sell news stories, the same thing is true with hiking trails at the National Parks.

Red rock pinnacles Mossy Cave Bryce Canyon National Park Utah

Bryce Canyon has beautiful red rock hoodoos everywhere, even on the less visited trails.

At Bryce Canyon National Park there are lots of great hiking trails and overlooks with fabulously inviting names like: Fairyland Trail, Inspiration Point, Sunrise and Sunset Points and Peek-a-boo Trail to name a few.

Colorful trees and red rocks Mossy Cave Trail Bryce Canyon National Park Utah

Wonderful colors on the Mossy Cave hike.

But up in the northeast corner of Bryce Canyon National Park, well off the beaten path, and not even on the main drive through the Park, there’s a hiking trail called Mossy Cave. This is an interesting name, perhaps, but it sure didn’t jump out at us and beg us to come check it out!

Bridge at Mossy Cave Trail Mossy Cave Trail Bryce Canyon National Park Utah

The Mossy Cave trail crosses a cool bridge at the beginning of the hike.

I wonder if because of this rather drab sounding name, other visitors respond like we do and don’t bother to drive outside the Park and around to its far northeastern edge to find out what Mossy Cave is all about.

Whatever the cause, this hiking trail is very lightly used compared to the other more popular trails at Bryce Canyon National Park.

Red rock windows Mossy Cave Trail Bryce Canyon National Park Utah

“Windows” appeared high above us among the red rock formations.

My suspicion is that if this trail bore the name “Waterfall Cascades” or “Glittering Pools,” both of which is has, the trail would be overrun with visitors!

How fortunate that the feature this trail is named after is the other thing you’ll see on the hike — a shallow overhang that seeps water and is covered with various types of moss — instead of the beautiful waterfall!

Mossy Cave Trail Bryce Canyon National Park Utah

The waterfall on the Mossy Cave hike takes a lot of people by surprise!

Mossy Cave Trail Waterfall Bryce Canyon National Park Utah

A beautiful waterfall in the desert!

To a naturalist or biology expert, the mossy cave is probably the more fascinating feature on this trail. And photos we’ve seen of icicles in the cave during the winter are beautiful.

However, to everyday hikers and tourists, it is the waterfall and cascades upstream from it that are the real draw!

Mossy Cave Trail Bryce Canyon National Park Utah Waterfall

Who knew Bryce Canyon had a waterfall?!

The branch canyon that Mossy Cave is in is called Water Canyon, and rightfully so. In the early 1890’s, mormon pioneers diverted some of the East Fork of the Sevier River to flow through here so they could use the water for irrigation purposes. With picks and shovels they carved a ditch and let the water flow.

Mossy Cave Trail Waterfall Mossy Cave Trail Bryce Canyon National Park Utah

Silky falls and pools.

So, it is not a natural water course. But the waterfall itself is totally natural, and the water drops down over a red rock overhang as if this year-round stream were meant to be here and had been here all along!

Mossy Cave Waterfall Mossy Cave Trail Bryce Canyon National Park Utah

A rush of water over the desert rocks.

The overhang is fairly large, so Mark slipped in behind it to get some very cool images.

Hiking under the waterfall Mossy Cave Trail Mossy Cave Trail Bryce Canyon National Park Utah

The overhang makes it easy to walk under this waterfall.

Under waterfall Mossy Cave Trail Mossy Cave Trail Bryce Canyon National Park Utah

View from under the waterfall on the Mossy Cave hike.

View under waterfall Mossy Cave Trail Mossy Cave Trail Bryce Canyon National Park Utah

How refreshing on a hot day!

We walked upstream from the main waterfall and found that the stream is a babbling brook for quite a distance, tripping over stones and rocks along the way.

Stream Mossy Cave Trail Bryce Canyon National Park Utah

We turned the corner at the waterfall and found the hike continues upstream.

There are other smaller waterfalls too.

Waterfall Mossy Cave Trail Bryce Canyon National Park Utah

Looking upstream.

Mossy Cave Waterfall Bryce Canyon National Park Utah

We discovered another smaller waterfall too.

We wandered back down the trail to a fork and took the path leading to the Mossy Cave. A short distance down the trail we came to the cave. The water was seeping through the rocks in such quantities that it was dripping from the roof of the cave onto the gravel floor below. Patches of moss covered the rocks, and the air was cool. The trail didn’t go inside the cave, but we could stand on one side and peer in.

Water seeps through rock and drips down moss in Mossy Cave Bryce Canyon National Park Utah

Water seeps through the rocks and drips from the moss at Mossy Cave.

We ended up doing the Mossy Cave hike several times during our stay in Bryce Canyon. It is a short and easy trail that is lovely in both morning and afternoon light. And there are some wonderful hoodoos high up on the ridges.

Red rock window Mossy Cave Trail Bryce Canyon National Park Utah

.

One morning, as the sun was rising, Mark caught a fantastic starburst in one of the red rock windows.

Starburst Mossy Cave Trail Bryce Canyon National Park Utah

.

If you have already enjoyed some of the major hikes and overlooks at Bryce Canyon National Park, the Mossy Cave trail makes for a very pleasant trek. And on a hot day, what could be better than hanging around a waterfall!

Subscribe
Never miss a post — it’s free!

Here are some more links for planning a visit to Bryce Canyon National Park and doing the Mossy Cave hike:

More blog posts from our RV trips to Bryce Canyon

Related posts from our RV travels:

Our most recent posts:

More of our Latest Posts are in the MENU.
New to this site? Visit RVers Start Here to find where we keep all the good stuff!!

<-Previous || Next->

Red Canyon Utah and the Bryce Canyon Bike Trail!

On the way in to Bryce Canyon National Park, visitors pass through stunning Red Canyon. The red rocks in this magical canyon are such a vivid color and such a huge surprise that visitors are instantly in a quandary — should they stick around and check out this gorgeous canyon they’ve never heard of before, or continue on the remaining 12 miles to Bryce Canyon, full speed ahead??

01 721 Hoodoos in Red Canyon Utah

For many visitors to Bryce Canyon, the warmup act at Red Canyon is a fantastic surprise.

Red Canyon is a beautiful area the has several wonderful hiking trails and lots of incredible scenery.

Hiking Pink Ledges Trail in Red Canyon Utah

Hoodoos at Red Canyon

We hiked the easy Pink Ledges trail that took us right into the heart of the red rock hoodoos in just a few uphill steps.

Hiking Pink Ledges Trail Red Canyon Utah

Views on the Pink Ledges Trail

We’ve hiked the beautiful trails in Red Canyon before, and it was wonderful to be immersed once again in this lovely red rock canyon that so many tourists blow right by.

Huge caves and holes in the rocks

Huge caves and holes in the rocks

The various hiking loops in Red Canyon can be mixed and matched to make a hike of any length, and the Pink Ledges Trail soon merged into the Bird’s Eye trail.

Heading out on the Bird's Eye Trail Red Canyon Utah

Views on the Bird’s Eye Trail

This took us out along the edges of the red rocks and rose higher and higher.

Hiking the Bird's Eye Trail Red Canyon Utah

Hiking the Bird’s Eye Trail.

Bird's Eye Trail hike in Red Canyon Utah

.

We wandered back to the central part of the canyon and admired the twin hoodoos that stand like sentries high up on a ledge.

Closeup Hoodoos in Red Canyon Utah

Enormous stone sentries guard Red Canyon

Below them, we ran into a young couple sitting on a park bench enjoying the shade of a ponderosa pine and the views all around them. We found out they had just gotten engaged moments before, and they proudly showed us her beautiful brand new ring!

Couple on park bench in Red Canyon Utah

What a lovely spot to get engaged!

Red Canyon holds a special place in our hearts, because it was where we discovered the wonders of the RV lifestyle.

We were on a whiz-bang weeklong tour of Grand Canyon’s South and North Rim, Bryce Canyon and Zion National Park with our tent and bicycles, back in our workaday lives long ago, and we wound up camping at Red Canyon on the suggestion of a forest ranger we spoke with when we stopped in at the ranger’s office on the way to Bryce Canyon.

After a beautiful day at Bryce Canyon, we returned to the Red Canyon Campground to a massive deluge and thunderstorm that was followed by two days of rain.

Tent camping Red Canyon Campground Utah

Camping at Red Canyon Campground holds special memories for us

After scurrying from coffee shop to lunch bistro to dinner restaurant around Panguitch and Brian Head, desperately trying to stay warm and dry, we returned to the campground to find all the other campers happily kicking back in their RVs. They were reading books and playing board games with the lights on in their rigs, while we crawled back into our dark soggy tent.

RV Camping in Red Canyon Campground Utah

Life can be pretty sweet in an RV

Within a few days, we were the proud owners of a Toyota Tundra truck and a popup tent trailer!

RV Camping in Red Canyon Campground Utah

Camping at Red Canyon in a popup – Fun!!

Of course, tent camping is absolutely wonderful too, and we look back on our tenting days with fondness. But there’s nothing like being warm and dry and having a comfortable place to sit that is sheltered and high up off the ground when Mother Nature decides to let loose with a storm!

Tent camping under the stars

Camping under the stars

Red Canyon Campground is an absolute delight. You can camp within view of the red rock hoodoos, and there are a few campsites that are big enough for a big trailer like our fifth wheel.

Another treat at Red Canyon is the paved bike path. Being at 8,500′ elevation, we had to work a bit with each pedal stroke, but the scenery was second to none.

Red Canyon Bike Path in Utah

Riding in the Red Rocks at Red Canyon

The Red Canyon Bike Trail goes all the way from Red Canyon to Bryce Canyon City, the little hamlet that used to appear on maps as “Rubys Inn” because it is home to Ruby’s Inn, a family run operation that includes an inn, restaurant and an RV park.

Biking on the Red Canyon Bike Path Utah

We love this bike path

Every time we’ve been to this area in the past, we’ve wished that the bike trail went all the way into Bryce Canyon.

Bicycling the Red Canyon Bike Trail in Utah

There’s a little bridge on the east end of Red Canyon

Bicycling the Red Canyon and Bryce Canyon Bike Path

The bike path runs parallel to the highway for some of its route

Lo and behold, the National Park Service granted our wish this season and extended the paved bike trail all the way into Bryce Canyon as of a few weeks before our arrival!! It is now 17 miles long and you can ride from the west end of Red Canyon all the way to Inspiration Point in Bryce Canyon.

This project was undertaken and completed for the 100th anniversary of America’s National Parks this past August, and it takes a wonderfully winding route through the ponderosa pine forest right to the Bryce Canyon Visitors Center.

Bicycling on the Bryce Canyon Bike Trail Utah

The new paved bike path in Bryce Canyon passes through Ponderosa Pine forest

From the Visitors Center, the Bryce Canyon bike trail passes all the main overlooks and wanders away from the rim for a bit too as it swings by the Bryce Canyon Lodge.

Bryce Canyon Lodge Bryce Canyon National Park Utah

Bryce Canyon Lodge is on the route for the new Bryce Canyon bike trail

We had to get off our bikes and walk when we visited the overlooks in Bryce Canyon, but what a fabulous addition this bike trail is to one of the National Park Service’s premier parks. We were absolutely thrilled by the new bike path, and we rode it many times during our stay.

New Bryce Canyon Bike Trail to Inspiration Point

In Bryce Canyon we walked out to the overlooks

Hopefully the National Park Service will continue building bike paths at other National Parks. The bike trail at Grand Teton National Park is superb as well, and keeps getting longer each time we visit.

The best way to experience a National Park is to be outdoors in the thick of it, and how fantastic it is to be able to fly along and enjoy the views from the seat of a bike!

Subscribe
Never miss a post — it’s free!

More info about Red Canyon and the Bike Trail:

Our previous RV trip to Red Canyon:

Red Canyon Utah – An Overlooked Treasure09/15/11

More blog posts from our RV trips to Bryce Canyon

Related posts from our RV travels:

Our most recent posts:

More of our Latest Posts are in the MENU.
New to this site? Visit RVers Start Here to find where we keep all the good stuff!!

<-Previous || Next->