The last breakdown — the failure of our fifth wheel trailer’s suspension — ended up being the most expensive repair of them all, because the entire trailer suspension had to be replaced. We were so miserable about the whole situation as it unfolded last fall in Phoenix, Arizona, that the last thing I wanted to do was to write about it on this blog.
So, the story has waited five months until now when our spirits are high and we’re camped near a stunning lake in the Canadian Rockies!
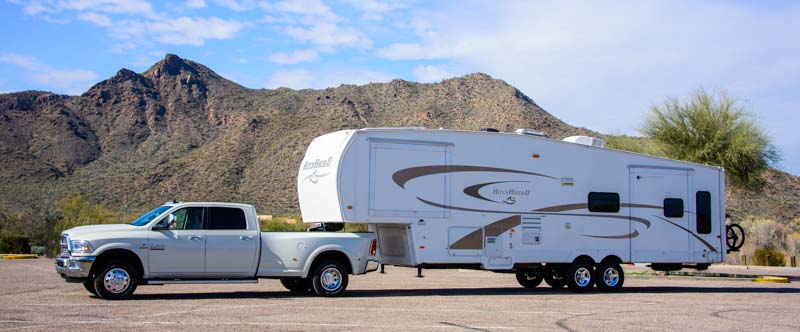
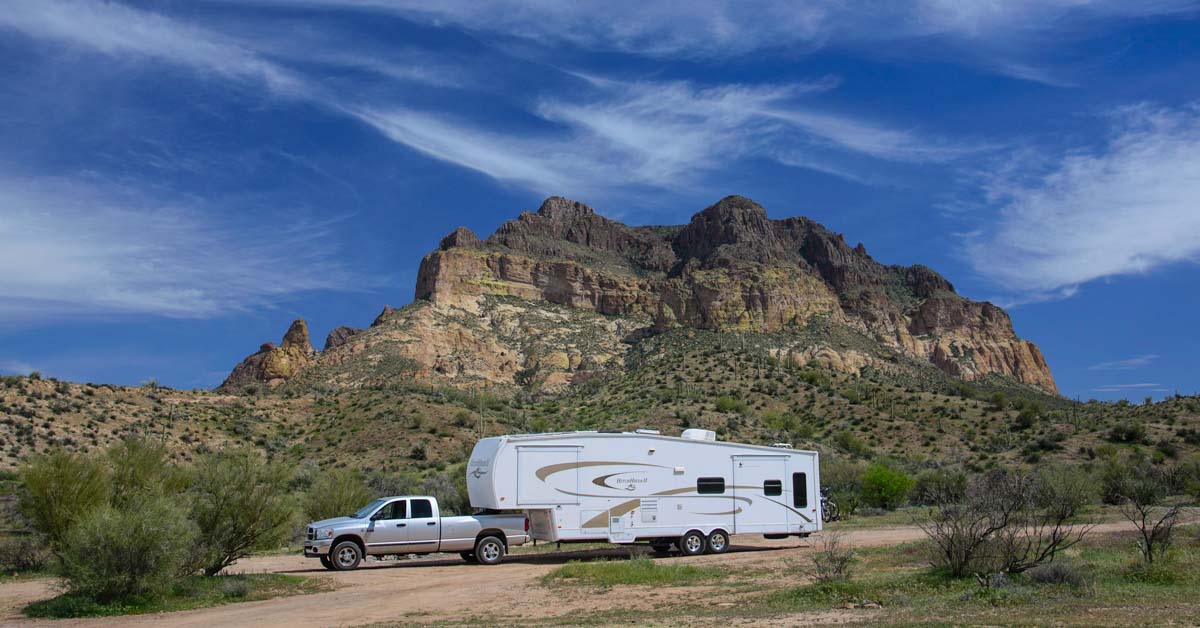
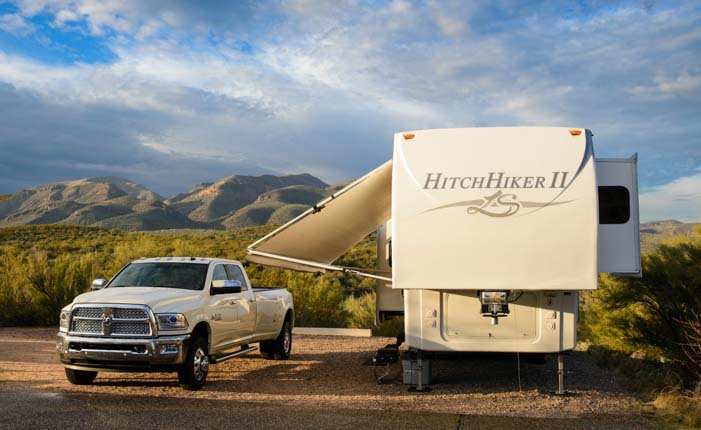
Repairs aside, this is why we RV!
2015 was a phenomenal year of travel for us, but it could have been a financial disaster.
$7,420
That was the scary total cost of all our RV repairs in 2015. Yikes!!
Fortunately, our out of pocket cost was just $1,045, because we had an extended RV warranty for our trailer.
Here's a summary of what our four year RV warranty through Wholesale Warranties cost, what our repairs WOULD HAVE cost, and what our warranty reimbursements have been to date:
Our trailer warranty has paid for itself 3.5 times over! Confused about the nitty gritty fine print buried in RV Extended Warranties? Here's an excellent detailed explanation!!
But 2015 unfolded very differently than prior years. This was mostly due to our trailer now being eight years old and also because we spent a month spent driving the rough back roads of Nova Scotia.
We weren’t sure at first, but after 4 expensive repairs in 4 months in 2015, we now know the answer is YES!!!
So, how did this all transpire?
When we were in Nova Scotia, we bent a spindle on the rear axle of our trailer. We limped to Bangor, Maine, and got a new axle installed.
We had to replace a trailer axle after driving the rough back roads in Nova Scotia
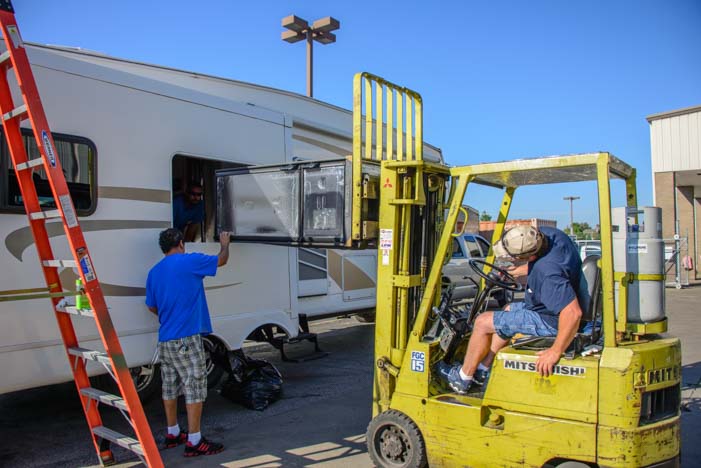
Besides damaging a trailer axle while we were in Nova Scotia, we also sprang leaks in both our fresh water tank and in our big rear window. The underbelly compartment of our trailer was filling with water whenever we filled our fresh water tank, and our rear window was leaking water all over our living room carpet whenever it rained (and it rains a lot in the northeast). Ugh!
Sadly, large fresh water tanks are not a commodity item, because they come in all shapes and sizes.
So, rather than waiting for two months for a new fresh water tank to come to the repair shop in Maine, we decided to do both of these water-related repairs (as well as a bunch of other smaller repairs) in Chanute, Kansas, at NuWa Industries, the factory repair facility where our trailer was originally manufactured.
NuWa claimed to have a fresh water tank for our trailer model in stock (this proved not to be the case, but that is another story), and they had an appointment available in two months (and no sooner!).
We could live with the leaks and other small problems, so this gave us two months to get from Maine to Kansas. We moseyed west and enjoyed a fabulous stay in Maysville, Kentucky.
Unfortunately, within 24 hours of leaving there, our RV refrigerator died. Good grief — While en route from a trailer axle repair in Maine to a bunch of plumbing related repairs in Kansas, we had to get a new RV fridge somewhere near western Kentucky. Not many places stock 8 cubic foot Dometic RV refrigerators! We scrambled and got our RV refrigerator replaced outside Indianapolis.
We had to replace our RV refrigerator after 8 years (the typical lifespan for a fridge, we found out!)
Luckily, the refrigerator replacement at Camping World went really well.
Once we got to Chanute, Kansas for our new fresh water tank, window repair, toilet repair, faucet replacement and a few other things, our buggy had to stay in the shop for three days!!
We had to replace our fresh water tank and do many other plumbing and leak-related repairs.
We were not allowed to stay in our rig while it was in the shop in Kansas. Fortunately, the trailer warranty reimbursement for those three days of repairs included our two nights at a motel. Thank goodness for that warranty once again!
Sadly, our saga of trailer repairs was not over yet.
TRAILER SUSPENSION FAILURE
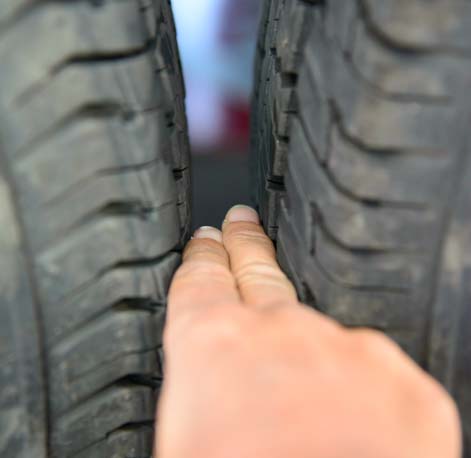
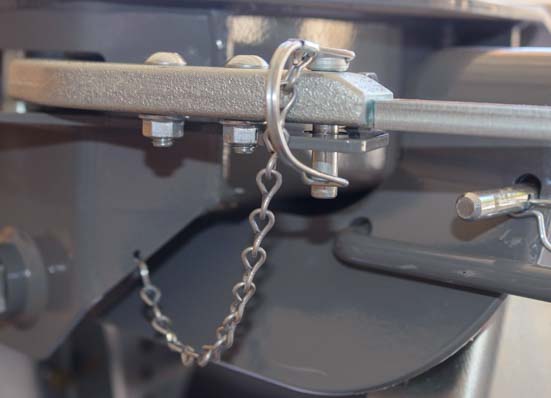
Since we had left Maine (where we had gotten our new trailer axle installed), we had watched with alarm as the two wheels on our trailer’s tandem axles had gotten progressively closer and closer together. The frame of our trailer, built by Lippert Components, had always had very narrow spacing between the two wheels.
When we had upgraded from the factory installed E-rated (10 ply) tires to the higher profile G-rated (14 ply) tires a few years prior, I could squeeze two fingers between the tires. After our trailer axle replacement and new tire purchase in Maine, I verified that this was still the case.
Spacing between the wheels is two finger widths.
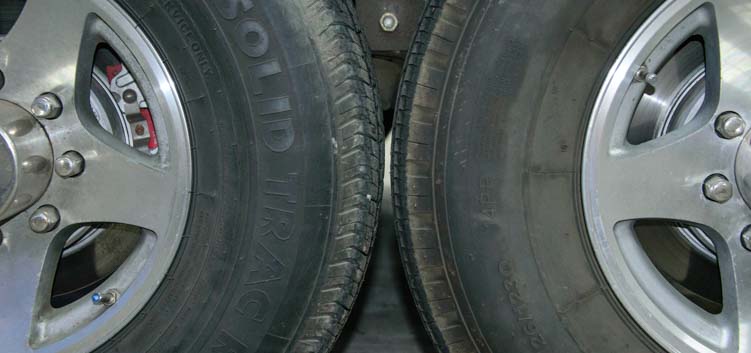
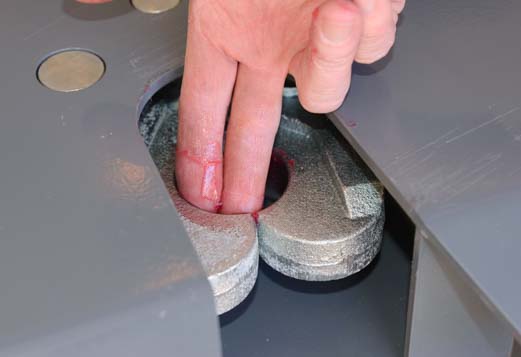
However, by the time we got to Phoenix, I could barely get the tip of my pinky finger between them and I could not slide my whole pinky in.
My pinky finger can squeeze only partway in between the tires!
The spacing was down to less than 1/4 inch.
Sagging suspension made our wheels dangerously close together.
Something was very wrong.
We took the trailer to Straight Line Suspension in Mesa, Arizona, a repair shop that had a newly outfitted facility that does a lot of contract suspension maintenance work on fleets of school buses and commercial trucks.
After careful inspection, their consensus was that we needed to revamp the trailer’s suspension completely. Something was failing, and whether the culprit was the leaf springs, or the equalizer between the springs or the axles themselves, no one could determine exactly.
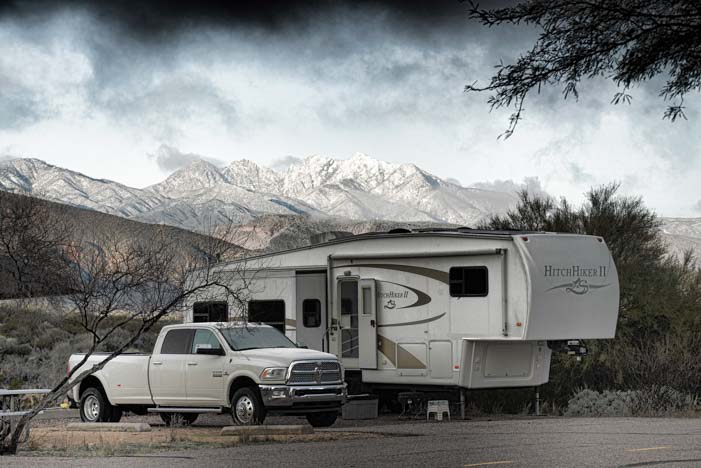
Our buggy goes into the repair shop for a new suspension.
And this is where we were glad not just to have any old extended warranty contract on our trailer but to have one purchased through Wholesale Warranties.
THE IMPORTANCE OF HAVING AN ALLY
Unlike most RV warranty brokers, Wholesale Warranties is heavily invested in the relationship between their clients and the warranty providers they represent. They want to be sure that their customers’ claims are properly handled by the warranty companies. So, they are more than happy to get involved in their clients’ claims to facilitate and make sure there are no misunderstandings.
This level of commitment to their products and belief in them is truly astonishing. And it makes all the difference in the world.
When the service provider (Straight Line Suspension) first called our warranty provider (Portfolio Protection), the warranty company was understandably reluctant to cover the repair without knowing the root cause of the failure. They pressed the shop to determine which specific part had caused the failure. Was it the shocks? The leaf springs? The axles? They wanted to replace only the component(s) that failed and nothing more. That makes sense!
However, the suspension experts had no idea which part had failed, and they said there was no easy way to figure that out. So, we called Wholesale Warranties and had a long conversation with John Wise. We described to him the gradual failure we had witnessed and the difficulty of pin-pointing exactly which component(s) had failed and in what order the failure(s) had occurred.
I emailed him photos of our wheel spacing both before and after the failure. Thank goodness I take so many photos and had both “before” and “after” photos to send him!
He then called our warranty company, Portfolio Protection, and reviewed the photos with them. He explained that the suspension mechanics were not sure exactly what had caused the failure but that the suspension was not functioning properly and needed to be replaced.
In the end, Portfolio Protection agreed to replace the springs, equalizers and shocks and also to correct the insufficient spacing between the leaf spring hangers, placing them further apart so that even if some components failed or sagged in the future, there would no risk that the wheels would touch.
If it weren’t for Wholesale Warranties coming to our aid to act as a liaison and facilitator and to help explain our breakdown in a way that the warranty provider could understand, this vital repair would not have been covered.
Of course, the role of Wholesale Warranties is strictly as a facilitator. They can’t force the provider to reimburse a repair that is not covered by the contract. We have called Wholesale Warranties for liaison assistance several times now, and they have been very up front when our repair was outside the limits of our contract.
However, being able to call them and describe the problem and get their input is extremely helpful. This is particularly true in cases like our trailer axle repair where both our RV insurance plan AND our RV warranty contract could be used to pay for the repair, but one was financially preferable to the other due to differing deductibles and different kinds of coverage.
FIFTH WHEEL TRAILER SUSPENSION REPLACEMENT
The first step in our trailer suspension replacement was to jack up the trailer and remove the two axles. We had just done a fabulous trailer disc brake conversion eight months earlier, and this was the THIRD time the hydraulic lines had been tampered with due to removing the axles or the belly pan from the frame. How frustrating!
The trailer axles are removed from the trailer.
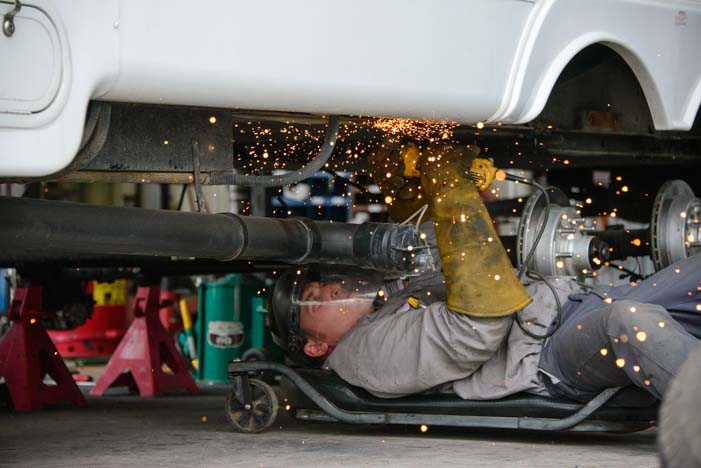
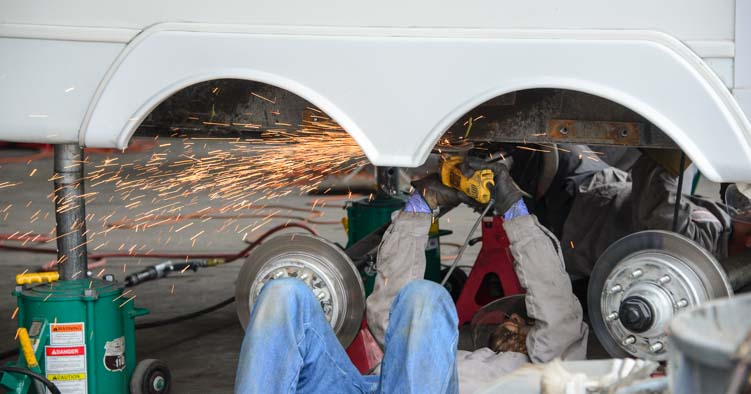
Once the axles were off the trailer, the next step was to remove the leaf spring hangers.
The hangers must be cut off the frame.
The sparks flew like mad as each of the six hangers was cut off the frame using a torch.
Sparks fly as the old trailer leaf spring hangers are cut off
.
The mechanics wanted to ensure the new springs were strong enough, so they chose 8,000 lb. American made springs from Rockwell American, even though we had just 7,000 lb. axles and only 11,250 lbs. sitting on the pair of axles (as of our most recent RV weighing by the Escapees Smartweigh program).
New 8000 lb American made leaf springs from Rockwell American
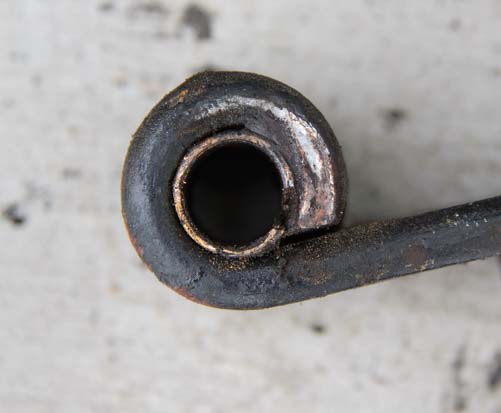
They pointed out to us the difference between Chinese made springs and American made springs. Chinese steel is notorious for being inferior to American steel, and the overall fabrication quality of the springs, especially at the eye, was not as good.
The eye of the American made leaf springs looks clean and well made.
Not so much for the Chinese made leaf springs
Our trailer’s original Chinese springs had come with nylon bushings inside the eye, but they had been upgraded to brass bushings. When the old springs were removed from the trailer, we saw the brass bushings inside were worn out. The curvature of the spring from the eye was also flat, an indication that the spring itself was worn out.
Worn out bushings and the spring is flat — no curvature left! (compare to above pics!)
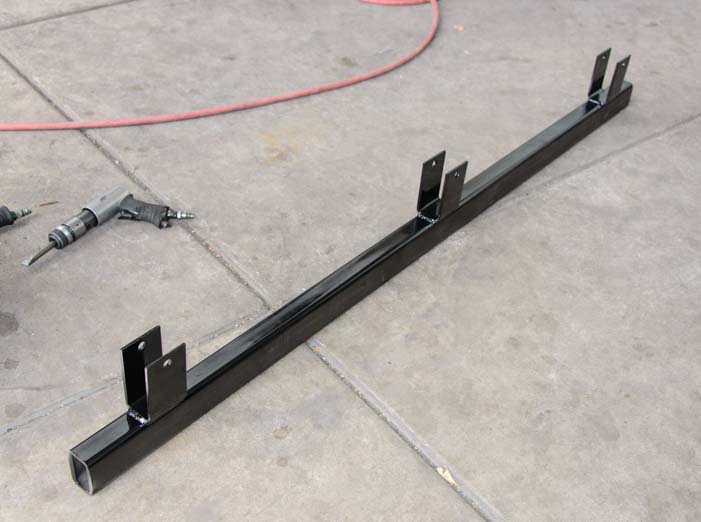
The mechanics fabricated a new leaf spring hanger system that had three hangers welded onto a bar. These hangers would space the axles further apart than they originally had been.
New custom trailer leaf spring hangers
The bar was then welded onto the underside of the trailer frame.
The new trailer leaf spring hanger bar is positioned so it can be welded onto the frame.
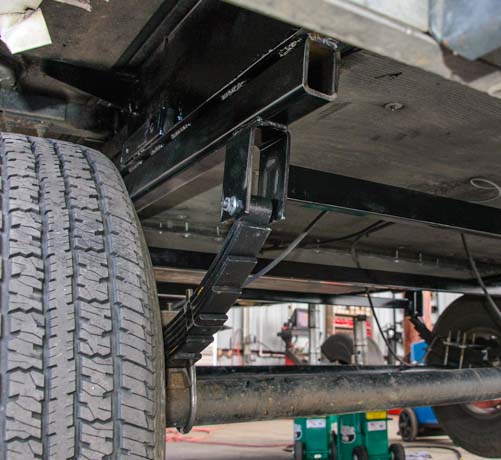
After welding on the new hanger bar, new equalizers were bolted onto each center hangers.
.
Then the leaf springs were bolted onto the outer hangers.
Springs and equalizers in place — all set to reinstall the axles.
The axles were installed using new U-bolts. The mechanics also made a brace to span the width of the trailer between the two hanger bars to add some rigidity to the suspension system.
A brace running across the width of the trailer makes the system stronger and more sturdy.
The final result — our wheels were a fist’s width apart!!
The trailer axles are spaced a lot better now.
SUSPENSION REPAIR COST BREAKDOWN
Here are the costs for the suspension replacement and our out of pocket costs as a result of our extended trailer warranty:
Parts:
$1,119.83
Labor:
$1,440.00
Tax:
$90.15
Total:
$2,649.98
Reimbursement:
$2,549.98
Out of Pocket (deductible):
$100.00
COMPLICATIONS
Unfortunately, in the world of repairs, sometimes fixing one thing breaks another.
After our trailer suspension replacement was completed, we towed our trailer out into the parking lot and went inside to get organized to leave for our next destination.
We flew to turn off the inverter and then began troubleshooting segments of our AC wiring to try to figure out the problem.
Suddenly, we heard a huge loud POP. And that was the end of the inverter.
Good heavenly days.
Luckily, the inverter was still under its manufacturer’s warranty. Exeltech is phenomenal about caring for their equipment out in the field. They provide inverters to NASA and their equipment is on both the American and Russian sides of the International Space Station. They take great pride in their equipment and have an excellent warranty repair process.
Mark undid the really nice inverter installation job he’d done for our Exeltech, boxed it up, and shipped it to Exeltech’s Ft. Worth, Texas, facility.
Geez… Our beautiful inverter (the suspended black box) had been working flawlessly! (To keep the inverter cool and well clear of the batteries, yet still close, it is securely suspended above)
In the meantime, we spent a day troubleshooting our wiring to try to understand what had gone wrong. It wasn’t clear to us how the trailer suspension replacement might have impacted our trailer wiring, and the mechanics were certain that the two were unrelated.
After many hours of crawling under the trailer, and removing the belly pan section by section, and running our fingers along the frame and shining a flashlight into the unreachable depths, we found a spot where the AC trunk line was resting on the frame.
Well, it wasn’t exactly resting any more. The heat from the cutting and welding torches had melted the cable’s insulation onto the frame!
Mark carefully incised the casing, separated the hot and neutral lines, re-wrapped them in new insulation and affixed the cable firmly to the underside of the plywood flooring well away from the frame.
How had this happened?
Sadly, Straight Line Suspension did not check the frame sufficiently in the areas where they would be welding before they started torching the hangers off of it and welding on the new hanger system. Of course, this is a difficult thing to do because a plastic corrugated sheeting covers the entire underbelly of the trailer, protecting the tanks and wiring from road grime.
In order to inspect the frame before taking a torch to it, this corrugated sheeting must be removed, and any wiring in the area where the welding will take place must be located to ensure that it is not touching the frame.
RV manufacturers should enclose all wiring in conduit, or at least tack it to the underside of the plywood flooring, rather running it along the I-beams. However, that was not the case in our trailer. The wiring was tacked up to the flooring in some places, but there were extensive gaps that sagged, and this one portion sagged enough to be touching the frame right where the cutting and welding took place.
While we waited for ten days or so for our inverter to make it to Ft. Worth, undergo diagnosis and repair then be shipped back to Phoenix, Mark installed our old Exeltech XP 1100 inverter in its place. Thank goodness we hung onto it after our upgrade from the 1100 watt to the 2000 watt version of the inverter!!
Straight Line Suspension paid for the expedited shipping and insurance for our inverter, and eventually, the happy day came when our inverter arrived and Mark got it put back in place.
For folks who want to get work done on their trailer in the Arizona area, we had our trailer suspension further upgraded with a MORryde SRE 4000 equalizer that was installed by the excellent mechanics at Rucker Trailer Works in Mesa, Arizona. Their workmanship was top notch and the MORryde has made a huge difference. Read our blog post about that installation here.
The Exeltech XPX 2000 watt pure sine wave inverter has been repaired and is ready to be reinstalled.
Needless to say, this was an ordeal that was not fun to live through and one that I waited a long time to write about. However, it is an amazing illustration of just how valuable an RV warranty can be, especially if you get one from a broker that stands behind their customers during the claims process. It’s also an important reminder that if someone is going to take a torch to your RV frame, they should check the nearby wiring first!
We weren’t sure just how worthwhile an RV Warranty would be when we got ours, but 2015 would have been an extremely expensive year for us without it. It’s bad enough to be stuck on the side of the road. But having to pay through the nose for the nasty surprise of a major repair makes the ordeal even worse.
What’s worse than being dead on the side of the road? Knowing it’s gonna cost ya!
Wholesale Warranties loves our repair stories, and they have offered our readers a $50 discount on their RV warranty (for a trailer or motorhome) if you mention our website, Roads Less Traveled, when you set it up. The discount will come off the quoted price at the time of purchase (remind them before you sign if you don’t see it — it’s not automated!!). Here is the link to get a quote for a warranty on your particular RV:
Trailer Life Magazine, May 2016 Issue. Article by: Emily Fagan. Photos by: Emily and Mark Fagan
We visited the area in the spring and absolutely loved it. When we started our journey, the wild rhododendrons were just beginning to bloom. As we made our way north, they continued to be at their peak in each area we visited!
Rhododendrons bloom everywhere in the Smokies and Blue Ridge Mountains!
Great Smoky Mountains National Park is so big that it spans two states: North Carolina and Tennessee. We stayed on the North Carolina side, saving the Tennessee side for a future visit.
The town of Cherokee is an excellent place to use as a base camp for exploring both Great Smoky Mountains National Park and the Blue Ridge Parkway, and we got a kick out of the town itself, even though it’s very touristy with a slightly cheesy flair.
From there, we bee-bopped on and off the Blue Ridge Parkway heading north.
The first waterfall we saw in the Smokies captivated us. After that, we worked our way through the Smokies and up the Blue Ridge Parkway, waterfall by waterfall
North Carolina’s Crabtree Falls on the Blue Ridge Parkway
There are a few low tunnels at the south end of the Blue Ridge Parkway that a tall RV like our fifth wheel trailer can’t sneak through, but the rest of the Parkway is easily driven by any size RV.
A motorhome zips along on the Blue Ridge Parkway.
Much of the Parkway itself, although lovely, can get a little monotonous after a while because it is a skinny, winding road that snakes under a canopy of trees for much of its length, with little to see but greenery. Many of the scenic vistas and overlooks have become overgrown by tall trees over time, so sometimes there is no view at all!
Blue Ridge Parkway – Driving under a canopy of green trees
However, the small roads that zig-zag around and across the Blue Ridge Parkway are fascinating, because they give a glimpse of life in the Appalachian Mountains with homes and businesses owned by the locals. So, we traveled on these roads for the most part and just sampled the Blue Ridge Parkway here and there when there was a landmark, like a waterfall, that we wanted to see.
Soco Falls on the Blue Ridge Parkway
Sometimes readers ask us what the best way is to find out about great RVing destinations or how to pick up tips about the RV lifestyle. Being a little old fashioned, I always recommend subscribing to a magazine or two, whether in print or digital form.
Thigh deep in a field of wildflowers in North Carolina!
Beginning in my twenties, I subscribed to various RVing and sailing magazines. They fed my wanderlust and kept my dreams alive when the only view I saw most days was my cubicle walls.
I’m proud now to write for all the magazines that used to be my sources of inspiration back when they arrived in my mailbox years ago. Hopefully the tech tips and travel stories I write for them now will encourage and inspire future travelers.
Springtime is all about flowers in the Smokies
Trailer Life Magazine has published our article about North Carolina’s Smoky Mountains and the Blue Ridge Parkway on their website here:
If your RV travels will be taking you on a north-south route through North Carolina this year, a very enjoyable way to navigate is to follow the Blue Ridge Parkway and do a little exploring at Great Smoky Mountains National Park!
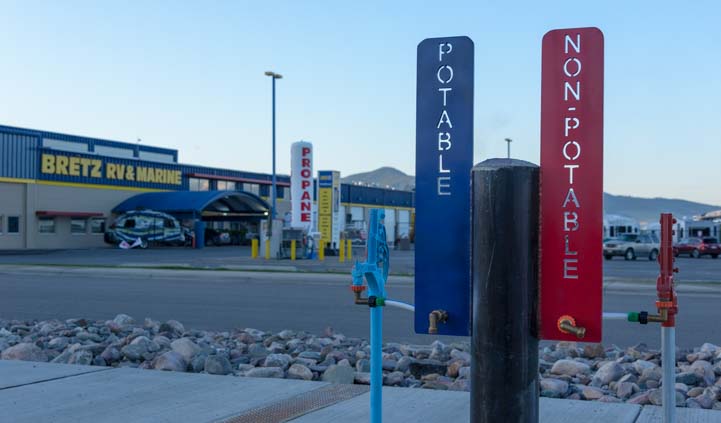
The other day we found ourselves at a fabulous RV dealership in Missoula, Montana: Bretz RV and Marine on I-90. This is a huge place that has a mammoth inventory of trailers and motorhomes that spills over several lots. What a great spot to go RV shopping!
But what brought us here? Well, the 99 cents per gallon propane deal they are offering was one thing, and the free and extremely well laid out RV dump station was another. What a place!
A free dump and ultra cheap propane brought us to a very cool RV dealership in Montana
After we’d dumped and gotten our propane, we decided to have a look around the RV lots and check out some of the very pretty RVs. Bretz has an enormous selection of Airstream trailers, and we got a huge kick out of seeing a few up close. Beautiful!
How fun it was to prowl around these classic Airstream trailers.
I have written a little about what to look for in an RV for full-time living, and one of the things that a lot of new RVers don’t realize when they go shopping is how important it is to get a trailer with an adequate Cargo Carrying Capacity.
Cargo Carrying Capacity is the difference between what the RV weighs when there is nothing in it (the “Unloaded Vehicle Weight” or UVW) and what it weighs when you have loaded it down with all of your personal belongings plus food, water and propane as well as upgrades like solar power, washer/dryer, a big battery bank, a generator, a bike rack and bikes, etc., (the “Gross Vehicle Weight” or GVW).
It is important not to exceed the Cargo Carrying Capacity!
If you do, then you’ve gone over the trailer’s GVWR (“Gross Vehicle Weight Rating”) which is the maximum safe weight for the trailer when it is fully loaded.
On older trailers the GVWR is posted on a sticker that is placed on the outside of the trailer up near the front on the driver’s side. On newer trailers there is usually another sticker that indicates the Cargo Carrying Capacity.
A sticker for the trailer’s weight capacities is usually on the driver’s side up by the hitch.
So we had our trailer weighed using the Escapees Smartweigh Program at the Escapees RV park at North Ranch near Wickenburg, Arizona. Our trailer had gained 250 lbs. and now weighed 14,100 lbs. The weight on our rear axles was 11,250 lbs.
The trailer was built with two 7,000 lb. axles. It also came from the factory with E-rated (10-ply) tires that were rated to carry 3,032 lbs. apiece, or 6,084 lbs. per pair on an axle.
When it comes to GAWR (“Gross Axle Weight Rating”), the axles are rated according to the weaker component, whether it is the axles or the tires. So our GAWR was 6,084 lbs. due to the E-rated tires. However, by upgrading to G-rated (14 ply) tires that are rated to carry 3,960 lbs. each, or 7,920 lbs. all together, the weak link became the axles themselves rather than the tires. So our GAWR was now 7,000 lbs. due to the axles.
Either way, the 11,250 lbs. actual weight we had on our axles was well within both the original axle rating of 12,780 lbs for the pair (6,084 per axle x 2 axles = 12,780) and the new axle rating of 14,000 lbs for the pair (7,000 per axle x 2 axles = 14,000 lbs).
In 2013 we began to worry about the battle of the bulge.
We knew the trailer weight was well within the towing capacities of the new truck, but we had had to replace a trailer axle in August 2015 and then replace the entire trailer suspension (ugh!) in October of 2015. Needless to say, we were concerned about the weight on the trailer axles.
When the trailer was weighed this time around, the weight on the trailer axles had increased to 11,600 lbs., 350 lbs. higher than two years earlier, but still well within the limits of the 14,000 lbs. that the axles and tires could carry.
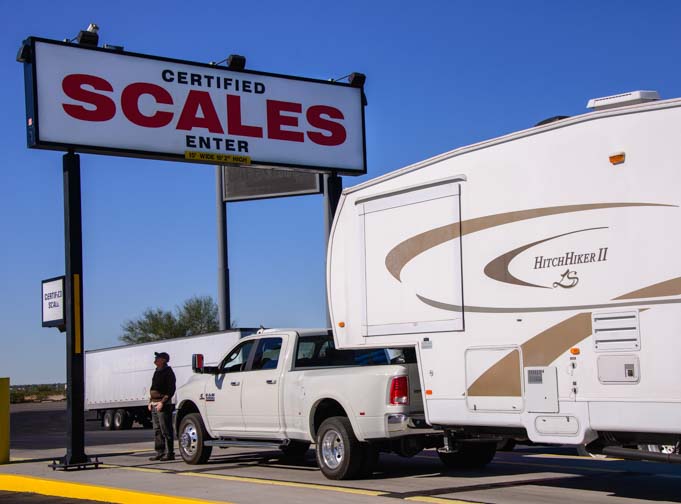
Mark gets the low-down on our truck and trailer weights.
We didn’t weigh the truck and trailer separately, so we don’t have a figure for the overall trailer weight yet. However, my suspicion is that the extra 350 lbs. on the axles means our 14,100 lb. overall trailer weight has increased by 350 lbs. to about 14,450 or so. This means the trailer is 455 lbs. or so over the its GVWR of 13,995 lbs.
Despite having many cabinets that are only partially full, our trailer is over its weight limit!
Besides being overweight, we’ve learned something important from this.
The UVWR (“Unloaded Vehicle Weight Rating”) on our trailer is 10,556 lbs. Since 13,995 GVWR – 10,556 UVW = 3,439, this means the Cargo Carrying Capacity of our trailer is 3,439 lbs. That’s a little above average for most fifth wheel trailers.
However, if our trailer’s true weight is now 14,450 lbs., then the cargo we are actually carrying weighs 3,894 lbs (because 14,450 True Weight – 10,556 UVW = 3,894 Actual Cargo Weight).
A few weeks ago (in March 2016) we were back on the scales again.
So, what this means is that for us to live in our trailer comfortably over a period of many years, as we have done, we need a trailer with a Cargo Carrying Capacity of around 4,000 lbs. Other RVers may have different requirements.
Frankly, if we were to buy a new trailer, we would be looking for a Cargo Carrying Capacity of at least 5,000 lbs.
We dry camp 100% of the time, so we always tow the trailer with the fresh water tank full (since we will need a full tank when we set up camp). Water weighs 8.3 lbs. per gallon. So, our 70 gallons in the fresh water tank and 10 gallons in the hot water heater, weigh 664 lbs.
Our waste tanks are empty when we travel.
RVers who don’t dry camp at all can travel with as little as 20 gallons or so of water all together between the fresh water tank and hot water heater, or 166 lbs. of water weight instead of 664 lbs. like we have.
So, what does all this have to do with our RV window shopping at Bretz RV & Marine the other day?
Well, whenever we go RV window shopping, we routinely check the weight capacity sticker on every trailer we look at, because overall GVWR and Cargo Carrying Capacity are just as important to us as the kitchen and living room layout. And while we were checking out cool new trailers, we got a big surprise…
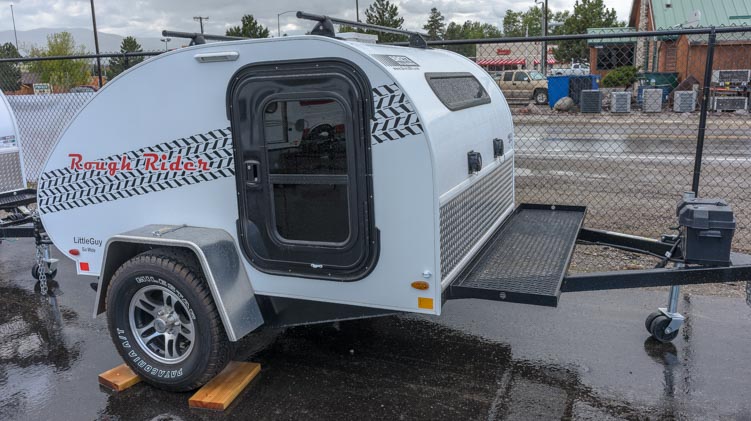
I LOVE little trailers, and I was smitten by a sweet tear drop trailer called the Little Guy Rough Rider.
The Rough Rider – How Adorable!!
What a fun little trailer! It even has a cute saying on the back…
“I Go Where I’m Towed To” — Funny, that’s what Mark says!!
We also really liked a big Redwood fifth wheel.
A beautiful Redwood fifth wheel trailer caught our attention.
It was a monster with two exterior doors and five slides. Wow!!
This big beautiful baby has two exterior doors and five slides!!
Well, which one do you think can carry a heavier load — the little weekend trailer that is just a bed on wheels with a wee mini-kitchen on the back, ideal for summer camping, or the big “full-time,” four season fifth wheel trailer that might replace someone’s house??
Ahem, not the trailer you’d think.
The stickers on these two trailers gave the following:
The weights capacity sticker for the teardrop trailer: Cargo Carrying Capacity of 1,925
Weights capacity sticker for the big beautiful fifth wheel trailer: Cargo Carrying Capacity of 1,876 lbs.
Wow!
Reeling from this sticker shock, we wandered around the RV dealership lot a little more and found a wonderful big fifth wheel toy hauler.
Curious about cargo carrying capacities for toy haulers, we checked out this big trailer.
This triple axle behemoth had three slides and was built to carry big toys with motors, like ATVs, motorcycles, and other goodies.
Three slides and three axles — ready to go do some ATV adventuring in style!!
Like all toyhaulers, it had a big door in the back that would drop down to become a ramp so you could roll out on your ATV or motorcycle with ease.
The back has a huge door that drops down to form a ramp so you can ride out!
So this big guy was built to haul a big load, right?
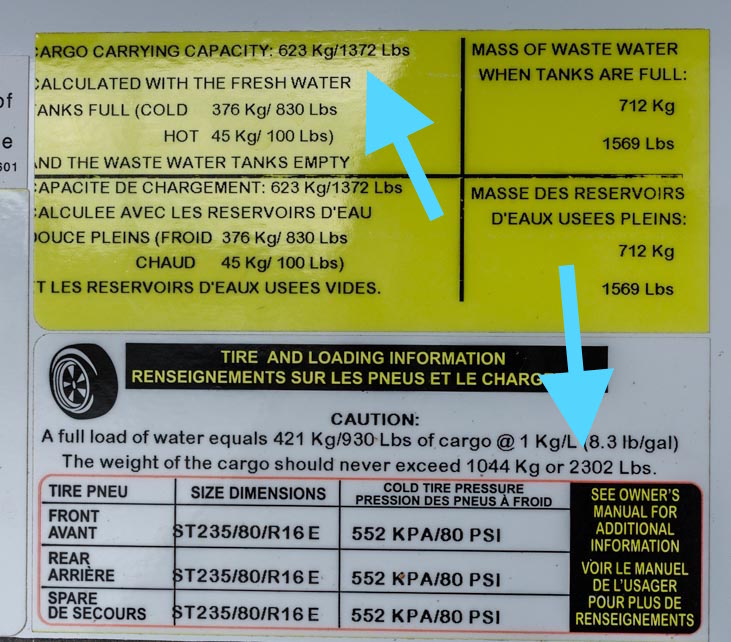
Well, not exactly. It has a Cargo Carrying Capacity of 2,302 lbs. That is just a little more than the Little Guy Rough Rider teardrop!
The sticker on this toy hauler makes it very clear that when the trailer’s fresh water tank and hot water tank are both full, then the Cargo Carrying Capacity drops to 1,372 lbs.
So, your clothes, food, generator, on-board gas tank, propane tanks and your big toys like your ATV or motorcycle can’t weigh more than 1,372 lbs. all together if you wish to dry camp. If you are going to get hookups, then your limit will be 2,302 lbs., still a very tight squeeze if your toys weigh a few hundred pounds.
If this toy hauler is towed with empty water and waste tanks, it can carry 2,302 lbs. If the fresh and hot water tanks are full and waste tanks are empty, it can hold just 1,372 lbs.
I’m not advocating one RV brand over another or knocking any particular RV brand with this info. Far from it! These specs and stickers come from random trailers that appealed to us and that happened to be on the dealership lot the day we were there.
When we have wandered through other RV dealership lots in different states at other times, we have discovered that many very popular brands have similar specs.
Need a pick-me-up after looking at all those trailers and calculating all those numbers? There’s a great little coffee kiosk next door to Bretz RV & Marine!
The important thing is that if you are shopping for a trailer that you are going to tow a lot, you should try to estimate how much weight you will put into it, including however much fresh water it will have in it when you hitch up. Then make sure the trailer you buy has sufficient cargo carrying capacity.
Unsure what your stuff weighs?
You can use a bathroom scale to get a rough estimate of what your clothes weigh by putting your laundry basket on it or weighing yourself holding your laundry basket and subtracting out your weight. You can also grab a bunch of clothes/jackets on hangers and do the same thing.
Likewise after a big grocery shopping spree — weigh yourself holding bunches of bags of groceries before you put it all away. Then look at what you already have in the fridge and pantry. The same can be done with pots and pans, dishware, tools, shoes, bikes etc. And don’t forget any upgrades you plan to do to the trailer after you buy it.
Or use our numbers as a guideline. We still haven’t filled all the shelves in our fifth wheel!
More of our Latest Posts are in the MENU.
New to this site?
Visit RVers Start Here to find where we keep all the good stuff. Also check out our COOL NEW GEAR STORE!!*** CLICK HERE *** to see it!
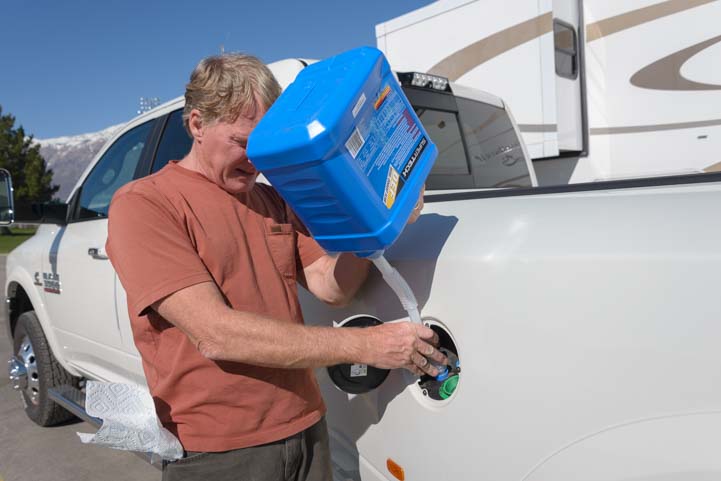
How do you put DEF fluid in a truck without spilling a drop? Here are a few tips for diesel truck owners out there as well as lots of helpful info about Diesel Exhaust Fluid, what it does and where we found it’s cheapest to buy.
Since 2010, diesel pickup truck engines have relied on Selective Catalytic Reduction technology (SCR), which uses Diesel Exhaust Fluid (DEF), to meet the EPA emmissions standards. DEF is a mixture of 1/3 urea and 2/3 de-ionized water, and it is sprayed into the exhaust system of diesel trucks to reduce the nitrous oxide (NOx) emissions into harmless nitrogen and water.
Late model diesel trucks require refilling the DEF tank!
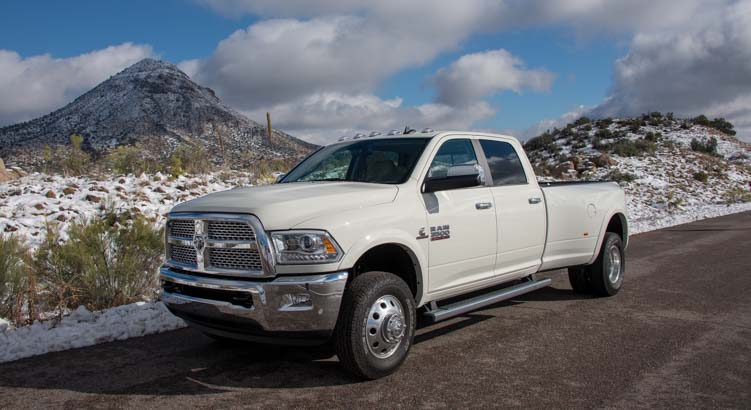
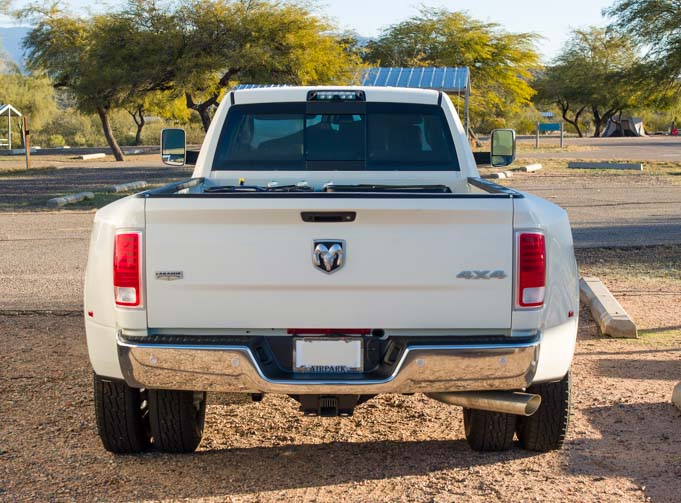
Each manufacturer designs their trucks with a tank to hold the DEF, and you have to replenish it every so often. Our 2016 Dodge Ram 3500 has a 5 gallon DEF tank. The filler hole is under the gas cap next to the diesel filler hole. On some brands of trucks the filler hole is in the engine compartment under the hood.
The Dodge Ram has the DEF filler hole next to the diesel filler hole under the gas cap
We use this handy magnetic gas cap.
As a side note, opening the gas cap on a Ram truck is interesting because there is no screw-on dust cap covering the diesel filler hole inside. There’s just a spring-loaded flap. We find we need to wipe down the whole area after we’ve taken the truck out on four wheel drive roads in dusty places like southeastern Utah.
We use a nifty aftermarket diesel gas cap that uses a magnet to keep it handy during fill-ups. Just stick it on the side of the truck. Very cool! A slightly less expensive one is also available here.
While it would seem trivial to refill the DEF tank, we struggled the first few times with the bulky jugs and awkward spouts, and it dripped here and there and was basically a pain in the neck.
However, the best deal we’ve found is the big blue 2.5 gallon jug of SuperTech DEF sold at Walmart (in-store) for $7.88. The jug is easy to use and it’s drip-free.
SuperTech Diesel Exhaust Fluid (DEF)
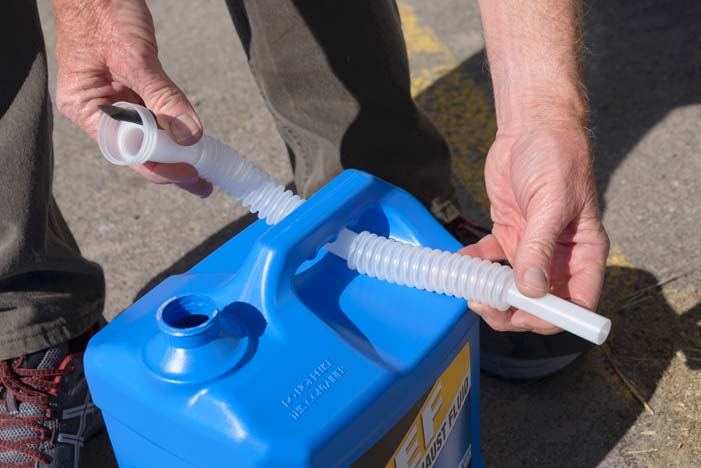
SuperTech DEF comes with a flexible pouring spout that is wrapped around the handle. Simply unscrew the jug’s cap and screw the spout on until it’s really tight.
The SuperTech DEF jug comes with a flexible pour spout wrapped around the handle
Screw the flexible pour spout on tightly
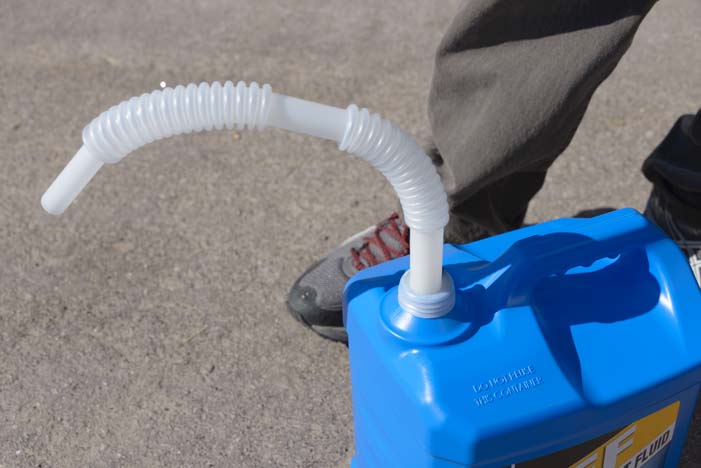
Ready to pour.
There is a small black vent hole on the spout, and this little guy is essential to making the whole process go smoothly and cleanly.
The black air vent on the pour spout is the key to doing this chore without dripping or spilling
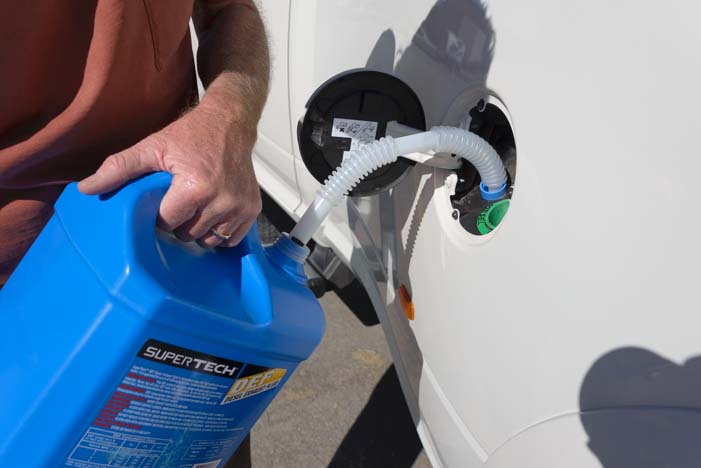
After putting the flexible spout securely into the filler hole on the truck, give the jug a small squeeze to start the flow of fluid. This will make the vent hole on the jug such air in, which vents the jug and allows the fluid to flow easily.
Once the spout is inserted securely in the filler hole, squeeze the bottle slightly to start the flow.
Make sure all the fluid has been poured into the tank, and then you’re done!
Empty the contents into the DEF tank.
The first time we did this, we didn’t squeeze the jug first, and DEF dribbled out the air vent. But if you get the siphon going properly, by squeezing the jug as you start to pour, it’s a cinch.
Our Ram truck has a dashboard gauge that indicates the fill level of the DEF tank. When it gets down to half full, we put a 2.5 gallon jug of DEF into the tank to fill it back up again. We typically do this every 1,000 miles or so.
DEF has a minimum shelf life of a year. We keep just one 2.5 gallon jug on hand at all times. Since we refill our tank about every four to six weeks, we never remotely approach its shelf life.
Buying DEF in Bulk
Another option for DEF fluid is to get it in bulk at a gas station. This is not common yet, and most gas stations don’t have DEF in bulk. However, Flying J and Pilot truck stops carry it at some of their travel centers (see links at the end for locations).
In our travels, we don’t often fill up at Flying J or Pilot, simply because they tend to be on the interstates and we tend to be on back country roads. So, we haven’t yet seen or been able to take advantage of their bulk DEF at the pump.
However, for RVers that use these travel centers a lot, this is a super way to go. The current bulk Flying J / Pilot DEF price at many of their centers is a little less than the SuperTech bottled price (~$2.79/gallon vs. $3.16/gallon).
Pilot / Flying J offers a discount card for RV travelers that gives a few cents off on fuel and 50% off on RV dump station fees, and special discounts for Good Sam Club members.
Pilot and Flying J have DEF in bulk at the pump AND a discount card for RVers
What are the pros and cons with a truck that uses DEF fluid? An obvious disadvantage is that you’ve got to do this extra little chore every so often.
However, there are benefits too. The fuel mileage is slightly better on SCR equipped engines than on older trucks that used a Diesel Particulate Filter (DPF) to meet the EPA emissions standards (like our 2007 Dodge Ram 3500). Cummins, manufacturer of the engine in the Dodge Ram line of diesel trucks, says the improvement can be up to 5%.
This increase in fuel economy is because the improved conversion of NOx emissions allows the newer engines to be fully optimized. Also, the older engines go into a “Regen” frequently to burn off the particulates in the Diesel Particulate Filter. In a Regen, a higher quantity of fuel than normal is pumped into the engine to make it run hot so the particulates can be burnt off. This wastes fuel and ultimately lowers the truck’s overall fuel mileage.
The newer engines that use SCR technology (and DEF) don’t need to go into a Regen quite as often.
For more info on all of this, there are lots of links below that explain the history and mechanics behind Diesel Exhuast Fluid.
More of our Latest Posts are in the MENU.
New to this site?
Visit RVers Start Here to find where we keep all the good stuff. Also check out our COOL NEW GEAR STORE!!*** CLICK HERE *** to see it!
A few years ago we installed an Edge Evolution diesel tuner in our truck to give it a little more power in the mountains and to increase our fuel economy a bit when not towing. This super easy DIY project turned out to be really worthwhile. We picked up 1-2 miles per gallon in fuel efficiency, and we got some extra horsepower and torque when climbing the Rockies and the Smokies with our trailer in tow.
Escapees Magazine – March/April 2016 IssueArticle: Engine Tuners by Emily & Mark Fagan
The March/April issue of Escapees Magazine features our article about the Edge Evolution Diesel Tuner. We have also written extensively about our Edge Tuner on this website, and you can read our blog post about it here:
Engine tuners (or “programmers”) are electronic components that modify the input parameters for an engine’s on-board computer. An engine tuner makes it possible to operate the truck with settings that are optimized for specific driving conditions.
So, whereas the factory settings on a Dodge Cummins engine in a Ram 3500 truck make the engine run pretty well in all conditions (towing, not towing, highway driving, mountain driving, etc.), an engine tuner will operate the engine with settings that are optimized for just one of these situations at a time.
If you will be towing a heavy trailer in the Rockies, you can program the tuner specifically for that kind of driving. If the truck won’t be towing anything for a while, you can program the tuner to maximize fuel economy.
We have used just two of the modes on our Edge engine tuner, Level 1 (“Economy”) and Level 2 (“Towing”).
In both cases we have seen an improvement in miles per gallon. In the towing mode, we’ve also found the increased power is significant. On the freeway this means it is easier to get up the speed to pass a slower moving vehicle. In the mountains it means the truck can get up steep inclines more easily.
There is a mode on the Edge Tuner that puts the truck into “stock” mode, effectively changing all the engine’s input parameters back to their factory default settings. It is also easy to disconnect the tuner all together. So, installing an Edge engine tuner is a non-destructive upgrade. The tuner is there for you if you want to use it, but you can easily opt not to use it too.
We recently bumped into the Jeep Safari Week in Moab, Utah, and while we were wandering around the booths looking at all the cool gear for Jeeps, we suddenly saw the Edge Products trade show booth. We went over to chat with the team and tell them about our installation. We met Jared Venz, one of their marketing guys. How cool is that?!
Mark found a fellow diesel motorhead buddy in Jared Venz of Edge Products when we bumped into the Edge Products / Superchips team at the Moab Jeep Safari event!
When we got our first Edge tuner, we chose the simplest programmable model, because we weren’t sure if a tuner would be a worthwhile upgrade. This time around we got a more sophisticated model. With all the products laid out on their table in boxes in front of us, Jared helped us understand the overall product line. Here it is in a nutshell:
There are three types of Edge tuners:
Insight – The most basic model that simply displays the engine data that is coming from the engine computer’s outputs. It does not have the ability to change the engine’s parameters or program it in any way .
Evolution – This model can modify the input parameters to the engine’s computer and also displays key data like the Transmission Fluid Temperature and Engine Coolant Temperature. It also indicates when the truck has gone into a “Regen” to burn off the particulates that have built up in the engine’s particulate trap (part of the “Blue Tech” 2010 EPA requirements for diesel engines).
Knowing the truck is in a Regen is especially useful, because the coolant and fluid temperatures increase, and there is a slight loss of power, but there is no indicator on the truck dashboard to show when one is happening. We found it very helpful with our old Edge Tuner to know exactly when a Regen was going on.
The Edge Evolution tuner uses the truck engine’s input port to modify the engine’s input parameters. So, the installation is very easy. A single cable plugs into that input port (the OBD II port on Dodge Ram trucks). However, in order to change from one programming mode to another (for instance, from Level 1 (Economy) to Level 2 (Towing), the truck must be parked and you have to go through a series of steps that take a good 5 to 10 minutes.
Juice with Attitude – This top of the line model has an additional computer module (the “juice”) that makes it possible not only to adjust the input parameters on the truck’s on-board engine computer, but also allows you to change modes on the fly. So, rather than having to stop and reprogram the tuner to change from Level 1 to Level 2, you can hit a button and make the switch instantly. For instance, if you are towing and want to unhitch to go drive somewhere without the trailer, you can change modes simply by pressing a button.
However, the installation is more complex, because the “juice” computer that is part of the tuner must be wired into the truck engine’s on-board computer via two wiring harnesses.
There are also two display options for each Edge tuner model:
The smaller and more simplistic display has a monitor screen that is 2.4 inches wide. The Edge tuner models that use this smaller screen have “CS2” in the model name.
The larger, more sophisticated and detailed display has a monitor screen that is 4.3 inches wide. The Edge tuner models that use this bigger screen have “CTS2” in the model name.
The final two digits in the model number distinguish between the various truck makes, models and years.
The Juice with Attitude model is available only in the large monitor screen size.
The basic model breakdown is:
Insight (Data Display Only – no engine programming capability): Insight CTS2 (large screen) vs. Insight CS2 (small screen)
Juice with Attitude (engine programming with mode switching on the fly and more complex installation): Juice with Attitude (large screen only)
Because each diesel truck manufacturer uses a different engine (Dodge has Cummins, GM products have Duramax and Ford has Ford built engines), the tuners come in different models for each truck engine. There is some variation between truck model years as well.
We’ve chosen the Edge Juice with Attitude engine tuner for our 2016 Ram 3500.
Our article, “What Puts You in the Driver’s Seat? Engine Tuners!” is the latest feature article of many that we have contributed to the Escapees RV Club member magazine since 2008. Escapees is a very varied RV and travel club that touches on all the possible concerns and interests that full-time and seasonal RVers have.
Back when the club was first started in 1978, there were no RV clubs that catered specifically to the needs of full-time and extended-travel RVers. Escapees began as a simple bi-monthly newsletter to bring full-time RVers together and to give them a place to share ideas and pass on information.
Today, the bi-monthly Escapees Magazine is one of the most informative and fun to read magazines in the RV industry.
Escapees Magazine covers on display in the mail sorting facility at Escapees HQ in Livingston, Texas
We became Escapees members a few months after we started full-time RVing, and we feel that anyone interested in using their RV for extended periods of time should consider becoming a member too. Besides receiving the wonderful magazine for free, members receive discounts of up to 50% at participating RV parks.
In addition, Escapees RV Club offers a wide range of overnight parking options at its own various RV parks, from overnight accommodations to seasonal stays to long term leases to ownership, and they offer a list of boondocking locations via the Days End Directory subscription.
Escapees also hosts a very informative online forum, RVnetwork.com. The participants in this forum are often very experienced RVers, and although non-members can read the forum, only Escapees members can join in the conversation or ask questions. For new RVers, Escapees hosts Boot Camp events where folks learn All Things RV, and each year Escapees puts on a huge rally called Escapade where members from every corner of the country come to share experiences, socialize and learn from each other. Younger Escapees also gather at Xscaper Convergences.
This coming summer, from July 24-29, there will be an Escapade Rally and Xscapers Convergence in Essex Junction, Vermont. Just before that, from July 21-23, there will be an Escapees Boot Camp for New RVers.
To learn more about Escapees and perhaps join the club (we highly recommend it), you can click here:
More of our Latest Posts are in the MENU.
New to this site?
Visit RVers Start Here to find where we keep all the good stuff. Also check out our COOL NEW GEAR STORE!!*** CLICK HERE *** to see it!
A few weeks ago we camped in Sedona, Arizona, with two good friends who own popup campers. We were reminded how much fun these little trailers can be and how much we learned in the two years we owned ours before we started RVing full-time in our first big trailer.
If you are thinking about RVing full-time sometime down the road, a year or more from now, the most valuable thing you can do in the meantime is buy a little rig and go play. There is no better way to learn about RVing than to go out and do it, and a small RV provides an awesome introduction.
You can trade in the little rig for a bigger one when you are ready to take the plunge and go full-time.
We camped in our fifth wheel with good friends who have two different styles of popup campers.
We owned our popup for two years and spent every possible weekend and vacation in it before we started full-timing. We towed it all over the place. It was routine for us to travel 300 miles with it for a long weekend or to tow it 1,500 miles on a week’s vacation.
A popup tent trailer folds up small and opens up to be a nice sized rig with beds on each end.
Before we even knew what full-time RVing was, we had already learned a lot about the RV lifestyle from camping in our popup.
We dry camped in it most of the time, so we learned little things like exactly how much water we typically used in a day, and how to take a one gallon shower. We made all kinds of classic rookie mistakes as we tried to keep our battery charged, and we figured out how to “live small” and cook in a dollhouse sized kitchen.
The surprising thing is that our popup camper had many of the same basic systems as our current fifth wheel trailer that we now live in year round. It had DC lights, a propane RV fridge, 26 gallons of water, including a 6 gallon propane hot water heater, a water pump and a propane furnace. It had a shower and a two burner propane stove, and it could hook up to shore power for electricity and to a city water connection for water.
Home sweet home!
It even had one thing our current RV doesn’t have: a king size bed!
There were two things it didn’t have. One was a toilet. When we bought it, we knew we’d be camping in campgrounds, and they always have toilets, so we decided that rather than give up precious space in the trailer for a toilet and have to deal with dumping it, we’d just use the campground toilets instead
It also didn’t have an air conditioner. We knew we’d be camping in places where we wouldn’t need one, so why pay for something we wouldn’t need?!
A popup trailer is small and easy to tow and fits in the garage!
The fun thing about running around in a little RV is that you can can go almost anywhere the Big Rigs go and get a taste of living a nomadic lifestyle without spending a fortune.
We took our popup camper to some wonderful RV parks and hooked up to electricity and water just like the big fifth wheels and motorhomes. We stayed in RV parks in San Diego (right on the water – wow!), and the Bay Area in California (in a cool wooded area not too far from the city), in the Moab Utah area where we bicycled in the red rocks, and in New Mexico, where we bicycled in the mountains.
Our friends have two styles of popup: an A-frame (smaller & lighter) and a tent trailer (big beds on each end)
Camping in these RV parks gave us a chance to wander around the loops and meet people that were experienced RVers. We’d talk with them about their rig, find out what they liked and didn’t like about it, and we’d get their advice for what to look for if we ever wanted a bigger RV (we had NO idea we ever would!) and we’d get suggestions for where to travel with our little popup.
We learned about full-timing, and we learned about work camping, and we discovered a world we’d never known anything about. We supplemented that education with online research and magazine subscriptions, but there is no better way to understand an RV’s systems than to use them, and no better way to understand the RV lifestyle than to live it.
This is a Chalet A-frame, and it has a twin bed, a dinette that folds into a full size bed and kitchen. The beauty of an A-frame is it’s light enough to be towed easily by a minivan.
Lots of people email me expressing interest in going full-time and some express interest in boondocking too. These are big steps, and having as much first-hand experience as possible before you jump in is a really good idea. Online resources are great, but they are limited and only go so far.
If you haven’t done much tent camping, and you dream of camping in the wild, learning how to dry camp in a cheap, small, rolling box is a wonderful way to start. It’s a lot of fun, and it will teach you what to look for when you buy a bigger rig, and more importantly, it will help you decide if it’s something you enjoy before you make a big commitment and turn your life upside down.
Boondocking is basically glorified tent camping in a fancy rolling box.
If you are interested in solar power, you can learn all about it for just a few hundred dollars with a folding solar panel kit and an inverter. The batteries on a popup are right there on the trailer tongue. So, it’s easy to see what’s going on!
Before you go full-time, you can sell the solar panel the kit, either with the little trailer or without!
Here’s a pretty campsite in Utah’s red rocks.
The transition to full-time RVing is a lot less stressful if you are an experienced RVer already. It’s not a requirement, and plenty of people jump right into living in an RV without ever having used one before, but I think that having hands-on experience is the best way to go.
The wonderful thing about getting a little “starter” RV and playing with it for a while before going full-time — besides all the fun you’ll have — is that the mistakes you make don’t cost much, and you haven’t got a lot at risk.
Here’s another a great camping spot — on Cape Breton Island in Nova Scotia
If you don’t like it, you can sell it.
If you DO like it but have some unexpected repairs, they won’t break the bank and you won’t be trying to live in it while it’s being fixed.
Best of all, you can go home after every excursion and take a long hot shower, wash your clothes in your own washing machine, and you can savor your photos and your memories in the comfort of your big living room, all things that will no longer be possible once you commit to the RV lifestyle full-time.
A few weeks ago we camped next to a couple in their early 40’s who are a river rafting and white water kayaking guide (him) and a mountain biking guide (her). They live in a 17′ travel trailer, and they absolutely love it.
They boondock full-time with the seasons as their jobs move between Colorado and Arizona. The trailer is a huge upgrade for them. They lived in a tent for a few years until this past October when they bought the trailer.
A river rafting guide and mountain biking guide love living in this 17′ travel trailer.
We’ve known a lot of 40-somethings over the years who lived in much fancier digs, with granite counter tops and sleek cars in the driveway. But they weren’t happy with their lives. It was enlightening and motivating and inspiring to spend time with these two people who had decided fifteen-plus years ago, right out of college, that they wanted to spend their days doing what they loved, even if it meant having a very simple home.
So, for those who think a nomadic lifestyle is out of reach financially, it just depends on how you want to live.
Our friends Rich and Mary bought our popup camper from us when we went full-time nearly nine years ago. While Rich was setting up camp, he let me take pics of the process so I could show you just how easy it is to set up a popup tent camper.
Here are the steps:
First you crank it up with a cranking tool that comes with the trailer.
First, crank up the roof all the way.
The roof is fully raised but the bed slides are still inside the trailer.
Then you pull out the bed slides on either side. Each slide locks into place in the open position.
Pull out the bed slide at each end. In many models one or both beds is a King.
Then you put the support struts in place. While traveling, these are latched under the bed sllides. Once the bed slide is opened, just hook the end onto a latch on the frame.
Attach the supports for the bed slide.
The bed slide is in place but the canvas tent isn’t propped up yet.
Then go inside and remove anything that’s hogging up space. Rich stores his solar panel inside while traveling, so he takes it out at this point.
Bring out whatever is stored inside: solar panel, camp chairs, patio mat, etc.
This popup camper — a 2005 Fleetwood Colonial — has a slick lower half door that folds down to become the entrance step. There are lots of designs out there, but this is common in the old Fleetwood lineup.
Fold down the entry step.
.
Now remove the door from its travel spot where it is suspended from the ceiling and put it in place using the velcro strips on either side. The door and its frame are one unit, so the hinging is solid, but it stands upright in place using latches and velcro.
Lower the door from the ceiling and press it into place along the velcro strip on the canvas.
Now open up the canvas above each bed. There is a special support rod that hooks in place that holds up the center of the canvas roof over the bed and gives it its shape.
Prop up the canvas over each bed with the support rod You can hang things from the loop – a lantern, fruit basket, whatever.
The canvas over the bed slide is fully opened.
Now crank down the landing jacks. These give the camper floor a bit of rigidity as you move around inside. The interior isn’t huge — it’s just a 10′ by 8′ box or so — but you can walk around. Having the landing legs down keeps the floor solid.
Lower the landing jacks.
Last of all, set up the gray tank. This is a bucket outside the back of the trailer! If you want to see exactly how much water you use to wash dishes, there it is!
Set up the gray water tank (this popup camper doesn’t have a toilet).
The shower is a shower wand on the back of the popup camper. We just wore bathing suits and stood on interlocking rubber mats. If you are more modest than that, you can set up a shower enclosure.
We didn’t have any kind of solar gear when we owned our popup. We used a battery charger in our garage to charge the batteries before we’d go on a trip, and that was it. We learned really quickly how to be conservative with electricity.
Rich decided to install a second battery on the trailer tongue. He also bought a solar panel and had it wired so it could be connected to the batteries easily.
You can also run heavy gauge wire from the batteries to an 800 or 1,000 watt inverter located inside the popup and then run a power strip from the inverter to a handy place in the rig so you can charge your phone or laptop or run a small appliance.
Put out the patio mat, raise the awning and set up the solar panel. Done!
What a fabulous rig!!
If you are looking forward to having big RV adventures on the road someday in the future, make that “someday” be today! Go out and get a cool little RV and have a blast.
Popup tent trailers like ours are a little heavier (the GVWR is 3,000 lbs.), so both we and Rich bought Toyota Tundra pickups to tow it. An A-frame popup is lighter, because there are no bed slides, so our friend Mark tows his with a minivan.
More info and links for specific popup camper manufacturers below.
More of our Latest Posts are in the MENU.
New to this site?
Visit RVers Start Here to find where we keep all the good stuff. Also check out our COOL NEW GEAR STORE!!*** CLICK HERE *** to see it!
Defrosting an RV refrigerator is a surprisingly easy job. We’ve been living with a propane RV refrigerator for many years now, and they always need defrosting after a few weeks or months. Being meticulous about not leaving the refrigerator door open unnecessarily can help, but when you find yourself living in a hot and humid environment or if you have the refrigerator side of your trailer or motorhome facing the blazing hot summer sun all afternoon, the frost is going to build up over time.
Over the years, we’ve tried several different techniques for defrosting our RV fridge, and in the old days this was a big job that, with some methods, could take well over an hour. We now have it down to a super fast method that makes this pesky job a cinch. The last time we did it, I made a note of the time on the clock as we went through each step. From start to finish, it took 20 minutes.
The first step is to turn off the refrigerator and empty the contents of the freezer into cooler bags or a cooler of some kind. Since these things will be out of the freezer for just 20 minutes, they won’t defrost and the ice cream won’t melt. If your RV is hot inside, covering the cooler bags with blankets for extra insulation can help.
9:17 a.m. – Turn off fridge and unload freezer into cooler bags
We used to unload the whole refrigerator and empty it out completely, but that isn’t necessary and it takes a lot of time. An awful lot of what is in the refrigerator can handle warming up slightly as you keep the refrigerator door open to defrost it.
Instead, just unload the most temperature sensitive items — milk, yogurt, lunch meats, mayonaise, etc., into an insulated cooler bag or a cooler. Most of the fruits, veggies, bread, cheese, condiments, etc., can remain right where they are in the fridge for the 20 minutes it takes to defrost it.
Set the cooler bags aside. Covering them with blankets will keep everything even cooler.
Next, put a super absorbant chamois towel in the bottom of the freezer compartment to absorb the water from the melting ice, and use a hair dryer to thaw the walls of the freezer.
9:22 a.m. – Use a hair dryer to thaw out the freezer.
We put it on the high setting and keep a distance of about 8″ between the hair dryer and the walls of the freezer. A higher wattage hair dryer may need to be put on the low heat setting. Hold your hand about 8″ from the hair dryer and see how hot it feels.
Be sure you keep the hair dryer from heating up the plastic walls or they will crack from being cold and then getting hot. Keep the hair dryer moving and test the temp of the plastic walls with your hands.
After thawing the walls of the freezer a little, move down to the cooling fins in the refrigerator compartment. Keep the hair dryer in constant motion, sweeping it back and forth from side to side.
Slowly wave the hair dryer in front of the cooling fins.
Alternate working on the freezer compartment and the refrigerator compartment.
Alternate between the cooling fins in the refrigerator compartment and the freezer compartment.
At the beginning, when the cooling fins are caked in ice, the hair dryer can be closer to them.
Little ice sheets will begin to fall off the refrigerator cooling fins into the drip tray underneath. As the thawing process continues, increase the distance between the hair dryer and the cooling fins.
As ice drops and the cooling fins thaw, move the hair dryer back a little.
Don’t chisel the ice off the fins or the freezer walls with a tool. If you pierce the metal base behind the cooling fins or the walls of the freezer, the refrigerant (ammonia) will leak out. We don’t use any chiseling device. We simply assist the thawing process with the hair dryer.
Check beneath the cooling fins and you’ll see the bits of ice dropping into the drip tray.
Check below the cooling fins where the ice drops off in chunks.
If you go outside, on the back of the RV you’ll see water seeping out of the refrigerator vent.
Outside the rig, water will be seeping from the refrigerator vent.
A little trickle of water flows down.
Once all the ice has fallen off the cooling fins, pull out the drip tray and dump the ice in the sink.
9:34 a.m. – Once all the ice has dropped off the cooling fins, empty the tray of ice into the sink.
Up in the freezer compartment, the chamois towel is now fairly wet with water that has dripped down off the walls. Wring it out and use it to wipe down the freezer and the fridge.
9:35 a.m. – The chamois towel in the freezer is pretty wet. Use it to wipe down the fridge and freezer.
Load the food from the cooler bags back into the refrigerator and freezer compartments, and you’re done! Put the fridge at max temp for a few hours to help it cool back down, and then set it to the temperature setting you normally use.
9:37 a.m. – After loading the food back in the refrigerator, turn it back on. Done!
Other RV Refrigerator Tips
The key to having an RV refrigerator work optimally is having the air circulate inside well. Overstuffing the fridge with food makes this difficult for it. We have used a little RV refrigerator airator fan that’s designed to keep the air flowing. We’ve had mixed results with this, and when it died we didn’t replace it. I think this would work well if there were space between all the food, but our fridge is usually packed (the turf wars between the beer and the veggies can be brutal…sometimes we can hear them battling it out in there!).
As a maintenance item, we keep the door seals clean, wiping them down periodically.
We use simple refrigerator thermometers to monitor the temperatures in the fridge and freezer. It has a built in hook, and we hang it from one of the rungs in the top shelf in the refrigerator. The one in the freezer rests against one wall.
We were surprised to learn that RV refrigerators have an expected lifespan of about 8 to 10 years. A classic sign of impending failure is the appearance of yellow dust in the refrigerator vent area behind the fridge (go outside and take the vent cover off and look around with a flashlight). Click the following link to read the funny story of our RV refrigerator replacement and see how an RV fridge replacement is done.
Because of the shorter lifespan, higher price, and use of propane in RV refrigerators, many (most) “full-time” level fifth wheels and motorhomes are now being built with residential refrigerators that run on AC power only (a dedicated inverter is installed so it can run from the batteries while in transit). For folks that have plans to dry camp and boondock a lot in their RV life, a residential refrigerator will require a much bigger battery bank and solar panel array than would otherwise be needed. We discuss that in more detail at this link in our introductory solar power article.
If our hair dryer method of defrosting an RV fridge seems unorthodox to you, believe me, we have tried many other methods. We tried opening the fridge and freezer doors and letting the fridge thaw out on its own. We tried doing that and “helping it along” by chiseling the ice off with a small plastic scraper. We tried putting a bowl of hot water in the fridge to help it warm up.
All of these methods were adequate, but they were time consuming. We’ve been using our current method with the mini travel hair dryer for a few years now and really, really like it.
More of our Latest Posts are in the MENU.
New to this site?
Visit RVers Start Here to find where we keep all the good stuff. Also check out our COOL NEW GEAR STORE!!*** CLICK HERE *** to see it!
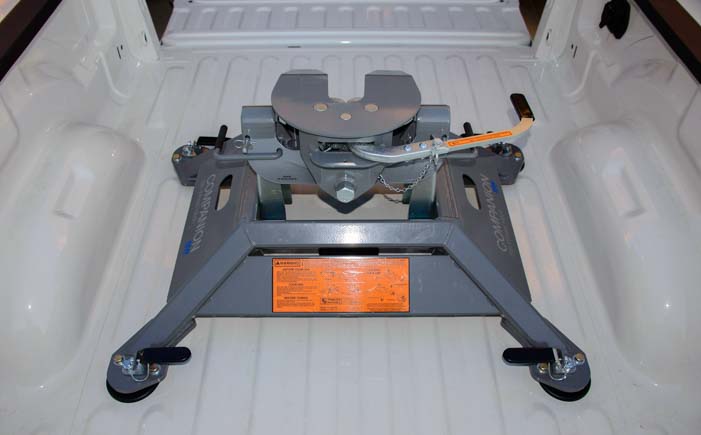
The B&W Companion OEM fifth wheel hitch uses the new and very clever puck hitch mounting system that can be ordered with Ram and Ford trucks in their fifth wheel and gooseneck towing prep packages. This truck option has five “pucks” installed in the bed of the truck: four in the corners to mount a fifth wheel hitch and one in the center for a gooseneck.
The new style fifth wheel hitches that are designed for these puck systems stand on four legs that each have a quarter turn locking mechanism at the foot to secure them into the four pucks in the bed of the truck. This allows the hitch to be installed or removed from the bed of the truck easily. When the hitch is removed, the truck bed floor is totally flat and free of obstacles, because there are no hitch rails to get in the way. Ford, GM and Ram have different puck layouts in the beds of their trucks.
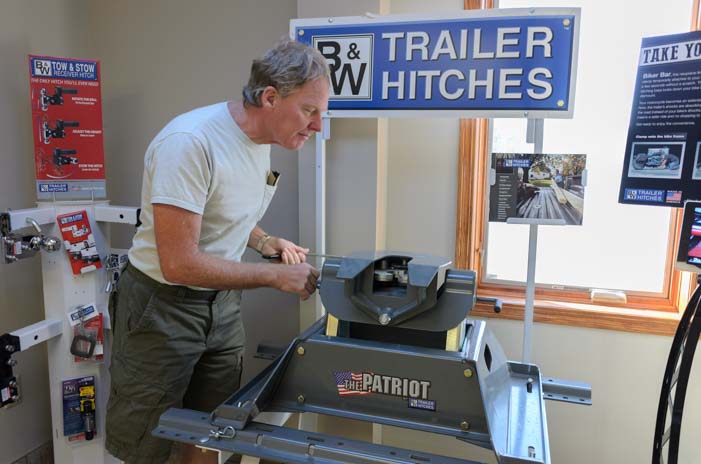
When we were going through the process of buying a new Ram 3500 dually truck, we knew we wanted the best of breed fifth wheel hitch that incorporated this new design for our full-time RV lifestyle. After a factory tour of the B&W Trailer Hitches plant in Humboldt, Kansas, we were sold. You can navigate this page using the following links.:
B&W hitches have long had a stellar reputation in the RV industry, and when our 36′ Hitchhiker fifth wheel trailer was getting a slew of big repairs done at the NuWa factory service center in Chanute, Kansas, (thank goodness for our RV warranty), we discovered B&W Trailer Hitches was just a ways down the road. So we took a factory tour of the plant.
All of the hitches manufactured by B&W Trailer Hitches are on display at the manufacturing plant.
What struck us more than anything is that B&W Trailer Hitches is a company that cares. They not only turn out a superior product, but they take take care of their employees.
When the RV manufacturing industry went into a steep nose dive in the years following the financial debacle of 2008, many of the employees that had worked at NuWa industries building fifth wheel trailers eventually found employment over at B&W Trailer Hitches as NuWa’s need for workers shrank. And when B&W didn’t have enough work for everyone to do, the company paid their employees to do city maintenance work in their hometown of Humboldt, Kansas.
How cool is that. And how RARE is that?!
Mark checks out one of the hitches on display at B&W.
We got a taste of just how deeply these community values run when we saw the Biblesta celebration and parade during our visit to Humboldt, Kansas. In an age of political correctness when many people are afraid to express their beliefs publicly, this is a town that has been openly celebrating Christianity in an annual festival for the past 52 years. All the churches in the area — as well as B&W Hitches — have a float in this extraordinary parade. Read our blog post about it here: America’s Heartland – Is It In Humboldt Kansas?
B&W Trailer Hitches sponsored a float in the Biblesta parade in their hometown of Humboldt, Kansas
.
Founded in 1987 by Joe Walker and Roger Baker as B&W Custom Truck Beds, the company long ago became B&W Trailer Hitches. They still build custom truck beds, but the company has grown and now manufactures many other products.
In 1991, B&W invented the clever turnover ball for gooseneck hitches, and that put them in the forefront of the towing industry. For trucks that have a gooseneck socket in the bed of the truck, the turnover ball gets inserted this socket and a fifth wheel hitch can be installed that latches onto the ball and also onto rails that are installed under the bed of the truck. When the fifth wheel hitch is removed, the turnover ball can be turned over to make the bed of the truck completely flat since the rails for the hitch are under the bed.
This makes the entire bed of the truck available for hauling when the fifth wheel hitch isn’t installed, and it also allows the truck to be set up for either gooseneck or fifth wheel towing really easily. This is handy out in ranch country where one truck might tow a variety of trailers, and also be used to haul big loads.
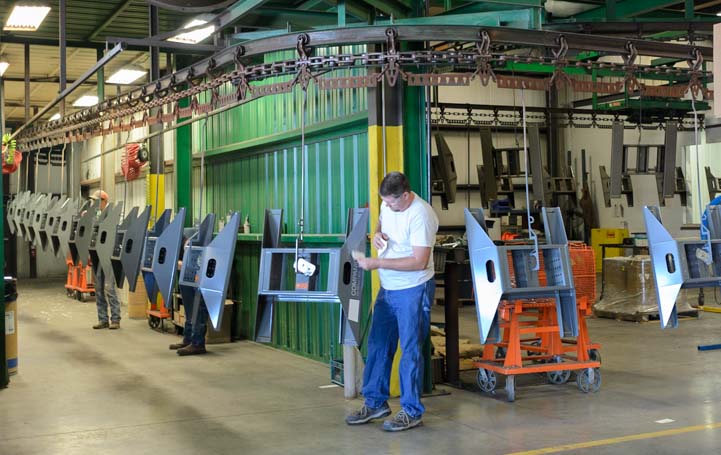
B&W hitches on the assembly line in Humboldt, Kansas.
The new puck style hitch mount offered by the truck manufacturers is a similar concept. Rather than just one connection point between the 5th wheel hitch and the truck bed in the center, there are four points of contact in the four corners. The four puck system also allows for an even heavier duty weight rating on the biggest fifth wheel hitches, so larger fifth wheel trailers can be towed.
B&W Trailer Hitches is into quality, and one of the things that sets their hitches apart is that they are made from American steel. Since we have dealt with axle and leaf spring problems on our trailer several times over the last year, we have come to realize just what a huge difference there is between Chinese made steel and American steel. When it comes to something that puts your life on the line because it is carrying heavy loads, American made steel is the only way to go.
Stacks of B&W fifth wheel hitch bases (these are not the new puck style base)
Another hallmark of quality in B&W hitches is that the nuts holding the hitch base to the truck are castle nuts. This means you can lock them with a sheer pin so they don’t back out.
Also, just about everything at B&W Trailer Hitches is done in-house. That way, they can retool the assembly line easily, as needed, for instance, if they improve the design or the puck layout is changed by the truck manufacturers.
Stacks of fifth wheel hitch couplers (the top part of the hitch).
Lots of metal shavings are generated in the production of hitches on the B&W assembly lines. We were impressed that B&W recycles all the metal shavings at Missouri Metals. Very green!
B&W recycles all the metal shavings from their production lines
We chose the 25,000 lb. B&W Companion OEM fifth wheel hitch. This is way overkill for our 14,100 lb. trailer, but our goal in our whole truck-and-hitch upgrade was to be able to tow our fifth wheel effortlessly. It also gives us options down the road in case a day comes when we want to replace our trailer with something bigger or beefier.
The whole installation of the B&W Companion OEM 5th wheel hitch could easily be done right in the bed of the truck, but we we got the hitch before we got our truck! So, we did it in two stages. First we assembled the hitch in a friend’s garage. This took 40 minutes. Then, once we got our new truck, we installed the hitch in the bed of the truck. This second stage took 20 minutes because we needed to fine tune the mating of the four pucks and the four legs. In the future, lifting the hitch in and out of the truck bed will take just a few minutes.
So, it’s about a one hour DIY job to install a B&W Companion 5th wheel hitch right out of the box. That’s a huge improvement over paying the fifth wheel dealership to do a two hour installation like we did when we installed our first fifth wheel hitch in our first truck!
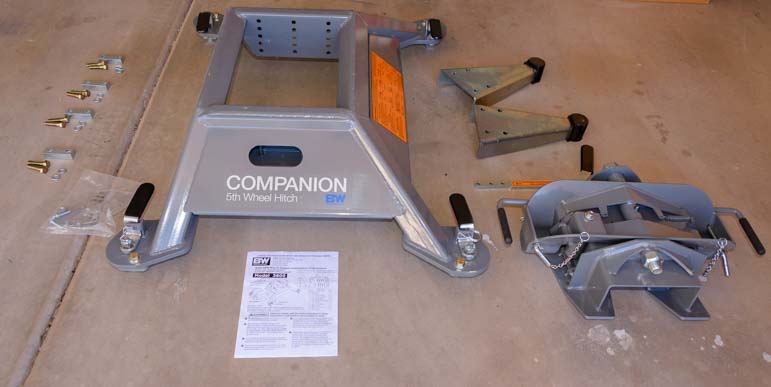
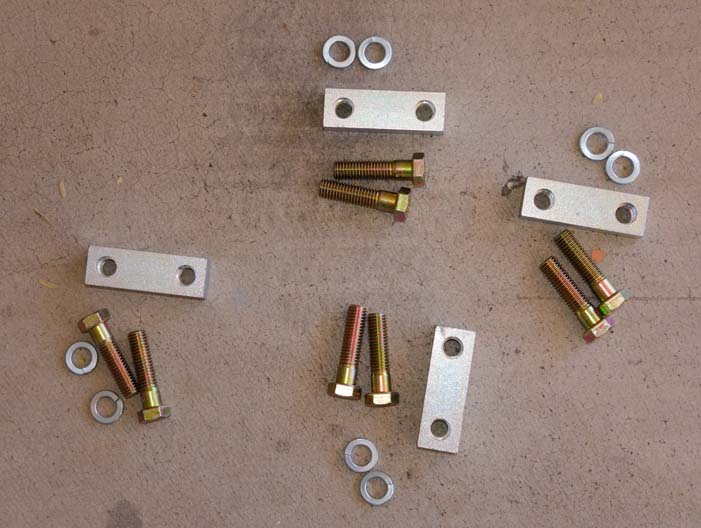
There is a base and a head (or coupler) and assorted parts. We laid them all out to get a look at them.
We lay out all the parts and the instructions.
There is a one page installation instruction sheet that comes with the kit (also available online here). There’s also a sticker on the hitch base with instructions for mounting the hitch’s two parts into the truck bed.
The orange sticker on the hitch base has instructions for mounting the hitch in the truck bed. The sticker faces the truck cab.
The first step is to install the big triangular pivot arms that support the hitch coupler (the top part of the hitch). The orientation of these triangular pieces depends on the placement of the hitch over the axles, which varies by truck model. In the case of the Ram 3500 dually long bed, they are oriented so the shallower slope goes towards the cab of the truck.
The hitch has a big orange sticker on the side that faces the cab, so the shallow slope of the pivot arms faces that sticker.
The shallow sloping side of the pivot arm faces the truck cab in our installation. The pivot arm orientation varies with the type of truck bed.
There are four pairs of lock washer and bolts, two for each pivot arm. There are five possible holes, so you can set the height of the pivot arm higher or lower, which will change the gap spacing between the overhang of the fifth wheel trailer and the sides of the truck bed. We chose the middle setting for starters.
The pivot arms are attached using these parts.
The bolts and lock washers screw into the threaded block an the back side of the pivot arms.
Use a socket and ratchet to tighten the bolts.
The bolts screw into a threaded block plate on the back side.
Mark bolts the pivot arm to the threaded block plate
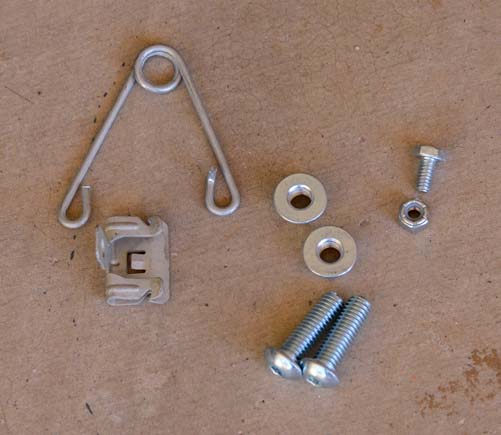
The next step is to install the wire torsion spring on the flange on the driver’s side pivot arm that is closest to the truck cab.
The wire torsion spring is next.
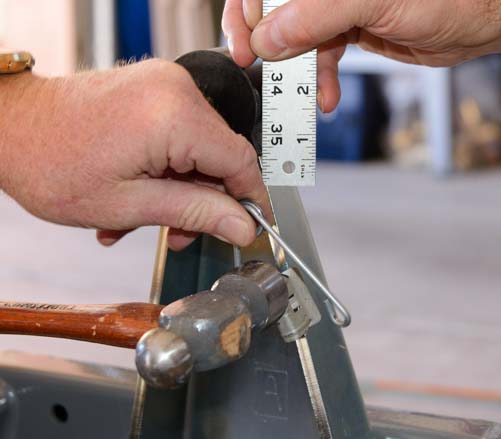
The mounting clip (below the spring in the photo above) is attached to the spring. Then the spring is installed so there is 1/2″ of clearance between the top of the spring and the bottom of the rubber bumper on the pivot arm. A few taps with a small hammer secured the clip onto the flange.
Tap the spring into place with a small hammer
The spring must be 1/2″ from the bottom of the rubber bumper on the pivot arm.
Now the pivot arms are fully installed on the hitch base.
The two pivot arms are in place (photo is prior to mounting the torsion spring).
The next step was to put the hitch head — the coupler — onto the hitch base and install its handle and three safety pins.
The coupler (top of the hitch), seen upside down here, is next.
We lubricated the rubber bumpers on the tops of the pivot arms with CRC Lithium Grease.
Spray some grease onto the rubber bumpers
Then, holding the coupler by the two saddle handles on either side, Mark placed the coupler onto the hitch base. When you set the coupler down on the base, press down on the handles to secure it.
Set the coupler on the base and press down on the handles to secure it
The coupler rests on the hitch base. Saddle locking pins under the two saddle handles prevent it from lifting up. A “hairpin” holds the saddle locking pin in place.
A saddle locking pin prevents the coupler from lifting off the base. It’s held in place with a hairpin (cotter pin) that is under Mark’s fingers in this photo.
Next, the coupler cam handle gets installed onto the coupler.
Install the coupler cam handle onto the coupler
The handle is secured to the coupler with two button head cap screws (tightened with a 7/32″ allen wrench), and it is held closed (or open) with the coupler’s cam handle safety pin.
Two button head cap screws and a the cam handle safety pin do the trick.
As mentioned above, all of these assembly and installation steps could have been done in the truck bed, but we did not have our truck yet, and we were excited to get started and work on the hitch in the meantime.
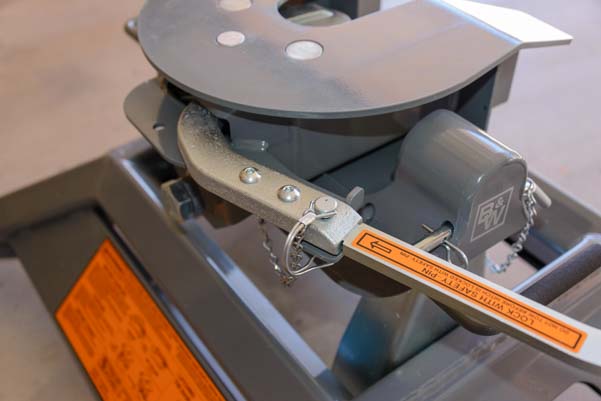
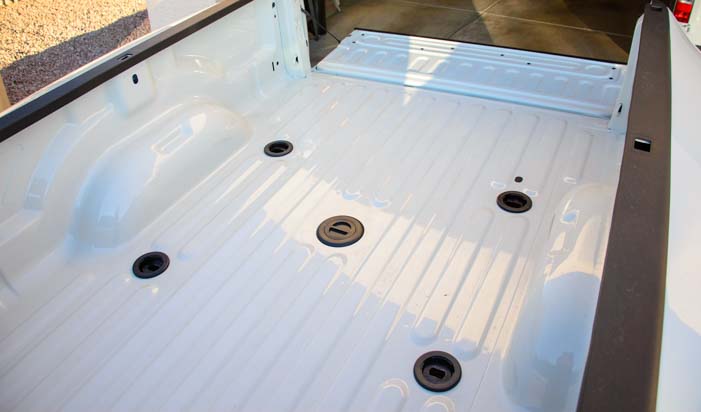
The gooseneck / fifth wheel hitch tow prep package puck system in our Ram 3500 dually truck was ready for the hitch installation.
The gooseneck / fifth wheel tow prep package has five pucks in the bed of the truck. Fifth wheel hitches use the outer four pucks.
Mark and his buddy lifted the hitch base into the truck bed. Back in our article about our truck, a reader noted that he hoists his fifth wheel hitch in and out of his truck bed using a hydraulic lift table. If you are going to be moving the fifth wheel hitch in and out of your truck bed a lot, and you have the garage space, and you don’t have a strong, strapping friend at your beck and call to help you, this seems like a super idea.
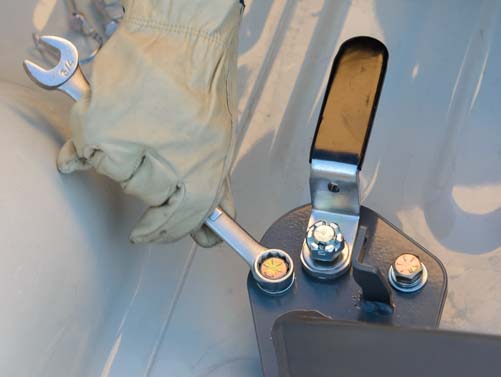
Each foot of the base required a little adjustment to fit properly into the truck’s pucks. This was done by loosening and tightening the cap screws on the pilot assemblies on each foot.
Each puck requires some small adjustments the first time.
Then the tension in the latch handle was set by adjusting the height of the castle nut. We used needle nose pliers to remove the cotter pin and then reinstall it and bend the end once the castle nut height adjustment was set.
A sheer pin prevents the castle nut from backing out.
It took a little pushing and shoving to get everything in place, but these are one-time adjustments. The latch handles could now be opened and closed easily.
Hitch latch handle in the open position.
Hitch latch handle in the closed position.
The B&W Companion hitch base was now installed in the bed of the truck.
The base is installed and all four latch handles have been adjusted to open and close easily.
Next, the hitch head (the “coupler”) was set on the hitch base. The two saddle handles were pushed down and the saddle lock pin was put in place.
The B&W Companion OEM 5th wheel hitch is completely installed! This view (above photo) is looking towards the tailgate.
This view is looking towards the truck cab.
Great job, guys. Thanks!!
Hey, can I have a beer too?
Celebrations behind us, the next day we hitched the new truck up to our fifth wheel trailer and took our home on a joy ride up and down some nice long 7% grades nearby. What a combo!!!
Prior to hitching the truck to the trailer the first time, we cleaned the hitch plate on the trailer and lubed both that and the coupler plate on the B&W hitch with CRC silicone spray.
We ended up adjusting the pivot arms down one notch, and that seems right for our particular truck and trailer.
We adjusted the height of the pivot pins by one notch to get the distance between the sides of the truck and the fifth wheel overhang right.
After ten thousand miles of towing with the B&E Companion OEM hitch, we are happy to report that we have been very happy with this hitch. In early 2017 we heard of a case where this hitch performed extraordinarily well in a fifth wheel rollover accident. You can read about it here:
The following info is FYI for those whose truck does not have a Puck System in the bed.
The Gooseneck Turnover Ball hitch is one option which allows you to have a totally flat truck bed when the hitch is removed. The other option is to go with the traditional rail mounted Patriot fifth wheel hitch.
B&W Gooseneck Turnover Ball Hitches:
Unlike the Puck System hitches, the Gooseneck Turnover Ball hitches require installing the Gooseneck Turnover Ball in the bed of the truck with rails mounted underneath. So, each truck bed in each model year has a different kit. The B&W Companion Hitch that mounts onto the Gooseneck Turnover Ball in the bed of the truck comes in two flavors: long bed and short bed (slider hitch).
Gooseneck Turnover Ball Companion Hitches (these are the “couplers” or actual hitches):
More of our Latest Posts are in the MENU.
New to this site?
Visit RVers Start Here to find where we keep all the good stuff. Also check out our COOL NEW GEAR STORE!!*** CLICK HERE *** to see it!
The February 2016 issue of Trailer Life Magazine features our travel story about RVing at Big Bend National Park in Texas. Big Bend National Park is extremely remote, located about 150 miles due south of I-10, an interstate that runs east-west across Texas for almost 900 miles. This extraordinary National Park offers stunning canyons, wild rock formations, towering pine forested mountains and the iconic Rio Grande, a slow moving river that separates America and Mexico.
Trailer Life Magazine – February 2016 Article by: Emily Fagan — Photos by: Emily & Mark Fagan
Big Bend National Park is enormous and full of variety. The drive across the width of the park is 45 miles long, and it climbs and descends through large sweeping turns that take you through many different terrains. At the far west end of the park, we found an utterly unique hippy enclave in the small town of Terlingua where the ghosts of a former Mexican mining camp come alive each year on Dia de Muertos, the Day of the Dead, on November 1st.
Santa Elena Canyon, Big Bend National Park
At the far eastern end of the park we took a “ferry” across the Rio Grande (this is actually just a rowboat ride!) and we crossed the international border to spend a delightful day in the tiny village of Boquillas del Carmen in Mexico.
Dusty streets, colorful buildings, and a friendly local guide who took us on a tour around town all brought back precious memories for us of our nearly four years of traveling throughout Mexico on our cruise. As close to the border as this small town is, it is as authentic in flavor and genuine in soul as any Mexican town we have ever visited.
Big Bend National Park is a hiker’s dream, with short ‘n easy and long ‘n strenuous hikes available in every kind of landscape, from mountains to desert to walking along the Rio Grande.
A hike in Santa Elena Canyon along the cliffs that line the Rio Grande in the southwest corner of the park gave us a beautiful glimpse of this very calm and quiet river, while a hike into the Chisos Mountains in the middle of the park took us through the pines to a window in the rocks that gave us a view of mountains in the distance. Traipsing through the hot desert portion of the park, we climbed a series of switchbacks to find ourselves face to face with a massive balancing rock.
There is something in Big Bend National Park for everyone, and perhaps most intriguing is that the National Park Service operates the entire park as a dry camping campground, which makes it possible to “boondock” within the limits of the park, something no other National Park offers (that we know of).
To see what Big Bend National Park looks like, here are all our blog posts from our RV travels there:
While you are taking your RV to or from Big Bend National Park, a stopover at the phenomenal Caverns of Sonora is an absolute must. This is by far the most beautiful cave system we have ever seen, and there is a small RV park at the Caverns as well:
Here is a Google Maps link to all these places. Boquillas del Carmen is a very short distance from the Rio Grande Village RV Campground in Big Bend National Park:
Trailer Life Magazine is an excellent magazine about all aspects of RVing with towable rigs, and they are celebrating their 75th birthday this year. The first issue was published in 1941, and the editors have written two charming articles about what Trailer Life and the RVers it serves were like in the early days:
Throughout the decades, Trailer Life has inspired campers with creative ideas and stories for fun things to go see and do with a trailer. They have also educated people on what to look for in a trailer, how to match a trailer with a properly sized tow vehicle, and outlined important maintenance procedures and discussed all kinds of other things related to traveling with an RV.
We were avid readers of Trailer Life long before we began making contributions to the magazine, and we highly recommend it to others that are learning about RVing. Subscribe to Trailer Life here!.
Choosing a truck to pull a trailer is a critical decision for RVers, because getting there, and particularly getting there safely, is the first and most important part of enjoying the RV lifestyle! Towing specs and towing guidelines always give the outer limits of what a truck can safely tow. Too often, in towing situations, the trailer is a little too big for the truck, or the truck is a little too small for the trailer, pushing the truck right to its outer safety limits or beyond.
The 2016 Ram 3500 Dually is an awesomely powerful truck for towing big and heavy trailers
The truck-trailer combo may be just a little out of spec on paper, so it may seem okay, like you can get away with it, but it is a really unwise decision. Not only is it absolutely no fun to drive a truck that is screaming its little heart out to tow the load its tied to, but if you have an accident and it is determined your truck was towing a load that is beyond its safety limits, you will be liable.
Heaven forbid that there is a fatality in the accident — either yours or someone else’s. There are lots of horror stories out there of people’s lives that were transformed because someone decided not to get a truck that could tow their trailer safely.
Of course, truck and trailer salesmen don’t help. We have heard time and again, “That truck is fine for this trailer,” or “This trailer will be no problem for that truck.” Don’t listen to them! Trust your instincts and your gut feelings. If you are studying the specs and are nervous that your truck *might* be too small because your trailer puts it on the hairy edge of its specs, then you need a bigger truck or a smaller trailer.
We have been amazed at the huge difference between our old 2007 Dodge Ram 3500 Single Rear Wheel and this new 2016 Ram 3500 dually
This article covers all the specifications we studied and were concerned about when we placed the order for our 2016 Ram 3500 truck to tow our 14,100 lb. 5th wheel trailer. You can navigate to the various sections with these links:
When we bought our 2007 Dodge Ram 3500 Single Rear Wheel long bed diesel truck with the 6.7 liter Cummins engine, its purpose was to tow a 7,000 lb. (fully loaded) 2007 Fleetwood Lynx travel trailer. Our 2004 Toyota Tundra (4.7 liter engine) had been okay to tow that trailer on paper, but when we took it on its first mountain excursion up and over Tioga Pass on the eastern side of Yosemite in California, it could not go faster than 28 mph with the gas pedal all the way to the floor. What a scary, white knuckle drive that was. Who needs that?
Our ’04 Toyota Tundra half-ton pickup rests as it tries to tow our 27′ travel trailer over Tioga Pass… sigh.
We replaced the Toyota Tundra with a 2007 Dodge Ram 3500 which was rated to tow much bigger trailers than the little Lynx travel trailer, so all was good with that small travel trailer. However, within a year, we upgraded our trailer from the lightweight Fleetwood Lynx to a full-time quality, four season, 36′ NuWa Hitchhiker LS II fifth wheel trailer that the scales told us was 14,100 lbs. fully loaded. Suddenly, our big beefy diesel truck was at its outer limits!
We drove our ’07 Dodge Ram 3500 and 36′ fifth wheel combo for seven years without a mishap, but it was not an ideal situation. The truck would strain in the mountains and would wander in strong cross winds on the highway. We installed a K&N Cold Air Intake Filter and an Edge Evolution Diesel tuner which helped the engine breathe better and increased its power (see our Edge Evolution Tuner Review), and we installed a Timbren Suspension Enhancement System to keep the truck from sagging when hitched to the trailer. But the frame of the truck and the transmission were still stressed by the heavy load on steep inclines.
We wanted a truck that was well within its towing limits and that could tow our trailer effortlessly.
The weight ratings for trucks and trailers are an alphabet soup of confusion that takes a little imagination to grasp. Here’s a synopsis:
UVW
Unloaded Vehicle Weight
The weight of the vehicle without fuel, people and stuff
GVWR
Gross Vehicle Weight Rating
The heaviest weight the vehicle can safely be when it is loaded up with fuel, people and stuff
GCWR
Gross Combined Weight Rating
The most a truck-and-trailer combo can safely weigh when hitched together and loaded up with people, fuel, food, etc
Payload
The GVWR less the UVW
The amount of weight the truck can safely carry. Compare to the trailer’s Pin Weight
PW
Pin Weight
The actual weight on the truck’s rear axle when a trailer is hitched up. Compare to the Payload
The Pin Weight is most easily visualized by first imagining yourself standing on a bathroom scale and making a note of your weight. Then your teenage kid walks up and puts his arms around your neck and hangs on your shoulder. The weight on the scale goes up a little bit, but not a huge amount, because your kid is still standing on the floor on his own two feet. The more he leans on you, the more weight the scale shows.
The difference between the weight the scale shows when your kid is hanging on your shoulder and the weight it shows when you’re by yourself is the “pin weight.” In the case of you and your kid, the “pin weight” might be 30 lbs.
The Pin Weight is the weight of the trailer at the hitch pin, a value that has to be calculated.
The following chart shows the factory safety weight ratings given by Chrysler and NuWa and the actual weights for our ’07 Dodge Ram 3500 truck and ’07 36′ NuWa Hitchhiker 5th Wheel trailer. We had our rig weighed by the Escapees Smart Weigh program at their North Ranch RV Park in Wickenburg, Arizona. This is a detailed, wheel by wheel, RV specific method of weighing.
Our truck, when loaded, carries fuel, 24 gallons of water, a generator and BBQ, the fifth wheel hitch, several leveling boards, two huge bins of “stuff” and ourselves, as well as the pin weight of the trailer. So, even though the pin weight itself was within tolerance on our ’07 Dodge 3500, all that other stuff made the truck way overweight. Moving those things to the trailer would clog our fifth wheel basement and would just make the trailer way overweight instead.
2007 Dodge Ram 3500 SRW (Single Rear Wheel) Truck
UVW
GVWR
GCWR
Payload/Pin Weight
Rating
7,147
10,100
21,000
2,953
Actual
8,025*
10,850
22,125
2,850
* LOADED with passengers, fuel and cargo but not towing
Besides the pin weight, our truck carries spare water, a heavy hitch, leveling boards, and generator. And there’s more stuff plus ourselves in the cab!
We improved our trailer’s cargo carrying capacity by upgrading from E rated tires to G rated tires and by revamping the suspension completely (I have not yet written about that project). So, even though some elements of the trailer frame are still at the spec limit, we have some leeway with our trailer in those places where the rubber meets the road.
The truck, however, was over its limit for both GVWR and GCWR, and it was pushed nearly to its max when towing.
The 2007 Ram 3500 towing guide is here: 2007 Dodge Ram Trucks Towing Guide. Our truck is on p. 20, on the 2nd to last line. Search for this text: “D1 8H42 (SRW)” (you can copy and paste it from here).
There are three brands of big diesel pickup trucks on the market: Chevy/GMC, Ford and Dodge. People have lots of brand loyalty when it comes to diesel trucks, and the bottom line is it’s pointless to get into a religious war over truck manufacturers. That said, the following are our personal opinions and there is no offense intended to anyone who loves a particular brand.
GMC makes the Chevy Silverado and GMC Sierra which both have the Chevy Duramax 6.6 liter engine and the Allison transmission. The Allison transmission is widely used throughout the commercial trucking industry and is considered to be the best.
FORD makes the Super Duty series of trucks which have Ford built engines and transmissions. Ford has modified its Power Stroke engine several times since the early 2000’s. The current engine is a 6.7 liter engine and it has performed well. Earlier models, the 6.0 liter engine and 6.4 liter engine, both had significant problems and were less reliable.
CHRYSLER makes the Ram series of trucks which have the Cummins 6.7 liter engine and Aisin transmission. The Cummins engine is widely used throughout the commercial trucking industry and is considered to be the best.
With the late model Ram trucks there are two models of 6 speed automatic transmissions to choose from. The 68RFE transmission was the only one available for our ’07 Dodge, and we found it developed problems over time (before our installation of the K&N Cold Air Intake and Edge tuner). It stuttered on climbs and didn’t always shift smoothly. The new (in 2013) Aisin AS69RC transmission is much more rugged and reliable and is now available as an option in the Ram Trucks lineup.
All three big diesel truck brands are good. After much research and many test drives, we chose the Ram 3500.
PICKUP TRUCK SIZES
All trucks are categorized into eight weight classes, from Class 1 (lightest) to Class 8 (heaviest) according to their GVWR. Pickup trucks fall into the smallest (lowest) three classes:
Class
GVWR
Class 1
0 – 6,000 lbs
Class 2
6,001 – 10,000 lbs
Class 3
10,001 – 14,000 lbs
All three classes of pickups are referred to as “light duty” trucks, as compared to dump trucks and semi tractor-trailers in the higher “medium duty” and “heavy duty” classes. Within the pickup truck market, however, they are referred to as “Pickups” (Class 1), “Full Size Pickups” (Class 2) and “Heavy Duty Pickups” (Class 3). So, even though a large diesel pickup is marketed as “heavy duty,” it is not technically a heavy duty truck. It’s just a heavy duty pickup. This may be obvious to many, but sure had me confused at first glance.
When we were first time truck buyers shopping for a truck to pull our popup tent trailer, the advertising made the ’04 Toyota Tundra look like it was a heavy duty towing monster that could pull a mountain right across a valley. But it is not so! Pickups come in all sizes.
Toyota Tundra and Ram 3500 — Which one is the towing monster?
Pickup truck sizes are referred to as “half-ton” “three-quarter ton” and “one ton,” and they are numbered accordingly:
Size
Ford
Chevy/Dodge
Half-ton
150
1500
Three-quarter ton
250
2500
One ton
350
3500
Ford also mass markets 450, 550 and larger pickups. Some people make custom Chevy and Dodge trucks in those sizes too, but they don’t come from the factories that way.
Ensuring the tow ratings of the truck are well beyond the actual weight of the trailer is essential.
For reference, a ton is 2,000 lbs. The truck naming convention comes from the original payloads these trucks could carry when they were first introduced decades ago. Back in those days, a half-ton truck could carry 1,000 lbs. (half a ton) in the bed of the truck. A three-quarter ton could carry 1,500 lbs and a big one ton truck could carry 2,000 lbs.
In 1918 Chevy had a very cute half-ton pickup that was basically a car with sturdy rear springs. By the mid-1930’s pickups came with factory installed box style beds, and a 1937 Chevy half-ton truck went on a 10,245 mile drive around the US with a 1,060 lb. load in the bed. It got 20.74 miles to the gallon!
As the payload capacities increased, the manufacturers assigned model numbers that corresponded to the weights the trucks could carry. But technology advances never quit!
Our 2016 Ram 3500 dually can tow this trailer with one hand tied behind its back.
Since those early times, truck and engine designs have improved dramatically, and the payloads modern trucks can carry now is significantly higher. For instance, the payload of a 2016 Toyota Tundra, a half-ton truck, is 1,430 to 2,060 lbs., depending on the options, making it essentially a “one ton” truck. The payload of a 2016 Dodge Ram diesel can be as high as 6,170 lbs. (and even higher for the gas HEMI version), making the 3500 model more of a “three ton” truck than a one ton.
In the modern trucks, the major difference between a three quarter ton 250/2500 truck and a one ton 350/3500 truck is the beefiness in the rear end suspension for supporting a heavy payload, that is, the number of leaf springs on the rear axle. In our opinion, if you are going to spend the money to buy a three quarter ton truck for towing purposes, you might as well spend the tiny incremental extra few bucks to buy a one ton.
Pickups come with more than one bed size. A “short bed” truck has a box that is a little over 6′ long and a “long bed” truck has a box that is around 8′ long. When a fifth wheel hitch is installed in the bed of a pickup, it is placed so the king pin of the fifth wheel will be over the rear axle. In a short bed truck this leaves less distance between the hitch and the back of the pickup cab than in a long bed truck.
The advantage of a short bed truck is that the two axles are closer together, so the truck can make tighter turns. This is really handy in parking lots and when making u-turns. The truck also takes up less space when it’s parked, again, a big advantage in parking lots.
A long bed truck is less maneuverable when it’s not towing but is preferable for towing a fifth wheel trailer
However, when towing a fifth wheel trailer, there is a risk that the front of the fifth wheel cap will hit the back of the pickup cab when making a tight turn. For this reason, there are special sliding fifth wheel hitches, and some 5th wheel manufacturers make the fifth wheel cap very pointy and even concave on the sides so there’s room enough to ensure the pickup cab doesn’t touch the fifth wheel cap on tight turns.
The advantage of a long bed truck is that not only can it carry more and bigger things in the bed of the truck, but when it is hitched to a fifth wheel trailer, doing a tight turn will not risk the front of the fifth wheel hitting the back of the truck cab.
Also, you can open and close the tailgate when the fifth wheel trailer is hitched up. We can actually walk from one side of our trailer to the other through the gap that’s between the open tailgate and the front of the trailer, even when the truck is cocked in a tight turn.
With a long bed, the truck can be at a sharp angle to the trailer and still have the tailgate open.
For folks that use their pickup primarily in non-towing situations and take their fiver out for just a few weekends a year (and stay close to home), a short bed truck is fine. However, in our opinion, if you are going to tow a large fifth wheel frequently, and especially if you are a seasonal or full-time RVer traveling longer distances, a long bed truck is the way to go.
We bought a long bed as our first diesel truck for our little travel trailer, knowing we might eventually get a fifth wheel, even though it takes much more real estate to back a travel trailer into a parking spot with a long bed truck that it does with a short bed truck (because the pivot point on a travel trailer is behind the bumper rather than over the truck axle, forcing the front end to swing exceedingly wide to make a turn).
When we use our truck as a daily driver, even though we always have to park away from the crowd and walk a little further, and we sometimes struggle making u-turns and maneuvering in tight spaces (it takes nearly four lanes to do a U-turn in a long bed pickup without the trailer attached), we have never once regretted having a long bed truck.
SINGLE REAR WHEEL vs. DUAL REAR WHEEL (DUALLY)
In the one ton class of trucks (Ford 350, Chevy/Dodge 3500), there is an additional consideration: single wheels on the rear axle of the truck (“single rear wheel”) or two pairs (“dual rear wheel” or “dually”).
The advantages of a single rear wheel truck are:
Only 4 tires to maintain instead of 6
Changing a flat will never involve accessing an inner tire under the truck
No wide rear fender to worry about at toll booths and drive-through bank windows and fast food windows
Easy to jump in and out of the bed of the truck from the side using the rear wheel as a foothold
Can handle rough two track roads better because the rear wheels fit neatly into the ruts
Gets traction on slick ice, snow and muddy roads better than a dually
The advantages of a dual rear wheel truck (“dually”) are:
Wider stance supporting the weight of the king pin (or bumper hitch)
Can carry a heavier payload — heavier trailer pin weight and/or bigger slide-in truck camper
Much safer if there’s a blowout on one of the rear wheels, and you can still drive (for a while)
A dually has a wider stance, providing more stability, and it can handle much more weight in the bed of the truck.
Why do you need to get in and out of the truck bed from the side? Climbing in on the tailgate is great, and there is a very handy foothold at the license plate mount on the 2016 model that is low enough for a short person to reach easily. However, when the truck is hitched to the fifth wheel, it’s not possible to climb in from the tailgate, and sometimes we need to get into the bed of the truck when the fiver is attached!
For instance, we keep 22 gallons of spare water in the bed of the truck in 5.5-gallon jerry jugs. I’m the one who holds the hose in the jugs while Mark goes to the other end of the hose and turns the water on or off at the spigot. We could switch roles, but I like that job!
When we’re hitched up, I have to get into the bed of the truck from the side to get to the water jugs. I plant one foot on the rear tire, and I hoist myself up and over the side. Getting over that fat fender is not so easy with the dually!
When hitching/unhitching, Mark also reaches over the side of the truck to loop the emergency break-away brake cable from the trailer onto the hitch in the truck bed. That way, if the trailer comes unhitched as we’re driving, the quick yank on the small cable (as the trailer breaks free) will engage the trailer’s own brakes as we wave it goodbye behind us.
Obviously, for both of these maneuvers, the width of the dually fender makes reaching into the bed of the truck a whole lot harder. Doing these things on a single rear wheel truck is trifling by comparison!
RESEARCHING SINGLE REAR WHEEL vs DUALLY TRUCKS
Our biggest debate was whether or not we should simply buy a new single rear wheel truck that had the latest engine and drive-train and chassis improvements or if we should take the plunge and get a dually. We do occasional research online, but our preferred method of learning about things in the RV world is to talk to experienced people in person, especially since we are out and about all day long and we enjoy meeting new people.
So, we interviewed every single dually truck owner that we ever saw. For two years! Whenever we saw a dually parked somewhere, we’d look around to see if the owner was anywhere nearby. If so, we’d walk up and ask him about his truck.
Did he like it? What did he tow with it? How long had he had it? Was it his first dually? Did he have trouble maneuvering in tight quarters? Had he towed that same trailer with a single rear wheel truck? How did they compare?
We asked lots of people how their dually performed compared to a one ton single rear wheel long bed truck towing the same heavy trailer.
To our astonishment, although we searched for two years for a person who had towed the same large fifth wheel trailer with both a dually and a single rear wheel truck, and we talked to dozens of dually truck owners who had towed all kinds of trailers, we found only one who had towed the same fifth wheel trailer with both styles of truck.
This guy was a rancher with several big cattle and horse trailers as well as a 40′ toy hauler fifth wheel. He’d been towing comparable trailers with single rear wheel long bed trucks for over twenty years. Three years ago he’d switched to a dually, and he said the difference for his toy hauler was night and day. He’d never go back.
Another fellow told us the ranch he worked on had both single rear wheel and dually trucks and that the duallies were used exclusively for the big trailers because they were better tow vehicles.
We LOVED the new, sleek styling on the Ram duallies.Our biggest questions: is the wide dually fender flare a pain? How does it do at toll booths and drive-through windows?
This was very convincing, but an interesting side tid-bit we learned is that many folks go either dually or single rear wheel when they buy their first diesel truck for a big trailer, and they stick with that type of truck when they replace it. Guys love their trucks, so we heard few complaints, but when folks raved about how their single rear wheel or dually was the ultimate towing machine and that they’d never switch, when pressed for details, we found they didn’t have first-hand experience using the two different types of trucks to tow the same large trailer.
For those looking to conduct their own research, in addition to talking with ranchers and horse owners, one of the best sources of information we found was the trailer transport drivers who drive their own personal trucks to tow both large RV and horse trailers from the manufacturers to the dealerships where they are sold..
Our questions would have all been answered in a heartbeat if we could have hitched our trailer onto a dually sitting in a truck dealership lot and towed it up a mountain and on a few back roads. However, that wasn’t possible.
Perhaps in the future, because of the fantastic new hitch puck systems that can be factory installed in pickups these days, dealerships will decide to keep one of the nifty B&W OEM fifth wheel hitches on hand for prospective customers to do just that (if they can sort out the liability and insurance issues).
Ultimately, we held out on the dually versus single rear wheel decision until the very end, but we knew inside that if we did buy a new truck it would probably be a dually. So every test drive we did was with a dually truck.
We took all three brands of pickups out on over 200 miles of test drives at 25 or so dealerships.
Going for test drives is lots of fun and is the best way to learn the product
Dealing with Slick Salesmen
A reader wrote me recently to say he was intimidated by the sales tactics at car dealerships, so he was reluctant to do many test drives or much dealership research. That is a real shame, because the only way to learn about trucks is to spend time with them, test drive them, sit in them, crawl underneath, study what’s under the hood, read the marketing literature, and hound the salesmen with questions.
After all, the salesmen are there to teach you what you need to know about the product, and if they don’t sell you a truck today, they are helping another salesman (or themselves) sell you a truck tomorrow. What goes around comes around, and any good salesman understands that. You can easily deflect the high pressure sales tactics by saying, “We are starting our search and just want to do a test drive today. We won’t be ready to buy for a few months.”
Where to Do a Test Drive? Where to Buy?
The best places to find knowledgeable diesel truck salesmen and buy big diesel trucks, especially duallies, is in cattle ranching country. As we scoured dealerships from San Diego to Maine and from Sarasota to the Tetons, we found urban areas generally have few big trucks on the lot and the salesmen know very little about diesel trucks. Cattle ranchers, horse owners and big commercial farmers know their trucks, and so do the salesmen they work with.
The most knowledgeable truck salesmen are in places where people need and use big trucks — a lot!
Our first test drives were focused on the turning radius and maneuverability of a dually truck as compared to the single rear wheel truck we knew so well. It was hard to tell, but the turning radius seemed to be the same or better (and we now feel the 2016 Ram dually definitely turns tighter) than our old 2007 single rear wheel Ram.
As for general maneuverability, Mark didn’t notice a whole lot of difference driving a dually versus our single wheel truck. Frankly, owning a long bed diesel truck period means you have to park in the back 40 and walk long distances anyway, so we soon realized that dealing with a dually in parking lots would be no different.
We did one round of comparative test drives on the uphill entrance ramp to an interstate in Baker City, Oregon. We visited each truck dealership in town, and when we did our test drives, we floored each dually truck on the incline to see how powerful it felt. The 2015 Chevy won by a long shot, against the Ford and Dodge 2015 models, but did not feel as powerful as our single rear wheel ’07 Dodge Ram (at that point our truck had the K&N Cold Air Intake and Timbrens but did not have the Edge Evolution Diesel tuner).
Our trailer snuggles up to its new companion, a 2016 Ram 3500 dually
Deciding Factor – The Cummins Engine
In the end, the deciding factor for us for choosing a brand was the Cummins engine. This was true when we were researching our ’07 single rear wheel truck and again when researching the 2013-2016 duallies. Lots of people wish they could buy a pickup with both the Cummins engine and an Allison transmission in one brand of truck, a combo that is on many commercial trucks. But that’s not possible.
For us, the simplicity of the inline 6 cylinder Cummins engine (as compared to the more complex V8 engines in the Chevy and Ford) along with the longer stroke (inherently higher torque) makes a lot of sense. Inline engines are used commercially in big rigs and tractors, and the 6.7 liter Cummins engine has a long and solid track record, not just in Ram trucks but in many commercial applications as well. The Cummins quality control and manufacturing seem to be top notch.
Here is a fantastic video showing a Cummins engine being built:
Amazingly, with each passing year, the payload and towing capacity of each brand of truck jumps higher. From the time we started test driving duallies in 2013 until we placed our order for our new 2016 Ram 3500, the horsepower and torque across all three brands increased, and the towing and payload capacities climbed too.
Built with the right options, the 2016 Ram 3500 diesel truck has an eye-popping, 385 horsepower and 900 ft-lbs. of torque with a GCWR of 39,100 lbs. It can tow a trailer weighing 31,210 lbs. and has a max payload of 6,720 lbs.
This is absolutely astonishing, and neither the Chevy nor the Ford trucks match that torque right now.
Accurate comparisons between brands are challenging within the same model classes, however, because there are different standards for making measurements. Ram Trucks uses the SAE J2807 standards, while other manufacturers don’t. Also, we were able to locate Ford’s towing and payload capacity charts online (see the links at the bottom of the page), but did not locate a similar chart for GM.
Some of the head-to-head tests between the brands that are posted online are also a little misleading, because, for instance, a Ram 3500 is pitted against a Ford F450. Even though both of those models are Class 3 trucks (10,001 to 14,000 lbs GVWR), one would expect the Ram 3500 to compete head to head with the Ford F350, not the Ford F450.
Best in Show
Here are the towing and payload capacities of the many models of Dodge Ram trucks:
As mentioned above, the Ram trucks are sold with two options for the transmission. After our troubles with the old 68RFE automatic transmission in our ’07 Dodge Ram 3500, we wanted the new and better one, the AISIN AS69RC automatic transmission. In the Ram Trucks marketing literature, the 6.7 liter Cummins engine is paired with the AISIN AS69RC transmission to make their “High Output Engine” because it delivers max torque at the low end for heavy towing situations. This combo became available in 2013.
“High Output” engines on Ram Trucks pair the Cummins 6.7 liter engine with the Aisin AS69RC transmission
The rear axle gearing on a pickup determines the GCWR for the truck (the maximum safe weight of truck and trailer hitched together and fully loaded) and the maximum weight trailer that the truck can tow safely. It also makes a huge difference in how the truck drives, both while towing and not towing.
Rear axle gear ratios are given as a ratio, for example “4.10” which means 4.10:1 or “3.73” which means 3.73:1. The ratio refers to the number of teeth on the axle ring gear as compared to the number of teeth on the driveshaft’s pinion gear. With a 4.10 rear end, the driveshaft has to turn 4.1 times in order to rotate the rear wheels one revolution. With a 3.73 rear end, the driveshaft must turn 3.73 times to rotate the rear wheels one revolution. So, with a 4.10 rear axle ratio the driveshaft’s pinion gear is spinning more quickly at a given speed than with a 3.73 rear axle ratio.
“Easier” Gears vs. “Harder” Gears
If you think of riding a bike, when you have the bike in a “hard” gear, it takes a lot of leg strength to turn the wheels, but one pedal stroke will cover a lot of distance. For example, going uphill in a “hard” gear would be especially hard. Your legs are turning really slowly and straining and you’re wishing you could put it in an “easier” gear! But when you descend in that same gear, you can hit high speeds easily. Back to trucks, this is like having the driveshaft turn a little to make the wheels turn a lot as it does with the 3.42 or 3.73 rear axle gear ratios found on Dodge Rams.
However, when the bike is in an “easy” gear, just a small amount of leg strength will turn the wheels, but one pedal stroke doesn’t get you very far. For example, going uphill isn’t so bad — you can inch up slowly — but once you began descending you’re spun out because your legs can’t pedal fast enough to hit super fast top speeds. In the truck world, this is like having the driveshaft turn a lot to make the wheels turn a little as it does with the 4.10 rear axle gear ratio.
Wide Load!! The highest tow ratings are achieved with a high rear axle gear ratio (like 4.10)
Towing Heavy Loads vs. Driving Fast on the Highway
So, on a truck, the higher ratio (4.10) is ideal for towing heavy loads. It takes more turns of the driveshaft to rotate the rear wheels of the truck, so the engine revs higher, putting it in the power band for RPMs, and the heavy load gets moved. But the top end speed and fuel economy get sacrificed a bit.
With a lower gear ratio (3.73 or 3.42) it takes fewer turns of the driveshaft to rotate the rear wheels of the truck. When the truck is zipping along at highway speeds, the gears are turning a little more slowly (lower RPMs) than they would with a 4.10 rear end, which saves on fuel efficiency and makes the fastest attainable speed a little higher.
The highest tow ratings are achieved with a 4.10 rear end, so the heaviest trailers will be best if towed by a truck with a 4.10 rear axle gear ratio. However, if most of your towing is with lighter weight trailers, and your driving will be primarily on interstates, and your personal preference is to drive fast, a 3.73 or 3.42 rear axle gear ratio may make more sense.
Our ’07 Dodge had a 3.73 rear end. The problem was that at the speeds we tended to drive — 55-65 — the engine would lug. Mark manually changed gears a lot to try to keep the RPMs up, but he found it fatiguing to have to monitor the gears so closely and to change gears all the time.
We also don’t drive on interstates very often, and when we do, we’re the grannies of the road, moseying along in the right lane.
We take life, and the open road, fairly slowly, so a 3.73 rear end, which is awesome a 75 mph, was not the right choice for us.
4.10 vs. 3.73 – RPMs at Different Speeds
We wanted a 4.10 rear end on our new truck, but we wanted to be 100% sure this would truly make the kind of difference we expected. So, on one Ram dually test drive we drove a stretch of highway in our ’07 Dodge at various speeds between 45 and 65 mph, noting the RPMs in a notebook, and then we took a 2015 Ram 3500 dually with a 4.10 rear end out on the same road at the same speeds. The salesman raised an eyebrow in surprise when we marched into the dealership and announced we wanted to do a test drive at various speeds to note the engine RPMs, but he went along with the idea!
On that test drive we found the 4.10 rear end shifts out of lower gears sooner than the 3.73 rear end, and generally keeps the engine RPMs about 100-200 RPMs higher at each speed. Our new truck bears out those findings.
So, how can you tell if a truck on the dealer lot has a 4.10 rear end without peering at the window sticker? Check underneath the back end of the truck. The differential is the big round casing that hangs between the rear wheels. On trucks with a 4.10 rear end, the differential has a series of vertical cooling fins on it. These help keep it cool since the gears spin faster and it is designed for heavier towing loads, both of which make it heat up.
Looking under the rear end of the truck, the differential has cooling fins if the rear axle ratio is a 4.10
BEEFED UP FRAME
Besides the more powerful engine tuning and transmission, Ram has improved the truck frame on the dually considerable. Every aspect of the frame is more sturdy than it used to be, making the truck not only powerful enough to pull heavier loads but strong enough to withstand the multitude of forces as it hauls the load up a mountain.
Peering under the front end of the truck, the frame has been strengthened for heavy towing
We learned with our ’04 Toyota Tundra truck towing our 7,000 lb. 27′ travel trailer that four wheel drive is a necessity for us in our RV lifestyle. In our first weeks of full-timing, a small, wet grassy incline prohibited us from camping in a campground in Texas, because our truck kept slipping and couldn’t tow the trailer up over the short rise! From that moment on, we’ve felt that a four wheel drive is mandatory if you are going to tow a big trailer.
Also, while descending a really gnarly, skinny, twisty, single lane road on a mountain in Utah, with grades of 10% or more in places, we discovered that the safest way to drive DOWN a very steep descent is to put the truck in four wheel drive LOW gear, and creep down the mountain at 5-10 mph using the exhaust brake. This tactic was a lifesaver for us on that mountain with our ’07 Dodge truck and fifth wheel trailer. Without it, we would still be living at the summit of that mountain!
The new Dodge Ram and Ford Super Duty trucks have a really fantastic option for a factory installed puck system in the bed of the truck where you can mount either a fifth wheel or gooseneck hitch. During our truck search, GM did not have that option on their trucks. However, GM trucks now have the puck system as well.
B&W Trailer Hitches makes a fifth wheel hitch specifically for each truck brand’s puck system. We installed one and you can read about it at this link: B&W OEM Companion Fifth Wheel Hitch DIY Installation. The three hitches are shown below, Ram, Ford & GM:
This option has five holes in the bed of the pickup, one in the center for a gooseneck hitch and four outer ones to hold a fifth wheel hitch. The idea behind this mounting system is that rather than drilling holes in your brand new truck bed to install hitch rails to support a fifth wheel hitch — the method that was always used until this new system was devised — you can buy a hitch designed for these puck mounts and simply drop it in.
Looking towards the tailgate, there’s a gooseneck puck in the middle and four pucks in a square to mount a fifth wheel hitch. The bed is totally flat without the hitch in it.
If you want to use the bed of your truck for hauling, and you won’t be towing your fifth wheel, you can easily remove the fifth wheel hitch temporarily and have the entire bed of the truck available to you. Not only is it a snap to remove the hitch, but the bed of the truck will be flat and obstacle free because there won’t be any hitch rails installed in it.
The B&W Companion Fifth Wheel Hitch is easily installed and removed (facing the front of the truck)
Another huge benefit is that installing the hitch is an easy do-it-yourself job. We have a detailed pictorial step-by-step guide showing how to install a B&W Companion OEM Fifth Wheel Hitch here (it took just one hour from start to finish!):
Our 2007 Dodge Ram came with an exhaust brake built into the turbo. Mark LOVED this brake and used it all the time, both towing and not towing. The only thing that bugged him about it was that coming down mountains with our trailer hitched on, he often had to shift gears manually and feather the gas pedal to keep the truck going the speed he wanted.
The 2016 Ram trucks have an improved exhaust brake that has two modes: max braking power and constant speed braking. We definitely wanted that option!
BACKUP CAMERAS
Dodge Ram trucks have two backup cameras, one that aims at the bed of the truck (for hitching and unhitching) and one that aims behind the truck (for backing up). Beginning in 2016, both of these cameras could be set to display their image on the main touch screen display (in the 2015 model, one camera would display in the rear view mirror while the other would display on the touch screen display).
It’s nice to have a backup camera when backing the truck in next to the trailer!
AUTO-LEVEL SUSPENSION
An option on the 2016 Ram trucks is to have four leaf springs with computer controlled air bags to provide for auto-leveling of the rear suspension. This is instead of the standard six leaf springs without air bags that have a fixed height suspension.
Without the air bags — the standard configuration — the “rake” of the truck’s rear end is four inches, meaning that the rear end of the truck is raised four inches higher than the front to compensate for the weight of the trailer which will push it down when it’s hitched up. For a shorter person, this is quite high, and I was astonished how much higher the tailgate of a 2016 Ram truck sits than our old ’07 truck did.
With the air bags, the rear end is raked only one inch, making the whole back end of the truck much easier to access for those of us who aren’t that tall. In addition, there is an “Alt Ride Height” button that can be used to lower the back of the truck one more inch. Hurray for short people!
When the trailer is hitched onto the truck, pushing the truck down, the on-board compressor kicks on and pumps air into the air bags, raising the back end of the truck until it achieves its normal one inch rake. If you prefer to drive with the truck level, the “Alt Ride Height” button can be pressed to lower the back end one inch.
When we did our test drives, we found that the duallies with the auto-level suspension had a slightly smoother ride when not towing than the ordinary leaf spring only models did. This has proven true with our new truck too.
VENTED and HEATED LEATHER SEATS and STEERING WHEEL plus OTHER GOODIES
As we test drove different trim levels of trucks, we decided that if we were going to buy a new truck, we’d go all out and get the many little conveniences and options that are a “splurge” but that make using the truck a pleasure.
Let’s go for a ride!
Heated and vented leather seats with power seat adjustments and lumbar support, a side step to make it easier to get in and out of the truck, independent climate control for driver and passenger, a CD player, OWL on/off-rad tires, the fancy electronics console with the big touch screen display and GPS nav system and power adjustable pedals were all on our list.
Most of these options are bundled into the Laramie model of the Ram 3500 trucks.
The Laramie comes with a beautiful interior that includes all the fancy stuff.
Top level Nav/GPS Display with voice activation and climate control
Tan colored Heated/Vented Leather Seats and Steering Wheel
The Tow and Payload Ratings for the 2016 Ram 3500 dually with the above options as compared to our 2007 Dodge Ram 3500 single rear wheel are the following:
Rating
2016 Dually
2007 SRW
Trailer
UVW
8,319
7,147
GVWR
14,000
10,100
GCWR
39,100
21,000 lbs.
Payload
5,565
2,953
2,850
Max Trailer Weight
30,200
13,700
14,100
Even though the make and model of these two trucks is the same, separated by just nine years, these numbers show that they are two radically different trucks!
After doing so many test drives, studying all the material and thinking about this truck for two years, there was no way we would give up any of the options we wanted, especially the ones that made the tow ratings and payload rating so high. But we never found a dealership that ordered this exact truck for their lot. Time and again, Mark would find a truck that was close, but there would be some things missing and other things we didn’t want.
So we decided to order the exact truck we wanted and wait 8 weeks for it to be built.
We had a ball ordering this truck through Airpark Dodge in Scottsdale, Arizona, where a marketing connection with Alice Cooper made one of Mark’s lifelong dreams come true. See our really fun blog post:
A significant difference between our 2007 Dodge Ram truck and our new 2016 Ram dually is that the new truck requires occasional refilling of the DEF (Diesel Exhaust Fluide) tank. Here are some tips we’ve discovered about DEF since we purchased our new truck:
Dodge Ram Truck Owners — Please note:
Late model Dodge Ram 1500, 2500 and 3500 trucks have been recalled (beginning 6/23/17) for side airbag problems in a rollover accident. See this article for details: Dodge Ram Side Airbag Recall
More info about Pickup Trucks, Ram Trucks, Tow Ratings, etc.:
2016 Ram Trucks Towing Guide – Ours is on p. 5, 2nd section, last line. Search for: “CREW CAB LONG BOX, 4X4, DRW”
Current Ram Trucks Model Specific Weight Ratings – Choose Heavy Duty / Crew / 8′ Box / 6.7 Liter Cummins / Auto / 4×4 / Premium Axle Ratio. The truck like ours is the first Laramie in the list. If you know a VIN number, click the red button “Look Up My Vehicle” to get the specs for that truck.
Note (July 2018): Folks have asked us if we like our truck now that we’ve driven it for two and a half years. We LOVE our truck. It now has about 40,000 miles on it, about half of that towing, and we couldn’t be happier with it.
Below are some of our most POPULAR POSTS(also in the MENUS above)
More of our Latest Posts are in the MENU.
New to this site?
Visit RVers Start Here to find where we keep all the good stuff. Also check out our COOL NEW GEAR STORE!!*** CLICK HERE *** to see it!