
Our RV awning is 11 years old now, and the canvas fabric recently tore at the top and bottom. RV awnings are a pain in every respect (except for the wonderful shade they offer), and we knew we were in for a challenging DIY repair if we tried to do it ourselves.
Fixing an RV awning is a job for at least two people, preferably three or four for certain parts of the job, and it’s easiest if someone in the group has done it before because it can be a little tricky.

Oh no! Time for new RV awning fabric!
We were traveling through Rapid City, South Dakota, and recent hail storms had made a mess of many RVs and RV dealerships all around the area. Only one of the local RV dealerships and repair shops could get us in within the week, so we were thrilled when we backed into a bay at Jack’s Campers.
Fortunately, they had the fabric for a 17′ Dometic Sunchaser awning in stock, an old manual model that is not installed on new RVs any more. Luckily, there must be enough oldies-but-goodies on the road these days that Jack’s Campers stocks them.

We got into position at Jack’s Campers in Rapid City, South Dakota.
We called our RV Extended Warranty folks, Wholesale Warranties, to find out if this awning failure would qualify for reimbursement under our warranty plan.
We have had so much good luck with our extended warranty on major repairs like our refrigerator, trailer axle, suspension, toilet and window leaks and plumbing, that we were hopeful this repair would be covered too. However, only the mechanical aspects of the awning were covered, not the fabric.
In the end, the whole RV awning repair job ended up costing $444 out of pocket, most of that being for the new fabric, and it took the guys at Jack’s Campers just 45 minutes to do it.
The first step was to remove the awning arms and roller from the sidewall of our fifth wheel. They unrolled the fabric about a foot and unscrewed the mounting brackets that attached the awning arms to the side of the trailer.

First, remove the awning arms from the sidewalls of the trailer.
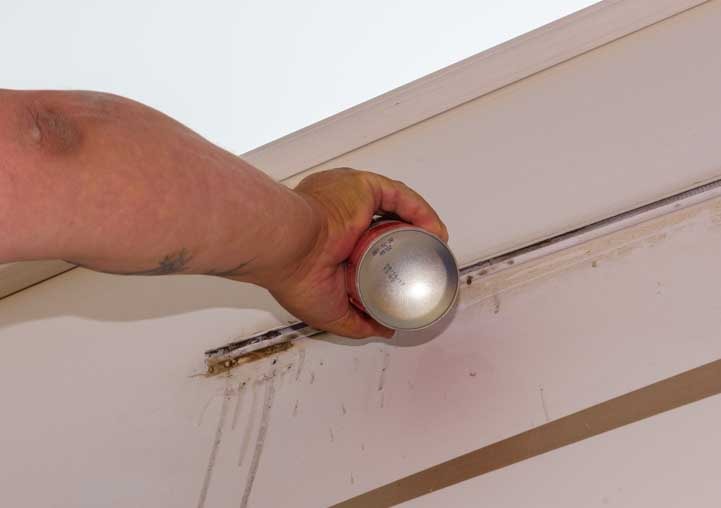
There was putty in the awning fabric track where the mounting bracket had been, so this had to be removed with a flathead screwdriver.

There was some putty in the awning track, so it was removed with a flathead screwdriver.
Next, two guys slid the awning fabric off of the awning track on the RV wall and marched the whole thing into the workshop and rested it on some saw horses.

Two mechanics walked the awning out of the track on the trailer.

Once in the shop the awning was laid across some saw horses.
Manually operated RV awnings have a spring inside the roller mechanism (a “torsion assembly“) for rolling up the fabric. At one end of the roller there is a locking mechanism to keep the spring inside the roller tight so the fabric doesn’t unroll. This locking mechanism became important when the new fabric was installed to get the spring tensioned correctly inside the roller.

The right arm of the awning has a locking mechanism which keeps the fabric from rolling off the roller.
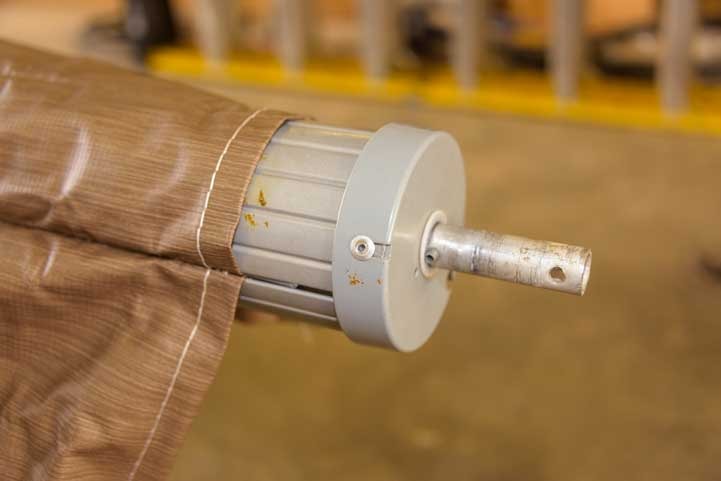
At the opposite end of the roller there was no locking mechanism. The bolt holding the awning arm to the roller at the non-locking end was removed and the arm was pulled off. The arm at the locking end of the roller remained attached throughout the job.

Remove the awning arm from the non-locking end of the roller.

Awning arm removed.
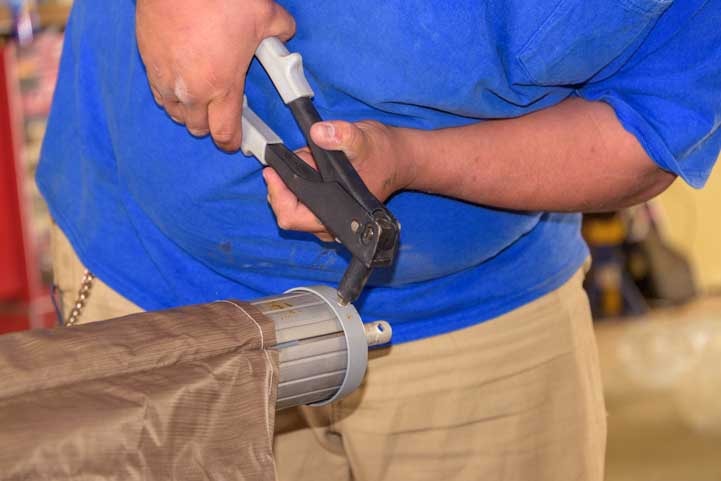
Then the rivets on the endcap were drilled out and the torsion assembly was pulled out.
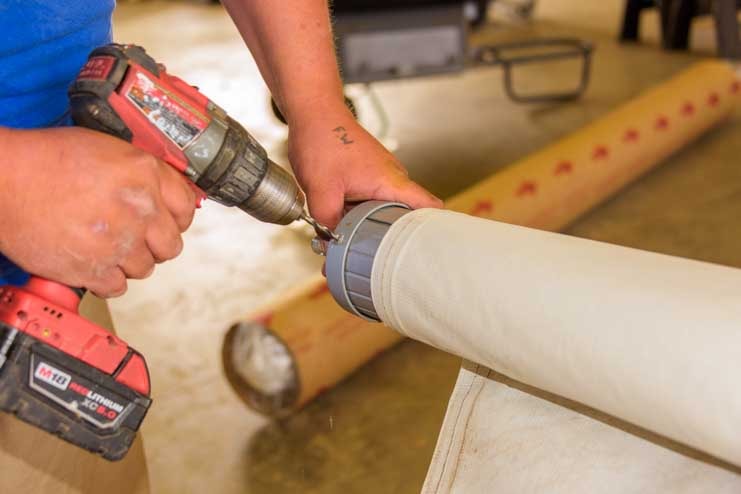
Drill out the rivets on the endcap.

The endcap and spring (torsion assembly) are removed from the roller.
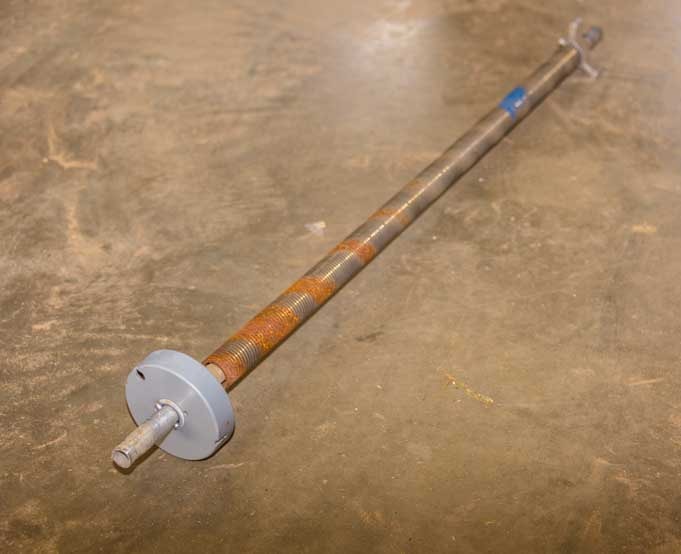
The torsion assembly is out of the roller.
Spraying it with silicone spray will help the awning roll more easily.
Then the awning fabric was slid off of the roller.
Two mechanics slid the old awning fabric out of the track.
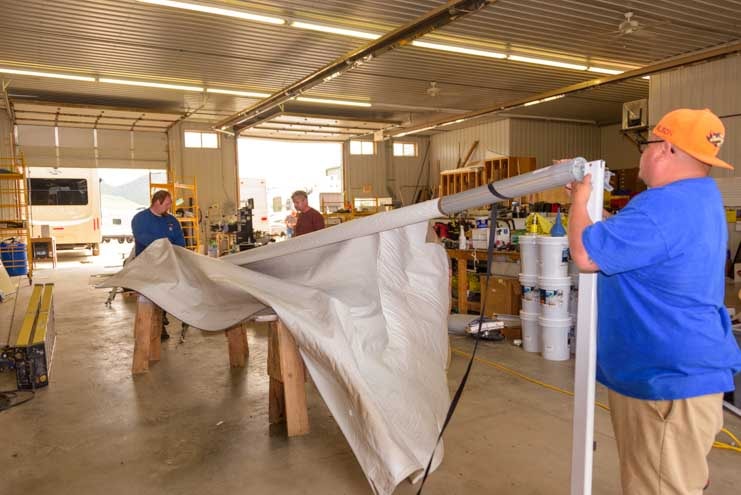
The new fabric was unfolded and laid out in the workshop, and then it was slid into the track on the roller until the fabric stretched the whole length of the roller.

The new awning fabric was unfolded and laid out.
The new awning fabric will be slid into the track on the roller.

The new awning fabric was started in the track on the roller.
Spraying the track with a heavy duty silicone spray helped the fabric slide along the track smoothly.

Spraying the track with silicone helps the fabric slide more smoothly.

Two mechanics slid the new awning fabric along the roller track.
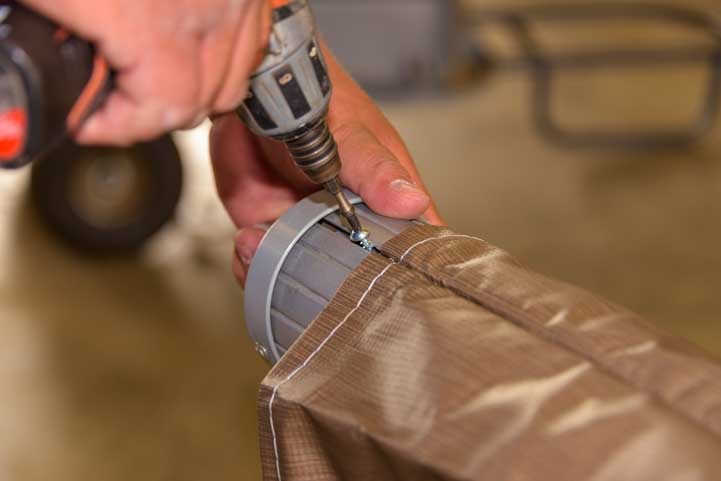
Then the torsion assembly was placed inside the roller and new endcap rivets were installed.

The endcap and spring were reinserted inside the roller.

torsion assembly in place.
Put new rivets on the endcap.
New rivet in place.
The fabric was positioned so it went all the way to the locking end of the awning. At the opposite end a set screw was screwed in to prevent the fabric from sliding off the track.

Make sure the awning fabric has been slid all the way to the locking end of the roller.
Put a set screw at the non-locking end of the fabric so it doesn’t slide off the track.
The new fabric was laid out so it could be rolled onto the roller. Then a vice grip was used to turn the spring between 15 and 18 times to get the right spring tension.
New awning fabric is in place.

Use vice grips to rotate the spring 15 to 18 times to ge the right spring tension.
Then the awning arm was reattached to the roller with a bolt.

Bolt on the awning arm.

Awning arm (non-locking end) is reattached.
Back at the trailer, the awning track was sprayed with heavy duty silicone.
Out at the trailer spray the awning track with silicone.
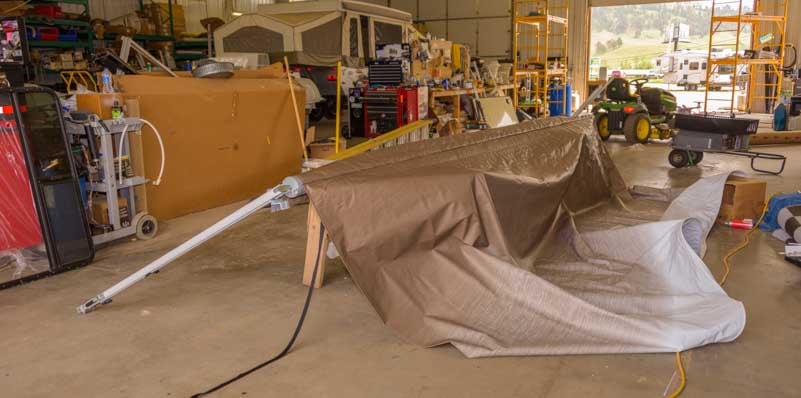
Then the new awning fabric was loosely wrapped around the roller and the whole thing was marched outside to the trailer.

Four guys assisted in wrapping the new awning fabric around the roller a few times.

The awning is taken out to the trailer.
Our little project supervisor, Buddy, had been watching all the goings on through open big shop door from a safe distance out by the trailer. When the awning and its new fabric were brought out to the trailer, he backed up as far as he could into the parking lot to give the guys room to work!

Stand back!
Using ladders and reaching overhead, four guys maneuvered the awning fabric into the track on the trailer and slid it all the way to the front end of the track. This is where having lots of hands can help.

The awning fabric is slid along the track on the side of the trailer.
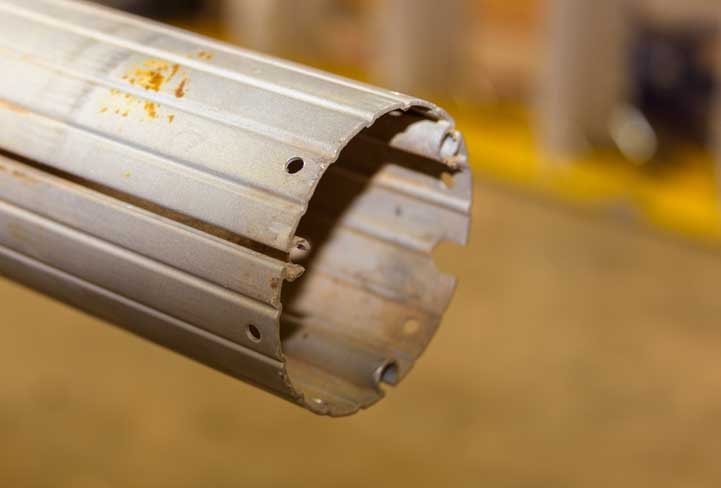
After installing the awning on the trailer, the mechanics noticed that the two feet that held the bottoms of the two awning arms had each developed hairline cracks. So, they replaced each foot.
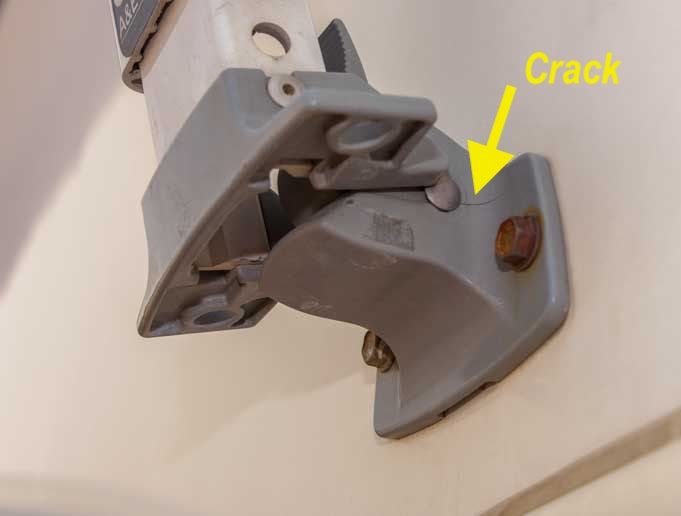
The feet of both awning arms had developed small cracks, so they were replaced.
The last step was to test the awning by rolling it all the way out and then all the way in again.

Test the awning to make sure it rolls all the way out and all the way in again.

Done!
Ta Da!! A job well done. The whole project took 45 minutes from start to finish.
Now that we’ve seen how a manual RV awning gets installed, Mark is confident he could do it without going to an RV repair shop as long as he had some extra hands for sliding the awning fabric on/off the trailer awning track and on/off the roller track.
Side note: If you have a manual awning, it is really important that you use some kind of velcro straps or bungee cords wrapped around the awning arms as extra security to keep the awning from accidentally opening while you are traveling.
Our photo above doesn’t show them, but we have used these awning straps ever since we bought the trailer.

Subscribe
Never miss a post — it’s free!
More cool articles about RVs and RVing:
- RV Tech Articles – An index of all our technical articles (upgrades/mods)
- RV Lifestyle Articles – An index of all our RV lifestyle articles (RV lifestyle costs, repairs & breakdowns, “living the dream” and more)
Below are some of our most POPULAR POSTS (also in the MENUS above)
Buddy - A Journey in Spirit - The story of an event that changed our lives forever. ARTICLE INDEXES- RV Tech Tips Articles - A one page index of links to all our RV Tech Tips, RV Upgrades & RV Maintenance articles.
- RV Lifestyle Tip Articles - An index of links to all our RV Lifestyle Tips (finances, boondocking, major repairs, work/jobs, etc.)
- Solar Power Articles - Overview and tutorial articles for how to design and install solar power on an RV or boat
- Product Reviews - An index of links to all of our Product Reviews
- Basic RV Tool Kit - What tools do RVers need? Here's a list of essentials, from tire changing to electricity, plumbing & more
- RVing Tips & Tricks - Tips and tricks to make RVing easy
- Reese Goose Box - Reclaim your TRUCK BED with air ride smooth towing + How to hitch and unhitch!
- RV Heater Installation - Step-by-step guide for how to select and install a vent-free propane heater
- CargoBuckle Ratchet Straps - These retractable straps make it a CINCH to tie down a side-by-side, motorcycle or ATV
- How to change a dually truck's inner rear tire - Tips for changing the inner rear tire on a dually truck.
- EASY SOLAR POWER UPGRADE - We TRIPLED our factory installed solar power output for CHEAP
- B&W Fifth Wheel Hitch - Why we chose this hitch for our fiver plus an easy 5th Wheel Hitch Installation Guide.
- Demco 21k Recon Fifth Wheel Hitch - This fifth wheel hitch mounts on a gooseneck ball in the truck bed!
- Increase Your RV Storage Space - Add precious storage space at the RV dinette with storage benches!
- Buying a Truck - Which options turn an ordinary diesel pickup into a massive TOWING MACHINE?
- Battery Charging Primer - The low-down on RV and marine batteries and how to charge them effectively.
- Which Solar Panels are Best? - Which is better: FLEXIBLE or RIGID?? 12 or 24 volt?? monocrystalline or polycrystalline???
- RV Solar Power Made Simple - An overview of how solar power works on an RV
- Trailer Disc Brake Conversion - Massively improve trailer stopping power with electric over hydraulic disc brakes
- Truck Engine Upgrade - How we improved performance, towing power and fuel economy with an engine tuner
- How to Defrost an RV Refrigerator in 20 Minutes - It is actually a cinch to defrost an RV fridge!
- Solar Charge Controllers - Understand and OPTIMIZE your RV / marine battery solar charging
- Wet Cell vs. AGM Batteries - Which is better, why we upgraded, PLUS wiring tips to optimize battery life
- Suspension Overhaul on a 5th Wheel - A Total Re-design for our Suspension: Hangers, springs, shocks & more!
- Can you run SOLAR POWER and SHORE POWER together? - What happens when you're on solar and you plug in?
- Converters, Inverter/Chargers and Engine Alternators - How do these battery charging systems REALLY work?
- RV Budget, Costs and Expenses - A detailed analysis of RVing expenses over 7 years of RVing full-time
- RV Extended Warranties - Is an RV warranty a good investment or a waste of money? Our personal case history.
- Working and Living on the Road - How do you make money on the road and who lives this nomadic lifestyle?
- Sell or Lease the House? - Is it better to SELL or LEASE your house when you start a life on the road?
- Mexican Dentists - Are the Dentists in Mexico any good? Just how cheap are they? Here are our PERSONAL experiences.
- How An RV Warranty Saved Our Bacon - Literally! - One repair on our RV practically paid for our RV Extended Warranty
- Still Smiling After 3 Days at the RV Repair Shop - Why? Our RV Warranty put us $2,000 ahead of the game!
- 5th Wheel Suspension Replacement - When our trailer's suspension failed, we $aved $$$ Thousands getting it replaced.
- RV Toilet Replacement - Our RV toilet quit flushing (ugh!) but our RV warranty saved us again. Now we're $6,700 ahead!
- RV Boondocking - Tips for how to live in an RV off the grid
- Which RV Is Best for Full-Time Living? - Transitioning from a house to an RV - Which RV makes the best home?
- Truck Camper Pros and Cons - The GOOD, the BAD and the UGLY!
- Full-time RV Lifestyle Tips - Full-time RVing Logistics - Mail, Domicile, Insurance, Warranties, Saving Money at RV Parks
- Toy Hauler Life - What's it like to live in an OPEN BOX Toy Hauler?
- What are the MOST IMPORTANT FEATURES in a Full-time Fifth Wheel? - For anyone planning to live in an RV!
- Internet & Phone Access for RVers - An inexpensive, minimalist solution for internet access on the road
- RV Dump Stations & Composting Toilets - How to do the dirty deed at the RV dump PLUS RV Composting Toilet tips
- Choosing a Trailer for Full-time RVing - Why the payload capacity is so important
- Learn RVing the Fun Way!! - Go Cheap, Go Small, Go NOW and have a blast in little RV!
- Free RV Campsites - Resources for locating campsites for boondocking
- Glimpses of the Full-time RV Life - Anecdotes from the road and essays about living the RV dream.
- Travel Photography Tips! - All the cameras, gear, books, blogs and tools we used to learn to take great pics!
- Gear Store - A list of the goodies, equipment and gear we've found useful in our RV lifestyle!
Our most recent posts:
- Buckskin Mountain State Park – Fun on the Colorado River! 01/31/26
- How to Install Starlink Gen 3 in an RV? Use the Speedmount! 08/07/25
- Escape to Paradise – Rocky Mountain Magic! 08/01/25
- Is Forest River a Good RV? Well Built? Here’s Our Experience 06/20/25
- Sunset Crater Nat’l Monument – Lava & Camels at Bonito CG! 06/06/25
More of our Latest Posts are in the MENU.
New to this site?
Visit RVers Start Here to find where we keep all the good stuff. Also check out our COOL NEW GEAR STORE!! *** CLICK HERE *** to see it!
Some jobs are just best done by pros…BRAVO, Jack’s Campers !!!!!
They did a very nice job and the new awning is great!
Wow, you got 11 years out of your original awning?! That’s very good. Just curious why you didn’t opt for an electric awning this time around? We love our electric awnings on our 2017 Jayco North Point 377RLBH, yet we’re now our 3rd main awning in 2.2 years-all under Jayco’s great 2 yr warranty. Our issue is the material wrinkles severely in a short period (we’re full timers) and the LED light strip goes serpentine and the arms don’t retract flush into their tracks and get hung up on one side or the other. One rivet of two, was missing on the right side! This is Carefree’s last chance to get it right. BTW-in due time, we will get an extended warranty kind like you guys have. Keep up the great reports, I enjoy them all!
We like manual things because they are simple to operate, are less likely to break and are relatively easy to fix. The list of problems that you’ve had with electric awnings in the last 2.2 years is in many ways a list of good reasons to go with a manual awning!
Upgrading to an electric awning would have been a lot more expensive than merely replacing the fabric on our existing awning. If our rig gets another 11 years out of this new awning, then I think we’ll have made the right choice.
From what we’ve seen, many electric awnings extend horizontally from the rig, offering little shade when the sun isn’t right overhead, and they can’t be extended at an angle towards the ground. We like to aim our awning towards the ground when the hot sun hits the side of the trailer to keep the whole wall shaded. We also set it at an angle (from the front of the trailer to the back) when it rains so the rain drains off quickly. I’m not sure if electric awnings offer that option or not.
In the end it’s just a personal preference.
You and Mark always seem to find such qualified people to get your repairs completed!
We got lucky with this one that we were in an area with a lot of RV repair places and Jack’s had an opening for us. We’ve had some bloopers in our time, but we are very grateful when the stars align and we find good people!!
Thanks for sharing. Our awnings are aging a bit too and after the photos and descriptions you shared, I almost think we can replace them ourselves too, though if you and Mark could lend a hand and be our quality control, that would be amazing! haha.. 🙂
Very funny. Buddy says he’s all in! Good luck if you do give it a try. Maybe a promise of free beers at cocktail hour would lure a few extra hands nearby to help you out…
Em,
Love to see how creative people can be with tools and parts. Are we going to see an article about Puppy Chow Repairs? 🙂
Bob
Oh yes, very likely, once we know how the story ends!
I certainly enjoy your tech articles as well as the travelogue posts. BTW, I recently used the services of two businesses you have used in the past. Had axle work and some welding done at Ruckers (RTW) in Mesa, AZ. Neil remembers the lady taking all the pics. Also Sergio Bernal DDS in San Luis. I was very pleased with each. Thanks for the recommendations.
You are welcome, JR. From welding to dental work, that’s very cool! Both of those folks are wonderful in their respective fields. I’m so glad you had good experiences with each one. Dr. Bernal would have remembered us too as we’ve been to his office quite a few times over the last 11 years and I brought him a copy of the Escapees magazine article I wrote about getting dental work done in Mexico. Enjoy your travels. We’ll have plenty of travelogue posts coming up soon!!
Hi Emily and Mark! I just want to say, I love you guys!! My wife, Martha and I, live in our 5th wheel as well and we just love it. It is the only way to go! Many good wishes from Martha and I! Go the distance you guys! Life is very short and fun is very scarce. So hit that road and live it up!! God bless!!
Leo & Martha
Wow! Thank you, Leo & Martha!! This is a great lifestyle and it’s wonderful to know you love it as much as we do. Life is indeed short, and time passes no matter what you are doing, and the decades roll by in the blink of an eye. We’ll be celebrating 12 years of traveling full-time in two weeks, and it is astonishing to realize that we used to be younger than all the full-timers and cruisers we met in our travels and now we fit right in with the median age group. Where did the time go? I don’t know, but my oh my, the things we’ve seen and done since we started all those years ago!! Happy travels to the two of you!