MORryde SRE 4000 Installation & Review – Smooth Trailer Towing

The MORryde SRE 4000 is a fabulous replacement for the standard equalizer used in most trailer leaf spring based suspension systems. We recently replaced our fifth wheel trailer’s equalizer with a MORryde SRE 4000, and what a difference this has made when we tow on bumpy roads!

MorRyde SRE 4000 Trailer Suspension Installation and Review

MorRyde SRE 4000 Trailer Suspension Installation and Review

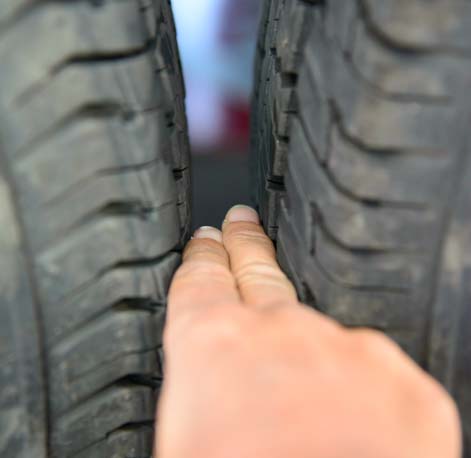
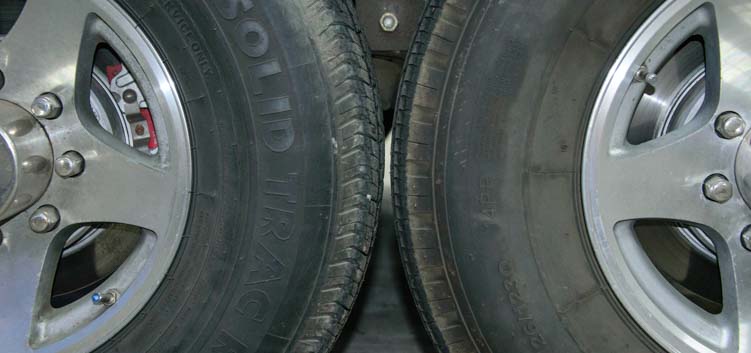
We have had our 14,500 lb. 36′ Hitchhiker fifth wheel trailer for over ten years, and during that time we have replaced the leaf springs, the shock absorbers and the equalizer with beefier components than the ones that were installed at the factory. We also cut the hangers off the frame and placed them at a slightly wider spacing when the tires threatened to touch each other due to a failure within the suspension system (blog post about all that here).

Our leaf springs are now Rockwell American leaf springs made in America from American steel. In addition to switching brands, we upgraded our leaf springs from the factory installed 7,000 lb leaf springs to 8,000 lb springs.

These wonderful upgrades meant we no longer had a problem with sagging leaf springs or a faulty suspension system, but the ride inside the trailer had become very harsh. It was now routine for us to find things in total disarray inside our trailer after towing it down even modestly bumpy roads.

MorRyde SRE 4000 installation and review-min

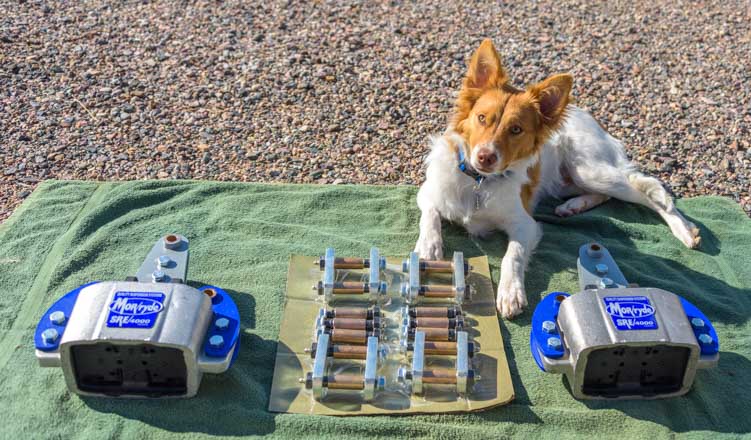
The MORryde SRE 4000 includes equalizer and wet bolts (heavy duty shackles) for each axle.

After arriving at a new campsite we’ve found our sconce lights dangling and we’ve had several light bulbs on our ceiling fan shatter all over the floor.

We keep some books in a cabinet in the far back of the trailer, above the rear window, and that cabinet was always a total disaster whenever we unhitched. Books and pamphlets and maps would be toppled all over each other.

In another rear cabinet in the trailer I keep a pocket flashlight and a chapstick, among other things, and darned if those two items didn’t always roll away and disappear under a pile of camera cleaning supplies every time we towed the trailer.

We had to be super careful opening our RV refrigerator door, because bunches of things would fall out onto the floor.

We have a few battery operated LED lights mounted under cabinets with Velcro, and they invariably would fall onto the counter tops. And from longstanding habit we tend to leave our place mats on our dining table, and they would always be on the floor when we arrived anywhere.

Mark’s tools down in the Man Cave? Oh my. We won’t even talk about that mess with all those tool boxes tipped over on their sides.

MorRyde SRE 4000 installation and review-min

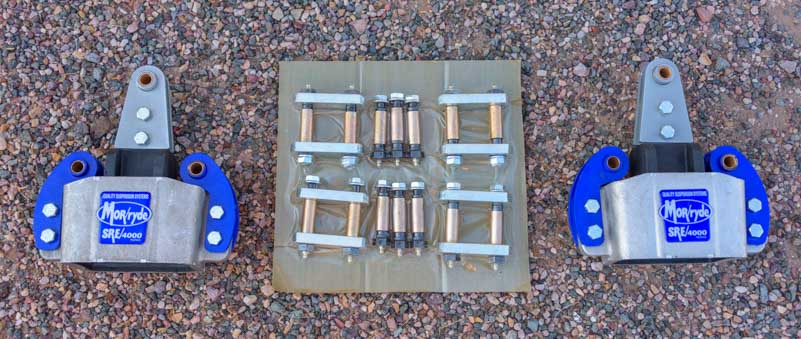
Here’s another look at the components of this system: MORryde SRE 4000 and heavy duty shackles

We had resigned ourselves to fixing a disaster every time we parked and set up camp, but it sure was frustrating.

Then Mark started reading up on the MORryde SRE 4000. MORryde is well known among RVers for their patented IS (Independent Suspension) system which is an axle-less rubber based system that doesn’t involve leaf springs at all. These are standard on the upscale New Horizons fifth wheels, and they are a pricey but popular upgrade with many RVers who have replaced their factory installed leaf spring suspension with the MORrydes IS suspension on their fifth wheel trailers.

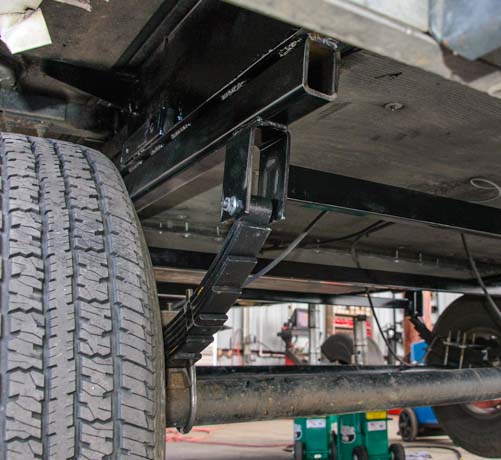
However, the MORryde SRE 4000 simply replaces the equalizer in a leaf spring suspension system and leaves the rest of the system intact, including the leaf springs, axles and shock absorbers. Rather than having a boomerang shaped piece of steel (an equalizer) that rocks back and forth between the two axles’ leaf springs, the MORryde SRE 4000 adds a rubber component that provides 4 inches of travel. So, not only does it rock back and forth, but it absorbs the bumps.

Replacement of trailer equalizer with Morryde SRE 4000-min

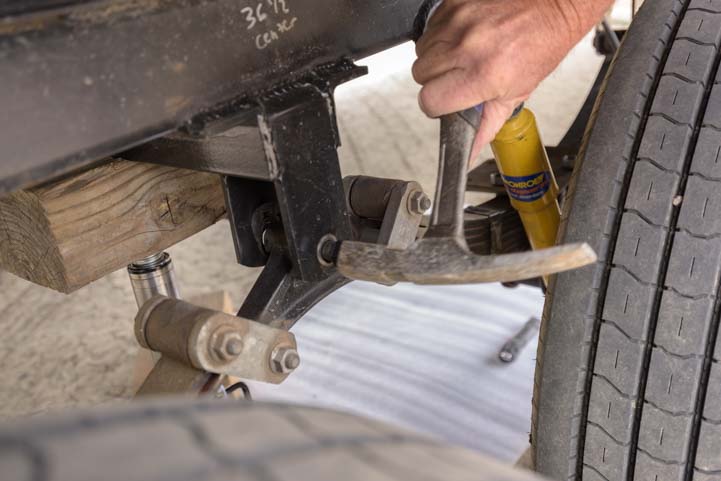
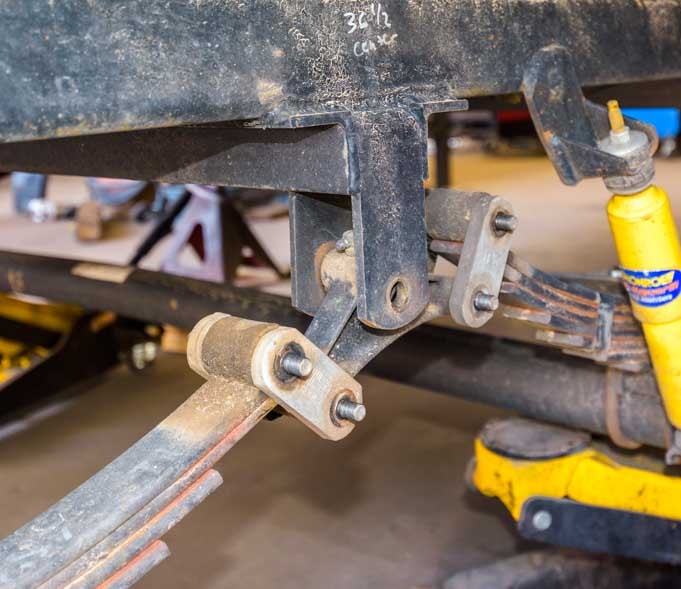
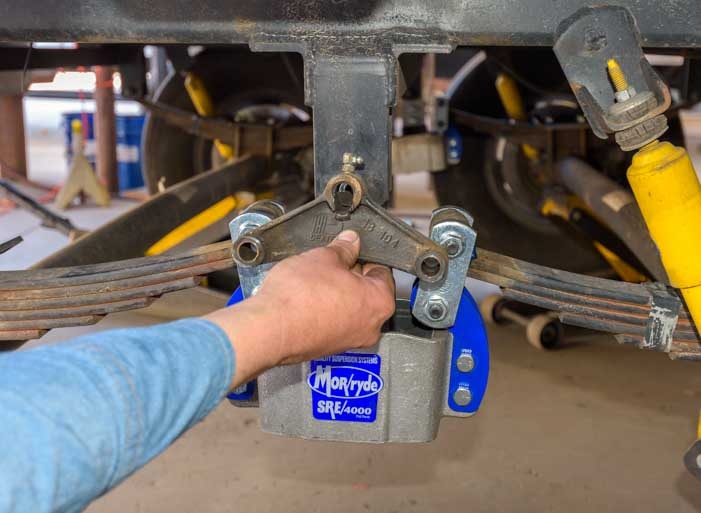
The MORryde SRE 4000 replaces the above equalizer and bolt assembly that sits between the hanger at the top and the two sets of leaf springs on either side.

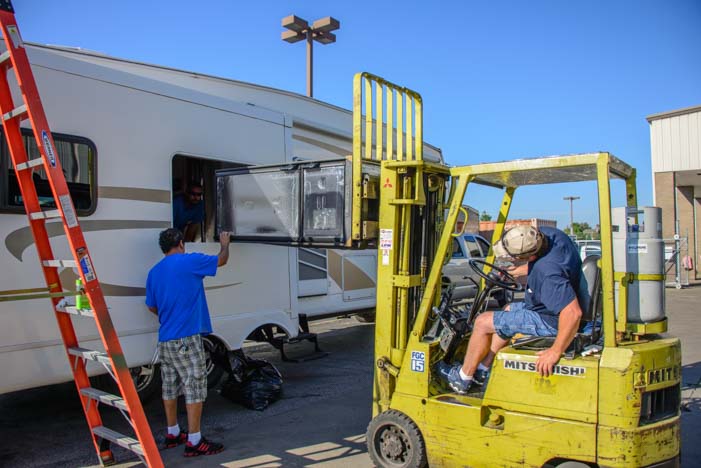
We decided that this seemed like a really neat solution to our problem, so we headed over to Rucker Trailer Works in Mesa, Arizona, to have the MORryde SRE 4000 installed.

Rucker Trailer Works has worked on our trailer before. They aligned the frame and rehung the hangers to laser-point perfection after our initial suspension replacement at another shop. They have been in business for decades and they are true trailer experts. We would trust them with our trailer any day of the week and will eagerly return to them for any work we need in the future.

If we had known about them at the time, we would have gone to them for our electric over hydraulic disc brake conversion, and they also would have been our initial choice when we had our failing suspension replaced.

Rucker Trailer Works Mor-ryde SRE 4000 installation-min

Rucker Trailer Works in Mesa, Arizona, did a superior job.

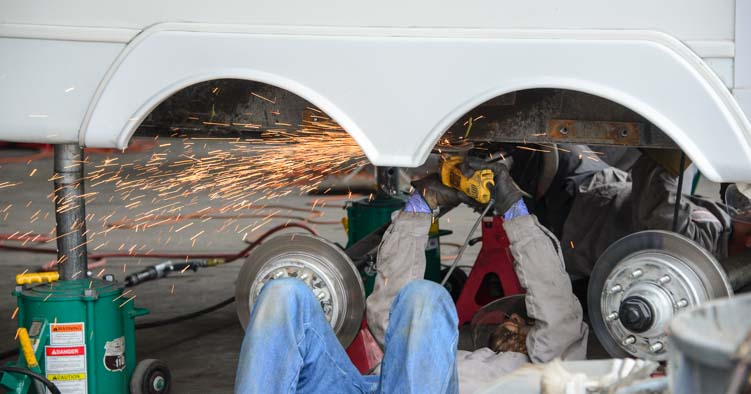
We got set up in a bay and three mechanics quickly got to work.

Fifth wheel trailer ready for Morryde SRE 4000-min

We parked our buggy (a 36′ Hitchhiker fifth wheel) in one of the work bays.

Our new puppy, Buddy, wanted to be the Project Supervisor. But he had been caught sleeping on the job when we did our RV screen door upgrades a few weeks ago. So, he reluctantly went away to take a nap in the truck while the experts did the installation.

MORryde SRE 4000 review and installation-min

Our new puppy, Buddy, wanted to be the Supervisor but he napped in the truck instead.

The first step was to remove the wheels and jack the trailer up with floor jacks, placing the jacks under the frame.

Remove 5th wheel trailer wheels for MORryde SRE 4000 installation-min

First things first: jack up the trailer and remove the wheels.

Once the trailer wheels were off the ground, additional jacks were slid beneath the axles to support them. This was an important step because the project would involve disconnecting and reconnecting one of the points where the axles are attached to the trailer via the leaf springs.

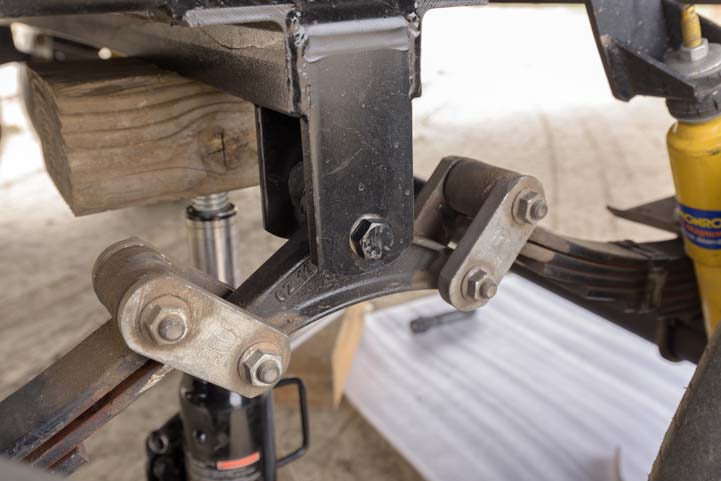
There are five attachment points on each side of the trailer between the axles and the frame. Three of these attachment points are the hangers. The hangers connect the endpoints of the leaf springs: one at each of the two the outer endpoints and one in the middle supporting both leaf springs via the equalizer. The other two axle/frame attachment points are the two shock absorbers.

When the equalizer is removed, each leaf spring loses one attachment point to the frame. That is, each leaf spring ends up connected to the frame by only one hanger at one end while the other end is left dangling where the equalizer used to be. As each leaf spring drops, the shock absorbers could also be stretched open and possibly damaged. Also, it’s much easier to line up the bolt holes when installing the MORryde SRE 4000 if the axles are supported!

Therefore, jacks were positioned beneath the axles to hold the axles in place during the job.

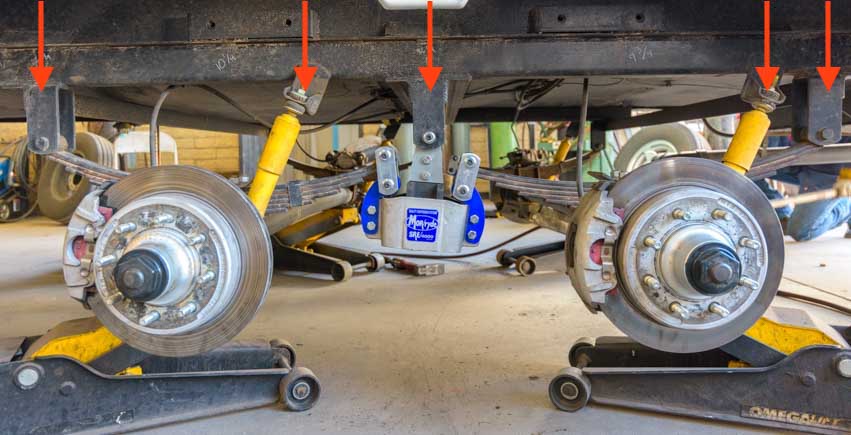
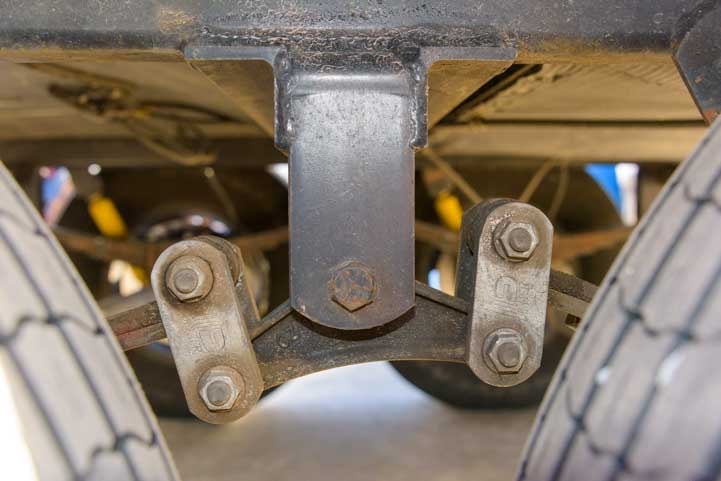
This “after” pic shows the five connection points between the trailer frame and the axles.
The axles must be supported when the center attachment point is removed during this job.

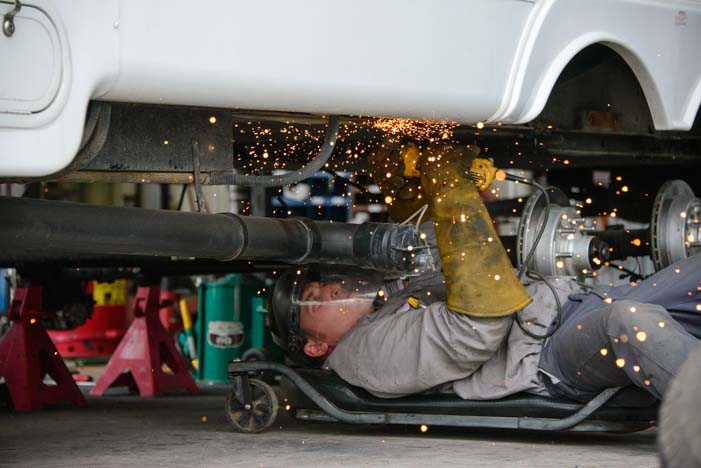
Because we have electric over hydraulic disc brakes on our trailer (an upgrade we highly recommend to anyone with a large fifth wheel trailer), the disc brake calipers were removed and set aside with the hydraulic lines still intact and attached.

Fifth wheel trailer disc brake rotor and caliper-min

Because we upgraded our trailer to disc brakes, the brake calipers had to be removed temporarily.

Fifth wheel trailer disc brake with caliper removed-min

The disc brake calipers were set aside with the hydraulic line still attached & intact.

The equalizer was now at a crazy angle because the trailer was raised up on jacks.

Fifth wheel trailer equalizer replaced by Morryde SRE 4000-min

The old equalizer is cocked because the trailer is on jacks and the weight is off the wheels

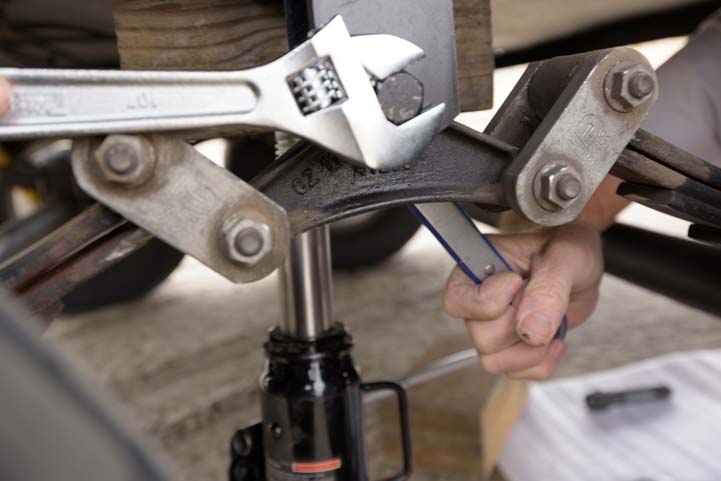
The bolt holding the equalizer to the hanger was removed, and then the bolts holding the equalizer to the leaf springs were removed.

Remove 5th wheel trailer equalizer to install Mor-Ryde SRE4000-min

The bolt holding the equalizer to the hanger was removed.

Bolts removed from fifth wheel trailer equalizer to install MorRyde SRE4000-min

Next, the bolts holding the equalizer to the leaf springs needed to be removed.

These were not the original factory-installed bolts. They were wet bolts that we had had installed when our suspension was replaced a while back.

Wet bolts and equalizer from fifth wheel trailer-min

The old equalizer and bolt assemblies.

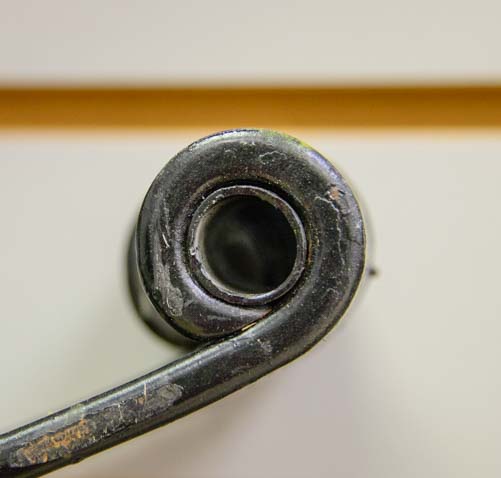
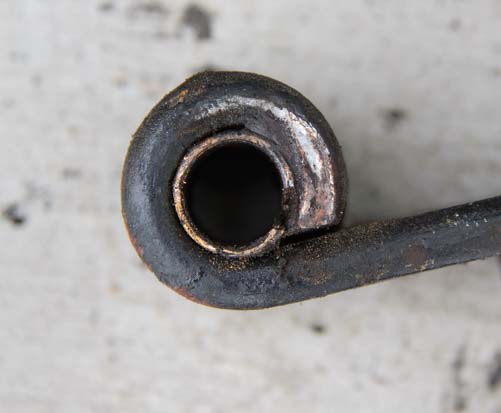
To our surprise, the mechanics discovered that the one of the equalizers was damaged. The top hole had started elongating and the brass bushing had broken. We were both astonished because we had towed our trailer only 7,500 miles since the equalizer had been installed. Our trailer weighs in at its GVWR and is not excessively heavy.

Damaged Dexter equalizer removed from fifth wheel trailer-min

One of the equalizers was already damaged after just 7,500 miles of towing.

Damaged Dexter equalizer removed from fifth wheel trailer suspension-min

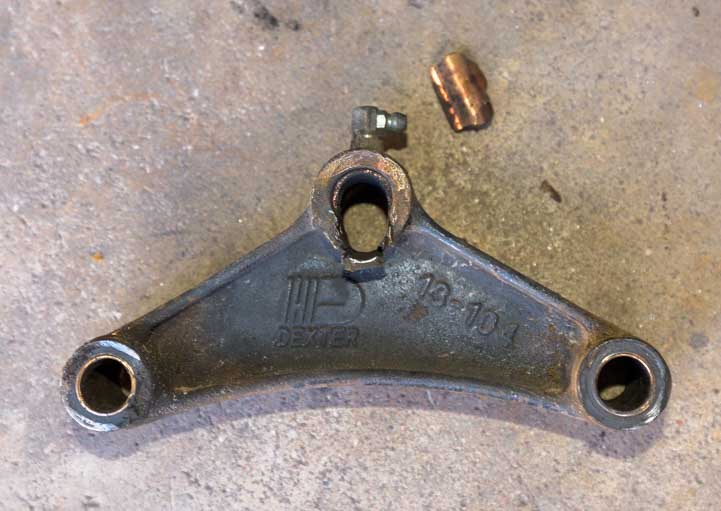
The top hole had elongated and the bronze bushing had broken.

As we pondered how this damage could have happened, we remembered one particularly nasty road we had driven down this past year. It was a 3 mile long stretch of miserably rutted dirt road that took us 45 minutes to cover. At the end of it we noticed that the top equalizer bolt was hanging halfway out because the nut had worked its way off.

You can read about the details and see Mark’s incredibly ingenious solution to get us back on the road in this post: Trailer Suspension Nuts & Bolts – One Nut From Disaster!

Here’s a pic from that scary moment many miles from nowhere:

Bolt falling out of equalizer in fifth wheel trailer suspension-min

Last year, after driving for 45 minutes on the nastiest dirt road we’ve ever been on, Mark noticed the bolt holding the equalizer to trailer frame was working its way out. This may be what caused the damage to the equalizer that we saw during the MORryde SRE 4000 installation.

Past damage behind us, the next step was to hang the MORryde SRE 4000 on the leaf spring hanger.

MorRyde SRE 4000 installation on fifth wheel trailer frame hanger-min

The MORryde SRE 4000 was suspended by a bolt at the top.

Prior to tightening the bolt, the mechanic used a C-clamp to tighten the hanger arms and hold the MORryde SRE 4000 in place.

MorRyde SRE 4000 installation on fifth wheel trailer frame hanger-min

A C-clamp held the MORryde SRE 4000 in place

Then the C-clamp was removed and the MORryde SRE 4000 was centered between the leaf springs.

Position MorRyde SRE 4000 on fifth wheel trailer frame hanger with disc brake caliper removed-min

The MORryde SRE 4000 was bolted onto the hanger.

Fifth wheel trailer suspension with disc brakes and MorRyde SRE 4000-min

The MORryde SRE 4000 was suspended from the hanger.

MorRyde SRE 4000 and fifth wheel trailer leaf springs-min

Looking good.

The next step was to install the heavy duty shackles (or “wet bolts”) on either side of the MORryde SRE 4000, first bolting together one side and then the other.

Leaf springs attached to Mor-Ryde SRE 4000 on fifth wheel trailer suspension-min

A new wet bolt assembly attached the MORryde SRE 4000 to one leaf spring.

MorRyde SRE 4000 installed on fifth wheel trailer hanger and leaf spring suspension-min

Now it was fully bolted on to the hanger at the top and to both leaf springs on either side.

And that was it! Of course, the process had to be repeated on the other side of the trailer.

The mechanic held up the equalizer to show where it had been.

Comparing fifth wheel trailer equalizer and MorRyde SRE 4000-min

For comparison, here’s where the equalizer used to be.

The next step — after admiring how the MORryde SRE 4000 looked between the leaf springs — was to reattach the disc brake calipers, mount the wheels and lower the jacks until the trailer was standing on its own wheels once again.

MorRyde SRE 4000 installed on fifth wheel trailer leaf spring suspension-min

The disc brake calipers were reattached.

Reinstall wheels on fifth wheel trailer after MorRyde SRE4000 installation-min

The wheels were mounted back on.

Finished installation MorRyde SRE4000 equalizer-min

The jacks were removed and the trailer stood back up on its own wheels.

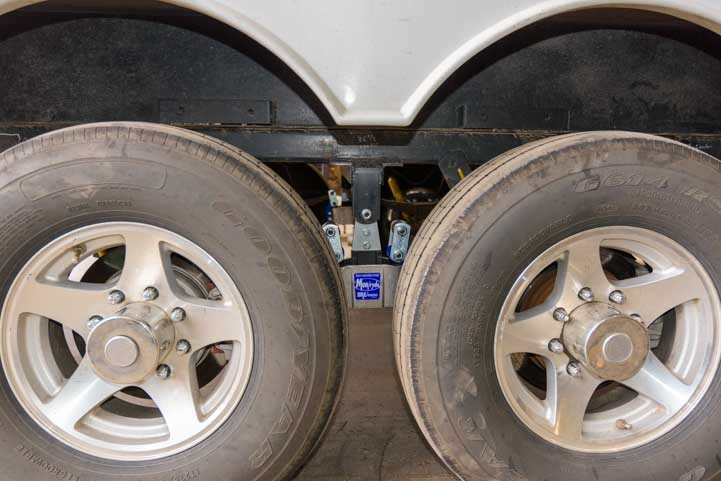
We crawled underneath to have a look at the new MORryde SRE 4000 from the insides of the wheels.

MOR-ryde SRE 4000 seen from beneath a fifth wheel trailer-min

View from under the trailer looking at the back side.

One of the things we were curious about was whether the MORryde SRE 4000 would raise or lower our trailer. We often travel on dirt roads and tow our trailer through washes, and we prefer it to be quite high off the ground. Even driving up or down a short ramp into or out of a gas station can cause havoc at the back end of the trailer. A few years ago when our trailer still stood at its original factory height, we left a deep 50′ long scrape in an insanely sloped parking lot in Boone, North Carolina.

We measured the trailer height off the ground both before and after the MORryde SRE 4000 installation and were pleased that it raised the trailer over an inch, from 28 5/8 inches to 29 7/8 inches. Woo hoo!

Trailer height before installation of MOR-ryde SRE 4000-min

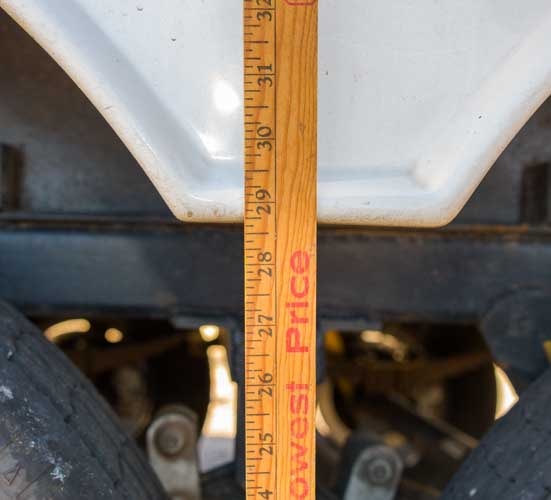
BEFORE the installation the measurement was 28 5/8 inches.

Trailer height after installation of MOR-ryde SRE 4000-min

AFTER the installation the measurement was 29 7/8 inches, 1.25 inches higher.

We have towed our trailer a few hundred miles since the installation, and quite a few of those miles have been on both bumpy paved roads where we were going 35 mph or so and on miserably rutted dirt roads where we were going 10 mph or less.

The first thing we noticed is that we were chucking around a lot less in the cab of the truck. So often in the past it seemed like the tail was wagging the dog, so to speak, and the trailer’s bouncing was making the truck bounce too. We have a Demco Glide-Ride fifth wheel pin box, which reduces the fore-and-aft movement of the trailer, but we were still being thrown around in the truck by the motion of the trailer.

But it is the difference inside the trailer that is most remarkable. We have been truly astonished each time we’ve gone inside the trailer to find everything is still intact. The books on the back bookshelf miraculously stay put. I haven’t lost that chapstick or that flashlight since the day the MORryde SRE 4000 was installed. And today, when we drove several miles on one of the rockiest and pot-hole filled dirt roads we’ve been on in ages, I was stunned to see that the placemats were still on the table when we arrived and the LED lights were still happily hanging under the cabinets.

Buddy was also excited that the water in his water dish was all still inside the bowl and hadn’t spilled out all over the sink.

He was also excited when we visited the parts shop at Rucker Trailer Works and scoped out what they had on their shelf: Buddy Wheel Bearing Protectors!!

Bearing Buddy wheel bearing protector-min

Buddy didn’t get to supervise, but he found a product he really liked in the Rucker Trailer Works shop!

If you are tired of cleaning up the mess every time you set up camp, look into the MORryde SRE 4000. We were actually a little skeptical about how much this system would improve our ride, and we merely hoped for a little less turmoil in the trailer. But we are absolutely delighted that it truly smoothed out the ride, enough so that things in the bumpiest part of the trailer — the far rear end — now stay in place.

Also, this smoother ride will help our trailer and everything in it last a little longer. With less jiggling and outright bouncing going on, there will be less wear and tear on every component in the trailer from the walls to the windows and cabinets to all the appliances that were never intended to withstand endless jolts and shocks.

In addition, our more delicate belongings, from our camera gear to our laptops and external hard drives, along with everything else we’ve put into the trailer will be much happier and less prone to breakage with our new smooth ride.

For RVers visiting Arizona, Rucker Trailer Works is a great choice (website here). We were back on the road in less than two hours. MORryde also does installations at their facility in Indiana (website here), and we found out they do electric over hydraulic disc brake conversions there as well, so you can get two excellent upgrades done at once!

Buying the MORryde SRE 4000

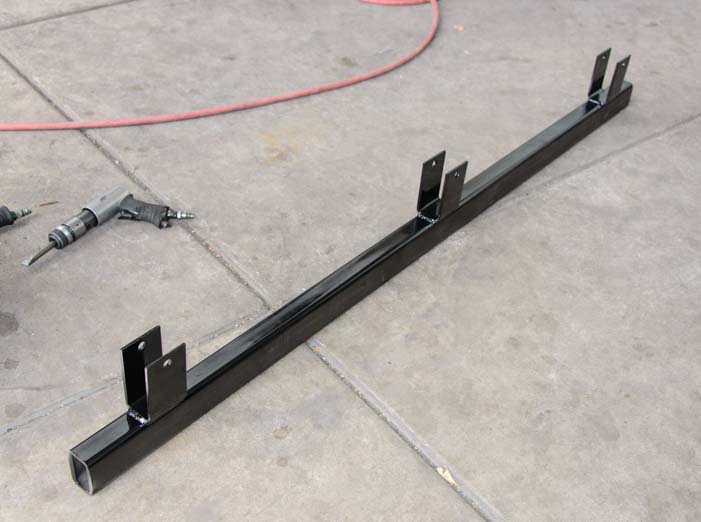
The MORryde SRE 4000 can be purchased with or without a steel crossmember (“X-Factor Performance Crossmember”) that goes between the two leaf spring hangers to eliminate flex. Our trailer already had a crossmember that was welded onto the frame when our suspension was upgraded, so we got the unit that doesn’t include it. The difference in the part numbers is that the unit with the crossmember has an “X” at the end of the part number.

Also, you must measure the distance between the axles (the wheelbase) to determine whether you need the 33″ or the 35″ version of the product. We needed the 33″ version.

Lastly, the heavy duty shackle wet bolt kit is sold separately.

More Info:

Other blog posts about our fifth wheel trailer suspension:

Subscribe
Never miss a post — it’s free!

More Trailer Uprgades & Maintenance Tips:

Below are some of our most POPULAR POSTS (also in the MENUS above)

Buddy - A Journey in Spirit - The story of an event that changed our lives forever.

ARTICLE INDEXES
  • RV Tech Tips Articles - A one page index of links to all our RV Tech Tips, RV Upgrades & RV Maintenance articles.
  • RV Lifestyle Tip Articles - An index of links to all our RV Lifestyle Tips (finances, boondocking, major repairs, work/jobs, etc.)
  • Solar Power Articles - Overview and tutorial articles for how to design and install solar power on an RV or boat
  • Product Reviews - An index of links to all of our Product Reviews
RV UPGRADES, SYSTEMS & TIPS MONEY FULL-TIME RV LIFESTYLE GEAR STORE
  • Gear Store - A list of the goodies, equipment and gear we've found useful in our RV lifestyle!
 

Our most recent posts:

More of our Latest Posts are in the MENU.   New to this site? Visit RVers Start Here to find where we keep all the good stuff. Also check out our COOL NEW GEAR STORE!! *** CLICK HERE *** to see it!

Trailer Suspension Nuts & Bolts – RV Blues on Rough Roads!

Lots of full-time RVers with big rigs are very sensible and stick to traveling on paved roads. But we like to get off the beaten path, and sometimes that puts us on crazy, rough and rugged dirt roads.

On our recent trip to Bisti Badlands in northwestern New Mexico, a 45 minute drive down three miles of extremely washboarded, nasty dirt road wreaked havoc with our trailer’s suspension.

Equalizer bolt walks out of fifth wheel suspension

Hmmm…. That center bolt on the equalizer doesn’t look right!

As we were hitching up to leave, Mark did his usual walk around our trailer to make sure nothing was about to fall off and that everything was secure. To his shock, he noticed that the long bolt that goes through the equalizer on our trailer’s leaf spring suspension system had walked almost all the way out!

Fifth wheel suspension Equalizer bolt unscrews itself on rough road

Yikes!

Holy Smokes! Our 14,000 lb. 36′ fifth wheel trailer was about to lose the bolt holding this vital piece of gear together!

We were miles from nowhere, and I immediately began scenario building in my head to plan various ways we might get out of this mess.

While I theorized, Mark calmly set about getting out his tools and tackling the problem right there in the dirt. His first task was to raise the trailer up so he could get the bolt properly aligned horizontally and tap it back into place with a hammer.

So, out came the 12 ton bottle jack.

Raise fifth wheel trailer with bottle jack for suspension repair

First things first:
Raise the wheels totally off the ground with our 12 ton bottle jack.

He needed to raise the trailer up quite high to relieve all the pressure on that bolt, so he took a piece of wood we sometimes use under the fifth wheel landing legs and put it under the bottle jack to raise it higher. Then he took a second block of wood and put it on top of the bottle jack to span the c-channel tube that runs the width of the trailer.

Pumping away on the bottle jack, he finally got the wheels entirely off the ground and began tapping the bolt through the two sides of the hanger with a small hammer.

Hammer fifth wheel equalizer bolt pack in place in suspension repair

With the pressure off, Mark taps the bolt back into place.

It took a little finagling to get the bolt to line up and go through the second hole on the back side of the hanger.

Fifth wheel equalizer bolt holds suspension together

At first, the bolt didn’t want to go through the second hole on the axle hanger.

But he was able to get it aligned and he got it to go through.

Equalizer bolt in position for fifth wheel suspension hanger assembly

All the way through. Yay!

The bigger problem, though, was figuring out what had happened to the nut that had been holding this bolt in place. It was nowhere to be found and undoubtedly was somewhere out on that nasty 3 mile dirt road.

So, now what?

Mark is a really amazing mechanic, and he keeps a magic container of potential spare parts in his Man Cave in the basement of our trailer. This magical container is a lot like the carpet bag that Mary Poppins carried.

Remember how Mary Poppins pulled all kinds of surprising things out of that bag, to the sheer delight and amazement of Jane and Michael Banks? Among other things, she pulled out a hat rack, a potted plant and a full-size standing lamp while Michael searched under the table to try to figure how she did it.

Well, that’s just the way Mark’s magic box of spare parts tricks works. When he needs a special little gizmo to make things right again, he fishes around in the box and finds just the thing while I scratch my head wondering how such a little container could always produce exactly what he needs.

A few months back we’d replaced the tires on our fifth wheel trailer and decided to replace the original lug nuts with locking lug nuts. A few of the original lug nuts also had cosmetic cracks on them which didn’t look attractive, so the new locking lug nuts were much nicer all around. Mark had decided to put a few of the old lug nuts in his magic box of tricks.

5th wheel trailer wheel lug nuts

A few months back we had replaced all the lug nuts on our trailer wheels.

So, as he fished around for an appropriately sized nut, lo and behold, it turned out those lug nuts were the exact diameter he needed!

Fifth wheel trailer lug nut_

This old lug nut is exactly the right diameter for our wayward bolt!

The thread pitch on the lug nut was not quite right, but the threads on the bolt had been damaged anyway as it walked itself out of the hanger.

While I held the bolt in place with a wrench on one side, Mark ratcheted the lug nut on the other side. He was able to jam the nut on the bolt and re-groove the bolt’s threads enough to make a super tight connection.

In no time we were back up and running and towing our fifth wheel trailer back down that crazy 3 mile road to the paved highway to go see other new and exciting destinations.

As I mentioned in my post about Bisti Badlands, it’s okay for a passenger car or van, but I would leave a bigger RV in Farmington and drive the tow vehicle or toad to Bisti instead!

Ratcheting 5th wheel equalizer suspension bolt in place

With some force, we secure the lug nut on the bolt. What a terrific temporary fix!

Who would’ve ever thunk that a rough road could loosen the nut on a big fifth wheel trailer’s suspension and walk the bolt that holds the equalizer in position almost all the way out?!

And who would’ve ever thunk that a lug nut from the trailer’s wheels would give us such a great temporary fix to get us back on the road?!

Other blog posts about our fifth wheel trailer suspension:

Subscribe
Never miss a post — it’s free!

Other tech tips for RVs:

Our most recent posts:

More of our Latest Posts are in the MENU.   New to this site? Visit RVers Start Here to find where we keep all the good stuff. Also check out our COOL NEW GEAR STORE!! *** CLICK HERE *** to see it!

5th Wheel Trailer Suspension Failure – Replaced with our RV Warranty!

You never know what might break on an RV, and during our RV travels back in 2015, going from Arizona to Nova Scotia and back, we faced four major repairs on our then 8 year old fifth wheel trailer, all in four short months. Ouch.

The last breakdown — the failure of our fifth wheel trailer’s suspension — ended up being the most expensive repair of them all, because the entire trailer suspension had to be replaced. We were so miserable about the whole situation as it unfolded last fall in Phoenix, Arizona, that the last thing I wanted to do was to write about it on this blog.

So, the story has waited five months until now when our spirits are high and we’re camped near a stunning lake in the Canadian Rockies!

Bow Lake Jasper Ice Fields Banff National Park Alberta Canada

Repairs aside, this is why we RV!

2015 was a phenomenal year of travel for us, but it could have been a financial disaster.

$7,420

That was the scary total cost of all our RV repairs in 2015. Yikes!!

Fortunately, our out of pocket cost was just $1,045, because we had an extended RV warranty for our trailer.

Here's a summary of what our four year RV warranty through Wholesale Warranties cost, what our repairs WOULD HAVE cost, and what our warranty reimbursements have been to date:

Cost of Warranty $1,904
Total Cost of Repairs we've had done $7,834
Total Out of Pocket Costs for those repairs $1,145
Repair Reimbursements:
Trailer Axle Replacement $1,036
RV Refrigerator Replacement $1,647
Plumbing Issues & Window Leak $1,142
Suspension Replacement $2,550
RV Toilet Replacement $314
Total Repair Reimbursements $6,689

Our trailer warranty has paid for itself 3.5 times over!
Confused about the nitty gritty fine print buried in RV Extended Warranties? Here's an excellent detailed explanation!!

As reflected on our RV budget and expenses analysis page, our combined maintenance and repair costs on our truck and trailer averaged $106 per month for our full-time travels between May, 2007, and August, 2015.

Life was good back then. Maintenance was easy and the unexpected repairs were small and manageable. Anything that went wrong was something Mark could fix (he’s an extremely gifted mechanic).

But 2015 unfolded very differently than prior years. This was mostly due to our trailer now being eight years old and also because we spent a month spent driving the rough back roads of Nova Scotia.

What is an RV Warranty and should you have one?

We weren’t sure at first, but after 4 expensive repairs in 4 months in 2015, we now know the answer is YES!!!

So, how did this all transpire?

When we were in Nova Scotia, we bent a spindle on the rear axle of our trailer. We limped to Bangor, Maine, and got a new axle installed.

Old trailer axle new fifth wheel RV axle

We had to replace a trailer axle after driving the rough back roads in Nova Scotia

Besides damaging a trailer axle while we were in Nova Scotia, we also sprang leaks in both our fresh water tank and in our big rear window. The underbelly compartment of our trailer was filling with water whenever we filled our fresh water tank, and our rear window was leaking water all over our living room carpet whenever it rained (and it rains a lot in the northeast). Ugh!

Sadly, large fresh water tanks are not a commodity item, because they come in all shapes and sizes.

So, rather than waiting for two months for a new fresh water tank to come to the repair shop in Maine, we decided to do both of these water-related repairs (as well as a bunch of other smaller repairs) in Chanute, Kansas, at NuWa Industries, the factory repair facility where our trailer was originally manufactured.

NuWa claimed to have a fresh water tank for our trailer model in stock (this proved not to be the case, but that is another story), and they had an appointment available in two months (and no sooner!).

We could live with the leaks and other small problems, so this gave us two months to get from Maine to Kansas. We moseyed west and enjoyed a fabulous stay in Maysville, Kentucky.

Unfortunately, within 24 hours of leaving there, our RV refrigerator died. Good grief — While en route from a trailer axle repair in Maine to a bunch of plumbing related repairs in Kansas, we had to get a new RV fridge somewhere near western Kentucky. Not many places stock 8 cubic foot Dometic RV refrigerators! We scrambled and got our RV refrigerator replaced outside Indianapolis.

RV Refrigerator replacement under warranty

We had to replace our RV refrigerator after 8 years (the typical lifespan for a fridge, we found out!)

Luckily, the refrigerator replacement at Camping World went really well.

Once we got to Chanute, Kansas for our new fresh water tank, window repair, toilet repair, faucet replacement and a few other things, our buggy had to stay in the shop for three days!!

RV fresh water holding tank replacement

We had to replace our fresh water tank and do many other plumbing and leak-related repairs.

We were not allowed to stay in our rig while it was in the shop in Kansas. Fortunately, the trailer warranty reimbursement for those three days of repairs included our two nights at a motel. Thank goodness for that warranty once again!

Back on the road after our plumbing and water leak repairs were completed in Kanses, we ventured onward to Phoenix, Arizona.

Sadly, our saga of trailer repairs was not over yet.

TRAILER SUSPENSION FAILURE

Since we had left Maine (where we had gotten our new trailer axle installed), we had watched with alarm as the two wheels on our trailer’s tandem axles had gotten progressively closer and closer together. The frame of our trailer, built by Lippert Components, had always had very narrow spacing between the two wheels.

When we had upgraded from the factory installed E-rated (10 ply) tires to the higher profile G-rated (14 ply) tires a few years prior, I could squeeze two fingers between the tires. After our trailer axle replacement and new tire purchase in Maine, I verified that this was still the case.

5th wheel trailer suspension tire spacing is okay

Spacing between the wheels is two finger widths.

However, by the time we got to Phoenix, I could barely get the tip of my pinky finger between them and I could not slide my whole pinky in.

Fifth wheel trailer tires 1-4 inch apart

My pinky finger can squeeze only partway in between the tires!

The spacing was down to less than 1/4 inch.

Fifth wheel trailer tires 1-4 inch apart

Sagging suspension made our wheels dangerously close together.

Something was very wrong.

We took the trailer to Straight Line Suspension in Mesa, Arizona, a repair shop that had a newly outfitted facility that does a lot of contract suspension maintenance work on fleets of school buses and commercial trucks.

After careful inspection, their consensus was that we needed to revamp the trailer’s suspension completely. Something was failing, and whether the culprit was the leaf springs, or the equalizer between the springs or the axles themselves, no one could determine exactly.

Fifth wheel trailer RV at suspension shop for service

Our buggy goes into the repair shop for a new suspension.

And this is where we were glad not just to have any old extended warranty contract on our trailer but to have one purchased through Wholesale Warranties.

THE IMPORTANCE OF HAVING AN ALLY

Unlike most RV warranty brokers, Wholesale Warranties is heavily invested in the relationship between their clients and the warranty providers they represent. They want to be sure that their customers’ claims are properly handled by the warranty companies. So, they are more than happy to get involved in their clients’ claims to facilitate and make sure there are no misunderstandings.

This level of commitment to their products and belief in them is truly astonishing. And it makes all the difference in the world.

When the service provider (Straight Line Suspension) first called our warranty provider (Portfolio Protection), the warranty company was understandably reluctant to cover the repair without knowing the root cause of the failure. They pressed the shop to determine which specific part had caused the failure. Was it the shocks? The leaf springs? The axles? They wanted to replace only the component(s) that failed and nothing more. That makes sense!

However, the suspension experts had no idea which part had failed, and they said there was no easy way to figure that out. So, we called Wholesale Warranties and had a long conversation with John Wise. We described to him the gradual failure we had witnessed and the difficulty of pin-pointing exactly which component(s) had failed and in what order the failure(s) had occurred.

I emailed him photos of our wheel spacing both before and after the failure. Thank goodness I take so many photos and had both “before” and “after” photos to send him!

He then called our warranty company, Portfolio Protection, and reviewed the photos with them. He explained that the suspension mechanics were not sure exactly what had caused the failure but that the suspension was not functioning properly and needed to be replaced.

In the end, Portfolio Protection agreed to replace the springs, equalizers and shocks and also to correct the insufficient spacing between the leaf spring hangers, placing them further apart so that even if some components failed or sagged in the future, there would no risk that the wheels would touch.

If it weren’t for Wholesale Warranties coming to our aid to act as a liaison and facilitator and to help explain our breakdown in a way that the warranty provider could understand, this vital repair would not have been covered.

Of course, the role of Wholesale Warranties is strictly as a facilitator. They can’t force the provider to reimburse a repair that is not covered by the contract. We have called Wholesale Warranties for liaison assistance several times now, and they have been very up front when our repair was outside the limits of our contract.

However, being able to call them and describe the problem and get their input is extremely helpful. This is particularly true in cases like our trailer axle repair where both our RV insurance plan AND our RV warranty contract could be used to pay for the repair, but one was financially preferable to the other due to differing deductibles and different kinds of coverage.


FIFTH WHEEL TRAILER SUSPENSION REPLACEMENT

The first step in our trailer suspension replacement was to jack up the trailer and remove the two axles. We had just done a fabulous trailer disc brake conversion eight months earlier, and this was the THIRD time the hydraulic lines had been tampered with due to removing the axles or the belly pan from the frame. How frustrating!

Fifth wheel trailer axles hangers ready to be removed

The trailer axles are removed from the trailer.

Once the axles were off the trailer, the next step was to remove the leaf spring hangers.

Fifth wheel trailer axle hangers

The hangers must be cut off the frame.

The sparks flew like mad as each of the six hangers was cut off the frame using a torch.

Sparks fly as fifth wheel trailer leaf spring hangers are cut off

Sparks fly as the old trailer leaf spring hangers are cut off

Cutting off trailer leaf spring hangers

.

The mechanics wanted to ensure the new springs were strong enough, so they chose 8,000 lb. American made springs from Rockwell American, even though we had just 7,000 lb. axles and only 11,250 lbs. sitting on the pair of axles (as of our most recent RV weighing by the Escapees Smartweigh program).

New 8000 lb fifth wheel trailer leaf springs

New 8000 lb American made leaf springs from Rockwell American

They pointed out to us the difference between Chinese made springs and American made springs. Chinese steel is notorious for being inferior to American steel, and the overall fabrication quality of the springs, especially at the eye, was not as good.

American made leaf springs

The eye of the American made leaf springs looks clean and well made.

Chinese leaf springs

Not so much for the Chinese made leaf springs

Our trailer’s original Chinese springs had come with nylon bushings inside the eye, but they had been upgraded to brass bushings. When the old springs were removed from the trailer, we saw the brass bushings inside were worn out. The curvature of the spring from the eye was also flat, an indication that the spring itself was worn out.

Worn out bushings in trailer axle leaf spring

Worn out bushings and the spring is flat — no curvature left!
(compare to above pics!)

The mechanics fabricated a new leaf spring hanger system that had three hangers welded onto a bar. These hangers would space the axles further apart than they originally had been.

New custom trailer leaf spring hanger

New custom trailer leaf spring hangers

The bar was then welded onto the underside of the trailer frame.

New trailer tandem leaf spring hanger ready to be installed

The new trailer leaf spring hanger bar is positioned so it can be welded onto the frame.

After welding on the new hanger bar, new equalizers were bolted onto each center hangers.

New trailer tandem axle equalizer

.

Then the leaf springs were bolted onto the outer hangers.

New fifth wheel trailer leaf spring hangers leaf springs and equalizer

Springs and equalizers in place — all set to reinstall the axles.

The axles were installed using new U-bolts. The mechanics also made a brace to span the width of the trailer between the two hanger bars to add some rigidity to the suspension system.

New support for trailer tandem axle suspension

A brace running across the width of the trailer makes the system stronger and more sturdy.

New trailer leaf spring and leaf spring hangers

.

Then they welded new shock mounts on the frame and installed new Monroe Gas-Magnum RV shock absorbers.

New shock absorbers on tandem trailer axle suspension

.

The final result — our wheels were a fist’s width apart!!

Proper spacing tandem axle fifth wheel trailer RV

The trailer axles are spaced a lot better now.

SUSPENSION REPAIR COST BREAKDOWN

Here are the costs for the suspension replacement and our out of pocket costs as a result of our extended trailer warranty:

Parts: $1,119.83
Labor: $1,440.00
Tax: $90.15
Total: $2,649.98
Reimbursement: $2,549.98
Out of Pocket (deductible): $100.00

COMPLICATIONS

Unfortunately, in the world of repairs, sometimes fixing one thing breaks another.

After our trailer suspension replacement was completed, we towed our trailer out into the parking lot and went inside to get organized to leave for our next destination.

As always, we were not connected to electrical hookups, so we turned on our new Exeltech XPX 2000 watt pure sine wave inverter that we had installed as part of our overall RV electrical system overhaul so we could generate 120 volt AC power from our batteries and run our microwave and computers.

Instantly an alarm went off.

What???

We flew to turn off the inverter and then began troubleshooting segments of our AC wiring to try to figure out the problem.

Suddenly, we heard a huge loud POP. And that was the end of the inverter.

Good heavenly days.

Luckily, the inverter was still under its manufacturer’s warranty. Exeltech is phenomenal about caring for their equipment out in the field. They provide inverters to NASA and their equipment is on both the American and Russian sides of the International Space Station. They take great pride in their equipment and have an excellent warranty repair process.

Mark undid the really nice inverter installation job he’d done for our Exeltech, boxed it up, and shipped it to Exeltech’s Ft. Worth, Texas, facility.

Exeltech 2000 watt pure sine wave inverter installed above Trojan Reliant AGM batteries in fifth wheel RV

Geez… Our beautiful inverter (the suspended black box) had been working flawlessly!
(To keep the inverter cool and well clear of the batteries, yet still close, it is securely suspended above)

In the meantime, we spent a day troubleshooting our wiring to try to understand what had gone wrong. It wasn’t clear to us how the trailer suspension replacement might have impacted our trailer wiring, and the mechanics were certain that the two were unrelated.

After many hours of crawling under the trailer, and removing the belly pan section by section, and running our fingers along the frame and shining a flashlight into the unreachable depths, we found a spot where the AC trunk line was resting on the frame.

Well, it wasn’t exactly resting any more. The heat from the cutting and welding torches had melted the cable’s insulation onto the frame!

Mark carefully incised the casing, separated the hot and neutral lines, re-wrapped them in new insulation and affixed the cable firmly to the underside of the plywood flooring well away from the frame.

How had this happened?

Sadly, Straight Line Suspension did not check the frame sufficiently in the areas where they would be welding before they started torching the hangers off of it and welding on the new hanger system. Of course, this is a difficult thing to do because a plastic corrugated sheeting covers the entire underbelly of the trailer, protecting the tanks and wiring from road grime.

In order to inspect the frame before taking a torch to it, this corrugated sheeting must be removed, and any wiring in the area where the welding will take place must be located to ensure that it is not touching the frame.

RV manufacturers should enclose all wiring in conduit, or at least tack it to the underside of the plywood flooring, rather running it along the I-beams. However, that was not the case in our trailer. The wiring was tacked up to the flooring in some places, but there were extensive gaps that sagged, and this one portion sagged enough to be touching the frame right where the cutting and welding took place.

We live off the grid in our RV on solar power, so our inverter is our sole source of AC power. Losing it was a huge inconvenience!

While we waited for ten days or so for our inverter to make it to Ft. Worth, undergo diagnosis and repair then be shipped back to Phoenix, Mark installed our old Exeltech XP 1100 inverter in its place. Thank goodness we hung onto it after our upgrade from the 1100 watt to the 2000 watt version of the inverter!!

Straight Line Suspension paid for the expedited shipping and insurance for our inverter, and eventually, the happy day came when our inverter arrived and Mark got it put back in place.

For folks who want to get work done on their trailer in the Arizona area, we had our trailer suspension further upgraded with a MORryde SRE 4000 equalizer that was installed by the excellent mechanics at Rucker Trailer Works in Mesa, Arizona. Their workmanship was top notch and the MORryde has made a huge difference. Read our blog post about that installation here.

Exeltech XPX 2000 watt pure sine wave inverter living off the grid in an RV

The Exeltech XPX 2000 watt pure sine wave inverter has been repaired and is ready to be reinstalled.

Needless to say, this was an ordeal that was not fun to live through and one that I waited a long time to write about. However, it is an amazing illustration of just how valuable an RV warranty can be, especially if you get one from a broker that stands behind their customers during the claims process. It’s also an important reminder that if someone is going to take a torch to your RV frame, they should check the nearby wiring first!

We weren’t sure just how worthwhile an RV Warranty would be when we got ours, but 2015 would have been an extremely expensive year for us without it. It’s bad enough to be stuck on the side of the road. But having to pay through the nose for the nasty surprise of a major repair makes the ordeal even worse.

Trailer on side of interstate with bad wheel bearing

What’s worse than being dead on the side of the road? Knowing it’s gonna cost ya!

Wholesale Warranties loves our repair stories, and they have offered our readers a $50 discount on their RV warranty (for a trailer or motorhome) if you mention our website, Roads Less Traveled, when you set it up. The discount will come off the quoted price at the time of purchase (remind them before you sign if you don’t see it — it’s not automated!!). Here is the link to get a quote for a warranty on your particular RV:

Wholesale Warranties Quote Page

Or you can call them at (800) 939-2806 and ask for our contact, Missi Emmett, or email her at missi@wholesalewarranties.com.

FURTHER READING:

Articles Related to Finances in the RV Lifestyle:

Our Personal Case History of RV Warranty Repairs:

More blog posts about our fifth wheel trailer suspension:

Subscribe
Never miss a post — it’s free!

Our most recent posts:

More of our Latest Posts are in the MENU above.