We’ve been taking our new-to-us truck camper on short jaunts this summer. These “shakedown” cruises are helping us figure out the ins and outs of traveling in a truly tiny home, whether it’s a truck camper like ours or even a pocket-sized Prius camper! We’ve learned a lot about living large in a very small space
In the process, we’ve come up with some storage ideas that we’d like to share.
Northwood Manufacturing did a great job with creating large storage spaces throughout our 2005 Arctic Fox 860 camper. There is a full height closet, two shirt closets, huge bins on either side of the bed that can hold lots of clothes and good sized storage spaces under the dinette seats, not to mention several cabinets and a sliding pantry.
However, creating storage spaces for small things like keys, glasses, flashlights, pocket knifes, pens, pads, small tools, etc., are projects they leave up to us RVers. And it’s been fun to get creative!
The first thing we noticed on our maiden voyage was that all our small stuff kept ending up in a huge pile on top of the dinette table. Nothing makes a small space feel really cluttered than having a single horizontal space piled high with stuff.
So, we mounted a few different types of storage spaces for small items on the walls.
As a reminder of what our camper looks like inside, here are pics of the interior so you can see the bigger picture of where each storage item wound up.
The kitchen needed a few extra goodies to increase the storage sapce
The dinette also got some simple upgrades to keep the dining table clutter-free.
For starters, we put a spice rack on the wall next to the range hood right below the microwave’s swinging door but high enough to be out of the heat of the flames on the range. This is handy for all those things I like to have “right there” for cooking.
A spice rack near the range makes cooking essentials easy to reach.
There is very little counter space, and I found that a second spice rack under the window helped get things like dish soap up off the counter so other things could be tucked underneath as needed.
<
The towel rack was already in place, whether from the manufacturer or the previous owner, I don’t know. I added another towel rack for a dish cloth.
Wire spice racks proved useful in the kitchen and elsewhere! A towel rack for the dish cloth helps it dry fast and keeps it off the faucet.
We like bananas and when we lived in our fifth wheel we had a banana hook for hanging banana bunches that we used a lot. So, we put a ceiling hook (also called a “swag hook” for hanging plants) in between the range hood and the kitchen light. It is screwed directly into the bottom of the cabinet. We may put a second one on the other side of the light too. In that position it would be further from the heat from the range burners.
We’ve found in both the fiver and the truck camper that the bananas actually stay on the hook while we’re in transit, even on bumpy dirt roads, and this helps keep them from bruising as we move from place to place.
Bananas bruise so easily we like to hang them up on a ceiling hook!
Although we rarely used a toaster in our fifth wheel, we’ve been enjoying having one in our sticks-and-bricks life and we wanted to have one in this camper too. Toasters and other small kitchen appliances are bulky and awkward, and I almost gave up on finding a home for it.
However, there’s a large cabinet over the sink that has just one shelf in it, and if I could get a second shelf in there it would be perfect for the toaster. After tossing a few ideas around for installing a shelf in that cabinet, I found a standalone shelf unit that fits perfectly. The dishware is stored underneath and the toaster fits on top. I take the toaster down and put it in the sink when we travel, but while we’re camping it is wonderful to store it out of the way and be able access it easily when we want to use it.
The big kitchen cabinet needed a second shelf. Building one in would be a good idea too, but I like this standalone shelf unit.
We’ve always had key hooks over our entry door, so we put two sets of four hooks over the door.
Our many keys and glasses all need a home of their own and these key hooks work well.
After a few trips, we realized that these 8 hooks weren’t enough. Between the keys to the camper, the truck and the RZR plus multiple pairs of sunglasses (light ones and dark ones), multiple pairs of reading glasses (strong and weak) and various hats, we decided to add two more strips of 7 hooks each going right across the wall so there would be plenty of room for all those things.
There is almost no space between this rear wall of the camper and the slide-out wall as it slides in and out. So, all the things on the hooks have to be put elsewhere when we travel, but the hooks themselves fit just fine and it sure is convenient while we’re camping to have a home for all those items.
A long row of key hooks gives us lots of hanging options, and although we have to remove the items to move the slide-out, the strips of hooks themselves don’t interfere with the slide-out movement.
One of our earliest outings was a trip to visit our friends Ann and Phil who were camping nearby in the woods.
Phil and Ann have been living in RVs for over three decades and are a wealth of knowledge. They travel in both a “winter home” that is a beautifully appointed Alpenlite fifth wheel and a “summer home” which is a smaller, really well laid out and more maneuverable Class C. Phil spent his working years as diesel mechanic and mobile RV mechanic and he has an incredible shop built onto the back of his Freightliner that is a sight to behold. He and Ann ran an RV park for many years, and Ann is full of great ideas for ways to make life in an RV comfy and cozy.
During our visit they had two great suggestions for us. The first was to use a product called Alien Tape to mount lighter things on the walls of the RV. This is a double sided tape that has a stronger stickiness than any tape we’ve seen before, and it doesn’t ruin the walls when you remove it.
We used this tape to mount the key hooks and it was a snap. Later, when we mounted a clock and then decided we didn’t like the location, all it took was a good strong twist and the Alien Tape came off of the wall and also came off the clock and didn’t leave a mark or a stain behind.
Alien Tape makes it a cinch to hang things on the walls — and remove them too!
We also wanted a bigger storage area for things like sunscreen, moisturizer, bug spray, wallets, flashlights, etc., right by the door. I found two cloth hanging baskets that fit perfectly in the space next to the bathroom sliding door — his and hers!
These hanging baskets are good for slightly bigger items including wallets, moisturizer, sunscreen and flashlights that we want by the door.
You can also see the side-view of these baskets in the previous photos of the keyhooks.
The tricky thing with finding places to mount mini-shelves and storage areas on the walls is that we didn’t want to bump into them as we moved about and we didn’t want them to obstruct the movement of the slide-out as it went in and out.
The bare walls in the dinette were begging to be useful. Those walls aren’t near the slide-out movement, but we did have to worry about banging our heads on anything we put there if we leaned back in our seats.
This wall could definitely help increase our storage.
So could this one!
They turned out to be the perfect places for more spice racks to hold things like our two-way radios, current book we’re reading, iPad, etc
We put one on each wall. Both were mounted high enough so if we threw our heads back they wouldn’t hit the racks.
The spice rack can hold pocket knives, a book or two, an iPad and other goodes.
The movement of the slide-out wouldn’t impact this space at all but we did have to place the spice rack high enough so we wouldn’t hit our heads on it if we leaned back in our seats.
We both enjoy reading magazines, especially if we’re camping in a place with no internet (which happened quite a bit this summer!).
There is a big open wall space next to the refrigerator that could definitely hold something. However, the slide-out comes in along this wall, so there is only about an inch of depth, just enough for a magazine or very thin book but not enough for a solid plastic wall filing system.
I found a fabric magazine rack designed to hold manila folders for school teachers, and it works perfectly. I put a manila folder in each pocket to keep the pockets from sagging. Mark used extra screws and washers on either side to hold the whole thing flat against the wall.
We like to read magazines and this fabric magazine rack is nearly flush to the wall which makes it ideal for avoiding the slide-out wall as it moves in and out. It holds plenty of magazines!
We’ve always had a big struggle with shoe storage. We like to have a variety of shoes — a pair of running shoes, hiking boots, slippers and slip-on shoes/sandals for each of us — so the pile of footwear by the door is huge no matter where we live.
There is a tiny space between the step in front of the dinette and the back wall of the camper where I squeezed in a single tier shoe rack.
This shoe rack comes unassembled as a bunch of rods and shelf supports with holes in them for the rods. The smallest model I could find was a five tier unit, so I took the rods and shelf supports for just one level for the camper and built a separate four tier unit to use in our home.
Our shoe chaos was solved with one tier of a multi-tier shoe rack.
It doesn’t hold absolutely all our footwear, but the thin and flexible slippers and slip-ons can be shoved behind the dinette seat. The main thing was to get the clunky boots and shoes out of the way so we aren’t tripping over them each time we go in and out of the camper.
Now the big clunky shoes and boots are out of the way.
There is just one drawer in the whole camper, right next to the range, and it is so narrow it has just a single divider inside. I use it for silverware on one side and cooking utensils on the other. I hadn’t really thought about how to get more drawers into the camper, but our friend Ann showed us an absolutely fabulous product that she is using in her Class C to hold her silverware. It is an “Under desk drawer.”
The Under desk drawer (or “add-a-drawer”) is a single unit that gets hung under the desk or table with double-sticky tape, Alien Tape or screws.
The whole sliding mechanism of the drawer is built into one unit, and you mount the drawer under the table using either the stick-on tabs they provide or Alien Tape (or screws if you wish). I bought two drawers that fit perfectly on either side of our dinette table — his and hers again! Surprisingly, they are shallow enough that our knees don’t hit when we slide on and off the settees getting in and out of the dinette.
Two fit side by side just right and our knees don’t hit them!
Each drawer comes with a small sliding compartment so you can separate smaller and larger items if you wish (or you can remove it). These drawers are great for small tools and hardware as well as pads, pens, scissors and other office goodies.
These can be used for paper, pens and other office items or for small tools and hardware or even for silverware or cooking utensils.
I just love these — thank you, Annie, for your wonderful tip!
Well, that’s it for now. If you’ve got a small RV like ours, I hope these tips help you make the most of your space, and if you’ve got other cool space saving ideas please share them in the comments below!
Oh goodness, there’s Buddy under the covers. He took a nap throughout this whole post!
.
After I took this pic, he opened one eye and said, “If you aren’t going to talk about Lizard Hunting or Rabbit Chasing then I’ll just keep snoozing under the covers.”
.
More tips and anecdotes from our Life On The Road and At Sea:
Going full-time RVing is a blast. The exhilaration of hitting the open road and discovering the hidden jewels the lie just over the horizon is a peak life experience, and living this way day after day, year after year, is deeply fulfilling. But how do you transition from a conventional life to living in an RV full-time? It’s quite a leap of faith, and the process of going full-time RVing can have its ups and downs. There are some pitfalls to avoid and things to consider as you go through the planning process. Just for starters, which RV is best for living and traveling in?
Full-time RVing includes a wide range of lifestyles, from folks who travel a lot to folks who stay home.
Part-time RVers
Many “full-time” RVers are technically “part-timers,” living in their rig for a few months a year and maintaining a home somewhere. This is a great way to go if you can afford to have both a house and an RV, especially if you can leave your home under the watchful eye of a friend.
For most of these RVers, the travel routes are pretty much north/south. After spending the first months of our first winter in southern Arizona, meeting people from Idaho and Montana, we were amused to go to South Padre Island Texas and discover many of the RVers were from Wisconsin and Minnesota. Everyone we’ve met in Florida seems to be from Michigan or the Northeast!
A lot of full-timers don’t actually travel 12 months a year. Some rent or own a site in an RV park somewhere for part of the year, using this location as a home base and roaming around as the spirit moves them.
Seasonal RV park rates are reasonable, and some parks include a storage area for boats and ATVs or even an alternate RV like a “weekending” or “summer travel” truck camper. Some of these parks also allow you to spread out to do repairs on the RV and clean it up after a season of travel.
Some full-timers split their time between two RV parks where they have sites they rent or own. Many RVers work camp in a northern location in the summer and in a southern location in the winter. These types of full-timers have a strong sense of home and community because they return to the same places year after year.
Full-time RVers Who Travel All the Time
Many full-time RVers wander all over the place, more or less in perpetual motion. Some camp in state parks and forest campgrounds or boondock most of the time, and others stick to RV parks which have more amenities. Some belong to campground membership programs, giving them a primary resource for finding places to stay, and also giving them a rich social life as they make friendships within the programs and plan their stays to coincide with their friends’ stays.
Full-time RV Residents
Some full-time RVers stay in one park year-round. A few of these folks are retirees who no longer wish to travel but want to remain in their RV. Others are younger working people that have a full-time job in the area that keeps them rooted in one spot.
Starting a full-time RV lifestyle is an absolute thrill. Leaving the bonds of a conventional life to live in total freedom made both of us feel vibrantly alive. Years ago I wrote a blog post about why we decided to go full-time, called Why Do It? I outlined the many reasons we decided to leave our old lives behind and try a life of adventure on the road.
Going full-time sounds great, but there can also be some bumps in the road on the way to your dream RV lifestyle, and that’s to be expected. The whole process may go swimmingly and you may live happily ever after. But more than likely you will experience some heartache on the way. We did. It’s part of what happens when you deal with important things like Lifelong Dreams, Personal Growth, Enrichment and Fulfillment.
Downsizing
The downsizing process can be intense, especially if you are emptying a large house that you have lived in for years. Keeping your dream alive and priorities straight during this (sometimes) stressful time is really important. When we downsized a second time as we moved off of our boat and back into our RV, I wrote a post On the Road to Your Dreams, Stay the Course to help me keep the big picture in mind.
Ready for adventure!
For a lot of people, downsizing all the way into an RV is a really liberating experience. After the hard part of sorting through everything, there is an uplifting sense of relief and unburdening that happens when you let most of it go.
Retiring and Going Full-time Simultaneously
Many people begin full-timing at the start of retirement. This means they are going through two major life transitions at once. Simply changing from the workaday life to one of an agenda-free retirement is a shock to the system. Downsizing into an RV and moving away from old friends and life structures at the same time can become a little overwhelming.
Retiring early is a super idea, but there is no badge of honor for going full-time. In some cases it might make sense to enjoy retirement for a little while first. Going on some shorter duration RV travels before you jump ship all together might accomplish the same travel and freedom goals without giving up the security of everything you know right away.
Life Partners
At the same time as all of this, you are dealing with your life partner in a whole new way. You are together much more than you used to be and are suddenly dependent on each other in ways you’ve never been before. Learning how to operate the systems in the RV, navigating unfamiliar roads in a hugely oversized vehicle in traffic, and getting in and out of RV sites with an audience watching can put a lot of stress on a relationship.
What a marvelous night for a moondance…
To diffuse the tension a little, revel in acquiring new skills, whether it’s learning to read a map or learning to take directions from your spouse as you drive. Respect and patience go a long way as you both adjust to new daily patterns, and in the darkest hours, remembering why you fell in love in the first place always helps. Any scratches that appear on the RV as a result of your joint learning curve can always be repaired!
Build Up and Let Down
There is a huge build-up to the Day of Retirement, and even if you are 30-something and are starting full-timing, there is an even bigger build-up to the Day of Driving off to a New Life in an RV. Some kind of let-down is only natural.
There is also the shock of reality. The RV life depicted in blogs (including this one), books and magazines (including articles I’ve written) may not reveal some of the more mundane and even yucky aspects of life on the road. For us, this lifestyle is almost entirely one of wine and roses, but roses do have thorns and you have to learn to deal with them.
You may be ecstatic when you cast off in your new life, and you may be Living The Dream right from the get go. But if not, don’t panic. There’s an adjustment phase and a learning curve that most new full-timers go through.
It takes time to figure out your travel style and what works best for you.
Pacing Your Travels
It’s really common for new full-timers to drive thousands of miles to dozens of destinations at a breakneck pace the first year. We sure did. Heck, you’re excited! You’re free! You run around like crazy! And then you drop from exhaustion.
Learning to slow down and to alternate the sightseeing days with the chore days takes time. Allowing yourself to have a few down days of doing nothing so you can absorb all the thrills you just had during some exciting sightseeing days may make you feel guilty at first. But a life of full-time travel can’t be lived like an endless vacation. You’ll wear yourself down to a frazzle!
Embracing A Hobby
It can be exhausting to spend all day everyday either reading travel literature, sightseeing, or writing in your journal or on your blog about all you did and saw. There needs to be something more to life than scrambling from one tourist destination to the next.
Picking up a hobby can help immensely. Our travel lives changed dramatically when we decided to learn photography and learn to write and maintain a website. These are activities that are beautifully linked to our travel adventures, but they are hobbies in their own right too.
Making music, bicycling, hiking, geocaching, running, yoga, kayaking and learning to make videos are other hobbies that fit a traveling lifestyle well and will ensure you feel like you are living a life that is bigger than just being a tourist.
Making music is a fabulous pass-time on the road
What If It Doesn’t Work Out?
Even after dodging that mini minefield of possible obstacles on your way to living the RV Dream, you may decide the lifestyle just isn’t for you. What then? Is the fear that this might happen enough to keep you from giving it a try? I hope not!
You already know how to live a conventional life, and that life will always be available to you. There may be expenses involved in returning to it, but at least you won’t look back later and say, “I shoulda…I coulda…I woulda” Instead, you’ll say, “I did it! I lived my dream, even though it turned out not to be a dream I wanted.” More than likely, the experience will lead you to a dream you do want.
Jumping in with both feet
The most important thing to keep in mind throughout the whole transition process is that this is just a phase of your life. It is definitely not for the rest of your life Without a doubt, your full-timing adventure will end some day, and you will probably move on to another lifestyle that doesn’t include living in an RV.
So, set aside any fears you have, and live your dream. The full-time RV lifestyle may not last forever, but the memories will.
The most popular full-time rigs are Class A motorhomes and fifth wheels. Class C’s, Class B’s and travel trailers are less common. However, it is possible to travel fulltime in just about anything. Some of the happiest people are those that are debt-free in a smaller rig.
All that really matters when you select an RV for full-timing is that it feels like home to you.
The first time we boondocked in Quartzsite Arizona, we found we were neighbors with 150 Alpine motorhomes (worth as much as $400K) on one side, and a guy living out of the back of his pickup truck on the other side.
Do you need a huge Class A to have fun full-timing? Heck no! For two years this has been home for one couple we met.
In Florida we spent some time with a couple in their sixties who had sold their house and been happily touring the country fulltime for the past four years in a popup tent trailer.
The most seasoned veterans on the road have owned a variety of rigs. The average owner keeps an RV for just three years, and, having purchased three rigs in our first four years of RV ownership ourselves, we were ahead of the curve for a while!
If you haven’t done much RVing yet, a great way to get your feet wet and figure out what kind of RV you like and what features are important to you is to get a small and inexpensive one and take it on some long road trips:
However, rather than buying and registering various RVs, a much cheaper and easier way to sort out what you really want in your full-time rig is to do one or more RV rentals for a few days or a week. This will help you narrow down which features are most important to you and which ones you can live without.
In the end, the bottom line for buying your new rolling home is:
When you walk inside, do you smile and say, “Ahhhh…home sweet home!!” ?
Also, keep in mind that your first full-time RV probably won’t be your last. You can see our progression of trailer upgrades and truck upgrades throughout our full-time RV travels here:
Some thoughts about different styles of RVs for use in long term travel:
Both motorhomes and trailers have their pros and cons, and certainly either one makes a fantastic home. These notes are intended to give you some food for thought if you haven’t developed a preference yet. They are not meant to imply that one style of RV is superior to another.
Motorhomes are inherently more complicated than trailers because they combine the propulsion and the living quarters all in the same vehicle. Higher end Class A motorhomes also feature more complex systems in an effort to make them more like a residential house. Trailers, even high end fifth wheels, are usually outfitted with simpler systems.
There’s a big beautiful world out there… Honestly, any rig will be fun!
We have not lived in a motorhome, but our 44′ sailboat was very similar with a combined propulsion/house design and many of the exact same components as are found in a Class A diesel pusher.
Simplicity equates to less time spent on maintenance and repair and less overall expense for everything from initial purchase to insurance and motorhome warranty, to registration to maintenance and repair.
Small rigs:
Popup tent trailers are easy to tow, they fit in the garage, and they offer a lot of space for a small package. However, they can’t easily be used to stop for lunch at a rest area or overnight at a Walmart
Truck campers and vans make for tight living but can be parked anywhere, from National Park campgrounds to tiny urban roads in the congested northeast.
Travel Trailers and Fifth Wheels:
Travel trailers are cheap but can require a bigger truck than you might think to tow efficiently in the mountains (ours did).
Fifth wheels are easier to back up and hitch up than travel trailers but generally require a big diesel truck.
Fifth wheels are a lot taller and heavier than travel trailers (so you get fewer miles per gallon), and it’s easy to swipe everything off the roof by accident when driving under a low overhang.
Fifth Wheels and Motorhomes:
Driving
The comfort and view from the driver’s and passeneger’s seats in a big Class A motorhome are far better than in a truck.
Tooling around town in a car and getting parked is much easier than in a big ol’ long bed truck.
If you are driving a motorhome and need something in “the house,” the passenger can just walk back and get it.
Sometimes the huge windshield and large interior space of a Class A motorhome can make for hot driving and you need to run the generator and house air conditioning while driving to cool it down.
Gas stations are tough to maneuver in with any large RV. You can gas up a truck when it is unhitched from the trailer. Motorhomes don’t have that option but do have bigger tanks and need gas less frequently.
Fuel Mileage
Gas mileage on a truck towing a trailer may be slightly better than on a large motorhome towing a car (especially if the truck has an engine tuner)
Gas mileage around town on a car (if traveling with a motorhome) is better than on a big truck (if traveling with a trailer)
Depending on how much you drive hitched up versus unhitched, the total fuel bill for a motorhome-car combo may be the same as for a fifth wheel-truck combo (our driving split is 50-50, towing vs. not towing)
To get around town, most full-timers tow a car or “toad” behind their motorhome. Sometimes the toad becomes a handsome prince and is towed on a trailer rather than its own four wheels.
Maintenance and Repair
Larger Motorhomes require a “toad,” or car towed behind, if you want to get around town easily. That’s two engines to maintain — motorhome and car — and the car tires wear as they are towed.
Motorhomes are more more complex vehicles than fifth wheel trailers, so they take more time and expense to maintain and repair.
A truck with a dead engine can stay overnight in the repair shop while you live in your healthy trailer somewhere else. A dead motorhome engine may leave you looking for a hotel room and eating out if the repair shop won’t let you stay in it there.
With a truck and trailer combo, the propulsion part of it (the truck) is mass produced. There are dealerships in every town, and it fits in any repair bay at any shop, including Jiffy Lube.
You can change the tires on a truck and trailer with a jack stand and tire iron but will need to call someone for help to change the tires on a big motorhome
Cost:
A truck-and-trailer combo of the same quality, size and age as a motorhome-car combo is generally about 1/2 to 2/3 of the price all together. Insurance, warranty and registration costs are less too.
Truck and trailer tires are much cheaper than larger motorhome tires.
Oil changes are cheaper, although more frequent, on a truck than on a motorhome
Storage and Living:
A large motorhome will likely have a much bigger payload capacity ( > 5,000 lbs.) than a fifth wheel (< 4,000 lbs.) which is important for full-timers carrying a lot of stuff with them. Lots more info on that here: Choosing a Trailer for Full-time RVing – Payload
Bikes can be stowed inside a large motorhome bay, or in the hatchback of a “toad” with the back seat removed, or in truck with a cap towing a travel trailer, but they mostly likely have to be left outside on a truck and fifth wheel.
While at a campsite, the area under a fifth wheel can provide shade for camp chairs and protection from rain for outdoor goodies.
Almost all motorhomes come with a built-in generator which means that air conditioning is available at the push of a button, something solar power can’t easily do.
If you love your house but hate how it drives (or it has chronic engine/drive-train problems) or if you love the drive but the house has lost its luster, you can upgrade your truck or trailer independently of one another.
There is an urban myth that a motorhome is more appropriate for shorter stays and a fifth wheel is better for longer stays. This year alone, in 8 months on the road, we have stayed at 75 different locations for an average of 3 nights each. We’ve had a ball and it has been easy. We set up and break down in about 10 minutes. I’m baffled by that urban myth, have no idea where it came from, and can only say that it doesn’t apply to us and our fifth wheel! (Wait, what kind of “pacing your travels” was that?! Well, this wild road trip was preceded by 4 months of staying put in Phoenix AZ and included a one month stop in Sarasota, FL)
If you are willing to buy used, there are a lot of great deals to be found. RVs depreciate really fast. In five years an RV will be worth 50% to 70% of what it was new. In 10 years it will be worth 40% of its purchase price or less.
Negotiate hard. Mass-market brand “vacation” quality RVs often sell for 25-35% less than MSRP and higher-end “full-time” brands often sell for 20-30% less than MSRP, depending on the manufacturer. The NADA Guide gives the values of used RVs.
If you are buying a trailer, look at the sticker at the hitch end of the trailer on the driver’s side. This will show when the trailer was built. If it has been on the dealer’s lot for a while, sitting in the elements (snow, rain, mud, etc.) and enduring lots of foot traffic from customers, there may be a lot of nit-picky problems when you first move in.
The sticker will also give you the payload capacity of the trailer. Many “full-time” trailers are built with a payload capacity of less than 3,000 lbs. In our experience, that will not be enough in the long run. Our fifth wheel trailer has a payload capacity of 3,300 lbs and I sure wish it were closer to 5,000. Here are some thoughts on trailer cargo carrying capacity.
Climb up on the roof of the unit you are buying to see what condition it is in. While you’re up there, check out the other roofs in the lot. You’ll be able to tell which units are the newest ones at the dealership by the condition of the roofs!
Visit lots and lots of dealerships and talk to lots and lots of salesmen. The more time you spend shopping the better purchase you will make. Besides, it’s fun!
If you will be towing a car on a trailer behind a motorhome or double-towing a utility trailer behind a fifth wheel to haul extra gear, tools, or equipment on your adventures, contact Brechbill Trailers today to explore their selection and get expert guidance.
More of our Latest Posts are in the MENU.
New to this site?
Visit RVers Start Here to find where we keep all the good stuff. Also check out our COOL NEW GEAR STORE!!*** CLICK HERE *** to see it!
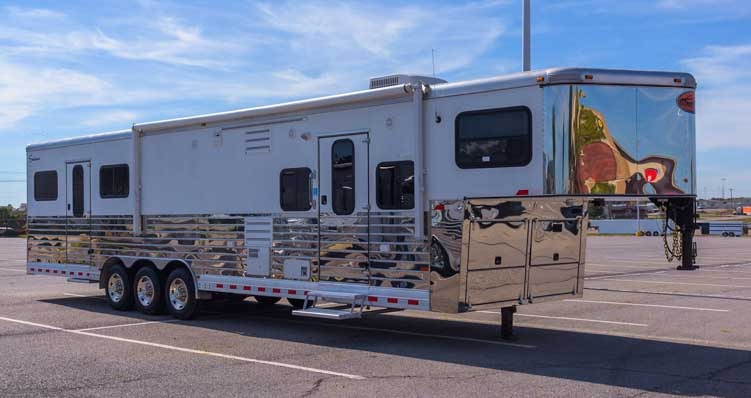
After 13 years of living on the road, first in a 2007 27′ Fleetwood Lynx travel trailer and then in a 2007 36′ Hitchhiker 34.5 RLTG fifth wheel, we switched gears and moved back into a sticks-and-bricks home.
But we didn’t want to give up the thrill of the open road completely! Since we still owned our 2016 Dodge Ram 3500 dually pickup truck, we decided a truck camper would do the trick for shorter duration adventures.
A 2005 Arctic Fox truck camper turned up on Craigslist in excellent condition, garage kept and barely used. Counting our lucky stars, we took the plunge, bought it, and have been having fun setting it up and taking it on a few short trips.
Here’s a quickie tour of the camper that will be our new little home on wheels.
Our new little buggy!
The Arctic Fox 860 has one slideout on the passenger side and is on the smaller size for a long bed truck camper. It is designed to be carried by a single rear wheel pickup truck so it is an easy load for our dually.
.
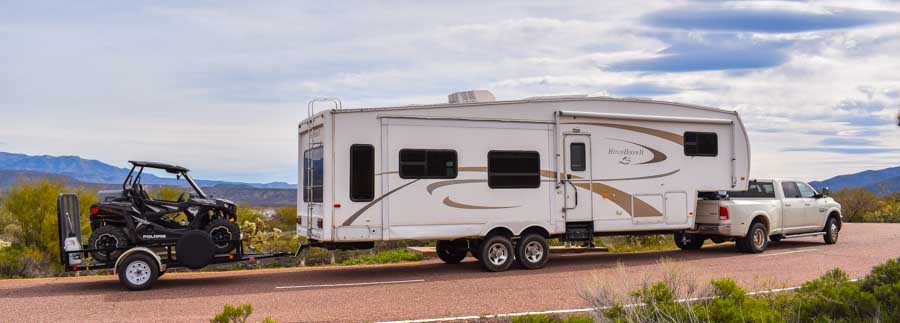
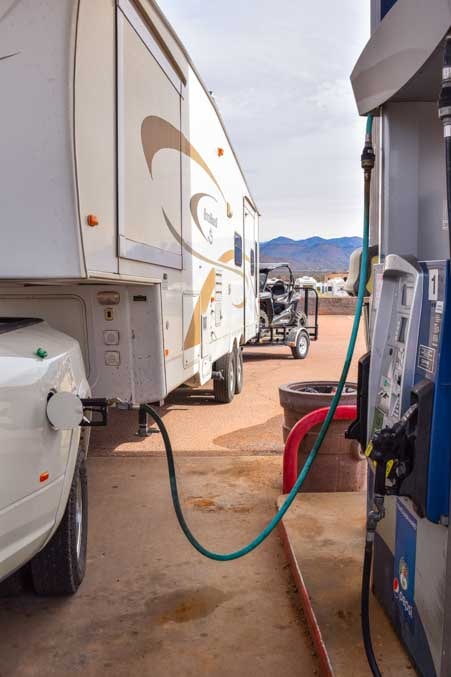
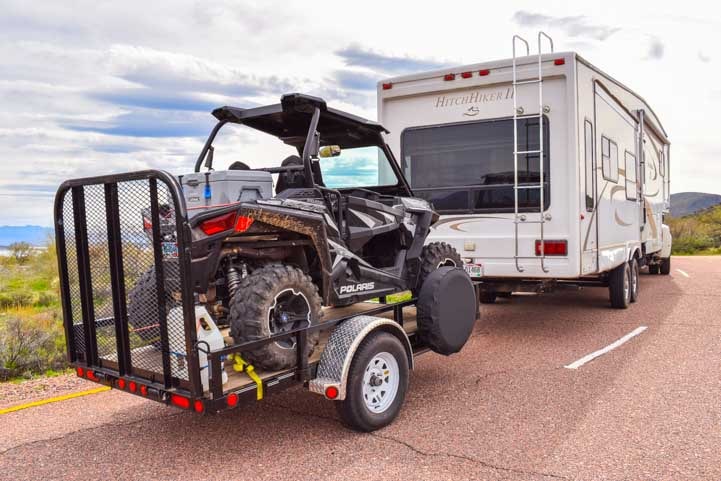
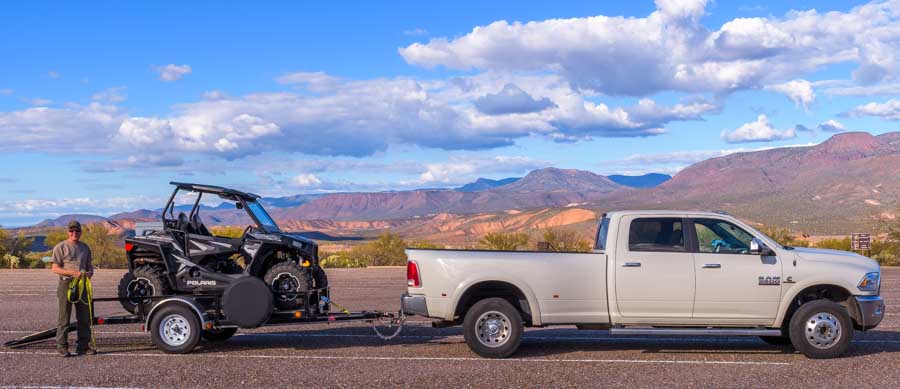
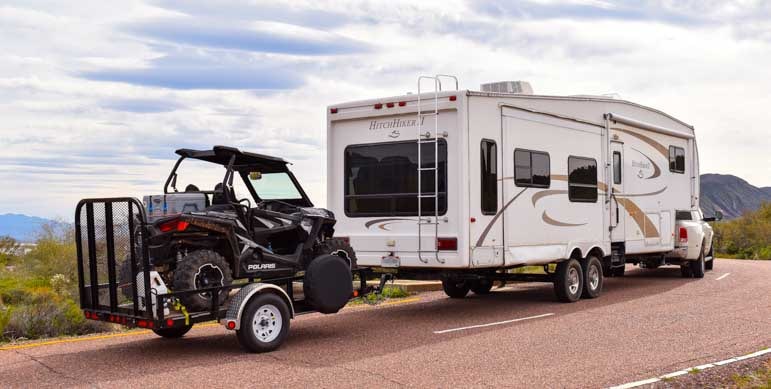
One of our goals was to be able to travel with our Polaris RZR in tow. We had triple towed the RZR on a small flat bed trailer behind our fifth wheel for two years. That worked, but it was cumbersome.
Having the RZR right behind the truck now rather than 40′ behind us makes it a lot easier to bring the RZR along on our travels. One thing that Mark has found, though, is that because our utility trailer is only 5′ wide, he can’t see it in the rear view mirrors when he’s driving unless he makes a very sharp turn. This makes it a bit tricky to back up!
Also, because our utility trailer is only 10′ long, it holds our Polaris 900 series UTV but can’t carry our bikes at the same time. I have a secret wish for a larger utility trailer which might solve both problems… we’ll see!
We can tow the RZR easily with this new rig.
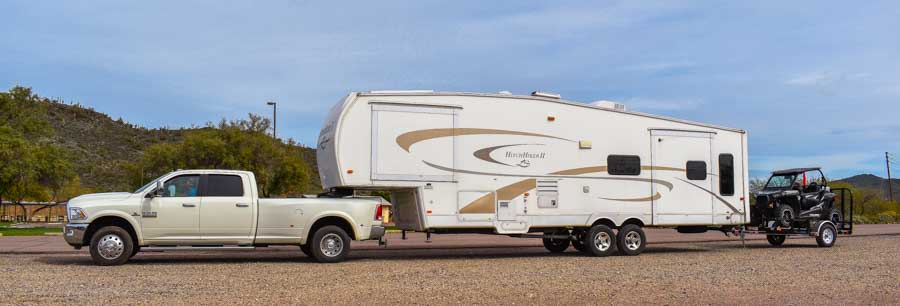
The Arctic Fox 860 does not extend beyond the back of the truck. Many larger truck campers hang out a foot or two beyond the back bumper of the truck. With those campers you need a hitch extension to tow anything behind. With this model, the RZR trailer hitches directly to the hitch receiver on the truck without an extension.
The camper doesn’t hang far off the back of the truck, so the RZR can be hitched directly to the ball mount in the truck’s hitch receiver.
FLOOR PLAN
Arctic Fox 860 truck camper floor plan
CAPACITIES
Here are the tank and HVAC capacities for the Arctic Fox 860:
Fresh Water: 46 gallons, including 6 gal. hot water heater
Gray Water: 25 gallons
Black Water: 25 gallons
Propane: 14 gallons (60 lbs.)
Furnace: 20k BTU
Air Conditioner: 11k BTU
INTERIOR
Oh look, there’s Mark at the door. Let’s head inside!
Come on in!
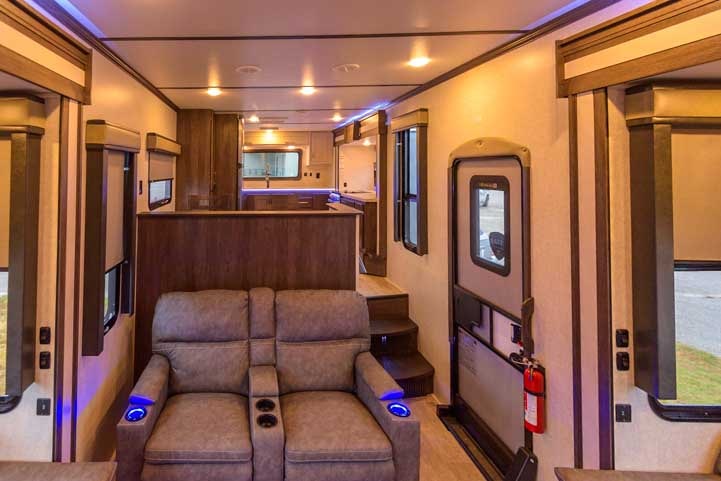
The interior is open and bright.
The slideout (right side of the pic) gives the interior an open feeling.
The dinette is on the passenger side as you walk in and it’s very comfortable for two. Since there are no recliners or sofa, we both like to turn sideways on the benches, lean against a cushion behind us and stretch out our legs!
The louvered window makes it possible to keep the window open even when it drizzles.
The dinette is comfortable and the window brings in lots of light.
The three-way 6 cubic foot refrigerator can run on 12 volt DC electricity, 110 volt AC or propane. The fridge is the same size as the one in our Lynx travel trailer that we lived in during our first year on the road. Our fifth wheel had an 8 cubic foot refrigerator.
The 6 cubic foot refrigerator is a 3-way (12v DC, 110v AC, or LP) .
The bathroom is on your left as you enter, behind a sliding door, and the kitchen is beyond that.
The bathroom and kitchen are on the left (the driver’s side) as you enter.
This camper has two showers, one in the bathroom and one outside. Back in our days of camping in our little popup tent trailer, we made good use of our outdoor shower and got a kick out of bathing in the fresh air (in remote places, of course!). Mark used to love showering on the back of the boat too!
Wet bath (ie., the toilet is your shower companion)
Wet bath
The kitchen is small but very workable and I’ve found it easy to make good meals in it.
Sliding pantry rack
The cupboards and drawer space are sufficient.
Years ago, for the boat, I bought a stainless steel Magma nesting pots and pans set which has several sizes of pots, pans and tops that all stack into each other along with two removable handles. I’ve always said this high quality, handy dandy compact kit would be ideal for a truck camper, and it is! (I just noticed that Camco and Stansport make similar smaller sets that are much less expensive).
I’ve never used the plastic cutting board sink covers in our previous RVs, but I find I tend to cover one side of the double sink all the time in the camper to get a little more working area when cooking.
Small but functional kitchen
When we took the camper out for our first overnight, we quickly realized we needed a little trash can. Mark improvised and converted a Deschuttes Pale Ale 12-pack box. Ya gotta have a little whimsy in life, so we’re keeping it for now!
Mark’s Deschuttes Pale Ale trash can is working out well!
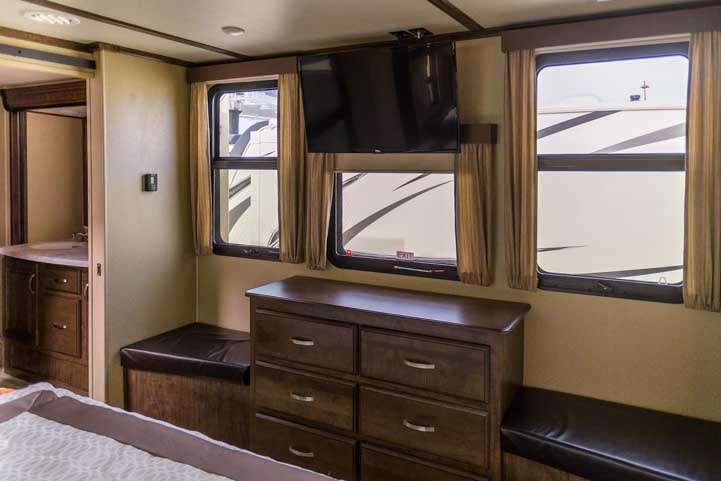
The bed is in the cabover part of the camper and is a queen size 60″ x 80″ mattress.
The bedroom 🙂
On either side of the bed there are two shirt length hanging closets with mirrored cabinet doors. There’s also an alcove with a window on each side. This makes the bed feel wider than a queen.
Each alcove has lift-up tops to access a deep storage area underneath. We can easily fit two week’s worth of summer clothing with plenty of room to spare.
Each of the window alcoves has a deep storage area beneath cabinet doors that lift up.
At the foot of the bed on the driver’s side there is a TV cabinet with a slide-out tray for the TV.
There is a large cabinet for a TV at the foot of the bed on the driver’s side (kitchen side).
On the opposite side at the foot of the bed a small door opens to reveal a full-length hanging closet that goes deep below the level of the bed.
Behind this door is a full length hanging locker.
And that’s the tour!
I’m heading out — I think there’s a hammock under the trees waiting for me out there!!
A sweet little home that fits right into the bed of our truck!
More of our Latest Posts are in the MENU.
New to this site?
Visit RVers Start Here to find where we keep all the good stuff. Also check out our COOL NEW GEAR STORE!!*** CLICK HERE *** to see it!
When Trailer Life Magazine asked me to write a 2,000 word feature article on RV dump station procedures, including step-by-step RV dumping tips, overall RV dump station etiquette and ideas for how best to empty and manage an RV’s holding tanks, all I could think of were two words:
“Don’t Spill !!“
Once Mark and I put our heads together, though, we realized it was a perfect opportunity to share the many dirty little secrets from the RV dump station that we’ve learned over the years! Our article quickly filled up with tips, procedures, hints, photos and ideas, and grew to cover seven pages of the May 2014 issue of Trailer Life!!
Holy cow!! I had no idea we’d learned so much about this topic and that we had so many ideas to share with the RVing community. Motorhome Magazine liked the article so much they ran it in their July, 2014 issue!
Dumping the holding tanks is easy. A few short steps and you’re done!
Dumping is a subject that is near and dear to every RVer’s heart (smile). So here is a synopsis of what we think are the most important things to do when visiting an the RV dump station or when you have sewer hookups at an RV park.
Over the years, we’ve received lots of queries about our thoughts on composting toilets and whether we use one or would recommend installing one if you are going to do a lot of boondocking. So there’s a section on that too.
For easy navigation within this post, use the links below:
Feature article: “Keep it Clean” Trailer Life Magazine – May 2014
(1) The most important thing at the RV dump station is to protect yourself from any pathogens that may be lurking, and to leave the place clean for the next guy.
As you do your work at the dump station, be aware of what you touch, because even though you are wearing rubber gloves, your gloves will still spread bacteria from one item to another.
At the end, when you take the first glove off, peel it back from the wrist to your fingertips so it turns inside out. Then peel the second glove off the same way while holding the fingertips so the second one rolls inside out into the first one in one unit. This keeps your hands from touching the exterior of the gloves. Then dispose of them properly.
(2) We connect a clear plastic elbow to our sewer hose so we can see what is coming out of the tanks. It’s not the prettiest picture, but this way we know the status as we go through the dump process.
(3) Before connecting our fresh water hose to the potable water spigot, we spray the nozzle of the water spigot with Clorox bleach spray.
(4) At the RV park, keep the black and grey tank valves closed. This keeps the liquids in the black tank and prevents the solids from drying out and getting stuck to the bottom and sides of the tank. It also prevents odors from the sewer to creep up into the rig via the sink.
Pour a bucket of water down the toilet to remove the solids.
(5) When flushing the black tank (about every 4-6 days or so at the RV park, or when at the RV dump), flush it first and flush the grey tank afterwards to clear the sewer pipes and hose of any black tank solids.
(6) At the RV dump, after the black tank is completely empty, we use a five gallon bucket to pour a pail of water directly down the toilet into the holding tank below. This removes any solids that are stuck to the bottom of the tank under the toilet. Usually two buckets is all that’s necessary for the water to run clear, although occasionally we need to dump in a third bucket. If you have a window in your toilet room, you can run a hose through the window rather than lugging buckets of water around.
(7) Once you are finished, hose down the whole area so the dump station is clean for the next RVer that comes along.
(8) In general, be courteous to your RVing friends at the RV dump. We find that popular dump stations often have a line of RVs waiting, especially at the end of a weekend. Try not to dawdle. We’ve heard of people taking showers while at the dump station because there is unlimited water and sewer capacity, but lordy, I would not be happy if I rolled up to a dump station and had to wait around for someone ahead of me to finish their shower!!
And where can you find an RV dump station? They are far more common than you might expect: national, state and municipal/regional parks, interstate rest areas, truck stops and RV parks all have them! The best resources for locating an RV dump station are:
Many RV parks and campgrounds allow RVers to dump their tanks in a site for free, usually about 25% to 50% of the cost of staying for a full night. Many of these places are listed in the above links. Of course, most folks figure that if you’re going to pay $10 to dump the tanks, why not spend $30 and spend the night at the RV park or campground as well!
TIPS FOR REMOVING DISPOSABLE RUBBER GLOVES
Thin rubber gloves fit fairly tightly on your hands and they can’t easily be pulled off by the fingers the way ordinary gardening or cold weather gloves can. Also, to be totally sanitary about things, it is best not to touch the outside of the gloves with bare hands after the dirty deed at the dump station is done.
Here’s an easy way to pull the gloves off by peeling one glove most of the way off one hand and then peeling the other off and over the first glove, leaving you with a neat little bundle where all the yucky stuff is on the inside:
Grab one glove by the edge of the cuff and peel it off your hand over your fingers stopping just before the glove is completely removed.
Then peel the other glove off over the first. Now the first glove is sealed inside the second glove which has been turned inside out.
WHERE TO DISPOSE OF DISPOSABLE RUBBER GLOVES
When we first started RVing, we saw tons of folks at RV dump stations using their bare hands. Fortunately, this article and others have encouraged people to protect themselves against lurking pathogens by using disposable rubber gloves.
However, we’ve begun to notice used disposable gloves lying around dump stations on the ground, in the grate and in the nearby bushes because folks just drop them after taking them off instead of throwing them in an appropriate trash container.
I’m not kidding!
After removing the gloves, please dispose of them properly. There may be a trash can at the RV dump station. If there isn’t, please put them in your own trash rather than throwing them on the ground or in the grate of the dump station!!
How inconsiderate and unnecessary! This was in an otherwise cute town in Montana!
HOLDING TANK TREATMENT PRODUCTS
There are a ton of RV and boat holding tank treatment products on the market, and some of them are extremely damaging to the environment. Many are made with various forms of formaldehyde and other toxic chemicals.
If you remember high school biology class and those gruesome dissections of fetal pigs, dogfish and other critters, you might remember that formaldehyde was the putrid smelling chemical that was used to preserve the carcasses. Formaldehyde isn’t the only toxic chemical used in RV holding tank treatment products. Some products are made with different types of embalming fluids.
Getting ready to do the dirty deed.
The idea behind using preservative and embalming chemicals on dead organic matter is to remove the stinky odor.
But do you really want the contents of your holding tank to be preserved?
It might be okay to preserve that stuff a long long time if it didn’t go anywhere, but what about the sewer system or septic tank that the holding tank’s contents are being transferred into when you dump them?
We have come across RV dump stations that were closed due to poisoning of the septic field and damage to the ground water supply caused by toxic RV holding tank chemicals.
The states of California and Arizona as well as the EPA have issued warnings about the use of those chemicals in RV holding tanks. California has considered banning their use all together.
For reference, here are a few links with more info about the environmental impact of toxic RV and boat holding tank chemicals:
The demo was pretty convincing. Two identical glass jars were filled with dog food, balled up toilet paper and water. One was beautifully preserved by a formaldehyde-based holding tank treatment product. The other was reduced to mush by RV Digest-It.
How did that happen?
RV Digest-It is an enzyme and bacteria based solution. The enzymes break down the solids in the tank, and the bacteria eat them up. What’s very cool is that, over time, the bacteria colonize in the holding tanks, and they continue working away, munching on the goodies in the tank and digesting them. They climb the walls and nibble on what’s there, keeping the walls of the tank clean and helping the tank level monitoring system perform better.
Another excellent environmentally friendly product that we use is Happy Campers Toilet Treatment. This is a powder product rather than a liquid. We have had equal success with both products.
The difference between these two products are the following:
RV Digest-It and Happy Campers are not the only enzyme-bacteria based holding tank product on the market. They’re just the ones we’ve used in both our trailer and our boat.
These may be just as good, we just don’t have personal experience with them.
Unfortunately, RV Digest-It and Happy Campers are not carried at many RV or boating supply stores, or Camping World, West Marine or Walmart. When we find one or the other, we stock up. Fortunately, they are available at Amazon.
HOLDING TANK CLOGS
Almost all black tank clogs are due to wadded up toilet paper. Most enzyme-bacteria based holding tank products claim to be able to break down even the thickest toilet papers. If you aren’t sure whether you can trust that claim, one way to avoid toilet paper clogs is to buy special RV (or marine) toilet paper.
We like the plush stuff, and we don’t want to test whether the bacteria like to dine on Quilted Northern, so we have opted, in our little household of two people, not to put our toilet paper down the toilet and into the holding tank. It sounds disgusting, I know. But it would be a lot more disgusting to have to fix a clogged black tank!
In our trailer, we find we have an overabundance of plastic supermarket shopping bags. Rather than toss them out, we put our soiled TP in a bag, sometimes doubled up, and dispose of the bags daily. Every shopping bag gets used, and there is nothing smelly about it.
Obviously, this is a very personal decision, and not one that’s worth debating if you don’t like the idea. However, I put it out there as something to consider. For us, having lived with holding tanks and funky RV and marine toilets for 7 years, it has worked just fine.
When it comes to freeing an RV holding tank clog, many people swear by Happy Campers Extreme Cleaner. We haven’t used it because we haven’t had a clog that bad, but if your tank is clogged up, give it a try!
LEAKY VALVES
Over time, the grey and black tank gate valves may begin to leak a little bit from debris getting caught and preventing the valves from closing completely. When this happens, you get a nasty little surprise at the RV dump when you first take the cap off the sewer line — a small bit black or grey water dribbles out. Having a bucket ready to catch that stuff is helpful, but it’s still messy.
One easy way to deal with this is to install an inexpensive Valterra T-58 twist-on gate valve. This screws onto the sewer opening the same way the sewer hose does and provides a final opening and closing valve to catch the dribble.
Screw on the twist-on valve and keep the valve closed until you are ready to dump the tanks. At the RV dump, start by removing the cap off the twist-on gate valve to attach the sewer hose, then open the gate valve to let the dribble out, and then open the grey or black tank valve to begin the dumping process.
For more RV dump station and holding tank tips, check out these articles:
FRESH WATER and WASTE WATER HOLDING TANK MANAGEMENT
WHAT’S A GIRL TO DO at the RV DUMP STATION? – RV Dump Station Tips for Women
For more RV tips, the following index pages give links to our extensive library of articles:
There is a growing interest in using composting toilets in RVs and boats instead of conventionally plumbed flushable RV toilets and marine heads, and we have received lots of inquiries from people who want to live an off-the-grid boondocking lifestyle, like we did, asking us if they should install a compost toilet in their RV.
We lived primarily OFF THE GRID in our RV and sailboat for thirteen years
During those years we spent 4,308 night either boondocking or at anchor in our sailboat.
We were very happy using CONVENTIONALLY PLUMBED RV toilets and periodically visiting RV DUMP STATIONS
In our minds, the expense and hassle of replacing a conventional RV toilet with a composting toilet is NOT REQUIRED AT ALL if you wish to live in an RV off grid. So, if you’re on the fence about whether to jump into this project, save your money and avoid the complications of installation until you have lived off the grid in your RV for a while. At that point you will probably have met several fellow RVers who showed you how theirs worked and you will be able to make an informed hands-on decision rather than relying on internet research.
I used to have a long rant here about the questionable practice of dumping the waste from composting toilets into the trash or out in America’s beautiful public lands. The composting toilets I was familiar with at the time did not compost the feces completely by the time the toilet needed to be emptied. It was gloppy and smelly. Also, the frequent dumping of large quantities of urine on public land seemed like a poor way to treat a National Treasure. Running into public bathrooms every few days to dump containers of pee also seemed like an awkward hassle.
Composting toilets have come a long way since then, and a seasoned RVing friend who has lived off the grid for decades recently showed me how her newly installed composting toilet works. I was astonished to see that the feces were fully composted into soil when it was time to empty the toilet. The urine dumping is still an issue, but if you are kind to the land and don’t repeatedly pour it all in one place, future users of your campsite will appreciate it. I’m still not sure about carrying a bucket of pee into a public bathroom stall on a regular basis…
I took step-by-step photos of my friend showing me how she and her hubby care for their composting toilet, and I noted which products they use for effective composting as well as for the avoidance of bug infestations. I will share those photos and their excellent tips and tricks in this space soon.
For us, we still find that dumping our holding tanks at an RV dump station is effortless and painless, and these days we have a conventional RV toilet in our seasonal-use truck camper.
For more information about living in an RV off the grid, see these links:
More of our Latest Posts are in the MENU.
New to this site?
Visit RVers Start Here to find where we keep all the good stuff. Also check out our COOL NEW GEAR STORE!!*** CLICK HERE *** to see it!
RVing full-time is becoming really popular these days, and you may be curious about what goes into living in an RV full-time. Who lives this way? And what’s it like working on the road? We absolutely loved our 13 years of full-timing and have a few tips to pass on.
Just another day at the office…what a place to live and work for a season!
OUR FIRST GLIMPSE OF FULL-TIME RVING
“The world is a book, and those who do not travel read only one page.” — St. Augustine, 354-430 A.D.
The first time we learned about the full-time RV lifestyle was in 2006 at Lake Cahuilla Campground outside of Indio / Palm Springs California. We were staying there for a week one February in our popup tent trailer to participate in the Palm Springs Century bicycle ride. We noticed that every afternoon there was a large gathering of people outside one or another of the RVs parked at the campground. These folks were all grey haired and whooping it up. Suddenly we saw an old-timer walking through the campground yelling, “Okay everyone: Time to get up from your naps. It’s happy hour!” It was a party on wheels!
We started talking to our neighbors at the campground about how they were living. Everyone was having a ball and seemed so free. We heard one woman talking to her adult child on the pay phone, saying “I’ll call in a few weeks to let you know where we are.” That sounded good to me — I had to be back at work on Monday! We talked to another woman who was getting a tan in southern California while her friends back in Idaho were shoveling snow. We heard a few folks making music around a campfire at night. From what we could see, they lived simply, they had fun with each other, and they seemed happier than anyone we knew at home.
We left California with a new idea taking shape in our minds.
Our popup tent trailer had become a key to new adventures and a new lifestyle! We researched what we could online and quizzed the campground hosts wherever we took the popup. Over time we learned that many people work as they travel, often as “work campers” at various tourist sites. Suddenly the idea of taking off on a long term travel adventure — with the backup option of getting part-time jobs if we ran out of money — seemed feasible.
We set off on our full-timing adventure within the year!
Full-time RVers are a rare breed that set out in their RVs for a life of travel. Many sell their homes, and most have gone through the life-affirming self-discovery process of downsizing all the way to an RV. They share a curiosity about what lies beyond the horizon, and they are willing to accept a few bumps in the road to find out. The full-timers we have met on the road include the following:
Retirees
The vast majority of full-time RVers we have met, perhaps as many as 98%, are retired couples. The average age is mid- to late-sixties, with a lot in their seventies, a few in their eighties and a few in their fifties. Of course, this is the age group that has the money, the time and the lack of day-to-day responsibilities that easily allow for this kind of free-spirited lifestyle. We have read about full-time RVers at both ends of the age spectrum. Many younger full-timers keep fabulous blogs, and some of the oldest old-timers have been written about in the magazines, including a woman who started in 1966 and was still out there in 2008 at age 90, and another fellow who started in 2007 at the young age of 104. We interviewed and wrote a magazine article about a terrific full-timing couple who began in their late 30’s and are still at it in their sixties.
Singles
There are quite a few singles on the road. We have run into the Wandering Individuals Network or WINS groups quite a few times over the years. They are a very active group of singles that has a great time together. Another group is Loners on Wheels. If you are a member of Escapees RV Club, you can join their SOLOS BOF (Birds of a Feather) Group.” We have camped near them quite a few times in Quartzsite, Arizona.
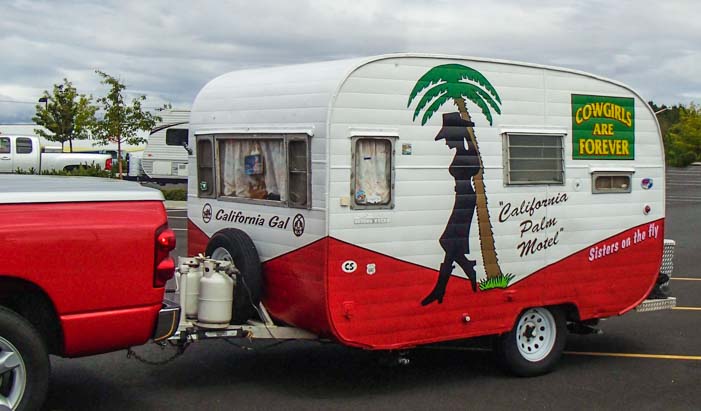
Surprisingly, we have met lots of women traveling alone. These gals are strong! A popular group for women RVers is Sisters on the Fly, which is open to any woman with an RV who wants to spend time with other women with similar interests, whether they are single or married, full-timing or not.
The “Sisters on the Fly” have a ball on gals-only RV adventures. Many of them have wonderfully decorated vintage trailers!
We have also met two men who had full-timed with their wives until their wives died unexpectedly. Deeply saddened and lonely, both men opted to downsize from a fifth wheel to a truck camper and continue traveling. We also met a solo woman who had lost her husband and decided to keep going, big RV, towable boat and all!
Families and The Under 50 Crowd
There is a growing interest in full-time RVing among younger folks, and there are many great blogs by younger RVers who are working on the road. Technology is making it possible for people to have a professional career without having to show up at an office every day.
We have read and heard about these fortunate people, but have met fewer than five on the road since we started RVing full-time in 2007. The youngest full-timers we have met personally was a couple in their early thirties. We’ve also met a handful of couples in their forties. We’ve met one family on the road, a French couple in their late forties with a 3 year old son. They were in the second year of a seven year RV trip around the world! Friends of ours from before our RVing days set off in a 24′ travel trailer with their three kids in 2016 and they have a YouTube channel filled with fun videos of their travels.
The online world of exciting blogs and social media groups related to full-time RVing for the younger set can make it look like there are tons of families and young couples out adventuring in their RVs full-time. This is a wonderful and lovely thought. However, in our personal experience on the road, we have met only an extremely very rare few.
WHAT’S THE BEST WAY TO LEARN ABOUT RVing FULL-TIME ?
You will learn the most about full-time RVing by talking to full-timers IN PERSON.
Where can you find them? At RV parks and campgrounds!
Most hosts are either full-timers or part-timers, and they are a wealth of information about every aspect of RVing, from rigs to travel to jobs to living small.
They may also know of other campers staying in the RV park or campground that are full-timers that you can talk to.
There is nothing like the back-and-forth of a real conversation to get all your questions answered quickly and to explore other subjects that suddenly spring to mind.
Before we started, we learned a lot this way. We owe a huge debt of gratitude to Bernie and Phyllis, hosts at Bonito Campground in Flagstaff, Arizona, who talked to us endlessly about trucks and fifth wheel trailers and solar power.
If you feel funny about taking up their time, ask the hosts if you could bring over some drinks and snacks at happy hour and chat with them about the lifestyle for a while. Few people will turn down a free drink and a chance to talk about a lifestyle they love!
You can do this kind of in-person research with experienced RVers whether you are staying in a hotel near an RV park, staying in a tent at a campground or staying in an RV.
Where can you find a high density of RV parks and full-timers? In the southern states in winter! Take a roadtrip to Quartzsite, Arizona, during the Quartzsite RV Show in January, and drive around on all the roads within a 15 mile radius of town. Pitch a tent and go make some friends. Or visit Yuma or Mesa, Arizona, or southern Texas or anywhere in Florida!
Renting an RV for a week’s vacation in southern Utah is a great way to sample the lifestyle.
A small used trailer or used Class C or van would work just as well.
This experience will teach you a million things about RVing and about yourself: the kinds of places you like to stay, the kinds of people you’re likely to meet in your travels and how the systems on an RV work, whether you are plugged into hookups or are dry camping somewhere.
If you don’t live in an area that lends itself to easy weekend RV travel, then flying to a gorgeous place and renting an RV is a fabulous way to go.
Renting an RV for a week may look really expensive on paper, but the memories will last a lifetime and the lessons you will learn will be priceless.
There are lots of RV rental companies all over North America. Most companies rent Class C motorhomes, and we’ve seen them everywhere in our travels. A few companies to look into that have their own fleets of rental RVs are:
There are also companies that offer rental RVs that are owned by private individuals or are part of smaller RV dealership rental fleets. These companies provide a “peer-to-peer” rental experience and function much like AirBnB and VRBO in the vacation rental property industry.
This kind of RV rental company acts as the middle man between the owner, who is renting out their own RV or one in their fleet, and the renter. The company’s website serves as an “aggregating” searching tool to put these two groups of people together.
This concept is potentially a great boon to both RV owners and to people who want to try out a particular style of RV before committing to buying one. For RV owners, there is a potential to make a few dollars on an RV that is otherwise sitting unused in their driveway. For prospective RV buyers, it is a neat way to try a tear drop trailer or fifth wheel trailer for a weekend and get more of a feel for it than just by looking at it on a dealership lot.
One of the first companies in this industry is RVshare.com.
Of course, both lessors and lessees need to enter into these contracts with eyes wide open, as there is the potential for things to go awry. An unscrupulous owner might be trying to make a few bucks from a junker that has been rusting in the back yard for a few years, or an unscrupulous renter might throw a wild party in someone’s meticulously maintained RV.
Take a vacation to a beautiful place in a rental RV!
The key to enjoying a happy RV rental, whether from a single source rental company that has its own fleet of RVs or through a website like RVShare.com that brokers deals between individual RV owners and renters, is to make sure you have covered all the bases before signing on the dotted line.
A few things to consider:
Have you tabulated all the hidden fees beforehand and do you have them in writing?
Do you have a written contract detailing how and when your security deposit will be refunded to you?
Do you understand exactly how the unit is insured (many private RV insurance contracts do now cover RVs that are leased out)?
Do you have all the codes and phone numbers necessary for obtaining roadside assistance if it is offered?
Have you done your due diligence searching for complaints against the company and pondering any negative reviews?
Have you contacted previous renters to find out if they were happy with their RV renting experience?
Do you have the phone numbers and names of the key people at the rental company so you know who is responsible and who to call in the event of breakdown or a financial concern?
Research the RV Lifestyle Online
In between your weekend and vacation RV adventure travels, there are lots of resources that will help you with your planning.
RV Forums – General purpose forums we’ve enjoyed: RV.net (Good Sam Club), irv2.com, and RVnetwork.com (Escapees).
Most manufacturers have owners forums too, and you can learn a lot about specific brands by reading the discussions.
RV Online Communities, including RVillage and social media groups on Facebook and Google+
One caveat about any online discussion group or website where the writers are fairly anonymous is that they may or may not be experts about the topic. Take everything with a big grain of salt and trust your own instincts. I was amazed to find out that a very outspoken member of a popular cruising forum hadn’t sailed in 30 years and lived hundreds of miles from the ocean. Yet he expressed his opinion on every cruising topic. It was his way of feeling connected to a world and activity he loved and dreamed of doing.
An inexpensive popup tent trailer can give you some incredible RVing adventures
WHAT DOES FULL-TIME RVING COST AND HOW DO YOU MAKE MONEY ON THE ROAD?
The full-time RV lifestyle can be very inexpensive or very costly, depending on how you choose to live. We are budget travelers and have posted a detailed explanation of our costs and budget over seven years of full-time travel here:
.
There are a myriad of options for making money on the road. The range of things available depends largely on how much money you need to make.
We started full-timing before retirement age, however we do not work. We live very simply and we were lucky enough to have a small nest egg before we began our adventures. We set up our investments before we left home.
Consulting Work or Part-Time Work In Your Profession
One approach to working on the road is to take part-time jobs in locations where you want to live for a while. Some professions lend themselves to that. Nurses can get three- to six-month contracts that pay a full professional wage. A couple we know of in the oil and gas industry takes contract work within their profession. We met a young couple that was waiting table at swank restaurants near their favorite national parks each summer and making enough money to float their RV lifestyle all winter. We met a woman who was a contract waitress for a catering firm in Las Vegas and she was doing very well too, bopping in and out of Vegas whenever funds ran short.
We have also met construction workers and electricians who work on jobs for short periods and then move on. If your profession doesn’t lend itself to part-time contracts, you might have skills or a hobby that lends itself to part-time jobs.
Early on, we met a young pair of musicians living in a popup tent trailer for the summer and playing gigs across the country. They booked themselves about 3 to 6 weeks out at various bars and other venues and were having a blast. We heard of a pair of sailors that did the same thing across the South Pacific ocean!!
One strategy is to work a “real” job for a period of time and then travel until the money runs out, and then repeat the cycle. School teachers can travel in the summertime. A ski instructor or sailing instructor can travel in the off season.
Ordinary Part-Time Jobs In Seasonal Tourist Destinations
There are also “help wanted” postings for part-time work in many towns that have a seasonal tourist industry. What fun to work in a boutique shop for a while! Many employers have trouble finding seasonal part-time workers among the local population, and they are happy to hire RVers who want to stay in town for a season.
In Jackson, Wyoming, where the billionaires have pushed out the millionaires, we spotted a help wanted sign in tne window of a fabulous bakery and coffee shop. I asked it they would hire RV travelers for two to three month stints. Absolutely! They loved the idea of mature workers who would be prompt and reliable. In the summer of 2014 they were paying $10 an hour.
Working on cruise ships and luxury charter yachts are another option. Just store the RV for the months you are at sea.
Self-Employment
Some RVers come up with a product to sell at the many RV rallies held around the country. Others write books about RVing or their travels or take on some freelance writing. An engineering friend of ours absolutely loves to grill meat, and he was hanging out on his favorite website about barbecuing and grilling one day when he noticed they wanted someone to do scientific testing on grill thermometers. He made $8k last year testing thermometers for them. Who woulda thunk??!!
Transcription work can pay really well. Full-timer Wendy Estelle explains the details on her blog, Gypsy Gibberish, HERE.
Another popular occupation for RVers is to work for the company that provides the free RV campground maps that you get when you check into a park, AGS Guest Guides. These maps/guides are paid for by the advertisers whose ads appear on them, and AGS Guest Guides hires reps to go out into the community to solicit ads. From what I understand, reps can stay in the RV park for free for as much as two weeks while they meet with the advertisers and get to know the area. More info here: AGS Guest Guides.
Many people dream of making money on the internet from a blog, or some sort of web service, or from online product sales. This is highly competitive, however, as everyone in the world wants to stay at home and make money on the internet, whether or not their home is an RV.
Is an RV blog a good way to earn a living in the road?
So, can an RV blog support your travels? Our blog has given us priceless experiences and opened some wonderful doors and given us some great opportunities that wouldn’t have been possible otherwise. For cold, hard cash, however, a “real job” (flipping burgers) would pay far more per hour for the first few thousand hours. I explain a bit about how all this works in this post: In the Spirit of Giving.
I’m hardly an expert on travel and RV blogs, however, and my experience is limited. A far more experienced blogging couple, both of whom work on activities related to their blog all day every day — and theirs is one of the top travel blogs in the entire world — has this to say on the subject of making money from a travel blog: I Want To Know Your Secret
In a nutshell: if you need to earn cash on the road to make your dream of a full-time RV lifestyle come true, the bottom line is to get creative. What do you love to do? How would you like to spend your days?
Work Camping – What Is It and How Do You Find Out About Job Openings?
Work camping is part-time work that is geared specifically towards RVers, often including an RV site on the jobsite or nearby as part of the compensation or at a reduced rate. Work camping is super popular with full-timers, and many choose their destinations based on work camping opportunities. Most of them seem to love their work. If you don’t need a full-time job to cover your expenses but do want a little supplemental income or want to work in exchange for a “free” RV site, this is a great way to go.
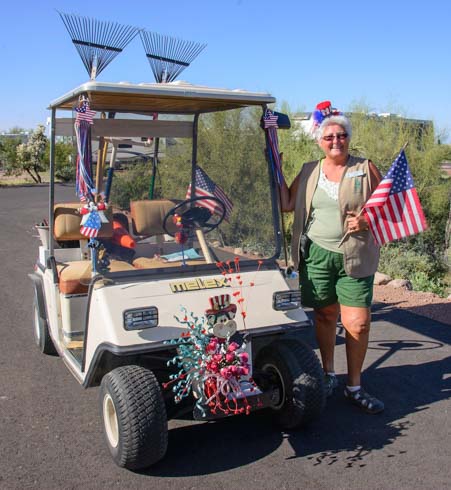
A very happy work camper on the job
The best workcamping options, according to the workcampers we have met on the road, are often found either in private deals or at small out-of-the-way places. One workcamper who has been at it for over 15 years told me that his favorite places were small historic sites.
Another workcamper we met on the Oregon coast was assigned the task of distributing literature to beach-goers about a rare plover that nested in the dunes. He loved birds, and these plovers were interesting little creatures. What a fun way to keep the public informed about an unusual bird and get an RV site with full hookups in exchange.
A good arrangement I heard about was a very wealthy absentee estate owner who needed someone to mow the lawn once a week. The estate owner had installed RV hookups and the work camper lived on very plush grounds for a few months in exchange for mowing the lawn and “being a presence” on the property.
Some private RV parks pay a good wage for workers that can maintain the grounds, check people in and out, etc. We’ve heard of pay rates as high as $20,000 for a couple, each working 25 hours a week, for six months. One of our readers told me about a fabulous job she has manning the guard shack at an oil field. The work is easy and the pay is terrific.
Work campers at the Escapees CARE Assisted Living facility in Livingston, Texas, receive meals as well as an RV site, and they get a discount on future stays in other Escapees RV parks to boot.
In Mesa, Arizona, where thousands of snowbird RVers flock each winter, we met two couples work camping at a cute little bakery called RaVeS Cafe. It has an RVing theme and is adorably decorated with RVs and RVers in mind.
At stunning Bryce Canyon National Park, in Utah, the privately owned hotel, gift shop and restaurant complex that is located just outside the park, Rubys Inn, has an RV work camping program that we’ve heard great things about as well: Rubys Inn Employment.
Work campers at RaVeS Cafe in Mesa Arizona
And, of course, some people work camp not because they need the cash but because they want to give back to society. There are loads of opportunities through the National Park Service, US Forest Service, BLM and Army Corps of Engineers.
One really fascinating workamping volunteer position we discovered was cataloging ancient Indian pottery for the National Park Service. This job was described to us by our vivacious tour guide on a ranger-led tour we took of the ancient Indian ruins at Tonto National Monument in Arizona: Workamping with the Ancients at Tonto National Monument
Another very popular program designed specifically for RVers is Amazon Camperforce where you can join dozens of other RVers at the big Amazon warehouses during the holiday season, packing boxes and shipping products, and make some really good money while you’re at it.
Websites that list work camping positions include the following:
We have not work camped yet, but we have met a lot of people who have. Listening to their stories prompts these thoughts:
— Choosing a work camping position is a hunt both for property and for a job. Not only do you need to make sure you want to do the work that’s required, but it needs to be in a place where you want to be, both on the map and within the grounds of the location.
— Sometimes work campers are given a yucky site next to the dumpster out back. Sometimes they are required to work 35 hours a week instead of the advertised 20 hours a week they saw when they took the job. The National Parks subcontractor Xanterra has been notorious for offering poor work and sub-optimal RV sites for minimal pay.
On the other hand, we’ve met RVers work camping at state park campgrounds on the waterfront in San Diego that keep going back and back and back again because they love it so much.
Raking is fun but taking a break to play air guitar is even more fun!
— Whatever kind of part-time work you take, whether in your professional field or work camping at a National Park, it is important to evaluate both the work required and the wage being paid to make sure you feel the exchange is fair. If you are trading labor for a site, make sure the site and the hours of labor you are paying for it match up with other RV park sites in the area — or that you are happy with the trade.
— For many retirees, there is nothing more fulfilling than helping out at a national or state park, and the positions can be in the gift shop, at the front gate, on the grounds or in the bathrooms. We met an 81 year old whose RV site at a national forest campground without hookups would have cost him just $3 a day if he didn’t workcamp there. However, he was more than happy to put in 8 hours of work a day picking up trash for four full months. He made a massive contribution to the area, and was sorely missed when his workcamping stint was over. He sure wasn’t being paid fairly, but he was one happy camper!
— For younger folks that need a living wage, the step down from a professional white collar position to cleaning the bathrooms at a private RV park can be a big jolt. Sometimes the bosses don’t remember you had a fancy career and they treat you like grunt labor. It’s important to think all this through before ditching a good paying conventional job and a big house mortgage to live in an RV and bounce from RV park to RV park doing menial work.
Fortunately, there are many kinds of work camping opportunities, and judging by the number of very happy work campers we have met, it is definitely a viable option to flush out the travel kitty and reduce camping costs.
More of our Latest Posts are in the MENU.
New to this site?
Visit RVers Start Here to find where we keep all the good stuff. Also check out our COOL NEW GEAR STORE!!*** CLICK HERE *** to see it!
June 2019 – One of the biggest surprises for us when we began our search for a new fifth wheel RV to be our full-time home was the gargantuan sizes of modern day RV refrigerators. When we last searched for a full-time fifth wheel in 2007-08, most upscale rigs had a modest 10 cubic foot refrigerator in the base model.
In those days, many of the manufacturers of higher quality rigs offered an upgrade to a 12 or 14 cubic foot fridge. Also, a lot of the entry level units being built back then by those same (now non-existent) manufacturers had an 8 cubic foot fridge with an upgrade to a 10 footer available.
Our Hitchhiker was a “budget” model that we bought right off the back lot at the factory, so we ended up with the smaller 8 cubic foot fridge.
Our 2007 Hitchhiker fifth wheel has an 8 cubic foot refrigerator. This now “tiny” fridge has served us well since we moved into our trailer in 2008.
This was an upgrade for us anyway. Our first year of full-timing in 2007 was spent in a 27′ travel trailer that had a 6 cubic foot fridge. So, moving to a bigger fridge in 2008 was terrific.
The 8 cubic foot model has been fine for us ever since then, although our ears do sometimes perk up when we hear the turf wars breaking out between the veggies and the beer.
Neither the beer nor the veggies has emerged a consistent winner over the years, but we have found a way to keep the battles from spreading onto every shelf in the fridge.
Even though most owners of late model higher end RVs have either a residential 110 volt a/c refrigerator or an 18 cubic foot two-way “RV refrigerator” that runs on either propane or household 110v electricity, modest sized RV fridges still appear in many smaller RVs and truck campers. So, I thought I’d share our tactic for keeping those big unwieldy bags of vegetables under control.
RV two-way propane/electric refrigerators do best when stuffed full. There’s actually lots of room for goodies even in this small model. This isn’t even full!
I like to buy all the veggies we’ll be eating for the next week or so at once and then cut them up and store them in a single container all together. I cut them in large chunks and then layer them into the container so they are nicely mixed rather than segregated.
I’ve found about six to nine veggies will fill a half-gallon size plastic tub. I have a taller thinner size container with a snap-on top that disappears inconspicuously into a corner of the fridge. I mix up the types of vegetables I put in it with each supermarket run.
All these colorful fresh veggies used to take up a lot of room in the fridge. Their plastic bags were everywhere!
Sure, this method means that we eat the same basic veggie mix until it’s all gone, but I love being able to grab the veggie bin and whip up something without having to take each individual vegetable out of the fridge, get it out of its plastic bag, and chop off what I need for that meal.
If I want the veggies diced smaller, I just grab the chunks I want from the bin and cut them into smaller pieces.
All those veggies fit in this small half-gallon snap-top container!
The veggies seem to last quite well in this snap-top tub, usually a week to ten days. Starting with super fresh veggies helps.
We have our own favorite vegetables, but depending on what is popular in your RV, any or all of these work well:
Bell peppers (pretty colors)
Zucchini and/or summer squash
Broccoli and/or cauliflower
Green beans
Snap peas
Baby carrots
Grape tomatoes
Celery
Red onion
The veggie container is tucked away in a corner!
Things we do with them (sometimes diced smaller) have included:
Served raw with a veggie dip made from plain yogurt and a ranch style powdered dressing mix
Served on a bed of spinach and/or romaine lettuce as a salad
Stir-fried in olive oil in a skillet
Cooked in a covered, salted skillet on medium heat with a splash of water thrown in one minute before serving for quick steaming
Steamed/boiled in a pot
Lined up on a skewer and grilled on our BBQ grill (best if segregated due to different cooking times)
Tossed into an omelet with meat and cheese
Rolled into a tortilla and microwaved with leftover steak/burgers/chicken topped with a little cheese
For sailors who come across this article, the best way I found to deal with the big, deep, dark refrigerators on older boats that require a veritable deep dive — feet in the air — to be able to reach the bottom is to put everything in large tupperware containers, segregating the meat, veggies, cheeses and even the condiments. This way, it’s easy to find the items you want because you are handling only a few big containers that are well labeled rather than digging around for that small jar of mustard you know is buried at the bottom in the wet mess somewhere.
Likewise with the tiny 3.5 cubic foot under-counter RV fridge that we had on our sailboat in Mexico. The plastic tubs were smaller and didn’t have covers (so the contents could mound up above the sides a bit as necessary), but the important items were grouped together into two or three bins, and when mealtime prep began, all the bins were taken out of the fridge at once and laid out so it was easy to locate the individual bits and pieces.
One of the unfortunate side effects of RV manufacturers moving towards ever larger refrigerators is that they cost a lot in terms of usable space in the kitchen. An 18 cubic foot RV refrigerator is 36″ wide while an 8 or 10 cubic foot RV refrigerator is only 24″ wide.
I measured out the 12″ we would have lost if our Hitchhiker fifth wheel had been built to accommodate an 18 cubic foot RV refrigerator the way all modern larger fifth wheels are built nowadays. We would have lost an important section of counter space, an upper cabinet that houses three shelves and a lower cabinet that contains a drawer and two shelves underneath. That is a lot of nicely partitioned storage to give up!
Modern higher end RVs have 18 cubic foot propane/electric refrigerators that eat up other kitchen counter and cabinet space.
RV refrigerators don’t get the Energy Star rating that many residential refrigerators do. They are inefficient and they operate best when they are packed to the gills with lots of cold stuff inside.
After we do a big shopping spree, we usually have two levels of goodies on every shelf and all the cold stuff is squeezed in pretty tight. As the days go on it loosens up a bit.
Given the RV propane refrigerator quirk of needing a very full fridge to operate well, I can’t imagine having enough cold food to keep an 18 cubic foot refrigerator continuously stuffed in a household with just two people. We would have to chill 24-packs of beer and multiple gallons of fresh water. Frankly, I think I’d be chilling our canned goods too!
That is all fine and dandy, but where space is at a premium — especially in the tiny living quarters of a toy hauler — it seems silly to give up precious cabinets and counter space to have a fridge that is difficult for two people to keep properly stocked (to overflowing) all the time.
Not only does it take a lot of propane to run an RV fridge when shorepower isn’t available, but RV refrigerators are expected to fail after about 8 years. We replaced our RV fridge under warranty right at the 8 year mark when it died unexpectedly.
However, built into the cost of any extended RV warranty is the cost of replacing the major appliances, including the RV refrigerator. So, the price of an extended warranty for an RV with an 18 cubic foot RV refrigerator is going to be a whole lot more than the price of an extended warranty for an RV with an 8 cubic foot RV refrigerator.
The bottom line that isn’t so obvious on the RV showroom floor is that RVers get hit with the exorbitant cost of replacing a huge two-way propane/electric RV fridge either way. Wouldn’t it be awesome if RVers were given a choice on a $100k (or more) RV to have a more modest sized RV fridge?
Of course, an 18 cubic foot residential 110 volt refrigerator is a fraction of the cost of an equivalent propane/electric RV refrigerator, along the lines of $2,000 versus $4,000, but powering such a beast without shorepower is a big ol’ can of worms unto itself. This is likely the reason why the National Sales Director at one of the major mass market RV manufacturers told us “The industry is getting away from residential refrigerators and going with the new 18 cubic foot RV refrigerators instead.”
Ironically, requesting a 10 cubic foot RV refrigerator from the custom manufacturers was met with the head scratching concern that their units are built to a certain very high standard and a modest RV refrigerator is not really up to that standard. In the end, they would prefer not to have their name on a fifth wheel roaming around the country sporting a smaller RV fridge. Undoubtedly, that issue could be pressed, but our initial request was not met with the expected enthusiasm of, “Oh, of course we can do that. We’d be glad to!”
Now, these are all very personal preferences, and there’s no right or wrong way to live the RV lifestyle. Our RV search has been an interesting journey through the maze of the modern day fifth wheel market, and this crazy refrigerator issue has been just one odd stumbling block in the whole process.
I just finished writing a detailed article for Trailer Life magazine about what we’ve learned and seen in our search. The article will be appearing in the September 2019 issue. If you subscribe to Trailer Life, keep an eye out for it!
In the meantime, give the veggie pre-prep idea a try. I like handling our veggies this way so much that I’d probably do it no matter how big a fridge we had, whether in a rolling home or in a stick-built house!
More of our Latest Posts are in the MENU.
New to this site?
Visit RVers Start Here to find where we keep all the good stuff. Also check out our COOL NEW GEAR STORE!!*** CLICK HERE *** to see it!
May 2019 – We’ve been on the hunt for a new fifth wheel trailer to replace our current one as our full-time home for a few years now, and in the last week or so we’ve been closing in on what we want.
.
It’s been a long and wild ride, but I know a lot of our readers have been going through the same roller coaster of emotions — from elation to frustration — in the search for an RV, so I thought I’d share a little about what we’ve seen and been thinking about in our own quest.
An RV home can be very warm and inviting and cozy. Warm banana bread in on a cold morning…what could be better?
We love our life on the road and we have a cozy home, but our zippy and fun RZR out back has sent us on a wild goose chase for a way to bring it along and still enjoy all the comforts of home. Triple towing is a tricky business, so buying a toyhauler seemed like the obvious solution at first and our search began there.
The Luxe toyhauler is very high end.
We started our search without a budget in mind. We wanted to see what was available regardless of price, so we visited The RV Factory where the semi-custom Luxe trailers are built.
These trailers have 3.25″ wide walls with graphite infused styrofoam insulation, and they feature 8k lb. Dexter axles with 17.5″ wheels and disc brakes along with gorgeous cabinetry and top of the line everything.
Disc brakes are standard on the Luxe
These are such high end trailers that all the drawers have dovetail joints.
Dovetail joints on the drawers…sweet!
The interior of the finished toy hauler they had on display at the factory was bright white and sumptuous. During our visit, we ended up chatting with a Luxe owner at the factory who was getting a few minor repairs taken care of. He’d owned his trailer for six months and was very happy with it. We just weren’t sure we wanted to tow a trailer this heavy.
We submitted our ideal toy hauler floorplan to both New Horizons and Space Craft (we also submitted it to Featherlite which we discovered is no longer building toy haulers). Both companies expressed concern that our truck, even with its dual rear wheels and 4.10 rear end, might not be able to tow one of their trailers if it exceeded 40 or 41 feet in length.
Our design was likely in the 42 to 43 foot range, but despite several phone calls and one two hour long in-person meeting, we never got far enough in our discussion with either manufacturer for them to put the design in their CAD software and draw it out.
This made us look more closely at the mass market toy haulers which are all in the 42 to 45 range. They are a bit lighter than the high end rigs, if less durable, of course.
Clean and crisp white Luxe toy hauler interior
.
By far, the most ruggedly built trailer for its weight that we saw was the Aluminum Toyhauler Company fifth wheel trailer. These folks come to the toyhauler market from the stackable race car end of the trailer world. The ATC fifth wheel toy hauler has a truly massive cargo carrying capacity, but it lacks some of the other toy hauler features most RVers take for granted. When we visited the factory in September 2018, the ramp door didn’t convert to a patio. It may now.
Aluminum Toyhauler Company (ATC) makes a rugged but lightweight rig
The ATC is purpose built for outdoor enthusiasts who expect their equipment to hold up under harsh conditions. All the interior cabinetry is aluminum and custom made in-house, and the whole trailer can be power washed inside and out. There are no slideouts but future models may include them. They have a basic open box model that you can modify to your own needs, and they’ll install a garage wall if you’d prefer an enclosed garage.
ATC prides itself on having no wood in the rig — that way nothing can rot, no matter how wet ‘n wild it gets!
Another interesting tour was the Sundowner factory tour at their plant in Oklahoma.
These aluminum trailers are also really well built although they are using Lippert axles in the current builds (they used Dexter until a few years ago). Coming to the toyhauler industry from the horse trailer world, they are designed around a gooseneck hitch. The beauty of the gooseneck hitch is that the bed of your truck doesn’t have a big ol’ fifth wheel hitch hogging up all the space when you’re driving around unhitched.
Sundowner makes beautiful gooseneck hitch toy haulers
Sundowner builds its own entry doors and ramp door, and like ATC, their ramp door didn’t convert to a patio at the time of our visit. But it may at a later date.
Looking into the garage of a Sundowner toy hauler
When a trailer is designed to use a gooseneck hitch, the height of the trailer is kept quite low. The Sundowners are around 11′ tall as compared to 13′ 6″ for most conventional mass market toyhaulers. This makes them more aerodynamic but also means the bedrooms are not standing height. They are more like the bedrooms in a truck camper.
Gooseneck trailers are designed this way because the arm of the gooseneck hitch is quite long, and the higher the trailer roof is, the longer this lever arm becomes and the more the roofline will sway from side to side as the trailer goes down the road, putting all kinds of lateral stresses on the frame.
Sundowner does a lot of custom and semi-custom work, and they will happily design a trailer that is 13′ 6″ tall and has standing height in the bedroom, but that is not typical of their designs.
One interesting thing with both the ATC and Sundowner trailers is that because they are coming from the stackable car trailer and horse trailer markets, their trailers sit quite low to the ground and the ramp doors have a shallow angle. This is great if you are driving your muscle car or sports car into the garage because the back end of the car won’t drag as you drive in. But it is less important for the folks with a rock climbing RZR that can drive up onto anything.
The cabinetry and finish work in the Sundowner is top notch and many different woods and fabric are available.
The gooseneck hitch means the ceiling is low in the bedroom, but that
doesn’t mean it can’t be romantic!
We also visited several mass market trailer factories in Indiana. At the time we were most interested in the Keystone Raptor and KZ Venom. We saw a beautiful Keystone Raptor 421CK at a dealership in Wyoming prior to going to Indiana. It was the first toy hauler we had ever walked into and said, “Wow. We could live in this!” However, the garage was only 11′ long and we’d decided we needed at least 12′ to fit our RZR and bicycles.
A KZ fifth wheel gets its flooring
The thing about toyhauler garages is that the patio doors and railings take up anywhere from 8″ to 16″ at the back of the garage when they are folded up against the closed ramp door. Also, there is a slope at the back of the garage floor that is about a foot long. It is there to extend the ramp angle of the ramp door so the ramp angle isn’t too steep. These two things combined can eat into the garage length by quite a bit. The 13′ garage might may have only 10′ 8″ of flat floor space, and that was typically what I saw with my tape measure in the various garages we looked at.
KZ fifth wheel walls and front cap get started
Also, if there is a side patio and some of it is built onto the garage sidewall, the garage will lose about 8″ of width where the side patio folds into the trailer.
Likewise, if there is a 2nd bath or half bath in the garage or living area, some of the garage floor space or living area floor space will be lost to the bathroom.
It makes a big difference in the livability and usability of both the garage and living space if the door to that half bath opens into the living area or into the garage. Whichever way it is, you don’t want to block the bathroom when you’re parked!
Some Heartland Road Warriors now have a moveable partition around the half bath that becomes a wall when you’re parked but folds out of the way when you need the extra inches for your toys.
KZ Durango. You don’t realize how huge the openings are for the slideouts til you see it like this!
Most toy haulers have a loft area above the garage that runs the full width of the trailer along the wall that separates the garage from the living area. It’s worth some thought to decide if you’d prefer the loft area to open into the garage or into the living space. It may also be possible to modify the loft wall on one side or the other post-purchase so you have access from both sides.
The sidewalls of the main part of the trailer are quite minimal!
We also visited the Highlander RV plant which is the Open Range toy hauler brand.
The Highlander toy hauler from Open Range
Open Range is owned by Jayco which is owned by Thor. The Highlander toy haulers come in at a lower price point than most. Jayco is known for employing Amish people on the assembly lilnes, and they really do. We saw their buggies in the parking lot and driving around the area.
Lots of Amish people work on the RV assembly lines
.
From what we saw, all fifth wheel trailers and toy haulers at each given price point are very similar. I don’t know that there is much quality difference from one mass market brand to the next since it seems the same overall manufacturing methods and materials are used in all the brands. Certain features are given different names in the marketing literature to distinguish each brand, but it often boils down to the same basic things.
I was astonished when our guide pulled out an 8′ wide roll of a material that looked like aluminum foil and said it gave their trailer an extra R-14 of insulation throughout. All I could think is that there are aspects of RV manufacturing that are pure smoke and mirrors, and to me this was one of them.
This metal foil has been used to produce great insulating R factors in certain scenarios, but it has to have at least two inches of air on either side of it, among other things, for the insulating properties to work. When it is installed in such a way that is is flush up against the other layers of material in the wall or ceiling, that big R-factor vanishes.
“So, which hydraulic line goes to the curbside slideout? ’cause I think it’s leaking!” Not all of what we saw inspired confidence.
Some of what we saw made it obvious why customers often have so many problems with their RVs, but our visit to the MORryde plant was an immersion in quality, much like our factory tours at Trojan Battery and B&W Hitches in the past. They had a cool toy hauler out front with their logo on it that was used for trade shows.
The MORryde tradeshow toyhauler
On the Independent Suspension assembly line, MORryde’s signature RV product, we saw axles marked “NH” and “DRV” for New Horizons and DRV. Those trailer brands offer the Independent Suspension as an option. How cool is that?!
An unpainted DRV waits for a MORryde Independent Suspension upgrade.
We had been visiting dealerships on a regular basis for several years prior to our Elkhart visit, and we continued to look at toy haulers after we finished our factory tours in Indiana. Road Warrior (Thor/Heartland) was a brand we looked into, and the 427, which is now the 4275, was a possibility in part because of the side patio and MORryde ramp door.
Unfortunately, my favorite floorplans were the older Road Warrior 427s that had a big sliding glass door going out to the side patio and a tiny fireplace/entertainment system that didn’t block the door. As the model years went by for the 427, the door with the big view onto the patio got smaller and the fireplace and TV got bigger.
The Grand Design Momentum 399TH has a nice big sliding glass door heading out to the side patio.
One thing that is very enticing about a toy hauler is the ability to put a workbench in the garage. Most bigger toy haulers nowadays have a 2nd bathroom with the door going into the garage, which limits the wall space for putting in a workbench if you are toting a big RZR.
Will a small 30″ workbench fit between the two doors in this Fuzion 429?
At first, the idea of two bathrooms didn’t excite us because it is a mammoth waste of space for a couple. But then we realized that with a 2nd bathroom you get double the black tank capacity because most designers place a black tank below each toilet to let gravity do its magic of filling the tank as the toilet is used. Some of them drain the little half-bath vanity sink into the rear black tank too.
It is my understanding that the DRV Fullhouse uses a macerator on the toilets to pump the fluids from both toilets to a single black tank, so adding a 2nd bathroom doesn’t double the black tank capacity in those trailers.
The more we did our own soul searching about what we really wanted in our new trailer, the more we realized that we couldn’t go backwards when it came to tank capacities. Our current Hitchhiker has 70 gallons of fresh water, 78 gallons of gray split between two tanks (50 for the shower and vanity and 28 for the kitchen sink) and 50 gallons of black.
Reducing any of these numbers would impact the way we live since we rarely get water or sewer hookups. Unfortunately, although most toy haulers offer over 100 gallons of fresh water, which is awesome, many have a bit less than 50 for the black tank unless they have a 2nd bathroom.
So the decision for us became a trade-off between living space (giving up part of the living area and/or garage to accommodate a second bathroom) and black tank capacity. Argh! Big black tanks do exist. The Arctic Fox 35-5Z has 65 gallons of black tank capacity with just one toilet.
The Keystone Raptor 421CK floorplan that we loved (except for the 11′ garage) was replaced with the Raptor 423 which has a 13′ garage. But it has just a 44 gallon black tank which contributed to taking it out of the running. Also, the designers took 2′ out of the bedroom to increase the garage length from 11 to 13 feet, and they turned the bed so it was “north/south” or parallel to the driving direction instead of being perpendicular to it.
Trailer designers are constrained in overall square footage for their designs by the RVIA (RV Industry Association). This group increases the maximum allowable square footage a little bit now and then, but for right now the limit is 430 square feet.
This seems to be a bit of an arbitrary number, but it is an important one. When you see very long trailers with very shallow and short slide-outs, it may be due to this maximum square footage. Turning a perpendicular bed that’s partly in a slide-out into a “north/south” bed that’s parallel to the curb with no slideout eliminates a few square feet. The designer can then use those square feet somewhere else in the trailer, like lengthening the garage.
We spent a lot of time lying on these “north/south” beds and opening and closing the small wardrobes in the driver’s side slideouts. This type of bedroom was not as appealing as the perpendicular bed with the big closet in the front cap, but it is the predominant design these days, probably due to the square footage constraint.
Many toy haulers have a “north/south” bedroom where the bed runs parallel to the road rather than perpendicular. You can walk around a queen but a king goes almost to the curbside wall.
The biggest challenge in our search is that most dealers stock only a few toy haulers of whatever brands they carry. So there were several floorplans we wanted to see that we still haven’t seen, even after two years of traveling around and a visit to the factories in Elkhart Indiana. The KZ Venom 4012TK is an open floorplan U-kitchen design much like the Raptor 421CK/423 that I’d love to see. Maybe someday!
I’d also like to see a DRV Fullhouse, specifically the LX450. Until we began our search, I didn’t realize that even though DRV is not an independent company any more, they still allow some customizations to be made to their trailers. Working with a good dealer — we heard that Rolling Retreats in Oklahoma was outstanding — you can ask for all kinds of customized things and some might be granted.
I was very surprised when I found out that the factory would be willing to remove the 2nd bathroom and the dinette cabinetry in the Fullhouse LX450. I had other ideas for those spaces that would work better for us. But I have yet to see a Fullhouse toy hauler in person — they always seem to be at least 400 miles away and never in the direction we’re headed. And ordering any trailer without seeing something pretty similar in person first makes me uneasy.
The other thing that made the search particular frustrating is that all the folks selling toyhaulers also had regular fivers on their lots. So, although we couldn’t see the KZ Venom toy hauler we wanted to see, the dealer had the KZ Durango Gold 380FL available. We walked inside and instantly fell in love with the huge rear bedroom with its 2nd entry door on the driver’s side. This didn’t help our search for a toy hauler!
Where Raptors were sold we often saw Montanas, which are also Keystone products, and Mark fell in love wih the storage space in the massive pullout shelf under the raised living room in the Montana 3790/91. This was yet another reminder that If you don’t have a 13′ dedicated garage and you’re willing to go up to 40′ or longer in a trailer, you can get a really spacious rig!
And where Momentums were sold, Grand Design Solitudes were also on display. We both fell totally in love with the massive bedroom and walkin closet of the Grand Design Solitude 373FB. The twin vanity sinks and gargantuan closet were wonderful, and the big bright windows opposite the bed along and the window over the bed’s headboard were fabulous.
I’d never been in a fifth wheel where I felt I could spend happy daytime hours in the bedroom, but in that rig I surely could.
The Grand Design Solitude 373FB has a gorgeous bedroom suite with an enormous bathroom and walk-in closet
Good morning sunshine — the Grand Design Solitude 373FB bedroom has a wall of windows!
So, the toy hauler idea went out the window because we began to think we’d triple tow with something like this beautiful Grand Design Solitude 373FB. The only problem is that it is 41′ 4″ long and that would put us over the limit for triple towing in every state except for South Dakota where the limit is 75 feet!
Back to the drawing board we went where we revamped our search to be for smaller trailers. Suddenly, at long last, we were able to see an Arctic Fox 35-5Z after wanting to see one for a long time. This is a really well made trailer built on Northwood Manufacturing’s own in-house constructed frame with a traditional floorplan.
The great thing about Northwood Manufacturing / Arctic Fox is that they are the only trailer manufacturer left that offers a long list of options. All the others pump out identical trailers one after another except for a very few items the customer can choose such as dual pane windows, an onboard generator and exterior paint.
The Arctic Fox 35-SZ is built on a custom in-house frame and offers lots of choices for options
At Arctic Fox you can choose to have either one air conditioner or two. You can get an electric fireplace under the TV or you can have wooden cabinets in that space instead. You can opt for a 10 cubic foot propane/electric RV fridge, which gives you an extra foot of counter space and upper and lower cabinetry to boot, or a 12 cubic foot RV fridge or an enormous 18 cubic foot RV fridge. You can also get a residential 110v AC electric fridge.
This is awesome because there are some RVers, like ourselves, who would prefer to have more cabinet and counter space and let the veggies and beer fight it out for themselves in a smaller 10 cubic foot fridge.
Also, since we dry camp all the time, we power our 8 cubic foot fridge with propane 24/7. When we’re not using propane for heat and are just using propane to power the refrigerator, the hot water heater and the stove, we go through a 30 lb. (7 gallon) tank of propane every three weeks. In our experience, it is not always so easy to find places to fill our propane tanks, especially in certain parts of the country.
If we were to go from our current 8 cubic foot refrigerator to an 18 cubic foot fridge, we would more than double the amount of propane our fridge uses. We would probably go through that same 7 gallon tank of propane in about 9-12 days instead of 21 days. If the trailer’s LP tank compartment allows 5″ of extra height, then we might be able to switch to using the taller 40 lb. (10 gallon) tanks instead and we might make the propane last a little longer. But those big tanks are unwieldy to carry around.
Even if you have an extended RV warranty (which is an excellent idea – here’s why), the warranty contract will cost a lot more to purchase if your rig has a big expensive refrigerator in it than it would if the fridge were a smaller cheaper model. After all, the warranty company has to calculate their potential costs if things in your rig (like the refrigerator) fail.
KZ allowed buyers to order trailers with smaller RV fridges and opt out of the electric fireplace until last fall, and that is one of the reasons we were so interested in the KZ trailers.
Many Grand Design Solitude trailers have a TV that lowers into a cabinet revealing a nice big window behind (on the right in this pic). This is fantastic for folks who don’t watch TV during the daytime.
Perhaps the biggest thing for us, though, is the tank capacities. Small tank capacities certainly rule out a lot of brands! The Grand Design trailers have excellent tank capacities, especially the toy haulers with a 2nd bathroom where you can get as much as 157 gallons of fresh, 106 of gray and 106 of black. Wow!!
No more lines for brushing teeth!
So, last week we were back to looking at toy haulers. We went to a dealership where we saw a Fuzion 429 which had a very cool walk-through kitchen layout with the sink set on an outside corner with long counters running along either side. There was tons of cabinet space and it had and an interesting country style decorative motif.
But the slide-outs were so shallow we would be challenged to replace the furniture if we ever wanted to because the fronts of the theater seats and sofa were all set on rollers to roll in and out with the slide room. The fronts of replacement furniture could be set on casters, perhaps, but it might look a little funny.
I’m not keen on being married to an RVs furniture just because it is on rollers.
One thing I’ve noticed with most of the Thomas Payne theater seats is that if I sit with my back touching the backrest, my feet can’t reach the ground. They’re about 2″ short. This is really uncomfortable! I’m 5’4″ but have fairly long legs for my height, so I imagine that most women would be in the same position. So, for me, replacing the furniture at some point is a likely scenario.
We prowled around other toy haulers, and as I stood in the kitchen of one and thought about where I’d put my dishware (I’d already resigned myself to storing pantry goods in the 18 cubic foot fridge because that’s where the bulk of the kitchen shelving was), I realized there was no cabinet in the kitchen for plates or glassware. Those would have to go in a drawer in the kitchen island or in a cabinet outside of the kitchen area.
A similar thing had happened when I stood in the kitchen of another toy hauler a few months earlier and opened the slim upper cabinet door above the sink. The shelf in there was big enough for just one coffee mug — as long as it didn’t have a handle — and no more.
Space is at such a premium in a toy hauler that the designers have to be super creative to make a living area that has both comfortable seating and sufficient usable storage.
Ironcially, Mark had skimmed through Craigslist before this last dealership trip, and he found a 2011 36′ Hitchhiker Discover America for sale. We walked inside it and knew we’d found our rig. It was just like the one we’d lived in for the last 12 years but with some important differences!
Woo Hoo!!
This Hitchhiker had factory installed 8k lb. Dexter axles with 17.5 inch wheels and disc brakes. This was huge!
Every new trailer we’d looked at so far, including most of the toy haulers, would require an upgrade to disc brakes and in many cases an upgrade to bigger axles too, and none but the highest end manufacturers offered those things as a factory installed option. Almost all the trailers had tandem or triple 7k lb. axles and 16″ wheels. Many were Dexter brand, which is terrific, but the cargo carrying capacities were really skimpy almost across the board.
See our article about upgrading our fifth wheel trailer with an electric over hydraulic disc brake conversion HERE.
One lovely 38′ fifth wheel had a mere 1,800 lbs of cargo carrying capacity. This would have to include fresh water, solar and battery add-ons and all of our belongings. Several toy haulers had just over 3,000 lbs. of cargo carrying capacity which leaves little room for food, clothes, lilnens, appliances and kitchenware once the 1,200 lb. toy is loaded and the 850 lbs. of fresh water and 450 lbs of fuel are put in the tanks (water is 8.3 lbs per gallon).
Hitchhiker Discover America – Looks familiar!
Besides the big axles, this old Hitchhiker’s 17.5″ wheels were a massive plus too. Bigger tires on fifth wheels are much less prone to problems caused by grinding the tread into the ground when making tight turns. Blow-outs are all too common with fifth wheel trailers, and although bad tires are often to blame, it’s also possible that the steel belts eventually fall apart under the twisting lateral loads induced by tight turns.
How funny this was, though. We’d come full circle and were right back where we’d started trailer-wise, more or less.
It was only after we began making calls to line up folks to replace the stained carpets and do a detailed cleaning so we could get our soon-to-be new-to-us home back on its wheels as soon as possible after the closing that we realized the handyman projects on an 8 year old trailer were feeling more like work than like fun!
That wasn’t what we wanted!
Totally stressed out, we walked away from the deal at the last minute. We felt better immediately.
There are some incredible deals to be found on the used market for highly regarded brands of yesteryear. But buying used has its challenges too.
This whole process can be both exhilarating and depressing. Just like buying a sailboat or a house.
Our offer for our cruising sailboat Groovy was the 5th offer we put in on a boat over the course of a year. One deal went so far south we had to get the California Boating and Waterways agency involved. On another deal we paid $1,300 to get the boat surveyed (like a house inspection), and backed out when we got it hauled out of the water and saw the forest of seaweed growing on the hull.
But our persistence and careful approach paid off. In the end, Groovy was a much newer, cleaner and far cheaper boat than any of the others we’d made offers on!
In the RV industry there are very few structurally well built and cleverly designed new trailers out there, and going with a used one that was well built and beautifully crafted in its day years ago opens a whole new can of worms. For those who love renovating, it’s a great way to go. But not everyone does.
On our way home, we decided to take one more look at some new fifth wheels just to change our mindset, so we pulled into a dealership and asked to see a line of trailers we hadn’t seen before.
Lo and behold, the first rig we walked into was fantastic. Holy cow! It had almost everything we wanted and the few things it didn’t have were upgrades that would be fun and exciting to do. Who woulda thunk?!
Home sweet home.
Is our search over? We don’t know, but we’ve got a hunch it is. We’re giving this latest idea a few weeks to simmer and we’ll let you know.
In the meantime, have faith that your ship — or RV — will come in. It’s out there somewhere. It just takes a ton of online research, dozens of walks through dealership lots and, more than anything, some heartfelt soul searching to find it.
Update: Our search for our next full-time rolling home came to a fork in the road when we opted to buy a house instead. After loving the home life, gardening, and being in one place all the time for 6 months, we got the itch to get an RV for seasonal travels. After trying a truck camper for a year, we settled on a Genesis Supreme 28CRT toy hauler fifth wheel which we absolutely love. Like the Aluminum Toy Hauler discussed on this page (and unlike all the others), it is an OPEN BOX floor plan rather than an enclosed garage floor plan. This gives us the large garage space we wanted in a short-ish overall fifth wheel trailer length, and we absolutely LOVE the patio.
More of our Latest Posts are in the MENU.
New to this site?
Visit RVers Start Here to find where we keep all the good stuff. Also check out our COOL NEW GEAR STORE!!*** CLICK HERE *** to see it!
Full-time RVers and other long term travelers enjoy incredible freedom in a wonderfully independent lifestyle, but we still need to get our mail every once in a while! Fortunately, there are mail forwarding services of all kinds in several states.
Surprisingly, each mail forwarding service is a little different in what they offer their customers. Some simply collect your mail and then send it to wherever you are when you ask them to while others offer additional services from assisting with vehicle registration to offering a place to stay while you establish residency in the state.
If you’re researching the many mail forwarding options out there, here are some of the things we’ve learned about mail forwarding during our dozen years of full-time RVing. Looking back over those twelve years of travel adventures, we estimate that we’ve received around 120 shipments of snail mail containing about 3,500 pieces of mail. Yikes!
Americas Mailbox provides mail forwarding, vehicle registration and domicile assistance for full-time travelers
Even though most modern communication is done online or over the phone, when you become a full-time RVer or full-time traveler you’ll probably still want to have a way to receive your mail, whether it’s financial documents, old fashioned birthday cards or magazines.
Selecting a domicile state can be quite easy, and the requirements for establishing residency can be quite minimal. However, it is worth noting that if at some point in time you are called upon to prove in court that your chosen state is your true domicile rather than a different state where you might have more ties, you may face an uphill battle if you own large assets like real estate and/or spend a lot of time in a state that isn’t your chosen domicile state.
America by license plate — on the wall at Americas Mailbox!
There are lots of resources to help with your domicile state decision, including our blog post on the subject here which is the third article in our three part series on full-time RVing here, here and here.
Choosing a state to be your legal domicile is just the first part of the process, however. The second part is selecting a company that will assist you with establishing residency in the state and forward your snail mail to you on the road.
Americas Mailbox is right off of Exit 41 on I-90 – Easy!
The three most popular domicile states for full-time travelers are South Dakota, Florida and Texas, and each state is home to several mail forwarding service companies:
We joined the mail forwarding service Americas Mailbox, located in Box Elder, a suburb of Rapid City, South Dakota, last year, and we have been very pleased with their service. During this past year we have relied on Americas Mailbox to deliver our mail in eleven different states, and we’ve also received their assistance in registering and paying South Dakota sales tax on two new vehicles, our street legal Polaris RZR and the utility trailer it rides on (we triple tow).
A sweet reminder on the wall at Americas Mailbox.
Some mail forwarding services do all their work over the phone and online, and it is possible to become a resident of South Dakota without physically meeting the people who run the mail forwarding service you choose.
However, Americas Mailbox is very serious about their role in assisting customers with establishing their residency and other things that require staying in South Dakota for a while, and they have not only built an RV park on their property, providing both full hookup, electric only and dry camping campsites, but they have also built several hotel rooms in their main building for customers who don’t arrive in an RV.
We spent several days in the Americas Mailbox RV park on two separate occasions last spring and summer, and we set up camp alongside lots of other Americas Mailbox customers in the dry camping area.
We joined the group lined up in the dry camping part of the Americas Mailbox RV Park.
It was a lot of fun because most of the customers were brand new full-timers who were just getting their wheels rolling, and their enthusiasm and excitement about their new lifestyle was palpable.
Some RVers were doing their mandatory single overnight stay to establish South Dakota residency, and others were staying for 30 days to comply with the concealed carry requirements in South Dakota. In addition, many folks were establishing relationships with professionals in the Rapid City area, from estate planning attorneys and accountants to doctors and dentists and insurance agents.
We had fun chatting with other full-timers who were staying at the RV park. Many were just starting their adventures!
When we first walked in the Americas Mailbox headquarters building, we were taken aback when we heard a voice say, “Welcome home!” Wow! We were soon shaking hands with the General Manager and being introduced to members of the staff.
What a surprise to hear “Welcome Home!” as we walked in! “Travel” is the theme and there’s even a compass rose on the floor!
It really did feel like coming home. All the customers in the room were living the same crazy full-time RV lifestyle as we are, and most were setting up new Americas Mailbox accounts.
There was a flurry of activity all around us. An inviting living room-like waiting area was on one side and a long service counter for staff to work with customers was in front of us. We quickly felt ourselves swept up in a surprising sense of community and homey warmth.
Americas Mailbox was founded by Don and Barbara Humes after they had traveled full-time in their RV for a few years in the early 2000s.
Prior to opening Americas Mailbox, Don and Barbara studied the entire country to determine which state and which county within that state would be the most favorable for full-time travelers to use as a legal domicile.
Americas Mailbox founder, Don Humes (right), is a full-time RVer who understands the needs of folks living a footloose and fancy free life on the road.
Rapid City is the county seat of Pennington County, and Americas Mailbox purchased a fantastic piece of property in Box Elder just outside of Rapid City, located right off of Exit 41 on I-90, an easy place to find and a convenient place to stay for a while to get your legal and financial affairs in order in your new home state.
The waiting area is like a living room — very inviting.
Americas Mailbox now has a big staff not only up front serving customers who walk in and call in, but also in the offices behind the reception counter where the envelope scanning and vehicle registration work happens and also in the mail sorting room out back where truckloads of mail arrive and are sorted into thousands of customer mail boxes each day.
In addition to providing step-by-step paperwork for changing your legal address to be an Americas Mailbox address, there are step-by-step instructions for registering out of state licensed vehicles, registering new vehicles, obtaining a driver’s license, registering to vote, and obtaining a concealed carry permit. Americas Mailbox also provides a reference list for professionals of all kinds in the area.
.
Out behind the main building with its hustle and bustle of mail sorting, vehicle registrations and assorted paperwork going on in the Americas Mailbox offices, the on-site RV park had lovely views of farm fields and was very peaceful. Additional long pull-through campsites were nearing completion during our stay and could easily accommodate our rig. At the far end foundations for future cabins had been poured as well.
The campsites out back are very nice!
One thing we loved is that Don and Barbara live in their motorhome on-site. Not only do they talk the talk about full-time RVing, but they walk the walk too!
Also, they are so committed to keeping in close touch with their customers and helping them with any issues they might have that Don gives out his personal cell phone number.
The hotel rooms Americas Mailbox were full during our visit, so Don showed us their beautiful hotel suite that just happened to be vacant. It was an elegantly furnished one bedroom condo with a beautiful kitchen. Nice!
The hotel suite would be a comfy place to stay while doing business in Rapid City!
Want to get it all done without driving your RV to South Dakota? Stay in a beautifully appointed suite on-site!
A nice and homey place to relax — but there are more basic hotel rooms available too
One of the reasons Americas Mailbox was so incredibly busy during our visit was because another mail forwarding company in South Dakota had just gone out of business without giving any advance notice to its customers. People were flocking to Americas Mailbox and other South Dakota mail forwarding companies to pick up the pieces and move on with their lives. Chaos ensued at all the South Dakota mail forwarding facilities for several months!
This unfortunate scenario brings me to some of the things we think are worth considering before choosing a mail forwarding service:
Long Term Stability of the Company
Your life will quickly turn upside down if your mail forwarding company goes out of business unexpectedly. It seems like it should be easy to switch to a new company. All you have to do is let everyone know your new address. However, there’s a bit more to it.
Most companies require you to keep a balance of cash in their possession to cover future postage expenses they incur on your behalf, and that money may not be refunded to you if they go out of business unexpectedly. They may also never send you the mail they’re keeping in their possession on the day they shutter the business. In addition, any monthly or annual dues you may have paid up front may not be refunded.
This may not sound like much but could add up to a loss of a few hundred dollars on top of the frantic search for a new mail forwarding servicing and letting all your contacts know about your address change.
When you move from one home to another you can fill out the US Postal Service Form 3575 to forward you mail from your old address to your new one. However, your PMB (Personal Mail Box) at your mail forwarding company’s street address is not distinguished by the US Postal Service as unique from all the other PMBs at that address. Obviously, you can fill out and submit the form and hope for the best, but the Postal Service may not acknowledge the address change and may be inconsistent about forwarding your mail to your new address if they even do it at all.
The offices and waiting area at Americas Mailbox are trimmed with all kinds of fun travel themed decorations.
It is impossible to know for sure if a company will last a long time, and I remember vividly how shocked the engineering community in Massachusetts was when Digital Equipment Corporation went from being a major employer with campuses all over the state to vanishing into thin air over the course of two very short years.
Some mail forwarding companies have seen several changes of ownership and management in recent years, and with each change there are staff, policy and procedural changes that affect the customers, whether they are explicitly notified about what’s going on or not.
In general, though, if the mail forwarding company has been around a long time, has a lot of customers, and treats those customers well, it is likely it will survive. Don and Barbara have many long term plans for Americas Mailbox and theirs is a family operation with plans in place for the company to outlast them.
.
How Fast Will They Ship Your Mail?
Every mail forwarding company has a different policy for how quickly they commit to packaging up your mail and sending it to you after you make your request for them to do so.
Some companies require that you notify them by 5:00 p.m. the night before it is shipped out. If you are in an earlier time zone or don’t think to make the call before 5:00 pm their time, your mail won’t be packaged up until the day after that! That is, a mail shipment request made at 5:30 p.m. on Tuesday won’t be packaged up and sent until Thursday. This means your mail probably won’t arrive until the following Monday because of the intervening weekend unless you are in a neighboring state.
If they receive your request after 5:00 p.m. on Friday, then your mail will not be shipped until the following Tuesday, four days later! If you are in a distant state, it may not reach you until the following Friday, a week after you requested it! This is very frustrating and very inconvenient.
Americas Mailbox has a really rapid response time and will get your mail off to you first thing in the morning as long as you request it by midnight the night before and it is a weekday. Requests made at any time during the weekend up until midnight Sunday night will go out Monday morning.
For us, that is a huge advantage. Lots of full-time RVers plan their travels in advance, so that kind of instantaneous response isn’t important, but we regularly extend or cut short our stays depending on whims like changes in the weather. So, if we suddenly decide early one morning that we want to take off in a few days, it is critically important that we be able to get our mail packaged up and sent out as quickly as possible.
Some America’s Mailbox customers are international travelers.
Virtual Mail – What Do You See and Not See on the Envelope?
Many companies offer a “virtual mail service” where they scan every envelope you receive and either post the images online or email them to you for you to view. You can then instruct them to open the envelope and scan the contents or shred it or just hang onto it until you request your next shipment of mail.
We have found this to be very useful, but the quality of the scanned images can vary a lot, and poorly scanned envelopes are useless. The most important piece of information for us is the return address, of course, so we can see who the piece of mail is from! You’d be surprised, but sometimes scanned envelopes show only YOUR name and address.
It sounds silly, but you need to be able to read the full name and full address of whoever sent the piece of mail or you’ll be left scratching your head. Obviously, if the image is blurry or cuts off the company name (you’d be amazed how often that can happen) or if the image is of your own name and address instead of the return address of the sender, then the image is useless.
We chatted with the gal doing the scanning at Americas Mailbox and watched the meticulous care she takes with each envelope to make sure the scanned image is not only readable but is of the correct address — the return address (not OUR address).
Americas Mailbox outsources the software that manages the scanned envelope images and we’ve found it works very well.
One thing that is especially helpful with their software is that they clear out all the images of the scanned envelopes once they are sent to us. That way we can distinguish between the mail that is waiting for us in South Dakota and the mail that we have received. You see, if all the images are left in the database and you receive regular mail from certain entities, it can be very confusing to look at a scanned envelope and determine whether it has already been forwarded to you or not, especially if it was scanned right around the time you ordered a mail shipment.
.
Ins and Outs of General Delivery
When mail is sent to an RV park it is a pretty straight forward process if the park regularly receives mail on behalf of its customers. But sending mail to General Delivery at a post office can be tricky. For starters, it must be addressed very simply (no street address is included), and the software has to make sure no street address is inadvertently inserted (bad software can do that!).
If a street address is included, all hell breaks loose. Literally. It can cost days in delivery time.
We prefer to use small town post offices instead of big city post offices for general delivery because they have less volume and fewer employees.
We like to call the small town post office directly ahead of time to find out if they accept General Delivery. The USPS website lists whether each post office accepts General Delivery mail, but in a few cases we’ve found that the website says they do when they actually don’t. Disastrous!
We also like talking to the folks at the post office because we can let them know our package is coming and approximately when we’ll be in to pick it up. Post offices are supposed to keep General Delivery mail on hand for 30 days, but we had one post office return it to the sender after 24 hours. Of course, the contents of that package were very important time sensitive financial documents, and at the time we were total full-timing newbies who had been out on the road for all of a week!
Despite being on the outer edge of Rapid City, the area right around Americas Mailbox is wonderfully rural.
Addressing Mishaps Caused by Auto-Fill !
Another thing to watch for is the “Bill To” versus the “Ship To” addresses when you order something online.
Lots of websites have Auto-Fill, and they’ll very helpfully fill in all kinds of info for you. Unfortunately, the next thing you know, you’ve sent a huge package to your mail forwarding address that you wanted to go to the address of the friend you’re currently visiting. Not only will your receipt of the item be delayed by a bunch of days but you’ll have to pay to ship that heavy package twice, once to your mail forwarding company and then again to your friend or some other destination you’re headed to!
Don told us a hilarious story along those lines. Americas Mailbox goes out of its way to accommodate any and all packages that are sent to them, even when they are a bit unwieldy. One day they received several mammoth crates from Harley Davidson that turned out to be all the pieces for a big beautiful motorcycle.
Curious what they were supposed to do with it, they called the customer the crates were addressed to and asked if he’d just ordered a motorcycle from Harley Davidson. “Yeah, I did. How did you know?” the confused customer asked. “Well, we’ve got all the crates right here at Americas Mailbox!”
Of course, the customer meant to have those boxes shipped directly to wherever he was in the world at the time, but he had mistakenly given his Americas Mailbox address as the “Ship To” address.
Shipping crates is outside the norm for Americas Mailbox, but they hired a qualified shipping company to pick up the crates and get them to the address where their customer was staying.
As a side note, many companies charge a small fee for oversized packages they receive because they require extra time and space to handle. Americas Mailbox charges a dollar or more for oversized packages depending on the size.
We had some wonderful stormy days during our stay at Americas Mailbox.
What Happens to Improperly Addressed Mail?
Despite your best efforts, some entities won’t address your mail correctly no matter how often and how nicely you tell them what it is.
Most addresses in this country don’t include a PMB number, and some folks just leave it off. The correct address must include your PMB number, preferably on the same line as the street address, and it may be written as “123 Main Street PMB 789” or “123 Main Street #789.”
In our experience, an awful lot of entities leave off the PMB number all together. By leaving off the PMB number, the address they send our mail to is simply the street address of the mail forwarding company itself, leaving your piece of mail lost in a sea of thousands of people who share the same address.
When this incorrectly addressed piece of mail arrives at the mail forwarding company, the mail sorters have to figure out who it’s for and what the PMB number is so they can put it in the right box. The bigger mail forwarding companies use super fast mail sorting machines as well as people reading the addresses, and an incomplete address gums up the production in a massive way.
Some companies have a policy in place to set the piece of mail aside and then later look up the name of the person to find out which PMB they have, write it on the envelope and then carry all the mis-addressed envelopes to the appropriate PMB files.
However, some companies simply mark the envelope “RTS” (“Return to Sender”) and put it in their outgoing mail for USPS to pick up because it is too time consuming for them to go through all the wrongly addressed mail and look up all the PMB numbers.
Americas Mailbox has a tiered strategy. First, they look up the customer name (hopefully your name is unique!) and hand-write the PMB number on the envelope and put it in your box. They’ll call you if they have questions (i.e., “Are you the John Smith that is expecting a package from Amazon?”). Last of all, they’ll write “RTS” on it and put it back in the mail for USPS to return it to the sender.
Be sure to find out from your prospective mail forwarding company exactly what their policy is for mail that arrives without your PMB number, because it is guaranteed that at least one piece of mail for you will arrive that way someday.
Also, take the time to triple check with anyone sending you either important documents, a check, or a time sensitive piece of mail that the address they put on the envelope for you is 100% correct.
.
Vehicle Registration and Sales Tax
Americas Mailbox dots every “i” and crosses every “t” when it comes to registering your vehicles and paying any sales tax that is due.
We were floored by the degree of detail and the number of documents necessary to get our RZR and our utility trailer registered, licensed and on the road: Power of Attorney for Americas Mailbox to do the legwork registering the vehicles, images of front and back of our licenses, fronts and backs of the titles, bills of sale, money orders for the sales tax, and a few other goodies.
Americas Mailbox provides a detailed checklist of the documents you must gather, and of course some might have to be notarized. If you don’t have a scanner, you can just take a good quality photo of each document and attach all the photos to your email correspondence with Americas Mailbox to verify you have all the right pieces in place before you mail the package of documents to them.
Another thing to watch for when you buy a vehicle is whether the community you are making your purchase in will impose a local tax on the purchase. Maricopa County in Arizona (Phoenix area) is notorious for dealerships charging tax on all vehicle purchases made by out of state buyers.
So, while you may think you will be paying only the South Dakota sales tax on your purchase, you may find yourself staring at a document at the dealership that requires you to pay a tax to Arizona too. I’m not sure if there are other places in America where this happens, but double check with the person who will be writing up the final sales receipts and taking your check before you finalize your purchase.
On Mother’s Day Don brought roses to all the women on his staff. Now that’s class!
Final Thoughts
There are all kinds of mail forwarding services available, and they range from bare bones to full service. You may need just mail forwarding, or you may want to have someone handle the vehicle registration and lines at the DMV, and/or you may want to have a sense of “home” with an RV park where you can stay each time you return home to take care of life’s legal and financial technicalities.
We’ve found that Americas Mailbox is a wonderful full service operation, and what’s more, we love the Black Hills and being “residents” of this part of South Dakota.
More of our Latest Posts are in the MENU.
New to this site?
Visit RVers Start Here to find where we keep all the good stuff. Also check out our COOL NEW GEAR STORE!!*** CLICK HERE *** to see it!
We have spent the last two years going back and forth about whether to move into a new fifth wheel trailer or a new toy hauler as we look forward to our second dozen years of non-stop travel and full-time RV living. We’ve been to tons of dealerships and did a bunch of toy hauler factory tours in the Elkhart area of Indiana as well as in Missouri and Oklahoma (there’s more about those tours is in the 2nd half of this article).
As I’ve mentioned a few times over the past few months since we started this experiment, triple towing is working out a whole lot better that we expected!
This may be in large part because the utility trailer is only 5′ wide compared to the 8′ width of our fifth wheel trailer, so even on a tight U-turn, the wheels on the fifth wheel carve a tighter turn than the wheels on the utility trailer. So, if there’s something we don’t want to roll over or hit, the vehicle at risk is the fifth wheel, just as it has always been!
The utility trailer just cruises along behind. It’s a little caboose!
When we’re triple towing we notice a lot more chucking action than when we don’t have out caboose connected. This is due to the accordion and jerking action of the three vehicles moving apart and back together as they rumble down the road. It’s not a violent sensation, but we can definitely feel it.
We’ve been to a few gas stations… yikes!
We have been to several gas stations fully hooked up as The Train. Even though The Train is quite long and winds up curved far behind us as we turn in to the pump, as long as the gas station is large enough and there aren’t too many customers, it all works out.
That RZR sure is a long ways from the pump!
We have also been to several RV dump stations with The Train, and again, as long as the approach and exit to the dump station aren’t too narrow or laid out in a tight turn, we can align the fifth wheel sewer hose and other goodies with the RV dump station while the truck and utility trailer sit in a curve ahead of and behind the dump station sewer.
We’ve been to a few RV dump stations.
We’re okay dumping our tanks as long as it’s fairly long!
We set up the utility trailer with a spare tire and tire cover just in case that trailer gets a blowout. At this point we don’t have a backup camera to watch the utility trailer while we’re towing. That may come in the future but will take some research as we figure out which model and where to place the monitor in the already full cockpit of the truck.
Unfortunately the utility trailer is too small to carry our bikes as well. A 12′ long trailer would be long enough, but our RZR came with this trailer so it’s a natural starting point. So, for the moment, we have left the bikes behind at a friend’s house.
We’re leaving the bikes out of the equation for the moment.
When loading the RZR onto the utility trailer, Mark drives the RZR’s front wheels flush up against the front of the trailer which leaves enough room behind it for two 5 gallon gas tanks lashed down on the utility trailer.
With the wheels flush against the front railing there’s room for two 5 gallon gas tanks in back.
Before hitching up The Train the very first time, we had to sort out the different heights between the tongue of the utility trailer and the hitch receiver on the back end of the fifth wheel.
Our fifth wheel trailer now sits some 6 to 8 inches higher than it did when we first bought it. After our fifth wheel got a desperately needed suspension overhaul when the suspension failed (blog post here), the fifth wheel sat higher than it had originally. Then, when we installed the MORryde SRE4000 equalizers, it sat even higher.
This is awesome for those pesky gas station ramps and other sharp dips in the road that are so steep they cause the back end of the fifth wheel trailer to drag on the asphalt. It’s also great for bumping over washes and other things on gnarly dirt roads.
However, all that good drag-avoidance stuff got thrown out the window with the decision to triple tow!
The utility trailer has 15″ tires and sits quite low, and in order to keep that trailer relatively flat instead of nose-up while towing, we had to put a 10″ drop hitch mount on the fifth wheel trailer’s hitch receiver to reach down to the utility trailer’s level.
We needed a 10″ drop hitch mount to reach down to the utility trailer
We use a receiver hitch tightener to eliminate any possible rattling in the connection between the receiver hitch and the hitch mount, and an electric plug ensures the lights on the utility trailer are powered and light up at night as well as when Mark hits the brakes.
The hitch tightener keeps things from rattling and the electric plug lights up the lights on the utility trailer
To learn more about hitch tighteners, see our blog post HERE:
If you stand behind The Train at night and have someone tap the brakes in the truck, it’s quite a light show because not only do the lights on the fifth wheel light up, but the ones on the utility trailer do too. We almost never tow at night but it’s good to know The Train is so visible on dark and stormy travel days.
It was a dark and stormy morning…
We’re really glad we decided to jump in with both feet and buy a RZR before we figured out how to transport it because there is nothing like hands-on experience to figure out what works and what doesn’t.
The biggest surprise we’d never thought of before is that it is super handy to have a utility trailer to tote the RZR behind our truck when we’re going to a trailhead that is a long distance from our campsite.
There’s an advantage to being able to tow the RZR to a distant trailhead.
Although our RZR can go 70 mph and is licensed for the road, driving it on the highway is not what we got it for. We’d rather drive 25 or 50 miles to a trailhead in the comfort of our truck and then arrive with the RZR gas tank full of gas so we can enjoy our off-road adventures without worrying about carrying spare gas.
The RZR has a 10 gallon fuel tank and gets about 15 mpg. So far, none of our adventures has been more than about 40 miles, so we don’t foresee a need to carry gas with us on the RZR any time soon.
At the end of a day of off-road adventure, after the sun has set, we find it’s much safer to drive our truck on the highway than to be out there in a little open air buggy that sits a lot lower on the road than most cars and trucks.
The RZR rolls on and off the trailer ramp.
Lastly, we’ve wanted to ensure that Buddy loves the RZR. For us and our lifestyle there’s no reason to own a RZR if our puppy doesn’t want to come along. We’ve integrated him into our lives so he doesn’t spend any time in our fifth wheel by himself. If we’re going to have RZR adventures, he’s going to be a part of them.
When we’re in the RZR, Buddy sits on my lap. I don’t want to go more than about 35 mph with him sitting in there. He’s not too keen on the loud noise of the RZR engine on the highway and of vehicles passing us, and I have to say, neither am I.
His favorite thing riding in the RZR is to sniff the air when we’re off-road, watch for rabbits, and to stare down at the dirt road going by just below RZR door. All that is lots of fun at 10-15 mph, our typical dirt road speed.
Mark has mastered driving the 56″ wide RZR onto the 60″ wide trailer!
We have a B&W Stow & Go hitch on the back of our truck, and the utility trailer hitches up to the truck very easily. After one or two tries loading the RZR, Mark has figured out how to align it so it drives in without rubbing the wheels on the railings at all even though the railings are 60″ apart and the RZR is about 56″ wide.
.
When we arrive at a trailhead, Mark drops the ramp door of the utility trailer, hops in the RZR, and backs it down the ramp. The driver’s door on the RZR swings out above the railing on the utility trailer, so he can get in and out of the RZR easily when it’s on its trailer.
.
.
.
The RZR came with a windshield, roof and a fancy stereo that the previous owner had installed, and this XC EPS edition of the RZR 900 includes upgraded wheels, wider fender flares, a hitch receiver and the Polaris Ride Command navigation system.
However, the trunk is just a shallow open area at the back, not the best place to store stuff if you don’t want it to get dirty.
We tossed around ideas and finally bought a Lifetime 55 quart cooler that sits very nicely on an old welcome mat in the back of the RZR. It is lashed down to keep it in place.
We use a Lifetime 55 quart cooler for easy flip-top trunk system.
What we love about this cooler is that we can keep all the little essentials we always want with us — emergency water, toolbag, flat repair & spare air kit, first aid kit — in the bottom of it at all times, and we can throw things like jackets, hats, cameras and snacks on top as we need them for each ride.
The flip top lid makes it super easy to access everything in the cooler, and it has an excellent seal when it is closed which keeps everything inside dust free. We’ve also put a long shank padlock on the cooler to keep the less determined thieves out. Of course, anyone that really wanted that cooler and its contents could simply carry it away.
Another great feature of the cooler is that the things in the bottom of it don’t get overly hot. The engine sits right below the RZR’s trunk area, but since this little “portable trunk” is actually a cooler, there’s lots of insulation between the contents of the cooler and the engine below.
You can see a hilarious video of a grizzly bear trying to get into one of these coolers here.
We’ve found that the multi-use trails that allow motorized vehicles are not only lots of fun for riding but are also great for running and hiking too. Sometimes Buddy and I hop out to run while Mark drives.
Unlike yours truly, Buddy can easily keep up with the RZR and loves chasing it at top speed. But after he’s done a 5 minute mile with some surges to 3 minute mile pace thrown in, he’s usually ready to ride again, and he happily jumps back in.
Need a ride?
Come on in!
Easy!
We’ve experimented with quite a few scenarios for arriving at a campsite and unhitching the bits and pieces of The Train.
The utility trailer has to be hitched up to something — either the truck or the fifth wheel trailer — in order to drive the RZR on or off of it. Otherwise, once the RZR wheels roll on or off the ramp the tongue of the utility trailer will fly up in the air.
So, at campsites where we want to use the utility trailer with the truck to take the RZR somewhere, we have to move the utility trailer from its caboose position at the end of The Train to a place where it can be hitched to the truck, and then we reverse its location before we leave.
We can move the utility trailer around small distances by pushing or pulling it ourselves. However, if the RZR is on the trailer, neither is going anywhere until the utility trailer gets hitched to either the truck or fifth wheel.
The RZR has a hitch receiver on it, and we purchased a ball mount for it, so the RZR can tow the utility trailer around if needed. This is handy in small campsites since the big long bed dually truck isn’t very maneuverable in tight spaces.
Luckily the RZR can also do the job of towing the utility trailer, if needed.
.
Again, we learned a few things that we hadn’t thought of before.
First, although it seemed daunting to back the fifth wheel to the utility trailer to hitch it on when it’s already got the RZR loaded on it, it’s not all that bad. Using our two-way radios as Mark backs up the fifth wheel and I stand at the tongue of the utility trailer, and then using our feet to shove the tongue of the utility trailer the final inch or two, we can get it done quite easily.
Second, if the utility trailer is already hitched to the fifth wheel but is at an angle to the fiver and not aligned straight behind it, there is a lot of lateral force on the fifth wheel’s stabilizing jacks and the front landing legs when the RZR drives onto the trailer.
If the utility trailer is aligned with the fifth wheel, the fiver takes the impact much better (I’ve stood inside the fifth wheel and felt it both ways!).
Mark has sorted out how best to tie down the RZR on the utility trailer.
The ramp door folds up.
Tying down a side-by-side either on a flatbed trailer or inside an enclosed trailer can be super easy or relatively difficult and frustrating.
At first, we did it the hard way by using traditional ratchet straps. Unfortunately, the straps would loosen easily as we traveled. So, we had to stop and check the straps, often several times if we were traveling 100 miles or more in one trip.
Then Mark discovered CargoBuckle Retractable Ratchet Tie-downs. These are a total game changer. They mount permanently onto the frame of the flatbed trailer. To tie down the RZR, simply pull the strap out of the CargoBuckle, hook it to an attachment point on the RZR and ratchet it down. To unload the RZR, just loosen the hook and let the strap retract into the CargoBuckle. We use four of them, one for each corner of the RZR. To learn more, read our post HERE:
While a trailer works perfectly for standard trailering, those who need to tow an unusually large vehicle (a boat or powered paraglider or even a non-running project car) often find that cross-country vehicle transport services offer a much safer, hands-off alternative.
But for us, we are liking this triple towing thing and may stick with it. We’ll see. If we do, then our new home search will be focused on conventional fifth wheel trailers rather than fifth wheel toy haulers.
There are pros and cons to both conventional fifth wheels and toy hauler fifth wheels. Here are a few we’ve come up with:
Conventional 5th Wheel
Toy Hauler 5th Wheel
More Living Space
Less Living Space
More Closet Space
Less Closet Space
More Cabinets
Fewer Cabinets
Bigger Kitchen
Smaller Kitchen
Recliners + Sofa + Dining Table
Pick any two
Generally, bed in slide w/ windows each side
Generally, bed not in slide & window on one side & small wardrobe on other
Back Deck AND Possible Side Patio (always includes 2nd bath)
Tow RZR to trailhead behind truck
Drive RZR on highways to trailhead
Triple tow not legal in some states
Always a legal beagle
Can travel w/o caboose
Full length toy hauler is always with you (47′ in some cases!)
TRAILER LIFE ARTICLE – SHORTCUT to TOY LAND!
The March issue of Trailer Life Magazine features an article I wrote surveying some of the 2019 offerings in the toy hauler market. I chose four different toy haulers to highlight in that article and included another dozen models in the lineup.
Our personal favorites for sheer innovation and cleverness and/or ruggedness are the Aluminum Toy Hauler fifth wheel and the Keystone Raptor 427.
Aluminum Toyhauler Company (ATC) has been making stackable car haulers for the high end racing car set for ages. They build an incredibly strong and durable toy hauler. Unfortunately, they don’t have any models with slide-outs yet, but their toy haulers are built like tanks and can haul 9,700 lbs. of stuff in a trailer that has a GVWR of 21,000 lbs. Unbelievable!
The Keystone Raptor 427 is a fabulous new entry into the garage-under-the-master-bed style of toy hauler. Montana and Grand Design have these floor plans too: the Montana High Country 380TH and Grand Design Momentum 376TH (and formerly the Grand Design Solitude 374TH which was discontinued a few months ago).
All of these manufacturers place the bedroom in the rear of the trailer and put a small garage big enough for bikes or a motorcycle under the bed itself. A workbench could fit in this garage. The bed above the garage raises and lowers if you need full standing height in the garage.
Montana and Grand Design place the kitchen in the middle of the rig. Montana has a beautiful open L-shaped kitchen with counters along two walls, a style that I like, and Grand Design has an island kitchen that is very popular. Both put the living room in the fifth wheel overhang.
The clever idea in the Raptor 427 is that the kitchen, which doesn’t need vaulted ceilings, is smartly placed in the part of the trailer where high ceilings can’t exist: the fifth wheel overhang. I don’t know what the headroom is there, probably around 6′ 4″ or higher, but it was more than sufficient for cooking, dining and even entertaining a cocktail party or buffet crowd! And there’s a window in the front cap so you can see out in all directions.
The kitchen is truly vast, and there is a side-by-side dinette for two that overlooks the living room. We just loved the design. For us, though, it’s too long a trailer since we’d have to tow our RZR behind (it’s 44′ long), and we’d prefer hydraulic slides to cable slides in the bigger slide-outs. Our two hydraulic slide mechanisms and single worm-gear electric slide mechanism on our current trailer have pushed our slides in or out an estimated 2,000 times so far.
The Keystone Raptor 427 has an immense kitchen in the front of the trailer.
The counter space is incredible (although I could do without the purple lights)
Seating for two overlooking the rest of the trailer – very cool!
Opposing loveseats in the slides plus dual recliners facing the TV (not seen in this pic).
Looking back up into the kitchen above the recliners
The bike or motorcycle sized garage is under the bed. The ceiling raises and lowers.
The March issue of Trailer Life happens to include two other articles of mine with photos by both of us: a feature article about RVing in the Canadian Rockies and my back page column about lovely Maroon Bells in Colorado!
Another outstanding RV magazine and RV advocacy group and discount camping membership club and mail forwarding service, among many other things, is Escapees RV Club which we highly recommend joining.
IMPRESSIONS from VISITING the TOY HAULER FACTORIES
When were in Elkhart, Indiana, last fall (2018), we visited several RV manufacturing plants. We hadn’t done a factory tour in Elkhart since the spring of 2009 when the industry was in the midst of collapse.
The consolidation in the RV industry since the beginning of the recession of 2008 has been staggering and has whittled the list of RV manufacturers down to three conglomerates: Thor, Forest River and Winnebago. It has also reduced the list of major component suppliers down to two, Lippert Components and Furrion. Mom-and-pop shops making fifth wheel trailers independently of these conglomerates like Aluminum Toy Hauler, New Horizons and Space Craft and smaller component suppliers like MORryde are exceedingly rare.
The fraternity of talent at the top of the RV industry is very close knit and goes back many decades. If you follow the mergers and acquisitions back to the 1960s and 70s, the same names appear over and over in the executive suites of each company. The brothers who founded Keystone together with another executive who oversaw its huge growth sold it to Thor which itself was the result of the acquisition of failing Airstream from Beatrice Foods. After the three held top executive positions at Thor, these three men went on to found Grand Design and oversee its growth and sale to Winnebago. One of the partners sat on the Board of Directors over at Lippert Components, and after the sale to Winnebago another of the partners left the RV industry to start a pontoon boat company in partnership with Lippert Components.
The advantage to the rise of the conglomerates is wonderful economies of scale, but the flip side for the brands under these corporate umbrellas is the loss of the wild frontier style innovation that made early RVs so fun and funky as well as the forced adoption of quality standards that may not match the standards these brands had back when they were independent companies.
A Dishwasher = “That True Residential Feel”
Perhaps the most shocking thing for us was to discover how few people in the RV industry actually own and use RVs. I asked the general manager of one brand and a national sales rep of another what kind of RVs they owned, and the answers were, “I’m too busy to vacation in an RV” and “My wife likes hotels.”
This lack of personal RV experience has caused a disconnect between the manufacturers and their customers’ needs.
A perfect example was when a top executive at one brand told me that full-timers want a true residential feel to their fifth wheels, so every unit in his line of full-timer fifth wheels would be shipped with a dishwasher in it starting in 2019.
Now, of course, lots of full-timers want a dishwasher in their RV, but a lot of full-timers don’t want one.
Another executive at a different company told me, “Well, the dishwasher is a great place to store your dishes in an RV.”
It is? I’m not keen on mixing my clean and dirty dishes in the same storage place!
.
Check out our reactions to LIVING in a toy hauler HERE!
A National Sales Rep proudly showed me the outdoor kitchen on his toy hauler. He was so excited about it when he pulled it out, “Emily, you’re going to love this!” But when he pulled it out, it came to shoulder level on me. I’m 5′ 4″. I raised my arm and made a stirring motion with my hand in front of my chin and said, “I can’t cook like this.” He was crestfallen.
I began asking the executives we were meeting how they get their feedback from customers, and it seemed that they rely on a combination of the orders placed by the dealership buyers and by talking to people at trade shows.
So, it turned out that because 95% of the units of the one brand had been ordered with dishwashers in 2018, it was obvious there was a massive demand for dishwashers. So that’s why all units will have dishwashers going forward.
Similarly, since the sales rep with the outdoor kitchen had seen only grins and enthusiasm when he showed it to folks dropping by the booth at trade shows, he thought his outdoor kitchen was something his customers loved.
Ironically, doesn’t it make sense for dealers to put predominantly fully decked out units on their lots to show customers what can be ordered? And when you’re gallivanting around at an RV trade show and having a ball dancing in and out of tons of brand new units, are you really going to tell that smiling and friendly sales guy that his outdoor kitchen would never work for you?
The takeaway we got from all this is not to be shy and to find out who the buyer is at your local dealership and to tell them what you like and don’t like about the units on their lot. It seems that the closest the residents of the RV manufacturers’ executive suites come to their customers is the contact they have with the folks ordering their units in their dealer network.
ESCAPEES RV CLUB and WINNEBAGO
Fortunately and fabulously, Escapees RV Club and Winnebago have begun working together to get real feedback from real RVers into the design process. This project is in its earliest phase right now, but the emails I’ve received from Escapees about it are very encouraging. It is because of this kind of innovative and forward thinking at Escapees that we keep recommending our readers join Escapess!.
Escapees RV Club was founded by Kay and Joe Peterson and it has been led by three generations of family members who have spent years on the road living in their RVs. They are the real deal when it comes to understanding the RV lifestyle. In July 2024, Harvest Hosts purchased Escapees RV Club.
TRAILERS BUILT by the AMISH
On a completely different note, some folks feel that a trailer built by Amish hands is of better quality than one made by other hands. It certainly makes for great marketing, especially for the companies that are in the heart of Amish country and employ lots of Amish people. We saw Amish workers in some of the plants, both men and women, but we didn’t see how their work could be substantially different than the work done by anyone else on the same assembly line.
The Amish really do work at the RV factories. They do the same jobs as other assembly line workers.
The factory workers are given jobs to do and are told how to do them. The quality standards and aseembly techniques are determined by corporate goals in areas like profitability, target market share, and unit build time to completion.
While a conscientious individual might put tremendous thought and care into a backyard project at their own home, the work they do on the assembly line at their job for an employer will be done the way management demands and not necessarily in a way that they would choose for their own personal project at home.
Before I tell you, take a quick guess at how long it takes to build a 44′ toy hauler fifth wheel. A month? A week?
At the Raptor plant we were told it takes 3 days. At the KZ plant it is 2.5 days. They have a ton of hands working simultaneously, and they all get the job done as quickly as possible.
INDEPENDENT MANUFACTURERS – ATC, Sundowner, Luxe, Space Craft, New Horizons
Independent RV manufacturing plants like ATC and Sundowner (another new entrant into the toy hauler market coming frome the horse trailer industry) take a few days longer to build their units than the bigger mass market brands. This partly because fewer people work on each trailer at a time, and partly because they start from scratch and build their own frames, doors and ramps rather than buying a ready-made frame, door and ramp.
Both ATC and Sundowner looked appealing to us, and we toured each plant. ATC is near Elkhart in Nappannee and Sundowner is in Oklahoma.
Unfortunately, without any slideouts we couldn’t fit our lives and belongings into an ATC fifth wheel toy hauler, and although the Sundowner toy haulers are an aerodynamic two feet shorter than standard fifth wheel toy haulers and are built with a fifth wheel gooseneck hitch which makes a fabulouos connection to the truck and completely frees up the truck bed when you’re not towing, they are also built with a very small bedroom because of the short gooseneck overhang.
However, for folks who have other lifestyle needs than ours, both the ATC and Sundowner deserve a good long look as they are sturdy, well built and rugged trailers that can be modestly customized on order and that have an intermediate price point between the mass market trailers and the high end custom units (New Horizons, Luxe and Space Craft). We visited Luxe and went to Space Craft a second time but will get into that in another post.
ALTERNATE SUPPLIERS – MORryde, Dexter
I mentioned the RV parts manufacturer MORryde, and as we studied toy haulers it seemed to us that there are two components in toy haulers these days where the MORryde version is superior to the competition: the ramp door and the stairs. Likewise, the Dexter brand of axles is considered to be superior to the competition (although the axle brand is a moot point if you plan to upgrade to the MORryde IS suspension which replaces the axles completely).
When our second factory-installed axle failed on our current trailer after our first axle failed and was replaced under our extended warranty, we replaced both axles with Dexter brand at our own expense (not under warranty) and have been very pleased.
So, in our evaluation of toy haulers during our own personal search for ourselves, the brands we focused on came with these MORryde and Dexter components. Generally, if a brand doesn’t specify in its marketing literature that it has a MORryde or Dexer branded component, then it doesn’t have it. There is marketing value in advertising that your trailer includes these brands, and the RV manufacturers call it out in their literature.
One of the side benefits (or disadvantages, depending on your point of view) of massive industry consolidation is that a hugely dominant parts supplier can strong arm its customers into buying its products by bundling them or offering other perks as part of the deal, something like: “If you buy our doors and windows we’ll throw in our stairs for free,” or “If you buy our stairs and ramp door we’ll warranty the frame for three years.”
MORryde Zero-G Ramp Door
Check out this video comparing the deployment of the MORryde Zero-G ramp door and the Lippert ramp door:
MORryde StepAbove
We like the old fashioned flip down front stairs on our fifth wheel, but that design is antiquated these days. The MORryde stairs called the “StepAbove” deploy easily.
FINAL TID-BITS
One of the interesting fallouts from the wholesale decimation of the RV industry that began in 2008 and went on until 2013 or so is that the smaller companies that survived the downturn did so because they engaged in some true soul searching and revised their self-image.
The folks at B&W Trailer Hitches began making farm fencing, and they had enough cash flow to pay their employees to work for the town where they are headquartered, providing groundskeeping and other municipal services. This not only kept everyone employed but it heightened their pride in their town and their loyalty to their company. Amazing and very smart. The folks at MORryde also branched out into non-RVing related products in a similar way.
The management at ATC took a long hard look at how to motivate their assembly line workers to make the best product possible. Rather than providing incentives based on the number of units produced, which is a common metric, they offered incentives that focused on quality control and reducing mistakes and system failures. ATC has the longest and deepest warranty of all the fifth wheel toy hauler manufacturers.
PHEW — THAT WAS LONG!
We’ve got more thoughts to share as we ponder this fork in our less traveled road. At the moment we’re leaning towards a new traditional fifth wheel trailer because the triple-towing seems okay, but who knows what the coming months will bring as we travel further afield and encounter a wider variety of situations with our rig.
Stay tuned!!
.
Note added later: After several years of triple-towing, in the middle of Covid, we bought a house and ended our full-time traveling lifestyle. We bought a truck camper for weekend getaways for a while, towing our RZR on its flatbed trailer behind. We weren’t happy with that arrangement for a variety of reasons (explained in detail here).
However, the travel bug was still biting us, so we decided to spend our summers RVing — in a toy hauler! It is a 2022 Genesis Supreme 28CRT.
This is an OPEN BOX toy hauler where there is a bedroom/bathroom upstairs but the entire downstairs area is a cavernous room with the kitchen at one end, a ramp door at the other and moveable furniture in between. The RZR rolls into that “garage” room when we get ready to tow. When we set up camp, the RZR rolls out and that huge room becomes our living area.
It is an ideal rig for our seasonal travels (4-5 summer months). I’m not sure if we’d want to live in an open box toy hauler full-time, however.
More of our Latest Posts are in the MENU.
New to this site?
Visit RVers Start Here to find where we keep all the good stuff. Also check out our COOL NEW GEAR STORE!!*** CLICK HERE *** to see it!
February 2019 – One of our favorite sightings in our RV travels is the cute little coffee kiosks and coffee huts we find tucked into parking lots and standing on street corners all around the West. As America’s quest for the perfect cuppa joe has become more refined and exotic over the years, these adorable little coffee pit stops have been sprouting all over the place.
Drive-up (and walk-up) coffee kiosks can be found all over the American West!
When we got to Oregon a few years back they were everywhere. And no wonder. Starbucks is headquartered in Washington, and it seems that America’s demand for fancy, fluffy coffee spreads out from there!
De La Bean Coffee in Bend, Oregon
Some of the little coffee kiosks serve more than just coffee too.
Hot Shots and Smoothies in Oregon
As we’ve taken our RV from one small town to another we’fve found that many of these cute coffee joints are marked by a big “Espresso” flag flying out front.
Java Rock Coffee Shop, Terrebonne Oregon
Along with bearing whimsical names, many of these coffee kiosks have all kinds of amusing displays and props too.
Blue Banana Coffee Shop in Lostine, Oregon
These coffee shacks are usually simple little buildings, just big enough for a barista or two inside, and they often have an inviting porch or patio area decorated with flowers out front.
Coffee Corral in Baker City Oregon
Java Rock in Terrebonne, Oregon
Besides being cute and serving great coffee, what I love about these little coffee kiosks is that they are all mom-and-pop shops.
Rather than being part of an impersonal international corporate behemoth, they are locally run and the owners have often put everything they own on the line to try to make their venture a success.
Bare Naked Beans (now called Cricket Flat Coffee) in Elgin, Oregon
When I visited one coffee kiosk a very little girl appeared at the window to take my order. Her mom was busy with another customer, and she was helping out.
I hung around a while afterwards to enjoy my coffee, and the mom told me this was the perfect enterprise for her. She could walk to work, she was with her two small children all day long, and she was building a business at the same time.
Longhorn Espresso in Enterprise, Oregon
Coffee Depot in Redmond, Oregon
One of the first coffee kiosks we ever encountered was Wicked Brew in Moab, Utah. We discovered it before we began RVing, and it was so neat to see it was still going strong years later when we returned to visit the area with our fifth wheel.
This classy little coffee hut serves each cup with a chocolate covered coffee bean perched on the lid!
Usually, these coffee kiosks are drive-thru shacks with windows on both sides of the building.
Drivers pulled up at both sides in Douglas, Wyoming
However, we often walk up to them instead. It only took two or three walk-ups for Buddy to realize that the smell of coffee, the sound of the milk being steamed, and a patient wait at a window might add up to a doggie treat!
Now he sits expectantly looking up at the window and licking his lips.
City Brew Coffee in Red Lodge Montana
Although the frequency of coffee kiosks diminishes as you go east and south from the Pacific Northwest, they are still plentiful in Wyoming.
At Rawhide Coffee in Cody, Wyoming, Buddy decided to do the ordering for us.
Rawhide Coffee in Cody, Wyoming
He’s a smart little guy, and he knew this clever stunt could win him two doggie treats instead of just one!
Buddy puts in his order.
On our first trip through Newcastle, Wyoming, we visited the Kaffee Klatsch several times, so we were looking forward to a return trip the next year. But the Kaffee Klatsch wasn’t there any more! After a brief hunt around town we found it in a new location.
The owner explained that they owned the building but leased the land it sat on. Happily, the new location has made their business grow exponentially. How cool is that?!
We don’t have a photo of that shop, but we do have a few others from South Dakota.
Pony Expresso in Belle Fourche, South Dakota
Hot Springs Coffee Kiosk in Hot Springs, South Dakota
Of course some of our favorite coffee shops are in ordinary buildings. One is the Calamity Jane Coffee Shop in Custer, South Dakota, where we’ve spent many mornings sipping a latte, munching a muffin and chatting with the owners, Jim and Deb.
This enterprising couple had a camera shop in this location for many years. Deb is a photographer, and Custer is located in a popular tourist area surrounded by tons of gorgeous scenery and almost-tame wild animals to photograph.
Mark and owner Jim ham it up at Calamity Jane Coffee Shop & Winery in Custer, South Dakota
But the rise of the internet and digital photography n eput and to film sales and retail camera sales at their shop. Rather than throw in the towel, they thought about what modern day tourists are looking for when they come to a small historic town, and they realized gourmet coffee would be the perfect thing.
The addition of a wine tasting room out back and a huge wine selection was another clever idea, and their store is as busy as can be.
This former camera shop is now thriving as a coffee shop and winery in downtown Custer, South Dakota.
East of the Dakotas the little coffee huts disappear for the most part, but that doesn’t mean great coffee can’t be found. In the small town of St. Ignace in Michigan’s Upper Peninsula of Michigan we came across Harbor Hope Coffee.
Harbor Hope Coffee Shop in St. Ignace, Michigan.
This unusual coffee shop is home to a church group that gathers to worship in the back of the shop each week, and the profits from the coffee sales go to charitable causes. We were astonished to hear the volunteer barista tell us the story behind this unique coffee shop, but what made Buddy’s ears really perk up was when she ased, “Does your puppy want a puppaccino?”
A what?
She grabbed a whipped cream dispenser from the fridge, filled a small bowl with homemade whipped cream and put it on the floor in front of Buddy.
He went crazy!! I have never seen him lap up a bowl of anything so quickly. He got it on his whiskers and all over his muzzle.
The next day, the moment we parked in front of Harbor Hope Coffee Buddy just about jumped through the window to get inside. I knew I was addicted to hazlenut lattes, but Buddy was absolutely bonkers over puppaccinos!
Buddy tastes his first puppaccino. Yum!
Unfortunately, although dogs are warmly welcomed at most coffee kiosks and they are usually offered a treat to boot, some coffee shops with inside seating have strict rules for dogs relating to food service and unexpected visits from the Health Inspector.
So, Buddy has learned that not every “Open” sign at a coffee shop is actually an invitation for his four paws to head in.
Sometimes our four-legged friend has to wait outside.
In Wisconsin he had to wait outside several coffee shops. Fortunately, he is a patient pup.
Buddy watches my every move through a crack in the front door.
At one coffee shop there was a bucket of chalk outside, so we marked his special waiting spot.
This time he got a specially marked spot to wait on outside.
In Hot Springs, South Dakota, before Buddy joined us, we found another shop with a bucket of chalk outside, so we added a bit of sidewalk art there too!
More of our Latest Posts are in the MENU.
New to this site?
Visit RVers Start Here to find where we keep all the good stuff. Also check out our COOL NEW GEAR STORE!!*** CLICK HERE *** to see it!


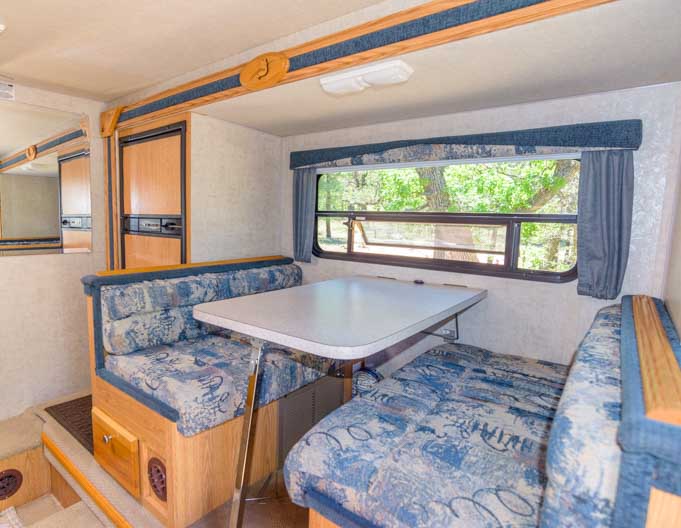


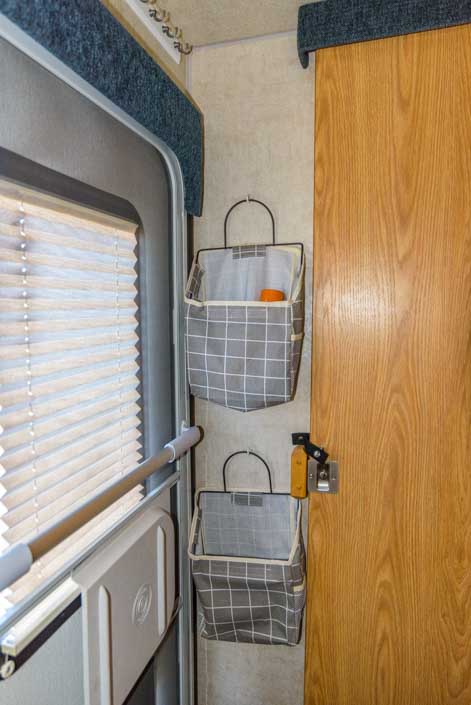

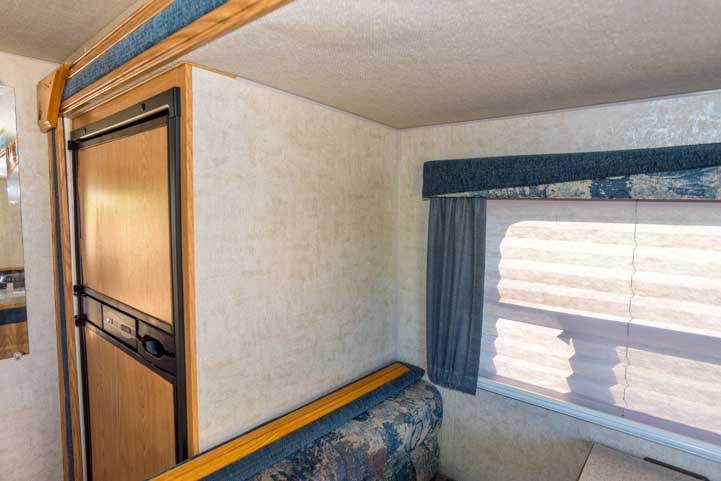

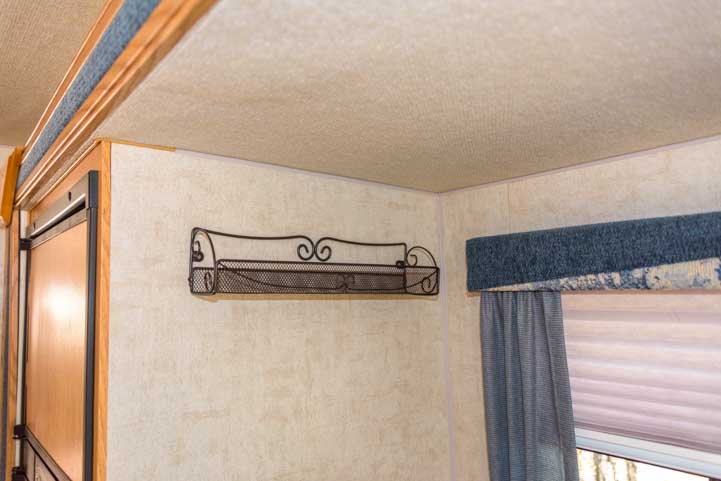


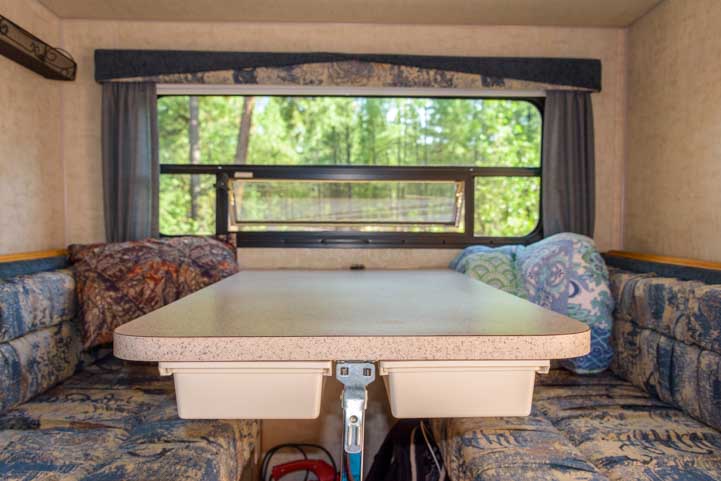


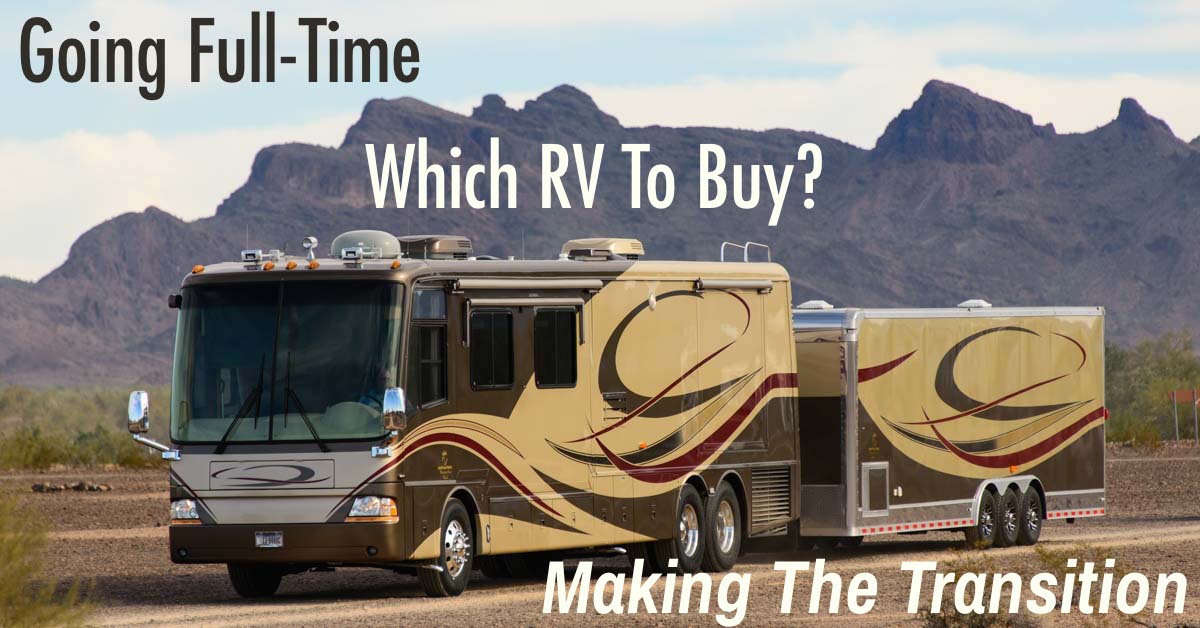


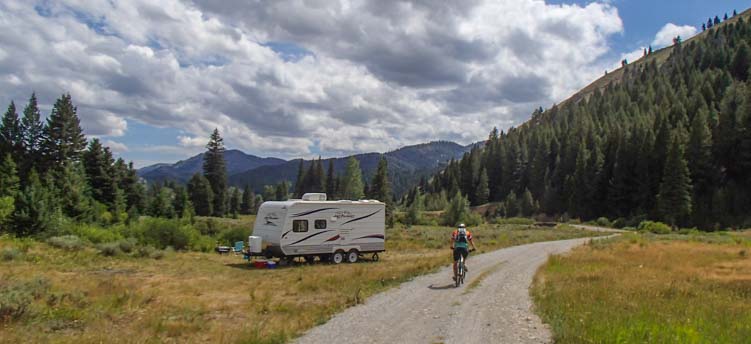

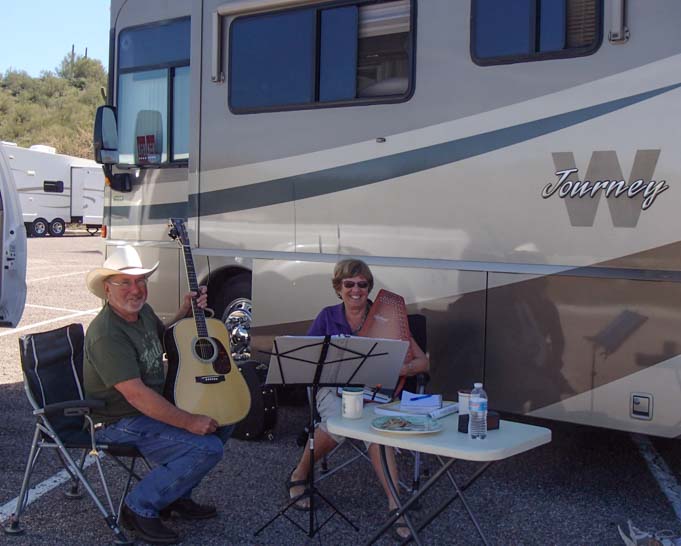


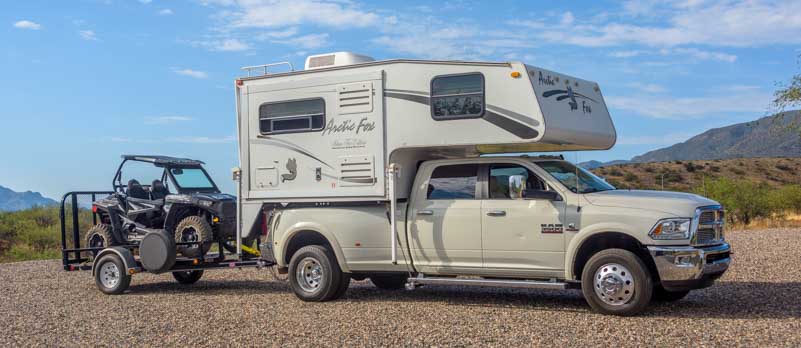


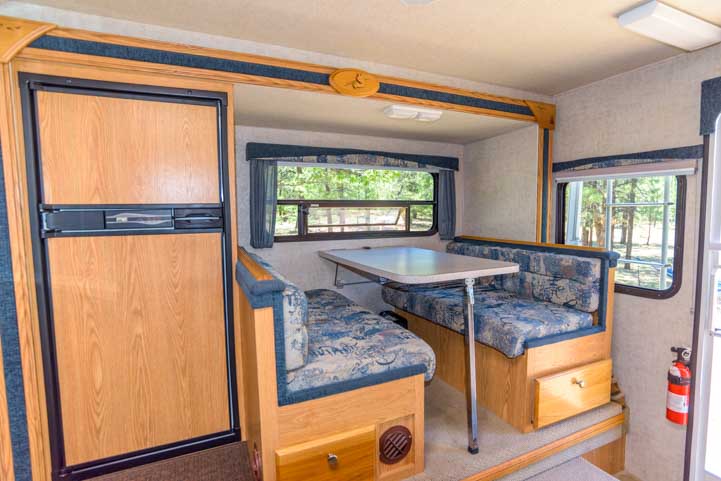


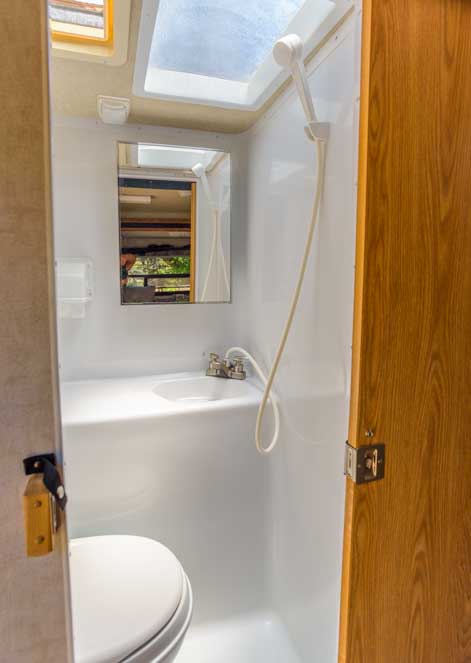


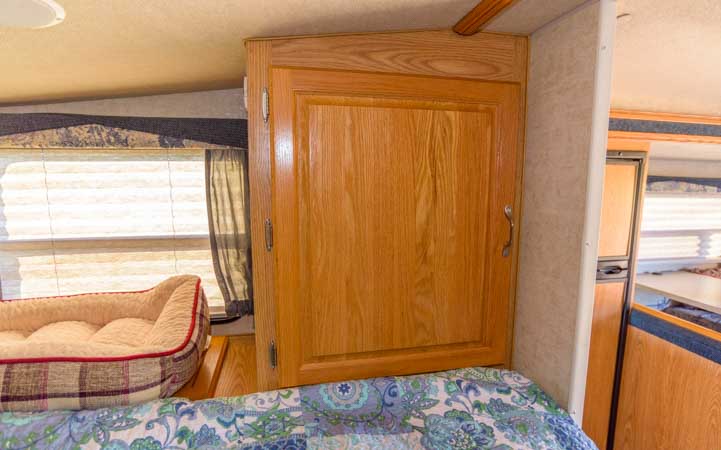


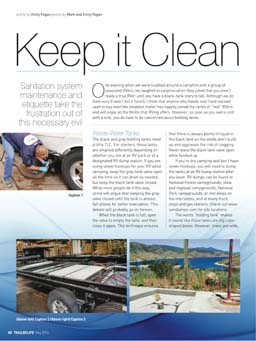


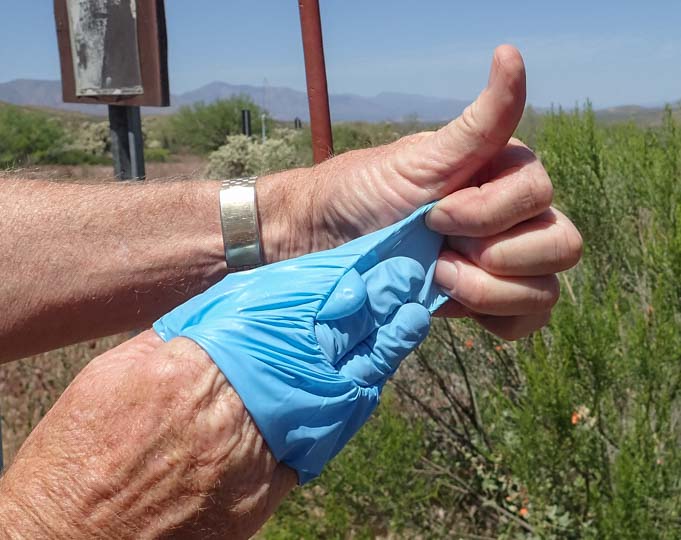


 As responsible RVers, I think it is in all of our best interests if we use chemicals that won’t pollute our ground water supply.