Valley of the Gods & Goosenecks State Park, Utah – Beautiful!

March 2016 – Just over the border of Utah and Arizona at the eastern edges of the two states, a few miles north of Monument Valley, lies a fabulous scenic drive through an area called the Valley of the Gods.

RV motorhome at Valley of the Gods Utah

Many RVers explore the Valley of the Gods on their way through the eastern AZ/UT region.

This is a 15 mile or so dirt road that winds through incredible rock formations.

Valley of the Gods rock formations Utah

The “golden hour” before sunset is a wonderful time for photography here.

Some of the rocks formations are reminiscent of the famous ones at Monument Valley, but this area is much smaller and much less visited.

Red rock formations Valley of the Gods Utah

A hand with a thumb similar to the more famous rock formations of Monument Valley!

It is a wonderful drive to do at any time of day, but sunrise and sunset are when the colors really jump out.

Tree at Valley of the Gods Utah

.

When we were there in late March, we had the whole place to ourselves as the sun was dropping low in the sky.

Camping at Valley of the Gods Utah

What fun!!

This is a parched desert land, but it had rained in the past few days and there were still puddles on the ground that made for some fun reflection photography.

Tree and rocks Valley of the Gods Utah

Recent rain left puddles that were lots of fun to photograph.

Reflections at Valley of the Gods Utah

.

Puddle Reflections Valley of the Gods Utah

.

We were hoping for a colorful sunset, but the skies darkened before any pink or red hues had a chance to form.

Truck at Valley of the Gods Utah

No sunset, but very cool anyway!

Early the next morning, we did the drive again (it is well worth driving through Valley of the Gods more than once!).

Valley of the Gods Scenic Drive Utah

At dawn, the sun played with its shadow.

For brief periods, the sun penetrated the overcast skies and played with its shadow on the rock formations.

Sunrise Valley of the Gods Utah

The rock formations were filled with vibrant colors in the morning sun.

The most beautiful part of this drive is a two to three mile section in the middle where it makes a series of s-curves between the rock formations.

Road through Valley of the Gods Utah

I love curvy roads!!

Each formation is lovely, and even though the sun decided to call it quits for the day, the muted light showed off the majestic scenery without the glaring brightness and shadows cast by sunny skies.

Truck at Valley of the Gods rock formations utah

.

RV camping at Valley of the Gods utah

The sun didn’t stay out for long, but the colors were still beautiful.

Valley of the Gods Utah Scenic Drive

This is a jaw-dropping drive!

Not far from the Valley of the Gods is a phenomenal road that climbs through a series of very tight and steep switchbacks up to lofty heights. It’s called the Moki Dugway. This road was built in 1958 to move uranium ore from the Happy Jack mine to Fry Canyon.

Moki Dugway Valley of the Gods Utah

The Moki Dugway is a hair-raising drive up steep switchbacks on a dirt road. But what a view!

We climbed up the switchbacks and 10% grades in our truck. At a viewpoint part way up we watched a Class C motorhome making its way along this insanely steep road. What a brave driver!

Class C motorhome climbs the Moki Dugway in Utah

A Class C motorhome braves the Moki Dugway

On another day we took a daytrip to Goosenecks State Park. This park is basically an overlook with sweeping views of a tight turn in the San Juan River, reminiscent of Horseshoe Bend in Arizona.

Goosenecks State Park Utah

Goosenecks State Park is a bend in the San Juan River, much like Horseshoe Bend near Page, Arizona.

I had always thought these two places were one and the same, but they are actually very different.

Horseshoe Bend has vast stretches of red rock sandstone slabs at the top of the rim> The Colorado River far below is blue, because at that point in its journey it has just emerged from the dam at Lake Powell. Goosenecks State Park has more of a crumble rock surface at the rim and has lots of vegetation on the canyon walls. At the bottom, the San Juan RIver is muddy and brown.

Overlook Goosenecks State Park Utah

Goosenecks State Park overlook.

Someone had placed a bunch of stones in spiral near the edge.

Rock Circles Goosenecks State Park Utah

What is this? Some strange meditation ring? A tourists’s artistic contribution to the state park?

Unlike the National Park Service’s Horseshoe Bend, which is overrun with thousands of international tourists and is free, Goosenecks State Park is $5 for day visitors, and $10 a night for camping on the rim, and there is hardly anyone there. When we stopped by, I doubt the daily fees were covering the salary of the gal sitting in the guard shack at the entrance!

Truck Camper Goosenecks State Park Utah

Goosenecks State Park has a handful of dry camping sites right along the rim of the canyon.

There were a few RVs parked along the rim. Some were camped in a cluster near the entrance, but one had claimed a spot far in the distance along the rim. What an incredible view out your RV window!

RV camping Goosenecks State Park Utah

Now here’s a fun spot to camp — with a view!

One RVer was enjoying the morning from his camp chair right at the edge of the overlook. How cool is that?!

RV camping on the rim Goosenecks State Park Utah

Now THAT’s a spot to put your camp chair!!

All three of these places — Valley of the Gods, Moki Dugway and Goosenecks State Park — are at the very southern end of the 3,000 square miles of Utah land that the Navajo and other Indian tribes are asking President Obama to set aside to become Bears Ears National Monument. This will protect their many ancestral archaeological sites that are scattered throughout the region. Currently, these areas fall prey to desecration and to mining and oil drilling activities.

National Monuments are under the jurisdiction of the National Park Service whose mission is the protection of national treasures. In line with their charter, the NPS usually takes a hard stance against free wheeling recreation, and they control access and use with an iron fist.

However, the land in question is currently managed by the Bureau of Land Management, the US Forest Service, and even Utah State Parks, each of which has its own unique mission, from resource extraction to recreational use to tourism.

So, this unusual proposal will require these public land management agencies to cooperate in a way they never have before. With any luck, if Bears Ears National Monument is created, recreational use like scenic driving, hiking, biking and camping will still be possible.

Subscribe
Never miss a post — it’s free!

More info about Valley of the Gods, Goosenecks State Park and Moki Dugway:

Other blog posts from our RV travels in Southeastern Utah:

Our most recent posts:

More of our Latest Posts are in the MENU above.

<-Previous || Next->

Go Cheap, Go Small, Go NOW!! Have Fun & LEARN in a Small RV

A few weeks ago we camped in Sedona, Arizona, with two good friends who own popup campers. We were reminded how much fun these little trailers can be and how much we learned in the two years we owned ours before we started RVing full-time in our first big trailer.

If you are thinking about RVing full-time sometime down the road, a year or more from now, the most valuable thing you can do in the meantime is buy a little rig and go play. There is no better way to learn about RVing than to go out and do it, and a small RV provides an awesome introduction.

You can trade in the little rig for a bigger one when you are ready to take the plunge and go full-time.

RV camping in Sedona Arizona

We camped in our fifth wheel with good friends who have two different styles of popup campers.

We owned our popup for two years and spent every possible weekend and vacation in it before we started full-timing. We towed it all over the place. It was routine for us to travel 300 miles with it for a long weekend or to tow it 1,500 miles on a week’s vacation.

Popup camper tent trailer RV

A popup tent trailer folds up small and opens up to be a nice sized rig with beds on each end.

Before we even knew what full-time RVing was, we had already learned a lot about the RV lifestyle from camping in our popup.

We dry camped in it most of the time, so we learned little things like exactly how much water we typically used in a day, and how to take a one gallon shower. We made all kinds of classic rookie mistakes as we tried to keep our battery charged, and we figured out how to “live small” and cook in a dollhouse sized kitchen.

The surprising thing is that our popup camper had many of the same basic systems as our current fifth wheel trailer that we now live in year round. It had DC lights, a propane RV fridge, 26 gallons of water, including a 6 gallon propane hot water heater, a water pump and a propane furnace. It had a shower and a two burner propane stove, and it could hook up to shore power for electricity and to a city water connection for water.

Popup tent trailer RV and campfire

Home sweet home!

It even had one thing our current RV doesn’t have: a king size bed!

There were two things it didn’t have. One was a toilet. When we bought it, we knew we’d be camping in campgrounds, and they always have toilets, so we decided that rather than give up precious space in the trailer for a toilet and have to deal with dumping it, we’d just use the campground toilets instead

It also didn’t have an air conditioner. We knew we’d be camping in places where we wouldn’t need one, so why pay for something we wouldn’t need?!

Toyota Tundra towing a popup camper

A popup trailer is small and easy to tow and fits in the garage!

The fun thing about running around in a little RV is that you can can go almost anywhere the Big Rigs go and get a taste of living a nomadic lifestyle without spending a fortune.

We took our popup camper to some wonderful RV parks and hooked up to electricity and water just like the big fifth wheels and motorhomes. We stayed in RV parks in San Diego (right on the water – wow!), and the Bay Area in California (in a cool wooded area not too far from the city), in the Moab Utah area where we bicycled in the red rocks, and in New Mexico, where we bicycled in the mountains.

Chalet and Popup tent trailer RV

Our friends have two styles of popup: an A-frame (smaller & lighter) and a tent trailer (big beds on each end)

Camping in these RV parks gave us a chance to wander around the loops and meet people that were experienced RVers. We’d talk with them about their rig, find out what they liked and didn’t like about it, and we’d get their advice for what to look for if we ever wanted a bigger RV (we had NO idea we ever would!) and we’d get suggestions for where to travel with our little popup.

We learned about full-timing, and we learned about work camping, and we discovered a world we’d never known anything about. We supplemented that education with online research and magazine subscriptions, but there is no better way to understand an RV’s systems than to use them, and no better way to understand the RV lifestyle than to live it.

Chalet folding trailer RV

This is a Chalet A-frame, and it has a twin bed, a dinette that folds into a full size bed and kitchen.
The beauty of an A-frame is it’s light enough to be towed easily by a minivan.

Lots of people email me expressing interest in going full-time and some express interest in boondocking too. These are big steps, and having as much first-hand experience as possible before you jump in is a really good idea. Online resources are great, but they are limited and only go so far.

If you haven’t done much tent camping, and you dream of camping in the wild, learning how to dry camp in a cheap, small, rolling box is a wonderful way to start. It’s a lot of fun, and it will teach you what to look for when you buy a bigger rig, and more importantly, it will help you decide if it’s something you enjoy before you make a big commitment and turn your life upside down.

Boondocking is basically glorified tent camping in a fancy rolling box.

If you are interested in solar power, you can learn all about it for just a few hundred dollars with a folding solar panel kit and an inverter. The batteries on a popup are right there on the trailer tongue. So, it’s easy to see what’s going on!

Before you go full-time, you can sell the solar panel the kit, either with the little trailer or without!

Popup Camper Moab Utah

Here’s a pretty campsite in Utah’s red rocks.

The transition to full-time RVing is a lot less stressful if you are an experienced RVer already. It’s not a requirement, and plenty of people jump right into living in an RV without ever having used one before, but I think that having hands-on experience is the best way to go.

The wonderful thing about getting a little “starter” RV and playing with it for a while before going full-time — besides all the fun you’ll have — is that the mistakes you make don’t cost much, and you haven’t got a lot at risk.

Popup camper Cape Breton Island Nova Scotia

Here’s another a great camping spot — on Cape Breton Island in Nova Scotia

If you don’t like it, you can sell it.

If you DO like it but have some unexpected repairs, they won’t break the bank and you won’t be trying to live in it while it’s being fixed.

Best of all, you can go home after every excursion and take a long hot shower, wash your clothes in your own washing machine, and you can savor your photos and your memories in the comfort of your big living room, all things that will no longer be possible once you commit to the RV lifestyle full-time.

Another great thing about a little RV is that if you have a small budget you can use it to live your full-time travel dreams.

A few weeks ago we camped next to a couple in their early 40’s who are a river rafting and white water kayaking guide (him) and a mountain biking guide (her). They live in a 17′ travel trailer, and they absolutely love it.

They boondock full-time with the seasons as their jobs move between Colorado and Arizona. The trailer is a huge upgrade for them. They lived in a tent for a few years until this past October when they bought the trailer.

Summerland Travel Trailer by Springdale

A river rafting guide and mountain biking guide love living in this 17′ travel trailer.

We’ve known a lot of 40-somethings over the years who lived in much fancier digs, with granite counter tops and sleek cars in the driveway. But they weren’t happy with their lives. It was enlightening and motivating and inspiring to spend time with these two people who had decided fifteen-plus years ago, right out of college, that they wanted to spend their days doing what they loved, even if it meant having a very simple home.

We’ve also met people living in a popup tent trailer and a half-ton pickup camper.

So, for those who think a nomadic lifestyle is out of reach financially, it just depends on how you want to live.

Our friends Rich and Mary bought our popup camper from us when we went full-time nearly nine years ago. While Rich was setting up camp, he let me take pics of the process so I could show you just how easy it is to set up a popup tent camper.

Here are the steps:

First you crank it up with a cranking tool that comes with the trailer.

Cranking up a popup tent trailer at campsite

First, crank up the roof all the way.

Popup tent trailer roof cranked up for camping

The roof is fully raised but the bed slides are still inside the trailer.

Then you pull out the bed slides on either side. Each slide locks into place in the open position.

Sliding out a bed slide in popup camper trailer RV

Pull out the bed slide at each end. In many models one or both beds is a King.

Then you put the support struts in place. While traveling, these are latched under the bed sllides. Once the bed slide is opened, just hook the end onto a latch on the frame.

Support struts for bed slide in popup camper RV

Attach the supports for the bed slide.

Popup tent trailer roof bed slide out for camping

The bed slide is in place but the canvas tent isn’t propped up yet.

Then go inside and remove anything that’s hogging up space. Rich stores his solar panel inside while traveling, so he takes it out at this point.

Popup tent trailer RV solar panel

Bring out whatever is stored inside: solar panel, camp chairs, patio mat, etc.

This popup camper — a 2005 Fleetwood Colonial — has a slick lower half door that folds down to become the entrance step. There are lots of designs out there, but this is common in the old Fleetwood lineup.

Setting up the door in a folding tent trailer RV

Fold down the entry step.

Popup camper trailer RV Setting up the door

.

Now remove the door from its travel spot where it is suspended from the ceiling and put it in place using the velcro strips on either side. The door and its frame are one unit, so the hinging is solid, but it stands upright in place using latches and velcro.

Door in place folding tent trailer RV

Lower the door from the ceiling and press it into place along the velcro strip on the canvas.

Now open up the canvas above each bed. There is a special support rod that hooks in place that holds up the center of the canvas roof over the bed and gives it its shape.

Inside popup tent trailer RV queen size bed slide

Prop up the canvas over each bed with the support rod
You can hang things from the loop – a lantern, fruit basket, whatever.

Popup tent trailer RV queen size bed slide

The canvas over the bed slide is fully opened.

Now crank down the landing jacks. These give the camper floor a bit of rigidity as you move around inside. The interior isn’t huge — it’s just a 10′ by 8′ box or so — but you can walk around. Having the landing legs down keeps the floor solid.

Cranking down the stabilizer jacks in popup camper trailer RV

Lower the landing jacks.

Last of all, set up the gray tank. This is a bucket outside the back of the trailer! If you want to see exactly how much water you use to wash dishes, there it is!

Popup camper gray water tank

Set up the gray water tank (this popup camper doesn’t have a toilet).

The shower is a shower wand on the back of the popup camper. We just wore bathing suits and stood on interlocking rubber mats. If you are more modest than that, you can set up a shower enclosure.

We didn’t have any kind of solar gear when we owned our popup. We used a battery charger in our garage to charge the batteries before we’d go on a trip, and that was it. We learned really quickly how to be conservative with electricity.

Rich decided to install a second battery on the trailer tongue. He also bought a solar panel and had it wired so it could be connected to the batteries easily.

Another super easy alternative is to get one of the portable suitcase solar panel kits that is designed for RV use.

You can also run heavy gauge wire from the batteries to an 800 or 1,000 watt inverter located inside the popup and then run a power strip from the inverter to a handy place in the rig so you can charge your phone or laptop or run a small appliance.

Popup tent trailer with RV solar power

Put out the patio mat, raise the awning and set up the solar panel. Done!

What a fabulous rig!!

If you are looking forward to having big RV adventures on the road someday in the future, make that “someday” be today! Go out and get a cool little RV and have a blast.

Popup tent trailers like ours are a little heavier (the GVWR is 3,000 lbs.), so both we and Rich bought Toyota Tundra pickups to tow it. An A-frame popup is lighter, because there are no bed slides, so our friend Mark tows his with a minivan.

More info and links for specific popup camper manufacturers below.

Subscribe
Never miss a post — it’s free!

Related posts about small RV living:

Popup Camper Manufacturers:

Popup Tent Trailers:

A-Frame Trailers:

Other RVing tips and tricks:

Our most recent posts:

More of our Latest Posts are in the MENU.   New to this site? Visit RVers Start Here to find where we keep all the good stuff. Also check out our COOL NEW GEAR STORE!! *** CLICK HERE *** to see it!

Navajo National Monument, Monument Valley and Bears Ears

March 2016 – The Northeastern quadrant of Arizona and a bit of southeastern Utah is the Navajo Nation, an Indian reservation that is over 27 thousand square miles. It is larger than the state of West Virginia (~24k sq. mi.). It is also larger than the states of Massachusetts, New Hampshire, Rhode Island and Delaware combined, with enough left over to add in the southern half of Vermont.

Just under 175,000 people call it home.

Within the borders of the northern part of the Navajo Nation, the National Park Service manages the Navajo National Monument, an area where there are some ancient Indian cliff dwellings and ruins.

Hiking at Navajo National Monument Arizona

Navajo National Monument is home to ancient Indian cliff dwellings.
One is in a cave across the canyon.

After visiting stunning Horseshoe Bend and Lees Ferry near Page, Arizona, we drove our truck and trailer across the northern part of the Navajo Nation to see Navajo National Monument.

There are three short hikes at Navajo National Monument, each one progressing along the canyon rim and offering views down into the canyons. We started with the Sandal Trail which was an easy stroll on a paved path to a viewpoint at the end which looked across the canyon at the Betatakin Ruin.

Navajo National Monument Arizona

The Sandal Trail took us along the edge of the canyon to an overlook facing the Betatakin Ruins

In the summers there are guided tours of these ruins, but they don’t start until May 29th, and we were there in mid-March. But the view of the ruins — with binoculars or our long telephoto camera lens — was wonderful.

Betatakin Ruins Navajo National Monument

The Betatakin ruins are in the back of this cave.

Ruins at Navajo National Monument Arizona

In the summer months you can take a guided tour of these ruins. We were there too early!

The Canyon View Trail hike gave us views of this same canyon, although there were no Indian ruins to be seen.

Navajo National Monument canyon view

The Canyon View Trail gave us different views of the same canyon.

Unlike the first two “mesa top” hikes, the Aspen Trail hike descended down into a canyon and gave us a terrific stair-stepping workout going down and then climbing back out.

We were definitely missing the “prize” at this park since we couldn’t do any tours of the ruins themselves, but spring was in the air and wildflowers were just starting to bloom.

Spring flower Navajo National Monument Arizona

Pretty wildflowers on the trail.

There are two dry camping campgrounds at Navajo National Monument, and they are free. Only one campground was open (and only two campsites were being used!), and with some jockeying a bigger rig could fit during seasons where there is little traffic. The signs give RV size limits of 25′ to 32′, depending on the sign, not just in the campground but on the road leading to Navajo National Monument, but in reality a 35′ fifth wheel could manage in one or two of the campsites we saw (with patience). Busy summer weekends might be more hair-raising with a big rig.

This is high desert country (7,300′) so it was quite cold during our stay, but we saw a beautiful sunset.

Sunset starburst Arizona

Remote and quiet in March, we had the sunset to ourselves.

Sunset Navajo National Monument

Sunset at Navajo National Monument

Traveling northeast from there, we passed through Monument Valley, which sits on the Arizona and Utah border. This ia a vast flat plain that is dotted with towering rock formations.

The most dramatic rock formations of Monument Valley are in the Monument Valley Navajo Tribal Park in the Navajo Nation, a four mile detour east of US-191, the road we were on. We decided to save a trip there for another time, but stopped in at a Welcome Center to get some info.

At least, the building had a sign on it that said “Welcome Center!”

When I walked in the door, I expected to see racks of literature and a helpful person behind a desk. Instead, I found myself staring at the backs of several rows of people in folding chairs listening to a man giving a speech. His voice was low, melodic and wistful. And the language he was speaking was Navajo!

Monument Valley Arizona

Monument Valley is dotted with enormous rock formations

I wasn’t sure if I should back out quietly or stick around and see what this was all about. Suddenly, a woman approached me and whispered and gestured towards some pamphlets on a table. She wanted me to sign a petition.

“What’s it for?” I whispered.

“It’s a petition to create Bear’s Ears National Monument,” she said. She handed me a map and a glossy brochure.

Monument Valley selling Indian crafts Arizona

Indians sell crafts from stands on the side of the road.

It turned out that the Navajo Nation (together with 25 other Indian tribes) has approached the federal public land agencies for help protecting their artifacts, relics and ruins. They have been struggling with preventing the desecration of archaeological sites (ancient ruins and petroglyphs), and they want to phase out mining too.

The Navajo have never sought this kind of help before, but apparently they simply don’t have the manpower or the authority to protect the unique archaeological sites. So they are proposing to convert 1.9 million acres of land (about 3,000 square miles) into a National Monument.

Monument Valley Arizona

Towering rock formations in this part of the country often hide Indian archaeological treasures

The parcel of land is enormous. It is the size of Delaware plus half of Rhode Island.

It is a triangle that stretches, more or less, from a bit SW of Moab, Utah, in the north, down about 90+ miles to the Utah/Arizona border in the south, and westward about 50 miles to Glen Canyon, and then about 80+ miles back up on a diagonal along the Colorado River towards Moab.

The popular landmarks and destinations of Natural Bridges National Monument, the Valley of the Gods, Goosenecks State Park, Newspaper Rock and Manti La-Sal National Forest would all be enclosed inside the boundaries of the new National Monument land.

Canyonlands National Park and Glen Canyon National Recreation Area would border it to the west and south. The north-south highway of US-191 would be outside the eastern boundary but would more or less parallel the eastern border of the National Monument between the Moab area and the Arizona/Utah border.

You can see a map here:

Map of Proposed Bears Ears National Monument in Utah

RV at Monument Valley Arizona

This whole area is extremely popular with RVers and other travelers

This proposal is unique because it requires cooperation between several different agencies that manage public land, including the US Forest Service, Bureau of Land Management, and National Park Service, all of which manage portions of the land parcel already (most of the land is currently under BLM management).

The organization that is behind this and that was making presentations and gathering signatures to present to President Obama when I walked in the door is called Utah Diné Bikéyah. “Diné” is the Navajo word for the Navajo people.

I spoke briefly with Gavin Noyes, the Executive Director. He explained that this has been in the works for a few years and that the hope is that Bears Ears National Monument will be created by President Obama before his presidency is over.

He explained that in many ways the process is being modeled on Grand Staircase Escalante National Monument, another ~3,000 square mile public land conversion in southern Utah that was designated a U.S Presidential National Monument under the Antiquities Act of 1906 by President Bill Clinton.

Grand Staircase Escalante was created to preserve unique natural treasures (like red rock formations). Bears Ears National Monument will be created to preserve Native American cultural and archaeological treasures (ruins and petroglyphs and ceremonial sites).

RV at Monument Valley in Utah

The landscapes in this corner of the world are stunning.

I asked what the impact would be on recreational use of the land, like dispersed camping, hiking, mountain biking, rock climbing, etc. Gavin explained that the intention was for better management of the archaeological artifacts and that recreational use would still be allowed, just as it is still allowed in Grand Staircase Escalante National Monument.

Photos in the proposal’s brochure show situations where people have attempted to remove petroglyphs from rock faces by cutting them out with high powered saws. They also show images of mining and other commercial land use. These are the things that this proposal is seeking to eradicate.

Of course, even presidential protection doesn’t guarantee anything. In 1955 President Eisenhower protected a four square mile portion of Tonto National Forest in Arizona, making it off limits to all future mining. In late 2015, that was overturned by the National Defense Authorization Act, signed into law by President Obama, enabling the very same National Forest public land to be sold to a private, for-profit Australian and British mining operation. Eventually, this mine will destroy a beloved recreation area once used by campers and rock climbers that at least one president sixty years ago thought was worth hanging onto. (More info here).

An editorial in the LA Times by former Secretary of the Interior (1993-2001), Bruce Babbitt, spells out all the political back and forth that is going on behind the scenes. Just like the situation that arose in Tonto National Forest where foreign copper mines have trumped recreational use of America’s public land, mining seems to be playing a central role here as well.

Monument Valley reflected in fifth wheel trailer RV

Monument Valley reflections on our RV

All of this was news to me, and perhaps it is news to you too. I am sharing it here because the recreational use of public land is a large part of what this website is about.

Further questions can be directed to Gavin Noyes, Executive Director of Utah Diné Bikéyah by phone: (801) 521-7398 or by email: gavin [at] xmission.com

For more information about the proposed Bears Ears National Monument, see these links:

Further info:

Subscribe
Never miss a post — it’s free!

Things We’ve Learned About Public Land Management Since We Began Full-time RVing:

Other posts from our RV travels to Indian Ruins and to Indian Country:

Our most recent posts:

More of our Latest Posts are in the MENU above.

<-Previous || Next->

Lees Ferry & Marble Canyon AZ + Pretty Paria River Hike

March 2016 – Arizona boasts lots of incredibly scenic drives, and one beauty is Routes 89 and 89A which double back on themselves between Page and Lees Ferry in the northeast corner of the state. This is a portion of the Vermillion Cliffs Scenic Byway, an area that is great for RV travel. After our wonderful visit to the Horseshoe Bend overlook in Page, we drove to Marble Canyon and Lees Ferry.

RV at Lees Ferry Arizona red rocks

Lots of RVs drive the Vermillion Cliffs Scenic Byway

At Marble Canyon, the Navajo Bridge spans the Colorado River. It was built in 1929 and was an important bridge because it made it possible to cross the moody Colorado River without taking the more antiquated cable ferry across at nearby Lees Ferry.

Cars were new in those days, and the ferry system wasn’t great for carrying cars across the river. In 1928 the ferry sank, killing three men, so the bridge, known then as the Grand Canyon Bridge, was a huge improvement.

Today the original bridge is a walking bridge that runs parallel to the newer highway bridge that was opened in 1997.

Navajo Bridge Marble Canyon Arizona

The old Navajo Bridge (left) is now a footbridge. Highway traffic takes the bridge on the right.

Sheer cliffs plunge down to the Colorado River on either side.

Navajo Bridge Lees Ferry Arizona

The Navajo Bridge crosses the Colorado River

We enjoyed a stroll on the walking bridge. The river is a looooong way down!!

Navajo Bridge Overlook Marble Canyon Arizona

The river is way down there!!

We had loved our stay in the red rock country of Sedona, Arizona, a few weeks earlier, but that little town is just the beginning of the southwest’s explosion of orange and pink color in northern Arizona and southern Utah. Spring was just beginning, and we saw bunches of tiny purple wildflowers here and there.

Wildflowers in Lees Ferry Arizona

Wildflowers were just starting to bloom.

The road that winds from Marble Canyon into Lees Ferry is lined with dramatic red rock cliffs, and it is a jaw-dropper of a drive.

Scenic drive to Lees Ferry Arizona

The drive into Lees Ferry is gorgeous.

The towering red walls are still eroding, and in one area there is a massive debris field of enormous boulders that have broken away from the cliffs and rolled downhill. From a distance they look like gravel, but up close these boulders are gargantuan.

Huge red rock boulders Lees Ferry Arizona

Boulders strewn like gravel around the cliffs are actually really massive!!

We meandered among them and took a breather on a rock, totally awed by the sheer scale of Nature’s handiwork.

Hiking the red rocks at Lees Ferry Arizona

We love red rock country!

The forces of wind and water shaped these rocks, and we saw a jagged tributary leading to the Colorado River where a stream carved a zig-zag pattern through the rocks.

Lees Ferry Arizona crack in the earth

A tributary makes its way to the Colorado River

Prior to the Navajo Bridge, Lees Ferry was home to a cable ferry that was originally built by John Lee in 1873. It was the only place travelers could take their horses and wagons and themselves across the tempestuous Colorado River safely.

At the river’s edge there is a boat launch now, and this is a popular put-in spot for river rafters heading down the Colorado River through the Grand Canyon. Two groups of rafters were launching their rafts when we were there. One group was starting a 24 day voyage down the river and the other was starting a 16 day trip. What fun!

Colorado River Rafters headed to Grand Canyon

Lees Ferry is the start of the Grand Canyon, both geologically and for river rafters too.

Just downstream from the boat launch we found the Paria Riffle and white sand Paria Beach where the Paria River joins the Colorado River. This is a really beautiful spot with turquoise water and pink boulders. For those wondering, Paria is pronounced “PaREEa” and not like the word “pariah.”

Paria Riffle and Paria Beach Lees Ferry Arizona

The Paria Riffle and the white sand Paria Beach are very inviting

John Lee’s homestead is now owned by the National Park Service, and we roamed around a little bit. There is an orchard, and visitors can pick the apples and other fruit for free during the fall harvest. We found an old wagon sitting nearby and chatted a bit with an NPS worker who was tending the trees in the orchard.

Old wagon at Lees Ferry Arizona

We roamed around the grounds of the old homestead at Lees Ferry

The farm house itself is off-limits to visitors, and the National Park Service has an engraved padlock keeping folks out.

NPS Padlock Lees Ferry Arizona

No Admittance.
(What a nice padlock!)

The last family to work the farm and live in these buildings left in the 1960’s when the National Park Service bought the property. We wandered out beyond the farmhouse along the dirt road that passes the old farm fields, and we found an old Chevy dually truck sitting out there. As I looked at it, I couldn’t help but think of the day the first owner proudly put the key in the ignition and drove it home. What kind of deal had he struck with the salesman, and what did his wife think of their new wheels?

Antique Chevy truck Lees Ferry Arizona

The last family that lived in the homestead moved out over 50 years ago and left some things behind.

The dirt road that goes by the Lees Ferry Homestead (the homestead is called Lonely Dell Ranch) is the start of the Paria River Trail hike, and we followed the trail for a mile or so along the river.

Paria River Trail Hike Lees Ferry Arizona

From Lonely Dell Ranch, we walked along the Paria River towards Paria Canyon.

The red rock cliffs glowed a deep orange in the afternoon sun, and the cottonwood trees glowed green. What a spot!

Paria River trail hike Lees Ferry Arizona

How beautiful!

Paria River Trail hike Lees Ferry Arizona

Who knew this gorgeous canyon was back here behind Lonely Dell Ranch?!

There was a corral and cattle chute in a more distant farm field. I think farming and ranching would be a pretty enjoyable activity in a setting like this!!

Cattle chute Lees Ferry Arizona

We found a corral and cattle chute out beyond the farm fields.

We walked back towards the farmhouse and caught some trees shimmering in the sun.

Artsy trees Paria River Trail hike Arizona

.

The Paria River trail at Lees Ferry is actually the end of the 40+ mile Paria Canyon trail that starts at the White House Trailhead and goes through Buckskin Gulch and the Wire Pass Slot Canyon. As we were walking, we met two hikers that were wrapping up a three day hike through Paria Canyon. They were tired and had sore feet, but they said it had been a glorious hike. That multi-day hike is said to be one of Arizona’s best.

Hikers on Paria River Trail Buckskin Gulch Lees Ferry Arizona

We met a pair of hikers doing the last mile of their 3 day Paria Canyon hike. Wow!

If it is anything like the mile or so we walked at the south end, it must be truly stunning. We were catching the late afternoon sun on the eastern red rock canyon walls, but glancing at the shaded cliffs to the west, we could see that they must light up in spectacular color in the mornings…

Dirt road Paria River Trail Lees Ferry Arizona

The golden hour just before sunset lit the red rocks beautifully

We didn’t stay long at Lees Ferry, but we got a taste that will bring us back. This is the edge of the Vermillion Cliffs National Monument, and the whole area is ripe for exploring.

Road at Marble Canyon Arizona

Rush hour on the Vermillion Cliffs Scenic Byway

If you are taking your RV through northeastern Arizona from Page westward towards Jacob’s Lake and the North Rim of the Grand Canyon and Kanab, Utah or north towards Natural Bridges, the detour to Lees Ferry is really worthwhile. The combination of red rock canyons and riverside scenery is hard to beat!

RV camping Lees Ferry Arizona

Red rock country knocks our socks off every time we visit.

Subscribe
Never miss a post — it’s free!

Our most recent posts:

More of our Latest Posts are in the MENU above.

More info about this cool area:

More posts from our RV travels to NE Arizona and SE Utah:

Wire Pass Trail Slot Canyon – A FABULOUS hike further north in Paria Canyon
Two Gorgeous Paria Rimrocks Hikes – Easy to reach (and do) hikes at the far north end of the Paria River

<-Previous || Next->

Horseshoe Bend Overlook – Page, Arizona – Stunning!

March 2016 – Horseshoe Bend is a jewel of spot just a few miles south of Page, Arizona, that’s easy to access and is a fabulous place to spend a few hours or more, especially for RVers headed through northeastern Arizona. As we brought our truck and trailer up from Sedona, Arizona, we stopped at Horseshoe Bend in the afternoon.

All smiles at Horseshoe Bend Arizona

At the Horseshoe Bend overlook it’s easy to be all smiles!

From the parking lot there is a 3/4 mile walk up and over a rise to get to the Horseshoe Bend overlook. Hundreds of people were on this trail going in both directions.

As we crested the rise and began the descent on the other side, we could see people scattering like ants as they approached the Horseshoe Bend overlook.

Walking towards Horseshoe Bend Arizona

Horseshoe Bend is extraordinarily popular, and swarms of tourists roam along the rim all day long.

This is a Very Cool Place. Even though we were there with throngs of other people, we felt a rush of excitement as we neared the edge. Everyone else seemed to feel the same way, and the unprotected rim of the overlook was jammed with tourists peering over the edge.

People at Horseshoe Bend Arizona

Tourists were fearless at the edge.

Far down below, rafters were making their way along the Colorado River. The mighty Colorado has carved Horseshoe Bend over millenia, and it is staggering to think of the force necessary to dig this huge ditch through sandstone rock, especially with the river looking so meek and mild down there.

Colorado River rafters Horseshoe Bend Arizona

1,000 feet below, rafters were floating on the Colorado River

This is a great place for selfie shots too!

At the rim of Horseshoe Bend Arizona

I wasn’t the only one who wanted a pic of themselves at this overlook.

Selfie sticks were held high aloft all around us.

Taking selfies at Horseshoe Bend Arizona

Selfie sticks were everywhere!

Taking selfies at Horseshoe Bend Arizona

No selfie stick? Use a folded up tripod!

Some folks were pretty creative getting photos of themselves. Others just laid on their bellies to get a shot of the incredible bend in the river a thousand feet down below.

Taking selfies at Horseshoe Bend Arizona

Hmmm…. should I take a photo of me or a photo of that incredible view out there??

Some were brave and crept far out on a precipice for a very dramatic photo of themselves.

Horseshoe Bend Arizona Sitting on the RIm

The more daring the photo the better!

I’m not sure how many people had noticed the sign on the way in saying that the sandstone is crumbly and the overhanging edges have a tendency to break off…!

Photographer Horseshoe Bend Arizona

Everyone liked to be right on the edge.

As the afternoon wore on, the crowd swelled as people came in to get a shot of the sun setting over the bend in the river.

Photographers at Horseshoe Bend Overlook Arizona

Photographers lined up on the rim with their tripods.

The rim was packed with photographers getting set up for this special moment. Finding a place to squeeze in along the rim wasn’t so easy!!

Photographers Horseshoe Bend Arizona

We waited patiently for the sun to go down.

The excited discussion between everyone standing on the rim alternated between what kind of photography gear they had and speculation about whether we’d all have a chance to go for a starburst shot at the moment the sun vanished from the sky on the far side of the canyon. One woman said she had gotten a doozy of a starburst photo two nights before. We all crossed our fingers.

But Mother Nature had other plans for us that afternoon, and the sun slipped behind the horizon with nary a wink.

It was still very special!

Horseshoe Bend Sunset Arizona

We didn’t get a starburst, but the sunset was beautiful.

I had an 18-35 mm lens, but the best images were a little wider. Mark whipped out his favorite trusty 14 mm lens and got a fabulous image.

Horseshoe Bend Arizona sunset photo

Mark was able to get a beautiful and slightly wider shot at 14 mm.

As we watched the clouds drift across the sky in shades of orange and yellow, suddenly the river down below began to reflect the color. How cool!

Sunset at Horseshoe Bend Arizona

For a split second, the river reflected pink and orange back at the sky.

We left Horseshoe Bend on a total high, absolutely exhilarated by Nature’s show. If the sunset could be that magical, we thought, then what might be in store at sunrise?

The next morning we were on the trail before dawn. There were three cars in the parking lot, including ours, and a young couple was just ahead of us on the trail, weighed down with some serious looking photography gear.

I got chatting with Brittany as we trudged along the trail in the dark, and I discovered that she and her companion, Justin, were professional videographers with their own video production company, Chiet Productions. They had just landed a gig for a regular show on PBS about a nightclub in Washington, DC, that will begin airing in April. It’s called “Live at 9:30.”

They were here at Horseshoe Bend for pleasure, however, and they were planning to shoot the sunrise using timelapse photography.

Timelapse photography Horseshoe Bend Overlook Arizona

A pair of professional videographers set up three cameras on the rim for a timelapse video of the sunrise.

Mark and I went for stills, however, since that was where our heads were at this morning. it was too early to think clearly enough to figure out everything we’d need to do to set up a timelapse, although I LOVED the idea!!

The sunrise was lovely.

The funny thing is that the sunrise wasn’t all that different than the sunset the night before. The sun had set over the horizon in the distance in front of us, but the sun rose behind us, so it would seem the canyon would look quite different. However, the colors we saw at sunrise filled the sky opposite the sun as it rose, casting a soft light across the horizon front of us.

Sunrise Horseshoe Bend Arizona

This morning’s sunrise was just as lovely as last evening’s sunset.

A little while later, the sun lit up the top of the peak in front of us. As the sun rose higher and higher, the shadow on the cliff slipped lower and lower.

Horseshoe Bend Arizona between the cliffs

As the sun rose it lit more and more of the cliffs across the canyon, while the shadow crept slowly downwards.

When the big show was over, we found Justin and Brittany where we had left them with all their gear on the edge of the canyon. They had done three timelapse videos, one on a GoPro, one on a Sony mirrorless camera and one on a cell phone. Brittany showed me the one she’d done on her cell phone. She had caught the sun lighting the top of the pinnacle in the canyon and had captured the shadow slipping down its front as the sun rose higher. Wonderful!!

Videographers at Horseshoe Bend Arizona

Brittany and Justin captured some great timelapse video of the sun rising in the canyon.

The morning wasn’t over yet, though. In fact, the day was just beginning. Where there had been just four of us on the rim at sunrise, we could now see a steady stream of people pouring down the trail, cameras and tripods in hand. The rim slowly became crowded with photographers and tourists once again!

Photographers with tripods at Horseshoe Bend Arizona

After sunrise, we were joined by lots of photographers at the rim.

Curious about some rock formations nearby, we headed off to the right (north). Leaving behind the growing rush of visitors arriving at the rim, we walked out into these cool rocks.

Lines in the rocks Horseshoe Bend Arizona

Away from the fray, to the north, we found some wonderful rock formations.

There were lots of curvy lines and ripples in the sandstone.

Patterns and Lines Horseshoe Bend Arizona

The curving lines and formations in the rocks were beautiful.

Rock crevices Horseshoe Bend Arizona

What magical shapes and formations!

We were both really intrigued by the contours of this fantastic land, and we roamed around this spot for quite some time.

Rock patterns Horseshoe Bend Arizona

The lines and patterns in the rocks drew us in.

If your RV travels take you to Page, Arizona, a stop at Horseshoe Bend is a must.

A few tips:

To avoid the crowds, the best time to get there is early in the morning.

If you are driving your RV, your best chance for finding a place to park it in the parking lot is early morning, not too long after dawn. There is turnaround room (big buses come and go regularly all day long), but it seemed to me that on weekends at peak season, especially holidays, this parking lot probably fills early and would be nearly impossible for an RV. We were there midweek in mid-March, and the number of tourists was mind boggling. The numbers intensify in the afternoon, especially near sunset.

Rock lines Horseshoe Bend Arizona

Horseshoe Bend is an overlook that deserves more than a fleeting glimpse over the edge

As you hit the walking trail to Horseshoe Bend, there’s a sign that says this is a Fee Area managed by the National Park Service. Interestingly, no money was being collected and no one asked to see our Federal Interagency Pass. The National Park Service could be making a small fortune here, as I’m sure several thousand people visit every day.

Subscribe
Never miss a post — it’s free!

More info about Horseshoe Bend:

National Park Service Website – Official description of Horseshoe Bend
Allstays – RV Parks near Page, AZ
Location of Horseshoe Bend – Google Maps (it is mis-labled “Houseshoe” and called a “chapel” – funny!)

Other blog posts from our RV travels in northeastern Arizona:

Our most recent posts:

More of our Latest Posts are in the MENU above.

<-Previous || Next->

How to Defrost an RV Refrigerator in 20 Minutes!

Defrosting an RV refrigerator is a surprisingly easy job. We’ve been living with a propane RV refrigerator for many years now, and they always need defrosting after a few weeks or months. Being meticulous about not leaving the refrigerator door open unnecessarily can help, but when you find yourself living in a hot and humid environment or if you have the refrigerator side of your trailer or motorhome facing the blazing hot summer sun all afternoon, the frost is going to build up over time.

All you need to defrost an RV refrigerator is:

Over the years, we’ve tried several different techniques for defrosting our RV fridge, and in the old days this was a big job that, with some methods, could take well over an hour. We now have it down to a super fast method that makes this pesky job a cinch. The last time we did it, I made a note of the time on the clock as we went through each step. From start to finish, it took 20 minutes.

The first step is to turn off the refrigerator and empty the contents of the freezer into cooler bags or a cooler of some kind. Since these things will be out of the freezer for just 20 minutes, they won’t defrost and the ice cream won’t melt. If your RV is hot inside, covering the cooler bags with blankets for extra insulation can help.

Defrost RV refrigerator remove food from freezer

9:17 a.m. – Turn off fridge and unload freezer into cooler bags

We used to unload the whole refrigerator and empty it out completely, but that isn’t necessary and it takes a lot of time. An awful lot of what is in the refrigerator can handle warming up slightly as you keep the refrigerator door open to defrost it.

Instead, just unload the most temperature sensitive items — milk, yogurt, lunch meats, mayonaise, etc., into an insulated cooler bag or a cooler. Most of the fruits, veggies, bread, cheese, condiments, etc., can remain right where they are in the fridge for the 20 minutes it takes to defrost it.

How to defrost an RV fridge with food in cooler bag

Set the cooler bags aside. Covering them with blankets will keep everything even cooler.

Next, put a super absorbant chamois towel in the bottom of the freezer compartment to absorb the water from the melting ice, and use a hair dryer to thaw the walls of the freezer.

Defrosting RV refrigerator hair dryer on freezer with towels

9:22 a.m. – Use a hair dryer to thaw out the freezer.

We live exclusively on solar power, and our 2,000 watt pure sine wave inverter is what powers all our AC appliances, including the hair dryer. So, we have a low wattage travel hair dryer that draws just 800 watts (available here).

We put it on the high setting and keep a distance of about 8″ between the hair dryer and the walls of the freezer. A higher wattage hair dryer may need to be put on the low heat setting. Hold your hand about 8″ from the hair dryer and see how hot it feels.

Be sure you keep the hair dryer from heating up the plastic walls or they will crack from being cold and then getting hot. Keep the hair dryer moving and test the temp of the plastic walls with your hands.

After thawing the walls of the freezer a little, move down to the cooling fins in the refrigerator compartment. Keep the hair dryer in constant motion, sweeping it back and forth from side to side.

Defrost RV refrigerator hair dryer on cooling fins

Slowly wave the hair dryer in front of the cooling fins.

Alternate working on the freezer compartment and the refrigerator compartment.

How to defrost an RV refrigerator hair dryer in freezer

Alternate between the cooling fins in the refrigerator compartment and the freezer compartment.

Defrosting RV refrigerator hair dryer on fridge cooling fins

At the beginning, when the cooling fins are caked in ice, the hair dryer can be closer to them.

Little ice sheets will begin to fall off the refrigerator cooling fins into the drip tray underneath. As the thawing process continues, increase the distance between the hair dryer and the cooling fins.

How to defrost an RV fridge melting ice with hair dryer

As ice drops and the cooling fins thaw, move the hair dryer back a little.

Don’t chisel the ice off the fins or the freezer walls with a tool. If you pierce the metal base behind the cooling fins or the walls of the freezer, the refrigerant (ammonia) will leak out. We don’t use any chiseling device. We simply assist the thawing process with the hair dryer.

Check beneath the cooling fins and you’ll see the bits of ice dropping into the drip tray.

How to defrost an RV refrigerator ice dropping from fridge cooling fins

Check below the cooling fins where the ice drops off in chunks.

If you go outside, on the back of the RV you’ll see water seeping out of the refrigerator vent.

How to defrost an RV fridge water dripping from refrigerator vent on outside of trailer

Outside the rig, water will be seeping from the refrigerator vent.

How to defrost an RV refrigerator water dripping down fridge vent outside trailer

A little trickle of water flows down.

Once all the ice has fallen off the cooling fins, pull out the drip tray and dump the ice in the sink.

Ice in RV refrigerator drip tray

9:34 a.m. – Once all the ice has dropped off the cooling fins, empty the tray of ice into the sink.

Up in the freezer compartment, the chamois towel is now fairly wet with water that has dripped down off the walls. Wring it out and use it to wipe down the freezer and the fridge.

Wet Chamois towel from defrosting RV refrigerator

9:35 a.m. – The chamois towel in the freezer is pretty wet. Use it to wipe down the fridge and freezer.

Load the food from the cooler bags back into the refrigerator and freezer compartments, and you’re done! Put the fridge at max temp for a few hours to help it cool back down, and then set it to the temperature setting you normally use.

Defrosted RV refrigerator

9:37 a.m. – After loading the food back in the refrigerator, turn it back on. Done!

Other RV Refrigerator Tips

The key to having an RV refrigerator work optimally is having the air circulate inside well. Overstuffing the fridge with food makes this difficult for it. We have used a little RV refrigerator airator fan that’s designed to keep the air flowing. We’ve had mixed results with this, and when it died we didn’t replace it. I think this would work well if there were space between all the food, but our fridge is usually packed (the turf wars between the beer and the veggies can be brutal…sometimes we can hear them battling it out in there!).

As a maintenance item, we keep the door seals clean, wiping them down periodically.

We use simple refrigerator thermometers to monitor the temperatures in the fridge and freezer. It has a built in hook, and we hang it from one of the rungs in the top shelf in the refrigerator. The one in the freezer rests against one wall.

We were surprised to learn that RV refrigerators have an expected lifespan of about 8 to 10 years. A classic sign of impending failure is the appearance of yellow dust in the refrigerator vent area behind the fridge (go outside and take the vent cover off and look around with a flashlight). Click the following link to read the funny story of our RV refrigerator replacement and see how an RV fridge replacement is done.

Because of the shorter lifespan, higher price, and use of propane in RV refrigerators, many (most) “full-time” level fifth wheels and motorhomes are now being built with residential refrigerators that run on AC power only (a dedicated inverter is installed so it can run from the batteries while in transit). For folks that have plans to dry camp and boondock a lot in their RV life, a residential refrigerator will require a much bigger battery bank and solar panel array than would otherwise be needed. We discuss that in more detail at this link in our introductory solar power article.

If our hair dryer method of defrosting an RV fridge seems unorthodox to you, believe me, we have tried many other methods. We tried opening the fridge and freezer doors and letting the fridge thaw out on its own. We tried doing that and “helping it along” by chiseling the ice off with a small plastic scraper. We tried putting a bowl of hot water in the fridge to help it warm up.

All of these methods were adequate, but they were time consuming. We’ve been using our current method with the mini travel hair dryer for a few years now and really, really like it.

Subscribe
Never miss a post — it’s free!

Below are some of our most POPULAR POSTS (also in the MENUS above)

Buddy - A Journey in Spirit - The story of an event that changed our lives forever.

ARTICLE INDEXES
  • RV Tech Tips Articles - A one page index of links to all our RV Tech Tips, RV Upgrades & RV Maintenance articles.
  • RV Lifestyle Tip Articles - An index of links to all our RV Lifestyle Tips (finances, boondocking, major repairs, work/jobs, etc.)
  • Solar Power Articles - Overview and tutorial articles for how to design and install solar power on an RV or boat
  • Product Reviews - An index of links to all of our Product Reviews
RV UPGRADES, SYSTEMS & TIPS MONEY FULL-TIME RV LIFESTYLE GEAR STORE
  • Gear Store - A list of the goodies, equipment and gear we've found useful in our RV lifestyle!
 

Our most recent posts:

More of our Latest Posts are in the MENU.   New to this site? Visit RVers Start Here to find where we keep all the good stuff. Also check out our COOL NEW GEAR STORE!! *** CLICK HERE *** to see it!

Sedona Arizona – Brooding Skies at Sunset in the Red Rocks

March 2016 – During our RV travels to Sedona, Arizona, we were eager to capture a gorgeous sunset over the red rocks. We had seen some lovely sunsets, and we had enjoyed lots of time hiking and biking in the red rocks, so it only made sense that we should be able to get some photos of a magical sunset casting a pink and orange glow across the unique Sedona landscape.

We checked what time sunset was, got all our photography gear together, and headed out at the Golden Hour just before the sun went down.

Golden hour Bell Rock Pathway Sedona Arizona

The “Golden Hour” (an hour before sunset) on Bell Rock Pathway in Sedona AZ

We had everything we needed to capture the ethereal light of sunset. We hiked well out onto the Bell Rock Pathway to the big flat boulders in the middle where you get a wonderful 360 degree view of the majestic red rocks all around you.

Bell Rock Pathway Golden Hour Sedona Arizona

Would the brooding sky grace us with a beautiful sunset tonight?

Well, a daytime sky full of clouds doesn’t always translate into an evening sky full of pink and orange colors.

Golden sky Bell Rock Pathway Sedona AZ

Dark gray and pure white clouds striped the sky.

I had found an awesome spot to capture a vividly colorful sky with a craggy old tree framed by the red rocks, but as the minutes ticked by after the sun was gone from the sky, we both finally had to admit that this evening’s sunset was a total dud. Oh well.

Bell Rock Pathway views Sedona Arizona

Despite all the good looking prospects beforehand, the sunset never materialized.

We packed up our gear and went home. As we drove, we bolstered our rather dejected spirits with hopes for a stunning sunset tomorrow. After all, Nature would have to put on a vivid display the next night. There couldn’t be two dud sunsets in a row, could there?

So, after a day of other activites and much anticipation, we packed up our camera gear once again, hopped in the truck, and drove out to the Bell Rock Pathway for the Golden Hour a second time, our spirits high and hopeful.

Photography in Sedona Arizona

Tripods at the ready, we had everything we needed for a great sunset, provided Nature cooperated!

We had expected to see big crowds at the trailheads at sunset, but instead there were just a few vehicles. Some kids in a rental RV were climbing on the roof to get a shot of Bell Rock. They flashed peace signs at me and gave me a thumbs up.

RV motorhome at Bell Rock Sedona Arizona

Some Asian kids with a rental RV get shots of Bell Rock from the roof.

Just behind us, a girl in a beautiful pink gown was posing for a photographer. How fun!!

Photo shoot at Bell Rock Overlook Sedona Arizona

A pink gown and Sedona’s red rocks — what a great combo!

Mark posed for me too, although his outfit wasn’t quite as stunning, and the skies began to go gray above us. We stared at the darkening, mottled sky wondering how this sunset would go. Hmmm.

Bell Rock Pathway dark sky Sedona AZ

Mark models for me before we head out on the
Bell Rock Pathway trail.

Well, maybe a sunset would develop. We hoisted our tripods over our shoulders and trekked out onto Bell Rock Pathway once again.

To get a good sunset, there has to be some kind of small opening in the sky at the horizon where the sun can shine through and light up the clouds as it slips away. We watched with disappointment as the entire horizon filled with dark, dense, gray clouds, obliterating any chances the sun might have had to peek through.

Night sky Sedona Arizona

Very cool clouds, but no sunset.

We had our trusty radios with us, and we kept each other entertained with banter while we waited, even though we were on opposite sides of the huge rocks.

Eventually, the clouds and nighttime won, and the last shafts of light from the sun flashed across the sky. The sky went black, and our spirits went the same way. We couldn’t believe our luck. Two days in a row!

Stubbornly, we stayed put out on the trail until the trail itself was impossible to see, as if by remaining out there we could make the last half hour replay itself, this time with bright color and a vivid sunset.

Cathedral Rock light in the sky Sedona AZ

The sun splashed across the clouds for a split second before darkness fell.

We were very quiet in the trailer that night as we sorted through our photos. Would we give it a try again tomorrow? The third time’s a charm… but then, bad things come in threes. Oh goodness.

The thing was that these nights were COLD. We each wore three jackets when we hiked out onto the trail, and the wind always found its way through our clothes, even when we snugged our hats and hoods around our ears while waiting for the sun to do its magic.

Cold nighttime photography Sedona Arizona

Staying warm at sunset in Sedona in early Mark takes a lot of layers!!

On the third day there were puffy little idyllic happy clouds in the sky all day long. Huge platoons of them marched across the sky, and they promised us they’d still be marching come nightfall so we could photograph glorious shades of magenta and orange suspended over the red rocks.

But no.

Cathedral Rock stormy sky Sedona Arizona

Clouds streak over Cathedral Rock.

By sunset the clouds had banded together into massive blankets of gray that streaked across the sky.

Wild Skies at Cathedral Rock Sedona Arizona

The streaks over Cathedral Rock take on a wild look.

They swam from horizon to horizon, and even when the sun was able to cast its warming glow for a split second, the clouds hung heavy and dark.

Views from the Bell Rock Pathway Sedona Arizona

Sun lights the sky for a fleeting moment.

Mark got creative, though, and caught them in the act of coming directly towards him over the cliffs in the distance.

Bell Rock Pathway night views Sedona AZ

A spray of clouds.

But the color just wasn’t happening. The gods of the Sedona skies had decided not to give us any orange or pink brilliance for the third night in a row.

Suddenly, just as we were giving up hope and talking about packing it up so we could go home and get warm, we turned around and saw fire lighting the sky beneath the dramatic clouds hanging over Cathedral Rock.

Cathedral Rock at sunset Sedona Arizona

The sky is on fire at the base of Cathedral Rock.

“Holy cow. Do you see THAT?” I called on the radio.

“YES!” Mark answered. And we both leaped into action.

Sunset Cathedral Rock Sedona Arizona

Wow!

At last we had our colorful sunset skies over the red rocks in Sedona.

If you are traveling in your RV to Arizona’s red rock country in Sedona, try to get out on a hike during the golden hour for sunset. Even if you don’t get a wildly colorful sky, you will still see a lot of beauty. And who knows, at the very last moment the sun might do something magical!

Subscribe
Never miss a post — it’s free!

Each of the three nights we ventured onto Bell Rock Pathway from a different access point. The three trailhead parking lots can be found on Google Maps at this link.

Our most recent posts:

More of our Latest Posts are in the MENU above.

More info and blog posts from our RV Travels in Sedona:

<-Previous || Next->

The Crack at Wet Beaver Creek (Bell Trail Hike), Sedona, AZ

March 2016 – We really enjoyed mountain biking the Bell Rock Pathway during our RV travels to Sedona, Arizona, and one day we got chatting with young neighbors in an RV nearby about where the good mountain biking and hiking spots were around Sedona. They knew the area really well and asked if we’d ever been to The Crack at Wet Beaver.

Mark raised an eyebrow.

“No, no, not that!” They said. “It’s a really cool gorge on Wet Beaver Creek. It’s a great hike, and if you take your bathing suits you can swim there!”

Bell Trail Hike to Wet Beaver Creek The Crack Sedona Arizona

“The Crack” at Wet Beaver Creek

The next morning dawned sunny and warm, so we took off on the Bell Trail to hike into the Wet Beaver Creek Wilderness to find this infamous Crack.

Beginning Bell Trail Hike Sedona AZ

The beginning of the Bell Trail hike into the Wet Beaver Creek Wilderness goes through open grassland.

The Bell Trail is named for Charles Bell who built the trail in 1932 for moving cattle, and a sign at the trailhead indicates it is still used for that purpose today. It is about 3.5 miles from the trailhead to The Crack. The trail goes deeper into the Wilderness, but we figured 7 miles out and back was plenty for one day.

At the beginning, we hiked through open grasslands and under a canopy of trees alongside Wet Beaver Creek. After about two miles, we came across a red rock cliff soaring into the sky with a tree on top.

Hiking the Bell Trail Hike Sedona AZ

A red rock cliff with a tree on top juts into the sky

For the next mile or so we walked through gorgeous red rock scenery as the trail hung onto the edges of bright orange hillsides and zig-zagged under exotic red rock formations.

Hiking Bell Trail Sedona Arizona

How’s that for a cool trail?!

We were hiking in the morning, and the sun felt good on our skin, but later in the day this desert landscape would become very hot.

Bell Trail Hike Sedona Arizona

Desert plants, like ocotillo cactus and prickly pear, abound.

We could hear the sound of rushing water ahead of us, and soon we saw the creek splashing noisily over river rocks to our right. What a nice spot for a picnic!

Bell Trail Hike to Wet Beaver Creek Sedona Arizona

We stopped for lunch in a quiet spot where the water rushed over river rocks.

The whole area was filled with leafless deciduous trees that must bring true magic to the landscape in the fall. And what a great spot to do some flowing water photography!

Bell Trail Wet Beaver Creek Sedona Arizona

Wet Beaver Creek polishes the rocks in its path.

We hiked just a little futher on and suddenly the landscape opened up to massive shelves of boulders stepping down to sheer cliffs that plunged into the water below. This was The Crack!

View Wet Beaver Creek The Crack Sedona Arizona

“The Crack” is like a red rock quarry with huge flat slabs of sandstone and water far below.

Our friends had described crystal clear water that was a lovely shade of blue, but the creek was running fast from the snow melt and had swelled so much that lots of debris had been stirred up as the water tumbled down from the mountains. The water was murky and filled with foam from the crashing waterfalls upstream.

This made for some neat slo-mo photos!

Swirls Wet Beaver Creek The Crack Sedona Arizona

The fast moving water from the snow melt created cool foam swirls

The Crack is a stunning spot that is so unexpected in the dry dusty desert.

Hike to Wet Beaver Creek The Crack Sedona AZ

The canyon walls were steep and the surface of the water was foamy!

The huge flat boulders are really inviting, and we scrambled around on them for quite a while.

Wet Beaver Creek The Crack Sedona AZ

I just love that tree growing out of the crack in the rocks.

Photography at Wet Beaver Creek The Crack

This little oasis was such a surprise after the dusty, dry hike to get here.

We had the place to ourselves. Other than the distant sound of rushing water, it was quiet and still.

Hike to Wet Beaver Creek The Crack Sedona Arizona

We had the place to ourselves…for the moment!

I ventured out onto a cool looking precipice hanging out over the water and Mark got my photo.

Diving platform Wet Beaver Creek The Crack Sedona Arizona

Little did I know that this is a favorite diving platform!

Suddenly, we heard voices coming down the trail. Two young couples appeared and set up beach towels right on that same rock precipice I’d been standing on and then stripped down to their bathing suits to get a tan.

“Are you going to jump in?” One girl in a bikini asked me.

I looked down at the murky water doubtfully. Diving into the its depths had not been on my agenda today!

Sunbathing Wet Beaver Creak The Crack Sedona Arizona

Sunbathers stretch out on the diving rock.

Then, I watched in amazement as she made her way down to a lower rock and jumped in. Brrr!! Then the other girl did the same.

“The water’s great!” They yelled out to me.

Well, I was happier taking photos of them than swimming, so I let them have all the fun in the water while I stayed warm and dry on shore.

They debated jumping off the rock precipice where they’d laid their beach towels, but because they couldn’t see the bottom — which they said you usually can — they decided not to. You never know what kind of submerged log might be lurking just below the surface.

Flying leap Wet Beaver Creek The Crack Sedona AZ

The water was too murky to dive from the upper rock, but this intrepid gal jumped in from lower down.

The bathing beauties climbed out of the water using a rope that someone had secured in the rock, and they settled in on their beach towels for a while.

We left them and began to make our way back along Bell Trail. The trail had gotten really busy, and we were amazed that the silence of the early morning was completely gone now, shattered by the continual voices and footsteps of other hikers making their way to The Crack on this warm Friday afternoon.

A snort and a whinny up ahead alerted us to horseback riders coming down the trail. What a neat sighting at the end of a very enjoyable hike.

Horseback riding Bell Trail Sedona Arizona

A pair of horseback riders greeted us on the trail going back.

If you spend some time in Sedona, whether you travel there by RV or some other means, a hike on Bell Trail to The Crack at Wet Beaver Creek is a really nice change of pace. More info and links below.

Subscribe
Never miss a post — it’s free!

More info about Bell Trail and The Crack at Wet Beaver Creek:

Other fun hiking and biking trails we’ve found in our RV travels:

More posts from our RV adventures in Sedona, Arizona:

<-Previous || Next->

Our most recent posts:

More of our Latest Posts are in the MENU above.

B&W Companion OEM Fifth Wheel Hitch Installation – Easy!

The B&W Companion OEM fifth wheel hitch uses the new and very clever puck hitch mounting system that can be ordered with Ram and Ford trucks in their fifth wheel and gooseneck towing prep packages. This truck option has five “pucks” installed in the bed of the truck: four in the corners to mount a fifth wheel hitch and one in the center for a gooseneck.

The new style fifth wheel hitches that are designed for these puck systems stand on four legs that each have a quarter turn locking mechanism at the foot to secure them into the four pucks in the bed of the truck. This allows the hitch to be installed or removed from the bed of the truck easily. When the hitch is removed, the truck bed floor is totally flat and free of obstacles, because there are no hitch rails to get in the way. Ford, GM and Ram have different puck layouts in the beds of their trucks.

When we were going through the process of buying a new Ram 3500 dually truck, we knew we wanted the best of breed fifth wheel hitch that incorporated this new design for our full-time RV lifestyle. After a factory tour of the B&W Trailer Hitches plant in Humboldt, Kansas, we were sold. You can navigate this page using the following links.:

.

B&W Trailer Hitches

Return to top

B&W hitches have long had a stellar reputation in the RV industry, and when our 36′ Hitchhiker fifth wheel trailer was getting a slew of big repairs done at the NuWa factory service center in Chanute, Kansas, (thank goodness for our RV warranty), we discovered B&W Trailer Hitches was just a ways down the road. So we took a factory tour of the plant.

B&W Fifth Wheel Hitches

All of the hitches manufactured by B&W Trailer Hitches are on display at the manufacturing plant.

What struck us more than anything is that B&W Trailer Hitches is a company that cares. They not only turn out a superior product, but they take take care of their employees.

When the RV manufacturing industry went into a steep nose dive in the years following the financial debacle of 2008, many of the employees that had worked at NuWa industries building fifth wheel trailers eventually found employment over at B&W Trailer Hitches as NuWa’s need for workers shrank. And when B&W didn’t have enough work for everyone to do, the company paid their employees to do city maintenance work in their hometown of Humboldt, Kansas.

How cool is that. And how RARE is that?!

Checking out a B&W Fifth wheel hitch

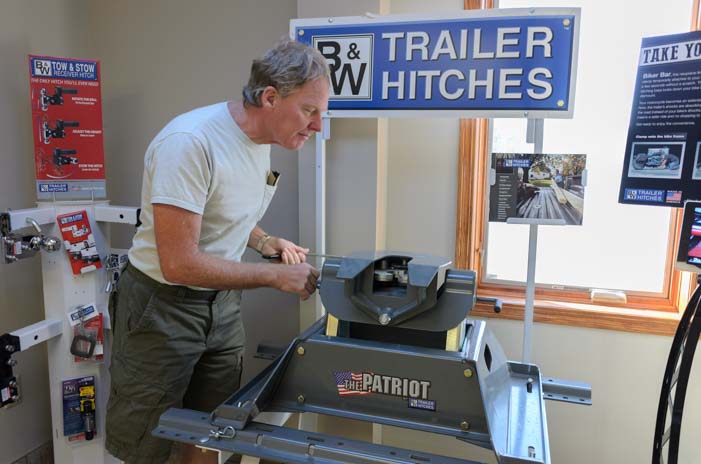
Mark checks out one of the hitches on display at B&W.

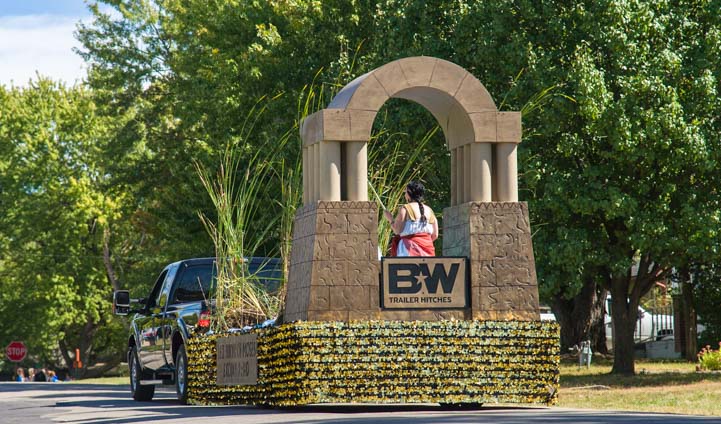
We got a taste of just how deeply these community values run when we saw the Biblesta celebration and parade during our visit to Humboldt, Kansas. In an age of political correctness when many people are afraid to express their beliefs publicly, this is a town that has been openly celebrating Christianity in an annual festival for the past 52 years. All the churches in the area — as well as B&W Hitches — have a float in this extraordinary parade. Read our blog post about it here: America’s Heartland – Is It In Humboldt Kansas?

B&W Trailer Hitches Moses Float Biblesta Parade Humboldt Kansas

B&W Trailer Hitches sponsored a float in the Biblesta parade in their hometown of Humboldt, Kansas

B&W Trailer Hitches Float Biblesta Parade Humboldt Kansas

.

Founded in 1987 by Joe Walker and Roger Baker as B&W Custom Truck Beds, the company long ago became B&W Trailer Hitches. They still build custom truck beds, but the company has grown and now manufactures many other products.

In 1991, B&W invented the clever turnover ball for gooseneck hitches, and that put them in the forefront of the towing industry. For trucks that have a gooseneck socket in the bed of the truck, the turnover ball gets inserted this socket and a fifth wheel hitch can be installed that latches onto the ball and also onto rails that are installed under the bed of the truck. When the fifth wheel hitch is removed, the turnover ball can be turned over to make the bed of the truck completely flat since the rails for the hitch are under the bed.

This makes the entire bed of the truck available for hauling when the fifth wheel hitch isn’t installed, and it also allows the truck to be set up for either gooseneck or fifth wheel towing really easily. This is handy out in ranch country where one truck might tow a variety of trailers, and also be used to haul big loads.

B&W Hitches factory tour

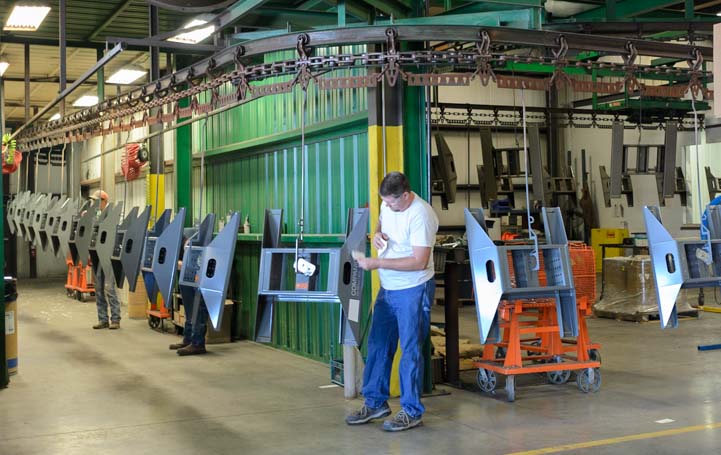
B&W hitches on the assembly line in Humboldt, Kansas.

The new puck style hitch mount offered by the truck manufacturers is a similar concept. Rather than just one connection point between the 5th wheel hitch and the truck bed in the center, there are four points of contact in the four corners. The four puck system also allows for an even heavier duty weight rating on the biggest fifth wheel hitches, so larger fifth wheel trailers can be towed.

B&W Trailer Hitches is into quality, and one of the things that sets their hitches apart is that they are made from American steel. Since we have dealt with axle and leaf spring problems on our trailer several times over the last year, we have come to realize just what a huge difference there is between Chinese made steel and American steel. When it comes to something that puts your life on the line because it is carrying heavy loads, American made steel is the only way to go.

B&W Fifth wheel hitch bases stacked up at factory

Stacks of B&W fifth wheel hitch bases (these are not the new puck style base)

Another hallmark of quality in B&W hitches is that the nuts holding the hitch base to the truck are castle nuts. This means you can lock them with a sheer pin so they don’t back out.

Also, just about everything at B&W Trailer Hitches is done in-house. That way, they can retool the assembly line easily, as needed, for instance, if they improve the design or the puck layout is changed by the truck manufacturers.

B&W Fifth wheel hitch heads stacked up at factory

Stacks of fifth wheel hitch couplers (the top part of the hitch).

Lots of metal shavings are generated in the production of hitches on the B&W assembly lines. We were impressed that B&W recycles all the metal shavings at Missouri Metals. Very green!

Metal shavings from B&W Hitches recycled at Missouri Metals

B&W recycles all the metal shavings from their production lines

.


B&W Companion Fifth Wheel Assembly and Installation

Return to top

We chose the 25,000 lb. B&W Companion OEM fifth wheel hitch. This is way overkill for our 14,100 lb. trailer, but our goal in our whole truck-and-hitch upgrade was to be able to tow our fifth wheel effortlessly. It also gives us options down the road in case a day comes when we want to replace our trailer with something bigger or beefier.

The whole installation of the B&W Companion OEM 5th wheel hitch could easily be done right in the bed of the truck, but we we got the hitch before we got our truck! So, we did it in two stages. First we assembled the hitch in a friend’s garage. This took 40 minutes. Then, once we got our new truck, we installed the hitch in the bed of the truck. This second stage took 20 minutes because we needed to fine tune the mating of the four pucks and the four legs. In the future, lifting the hitch in and out of the truck bed will take just a few minutes.

So, it’s about a one hour DIY job to install a B&W Companion 5th wheel hitch right out of the box. That’s a huge improvement over paying the fifth wheel dealership to do a two hour installation like we did when we installed our first fifth wheel hitch in our first truck!

These are the tools for the project:

Our B&W Companion OEM fifth wheel hitch was shipped to our friend’s house by UPS. It came in two boxes.

UPS Delivers B&W Companion Fifth Wheel hitch

Exciting day — UPS delivers our hitch!

There is a base and a head (or coupler) and assorted parts. We laid them all out to get a look at them.

B&W Fifth wheel hitch assembly pieces

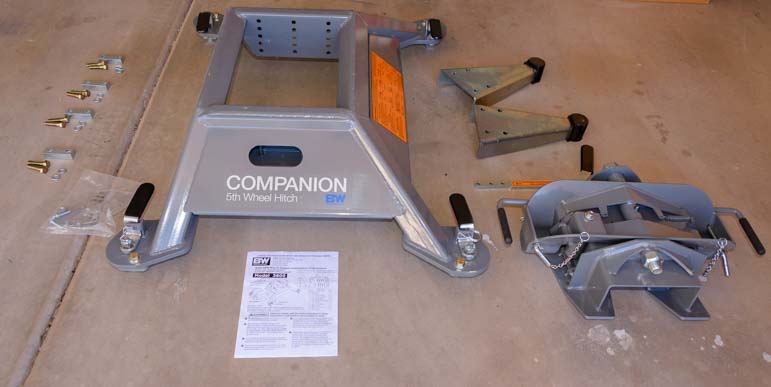
We lay out all the parts and the instructions.

There is a one page installation instruction sheet that comes with the kit (also available online here). There’s also a sticker on the hitch base with instructions for mounting the hitch’s two parts into the truck bed.

Instructions on B&W Companion fifth wheel hitch

The orange sticker on the hitch base has instructions for mounting the hitch in the truck bed.
The sticker faces the truck cab.

The first step is to install the big triangular pivot arms that support the hitch coupler (the top part of the hitch). The orientation of these triangular pieces depends on the placement of the hitch over the axles, which varies by truck model. In the case of the Ram 3500 dually long bed, they are oriented so the shallower slope goes towards the cab of the truck.

The hitch has a big orange sticker on the side that faces the cab, so the shallow slope of the pivot arms faces that sticker.

B&W Fifth wheel hitch assembly

The shallow sloping side of the pivot arm faces the truck cab in our installation.
The pivot arm orientation varies with the type of truck bed.

There are four pairs of lock washer and bolts, two for each pivot arm. There are five possible holes, so you can set the height of the pivot arm higher or lower, which will change the gap spacing between the overhang of the fifth wheel trailer and the sides of the truck bed. We chose the middle setting for starters.

Bolts locking nuts and plates for B&W Companion Fifth wheel hitch

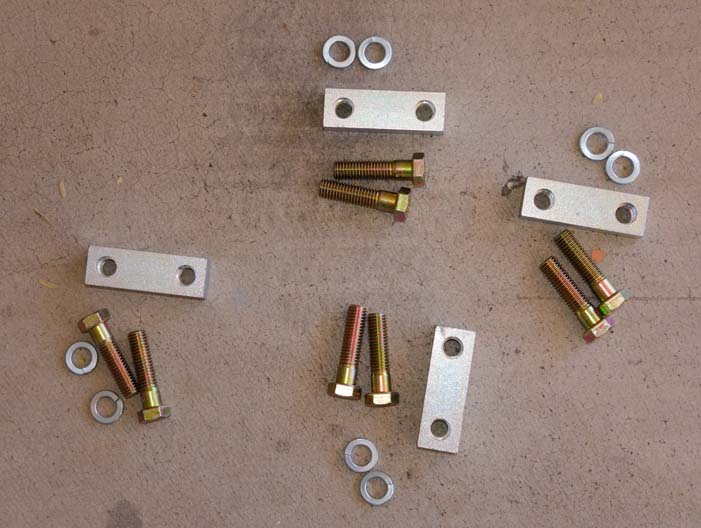
The pivot arms are attached using these parts.

The bolts and lock washers screw into the threaded block an the back side of the pivot arms.

B&W Companion OEM fifth wheel hitch assembly

Use a socket and ratchet to tighten the bolts.

Assembling a B&W Companion fifth wheel hitch

The bolts screw into a threaded block plate on the back side.

Assembling a B&W Companion fifth wheel hitch

Mark bolts the pivot arm to the threaded block plate

The next step is to install the wire torsion spring on the flange on the driver’s side pivot arm that is closest to the truck cab.

B&W Companion fifth wheel hitch parts

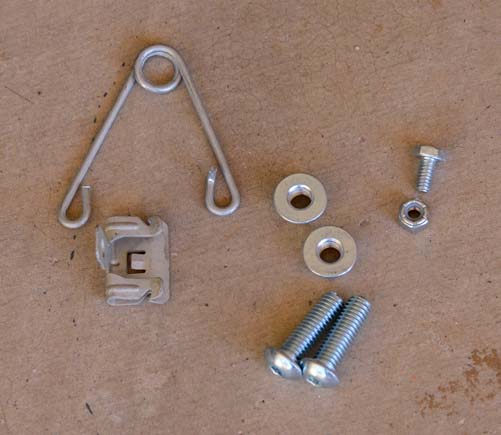
The wire torsion spring is next.

The mounting clip (below the spring in the photo above) is attached to the spring. Then the spring is installed so there is 1/2″ of clearance between the top of the spring and the bottom of the rubber bumper on the pivot arm. A few taps with a small hammer secured the clip onto the flange.

Tap the pin into place B&W Companion 5th wheel hitch

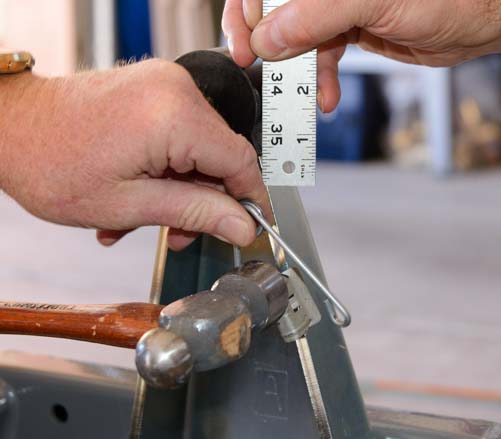
Tap the spring into place with a small hammer

Measure distance to pin B&W Companion 5th wheel hitch installation

The spring must be 1/2″ from the bottom of the rubber bumper
on the pivot arm.

Now the pivot arms are fully installed on the hitch base.

B&W Companion 5th wheel hitch assembly

The two pivot arms are in place (photo is prior to mounting the torsion spring).

The next step was to put the hitch head — the coupler — onto the hitch base and install its handle and three safety pins.

5th wheel Hitch assembly

The coupler (top of the hitch), seen upside down here, is next.

We lubricated the rubber bumpers on the tops of the pivot arms with CRC Lithium Grease.

Grease the 5th wheel hitch assembly

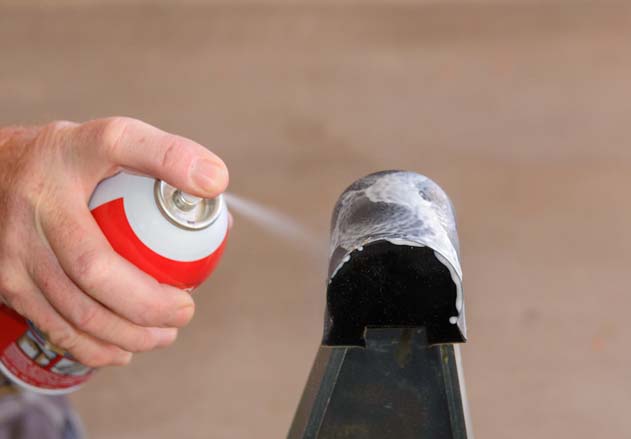
Spray some grease onto the rubber bumpers

Then, holding the coupler by the two saddle handles on either side, Mark placed the coupler onto the hitch base. When you set the coupler down on the base, press down on the handles to secure it.

Mount B&W Companion 5th wheel hitch head on base

Set the coupler on the base and press down on the handles to secure it

The coupler rests on the hitch base. Saddle locking pins under the two saddle handles prevent it from lifting up. A “hairpin” holds the saddle locking pin in place.

Fifth wheel hitch head chain link

A saddle locking pin prevents the coupler from lifting off the base.
It’s held in place with a hairpin (cotter pin) that is under Mark’s fingers in this photo.

Next, the coupler cam handle gets installed onto the coupler.

B&W Companion 5th wheel handle installation

Install the coupler cam handle onto the coupler

The handle is secured to the coupler with two button head cap screws (tightened with a 7/32″ allen wrench), and it is held closed (or open) with the coupler’s cam handle safety pin.

B&W Companion fifth wheel handle assembly

Two button head cap screws and a the cam handle safety pin do the trick.

B&W Companion 5th wheel hitch locking clevis pin

The cam handle safety pin.

Then lube the inside of the hitch jaws with Lucas Oil X-tra Heavy Duty Grease or a similar automotive chassis grease.

Greasing the jaws of the fifth wheel hitch

Grease the inside of the jaw so the trailer’s king pin can turn smoothly inside.

B&W Companion OEM fifth wheel hitch

Done!

Nice work, guys. 40 minutes by the clock! (I’m glad I was just the camera woman!)

Completed assembly of B&W Companion OEM fifth wheel hitch

Now all we need is a truck!
(Continued below…)

.


Installing the B&W Companion OEM 5th Wheel Hitch in the Truck Bed

Return to top

As mentioned above, all of these assembly and installation steps could have been done in the truck bed, but we did not have our truck yet, and we were excited to get started and work on the hitch in the meantime.

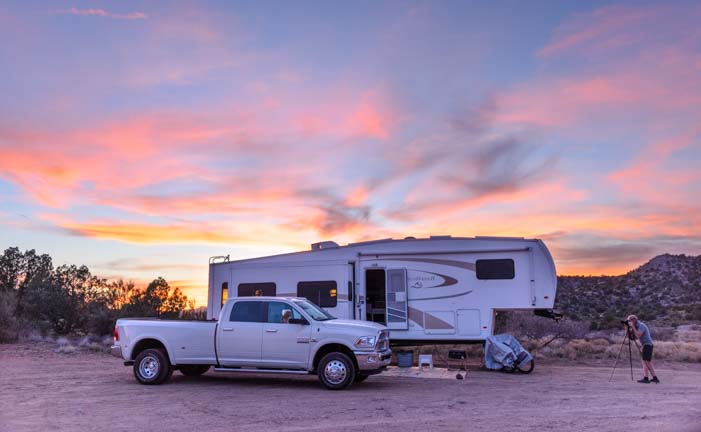
Finally our truck arrived and we had a blast with Alice Cooper as part of the purchase!

The gooseneck / fifth wheel hitch tow prep package puck system in our Ram 3500 dually truck was ready for the hitch installation.

Tow prep package puck system Dodge Ram 3500 Dually truck

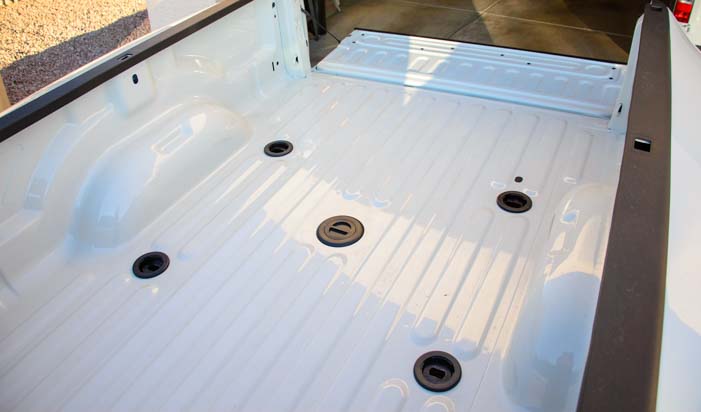
The gooseneck / fifth wheel tow prep package has five pucks in the bed of the truck.
Fifth wheel hitches use the outer four pucks.

Mark and his buddy lifted the hitch base into the truck bed. Back in our article about our truck, a reader noted that he hoists his fifth wheel hitch in and out of his truck bed using a hydraulic lift table. If you are going to be moving the fifth wheel hitch in and out of your truck bed a lot, and you have the garage space, and you don’t have a strong, strapping friend at your beck and call to help you, this seems like a super idea.

The 25,000 lb. B&W Companion OEM fifth wheel hitch has the following weights:

  • Hitch base – 131 lbs.
  • Coupler – 75 lbs.
Placing the B&W fifth wheel hitch in the bed of a pickup truck

The hitch base is placed in the bed of the truck.

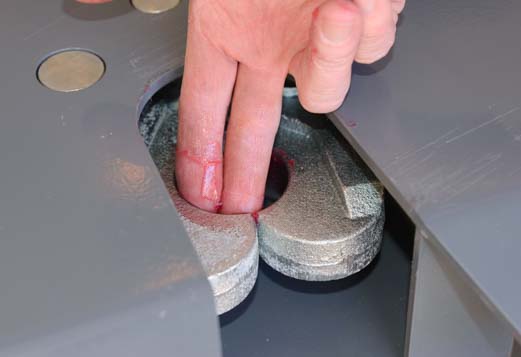
Each foot of the base required a little adjustment to fit properly into the truck’s pucks. This was done by loosening and tightening the cap screws on the pilot assemblies on each foot.

Installing B&W Companion OEM fifh wheel hitch in truck bed

Each puck requires some small adjustments the first time.

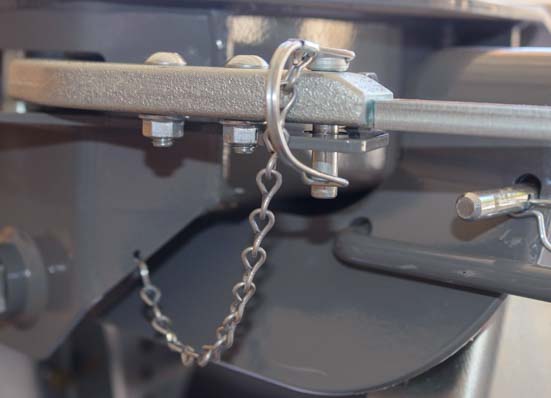
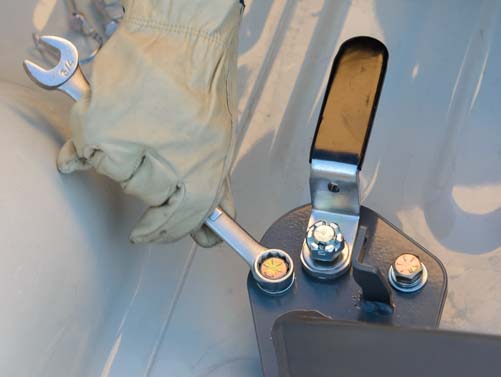
Then the tension in the latch handle was set by adjusting the height of the castle nut. We used needle nose pliers to remove the cotter pin and then reinstall it and bend the end once the castle nut height adjustment was set.

Bending the sheer pin

A sheer pin prevents the castle nut from backing out.

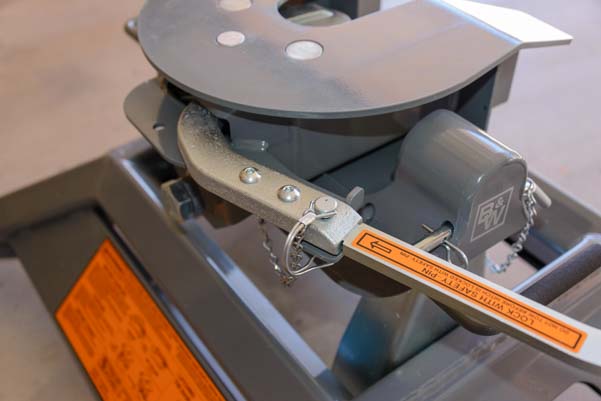
It took a little pushing and shoving to get everything in place, but these are one-time adjustments. The latch handles could now be opened and closed easily.

B&W Companion OEM fifth wheel hitch leg and puck in truck bed

Hitch latch handle in the open position.

B&W Companion OEM 5th Wheel Hitch levers in locked position

Hitch latch handle in the closed position.

The B&W Companion hitch base was now installed in the bed of the truck.

B&W Companion OEM fifth wheel in truck bed

The base is installed and all four latch handles have been adjusted to open and close easily.

Next, the hitch head (the “coupler”) was set on the hitch base. The two saddle handles were pushed down and the saddle lock pin was put in place.

Placing fifth wheel hitch head on base in bed of truck

The coupler is placed on top of the hitch base.

Ta da!! The B&W Companion OEM 5th Wheel Hitch is installed in the truck and ready for use.

Installation of B&W Companion OEM fifth wheel hitch

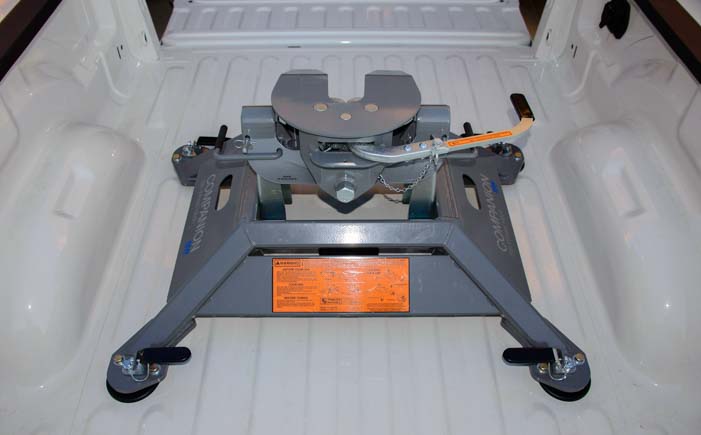
The B&W Companion OEM 5th wheel hitch is completely installed!
This view (above photo) is looking towards the tailgate.

Installing a B&W Companion OEM fifth wheel hitch

This view is looking towards the truck cab.

Great job, guys. Thanks!!

B&W Companion OEM Fifth Wheel Hitch installation on Ram 3500 Dually truck

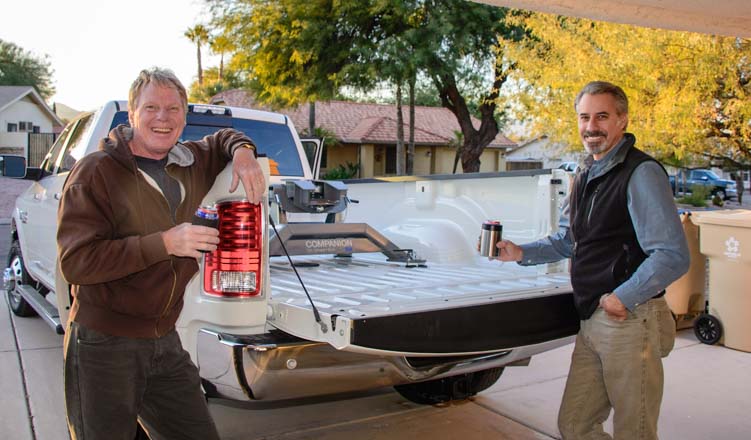
Hey, can I have a beer too?

Celebrations behind us, the next day we hitched the new truck up to our fifth wheel trailer and took our home on a joy ride up and down some nice long 7% grades nearby. What a combo!!!

Prior to hitching the truck to the trailer the first time, we cleaned the hitch plate on the trailer and lubed both that and the coupler plate on the B&W hitch with CRC silicone spray.

We ended up adjusting the pivot arms down one notch, and that seems right for our particular truck and trailer.

Dodge Ram 3500 Dually truck B&W Companion Fifth Wheel OEM Hitch

We adjusted the height of the pivot pins by one notch to get the distance between the sides of the truck and the fifth wheel overhang right.

After ten thousand miles of towing with the B&E Companion OEM hitch, we are happy to report that we have been very happy with this hitch. In early 2017 we heard of a case where this hitch performed extraordinarily well in a fifth wheel rollover accident. You can read about it here:

Fifth Wheel Trailer Rollover Accident and B&W Companion Hitch Performance

Where can you get a B&W Companion OEM 5th Wheel Hitch? At these links:

The following info is FYI for those whose truck does not have a Puck System in the bed.

The Gooseneck Turnover Ball hitch is one option which allows you to have a totally flat truck bed when the hitch is removed. The other option is to go with the traditional rail mounted Patriot fifth wheel hitch.

B&W Gooseneck Turnover Ball Hitches:

Unlike the Puck System hitches, the Gooseneck Turnover Ball hitches require installing the Gooseneck Turnover Ball in the bed of the truck with rails mounted underneath. So, each truck bed in each model year has a different kit. The B&W Companion Hitch that mounts onto the Gooseneck Turnover Ball in the bed of the truck comes in two flavors: long bed and short bed (slider hitch).

Gooseneck Turnover Ball Companion Hitches (these are the “couplers” or actual hitches):

Gooseneck Turnover Ball Mounting Kits (the under-bed rail system and gooseneck turnover ball itself):

B&W Traditional Rail Mounted Patriot Hitches:

Subscribe
Never miss a post — it’s free!

More info about the B&W Companion Hitches and our truck and trailer:

Dodge Ram 3500 dually truck with B&W Companion OEM Fifth Wheel Hitch in the bed

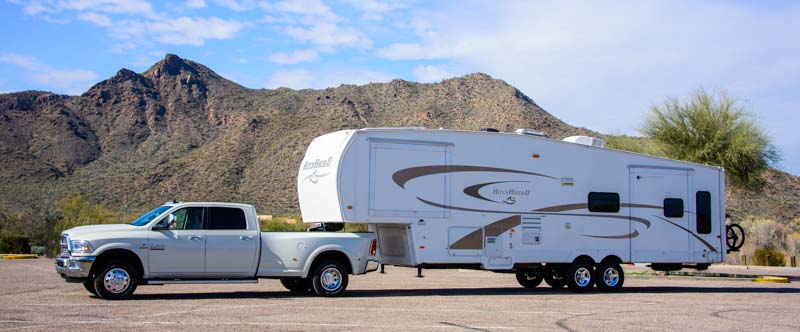
The B&W Companion OEM 5th Wheel Hitch connects our Ram 3500 Dually truck
to our NuWa Hitchhiker fifth wheel trailer.

Below are some of our most POPULAR POSTS (also in the MENUS above)

Buddy - A Journey in Spirit - The story of an event that changed our lives forever.

ARTICLE INDEXES
  • RV Tech Tips Articles - A one page index of links to all our RV Tech Tips, RV Upgrades & RV Maintenance articles.
  • RV Lifestyle Tip Articles - An index of links to all our RV Lifestyle Tips (finances, boondocking, major repairs, work/jobs, etc.)
  • Solar Power Articles - Overview and tutorial articles for how to design and install solar power on an RV or boat
  • Product Reviews - An index of links to all of our Product Reviews
RV UPGRADES, SYSTEMS & TIPS MONEY FULL-TIME RV LIFESTYLE GEAR STORE
  • Gear Store - A list of the goodies, equipment and gear we've found useful in our RV lifestyle!
 

Our most recent posts:

More of our Latest Posts are in the MENU.   New to this site? Visit RVers Start Here to find where we keep all the good stuff. Also check out our COOL NEW GEAR STORE!! *** CLICK HERE *** to see it!

Sedona, Arizona – Great Beer, Coffee, Red Rocks & Psychics!

March 2016 – When we brought our RV to Sedona, Arizona, even though we had been there many times before, we still hung our heads out the windows of the truck saying, “omg omg omg OMG!!!” We’d forgotten just how stunning the towering red rocks cliffs are.

RV travel to Sedona Arizona red rock country

Driving into town, we were totally awed by the red rock scenery.

We were utterly mesmerized as the road carved beautiful sweeping turns through these monoliths. We just drove around for a while, taking it all in, and marveling at the views out the windows.

RV road trip and scenic drive Sedona Arizona

Anywhere you drive in Sedona, the landscapes are breathtaking.

RV adventure in Sedona Arizona and scenic drives

.

White flowering trees were in bloom all around town too. What a great combination these made with those incredible cliffs behind!

Sedona Arizona red rocks and flowers

White flowering trees were in bloom.

Sedona Arizona rock cliffs and white flowers

.

Sedona is a funny mix of dramatic natural landscapes, upscale trendy shops, and outdoor pursuits, all overlaid with a mystical, New Age flair. The Hyatt Regency has a fancy resort hotel in the middle of it all, while the main drag is dotted with psychic readers, mountain bike shops, art galleries, hiking stores, elegant bistros and souvenir shops.

Restaurants Galleries Shops Sedona Arizona

For many, Sedona is all about shopping, artsy stuff, and eating great food.

It is a vacation playground for people from “The Valley of the Sun” (Phoenix) about 100 miles away. Bustling shops selling homemade ice cream cones are lined up against a breathtaking backdrop of bright orange cliffs where tourists go on joy ride jeep tours into the rugged pink and orange desert landscapes.

Uptown Sedona Arizona

Gorgeous natural landscapes beckon just outside of town.

And every few minutes a snazzy sports car or vintage car rolls by.

Sports car in Sedona Arizona town center

Some folks travel here in style.

Fancy vintage car in Sedona Arizona

Exotic car sightings are the norm in Sedona.

It’s a fabulous town to stroll around, and we love the sculptures that grace the sidewalks.

Horse statue Sedona Arizona

Sedona is an artsy town with creative sculptures decorating the sidewalks.

Sedona Arizona T-shirts

No problem finding a souvenir t-shirt in this town!

The town was founded in 1902, and camera buffs have been stopping in at Rollie’s Camera Shop for camera gear and supplies since it opened in 1961. We dropped by three times to visit our friend Tom Kelly who works there and also sells his beautiful photographs.

How funny it was when a pair of tourists came into the shop to buy film. “Fuji Film or Kodachrome?” Tom asked them. They took the Fuji Film, but gosh, I never thought I’d hear those words again!

Rollies Camera Sedona Arizona

The back door of Rollies Camera where photographers have bought gear since 1961.

Of course, part of vacationing in a place like Sedona is relaxing with a glass of wine or a good microbrew beer after the sun has crested its peak in the sky. Sometimes you can have too much of a good thing, though, and partiers occasionally wind up regretting last night’s wild party the next morning. We passed a hilarious sign showing a fish that…well… drinks like a fish…

Murphy's Country Store Sedona Arizona

.

And where do you find the biggest selection of beer — at the best prices — in this oh-so-trendy and pricey town? At the Chevron station in the Village of Oak Creek!

Really!!

They have shelves and shelves of unusual microbrew beers, all at very modest prices, and best of all, you can build your own six pack. On Thursdays they knock even more off the price of the build-your-own-six-packs. So, if you plan your week out right, Thursday is the day to go stock up on beer.

At Chevron!

Chevron Station Village of Oak Creek Sedona Arizona

This place has the best selection of craft beer (and at the best prices) in town!

Why does a gas station have the best beer selection in a fancy dancy town like Sedona? Because it’s run by a very cool guy. Tony Pugliano is a young, entrepreneurial mountain biker who owns not just this Chevron but a 76 station over in Cottonwood too. His gas station in Cottonwood is even better. It has craft beers on tap!!

Now that’s the way to bring customers in and make them happy at your gas station!

We met Tony two years ago when we brought our RV to Sedona, and this year, while stopping at the Sedona Bike and Bean bike shop to get a part for Mark’s mountain bike, who walked in but Tony! He was picking up some parts for his bike too.

Sedona Bike and Bean Sedona Arizona

Mark recognized Tony at Sedona Bike & Bean right away. What a perfect place to run into each other!

While we chatted, I got a latte. And why not? This bike shop is the Sedona Bike and Bean, afterall. When you walk in the front door of the shop, the first thing you notice — before the bikes, and bike jerseys and bike repair stands — is the huge coffee bar where you can order any kind of fancy coffee drink you can imagine.

That’s the way Sedona is. It is a haven for lovers of gourmet coffee, great beer, and the outdoors. If you are clairvoyant and/or rich, you’ll fit right in too!

Gypsy Jenny's Sedona Arizona

Sedona is a great place for reflections — in store windows and introspectively too!

Another fun place to go for a beer is at the Oak Creek Brewery. The brew master was busy making one of our all time favorite beers when we stopped by, their Nut Brown Ale.

Oak Creek Brewing Company Sedona Arizona

The Nut Brown Ale is as fresh as it can be at the Oak Creek Brewery in Sedona.

When we cruised out of Sedona to the west, we found even more stunning scenery.

Red rock scenery in West Sedona Arizona

Even under cloudy skies, the scenic drives in West Sedona are jaw-droppers.

Pink Jeep West Sedona Arizona

Pink Jeep Tours are everywhere. What a fun way to get into the more rugged areas out of town.

The red rocks and towering mountains just don’t quit!

West Sedona Arizona scenic drives in the red rocks

Sedona is in the heart of Arizona’s red rock country!

Sedona is an awesome place for RVers to settle in for a week or two.

Truck and fifth wheel trailer RV at sunset

Mark catches a pink sunset over our truck.

If you have a hankering for an RV roadtrip to red rock country, Sedona is one gorgeous spot, and the climate is ideal in spring and fall! There are more tips and links and info about Sedona below.

Subscribe
Never miss a post — it’s free!

More info about Sedona Arizona:

Related posts from our RV travels in Sedona, Arizona:

<-Previous || Next->

Our most recent posts:

More of our Latest Posts are in the MENU above.