This page is a review of the 10′ Porta-bote operated with a 6 hp Suzuki 4-stroke outboard. The Porta-bote’s overall design is terrific, and it worked very well for us as a cruising dinghy during our nearly 4 year cruise of Mexico’s Pacific coast aboard our Hunter 44DS sailboat named Groovy.
We initially posted this review in 2012 after we had owned and used the Porta-bote for a year.

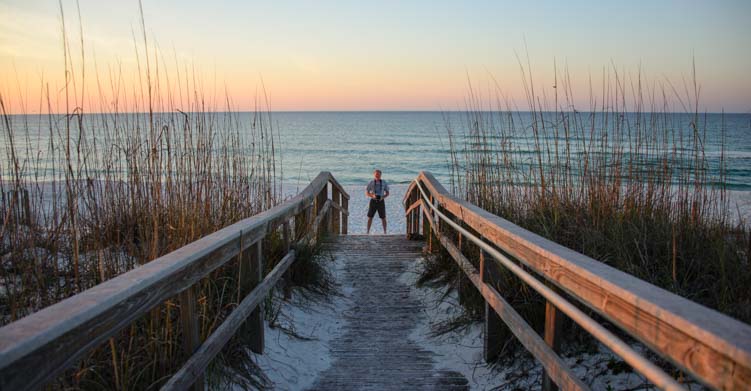
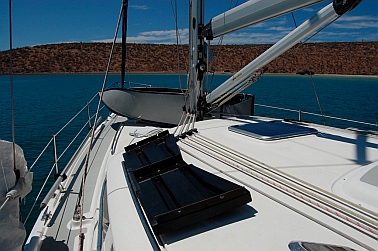
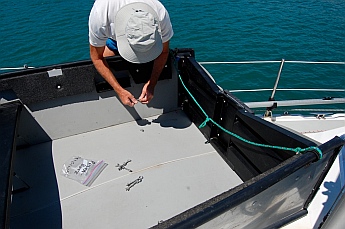
10′ Porta-bote with 6 hp outboard.
Since that time, the Porta-bote design has been completely overhauled and revamped.
The new Alpha series models being sold today are much improved over the older models. Many of the problems we had with our Porta-Bote have been eliminated by the new design.
In the end, we used the Porta-bote as our cruising dinghy for nearly four years and we were very happy with it. This review has been updated to indicate the areas in which the new Alpha series Porta-botes outshine the older models like ours.
The most notable improvements are:
- The transom is an integral part of the hull and not a separate component
- The seats have been completely redesigned
- The plastic that the rub-rail is made of does not leave marks on white fiberglass motherships
The Porta-bote rows beautifully
We learned, after the fact, that the design engineers read and used this Porta-bote review to pinpoint aspects of the design that needed improvement when they did the Alpha redesign. I am really thrilled that our notes proved useful to them and gave them some good ideas.
The things we loved most about the Porta-bote were:
- Easy and swift movement, whether rowing or motoring
- Enormous capacity for carrying groceries, laundry, scuba gear and propane tanks to and from shore in the cruising lifestyle
- Incredible ruggedness when dragging it up on shore or tying it to a pier covered with barnacles
- Imperviousness to tropical UV rays, even when left in the sun for years on end
- Excellent tracking in the water when towed behind a large cruising sailboat
We made a wonderful system for carrying the Porta-bote along our lifelines while on passage, and we found that the Porta-bote fit perfectly into our sailboat’s swim step.
We created a lightweight davit system to hoist it up out of the water every night.
The Porta-bote was light enough, even with the engine mounted on the transom, that I (an able bodied woman) could hoist it by hand to put it on our swimstep for the night without needing to winch it.
The notes below are offered for anyone considering using a Porta-bote as a cruising dinghy. It details how we used the boat and the custom modifications we made. Any criticisms we had of the boat that have been fixed in the new Alpha series are clearly noted in the review.
Would we consider a Porta-bote for a future tropical cruise? Absolutely!!
The official Porta-bote website is
www.porta-bote.com
PORTA-BOTE SPECIFICATIONS

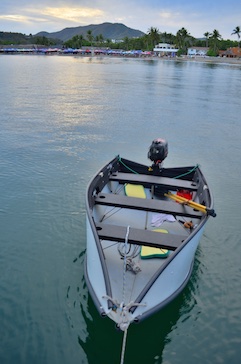
The Porta-bote has lots of interior space
Length: 10′
Beam: 5′
Weight: ~80 lbs (w/ seats but w/o outboard)
Weight: ~135 lbs (w/ seats & w/ outboard)
Component Parts:
1 Hull
3 Seats
1 Transom (transom is integral to the Alpha series hull)
3 pairs eyebolts/washers for seats
2 pairs wingnuts/washers for transom
1 pair aluminum collapsible oars

There’s enough room to take a snooze!
Following is a summary of what we have found to be Porta-bote’s best and worst qualities when used as a cruising dinghy:
Porta-bote Strengths
- Lightweight enough to hoist in davits effortlessly, even with the outboard
- Lightweight enough to drag high onto the beach without dinghy wheels
- Tows easily, with or without the outboard mounted (best without)
- Rows beautifully — truly a pleasure to row
- Planes quickly with a 55 lb. 6 hp outboard and two adults
- Huge interior volume for hauling stuff
- No worries about running it up on rocks
- No need for a sunbrella cover to protect the hull from UV rays
- Half the price of a comparable RIB dinghy
Porta-bote Weaknesses
- No built-in system to attach a bridle for lifting the boat in davits
- No “drain hole” in the hull to drain water when boat is out of the water **
- Seats take up storage space and the long middle & rear seats can be awkward to carry
- Black plastic seats get untouchably hot in the tropical sun
** We did not know this at the time, but if you want a drain plug, Porta-bote recommends installing a Ronstan RF294 Drain Plug on the side of the boat just in front of the transom and above the black tube.
Issues with OLDER MODEL Porta-botes (NOT applicable to the new Alpha series)
- Some of the construction materials are not appropriate for tropical, salt water use
- Transom is heavy, awkward to carry and takes up a lot of storage space
- The flotation foam disintegrates in the sun and leaves black flecks on the floor
- Black plastic seams along the length of the hull leave scuff marks on Groovy’s white gelcoat
Our overall assessment after nearly four years of using the Porta-bote in anchorages from San Diego to Zihuatanejo, Mexico is that it is a great little cruising dinghy, especially once a few modifications have been made.
Here are some details about its strengths and weaknesses along with descriptions of the upgrades we did to make it work better.
PORTA-BOTE STOWAGE LOCATIONS on a CRUISING SAILBOAT
The Porta-bote is not as compact a boat as you might think because it is not just a folding hull. It is a hull, three large seats and a big transom Note: in the Alpha series the transom is not a separate component as it was in the older Porta-botes.
The 8′ version is a hull, two seats and a transom, and is reportedly “just as difficult to set up” according to a singlehanding friend of ours who has cruised 10,000 miles, first with a 10′ Porta-bote and then, after he lost it, with an 8 footer. “I liked my 10 footer better,” he claimed. “Smaller doesn’t mean easier, and you lose all that interior space with the 8′ model.”

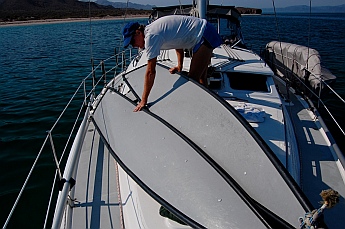
The Porta-bote planes easily with two adults on board
All the pieces of the Porta-bote are big and awkward to carry. For longer passages we disassemble the Porta-bote and store the hull in kayak-style racks outboard of Groovy’s starboard deck, so it is tucked out of the way without having to hang in davits off the back or lie upside down on the foredeck as most cruising dinghies do. Because of their length, we store the longest seat and the transom in the master stateroom (ugh!). We store the other two seats in our big cockpit locker, standing on end for easy retrieval.
For overnights at anchor we lift the dinghy in retractable davits that are built into our solar panel support arch. The Porta-bote fits perfectly into our sugar-scoop transom, resting neatly on the swim platform and held in place by the shape of Groovy’s hull.
We leave the outboard mounted on the Porta-bote. The boat and outboard are light enough that each of us can hoist the dinghy unassisted (our davit system has a simple 4-to-1 purchase and no winches). Splashing the boat in the morning is just a matter of lowering it a foot or so back into the water, which each of us can also do unassisted.
PORTA-BOTE SEATS and SEAT STOWAGE
The seats on the new Alpha series Porta-botes have been completely redesigned, and the transom is integral to the hull and not a separate component, so the following notes pertain strictly to older Porta-botes.
Porta-bote hull mounted on the lifelines of our sailboat
The three seats and transom are all large, heavy components made of plastic and metal. Each one has some swinging legs that hang off of it, making each piece quite a challenge to carry on a pitching boat. Each of the three seats has two (or three) metal U-shaped rods attached underneath that flip out and become the seat legs once the seat is installed in the Porta-bote. These metal loops are only loosely attached to the seats, relying on spring tension to keep them in place.
The first time I carried a seat forward on Groovy’s deck, one of the metal pieces detached itself from the seat and vanished over the side, never to be seen again. Fortunately Porta-bote replaced the piece free of charge. We now use duct tape to keep tension on the open part of the U-shaped rods so these crazy loops don’t fall off when we carry the seats to and from the foredeck. The metal loops fold back against the bottom of the seats.
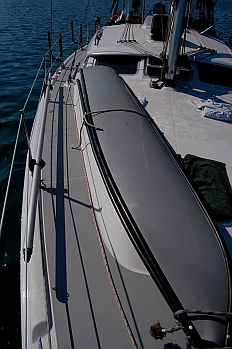
Porta-bote rests on foredeck of our 44′ Hunter 44DS sailboat
Actually, they swing freely and independently of each other, flopping all over the place. However, with some coordination they can be held against the seat while carrying it, still leaving a hand free “for the boat.” Unfortunately the loops don’t fold flat to the seat and there are no clips to hold them in place, so they flop around until you get a grip on them as you carry the seat. Also, when folded, at least one of the loops on each seat sticks out an inch or two beyond the end of the seat. So in the stored position the seat becomes even longer due to this metal bracket sticking out the end.
The design of the seats and legs could be infinitely improved. The seats could be designed to fold in half, shortening them considerably for stowage. The legs could fold into the seats and clip into place so they don’t flop around.
There is a myriad of possibilities for designing solid functional seats that are easy to carry and store. However, the current seats are very awkward, and the black plastic will singe your hand when you touch it after the boat has been sitting in the tropical sun for a few minutes. Simply making the seats of white plastic would be an immeasurable improvement.
We use towels to cover the seats, or in very hot places rely on flotation cushions (which slide around under you). We have heard of cruisers making sunbrella seat covers for the seats too. In the hottest places a towel is not sufficient and you will still burn your backside while sitting on the seats.
The biggest problem with the seats, besides being so difficult to lug around on a rolling boat, is that they are too big to stow easily. Some cruisers lash them on deck, but we have neither found a good place on deck for them nor come up with a quick way to tie them down securely. Many cruisers simply tow their Porta-bote instead of hassling with assembly and disassembly.

Groovy in Tangolunda Bay (Huatulco, Mexico)
The porta-bote is snug in its perch on the starboard side.
We met a couple that towed theirs thousands of miles up and down the Mexican coast. I consider this risky if the seas get out of hand, and it also seems to defeat the purpose of the folding “portable” nature of the boat.
On our boat the transom and middle seat are too long to fit in a cockpit locker in a way that is easily accessible, so we store them alongside our bed.
The other two seats fit in our large aft cockpit locker standing on end. In order to get a grip on these big floppy seats, we use several large Navy-issue canvas bags, storing two seats to a bag and putting a second bag over the other end so the whole seat is covered (they are salty and dirty when removed from the boat, and who wants that next to their bed?).
A tidier solution would be to have custom canvas bags made to fit the seats with a large rugged handle on the side. It would be awesome if these bags came with the Porta-bote right from the factory!
PORTA-BOTE TRANSOM and TRANSOM STOWAGE
The transom on the new Alpha series Porta-botes has been completely redesigned and is integral to the hull rather than being a separate component
The transom is not only long, wide and heavy, it has a big flopping plastic piece that folds over the hull when the transom is installed in the Porta-bote to provide a support for the outboard to clamp onto. This heavy piece is held to the transom by a thin piece of plastic that acts as a hinge and looks very prone to tearing.
Transom lies on the foredeck
When we tow the Porta-bote, we remove the outboard, and then the plastic outboard support piece flaps as the Porta-bote goes over the waves, threatening to rip the hinge piece. To stop the flapping and wear and tear on that thin hinge, we use a large clamp to clamp the outboard support piece to the Porta-bote’s hull.
The transom also has two long metal L-brackets along each side. These are the supports that hold the transom in place: two pairs of wing nuts and washers secure the metal L-bracket to the side of the hull. These L-brackets are major ankle-biters and interior cabin wood-gougers when carrying the transom around.
Therefore, we load the transom and the longest seat into a canvas bag before lugging them anywhere — the flopping legs on the seat are held in place, the flopping outboard engine mounting piece is held in place, and the sharp metal edges of the L-brackets are somewhat protected by the heavy canvas.
Some clever engineers at Porta-bote could surely devise a way to secure the transom without requiring large metal L-brackets (or tiny wing nuts and washers, for that matter), and the outboard engine mount could definitely be designed to fold into the transom so it lies flush and is held in place with a clip system that keeps it from flopping around.
Please note that the new Alpha series Porta-botes have the transom integrated into the hull which eliminates the problems associated with carrying the transom around and attaching it to the hull!
PORTA-BOTE ASSEMBLY
Step 1: The hull is opened
We have tried several methods of assembling the Porta-bote on Groovy’s deck, and the best system we have found is described below. It takes us about 15 minutes, including retrieving the many parts from the cabin and the cockpit locker.
When the hull is in its stowed position, it is folded lengthwise twice: first the sides fold into the middle, then the (new) sides are folded in towards each other.
The end result looks like a small surfboard, 10′ long and about 4″ wide. Our first task is to remove the hull from its stowed position outboard of Groovy’s starboard side deck. Then:

Center seat is installed
1. Carry the hull to the foredeck and open it up. The plastic is rigid and you have to use a lot of force to get the sides to open.
Porta-bote provides a specially cut board to assist with this: you stand on one side of the hull and push against the other, wedging the board between the two. Eventually the board is positioned to hold the hull open.
2. Insert the middle seat. The ends of the seats are inserted into metal supports that are riveted on either side of the interior of the hull.
The seats don’t fit in the supports all that well. There is some wiggle room up and down and the angle of the supports is perpendicular to the hull, which is not ultimately in line with the seat’s horizontal orientation, because the hulls’ sides flair outward.
Note: The seats have been totally redesigned in the Alpha series!

Eyebolt / wingnut / washer combo for attaching the seats to the Porta-bote hull
3. Secure the middle seat with wing nuts and washers. The Porta-bote ships with long thin cotter pins that are tied to the seats with thin string so they don’t get lost.
The cotter pins are intended to hold the seats in place against the metal hull supports, however they fly all over the place when you are carrying the seats, and they don’t hold the seats securely.
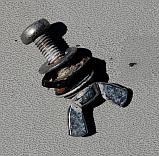
Bolt-wingnut-washer combo for attaching the transom to the hull
Therefore, we replaced the cotter pins with long stainless steel eyebolts held in place with large stainless steel washers, both above and below the seat, and with a stainless steel lock washer underneath to keep everything tight despite the jiggling and jostling of the hull when the Porta-bote is driven over the waves.
The eyebolt is slid through a hole in the upper part of the metal support, then through a hole in the seat and then through a hole in the lower part of the metal support, and a wingnut is screwed on from underneath.
Note: The mechanism for attaching the seats to the hull has been upgraded in the Alpha series of Porta-botes, however we found the eyebolts useful…
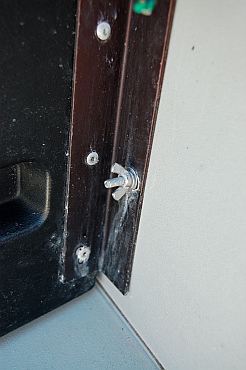
Bolt/wingnut attaching transom’s L-bracket to the hull
The eyebolts also come in very handy for holding the dink in place behind Groovy’s swim platform. We have two lines rigged on either side of the swim platform with clips on the ends that clip into the Porta-bote’s eyebolts on the forward and aft seats. This keeps the Porta- bote parallel to Groovy’s transom and keeps it snug to the swim platform for easy boarding.
4. Install the transom. The outboard mounting flap goes over the hull, and the metal L-brackets are attached to holes in the hull using bolts, wing nuts and washers.
The Porta-bote ships with non-stainless bolts, nuts and washers, which are probably fine for the once-in-a-while lake fishing that the Porta-bote is built for. We replaced all these little pieces with stainless steel bolts, nuts and washers and added a lock washer to the set.
The sizes of these pieces that Porta-bote ships are non-standard (I searched high and low for stainless components that would match the originals). Instead, we simply used replacement bolts, washers and nuts that would fit the holes rather than trying to match the thread pitch, bolt length and width of the ones from the factory.
Attaching the transom to the hull with wingnuts
The lower wing nut / washer set on each side of the transom includes a rubber washer to keep that part of the boat watertight since that part sits below the waterline. The rubber washers last about 6 months in the salt water environment.
We keep several spare rubber washers to use as replacements each time they wear out. In addition, we have a complete duplicate set of all the eyebolts, straight bolts, wing nuts and washers that we use for the Porta-bote, as it is all too easy to drop one of these tiny pieces overboard while assembling or disassembling the Porta-bote on deck.

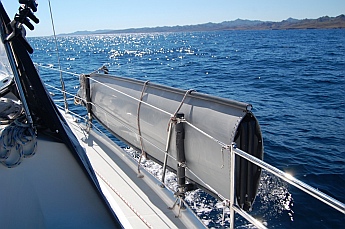
Porta-bote is hoisted on spare halyard
The worst aspect of the Porta-bote design for use as a cruising dinghy prior to the new Alpha series, is that you are fumbling with the very large pieces of a 10′ long hull, several wide seats that don’t fit into their supports very well, and a big heavy transom, all while screwing the whole thing together with tiny wing nuts.
The bottom of the boat is a black plastic “hinge” that acts as something of a keel, so the boat doesn’t sit flat on deck but pivots about on this round tube of plastic.
So when Groovy rolls in the swell, the porta-bote pivots on its keel, and you are hanging onto the boat in one hand with a fist full of wing nuts and washers in the other, all while trying to mate the threads of the wing nuts to the bolts.

Porta-bote is lowered into the water
5. Raise the Porta-bote up and over the lifelines and lower it into the water using the spare halyard.
We have an electric halyard winch that works really well but also works quite hard during this process (of course it would be a great upper body workout to winch it by hand).
When the boat rises up in the air, the outboard mounting bracket flops down unless we clip it in place with a large clip before raising the boat. Note: This has been remedied in the new Alpha transom design.
This part of the process can be tricky in a large swell or in high winds, as the boat is difficult for the guy on deck (Mark!) to control as it swings around on the halyard.
6. Move the boat to the swim platform, clip middle and rear seats’ eyebolts to two lines on Groovy’s transom to keep the Porta-bote parallel to Groovy’s swim platform for easy access, and install the other two seats.
7. Lower the outboard engine onto the mountain bracket on the transom (using one of the dinghy davits) and secure it in place.

Porta-bote is brought back to the swim platform
for the rest of the assembly

Front seat is installed

Rear seat is ready for installation.
Note the 3 u-shaped metal legs.

Porta-bote is clipped to swim platform
to keep it parallel to Groovy.

Outboard is installed on transom
TOWING the PORTA-BOTE

Painter is tied at two points on Groovy’s transom to create a 3-point bridle. A second line is tied to Groovy’s transom “just in case.”
The Porta-bote tows beautifully, and we have towed it (without the engine mounted), for hundreds of miles, a few times in some rather large and lumpy seas.
We have towed it with the outboard mounted too, and that works just fine, but we wouldn’t want to go more than a few very sheltered miles towing it that way.
We tie the Porta-bote’s painter to two points on Groovy’s transom, making a bridle. We usually tie a second line to Groovy as well, just in case. There’s nothing like trying to find and retrieve a lost dinghy in big seas (been there, done that!).
We have tried towing the Porta-bote far behind Groovy, but have found it behaves much better when it is snugged up close behind.
We keep it about a foot or so off of Groovy’s transom. Sometimes when we are sailing slowly in lumpy, following seas it has a tendency to run into the back of Groovy.
HOISTING the PORTA-BOTE in DAVITS
We had a custom made stainless steel arch extension built for our boat to support our 555 watts of solar panels and to provide telescoping davits to hoist the Porta-bote.
We drilled two holes on the stern end of the Porta-bote just forward of the transom, one on each side of the hull. We had four stainless steel plates made to reinforce these holes, and those are bolted in place (with stainless bolts), one plate on the inside and one on the outside of each hole, sandwiching the plastic hull in between. To create a davit bridle, we simply run a line between those two holes in the hull’s stern and run another line between the two factory-installed holes in the bow of the boat to make a two-point hoisting system for our davits.
Because the lifting points are at the top of the hull, it is not possible to snug the Porta-bote tightly into the davits. Instead, it always swings a little, no matter how high you hoist it. If the lifting points were in the bottom of the boat, the top edges of the hull could be pulled flush to the davit arms. However, I am not sure how to install lifting points in the boat’s floor. So we don’t travel with the Porta-bote in the davit system.

We raise the Porta-bote out of the water onto the swim platform at night.
The davits are ideal for getting the boat out of the water at night when we are at anchor, as the Porta-bote sits snugly on the swim platform and we secure it with lines tied to the seats’ eyebolts to keep it perfectly still.
Also, if it rains (which it doesn’t do in Mexico’s winter cruising season) or if there is a lot of dew, the boat doesn’t have a drain hole to release the water. Water also collects in the bottom of the boat when we drive it hard, as waves splash in and water jumps over the transom. So there is occasional light bailing to be done, but not more than a sponge or towel can handle.
One thing we discovered is that the Porta-bote’s black plastic seam tubes that run along the length of the hull are made of a plastic that leaves scuff marks on Groovy’s white fiberglass gelcoat.
When we hoist the dinghy in the davits, it invariably bumps along Groovy’s transom a bit, and over time it leaves a lot of marks. They come off with a little elbow grease and polish, but there are plastics out there that are non-marking, and if Porta-bote used that kind of plastic it would be a huge improvement.
Note: The black plastic seam tubes in the new Alpha series does not leave scuff marks
FLOTATION
Just beneath the black plastic lip at the top of the Porta-bote hull there is a strip of foam rivited to the hull. This provides enough flotation to keep the boat afloat if it fills with water — as long as there is no outboard engine mounted on the boat. The foam material deteriorates in the sun and flakes off, constantly leaving little black flecks all over the Porta-bote’s floor. I have heard of cruisers covering this foam with Sunbrella to keep it intact and prevent its total disintegration. I haven’t gotten to that project yet… This foam provides a little flotation, but the Porta-bote will definitely sink if it is swamped while an outboard engine is mounted on its transom.
Note: The flotation material in the new Alpha series Porta-botes does not disintegrate in the sun
USING the PORTA-BOTE
A lot of this description so far includes many negatives and short-comings of the Porta-bote, simply because [the older models were] not designed to be a cruising dinghy and is rather carelessly engineered and cheaply manufactured. However, the great qualities of this dinghy show up once it has been assembled and is out on the water. We have found ways to work around its portability limitations, and feel that because of its good traits on the water it is an excellent choice as a cruising dinghy. We would buy it again, and here’s why:

Our Porta-bote lines up with inflatable dinghies on wheels
in Santiago Bay, Manzanillo, Mexico
The interior volume is enormous. We have packed it with a month’s worth of groceries (at the supermarket the provisions were mounded way above the top of the shopping cart) along with three weeks worth of laundry (in two huge laundry bags), plus ourselves, and we still had space leftover.
We have also loaded it with five adults and putted along at a good clip. I think six adults would be pushing it. There is plenty of space on the seats for six adults, but the boat would sink too low in the water. It is a fast boat that planes easily with both of us aboard using just a lightweight 6 hp 4-stroke outboard. We raced a traditional RIB dinghy driven by a 15 hp outboard and carrying two adults. They barely pulled away from us as we reached about the quarter mile mark.

The Porta-bote is lots of fun.
I love rowing, and the Porta-bote is a lot of fun to row. It tracks well and moves nicely through the water. For the passionate rower the oars are totally inadequate and should be replaced.
The oarlocks in the hull also seem a little flimsy to me and I wonder how long they will hold up, as they flex ominously with every pull on the oars. The oars themselves are made for very light, occasional use. They are aluminum and they split into two halves for stowage, the handle half and the paddle half. The two halves are joined with a plastic pin-through-a-hole system, but the pin doesn’t actually go through the hole very well because the plastic spring mechanism is flimsy and weak.
So, the oars are prone to coming apart if you don’t keep an eye on them. Each oar has an aluminum pin that fits into the hole in the Porta-bote’s oarlock. The pin is held in place on the oar with a sleeve around the oar that is fastened with an aluminum bolt and wing nut.
On our fifth time out rowing, the bolt on one of our oars crumbled mid-stroke. We replaced the bolts and wing nuts on both oars with stainless steel, and they have been fine ever since. Over our four year cruise, we did not end up rowing the Porta-bote but used the outboard all the time instead.
Whether rowing or motoring, it takes a while to get used to the Porta-bote’s flexible floor. You can feel every wave and bump under your feet, and it is a very moveable platform, nothing like a hard dinghy or a RIB. However, the movement is just part of the package, and once you are accustomed to it, it’s kinda neat.

The Porta-bote is a great cruising dinghy.
All-in-all we are very happy with the Porta-bote. No cruising dinghy is ideal, each type being a pain in the neck in at least a few ways. We like the lightweight nature of the Porta-bote and being able to get most of it off the deck and out of the davits and out of the way while on a long passage.
We like its good manners while towing, its speed under power and its voluminous interior space for provisioning runs. The compromises and required upgrades are okay with us in return for its many good qualities. If Porta-bote ever went back to the drawing board and studied its plans and re-engineered the boat for use as a cruising dinghy, they could create a truly superior dink that surpassed everything else on the market.
As noted above, Porta-bote did just that, and the result is the new Alpha series!
Subscribe
Never miss a post — it’s free!
Our most recent posts:
More of our Latest Posts are in the top MENU above.
FURTHER READING:
Below are some of our most POPULAR POSTS (also in the MENUS above)
Buddy - A Journey in Spirit - The story of an event that changed our lives forever.
ARTICLE INDEXES
- RV Tech Tips Articles - A one page index of links to all our RV Tech Tips, RV Upgrades & RV Maintenance articles.
- RV Lifestyle Tip Articles - An index of links to all our RV Lifestyle Tips (finances, boondocking, major repairs, work/jobs, etc.)
- Solar Power Articles - Overview and tutorial articles for how to design and install solar power on an RV or boat
- Product Reviews - An index of links to all of our Product Reviews
RV UPGRADES, SYSTEMS & TIPS
MONEY
FULL-TIME RV LIFESTYLE
- RV Boondocking - Tips for how to live in an RV off the grid
- Which RV Is Best for Full-Time Living? - Transitioning from a house to an RV - Which RV makes the best home?
- Truck Camper Pros and Cons - The GOOD, the BAD and the UGLY!
- Full-time RV Lifestyle Tips - Full-time RVing Logistics - Mail, Domicile, Insurance, Warranties, Saving Money at RV Parks
- Toy Hauler Life - What's it like to live in an OPEN BOX Toy Hauler?
- What are the MOST IMPORTANT FEATURES in a Full-time Fifth Wheel? - For anyone planning to live in an RV!
- Internet & Phone Access for RVers - An inexpensive, minimalist solution for internet access on the road
- RV Dump Stations & Composting Toilets - How to do the dirty deed at the RV dump PLUS RV Composting Toilet tips
- Choosing a Trailer for Full-time RVing - Why the payload capacity is so important
- Learn RVing the Fun Way!! - Go Cheap, Go Small, Go NOW and have a blast in little RV!
- Free RV Campsites - Resources for locating campsites for boondocking
- Glimpses of the Full-time RV Life - Anecdotes from the road and essays about living the RV dream.
- Travel Photography Tips! - All the cameras, gear, books, blogs and tools we used to learn to take great pics!
GEAR STORE
- Gear Store - A list of the goodies, equipment and gear we've found useful in our RV lifestyle!