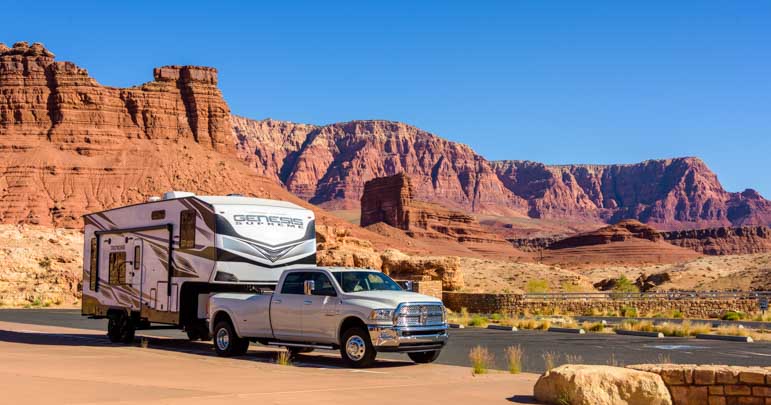
After our summer travels, it is time to put our Genesis Supreme 28CRT fifth wheel toy hauler to bed for the winter with a Goldline RV Cover, something we never had to do as full-timers. For those who are going to be doing the same thing, we wanted to let you see what how this winter protection will work with our new trailer.
.
Before we left in June, one of the things that concerned us most about buying our virtually brand new Genesis Supreme toy hauler was how we’d protect it from the elements during the eight months of the year it was sitting dormant waiting to be the Mothership for our travel adventures the next summer.
Our 2007 Hitchhiker fifth wheel that we lived in full-time was out in the elements 24/7/365 for the twelve years we owned it because we were living in it year round except for the months it was in storage between 2009 and 2013 as we sailed Mexico’s Pacific Coast on our boat.
Sadly, even though we washed and waxed the Hitchhiker fifth wheel regularly, by the last few years we owned it, the exterior seriously showed its age and looked terrible. Likewise, the exterior of the formerly garage kept Arctic Fox truck camper we owned for a year was just beginning to show a few signs of aging after it sat outside for the 12 months we had it.
We don’t have a good covered storage option for our new trailer, so we decided we’d try protecting our new trailer each winter with a fabric RV cover.
There are quite a few brands of RV covers on the market, and all get mixed reviews. They tend to tear over time and generally fall apart. For several weeks before we left, we read reviews of various RV covers until our eyes got tired.
Then we came across a discussion in the Escapees RV forum about the Goldline RV cover, a brand we hadn’t heard of before.
This cover is made from a 7-ply material rather than the standard 6-ply material used by other manufacturers, and the reviews and discussion about its construction were very favorable.
We dug a little deeper and discovered that one of the things that makes the Goldline RV cover unique is the Marine Grade fabric used in its construction. Similar to Sunbrella, which has a weave density of 800D, this fabric, Marinex, has a weave density of 600D which translates to a 33% weight savings, a big plus when trying to pull a 50′ x 25′ piece of it up onto an RV roof!
Also, the the color of the fabric is obtained by dyeing the thread rather than dyeing the finished fabric which makes the color hold much better over time.
One of the things we liked is that the Goldline RV covers are sized in two foot increments. Other covers we considered have as much as four foot increments between sizes, making it difficult to get a good fit.
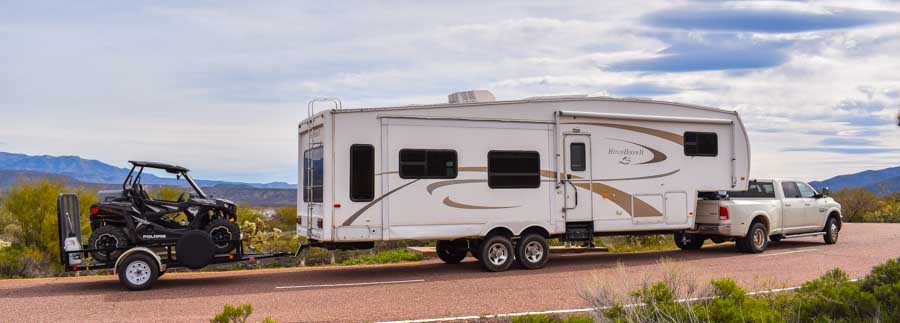
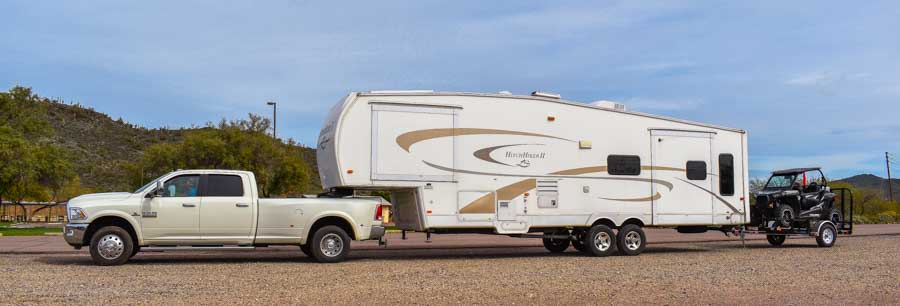
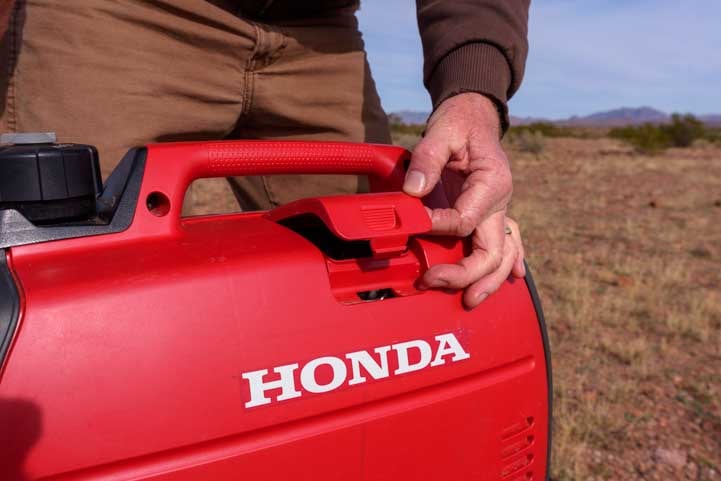
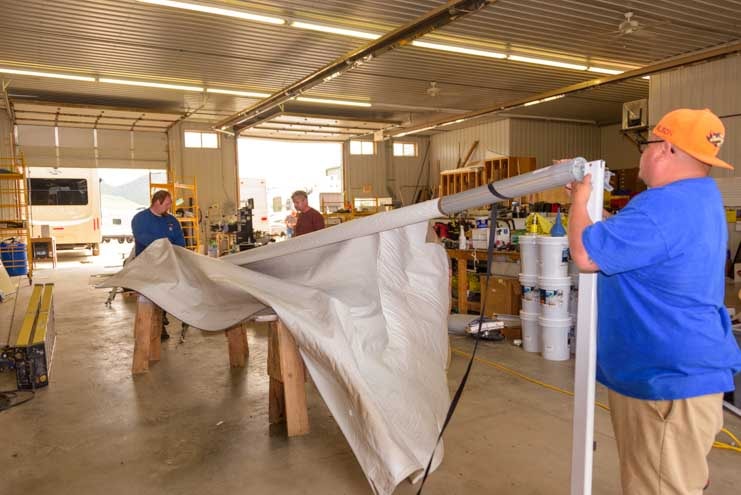
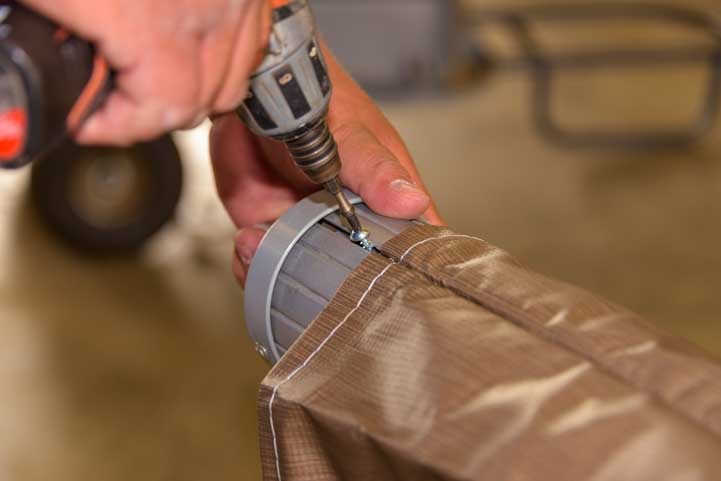
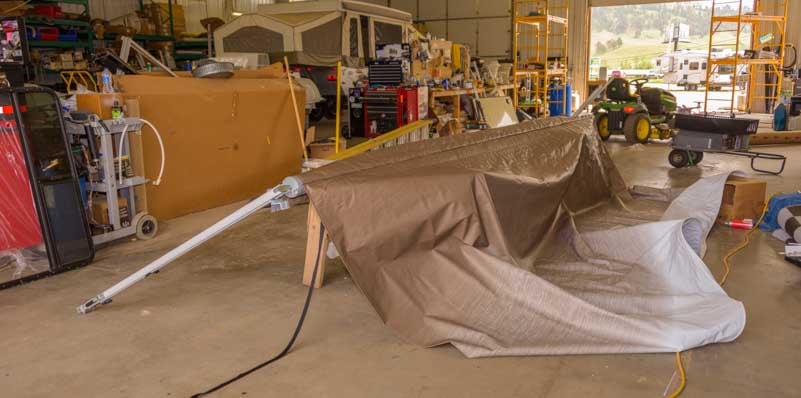
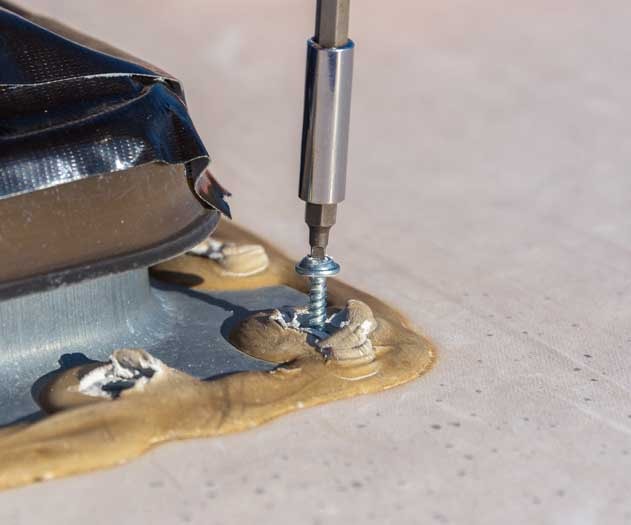
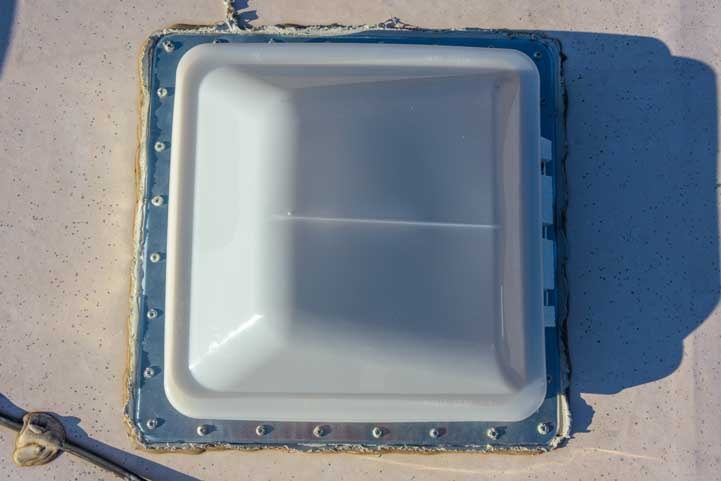
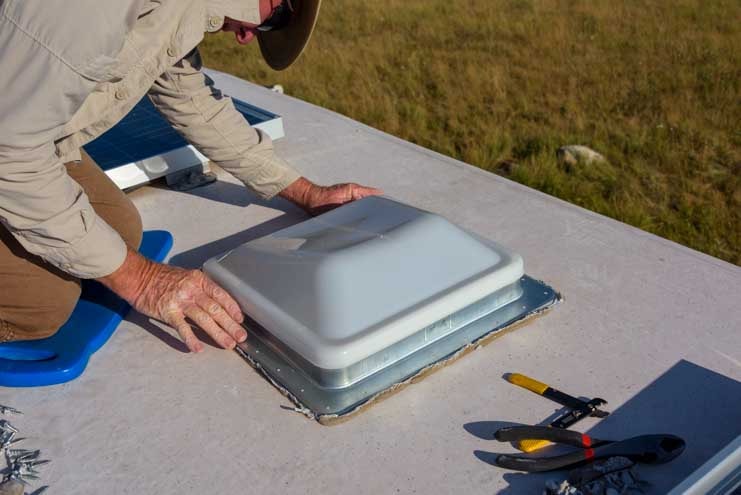
Our toy hauler is 32′ 10″ long, so we chose a 33′ Goldline RV cover. We’ve done a trial run of putting the RV cover onto the trailer so we could see how it worked and what we are in for when we’re finally ready to cover it for the winter.
It’s not hard to put this RV cover on. We laid it out on the ground next to the toy hauler, putting the “Front of cover” label at the front of the rig, and then Mark pulled it up onto the roof and lowered the sides.
We laid the cover on the ground alongside our trailer.
We located the “Front of Cover” label. You can also look for the piping that is on each side of the fifth wheel overhang.
Up the ladder he goes! This is where the full weight of Sunbrella fabric would be a challenge.
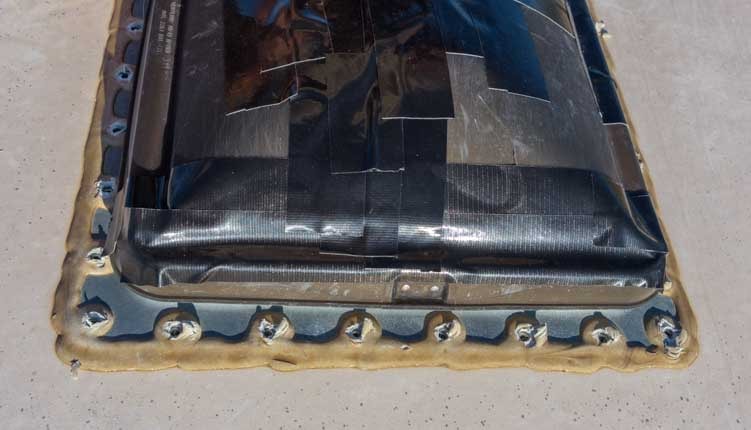
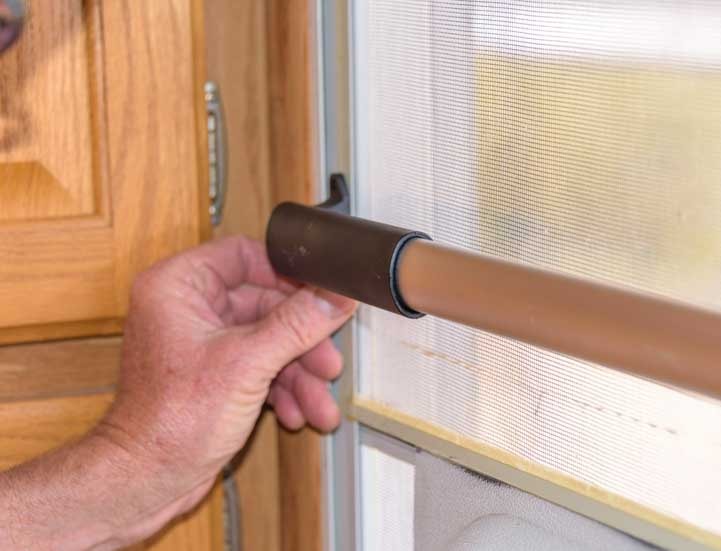
There are panels on the two sides of the Goldline RV cover that can be rolled up by the roof or lowered down and zipped closed. This allows access to the RV door, windows and hatches as needed.
Goldline makes toy hauler RV covers for travel trailer toy haulers that have an opening in the back for the ramp door as well. This would be terrific! However, they don’t have a model for a fifth wheel toy hauler like ours available yet, so we went with the regular fifth wheel RV cover. We just won’t be able to open the ramp door when the cover is on the trailer.
Mark pulled the cover towards the back of the trailer and let the sides fall as he went.
The last step in the installation is to cinch up the straps that go beneath the trailer and hold the sides down and also to tighten the straps on the rear end as well as the fabric that covers the fifth wheel overhang.
Looking good up there!
It seems like a good overall fit.
I’ll be writing a more detailed review of this RV cover once we’ve had it on our trailer for the winter months, gone in and out of various hatch compartments and the front door with the cover in place, and seen the cover through the worst of the mid-winter storms.
We rarely get snow in our area but we do get plenty of heavy rain in short doses, some wind, and tons of UV-filled sunshine. Those UV rays cause the worst damage to an RV’s exterior, so we’re excited to have found an RV cover made of UV resistent fabric that can protect our rolling home and hopefully keep it looking good!
We tied a few of the straps but not all of them…this was a trial run.
While it’s “in storage” we’ll be able to go in and out of it easily…nice!
More of our Latest Posts are in the MENU.
New to this site?
Visit RVers Start Here to find where we keep all the good stuff. Also check out our COOL NEW GEAR STORE!!*** CLICK HERE *** to see it!
Last year we jumped into the world of truck camper RVing as total newbies, and what a wild ride it has been! We learned a lot and want to share a few insights we picked up along the way plus give you some news about where this journey has taken us.
.
Of course, our info about truck camper RVing is based on our limited experience with one particular truck camper, a 2005 Arctic Fox 860, and one particular truck, a 2016 Dodge Ram 3500 dually. Other RVers with different truck/camper combos have different experiences.
A large part of why we decided to get a truck camper after living in a fifth wheel for 13 years is that good friends of ours spent 25 years wintering in a fifth wheel in Arizona and going on short jaunts around their home state of Montana in a truck camper in the summertime. They absolutely loved the various truck campers they had over the years, and hearing their stories inspired us. We considered other options like selling the truck and getting a Class C or even an overlanding rig like the Baja Series. But we liked our truck and thought a truck camper would be a great way to go.
What could be better than camping in the forest and riding the US Forest Service roads in a Polaris RZR?!
TRUCK CAMPER JOYS:
There are many great things about truck campers and they all stem from their small size. Unlike most other kinds of trailers and motorized RVs, you can park it in an ordinary parking space, whether on the street, at a store, at a National Park overlook, in a National Park campground, or at the hospital, as we found out.
You can load it onto a ferry boat where fees are charged by vehicle length, and it will cost you half as much (or even less) than if you were towing a trailer.
You never have to be concerned about whether your rig will fit into any kind of campsite, and you can even pull into a friend’s driveway for the night without knocking things over as you plow through their neighborhood (been there, done that, yikes!).
If you plan to tow a boat, or a side-by-side, or a Jeep or anything else, you can hitch it directly to the truck. Of course, if the camper sticks out beyond the back of the truck, you’ll need a hitch extension, but at least you won’t be towing your extra toy behind a truck and fifth wheel in a long train that isn’t even legal to drive in a lot of states.
In our case, the truck we had to work with is a diesel. So, we could take our camper up any steep mountain grade and the truck didn’t even break a sweat. This meant we could transform our powerful truck into a motorized RV worthy of mountain passes with the modest incremental cost of purchasing an older truck camper.
.
WHERE TRUCK CAMPERS & TRAILERS ARE MORE OR LESS EQUIVALENT:
We were surprised to discover that our truck got the same fuel mileage when we were carrying the truck camper as it did when we were towing the fifth wheel. The camper weighs around 3,500 lbs while the fifth wheel weighed 14,000 lbs, so you’d think the truck wouldn’t work as hard with the camper, but that’s what we saw.
Our truck gets anywhere from 15 to 21 mpg when it is not towing or carrying heavy weight. It got around 9 to 12 mpg towing the fifth wheel trailer and it got about the same carrying the camper.
TRUCK CAMPER CHALLENGES:
This is where our learning curve took off.
Swing-Out Landing Legs for Dually Trucks
Our first discovery was that the wide hips of our dually truck couldn’t fit between the front landing legs of the camper. We had to replace the two front factory-installed landing legs with a special type that can swing outward so the truck could fit between them as it backed in under the camper to load it up. Then they could be swung back inward for driving.
The wide hips of the dually required front landing legs that could swing open to let the truck back in. In this pic, the leg is in the “out” position.
The landing legs can be rotated outward for loading and unloading the camper and then rotated inward for driving. Shown here in the outward position.
The camper we bought didn’t come with swing out legs so we had to add them before we could bring the camper home. The seller delivered the camper to an RV repair shop where we had the work done.
Install a Tie Down System
Our next discovery was that the camper must be tied down to the truck so it doesn’t slide off (the tailgate of the truck gets removed so the truck camper can be loaded into the truck bed).
We chose to go with the top-of-the-line Torklift camper tie down system which consisted of Torklift’s bolt-on anchor points (the Talon Tie Downs for the truck and the Camper Anchor Relocation/Repair Kit for the camper.
Once these were bolted onto the truck frame and the camper frame, we used the Torklift FastGun Turnbuckles to tie the camper onto the truck. The FastGuns are super secure and they have a quick release mechanism that makes them very easy to put on and take off when loading and unloading the camper.
The Torklift Tie Down system has three components in each corner: an anchor point on the camper (“Camper Anchor Repair/Relocation Kit”, an anchor point on the truck (“Torklift Talon Tie Down”) and a connection between the two (“Torklift FastGun Turnbuckle”).
As great as this system was, the installation was another step in the process that needed to happen before we could take the camper home.
These two upgrades — swing-out landing legs and camper tie downs — were modifications to the rig that were much like buying a hitch, a hitch receiver, tow mirrors and a brake controller (or buying a truck with a factory installed Tow Package) for a truck/trailer combo. They are add-ons that must be done and done right before you can go anywhere, and they not only take time but add to the overall cost of the rig.
Truck and Truck Camper Marriage – A Match Made in Heaven?
We hadn’t realized before we bought our beautiful truck camper that when you match a camper to a truck (or vice versa), you are setting the stage for them to get married. Hopefully, they fall in love and it is a match made in heaven.
In our case, it wasn’t. Our dually long bed truck was a bit big for the camper. Coming from the world of trailers, we couldn’t imagine that a truck could be too big for any kind of RV setup, but in the world of campers the pairing of the truck and camper is so precise that it is possible to have too big and ungainly a truck for a given camper.
Campers are designed with specific sizes of trucks in mind. Our particular camper was advertised back in the day (2005 era) as being compatible with either a short bed truck or a long bed truck. Since it was short bed compatible, I don’t think the designers intended it to be paired with a long bed dually.
Loading and Unloading the Truck Camper – A Unique Issue with the Arctic Fox 860 and Long Bed Trucks
The camper is standing on its own four legs so so the truck can slide in underneath.
Like all truck campers, the layout of the bottom of our camper was a rectangle designed to fit in the bed of a truck. However, it had an extra box sticking out on the left side of the rear entry door. This box held all the sewer valves and the outlet for the sewer hose as well as providing storage for the landing leg controller, so it was not something that could be removed.
The right side of this compartment is the left edge of the bottom of the camper that fits into the truck bed. So, the whole sewer gear compartment sticks out beyond the profile of the bottom of the camper (illustration below).
This simplistic drawing shows the problem. The truck bed is in red and the camper floor is in black. The sewer gear box sticks out of the rear driver’s side of the camper which reduces the clearance for loading the camper into a long bed truck by several inches:
The sewer gear box sticks out from the side of the camper, making it a tight fit width-wise in a long bed truck.
Unfortunately, as we backed the truck in under the camper, we had to make sure not to hit that box while also ensuring that the dually wheel wells didn’t catch on the sides of the camper either. All this had to be in perfect alignment while backing up the full 8′ distance of the truck bed. We had about an inch to spare in total, and we had to back the truck perfectly straight for the entire 8′ length of the truck bed.
Okay, now back the truck up perfectly straight…
Looking up at the bottom of the camper as it slides into the truck bed, you can see the sewer gear box is going to hit on the left side of the bed.
After adjusting the truck so the camper’s sewer box doesn’t hit on the left side, over on the right side the camper just clears the dually’s inner wheel well. Phew!
Needless to say, it was a white knuckle affair every time we loaded or unloaded the camper, and it usually required jockying the truck forward and backward a few times to get it aligned perfectly. Sometimes we lightly bumped the tall spindly camper landing legs in the process, making our hearts jump. With every bump and shudder of the top-heavy camper, I was grateful it didn’t fall over.
Also, our 2016 truck bed was a few inches higher than the 2005-era trucks our camper was designed for. So, we had to raise the camper a few inches higher on those spindly legs than was originally envisioned by the designers. The camper looked like a giant bug with very long legs, and one time when the wind suddenly picked up to 30+ mph, the whole very top-heavy contraption began to sway on those spindly legs. We both ran for our lives for fear it might topple over on us.
Ironically, we’ve done plenty of challenging things with RVs and boats together, but nothing was as difficult or frustrating as loading and unloading this camper. Down in Mexico, we anchored our large beautiful sailboat in lots of dicey places, sometimes spending the night listening to waves crashing on rocks right outside our windows.
One time, in the violently unpredictable Sea of Cortez, our boat dangled, twisted and turned at the end of our taught 300′ anchor chain in powerful onshore winds with huge waves pounding the beach just a few feet behind us. Unnerved, we decided to leave that frightening setting for a safer spot on the other side of the island only to have a mammoth wave promptly crash over the deck and bend the one inch diameter stainless steel Garhauer racks holding our 14′ kayak as if they were made of rubber. The kayak was saved from the raging sea by a few stout lines that now seemed like pieces of sewing thread.
Due to the higher bed height of modern trucks, the camper has to be raised a few inches higher on its thin legs than was originally intended.
Yet none of those experiences matched the panic that we both felt when we loaded the camper on and off our truck. It was an ordeal.
Because we couldn’t load and unload the camper easily, we essentially lost the use of our truck by itself, not only when we were traveling but also when we were home. At home, we felt like we needed to get another truck for hauling jobs in our daily lives (how silly would that be?!). While traveling, we couldn’t leave the camper in our campsite and instead always had to take pack it up and take it with us no matter how short a distance we needed to go. We did have the RZR with us, and we happily drive it RZR on lightly traveled roads, but we don’t drive it on highways or roads with fast moving traffic.
Leaving a campsite with camping goodies in it like a patio mat and camp chairs without a rig present is asking for trouble. Someone arriving at the campsite could easily assume the goodies were abandoned (we have found tons of abandoned camping gear on public land that we’ve watched sit there day after day). Likewise, having to put everything away inside the rig in order to drive a few miles somewhere is inconvenient.
This all sounds a bit dire, but I believe the ease of loading and unloading–which makes it either possible or impossible to drive the truck without the camper on it–is 100% dependent on how well matched the truck is to the camper. If it’s a good match, getting the camper on and off the truck shouldn’t be difficult. That said, we haven’t seen many truck campers in campsites that have been unloaded from the truck they drove in on.
The bottom line for us is that our truck and camper were not a good match for each other and they ended up getting a divorce. Thankfully, the divorce was an amicable one.
In Contrast: A Good Truck/Camper Pairing
When we sold the camper, the perfect buyer snapped it up, and we saw the difference that a good pairing can make.
We took the camper off our truck and got ready to load it onto the buyer’s truck.
He has a 2002 Chevy shortbed truck, and the camper fits it like a glove. He slid his truck underneath with ease, never having loaded a truck camper before, and he looked like a pro as he backed in. FIrst, the camper didn’t need to be raised very high for the truck to slide underneath. Then, the camper fit into the bed without that awkward sewer box even getting involved. Because it was a shortbed truck, the sewer gear box hung off the back of the truck and didn’t have to get squeezed into the truck bed. Undoubtedly, the designers assumed that half or more of their buyers would be people with shortbed trucks.
The camper sticks out beyond the short bed of the truck unlike on a long bed where the back end is flush.
The troublesome sewer gear box doesn’t have to be squeezed into the bed of the truck because it hangs off the back — perfect!
As we watched the buyer load the camper on his truck so easily, it was obvious his new truck/camper combo would be a match made in heaven. Perhaps a bigger camper would have given us a better overall experience, but by this time we were ready to try something completely different!
PERSONAL CAMPING STYLE – IS TRUCK CAMPING FOR YOU?
.
Besides the technical issues of pairing the truck and camper, there’s also a huge difference between living in a camper and living in a larger rig. Obviously, a truck camper is a small space. But there is more to it than that.
The space is quite vertical, especially if the camper door is on the back of the camper at the level of the truck bed. The bed of our truck — which is the floor level of the camper — is at chest height for me. So, we had to step up from ground level to chest height just to enter the camper.
Torklift makes a stair system called the Glow Step that folds down to the ground accordion style from the truck bumper. Some folks nickname the Glow Step the Stairway to Heaven because it is such a long staircase. I found portable plastic stairs that fit into the camper while we traveled. These were sturdy and easy to go up and down.
When the truck was unhitched from the utility trailer it was a straight shot into the camper: two steps on the plastic stairs and two steps on the camper’s stairs. If we left the trailer hitched up, we had a turn in the staircase.
A two-step staircase was a cheap solution for climbing up to the entry door where there are two more stairs before entering the camper.
With the flat bed trailer hitched up to the truck, we step up to the trailer tongue and then up into the camper.
Mark also made a very clever platform out of plywood to fit on the tongue of the RZR trailer. This made a staircase landing where we could pause to open the door when our hands were full. We usually kept the RZR trailer attached to the truck, so this platform was a really nifty upgrade and didn’t take him long to make. We kept it in the RZR when we were driving.
Mark built a platform for the trailer tongue that gave us a landing midway up our staircase.
This stairway solution worked really well.
Because the buyer’s truck bed was much lower than ours, he didn’t need the plastic stairs and could get away with a 7 inch step stool, if even that. See? Match made in heaven.
Many truck campers have the entry door on the side of the camper rather than on the back. Because of the placement of this door, the truck camper hangs off the back end of the truck. The beauty of a side entry door is that it is substantially lower to the ground than a door placed on the back of the camper. This reduces the number of stairs needed to get up to the doorway and makes it much more like going into a trailer or motorhome.
The disadvantage of a side entry door is that if you plan to tow something behind the truck, you will need a hitch extension because the hitch receiver on the truck will now be recessed under the floor of the camper.
Once inside the camper, whether it is a rear entry or side entry door, you can sit at the dinette, stand in the kitchen or bathroom, or crawl into the bed. For one or two people this is fine — it’s just tight living. You’re out seeing the world anyway, so who cares? However, we found it is not so easy if you have pets.
Buddy had only one choice for where he could spend time comfortably in the camper: on the bed. He could sit at the dinette, but didn’t like to do that for longer than a few seconds.
Buddy joins us at the dinette.
“Hi, Mom.”
“What’s for lunch?”
He could also be on the floor, but he was under foot and not comfortable standing there. So, in the end, his only place in the camper was on the bed. He loved it there, though. He could watch the world outside through the windows on either side of the bed and it was soft and comfy.
Buddy’s favorite place was up on the bed where he could stretch out and look out the windows.
However, he was kind of stuck there. He’s a good jumper, but it was a long jump down to the floor and we didn’t want him jumping up and down off the high bed for fear the pounding would be tough on his slender limbs or we’d get in his way accidentally and cause him to injure himself.
He could aso jump up into the camper from outside on the ground, but again, we weren’t keen on having him jumping around in case we accidentally stepped in his path while he was jumping and injured him.
Buddy loves the outdoors, but with the truck camper he had to wait for one of us to help him in or out.
.
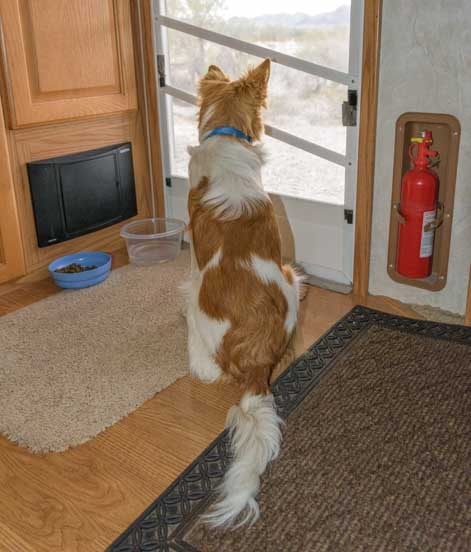
So, we ended up having to lift him in and out of the camper and also lift him on and off the bed. This meant he had no independence, and he was kind of stuck wherever he was, either outside in the campsite or inside on the bed, until we helped move him. In contrast, when we had the fifth wheel, he could come and go as he pleased.
SELLING AN RV IN TODAY’S CRAZY MARKET
Everyone wants to get out into nature and leave Lockdown World far behind.
So, after our trip to Quartzsite we knew it was time to sell our Arctic Fox camper and buy something different (and exciting!).
We learned a lot in the selling process. If you are selling an RV these days, here are some things we learned when we sold our camper on Craigslist in February, 2022.
First, the market is moving really fast and NADA Guide is not keeping up. We priced our camper based on dealership asking prices for similar untils nationwide that we saw listed in RVTrader.com. The asking prices were through the roof and insane. They were essentially double the NADA Guide prices. But we went with the flow and asked an insane price that fit in with the others.
We’d had our eyes on the RV market for a while and had noticed that good quality used rigs in excellent condition were selling quickly. We’d see a cool rig one day and it would be gone two or three days later. That happened repeatedly.
.
We put the ad up on a Tuesday and had some calls and made 3 appointments for showings on Saturday. None of the three who saw it on Saturday bit right away, but we had interest from five other people calling us from 200 to 1,000 miles away.
Saturday night I got a call from a serious buyer who put down a substantial deposit and promised to be out to pick it up on Tuesday. He lived 1,200 miles away and it would take him 2 days to drive to our place. Plus, he wanted to install new tires on his truck before making the trip. I changed the ad to “Sale Pending.”
On Sunday, all three people who had seen the camper the day before called to make offers. Meanwhile, four other people from 40, 180, 200 and 250 miles away respectively all made full cash offers, saying they could come with cash in hand the next day (Monday) to pick it up. I told them I had a deal pending that would take a few days to close and that I would call them if it fell through. Four of the prospective buyers kept in close touch during the next few days to see if the deal fell through.
Needless to say, the buyer was good to his word. Once he arrived, it took two days for him to complete the formal wedding ceremony between his truck and our camper. He got the tires he wanted before the trip and was able to find tie downs that fit his truck in a shop within an hour’s drive.
He was a smart shopper. He told us he had been looking for a camper like ours for over a year, and he had missed out on four previous deals because he didn’t move fast enough. That’s why he was willing to make the deposit sight-unseen and drive 1,200 miles to get the camper.
When I notified the other four prospective buyers that the deal had gone through, they were all sorely disappointed. Undoubtedly, they approached the next prospective deal they saw very differently.
The flatbed trailer was a fun place to hang out and get a slightly elevated view.
Of course, I have no idea if this kind of insanity in the RV market is ongoing out there three months later. A lot has happened in the world since then, and the inflation of both consumer goods, gas and diesel plus rising interest rates will surely put a damper on the enthusiasm people have for buying RVs. However, that is the RV sales experience we had just a short time ago.
It’s possible it could take a while for world events to affect the prices and availability of used RVs. Just prior to the financial crisis in September of 2008, we began shopping for a sailboat to go cruising. However, it wasn’t until January of 2010 that we began to see used boat prices finally begin to come down, due largely to marine loan foreclosures.
WHAT’S NEXT FOR RLT??
Lots!
We bought another rig, which I’ll introduce in the next post. Our RV buying story in this crazy market was just as wild as our truck camper selling story, and so far we think we made the right choice and totally love it.
When we went adventuring in the truck camper last year, each time we left we enthusiastically packed for 5 to 7 days. However, we invariably came home after only two or three! I don’t know if it was due to boredom or feeling fidgety or because we were living in such a confined space, but that was the pattern each time we took the camper out.
Two weeks ago we took our new rig out on its maiden voyage shakedown cruise. Cautiously, we packed for just 3 days only to find we had to run out and restock our essentials twice! To our great surprise, when we finally had to head home due to a prior engagement, we realized we’d been out for 9 happy days.
So, right now we’re buttoning up the homestead and packing up the new rig so we can head out and see the world for a few glorious summer months!
More of our Latest Posts are in the MENU.
New to this site?
Visit RVers Start Here to find where we keep all the good stuff. Also check out our COOL NEW GEAR STORE!!*** CLICK HERE *** to see it!
We’ve been taking our new-to-us truck camper on short jaunts this summer. These “shakedown” cruises are helping us figure out the ins and outs of traveling in a truly tiny home, whether it’s a truck camper like ours or even a pocket-sized Prius camper! We’ve learned a lot about living large in a very small space
In the process, we’ve come up with some storage ideas that we’d like to share.
Northwood Manufacturing did a great job with creating large storage spaces throughout our 2005 Arctic Fox 860 camper. There is a full height closet, two shirt closets, huge bins on either side of the bed that can hold lots of clothes and good sized storage spaces under the dinette seats, not to mention several cabinets and a sliding pantry.
However, creating storage spaces for small things like keys, glasses, flashlights, pocket knifes, pens, pads, small tools, etc., are projects they leave up to us RVers. And it’s been fun to get creative!
The first thing we noticed on our maiden voyage was that all our small stuff kept ending up in a huge pile on top of the dinette table. Nothing makes a small space feel really cluttered than having a single horizontal space piled high with stuff.
So, we mounted a few different types of storage spaces for small items on the walls.
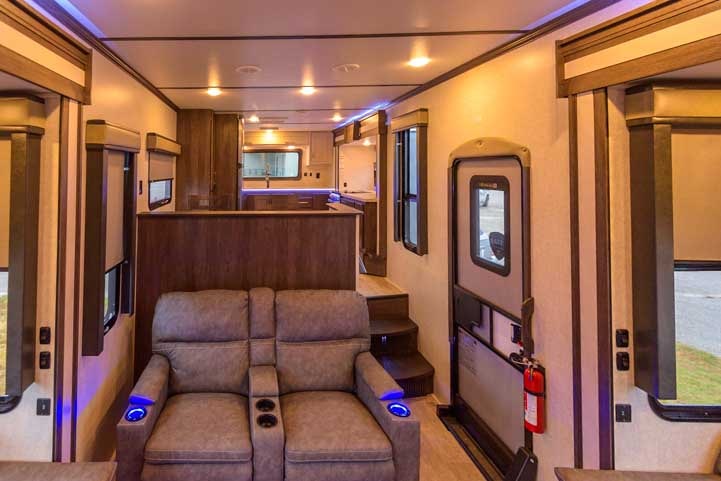
As a reminder of what our camper looks like inside, here are pics of the interior so you can see the bigger picture of where each storage item wound up.
The kitchen needed a few extra goodies to increase the storage sapce
The dinette also got some simple upgrades to keep the dining table clutter-free.
For starters, we put a spice rack on the wall next to the range hood right below the microwave’s swinging door but high enough to be out of the heat of the flames on the range. This is handy for all those things I like to have “right there” for cooking.
A spice rack near the range makes cooking essentials easy to reach.
There is very little counter space, and I found that a second spice rack under the window helped get things like dish soap up off the counter so other things could be tucked underneath as needed.
<
The towel rack was already in place, whether from the manufacturer or the previous owner, I don’t know. I added another towel rack for a dish cloth.
Wire spice racks proved useful in the kitchen and elsewhere! A towel rack for the dish cloth helps it dry fast and keeps it off the faucet.
We like bananas and when we lived in our fifth wheel we had a banana hook for hanging banana bunches that we used a lot. So, we put a ceiling hook (also called a “swag hook” for hanging plants) in between the range hood and the kitchen light. It is screwed directly into the bottom of the cabinet. We may put a second one on the other side of the light too. In that position it would be further from the heat from the range burners.
We’ve found in both the fiver and the truck camper that the bananas actually stay on the hook while we’re in transit, even on bumpy dirt roads, and this helps keep them from bruising as we move from place to place.
Bananas bruise so easily we like to hang them up on a ceiling hook!
Although we rarely used a toaster in our fifth wheel, we’ve been enjoying having one in our sticks-and-bricks life and we wanted to have one in this camper too. Toasters and other small kitchen appliances are bulky and awkward, and I almost gave up on finding a home for it.
However, there’s a large cabinet over the sink that has just one shelf in it, and if I could get a second shelf in there it would be perfect for the toaster. After tossing a few ideas around for installing a shelf in that cabinet, I found a standalone shelf unit that fits perfectly. The dishware is stored underneath and the toaster fits on top. I take the toaster down and put it in the sink when we travel, but while we’re camping it is wonderful to store it out of the way and be able access it easily when we want to use it.
The big kitchen cabinet needed a second shelf. Building one in would be a good idea too, but I like this standalone shelf unit.
We’ve always had key hooks over our entry door, so we put two sets of four hooks over the door.
Our many keys and glasses all need a home of their own and these key hooks work well.
After a few trips, we realized that these 8 hooks weren’t enough. Between the keys to the camper, the truck and the RZR plus multiple pairs of sunglasses (light ones and dark ones), multiple pairs of reading glasses (strong and weak) and various hats, we decided to add two more strips of 7 hooks each going right across the wall so there would be plenty of room for all those things.
There is almost no space between this rear wall of the camper and the slide-out wall as it slides in and out. So, all the things on the hooks have to be put elsewhere when we travel, but the hooks themselves fit just fine and it sure is convenient while we’re camping to have a home for all those items.
A long row of key hooks gives us lots of hanging options, and although we have to remove the items to move the slide-out, the strips of hooks themselves don’t interfere with the slide-out movement.
One of our earliest outings was a trip to visit our friends Ann and Phil who were camping nearby in the woods.
Phil and Ann have been living in RVs for over three decades and are a wealth of knowledge. They travel in both a “winter home” that is a beautifully appointed Alpenlite fifth wheel and a “summer home” which is a smaller, really well laid out and more maneuverable Class C. Phil spent his working years as diesel mechanic and mobile RV mechanic and he has an incredible shop built onto the back of his Freightliner that is a sight to behold. He and Ann ran an RV park for many years, and Ann is full of great ideas for ways to make life in an RV comfy and cozy.
During our visit they had two great suggestions for us. The first was to use a product called Alien Tape to mount lighter things on the walls of the RV. This is a double sided tape that has a stronger stickiness than any tape we’ve seen before, and it doesn’t ruin the walls when you remove it.
We used this tape to mount the key hooks and it was a snap. Later, when we mounted a clock and then decided we didn’t like the location, all it took was a good strong twist and the Alien Tape came off of the wall and also came off the clock and didn’t leave a mark or a stain behind.
Alien Tape makes it a cinch to hang things on the walls — and remove them too!
We also wanted a bigger storage area for things like sunscreen, moisturizer, bug spray, wallets, flashlights, etc., right by the door. I found two cloth hanging baskets that fit perfectly in the space next to the bathroom sliding door — his and hers!
These hanging baskets are good for slightly bigger items including wallets, moisturizer, sunscreen and flashlights that we want by the door.
You can also see the side-view of these baskets in the previous photos of the keyhooks.
The tricky thing with finding places to mount mini-shelves and storage areas on the walls is that we didn’t want to bump into them as we moved about and we didn’t want them to obstruct the movement of the slide-out as it went in and out.
The bare walls in the dinette were begging to be useful. Those walls aren’t near the slide-out movement, but we did have to worry about banging our heads on anything we put there if we leaned back in our seats.
This wall could definitely help increase our storage.
So could this one!
They turned out to be the perfect places for more spice racks to hold things like our two-way radios, current book we’re reading, iPad, etc
We put one on each wall. Both were mounted high enough so if we threw our heads back they wouldn’t hit the racks.
The spice rack can hold pocket knives, a book or two, an iPad and other goodes.
The movement of the slide-out wouldn’t impact this space at all but we did have to place the spice rack high enough so we wouldn’t hit our heads on it if we leaned back in our seats.
We both enjoy reading magazines, especially if we’re camping in a place with no internet (which happened quite a bit this summer!).
There is a big open wall space next to the refrigerator that could definitely hold something. However, the slide-out comes in along this wall, so there is only about an inch of depth, just enough for a magazine or very thin book but not enough for a solid plastic wall filing system.
I found a fabric magazine rack designed to hold manila folders for school teachers, and it works perfectly. I put a manila folder in each pocket to keep the pockets from sagging. Mark used extra screws and washers on either side to hold the whole thing flat against the wall.
We like to read magazines and this fabric magazine rack is nearly flush to the wall which makes it ideal for avoiding the slide-out wall as it moves in and out. It holds plenty of magazines!
We’ve always had a big struggle with shoe storage. We like to have a variety of shoes — a pair of running shoes, hiking boots, slippers and slip-on shoes/sandals for each of us — so the pile of footwear by the door is huge no matter where we live.
There is a tiny space between the step in front of the dinette and the back wall of the camper where I squeezed in a single tier shoe rack.
This shoe rack comes unassembled as a bunch of rods and shelf supports with holes in them for the rods. The smallest model I could find was a five tier unit, so I took the rods and shelf supports for just one level for the camper and built a separate four tier unit to use in our home.
Our shoe chaos was solved with one tier of a multi-tier shoe rack.
It doesn’t hold absolutely all our footwear, but the thin and flexible slippers and slip-ons can be shoved behind the dinette seat. The main thing was to get the clunky boots and shoes out of the way so we aren’t tripping over them each time we go in and out of the camper.
Now the big clunky shoes and boots are out of the way.
There is just one drawer in the whole camper, right next to the range, and it is so narrow it has just a single divider inside. I use it for silverware on one side and cooking utensils on the other. I hadn’t really thought about how to get more drawers into the camper, but our friend Ann showed us an absolutely fabulous product that she is using in her Class C to hold her silverware. It is an “Under desk drawer.”
The Under desk drawer (or “add-a-drawer”) is a single unit that gets hung under the desk or table with double-sticky tape, Alien Tape or screws.
The whole sliding mechanism of the drawer is built into one unit, and you mount the drawer under the table using either the stick-on tabs they provide or Alien Tape (or screws if you wish). I bought two drawers that fit perfectly on either side of our dinette table — his and hers again! Surprisingly, they are shallow enough that our knees don’t hit when we slide on and off the settees getting in and out of the dinette.
Two fit side by side just right and our knees don’t hit them!
Each drawer comes with a small sliding compartment so you can separate smaller and larger items if you wish (or you can remove it). These drawers are great for small tools and hardware as well as pads, pens, scissors and other office goodies.
These can be used for paper, pens and other office items or for small tools and hardware or even for silverware or cooking utensils.
I just love these — thank you, Annie, for your wonderful tip!
Well, that’s it for now. If you’ve got a small RV like ours, I hope these tips help you make the most of your space, and if you’ve got other cool space saving ideas please share them in the comments below!
Oh goodness, there’s Buddy under the covers. He took a nap throughout this whole post!
.
After I took this pic, he opened one eye and said, “If you aren’t going to talk about Lizard Hunting or Rabbit Chasing then I’ll just keep snoozing under the covers.”
.
More tips and anecdotes from our Life On The Road and At Sea:
When Trailer Life Magazine asked me to write a 2,000 word feature article on RV dump station procedures, including step-by-step RV dumping tips, overall RV dump station etiquette and ideas for how best to empty and manage an RV’s holding tanks, all I could think of were two words:
“Don’t Spill !!“
Once Mark and I put our heads together, though, we realized it was a perfect opportunity to share the many dirty little secrets from the RV dump station that we’ve learned over the years! Our article quickly filled up with tips, procedures, hints, photos and ideas, and grew to cover seven pages of the May 2014 issue of Trailer Life!!
Holy cow!! I had no idea we’d learned so much about this topic and that we had so many ideas to share with the RVing community. Motorhome Magazine liked the article so much they ran it in their July, 2014 issue!
Dumping the holding tanks is easy. A few short steps and you’re done!
Dumping is a subject that is near and dear to every RVer’s heart (smile). So here is a synopsis of what we think are the most important things to do when visiting an the RV dump station or when you have sewer hookups at an RV park.
Over the years, we’ve received lots of queries about our thoughts on composting toilets and whether we use one or would recommend installing one if you are going to do a lot of boondocking. So there’s a section on that too.
For easy navigation within this post, use the links below:
Feature article: “Keep it Clean” Trailer Life Magazine – May 2014
(1) The most important thing at the RV dump station is to protect yourself from any pathogens that may be lurking, and to leave the place clean for the next guy.
As you do your work at the dump station, be aware of what you touch, because even though you are wearing rubber gloves, your gloves will still spread bacteria from one item to another.
At the end, when you take the first glove off, peel it back from the wrist to your fingertips so it turns inside out. Then peel the second glove off the same way while holding the fingertips so the second one rolls inside out into the first one in one unit. This keeps your hands from touching the exterior of the gloves. Then dispose of them properly.
(2) We connect a clear plastic elbow to our sewer hose so we can see what is coming out of the tanks. It’s not the prettiest picture, but this way we know the status as we go through the dump process.
(3) Before connecting our fresh water hose to the potable water spigot, we spray the nozzle of the water spigot with Clorox bleach spray.
(4) At the RV park, keep the black and grey tank valves closed. This keeps the liquids in the black tank and prevents the solids from drying out and getting stuck to the bottom and sides of the tank. It also prevents odors from the sewer to creep up into the rig via the sink.
Pour a bucket of water down the toilet to remove the solids.
(5) When flushing the black tank (about every 4-6 days or so at the RV park, or when at the RV dump), flush it first and flush the grey tank afterwards to clear the sewer pipes and hose of any black tank solids.
(6) At the RV dump, after the black tank is completely empty, we use a five gallon bucket to pour a pail of water directly down the toilet into the holding tank below. This removes any solids that are stuck to the bottom of the tank under the toilet. Usually two buckets is all that’s necessary for the water to run clear, although occasionally we need to dump in a third bucket. If you have a window in your toilet room, you can run a hose through the window rather than lugging buckets of water around.
(7) Once you are finished, hose down the whole area so the dump station is clean for the next RVer that comes along.
(8) In general, be courteous to your RVing friends at the RV dump. We find that popular dump stations often have a line of RVs waiting, especially at the end of a weekend. Try not to dawdle. We’ve heard of people taking showers while at the dump station because there is unlimited water and sewer capacity, but lordy, I would not be happy if I rolled up to a dump station and had to wait around for someone ahead of me to finish their shower!!
And where can you find an RV dump station? They are far more common than you might expect: national, state and municipal/regional parks, interstate rest areas, truck stops and RV parks all have them! The best resources for locating an RV dump station are:
Many RV parks and campgrounds allow RVers to dump their tanks in a site for free, usually about 25% to 50% of the cost of staying for a full night. Many of these places are listed in the above links. Of course, most folks figure that if you’re going to pay $10 to dump the tanks, why not spend $30 and spend the night at the RV park or campground as well!
TIPS FOR REMOVING DISPOSABLE RUBBER GLOVES
Thin rubber gloves fit fairly tightly on your hands and they can’t easily be pulled off by the fingers the way ordinary gardening or cold weather gloves can. Also, to be totally sanitary about things, it is best not to touch the outside of the gloves with bare hands after the dirty deed at the dump station is done.
Here’s an easy way to pull the gloves off by peeling one glove most of the way off one hand and then peeling the other off and over the first glove, leaving you with a neat little bundle where all the yucky stuff is on the inside:
Grab one glove by the edge of the cuff and peel it off your hand over your fingers stopping just before the glove is completely removed.
Then peel the other glove off over the first. Now the first glove is sealed inside the second glove which has been turned inside out.
WHERE TO DISPOSE OF DISPOSABLE RUBBER GLOVES
When we first started RVing, we saw tons of folks at RV dump stations using their bare hands. Fortunately, this article and others have encouraged people to protect themselves against lurking pathogens by using disposable rubber gloves.
However, we’ve begun to notice used disposable gloves lying around dump stations on the ground, in the grate and in the nearby bushes because folks just drop them after taking them off instead of throwing them in an appropriate trash container.
I’m not kidding!
After removing the gloves, please dispose of them properly. There may be a trash can at the RV dump station. If there isn’t, please put them in your own trash rather than throwing them on the ground or in the grate of the dump station!!
How inconsiderate and unnecessary! This was in an otherwise cute town in Montana!
HOLDING TANK TREATMENT PRODUCTS
There are a ton of RV and boat holding tank treatment products on the market, and some of them are extremely damaging to the environment. Many are made with various forms of formaldehyde and other toxic chemicals.
If you remember high school biology class and those gruesome dissections of fetal pigs, dogfish and other critters, you might remember that formaldehyde was the putrid smelling chemical that was used to preserve the carcasses. Formaldehyde isn’t the only toxic chemical used in RV holding tank treatment products. Some products are made with different types of embalming fluids.
Getting ready to do the dirty deed.
The idea behind using preservative and embalming chemicals on dead organic matter is to remove the stinky odor.
But do you really want the contents of your holding tank to be preserved?
It might be okay to preserve that stuff a long long time if it didn’t go anywhere, but what about the sewer system or septic tank that the holding tank’s contents are being transferred into when you dump them?
We have come across RV dump stations that were closed due to poisoning of the septic field and damage to the ground water supply caused by toxic RV holding tank chemicals.
The states of California and Arizona as well as the EPA have issued warnings about the use of those chemicals in RV holding tanks. California has considered banning their use all together.
For reference, here are a few links with more info about the environmental impact of toxic RV and boat holding tank chemicals:
The demo was pretty convincing. Two identical glass jars were filled with dog food, balled up toilet paper and water. One was beautifully preserved by a formaldehyde-based holding tank treatment product. The other was reduced to mush by RV Digest-It.
How did that happen?
RV Digest-It is an enzyme and bacteria based solution. The enzymes break down the solids in the tank, and the bacteria eat them up. What’s very cool is that, over time, the bacteria colonize in the holding tanks, and they continue working away, munching on the goodies in the tank and digesting them. They climb the walls and nibble on what’s there, keeping the walls of the tank clean and helping the tank level monitoring system perform better.
Another excellent environmentally friendly product that we use is Happy Campers Toilet Treatment. This is a powder product rather than a liquid. We have had equal success with both products.
The difference between these two products are the following:
RV Digest-It and Happy Campers are not the only enzyme-bacteria based holding tank product on the market. They’re just the ones we’ve used in both our trailer and our boat.
These may be just as good, we just don’t have personal experience with them.
Unfortunately, RV Digest-It and Happy Campers are not carried at many RV or boating supply stores, or Camping World, West Marine or Walmart. When we find one or the other, we stock up. Fortunately, they are available at Amazon.
HOLDING TANK CLOGS
Almost all black tank clogs are due to wadded up toilet paper. Most enzyme-bacteria based holding tank products claim to be able to break down even the thickest toilet papers. If you aren’t sure whether you can trust that claim, one way to avoid toilet paper clogs is to buy special RV (or marine) toilet paper.
We like the plush stuff, and we don’t want to test whether the bacteria like to dine on Quilted Northern, so we have opted, in our little household of two people, not to put our toilet paper down the toilet and into the holding tank. It sounds disgusting, I know. But it would be a lot more disgusting to have to fix a clogged black tank!
In our trailer, we find we have an overabundance of plastic supermarket shopping bags. Rather than toss them out, we put our soiled TP in a bag, sometimes doubled up, and dispose of the bags daily. Every shopping bag gets used, and there is nothing smelly about it.
Obviously, this is a very personal decision, and not one that’s worth debating if you don’t like the idea. However, I put it out there as something to consider. For us, having lived with holding tanks and funky RV and marine toilets for 7 years, it has worked just fine.
When it comes to freeing an RV holding tank clog, many people swear by Happy Campers Extreme Cleaner. We haven’t used it because we haven’t had a clog that bad, but if your tank is clogged up, give it a try!
LEAKY VALVES
Over time, the grey and black tank gate valves may begin to leak a little bit from debris getting caught and preventing the valves from closing completely. When this happens, you get a nasty little surprise at the RV dump when you first take the cap off the sewer line — a small bit black or grey water dribbles out. Having a bucket ready to catch that stuff is helpful, but it’s still messy.
One easy way to deal with this is to install an inexpensive Valterra T-58 twist-on gate valve. This screws onto the sewer opening the same way the sewer hose does and provides a final opening and closing valve to catch the dribble.
Screw on the twist-on valve and keep the valve closed until you are ready to dump the tanks. At the RV dump, start by removing the cap off the twist-on gate valve to attach the sewer hose, then open the gate valve to let the dribble out, and then open the grey or black tank valve to begin the dumping process.
For more RV dump station and holding tank tips, check out these articles:
FRESH WATER and WASTE WATER HOLDING TANK MANAGEMENT
WHAT’S A GIRL TO DO at the RV DUMP STATION? – RV Dump Station Tips for Women
For more RV tips, the following index pages give links to our extensive library of articles:
There is a growing interest in using composting toilets in RVs and boats instead of conventionally plumbed flushable RV toilets and marine heads, and we have received lots of inquiries from people who want to live an off-the-grid boondocking lifestyle, like we did, asking us if they should install a compost toilet in their RV.
We lived primarily OFF THE GRID in our RV and sailboat for thirteen years
During those years we spent 4,308 night either boondocking or at anchor in our sailboat.
We were very happy using CONVENTIONALLY PLUMBED RV toilets and periodically visiting RV DUMP STATIONS
In our minds, the expense and hassle of replacing a conventional RV toilet with a composting toilet is NOT REQUIRED AT ALL if you wish to live in an RV off grid. So, if you’re on the fence about whether to jump into this project, save your money and avoid the complications of installation until you have lived off the grid in your RV for a while. At that point you will probably have met several fellow RVers who showed you how theirs worked and you will be able to make an informed hands-on decision rather than relying on internet research.
I used to have a long rant here about the questionable practice of dumping the waste from composting toilets into the trash or out in America’s beautiful public lands. The composting toilets I was familiar with at the time did not compost the feces completely by the time the toilet needed to be emptied. It was gloppy and smelly. Also, the frequent dumping of large quantities of urine on public land seemed like a poor way to treat a National Treasure. Running into public bathrooms every few days to dump containers of pee also seemed like an awkward hassle.
Composting toilets have come a long way since then, and a seasoned RVing friend who has lived off the grid for decades recently showed me how her newly installed composting toilet works. I was astonished to see that the feces were fully composted into soil when it was time to empty the toilet. The urine dumping is still an issue, but if you are kind to the land and don’t repeatedly pour it all in one place, future users of your campsite will appreciate it. I’m still not sure about carrying a bucket of pee into a public bathroom stall on a regular basis…
I took step-by-step photos of my friend showing me how she and her hubby care for their composting toilet, and I noted which products they use for effective composting as well as for the avoidance of bug infestations. I will share those photos and their excellent tips and tricks in this space soon.
For us, we still find that dumping our holding tanks at an RV dump station is effortless and painless, and these days we have a conventional RV toilet in our seasonal-use truck camper.
For more information about living in an RV off the grid, see these links:
More of our Latest Posts are in the MENU.
New to this site?
Visit RVers Start Here to find where we keep all the good stuff. Also check out our COOL NEW GEAR STORE!!*** CLICK HERE *** to see it!
We have spent the last two years going back and forth about whether to move into a new fifth wheel trailer or a new toy hauler as we look forward to our second dozen years of non-stop travel and full-time RV living. We’ve been to tons of dealerships and did a bunch of toy hauler factory tours in the Elkhart area of Indiana as well as in Missouri and Oklahoma (there’s more about those tours is in the 2nd half of this article).
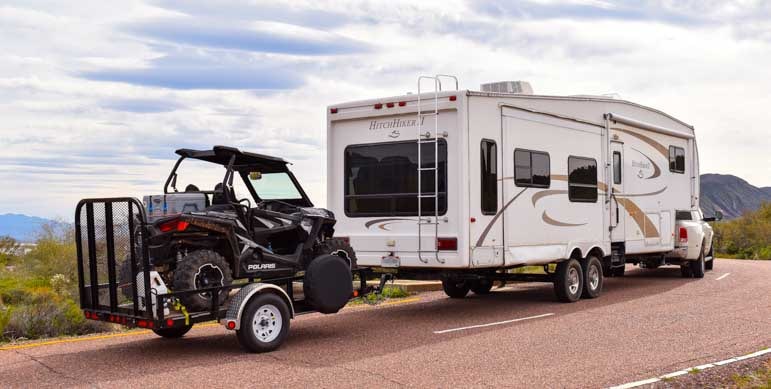
As I’ve mentioned a few times over the past few months since we started this experiment, triple towing is working out a whole lot better that we expected!
This may be in large part because the utility trailer is only 5′ wide compared to the 8′ width of our fifth wheel trailer, so even on a tight U-turn, the wheels on the fifth wheel carve a tighter turn than the wheels on the utility trailer. So, if there’s something we don’t want to roll over or hit, the vehicle at risk is the fifth wheel, just as it has always been!
The utility trailer just cruises along behind. It’s a little caboose!
When we’re triple towing we notice a lot more chucking action than when we don’t have out caboose connected. This is due to the accordion and jerking action of the three vehicles moving apart and back together as they rumble down the road. It’s not a violent sensation, but we can definitely feel it.
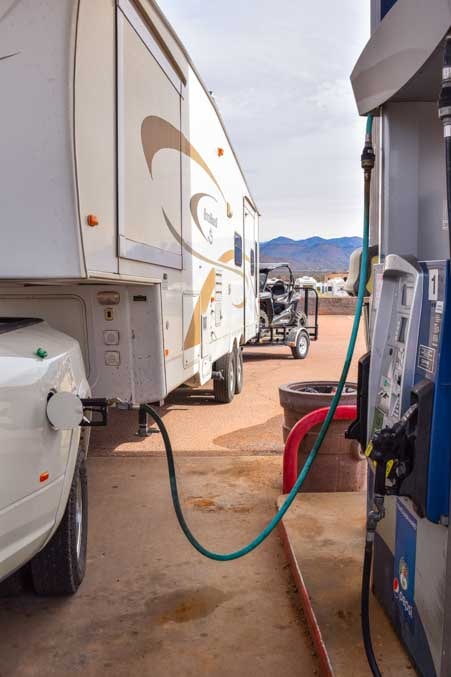
We’ve been to a few gas stations… yikes!
We have been to several gas stations fully hooked up as The Train. Even though The Train is quite long and winds up curved far behind us as we turn in to the pump, as long as the gas station is large enough and there aren’t too many customers, it all works out.
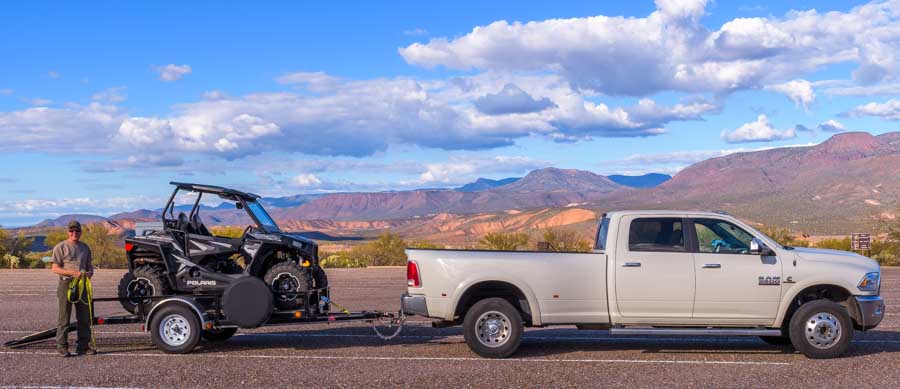
That RZR sure is a long ways from the pump!
We have also been to several RV dump stations with The Train, and again, as long as the approach and exit to the dump station aren’t too narrow or laid out in a tight turn, we can align the fifth wheel sewer hose and other goodies with the RV dump station while the truck and utility trailer sit in a curve ahead of and behind the dump station sewer.
We’ve been to a few RV dump stations.
We’re okay dumping our tanks as long as it’s fairly long!
We set up the utility trailer with a spare tire and tire cover just in case that trailer gets a blowout. At this point we don’t have a backup camera to watch the utility trailer while we’re towing. That may come in the future but will take some research as we figure out which model and where to place the monitor in the already full cockpit of the truck.
Unfortunately the utility trailer is too small to carry our bikes as well. A 12′ long trailer would be long enough, but our RZR came with this trailer so it’s a natural starting point. So, for the moment, we have left the bikes behind at a friend’s house.
We’re leaving the bikes out of the equation for the moment.
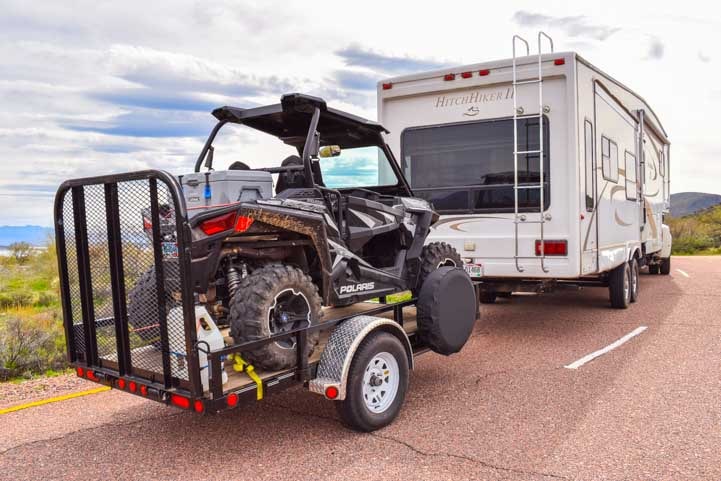
When loading the RZR onto the utility trailer, Mark drives the RZR’s front wheels flush up against the front of the trailer which leaves enough room behind it for two 5 gallon gas tanks lashed down on the utility trailer.
With the wheels flush against the front railing there’s room for two 5 gallon gas tanks in back.
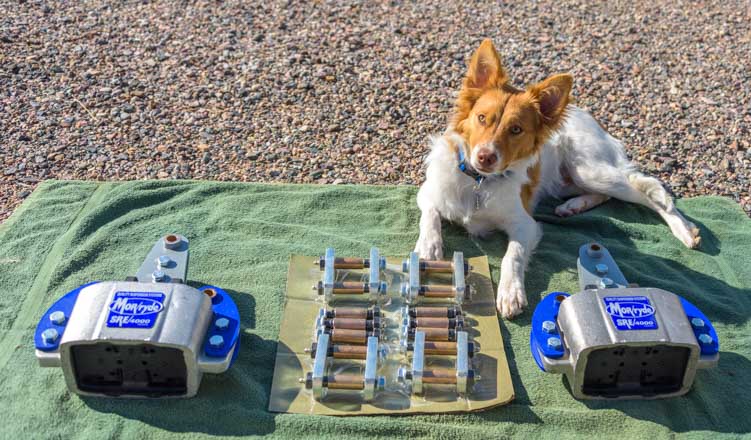
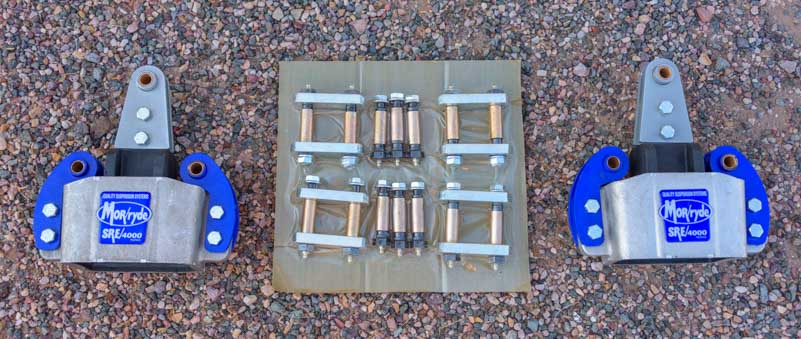
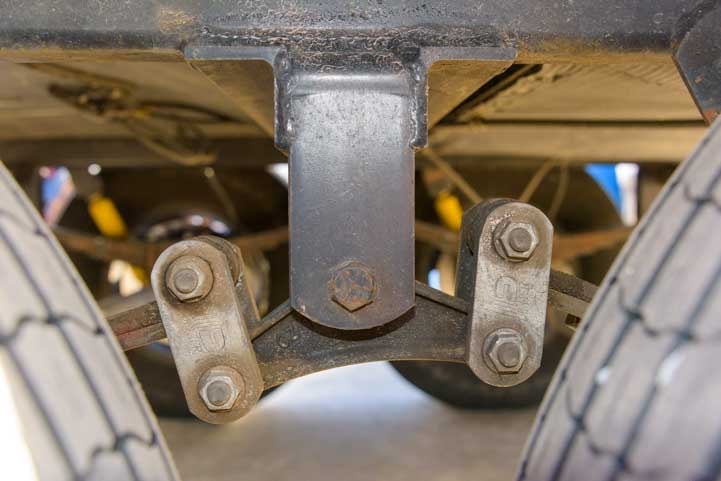
Before hitching up The Train the very first time, we had to sort out the different heights between the tongue of the utility trailer and the hitch receiver on the back end of the fifth wheel.
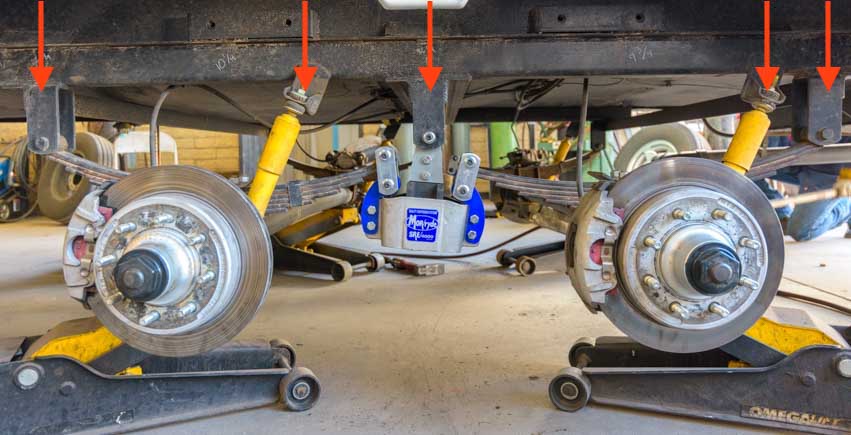
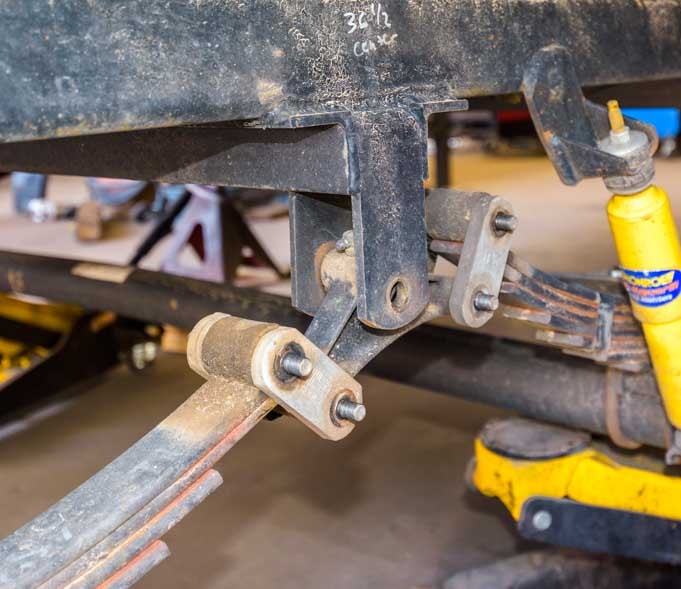
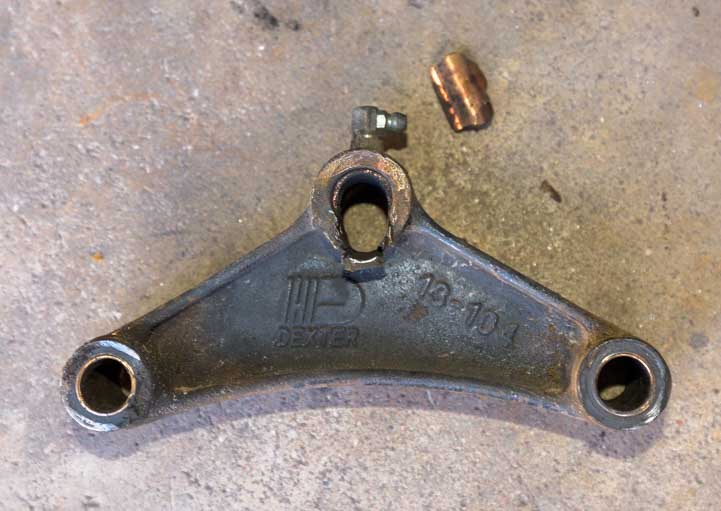
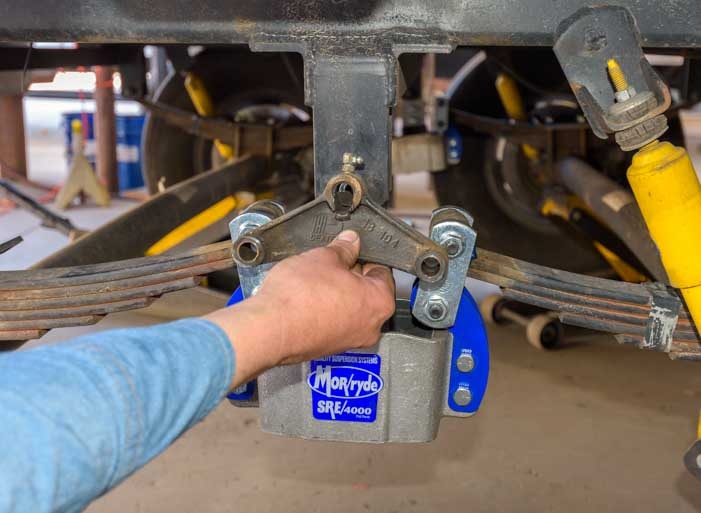
Our fifth wheel trailer now sits some 6 to 8 inches higher than it did when we first bought it. After our fifth wheel got a desperately needed suspension overhaul when the suspension failed (blog post here), the fifth wheel sat higher than it had originally. Then, when we installed the MORryde SRE4000 equalizers, it sat even higher.
This is awesome for those pesky gas station ramps and other sharp dips in the road that are so steep they cause the back end of the fifth wheel trailer to drag on the asphalt. It’s also great for bumping over washes and other things on gnarly dirt roads.
However, all that good drag-avoidance stuff got thrown out the window with the decision to triple tow!
The utility trailer has 15″ tires and sits quite low, and in order to keep that trailer relatively flat instead of nose-up while towing, we had to put a 10″ drop hitch mount on the fifth wheel trailer’s hitch receiver to reach down to the utility trailer’s level.
We needed a 10″ drop hitch mount to reach down to the utility trailer
We use a receiver hitch tightener to eliminate any possible rattling in the connection between the receiver hitch and the hitch mount, and an electric plug ensures the lights on the utility trailer are powered and light up at night as well as when Mark hits the brakes.
The hitch tightener keeps things from rattling and the electric plug lights up the lights on the utility trailer
To learn more about hitch tighteners, see our blog post HERE:
If you stand behind The Train at night and have someone tap the brakes in the truck, it’s quite a light show because not only do the lights on the fifth wheel light up, but the ones on the utility trailer do too. We almost never tow at night but it’s good to know The Train is so visible on dark and stormy travel days.
It was a dark and stormy morning…
We’re really glad we decided to jump in with both feet and buy a RZR before we figured out how to transport it because there is nothing like hands-on experience to figure out what works and what doesn’t.
The biggest surprise we’d never thought of before is that it is super handy to have a utility trailer to tote the RZR behind our truck when we’re going to a trailhead that is a long distance from our campsite.
There’s an advantage to being able to tow the RZR to a distant trailhead.
Although our RZR can go 70 mph and is licensed for the road, driving it on the highway is not what we got it for. We’d rather drive 25 or 50 miles to a trailhead in the comfort of our truck and then arrive with the RZR gas tank full of gas so we can enjoy our off-road adventures without worrying about carrying spare gas.
The RZR has a 10 gallon fuel tank and gets about 15 mpg. So far, none of our adventures has been more than about 40 miles, so we don’t foresee a need to carry gas with us on the RZR any time soon.
At the end of a day of off-road adventure, after the sun has set, we find it’s much safer to drive our truck on the highway than to be out there in a little open air buggy that sits a lot lower on the road than most cars and trucks.
The RZR rolls on and off the trailer ramp.
Lastly, we’ve wanted to ensure that Buddy loves the RZR. For us and our lifestyle there’s no reason to own a RZR if our puppy doesn’t want to come along. We’ve integrated him into our lives so he doesn’t spend any time in our fifth wheel by himself. If we’re going to have RZR adventures, he’s going to be a part of them.
When we’re in the RZR, Buddy sits on my lap. I don’t want to go more than about 35 mph with him sitting in there. He’s not too keen on the loud noise of the RZR engine on the highway and of vehicles passing us, and I have to say, neither am I.
His favorite thing riding in the RZR is to sniff the air when we’re off-road, watch for rabbits, and to stare down at the dirt road going by just below RZR door. All that is lots of fun at 10-15 mph, our typical dirt road speed.
Mark has mastered driving the 56″ wide RZR onto the 60″ wide trailer!
We have a B&W Stow & Go hitch on the back of our truck, and the utility trailer hitches up to the truck very easily. After one or two tries loading the RZR, Mark has figured out how to align it so it drives in without rubbing the wheels on the railings at all even though the railings are 60″ apart and the RZR is about 56″ wide.
.
When we arrive at a trailhead, Mark drops the ramp door of the utility trailer, hops in the RZR, and backs it down the ramp. The driver’s door on the RZR swings out above the railing on the utility trailer, so he can get in and out of the RZR easily when it’s on its trailer.
.
.
.
The RZR came with a windshield, roof and a fancy stereo that the previous owner had installed, and this XC EPS edition of the RZR 900 includes upgraded wheels, wider fender flares, a hitch receiver and the Polaris Ride Command navigation system.
However, the trunk is just a shallow open area at the back, not the best place to store stuff if you don’t want it to get dirty.
We tossed around ideas and finally bought a Lifetime 55 quart cooler that sits very nicely on an old welcome mat in the back of the RZR. It is lashed down to keep it in place.
We use a Lifetime 55 quart cooler for easy flip-top trunk system.
What we love about this cooler is that we can keep all the little essentials we always want with us — emergency water, toolbag, flat repair & spare air kit, first aid kit — in the bottom of it at all times, and we can throw things like jackets, hats, cameras and snacks on top as we need them for each ride.
The flip top lid makes it super easy to access everything in the cooler, and it has an excellent seal when it is closed which keeps everything inside dust free. We’ve also put a long shank padlock on the cooler to keep the less determined thieves out. Of course, anyone that really wanted that cooler and its contents could simply carry it away.
Another great feature of the cooler is that the things in the bottom of it don’t get overly hot. The engine sits right below the RZR’s trunk area, but since this little “portable trunk” is actually a cooler, there’s lots of insulation between the contents of the cooler and the engine below.
You can see a hilarious video of a grizzly bear trying to get into one of these coolers here.
We’ve found that the multi-use trails that allow motorized vehicles are not only lots of fun for riding but are also great for running and hiking too. Sometimes Buddy and I hop out to run while Mark drives.
Unlike yours truly, Buddy can easily keep up with the RZR and loves chasing it at top speed. But after he’s done a 5 minute mile with some surges to 3 minute mile pace thrown in, he’s usually ready to ride again, and he happily jumps back in.
Need a ride?
Come on in!
Easy!
We’ve experimented with quite a few scenarios for arriving at a campsite and unhitching the bits and pieces of The Train.
The utility trailer has to be hitched up to something — either the truck or the fifth wheel trailer — in order to drive the RZR on or off of it. Otherwise, once the RZR wheels roll on or off the ramp the tongue of the utility trailer will fly up in the air.
So, at campsites where we want to use the utility trailer with the truck to take the RZR somewhere, we have to move the utility trailer from its caboose position at the end of The Train to a place where it can be hitched to the truck, and then we reverse its location before we leave.
We can move the utility trailer around small distances by pushing or pulling it ourselves. However, if the RZR is on the trailer, neither is going anywhere until the utility trailer gets hitched to either the truck or fifth wheel.
The RZR has a hitch receiver on it, and we purchased a ball mount for it, so the RZR can tow the utility trailer around if needed. This is handy in small campsites since the big long bed dually truck isn’t very maneuverable in tight spaces.
Luckily the RZR can also do the job of towing the utility trailer, if needed.
.
Again, we learned a few things that we hadn’t thought of before.
First, although it seemed daunting to back the fifth wheel to the utility trailer to hitch it on when it’s already got the RZR loaded on it, it’s not all that bad. Using our two-way radios as Mark backs up the fifth wheel and I stand at the tongue of the utility trailer, and then using our feet to shove the tongue of the utility trailer the final inch or two, we can get it done quite easily.
Second, if the utility trailer is already hitched to the fifth wheel but is at an angle to the fiver and not aligned straight behind it, there is a lot of lateral force on the fifth wheel’s stabilizing jacks and the front landing legs when the RZR drives onto the trailer.
If the utility trailer is aligned with the fifth wheel, the fiver takes the impact much better (I’ve stood inside the fifth wheel and felt it both ways!).
Mark has sorted out how best to tie down the RZR on the utility trailer.
The ramp door folds up.
Tying down a side-by-side either on a flatbed trailer or inside an enclosed trailer can be super easy or relatively difficult and frustrating.
At first, we did it the hard way by using traditional ratchet straps. Unfortunately, the straps would loosen easily as we traveled. So, we had to stop and check the straps, often several times if we were traveling 100 miles or more in one trip.
Then Mark discovered CargoBuckle Retractable Ratchet Tie-downs. These are a total game changer. They mount permanently onto the frame of the flatbed trailer. To tie down the RZR, simply pull the strap out of the CargoBuckle, hook it to an attachment point on the RZR and ratchet it down. To unload the RZR, just loosen the hook and let the strap retract into the CargoBuckle. We use four of them, one for each corner of the RZR. To learn more, read our post HERE:
We are liking this triple towing thing and may stick with it. We’ll see. If we do, then our new home search will be focused on conventional fifth wheel trailers rather than fifth wheel toy haulers.
There are pros and cons to both conventional fifth wheels and toy hauler fifth wheels. Here are a few we’ve come up with:
Conventional 5th Wheel
Toy Hauler 5th Wheel
More Living Space
Less Living Space
More Closet Space
Less Closet Space
More Cabinets
Fewer Cabinets
Bigger Kitchen
Smaller Kitchen
Recliners + Sofa + Dining Table
Pick any two
Generally, bed in slide w/ windows each side
Generally, bed not in slide & window on one side & small wardrobe on other
Back Deck AND Possible Side Patio (always includes 2nd bath)
Tow RZR to trailhead behind truck
Drive RZR on highways to trailhead
Triple tow not legal in some states
Always a legal beagle
Can travel w/o caboose
Full length toy hauler is always with you (47′ in some cases!)
TRAILER LIFE ARTICLE – SHORTCUT to TOY LAND!
The March issue of Trailer Life Magazine features an article I wrote surveying some of the 2019 offerings in the toy hauler market. I chose four different toy haulers to highlight in that article and included another dozen models in the lineup.
Our personal favorites for sheer innovation and cleverness and/or ruggedness are the Aluminum Toy Hauler fifth wheel and the Keystone Raptor 427.
Aluminum Toyhauler Company (ATC) has been making stackable car haulers for the high end racing car set for ages. They build an incredibly strong and durable toy hauler. Unfortunately, they don’t have any models with slide-outs yet, but their toy haulers are built like tanks and can haul 9,700 lbs. of stuff in a trailer that has a GVWR of 21,000 lbs. Unbelievable!
The Keystone Raptor 427 is a fabulous new entry into the garage-under-the-master-bed style of toy hauler. Montana and Grand Design have these floor plans too: the Montana High Country 380TH and Grand Design Momentum 376TH (and formerly the Grand Design Solitude 374TH which was discontinued a few months ago).
All of these manufacturers place the bedroom in the rear of the trailer and put a small garage big enough for bikes or a motorcycle under the bed itself. A workbench could fit in this garage. The bed above the garage raises and lowers if you need full standing height in the garage.
Montana and Grand Design place the kitchen in the middle of the rig. Montana has a beautiful open L-shaped kitchen with counters along two walls, a style that I like, and Grand Design has an island kitchen that is very popular. Both put the living room in the fifth wheel overhang.
The clever idea in the Raptor 427 is that the kitchen, which doesn’t need vaulted ceilings, is smartly placed in the part of the trailer where high ceilings can’t exist: the fifth wheel overhang. I don’t know what the headroom is there, probably around 6′ 4″ or higher, but it was more than sufficient for cooking, dining and even entertaining a cocktail party or buffet crowd! And there’s a window in the front cap so you can see out in all directions.
The kitchen is truly vast, and there is a side-by-side dinette for two that overlooks the living room. We just loved the design. For us, though, it’s too long a trailer since we’d have to tow our RZR behind (it’s 44′ long), and we’d prefer hydraulic slides to cable slides in the bigger slide-outs. Our two hydraulic slide mechanisms and single worm-gear electric slide mechanism on our current trailer have pushed our slides in or out an estimated 2,000 times so far.
The Keystone Raptor 427 has an immense kitchen in the front of the trailer.
The counter space is incredible (although I could do without the purple lights)
Seating for two overlooking the rest of the trailer – very cool!
Opposing loveseats in the slides plus dual recliners facing the TV (not seen in this pic).
Looking back up into the kitchen above the recliners
The bike or motorcycle sized garage is under the bed. The ceiling raises and lowers.
The March issue of Trailer Life happens to include two other articles of mine with photos by both of us: a feature article about RVing in the Canadian Rockies and my back page column about lovely Maroon Bells in Colorado!
Another outstanding RV magazine and RV advocacy group and discount camping membership club and mail forwarding service, among many other things, is Escapees RV Club which we highly recommend joining.
IMPRESSIONS from VISITING the TOY HAULER FACTORIES
When were in Elkhart, Indiana, last fall (2018), we visited several RV manufacturing plants. We hadn’t done a factory tour in Elkhart since the spring of 2009 when the industry was in the midst of collapse.
The consolidation in the RV industry since the beginning of the recession of 2008 has been staggering and has whittled the list of RV manufacturers down to three conglomerates: Thor, Forest River and Winnebago. It has also reduced the list of major component suppliers down to two, Lippert Components and Furrion. Mom-and-pop shops making fifth wheel trailers independently of these conglomerates like Aluminum Toy Hauler, New Horizons and Space Craft and smaller component suppliers like MORryde are exceedingly rare.
The fraternity of talent at the top of the RV industry is very close knit and goes back many decades. If you follow the mergers and acquisitions back to the 1960s and 70s, the same names appear over and over in the executive suites of each company. The brothers who founded Keystone together with another executive who oversaw its huge growth sold it to Thor which itself was the result of the acquisition of failing Airstream from Beatrice Foods. After the three held top executive positions at Thor, these three men went on to found Grand Design and oversee its growth and sale to Winnebago. One of the partners sat on the Board of Directors over at Lippert Components, and after the sale to Winnebago another of the partners left the RV industry to start a pontoon boat company in partnership with Lippert Components.
The advantage to the rise of the conglomerates is wonderful economies of scale, but the flip side for the brands under these corporate umbrellas is the loss of the wild frontier style innovation that made early RVs so fun and funky as well as the forced adoption of quality standards that may not match the standards these brands had back when they were independent companies.
A Dishwasher = “That True Residential Feel”
Perhaps the most shocking thing for us was to discover how few people in the RV industry actually own and use RVs. I asked the general manager of one brand and a national sales rep of another what kind of RVs they owned, and the answers were, “I’m too busy to vacation in an RV” and “My wife likes hotels.”
This lack of personal RV experience has caused a disconnect between the manufacturers and their customers’ needs.
A perfect example was when a top executive at one brand told me that full-timers want a true residential feel to their fifth wheels, so every unit in his line of full-timer fifth wheels would be shipped with a dishwasher in it starting in 2019.
Now, of course, lots of full-timers want a dishwasher in their RV, but a lot of full-timers don’t want one.
Another executive at a different company told me, “Well, the dishwasher is a great place to store your dishes in an RV.”
It is? I’m not keen on mixing my clean and dirty dishes in the same storage place!
.
Check out our reactions to LIVING in a toy hauler HERE!
A National Sales Rep proudly showed me the outdoor kitchen on his toy hauler. He was so excited about it when he pulled it out, “Emily, you’re going to love this!” But when he pulled it out, it came to shoulder level on me. I’m 5′ 4″. I raised my arm and made a stirring motion with my hand in front of my chin and said, “I can’t cook like this.” He was crestfallen.
I began asking the executives we were meeting how they get their feedback from customers, and it seemed that they rely on a combination of the orders placed by the dealership buyers and by talking to people at trade shows.
So, it turned out that because 95% of the units of the one brand had been ordered with dishwashers in 2018, it was obvious there was a massive demand for dishwashers. So that’s why all units will have dishwashers going forward.
Similarly, since the sales rep with the outdoor kitchen had seen only grins and enthusiasm when he showed it to folks dropping by the booth at trade shows, he thought his outdoor kitchen was something his customers loved.
Ironically, doesn’t it make sense for dealers to put predominantly fully decked out units on their lots to show customers what can be ordered? And when you’re gallivanting around at an RV trade show and having a ball dancing in and out of tons of brand new units, are you really going to tell that smiling and friendly sales guy that his outdoor kitchen would never work for you?
The takeaway we got from all this is not to be shy and to find out who the buyer is at your local dealership and to tell them what you like and don’t like about the units on their lot. It seems that the closest the residents of the RV manufacturers’ executive suites come to their customers is the contact they have with the folks ordering their units in their dealer network.
ESCAPEES RV CLUB and WINNEBAGO
Fortunately and fabulously, Escapees RV Club and Winnebago have begun working together to get real feedback from real RVers into the design process. This project is in its earliest phase right now, but the emails I’ve received from Escapees about it are very encouraging. It is because of this kind of innovative and forward thinking at Escapees that we keep recommending our readers join Escapess!.
Escapees RV Club was founded by Kay and Joe Peterson and it has been led by three generations of family members who have spent years on the road living in their RVs. They are the real deal when it comes to understanding the RV lifestyle. In July 2024, Harvest Hosts purchased Escapees RV Club.
TRAILERS BUILT by the AMISH
On a completely different note, some folks feel that a trailer built by Amish hands is of better quality than one made by other hands. It certainly makes for great marketing, especially for the companies that are in the heart of Amish country and employ lots of Amish people. We saw Amish workers in some of the plants, both men and women, but we didn’t see how their work could be substantially different than the work done by anyone else on the same assembly line.
The Amish really do work at the RV factories. They do the same jobs as other assembly line workers.
The factory workers are given jobs to do and are told how to do them. The quality standards and aseembly techniques are determined by corporate goals in areas like profitability, target market share, and unit build time to completion.
While a conscientious individual might put tremendous thought and care into a backyard project at their own home, the work they do on the assembly line at their job for an employer will be done the way management demands and not necessarily in a way that they would choose for their own personal project at home.
Before I tell you, take a quick guess at how long it takes to build a 44′ toy hauler fifth wheel. A month? A week?
At the Raptor plant we were told it takes 3 days. At the KZ plant it is 2.5 days. They have a ton of hands working simultaneously, and they all get the job done as quickly as possible.
INDEPENDENT MANUFACTURERS – ATC, Sundowner, Luxe, Space Craft, New Horizons
Independent RV manufacturing plants like ATC and Sundowner (another new entrant into the toy hauler market coming frome the horse trailer industry) take a few days longer to build their units than the bigger mass market brands. This partly because fewer people work on each trailer at a time, and partly because they start from scratch and build their own frames, doors and ramps rather than buying a ready-made frame, door and ramp.
Both ATC and Sundowner looked appealing to us, and we toured each plant. ATC is near Elkhart in Nappannee and Sundowner is in Oklahoma.
Unfortunately, without any slideouts we couldn’t fit our lives and belongings into an ATC fifth wheel toy hauler, and although the Sundowner toy haulers are an aerodynamic two feet shorter than standard fifth wheel toy haulers and are built with a fifth wheel gooseneck hitch which makes a fabulouos connection to the truck and completely frees up the truck bed when you’re not towing, they are also built with a very small bedroom because of the short gooseneck overhang.
However, for folks who have other lifestyle needs than ours, both the ATC and Sundowner deserve a good long look as they are sturdy, well built and rugged trailers that can be modestly customized on order and that have an intermediate price point between the mass market trailers and the high end custom units (New Horizons, Luxe and Space Craft). We visited Luxe and went to Space Craft a second time but will get into that in another post.
ALTERNATE SUPPLIERS – MORryde, Dexter
I mentioned the RV parts manufacturer MORryde, and as we studied toy haulers it seemed to us that there are two components in toy haulers these days where the MORryde version is superior to the competition: the ramp door and the stairs. Likewise, the Dexter brand of axles is considered to be superior to the competition (although the axle brand is a moot point if you plan to upgrade to the MORryde IS suspension which replaces the axles completely).
When our second factory-installed axle failed on our current trailer after our first axle failed and was replaced under our extended warranty, we replaced both axles with Dexter brand at our own expense (not under warranty) and have been very pleased.
So, in our evaluation of toy haulers during our own personal search for ourselves, the brands we focused on came with these MORryde and Dexter components. Generally, if a brand doesn’t specify in its marketing literature that it has a MORryde or Dexer branded component, then it doesn’t have it. There is marketing value in advertising that your trailer includes these brands, and the RV manufacturers call it out in their literature.
One of the side benefits (or disadvantages, depending on your point of view) of massive industry consolidation is that a hugely dominant parts supplier can strong arm its customers into buying its products by bundling them or offering other perks as part of the deal, something like: “If you buy our doors and windows we’ll throw in our stairs for free,” or “If you buy our stairs and ramp door we’ll warranty the frame for three years.”
MORryde Zero-G Ramp Door
Check out this video comparing the deployment of the MORryde Zero-G ramp door and the Lippert ramp door:
MORryde StepAbove
We like the old fashioned flip down front stairs on our fifth wheel, but that design is antiquated these days. The MORryde stairs called the “StepAbove” deploy easily.
FINAL TID-BITS
One of the interesting fallouts from the wholesale decimation of the RV industry that began in 2008 and went on until 2013 or so is that the smaller companies that survived the downturn did so because they engaged in some true soul searching and revised their self-image.
The folks at B&W Trailer Hitches began making farm fencing, and they had enough cash flow to pay their employees to work for the town where they are headquartered, providing groundskeeping and other municipal services. This not only kept everyone employed but it heightened their pride in their town and their loyalty to their company. Amazing and very smart. The folks at MORryde also branched out into non-RVing related products in a similar way.
The management at ATC took a long hard look at how to motivate their assembly line workers to make the best product possible. Rather than providing incentives based on the number of units produced, which is a common metric, they offered incentives that focused on quality control and reducing mistakes and system failures. ATC has the longest and deepest warranty of all the fifth wheel toy hauler manufacturers.
PHEW — THAT WAS LONG!
We’ve got more thoughts to share as we ponder this fork in our less traveled road. At the moment we’re leaning towards a new traditional fifth wheel trailer because the triple-towing seems okay, but who knows what the coming months will bring as we travel further afield and encounter a wider variety of situations with our rig.
Stay tuned!!
.
Note added later: After several years of triple-towing, in the middle of Covid, we bought a house and ended our full-time traveling lifestyle. We bought a truck camper for weekend getaways for a while, towing our RZR on its flatbed trailer behind. We weren’t happy with that arrangement for a variety of reasons (explained in detail here).
However, the travel bug was still biting us, so we decided to spend our summers RVing — in a toy hauler! It is a 2022 Genesis Supreme 28CRT.
This is an OPEN BOX toy hauler where there is a bedroom/bathroom upstairs but the entire downstairs area is a cavernous room with the kitchen at one end, a ramp door at the other and moveable furniture in between. The RZR rolls into that “garage” room when we get ready to tow. When we set up camp, the RZR rolls out and that huge room becomes our living area.
It is an ideal rig for our seasonal travels (4-5 summer months). I’m not sure if we’d want to live in an open box toy hauler full-time, however.
More of our Latest Posts are in the MENU.
New to this site?
Visit RVers Start Here to find where we keep all the good stuff. Also check out our COOL NEW GEAR STORE!!*** CLICK HERE *** to see it!
We have been loving the heck out of our Honda EU2200i generator for the last seven months and have already put about 150 hours on it. We live in our RV off the grid on solar power 24/7, and we rely on the sun for 98% of our power needs. However, in the last few months we have experienced an extraordinary amount of wildfire smoke and rain in our RV travels, and that trusty old orb in the sky was nowhere to be seen for weeks on end.
Honda EU2200i generator
Why A Honda EU2200i generator?
In the past we have used a generator only for a few days in mid-winter when the days are really short and storms blow in for a week at a time, limiting the amount of power our solar panels could produce, or for just a few days in mid-summer when the interior temp of our trailer shoots into the 90s and we run our air conditioner to cool down.
The back side of the Honda EU2200i generator.
When we decided to get one of Honda’s new and easily carried 2200 watt generators in early May, we didn’t think we’d put it to use right away. We were headed to the cool mountains for a month or so, and we doubted we’d need our air conditioner.
Ironically, within a few weeks of getting our new 2200 watt Honda generator, wildfire smoke filled the mountain air, obscuring the sun and preventing our solar panels from being as effective as usual.
The wildfire smoke was followed by weeks-long rain storms for the next few months as we traveled from the mountain states to Lake Superior. Oh my, were we happy it was so easy to set up our new little generator to keep our batteries nicely charged despite the dark skies.
Solar power is great until a storm like this sweeps in!
At one point we had to ask ourselves if we had inadvertently done a rain dance by getting this new generator!
Just like how one of us always get really sick whenever we put a new bottle of Nyquil in our medicine chest, we wondered if the deluge of smoke and rains came because we now had an easy access generator that could power our lives on a moment’s notice!
When storms blew in we got the generator out — and it was easy!
The Honda EU2200i is light and easy to Carry!
The Honda EU2200i generator is a new and improved version of the much beloved Honda 2000i generator that has been powering the lives of RVers for many years. If you wander through the desert in Quartzsite, Arizona, in January, you’ll see the popular red generators outside of many RVs.
It weights just 46.5 lbs., holds just under a gallon of gas and delivers 2,200 watts of peak surge power and 1,800 watts of continuous power.
We have had a Yamaha 2400i generator with us since we started full-time RVing eleven years ago, and although it is a great generator, it is unwieldy to store, maneuver and set up. Too often we have looked at each other and said, “We really should get the generator out,” only to decide against it because neither of us felt like going through the hassle.
However, the light little Honda EU2200i generator has proven to be so darn easy to grab and set up that we often end up running it in circumstances where we wouldn’t have before.
For the moment, it is living in the back of our truck right next to the bigger generator. Either one of us can pick it up with one hand and lift it out of the truck, even while gingerly stepping around the fifth wheel hitch and the rest of the obstacle course in the bed of our truck. Not so with its big brother.
Starting the Honda EU2200i generator!
We like to start the Honda EU2200i generator without having it plugged into the RV so it can get a little warmed up before we put any loads on it. The shore power cord is plugged into the trailer, but we don’t plug the other end into the generator until the generator is actually humming along.
Since our trailer is a 50 amp trailer and the generator outlets are 15 amps, we use two adapters plus the shore power cord to get between the 15 amp female outlets on the generator and the male 50 amp outlet on our trailer:
We keep these two adapters on hand because it gives us the flexibility to connect the RV’s shorepower outlet to either a 15 amp power source or a 30 amp power source. However, you can also go directly from the 50 amp outlet on the RV to the 15 amp outlet on the generator and skip dragging out the heavy shore power cord by using a 15 amp Male to 50 amp Male adapter.
1. Open the gas cap vent so a vacuum doesn’t build up inside the tank
2. Close the choke (move the switch to the right)
3. Set the generator switch to ON
Then pull the pull start cable and away you go.
First point the gray dial to “On” to vent the gas cap. Mark painted the “On” and “Off” labels to make them easier to see.
Then close the choke and set the generator switch to “On.” Now you’re ready to pull the start cord.
Instant power!
Shortly after the generator roars to life, slowly open the choke (move the switch to the left).
We like to position the generator so the exhaust goes away from the trailer. If there are other people camped in the vicinity, we also like to place it somewhere in our campsite that it is as far from their campsite as possible so we don’t annoy them when we run it.
If it is raining out, we put it under one of the slide-outs so it doesn’t get wet.
Sometimes these locations are not optimal for pulling the start cord and getting the generator going (especially crawling under a slide-out!). But this little Honda generator is so light it is easy to maneuver it to wherever we want to place it, even after it is running.
All set up and purring away.
Buddy jumps for joy!
Using Eco Throttle for Greater Efficiency and Less Noise
One of the really nifty features on the Honda EU2200i generator is the Eco Throttle. This is located on the “business end” of the generator in the upper left corner.
Turning it on lowers the RPMs of the generator so it doesn’t use as much gas and runs more quietly.
If we are going to run the generator for a number of hours primarily to charge the batteries and do other things that put just a small load on the generator like using our laptops, running the lights at night, or watching a movie on TV, we keep the Eco throttle turned on.
We tested the generator to see how long it would run if we filled the 0.95 gallon gas tank before it ran out of gas. We had it in Eco mode and used our laptops and other small things while it was running.
It ran for 9.5 hours!
We don’t usually run the generator for nearly that long.
As I’ve described in our article about what happens when you run solar power and shore power simultaneously, the best time for solar powered RVs to run a generator is in the morning hours. This helps get the batteries sufficiently charged so they can easily reach their charging (Absorb) voltage under solar power alone once the generator is turned off. This gives them more daylight hours to complete the Absorb stage before the sun goes down.
The Eco Throttle switch allows the generator to run more efficiently and quietly when loads are light.
Eco mode is our default with this generator, both to save gas and to hear the generator’s quiet purr instead of its louder roar. In Eco mode it is as quiet as our Yamaha 2400i generator, but when it is not in Eco mode it is a little louder.
If you suddenly place a big load on the generator when it is in Eco mode, it will temporarily go into higher RPMs to provide the required power.
If we turn on the toaster while in Eco mode (our toaster is an 800 watt model), we can hear the generator rev up while the toaster is making toast. As soon as the toast pops up, the generator idles back down. If we do the same thing in non-Eco mode, the generator is already humming along at a fast pace, and it doesn’t need much of a surge to operate the toaster.
We camped under thick canopies of trees in the rain in Michigan’s Upper Peninsula
If the generator is in Eco mode and we use the microwave (ours is an 1100 watt model), the generator has a slight lag time as it first senses the heavy load and then revs up to provide the necessary power.
There is an audible drop in tone and dimming of the lights on the microwave for a second or two before the generator roars to meet the challenge. We’re not sure this momentary dip in power is good for the microwave, so if we plan to use it we prefer to have the generator running in non-Eco mode first.
Can it power an RV air conditioner?
We have a 15,000 BTU air conditioner on our 36′ fifth wheel trailer. With some coaxing (i.e., warming up the generator, then turning on the Coleman air conditioner’s fan and finally turning on the air conditioner itself), our Yamaha 2400i generator can handle the air conditioner’s initial power surge and run it for hours on end without a hitch.
We were hoping the much lighter and smaller Honda EU2200i might be able to run it too. However, the generator’s 2200 watts max power is not quite enough to handle the surge when the air conditioner starts. It is likely it could power a 13,500 btu air conditioner (standard on smaller RVs) just fine.
The Honda EU2200i generator is designed to work in parallel with a twin generator and connector cables, giving you 4,400 watts of peak power, more than enough to run a 15k BTU air conditioner. You can probably run the microwave at the same time with that kind of juice! The wonderful thing about this setup is that the two generators are a lot smaller than one big 4.4kw generator would be.
Honda EU2200i + EU2200ic Companion Generator Parallel Combo Kit with covers for each.
Putting Gas in the Honda EU2200i Generator
The hardest part about putting gas in a generator is fiddling with the child-proof, spill-proof, idiot-proof gas can. Government regulators have obviously never used a gas can in their lives, and we’re quite sure a lot more gas has been spilled on our precious environment because of the newfangled user-unfriendly spouts than ever was spilled using the trusty old gas can spouts of days gone by.
Good luck with the gas can spout!
Easy access on the top of the generator for gassing it up.
We’ve been adding Seafoam Motor Treatment to the gas in the generator. This fuel stabilizer cleans the carburetor, keeps the engine clean, and we find it makes it easier to start.
If you’re looking for affordable parts or tools to keep your generator in top condition, you can check out this parts geek coupon code for discounts on various items. It’s always handy to save while ensuring your gear stays in great shape!
Honda EU2200i Generator Maintenance Tips – Changing the Oil
Changing the oil on the Honda EU2200i generator is a snap. First find a pleasant place to do it. Mark likes to elevate the generator onto some kind of platform so it is easy to drain the old oil out of the bottom.
As always, Buddy likes to supervise.
Changing the oil doesn’t take long, but doing it in a pretty place makes it more fun.
You’ll need the following:
A flat head screwdriver
A sealable 14 oz. or larger container for the old oil
A quart of SAE 10W-30 oil
Rags to clean up drips and wipe your hands
Optional: Rubber gloves
The first step is to unscrew the single screw that holds the front panel on the front of the generator and remove the panel so you have full access to the heart of the machine.
Access the heart of the generator via the side panel on the front.
Once it’s unscrewed, the side panel lifts off easily.
To check or change the oil, simply unscrew the dipstick in the lower left corner.
If you are just checking the oil, make sure the oil level fills the spout and is clear. Honda recomments changing it every six months or 100 hours of use (keep track of the hours of use in a log book).
The dipstick is in the lower left corner.
Unscrew the dipstick to check the oil and/or to change it.
When changing the oil, hold a container of some kind below the spout.
Any container that can hold 14 ounces of liquid is fine. Or you can drain the oil into an oil drain pan and then, after the new oil has been put into the generator, pour the old oil into the container that held the new oil.
In the case pictured here, Mark used an old plastic peanut jar with a screw top lid.
Drain the oil into an easily sealed container that holds at least 14 ounces.
To get all the oil out, tip the generator slightly towards you.
Tip the generator towards you to get out every last drop.
Once the old oil is completely drained out, pour the new oil in.
Pour the new oil in
The oil reserve is properly filled when the oil comes right to the edge (with the generator sitting level). Once it’s full, screw the dipstick back in and tidy up any drips with the rags.
The oil is full when it is level with the spout
The generator takes 14 ounces of oil and, of course, oil is sold in 32 ounce bottles. You can save the last two ounces for other odd jobs around your RV in one of these classic oil cans. Grandpa will be proud!
Honda EU2200i Generator Maintenance Tips – Cleaning / Replacing the Air Filters
Since the front panel of the generator is off, now is a good time to inspect the air filters. To access the air filters, unscrew the screw holding the access panel in place.
The air filters are in the upper right area of the front of the generator
Remove the air filter cover
There are two small air filters inside. Each one is a small piece of foam. If they’re dusty and dirty you can clean and re-oil them. If they are brittle and have started to fall apart, you can replace them with Honda’s air filter replacement kit.
There are two air filters inside, one above and one below
Apply a thin layer of high temp anti-seize lubricant to the threads
.
And that’s it!
Happy campers!
If you are looking for a lightweight generator that can run for many hours on end and power all of the appliances in your RV that require less than 2200 watts to operate (in our case, this is everything except our 15k BTU air conditioner), the new Honda EU2200i generator is a great choice.
Hopefully if you buy one, you won’t inadvertently inspire the rain gods to dump weeks of rain on you like we did!!
Note added March 24, 2019 – 200,000 Honda 2200i units have been recalled for a leak in the fuel valve. You can schedule a free repair at a Honda authorized dealer. There is more detailed info from Honda about the specific units affected at this link.
Where to buy the Honda EU2200i generator and accessories:
More of our Latest Posts are in the MENU.
New to this site?
Visit RVers Start Here to find where we keep all the good stuff. Also check out our COOL NEW GEAR STORE!!*** CLICK HERE *** to see it!
Our RV awning is 11 years old now, and the canvas fabric recently tore at the top and bottom. RV awnings are a pain in every respect (except for the wonderful shade they offer), and we knew we were in for a challenging DIY repair if we tried to do it ourselves.
Fixing an RV awning is a job for at least two people, preferably three or four for certain parts of the job, and it’s easiest if someone in the group has done it before because it can be a little tricky.
Oh no! Time for new RV awning fabric!
We were traveling through Rapid City, South Dakota, and recent hail storms had made a mess of many RVs and RV dealerships all around the area. Only one of the local RV dealerships and repair shops could get us in within the week, so we were thrilled when we backed into a bay at Jack’s Campers.
Fortunately, they had the fabric for a 17′ Dometic Sunchaser awning in stock, an old manual model that is not installed on new RVs any more. Luckily, there must be enough oldies-but-goodies on the road these days that Jack’s Campers stocks them.
We got into position at Jack’s Campers in Rapid City, South Dakota.
We called our RV Extended Warranty folks, Wholesale Warranties, to find out if this awning failure would qualify for reimbursement under our warranty plan.
In the end, the whole RV awning repair job ended up costing $444 out of pocket, most of that being for the new fabric, and it took the guys at Jack’s Campers just 45 minutes to do it.
The first step was to remove the awning arms and roller from the sidewall of our fifth wheel. They unrolled the fabric about a foot and unscrewed the mounting brackets that attached the awning arms to the side of the trailer.
First, remove the awning arms from the sidewalls of the trailer.
There was putty in the awning fabric track where the mounting bracket had been, so this had to be removed with a flathead screwdriver.
There was some putty in the awning track, so it was removed with a flathead screwdriver.
Next, two guys slid the awning fabric off of the awning track on the RV wall and marched the whole thing into the workshop and rested it on some saw horses.
Two mechanics walked the awning out of the track on the trailer.
Once in the shop the awning was laid across some saw horses.
Manually operated RV awnings have a spring inside the roller mechanism (a “torsion assembly“) for rolling up the fabric. At one end of the roller there is a locking mechanism to keep the spring inside the roller tight so the fabric doesn’t unroll. This locking mechanism became important when the new fabric was installed to get the spring tensioned correctly inside the roller.
The right arm of the awning has a locking mechanism which keeps the fabric from rolling off the roller.
At the opposite end of the roller there was no locking mechanism. The bolt holding the awning arm to the roller at the non-locking end was removed and the arm was pulled off. The arm at the locking end of the roller remained attached throughout the job.
Remove the awning arm from the non-locking end of the roller.
Awning arm removed.
Then the rivets on the endcap were drilled out and the torsion assembly was pulled out.
Drill out the rivets on the endcap.
The endcap and spring (torsion assembly) are removed from the roller.
The torsion assembly is out of the roller. Spraying it with silicone spray will help the awning roll more easily.
Then the awning fabric was slid off of the roller.
Two mechanics slid the old awning fabric out of the track.
The new fabric was unfolded and laid out in the workshop, and then it was slid into the track on the roller until the fabric stretched the whole length of the roller.
The new awning fabric was unfolded and laid out.
The new awning fabric will be slid into the track on the roller.
The new awning fabric was started in the track on the roller.
Spraying the track with a heavy duty silicone spray helped the fabric slide along the track smoothly.
Spraying the track with silicone helps the fabric slide more smoothly.
Two mechanics slid the new awning fabric along the roller track.
Then the torsion assembly was placed inside the roller and new endcap rivets were installed.
The endcap and spring were reinserted inside the roller.
The fabric was positioned so it went all the way to the locking end of the awning. At the opposite end a set screw was screwed in to prevent the fabric from sliding off the track.
Make sure the awning fabric has been slid all the way to the locking end of the roller.
Put a set screw at the non-locking end of the fabric so it doesn’t slide off the track.
The new fabric was laid out so it could be rolled onto the roller. Then a vice grip was used to turn the spring between 15 and 18 times to get the right spring tension.
New awning fabric is in place.
Use vice grips to rotate the spring 15 to 18 times to ge the right spring tension.
Then the awning arm was reattached to the roller with a bolt.
Bolt on the awning arm.
Awning arm (non-locking end) is reattached.
Back at the trailer, the awning track was sprayed with heavy duty silicone.
Out at the trailer spray the awning track with silicone.
Then the new awning fabric was loosely wrapped around the roller and the whole thing was marched outside to the trailer.
Four guys assisted in wrapping the new awning fabric around the roller a few times.
The awning is taken out to the trailer.
Our little project supervisor, Buddy, had been watching all the goings on through open big shop door from a safe distance out by the trailer. When the awning and its new fabric were brought out to the trailer, he backed up as far as he could into the parking lot to give the guys room to work!
Stand back!
Using ladders and reaching overhead, four guys maneuvered the awning fabric into the track on the trailer and slid it all the way to the front end of the track. This is where having lots of hands can help.
The awning fabric is slid along the track on the side of the trailer.
After installing the awning on the trailer, the mechanics noticed that the two feet that held the bottoms of the two awning arms had each developed hairline cracks. So, they replaced each foot.
The feet of both awning arms had developed small cracks, so they were replaced.
The last step was to test the awning by rolling it all the way out and then all the way in again.
Test the awning to make sure it rolls all the way out and all the way in again.
Done!
Ta Da!! A job well done. The whole project took 45 minutes from start to finish.
Now that we’ve seen how a manual RV awning gets installed, Mark is confident he could do it without going to an RV repair shop as long as he had some extra hands for sliding the awning fabric on/off the trailer awning track and on/off the roller track.
Side note: If you have a manual awning, it is really important that you use some kind of velcro straps or bungee cords wrapped around the awning arms as extra security to keep the awning from accidentally opening while you are traveling.
Our photo above doesn’t show them, but we have used these awning straps ever since we bought the trailer.
More of our Latest Posts are in the MENU.
New to this site?
Visit RVers Start Here to find where we keep all the good stuff. Also check out our COOL NEW GEAR STORE!!*** CLICK HERE *** to see it!
July 2018 – We have been floating around northern Wyoming and the Black Hills of South Dakota for the past few weeks, an area that is prone to wild hail storms. The other day, while we were away from the trailer in town, a horrific hail storm came through our campsite and wreaked havoc on our RV roof.
Will these gathering storm clouds dump hail on us?
We didn’t know this was happening while we were gallivanting around town, sipping lattes, running errands and chatting with the locals. It was nice there!
But we got a hint about what had happened (that we didn’t understand at first) as we drove back to our campsite when we saw a fifth wheel trailer going by us on the highway with a wildly flapping tarp strapped down over its roof.
When we got back to our trailer we noticed some large clumps of ice in the grass and began to wonder.
At least half an hour or more after the storm ended, big chunks of hail were still on the ground.
We’ve been through hail storms before, most notably at Bryce Canyon and at Cedar Breaks National Monument, but the hail has always been about the size of a pea. Even at that, the thunderous sound on the trailer roof is astonishing.
But this time, considering the storm must have ended at least 30 minutes or even an hour or more before we got back to the trailer (the ground wasn’t very wet), these ice chunks were still pretty big despite melting fast. Suddenly it hit us, “Uh oh. Are the solar panels okay?” Mark quickly climbed up on the roof to find out.
As he yelled, “Oh, WOW!” from the rooftop I noticed that another storm was darkening the sky and was on its way.
Mark surveys the hail damage on our roof while another storm threatens…
Luckily, there was no damage to our solar panels. However, the hail storm had smashed two of our RV roof vents!
Not only were the RV roof vent dome lids broken in multiple places but the fan blades above the screens had been broken off too!
Not only did the lid get broken but some 12 volt fan blades broke too!
The other vent fared no better!
Interestingly, our two Fantastic Fan RV roof vents were still 100% intact and sustained no damage. That’s an especially good thing because they are over our bed and over our recliners which would have all gotten soaked.
We had little time to puzzle over it all because another storm was on its way and would be dumping either rain or hail or both on us again momentarily. If we didn’t fix the vents in the next 10 minutes or so, our shower and toilet room would get drenched inside once again. That wouldn’t be a disaster, but who would want to sop up the mess twice?
Mark surveyed the damage and decided the best way to fix the RV roof vents for the short term — until we could get some replacement RV roof vents — was to tape them up with Gorilla tape.
A quickie repair job with Gorilla Tape was enough to withstand a few more violent storms!
The storm arrived with a vengeance and we were pelted with rain. Then another two storms passed over us in the next 12 hours. Not much hail fell, but one storm pounded us with a deluge of rain for over two hours.
As I clicked the shutter on this eerie landscape I saw a flash of lightning through the view finder. What luck!
Gorilla tape is amazing stuff, and not one drop of water leaked through the broken roof vents in all that rain. So, if you’re ever in a bind like this, it doesn’t hurt to have a roll of Gorilla Tape on hand!
Insurance? Warranty??
We debated whether to file an insurance claim, but the cost of this repair would barely meet our deductible. We also debated whether to try using our RV extended warranty since it had worked so well for us in the past when we needed some truly major equipment replacements (axle, fridge, suspension, toilet and plumbing). But warranties cover system failures, not accidents or acts of God (like hail).
So, this would be a DIY job without any outside financial assistance.
The next day we picked up two replacement RV roof vents (Ventline V2094 units by Dexter) at a local RV dealership and parts store. We didn’t get there until the afternoon, and we were amazed to find that there had been a run on RV roof vents that morning. They had just one left. The other had to be brought in from a partner store in the next town!
We also picked up a bunch of tubes of Dicor Lap Sealant, and then Mark got out the tools needed for the job and went to work.
Tools for the job: Screwdrivers, drill, wire cutters and a knee pad. Not shown: a caulk gun.
First, he used a flathead screwdriver to get the old Dicor Lap Sealant off of all the screw heads holding the damaged roof vent to the roof of the trailer.
First, scrape off the old Dicor Lap Sealant to reveal the screw heads.
All the screws are #2 square heads.
Unscrew the screws using a #2 square drill bit in a cordless drill.
Then he used the flathead screwdriver to remove the Dicor Lap Sealant from the top of the RV roof vent flange.
Scrape the Dicor Lap Sealant off the flange so the RV roof vent can be removed.
The old RV roof vent was now ready to be pulled off of the roof all together. However, the wires for its 12 volt fan were still attached, so he clipped those off with diagonal cutting pliers.
The old RV roof vent is ready to be removed except for the 12 volt fan wires.
.
Cut the wires leaving plenty of wire remaining for the new RV roof installation.
At last the old RV roof vent was completely removed leaving just the gaping hole into our shower stall below.
Ready for the new RV roof vent.
The next step was to prep the new RV roof vent for installation. Mark unrolled some putty tape, which is sticky on both sides, and pressed it onto the bottom side of the flange of the new RV roof vent. Then he cut it to the proper length and peeled off the protective strip to expose the sticky part.
Place strips of putty tape on the bottom side of the flanges on the roof vent. This is double sided sticky tape.
Cut the tape.
Remove the protective strip to expose the sticky side of the putty tape.
At the end there was a tiny gap in one corner. He rolled a small bit of the putty tape into a ball and pressed it into the gap.
If you end up with a gap, ball up a little putty tape and press it in the gap.
.
One of the interesting things about these RV roof vents is that the lids are flexible. Our old ones were heavily scraped from going under low hanging branches (as you can see in the first pictures of the broken vents near the top of this article), and they are designed to flex when something presses on them.
We didn’t want to demonstrate this with the new RV roof vents, but Mark pushed his shoe into the old vent so you could see. Obviously, the lid is weakened by the taped up holes, but it still has huge amount of flex to it.
The dome lids on these RV roof vents are very flexible which helps when you hit low hanging branches.
The next task was to get the RV roof vent installed on our trailer roof. We often pass things up to and down from the roof via the slide-out next to our front steps. This is much easier than climbing the ladder with one hand while holding something in the other.
The new RV roof vent goes up on the roof.
The Ventline RV roof vents had embossed labels showing how to orient them on the roof. The idea is to install the RV roof vent so it opens to the rear of the RV. That way, if you accidentally leave it open and drive off, the hinges won’t be fighting 65 mph winds on the highway that could rip the lid off.
Be sure to orient the RV roof vent so it opens towards the back of the rig.
It says “Vehicle Front” with an arrow. You may need to feel around to find the lettering!
The new RV roof vent is in position.
Before securing the RV roof vent in place, Mark wired up the 12 volt fan. First he made a note of which color pairs had been wired together before and then cut off the crimp-on barrel connectors from each pair of wires. Then he used wire strippers to strip off a little bit of the outer casing of each wire to reveal the copper strands inside. Some errant strands were sticking out of the group so he he twisted all the copper strands together.
Note how the fan is wired, remove the existing barrel connectors and strip the casing from the wires.
Twist all the strands so no stray ones stick out.
After doing this to all four wires he twisted the two pairs of wires together and screwed on new wire nuts.
Twist the pairs of wires together and screw on the wire nut.
The last squeeze.
At this point he turned on the 12 volt fan just to be sure that it not only was wired correctly but also rotated in the right direction to exhaust air out of the RV. If he’d reversed the pairs of wires by accident, the fan would have run backwards, forcing air into the RV instead of exhausting it out.
Test the fan to be sure it turns on and spins in the right direction.
Then he tucked the wires in and closed the lid so he could screw it onto the RV roof.
Then tuck the wires in and position the RV roof vent so the screw holes line up.
Then, to ensure the RV roof vent would seal evenly on all sides, he placed all the screws in their positions around the edges of the vent and screwed them in using a star pattern in the same way that lug nuts get tightened when changing a tire.
After placing all the screws in the holes, use a star pattern to screw them in evenly.
Done.
The next task was to cover all the screws with a thick layer of Dicor Lap Sealant. Mark had tackled this project in the early morning so he wouldn’t have to sweat it out on the RV roof at midday, but this meant the Lap Sealant was still quite cold and wouldn’t flow well. So, he took a break and left the tubes of Lap Sealant out in the sun to warm up for a while.
Dicor Lap Sealant has to flow, so make sure it is warm enough that it will flow smoothly.
When the Lap Sealant was finally warm enough to flow, he clipped off the end of a Dicor Lap Sealant tube and set it in his caulk gun. He wryly joked with me that if you don’t invest in a quality caulk gun at the outset, you’ll keep throwing them out until you do!
Cut the end off the Lap Sealant tube and place it in the caulk gun.
Then he flowed the Lap Sealant along the edges of the RV roof vent flange, flowing a little over each screw head as he went. It took almost two tubes of Dicor Lap Sealant per RV roof vent.
Flow the Lap Sealant along the flange and over each screw head.
And Ta Da — he was finished!
This installation project took about 45 minutes per roof vent.
Done.
Our old RV roof vents had been installed at the NuWa factory in 2007 when our trailer was built, and they had worked flawlessly right up until this hail storm in 2018.
We were intrigued to discover that the old RV roof vents had been tinted a dark shade. The new ones were pure white, and what a difference that made inside! The first time I used the toilet room I opened the door and wondered why the light was on because it was so bright!
These lighter colored RV roof vents may let in a lot more heat, but vent insulators can help with that on the hottest days.
One RV roof vent finished and one to go. After that, time for a beer!
Mark did some other RV roof repairs while he was up there, but I’ll save those projects for a future article!
More of our Latest Posts are in the MENU.
New to this site?
Visit RVers Start Here to find where we keep all the good stuff. Also check out our COOL NEW GEAR STORE!!*** CLICK HERE *** to see it!
The MORryde SRE 4000 is a fabulous replacement for the standard equalizer used in most trailer leaf spring based suspension systems. We recently replaced our fifth wheel trailer’s equalizer with a MORryde SRE 4000, and what a difference this has made when we tow on bumpy roads!
MorRyde SRE 4000 Trailer Suspension Installation and Review
We have had our 14,500 lb. 36′ Hitchhiker fifth wheel trailer for over ten years, and during that time we have replaced the leaf springs, the shock absorbers and the equalizer with beefier components than the ones that were installed at the factory. We also cut the hangers off the frame and placed them at a slightly wider spacing when the tires threatened to touch each other due to a failure within the suspension system (blog post about all that here).
Our leaf springs are now Rockwell American leaf springs made in America from American steel. In addition to switching brands, we upgraded our leaf springs from the factory installed 7,000 lb leaf springs to 8,000 lb springs.
These wonderful upgrades meant we no longer had a problem with sagging leaf springs or a faulty suspension system, but the ride inside the trailer had become very harsh. It was now routine for us to find things in total disarray inside our trailer after towing it down even modestly bumpy roads.
The MORryde SRE 4000 includes equalizer and wet bolts (heavy duty shackles) for each axle.
After arriving at a new campsite we’ve found our sconce lights dangling and we’ve had several light bulbs on our ceiling fan shatter all over the floor.
We keep some books in a cabinet in the far back of the trailer, above the rear window, and that cabinet was always a total disaster whenever we unhitched. Books and pamphlets and maps would be toppled all over each other.
In another rear cabinet in the trailer I keep a pocket flashlight and a chapstick, among other things, and darned if those two items didn’t always roll away and disappear under a pile of camera cleaning supplies every time we towed the trailer.
We had to be super careful opening our RV refrigerator door, because bunches of things would fall out onto the floor.
We have a few battery operated LED lights mounted under cabinets with Velcro, and they invariably would fall onto the counter tops. And from longstanding habit we tend to leave our place mats on our dining table, and they would always be on the floor when we arrived anywhere.
Mark’s tools down in the Man Cave? Oh my. We won’t even talk about that mess with all those tool boxes tipped over on their sides.
We had resigned ourselves to fixing a disaster every time we parked and set up camp, but it sure was frustrating.
Then Mark started reading up on the MORryde SRE 4000. MORryde is well known among RVers for their patented IS (Independent Suspension) system which is an axle-less rubber based system that doesn’t involve leaf springs at all. These are standard on the upscale New Horizons fifth wheels, and they are a pricey but popular upgrade with many RVers who have replaced their factory installed leaf spring suspension with the MORrydes IS suspension on their fifth wheel trailers.
However, the MORryde SRE 4000 simply replaces the equalizer in a leaf spring suspension system and leaves the rest of the system intact, including the leaf springs, axles and shock absorbers. Rather than having a boomerang shaped piece of steel (an equalizer) that rocks back and forth between the two axles’ leaf springs, the MORryde SRE 4000 adds a rubber component that provides 4 inches of travel. So, not only does it rock back and forth, but it absorbs the bumps.
The MORryde SRE 4000 replaces the above equalizer and bolt assembly that sits between the hanger at the top and the two sets of leaf springs on either side.
We decided that this seemed like a really neat solution to our problem, so we headed over to Rucker Trailer Works in Mesa, Arizona, to have the MORryde SRE 4000 installed.
Rucker Trailer Works has worked on our trailer before. They aligned the frame and rehung the hangers to laser-point perfection after our initial suspension replacement at another shop. They have been in business for decades and they are true trailer experts. We would trust them with our trailer any day of the week and will eagerly return to them for any work we need in the future.
Rucker Trailer Works in Mesa, Arizona, did a superior job.
We got set up in a bay and three mechanics quickly got to work.
We parked our buggy (a 36′ Hitchhiker fifth wheel) in one of the work bays.
Our new puppy, Buddy, wanted to be the Project Supervisor. But he had been caught sleeping on the job when we did our RV screen door upgrades a few weeks ago. So, he reluctantly went away to take a nap in the truck while the experts did the installation.
Our new puppy, Buddy, wanted to be the Supervisor but he napped in the truck instead.
The first step was to remove the wheels and jack the trailer up with floor jacks, placing the jacks under the frame.
First things first: jack up the trailer and remove the wheels.
Once the trailer wheels were off the ground, additional jacks were slid beneath the axles to support them. This was an important step because the project would involve disconnecting and reconnecting one of the points where the axles are attached to the trailer via the leaf springs.
There are five attachment points on each side of the trailer between the axles and the frame. Three of these attachment points are the hangers. The hangers connect the endpoints of the leaf springs: one at each of the two the outer endpoints and one in the middle supporting both leaf springs via the equalizer. The other two axle/frame attachment points are the two shock absorbers.
When the equalizer is removed, each leaf spring loses one attachment point to the frame. That is, each leaf spring ends up connected to the frame by only one hanger at one end while the other end is left dangling where the equalizer used to be. As each leaf spring drops, the shock absorbers could also be stretched open and possibly damaged. Also, it’s much easier to line up the bolt holes when installing the MORryde SRE 4000 if the axles are supported!
Therefore, jacks were positioned beneath the axles to hold the axles in place during the job.
This “after” pic shows the five connection points between the trailer frame and the axles. The axles must be supported when the center attachment point is removed during this job.
Because we have electric over hydraulic disc brakes on our trailer (an upgrade we highly recommend to anyone with a large fifth wheel trailer), the disc brake calipers were removed and set aside with the hydraulic lines still intact and attached.
Because we upgraded our trailer to disc brakes, the brake calipers had to be removed temporarily.
The disc brake calipers were set aside with the hydraulic line still attached & intact.
The equalizer was now at a crazy angle because the trailer was raised up on jacks.
The old equalizer is cocked because the trailer is on jacks and the weight is off the wheels
The bolt holding the equalizer to the hanger was removed, and then the bolts holding the equalizer to the leaf springs were removed.
The bolt holding the equalizer to the hanger was removed.
Next, the bolts holding the equalizer to the leaf springs needed to be removed.
These were not the original factory-installed bolts. They were wet bolts that we had had installed when our suspension was replaced a while back.
The old equalizer and bolt assemblies.
To our surprise, the mechanics discovered that the one of the equalizers was damaged. The top hole had started elongating and the brass bushing had broken. We were both astonished because we had towed our trailer only 7,500 miles since the equalizer had been installed. Our trailer weighs in at its GVWR and is not excessively heavy.
One of the equalizers was already damaged after just 7,500 miles of towing.
The top hole had elongated and the bronze bushing had broken.
As we pondered how this damage could have happened, we remembered one particularly nasty road we had driven down this past year. It was a 3 mile long stretch of miserably rutted dirt road that took us 45 minutes to cover. At the end of it we noticed that the top equalizer bolt was hanging halfway out because the nut had worked its way off.
Here’s a pic from that scary moment many miles from nowhere:
Last year, after driving for 45 minutes on the nastiest dirt road we’ve ever been on, Mark noticed the bolt holding the equalizer to trailer frame was working its way out. This may be what caused the damage to the equalizer that we saw during the MORryde SRE 4000 installation.
Past damage behind us, the next step was to hang the MORryde SRE 4000 on the leaf spring hanger.
The MORryde SRE 4000 was suspended by a bolt at the top.
Prior to tightening the bolt, the mechanic used a C-clamp to tighten the hanger arms and hold the MORryde SRE 4000 in place.
A C-clamp held the MORryde SRE 4000 in place
Then the C-clamp was removed and the MORryde SRE 4000 was centered between the leaf springs.
The MORryde SRE 4000 was bolted onto the hanger.
The MORryde SRE 4000 was suspended from the hanger.
Looking good.
The next step was to install the heavy duty shackles (or “wet bolts”) on either side of the MORryde SRE 4000, first bolting together one side and then the other.
A new wet bolt assembly attached the MORryde SRE 4000 to one leaf spring.
Now it was fully bolted on to the hanger at the top and to both leaf springs on either side.
And that was it! Of course, the process had to be repeated on the other side of the trailer.
The mechanic held up the equalizer to show where it had been.
For comparison, here’s where the equalizer used to be.
The next step — after admiring how the MORryde SRE 4000 looked between the leaf springs — was to reattach the disc brake calipers, mount the wheels and lower the jacks until the trailer was standing on its own wheels once again.
The disc brake calipers were reattached.
The wheels were mounted back on.
The jacks were removed and the trailer stood back up on its own wheels.
We crawled underneath to have a look at the new MORryde SRE 4000 from the insides of the wheels.
View from under the trailer looking at the back side.
One of the things we were curious about was whether the MORryde SRE 4000 would raise or lower our trailer. We often travel on dirt roads and tow our trailer through washes, and we prefer it to be quite high off the ground. Even driving up or down a short ramp into or out of a gas station can cause havoc at the back end of the trailer. A few years ago when our trailer still stood at its original factory height, we left a deep 50′ long scrape in an insanely sloped parking lot in Boone, North Carolina.
We measured the trailer height off the ground both before and after the MORryde SRE 4000 installation and were pleased that it raised the trailer over an inch, from 28 5/8 inches to 29 7/8 inches. Woo hoo!
BEFORE the installation the measurement was 28 5/8 inches.
AFTER the installation the measurement was 29 7/8 inches, 1.25 inches higher.
We have towed our trailer a few hundred miles since the installation, and quite a few of those miles have been on both bumpy paved roads where we were going 35 mph or so and on miserably rutted dirt roads where we were going 10 mph or less.
The first thing we noticed is that we were chucking around a lot less in the cab of the truck. So often in the past it seemed like the tail was wagging the dog, so to speak, and the trailer’s bouncing was making the truck bounce too. We have a Demco Glide-Ride fifth wheel pin box, which reduces the fore-and-aft movement of the trailer, but we were still being thrown around in the truck by the motion of the trailer.
But it is the difference inside the trailer that is most remarkable. We have been truly astonished each time we’ve gone inside the trailer to find everything is still intact. The books on the back bookshelf miraculously stay put. I haven’t lost that chapstick or that flashlight since the day the MORryde SRE 4000 was installed. And today, when we drove several miles on one of the rockiest and pot-hole filled dirt roads we’ve been on in ages, I was stunned to see that the placemats were still on the table when we arrived and the LED lights were still happily hanging under the cabinets.
Buddy was also excited that the water in his water dish was all still inside the bowl and hadn’t spilled out all over the sink.
He was also excited when we visited the parts shop at Rucker Trailer Works and scoped out what they had on their shelf: Buddy Wheel Bearing Protectors!!
Buddy didn’t get to supervise, but he found a product he really liked in the Rucker Trailer Works shop!
If you are tired of cleaning up the mess every time you set up camp, look into the MORryde SRE 4000. We were actually a little skeptical about how much this system would improve our ride, and we merely hoped for a little less turmoil in the trailer. But we are absolutely delighted that it truly smoothed out the ride, enough so that things in the bumpiest part of the trailer — the far rear end — now stay in place.
Also, this smoother ride will help our trailer and everything in it last a little longer. With less jiggling and outright bouncing going on, there will be less wear and tear on every component in the trailer from the walls to the windows and cabinets to all the appliances that were never intended to withstand endless jolts and shocks.
In addition, our more delicate belongings, from our camera gear to our laptops and external hard drives, along with everything else we’ve put into the trailer will be much happier and less prone to breakage with our new smooth ride.
For RVers visiting Arizona, Rucker Trailer Works is a great choice (website here). We were back on the road in less than two hours. MORryde also does installations at their facility in Indiana (website here), and we found out they do electric over hydraulic disc brake conversions there as well, so you can get two excellent upgrades done at once!
Buying the MORryde SRE 4000
The MORryde SRE 4000 can be purchased with or without a steel crossmember (“X-Factor Performance Crossmember”) that goes between the two leaf spring hangers to eliminate flex. Our trailer already had a crossmember that was welded onto the frame when our suspension was upgraded, so we got the unit that doesn’t include it. The difference in the part numbers is that the unit with the crossmember has an “X” at the end of the part number.
Also, you must measure the distance between the axles (the wheelbase) to determine whether you need the 33″ or the 35″ version of the product. We needed the 33″ version.
Lastly, the heavy duty shackle wet bolt kit is sold separately.
More of our Latest Posts are in the MENU.
New to this site?
Visit RVers Start Here to find where we keep all the good stuff. Also check out our COOL NEW GEAR STORE!!*** CLICK HERE *** to see it!
We have recently made two upgrades to our RV screen door. Combined with our annual screen door shrink-wrapping project (explained here), that makes for three easy DIY RV screen door modifications we’ve done. Who knew you could do so much to a silly screen door??
RV Screen Door Modifications and Upgrades
INSTALLING A GRAB RAIL ON AN RV SCREEN DOOR
Although we’ve been in and out of our RV door countless thousands of times over the last decade of traveling full-time, we had never installed one of those handy grab handles that crosses the door’s mid-section. Until this week!
Grabbing the screen door when it’s being whipped out of your hands by the wind is nearly impossible without one of these grab bars, and when we saw one of these handles on a friend’s fifth wheel trailer, we just had to have one.
Our screen door is 24″ wide (skinny by today’s standards) but these handles are variable in length. The instructions that came with the handle involved drawing templates and other complicated things, so Mark went with his instincts and got it mounted just fine. Here’s what he did:
First, after holding the handle up to the door at various heights to decide where to mount it, he drilled a hole in the RV screen door frame and then screwed one end of the handle into the door frame.
Drill a hole in the door frame to hold the handle in place.
Screw the handle to the door with just one screw at first.
Then he held the handle in place on the other side of the door frame and put a level on it to ensure it was level. Then he used a fine pointed Sharpie pen to mark the location on the door where the handle would be screwed in.
Position the other end of the handle so it is level and mark the door frame where the hole must be drilled.
The grab handle expands and contracts to fit the width of various RV screen doors, so he adjusted both ends of it to get it to the proper width and also have an equal amount of the aluminum center part extending into the two plastic ends (rather than having it shoved far into one plastic end and barely dangling in the other).
Once he had it positioned correctly, he marked the aluminum center part with a pencil mark at each end where the plastic ends would be permanently screwed in.
Expand the handle and center the aluminum centerpiece between the ends. Then mark the aluminum with a pencil.
The handle can be extended and retracted, so this step centers the aluminum between the ends and marks where the ends should be permanently positioned.
Then he unscrewed the one screw that was holding the handle to the door frame and removed the handle from the frame so he could screw in the two handle ends.
On the back of each plastic end of the handle there is a pre-drilled hole so the plastic ends can be screwed to the aluminum center piece.
On the back of the handle each plastic end has a hole in it.
With the aluminum piece in the proper position according to the pencil marks he had made, he drilled a hole in the aluminum and then screwed the plastic end piece on. He did this at each end. Now the handle was fixed at the proper length to span the width of our door.
Drill the aluminum strip so the end cap can be screwed into it permanently.
Next, he drilled a hole in the door frame where he had made the mark with the fine pointed Sharpie.
Drill the hole in the frame where you put the Sharpie mark.
Then he screwed the handle to the door frame and then repeated the process for the lower hole on each side.
Screw the handle onto the door frame.
There are upper and lower holes in each endcap.
Done!
We’re really happy with this new grab handle. It strengthens the flimsy door a bit and is great to grab onto when opening and closing the door!
.
.
Goodies needed to install a grab handle on an RV screen door:
Of course, Buddy insisted on supervising this project.
The back of this chair says “Supervisor.”
Mark used a straight edge and a utility razor blade to score the plexiglass. Then he bent it along the edge of a table to snap it.
Then he took short strips of industrial strength velcro tape and placed the hooked half on the plexiglass and the matching fuzzy half on the door frame so the hooks wouldn’t grab things as we go in and out of the door when we remove the plexiglass later.
The lower half of the door has a clear plexiglass sheet mounted on the frame with velcro. You can see our patio reflected in it. Hey, where’s the Supervisor?!
Cut short strips of velcro and put the matching halves on the plexiglass and door frame.
The beauty of using velcro to mount the plexiglass on the door frame is that once the warm weather of summer rolls around we can remove it and let the cool breezes flow through the door. Or, perhaps we’ll just leave it up in case Buddy decides to paw at the screen. We can remove the shrink-wrap from the upper half of the door and enjoy the cool breezes up there and leave the plexiglass on the bottom to protect the screen from the mighty Watch Dog.
Ta Da! Our original shrink-wrap is still on the top half, the nifty grab handle is in the middle and the puppy-proof plexiglass is on the bottom half.
In hindsight, rather than shrink-wrapping an RV screen door for cold weather, another option would be to use plexiglass sheets and velcro. Certainly the installation each Fall would be a lot easier. Or, drill holes in the corners of the plexiglass and use sheet metal screws to attach it to the door. Every Spring and Fall the plexiglass could be screwed to or unscrewed from the door frame. However, the plexiglass sheets would have to be stored somewhere during the warm season…
When the project was finished the Supervisor reappeared.
Buddy loves his new plexiglass window in the door!
Goodies needed to install a plexiglass protector on an RV screen door:
More of our Latest Posts are in the MENU.
New to this site?
Visit RVers Start Here to find where we keep all the good stuff. Also check out our COOL NEW GEAR STORE!!*** CLICK HERE *** to see it!


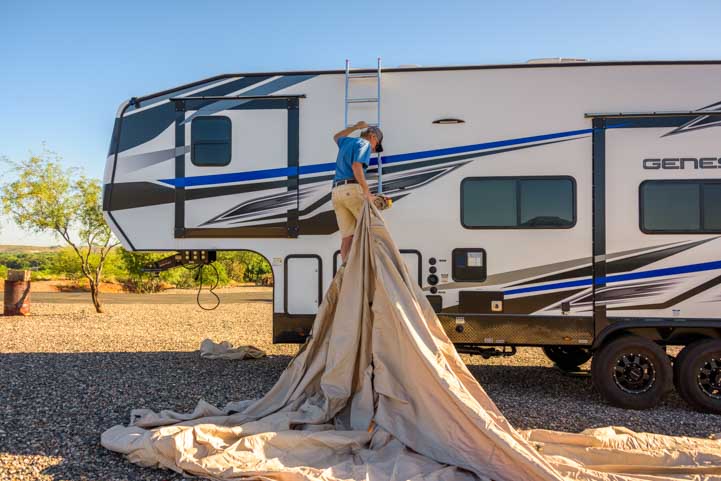
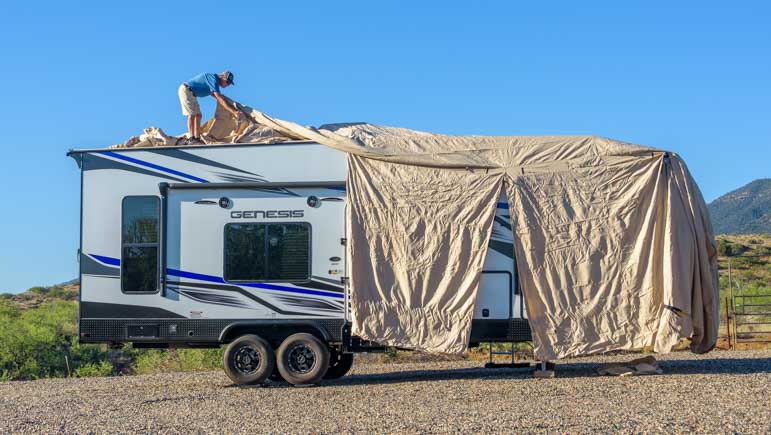
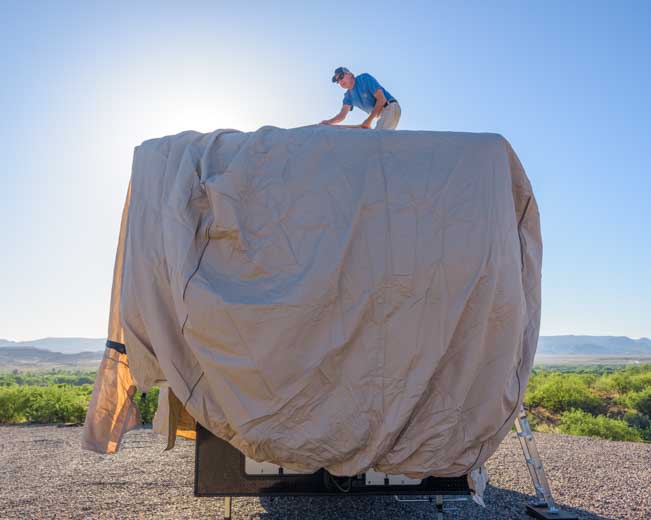
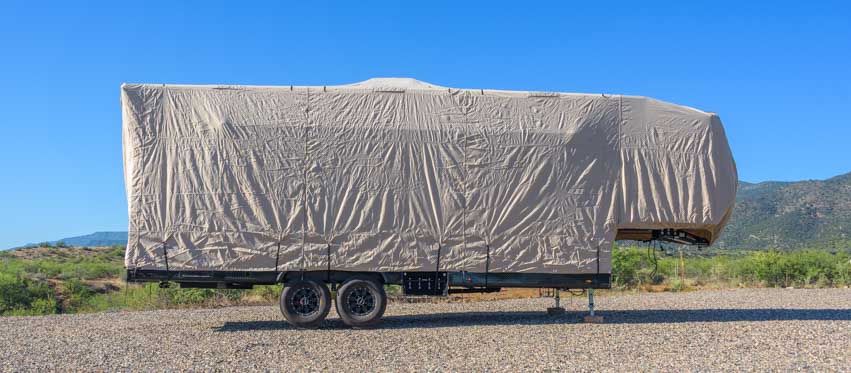


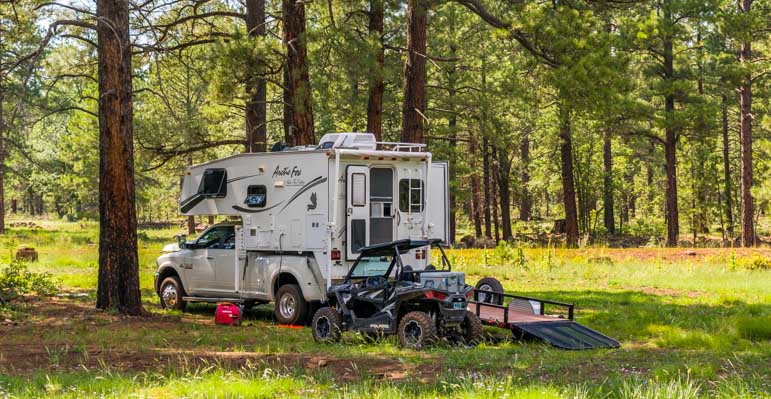


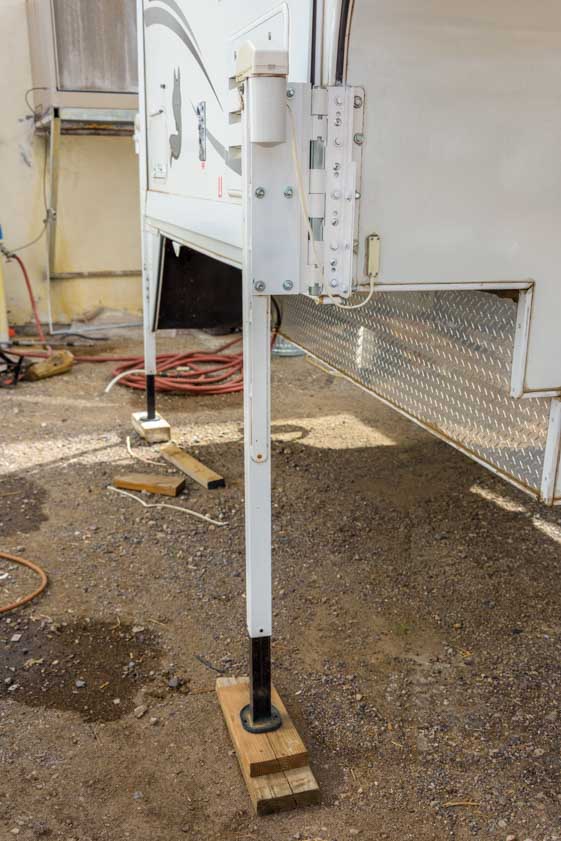
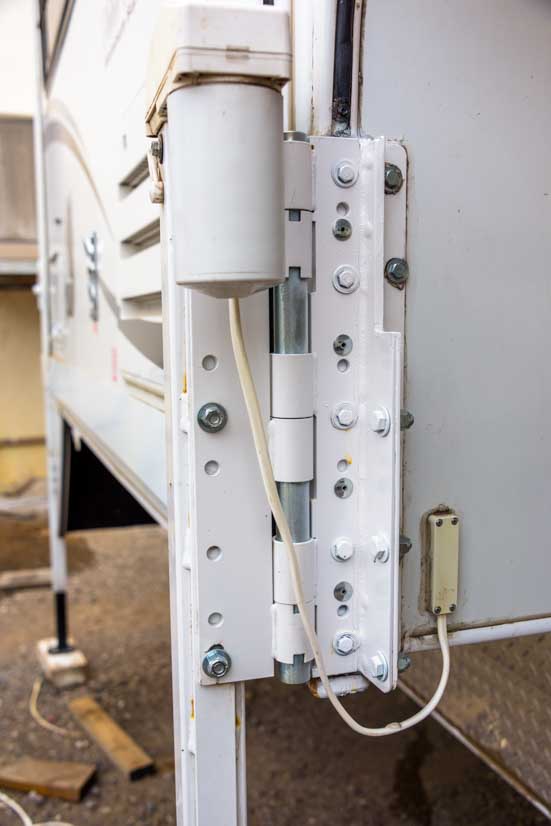
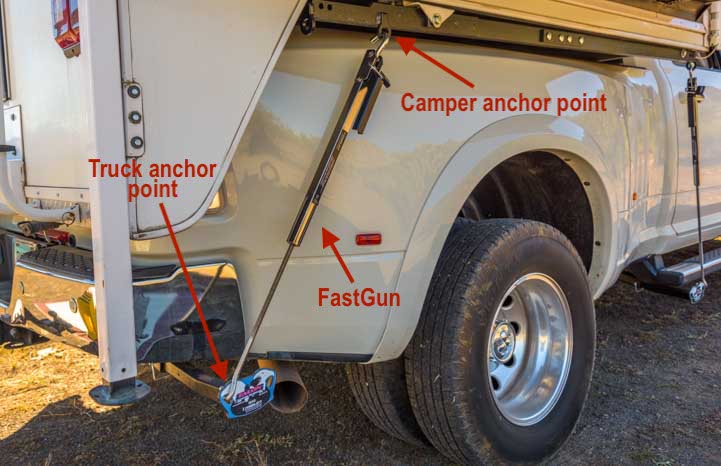


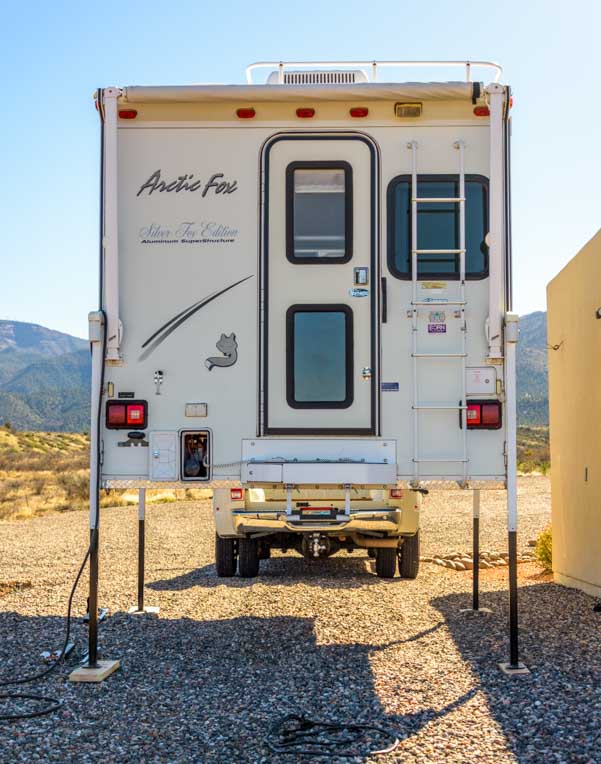


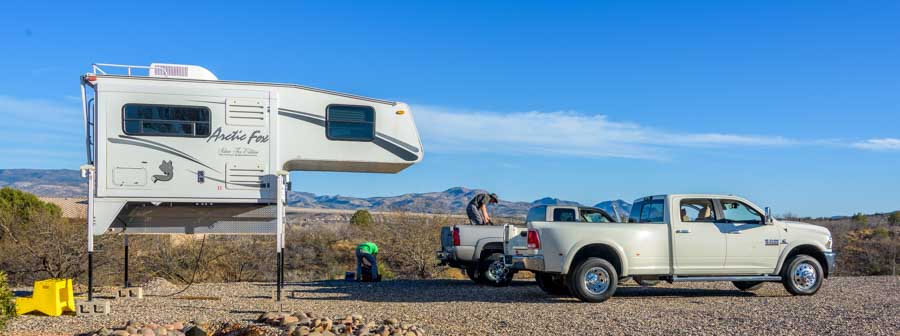
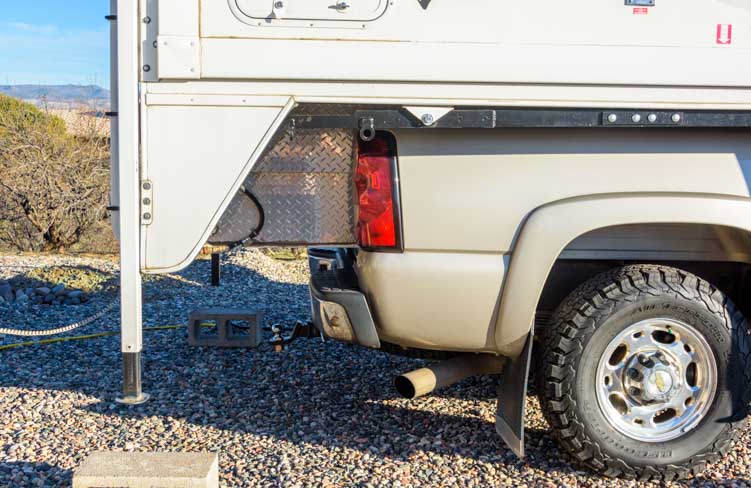


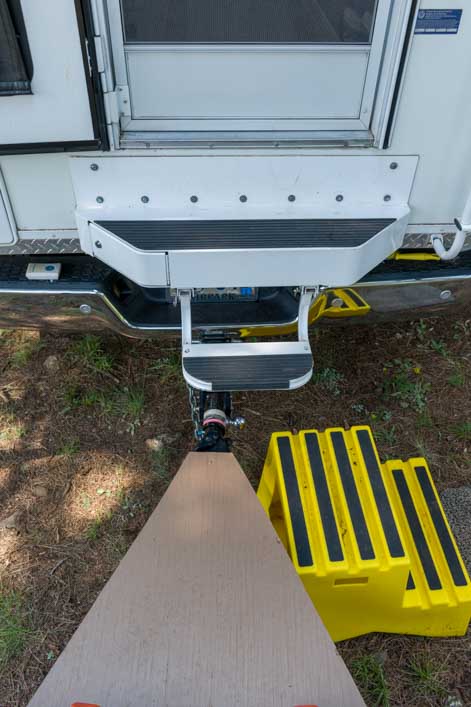
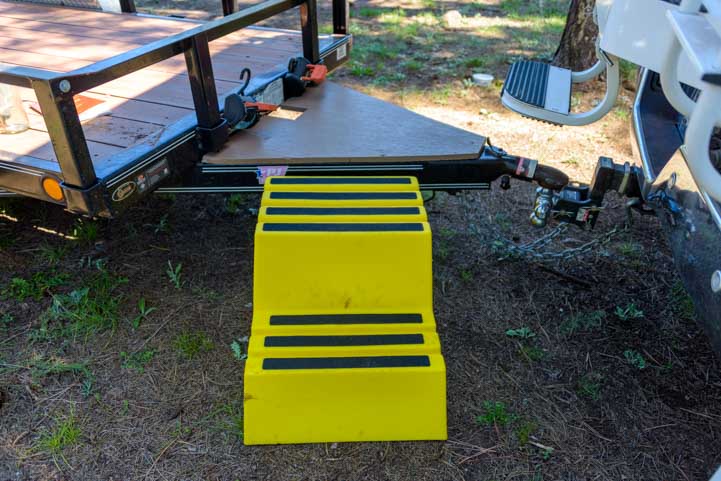


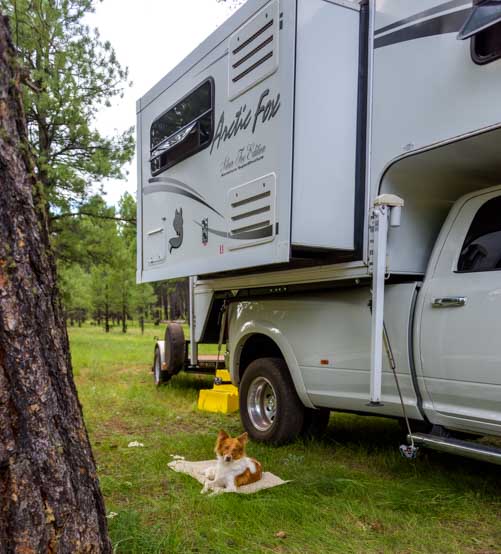

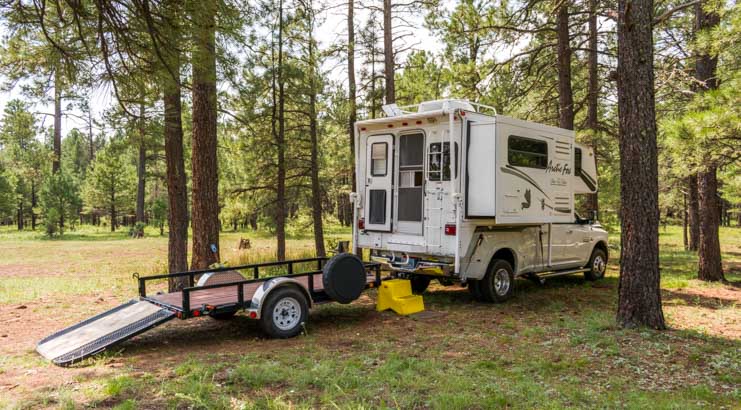


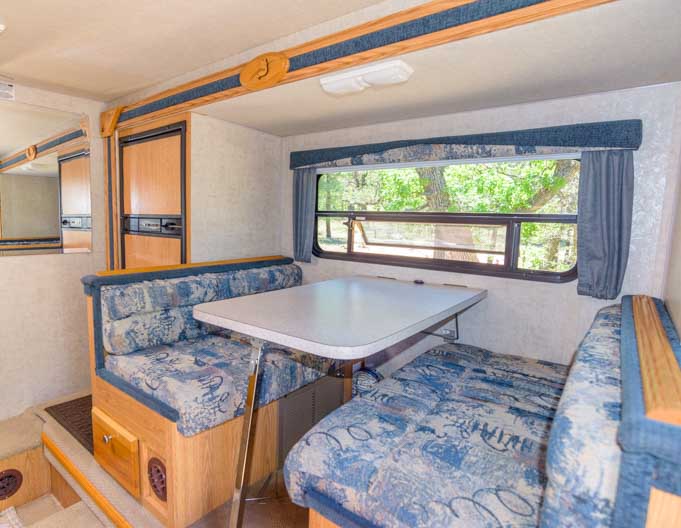
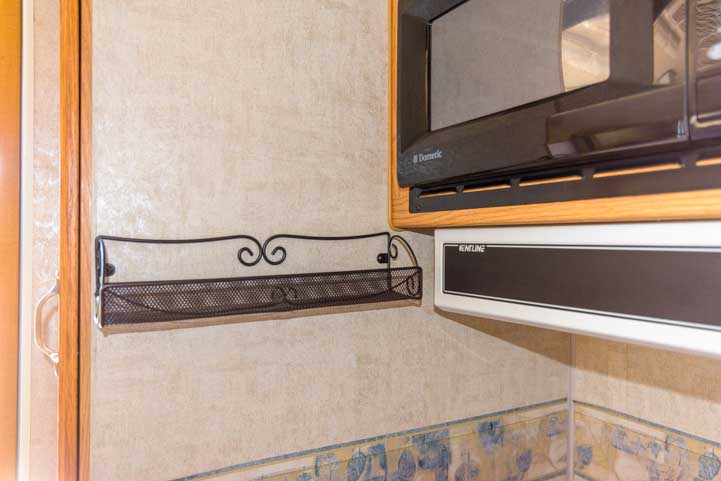


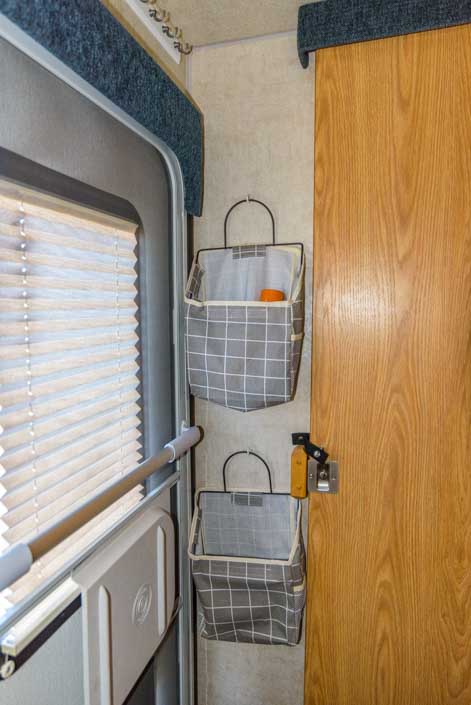

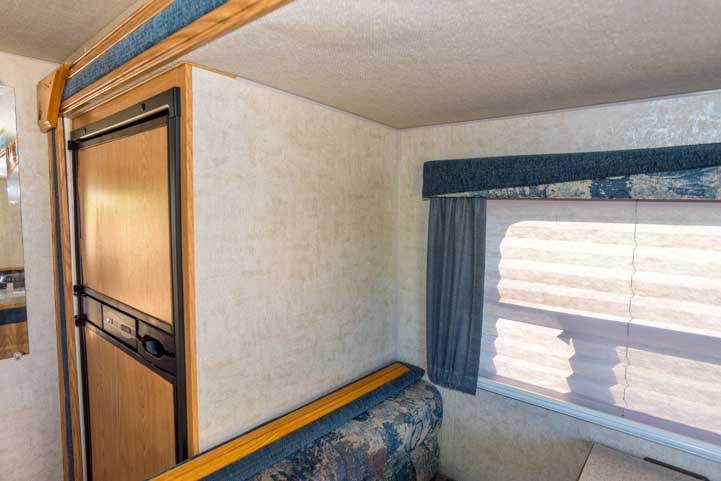

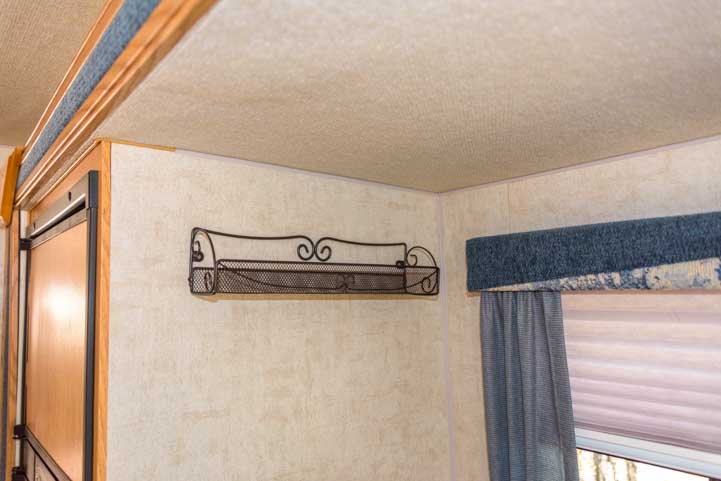


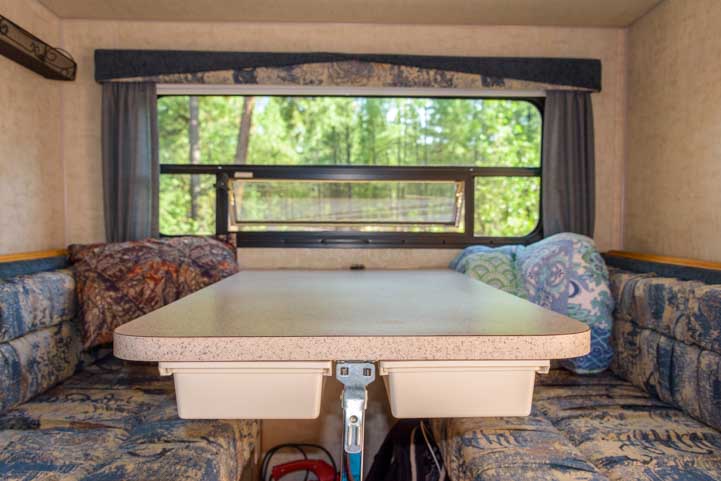


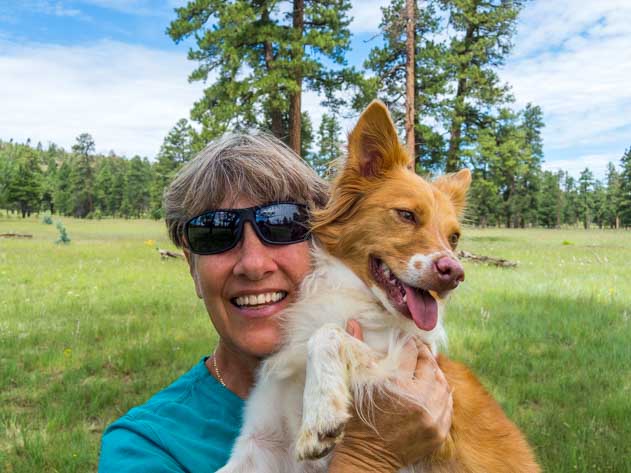


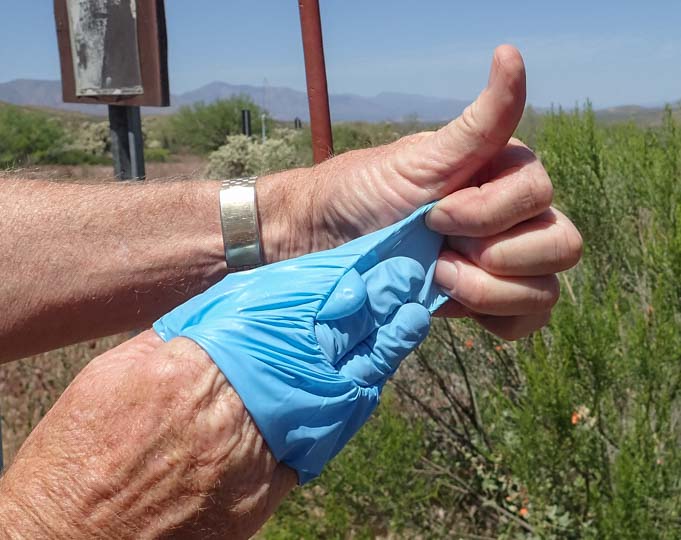


 As responsible RVers, I think it is in all of our best interests if we use chemicals that won’t pollute our ground water supply.