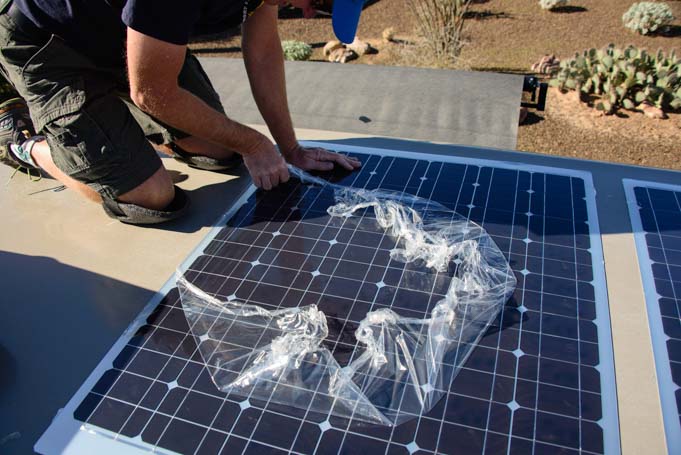
How do you put DEF fluid in a truck without spilling a drop? Here are a few tips for diesel truck owners out there as well as lots of helpful info about Diesel Exhaust Fluid, what it does and where we found it’s cheapest to buy.
Since 2010, diesel pickup truck engines have relied on Selective Catalytic Reduction technology (SCR), which uses Diesel Exhaust Fluid (DEF), to meet the EPA emmissions standards. DEF is a mixture of 1/3 urea and 2/3 de-ionized water, and it is sprayed into the exhaust system of diesel trucks to reduce the nitrous oxide (NOx) emissions into harmless nitrogen and water.
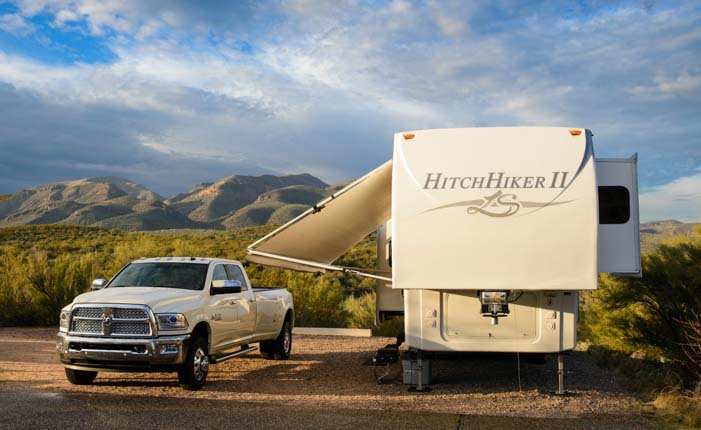
Late model diesel trucks require refilling the DEF tank!
Each manufacturer designs their trucks with a tank to hold the DEF, and you have to replenish it every so often. Our 2016 Dodge Ram 3500 has a 5 gallon DEF tank. The filler hole is under the gas cap next to the diesel filler hole. On some brands of trucks the filler hole is in the engine compartment under the hood.
The Dodge Ram has the DEF filler hole next to the diesel filler hole under the gas cap
We use this handy magnetic gas cap.
As a side note, opening the gas cap on a Ram truck is interesting because there is no screw-on dust cap covering the diesel filler hole inside. There’s just a spring-loaded flap. We find we need to wipe down the whole area after we’ve taken the truck out on four wheel drive roads in dusty places like southeastern Utah.
We use a nifty aftermarket diesel gas cap that uses a magnet to keep it handy during fill-ups. Just stick it on the side of the truck. Very cool! A slightly less expensive one is also available here.
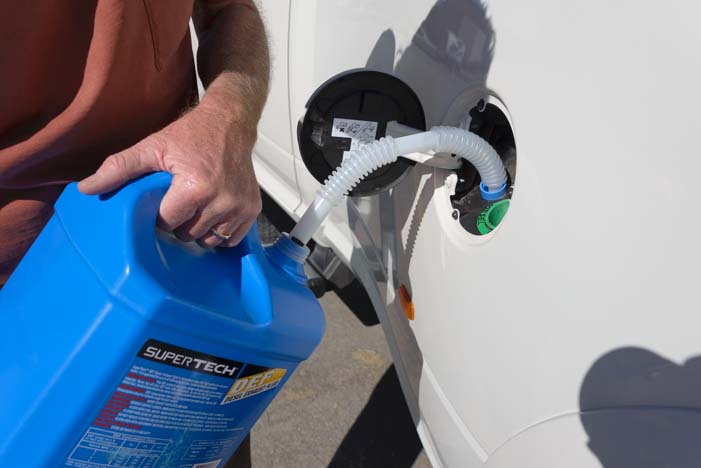
While it would seem trivial to refill the DEF tank, we struggled the first few times with the bulky jugs and awkward spouts, and it dripped here and there and was basically a pain in the neck.
However, the best deal we’ve found is the big blue 2.5 gallon jug of SuperTech DEF sold at Walmart (in-store) for $7.88. The jug is easy to use and it’s drip-free.
SuperTech Diesel Exhaust Fluid (DEF)
SuperTech DEF comes with a flexible pouring spout that is wrapped around the handle. Simply unscrew the jug’s cap and screw the spout on until it’s really tight.
The SuperTech DEF jug comes with a flexible pour spout wrapped around the handle
Screw the flexible pour spout on tightly
Ready to pour.
There is a small black vent hole on the spout, and this little guy is essential to making the whole process go smoothly and cleanly.
The black air vent on the pour spout is the key to doing this chore without dripping or spilling
After putting the flexible spout securely into the filler hole on the truck, give the jug a small squeeze to start the flow of fluid. This will make the vent hole on the jug such air in, which vents the jug and allows the fluid to flow easily.
Once the spout is inserted securely in the filler hole, squeeze the bottle slightly to start the flow.
Make sure all the fluid has been poured into the tank, and then you’re done!
Empty the contents into the DEF tank.
The first time we did this, we didn’t squeeze the jug first, and DEF dribbled out the air vent. But if you get the siphon going properly, by squeezing the jug as you start to pour, it’s a cinch.
Our Ram truck has a dashboard gauge that indicates the fill level of the DEF tank. When it gets down to half full, we put a 2.5 gallon jug of DEF into the tank to fill it back up again. We typically do this every 1,000 miles or so.
DEF has a minimum shelf life of a year. We keep just one 2.5 gallon jug on hand at all times. Since we refill our tank about every four to six weeks, we never remotely approach its shelf life.
Buying DEF in Bulk
Another option for DEF fluid is to get it in bulk at a gas station. This is not common yet, and most gas stations don’t have DEF in bulk. However, Flying J and Pilot truck stops carry it at some of their travel centers (see links at the end for locations).
In our travels, we don’t often fill up at Flying J or Pilot, simply because they tend to be on the interstates and we tend to be on back country roads. So, we haven’t yet seen or been able to take advantage of their bulk DEF at the pump.
However, for RVers that use these travel centers a lot, this is a super way to go. The current bulk Flying J / Pilot DEF price at many of their centers is a little less than the SuperTech bottled price (~$2.79/gallon vs. $3.16/gallon).
Pilot / Flying J offers a discount card for RV travelers that gives a few cents off on fuel and 50% off on RV dump station fees, and special discounts for Good Sam Club members.
Pilot and Flying J have DEF in bulk at the pump AND a discount card for RVers
What are the pros and cons with a truck that uses DEF fluid? An obvious disadvantage is that you’ve got to do this extra little chore every so often.
However, there are benefits too. The fuel mileage is slightly better on SCR equipped engines than on older trucks that used a Diesel Particulate Filter (DPF) to meet the EPA emissions standards (like our 2007 Dodge Ram 3500). Cummins, manufacturer of the engine in the Dodge Ram line of diesel trucks, says the improvement can be up to 5%.
This increase in fuel economy is because the improved conversion of NOx emissions allows the newer engines to be fully optimized. Also, the older engines go into a “Regen” frequently to burn off the particulates in the Diesel Particulate Filter. In a Regen, a higher quantity of fuel than normal is pumped into the engine to make it run hot so the particulates can be burnt off. This wastes fuel and ultimately lowers the truck’s overall fuel mileage.
The newer engines that use SCR technology (and DEF) don’t need to go into a Regen quite as often.
For more info on all of this, there are lots of links below that explain the history and mechanics behind Diesel Exhuast Fluid.
More of our Latest Posts are in the MENU.
New to this site?
Visit RVers Start Here to find where we keep all the good stuff. Also check out our COOL NEW GEAR STORE!!*** CLICK HERE *** to see it!
A few years ago we installed an Edge Evolution diesel tuner in our truck to give it a little more power in the mountains and to increase our fuel economy a bit when not towing. This super easy DIY project turned out to be really worthwhile. We picked up 1-2 miles per gallon in fuel efficiency, and we got some extra horsepower and torque when climbing the Rockies and the Smokies with our trailer in tow.
Escapees Magazine – March/April 2016 IssueArticle: Engine Tuners by Emily & Mark Fagan
The March/April issue of Escapees Magazine features our article about the Edge Evolution Diesel Tuner. We have also written extensively about our Edge Tuner on this website, and you can read our blog post about it here:
Engine tuners (or “programmers”) are electronic components that modify the input parameters for an engine’s on-board computer. An engine tuner makes it possible to operate the truck with settings that are optimized for specific driving conditions.
So, whereas the factory settings on a Dodge Cummins engine in a Ram 3500 truck make the engine run pretty well in all conditions (towing, not towing, highway driving, mountain driving, etc.), an engine tuner will operate the engine with settings that are optimized for just one of these situations at a time.
If you will be towing a heavy trailer in the Rockies, you can program the tuner specifically for that kind of driving. If the truck won’t be towing anything for a while, you can program the tuner to maximize fuel economy.
We have used just two of the modes on our Edge engine tuner, Level 1 (“Economy”) and Level 2 (“Towing”).
In both cases we have seen an improvement in miles per gallon. In the towing mode, we’ve also found the increased power is significant. On the freeway this means it is easier to get up the speed to pass a slower moving vehicle. In the mountains it means the truck can get up steep inclines more easily.
There is a mode on the Edge Tuner that puts the truck into “stock” mode, effectively changing all the engine’s input parameters back to their factory default settings. It is also easy to disconnect the tuner all together. So, installing an Edge engine tuner is a non-destructive upgrade. The tuner is there for you if you want to use it, but you can easily opt not to use it too.
We recently bumped into the Jeep Safari Week in Moab, Utah, and while we were wandering around the booths looking at all the cool gear for Jeeps, we suddenly saw the Edge Products trade show booth. We went over to chat with the team and tell them about our installation. We met Jared Venz, one of their marketing guys. How cool is that?!
Mark found a fellow diesel motorhead buddy in Jared Venz of Edge Products when we bumped into the Edge Products / Superchips team at the Moab Jeep Safari event!
When we got our first Edge tuner, we chose the simplest programmable model, because we weren’t sure if a tuner would be a worthwhile upgrade. This time around we got a more sophisticated model. With all the products laid out on their table in boxes in front of us, Jared helped us understand the overall product line. Here it is in a nutshell:
There are three types of Edge tuners:
Insight – The most basic model that simply displays the engine data that is coming from the engine computer’s outputs. It does not have the ability to change the engine’s parameters or program it in any way .
Evolution – This model can modify the input parameters to the engine’s computer and also displays key data like the Transmission Fluid Temperature and Engine Coolant Temperature. It also indicates when the truck has gone into a “Regen” to burn off the particulates that have built up in the engine’s particulate trap (part of the “Blue Tech” 2010 EPA requirements for diesel engines).
Knowing the truck is in a Regen is especially useful, because the coolant and fluid temperatures increase, and there is a slight loss of power, but there is no indicator on the truck dashboard to show when one is happening. We found it very helpful with our old Edge Tuner to know exactly when a Regen was going on.
The Edge Evolution tuner uses the truck engine’s input port to modify the engine’s input parameters. So, the installation is very easy. A single cable plugs into that input port (the OBD II port on Dodge Ram trucks). However, in order to change from one programming mode to another (for instance, from Level 1 (Economy) to Level 2 (Towing), the truck must be parked and you have to go through a series of steps that take a good 5 to 10 minutes.
Juice with Attitude – This top of the line model has an additional computer module (the “juice”) that makes it possible not only to adjust the input parameters on the truck’s on-board engine computer, but also allows you to change modes on the fly. So, rather than having to stop and reprogram the tuner to change from Level 1 to Level 2, you can hit a button and make the switch instantly. For instance, if you are towing and want to unhitch to go drive somewhere without the trailer, you can change modes simply by pressing a button.
However, the installation is more complex, because the “juice” computer that is part of the tuner must be wired into the truck engine’s on-board computer via two wiring harnesses.
There are also two display options for each Edge tuner model:
The smaller and more simplistic display has a monitor screen that is 2.4 inches wide. The Edge tuner models that use this smaller screen have “CS2” in the model name.
The larger, more sophisticated and detailed display has a monitor screen that is 4.3 inches wide. The Edge tuner models that use this bigger screen have “CTS2” in the model name.
The final two digits in the model number distinguish between the various truck makes, models and years.
The Juice with Attitude model is available only in the large monitor screen size.
The basic model breakdown is:
Insight (Data Display Only – no engine programming capability): Insight CTS2 (large screen) vs. Insight CS2 (small screen)
Juice with Attitude (engine programming with mode switching on the fly and more complex installation): Juice with Attitude (large screen only)
Because each diesel truck manufacturer uses a different engine (Dodge has Cummins, GM products have Duramax and Ford has Ford built engines), the tuners come in different models for each truck engine. There is some variation between truck model years as well.
We’ve chosen the Edge Juice with Attitude engine tuner for our 2016 Ram 3500.
Our article, “What Puts You in the Driver’s Seat? Engine Tuners!” is the latest feature article of many that we have contributed to the Escapees RV Club member magazine since 2008. Escapees is a very varied RV and travel club that touches on all the possible concerns and interests that full-time and seasonal RVers have.
Back when the club was first started in 1978, there were no RV clubs that catered specifically to the needs of full-time and extended-travel RVers. Escapees began as a simple bi-monthly newsletter to bring full-time RVers together and to give them a place to share ideas and pass on information.
Today, the bi-monthly Escapees Magazine is one of the most informative and fun to read magazines in the RV industry.
Escapees Magazine covers on display in the mail sorting facility at Escapees HQ in Livingston, Texas
We became Escapees members a few months after we started full-time RVing, and we feel that anyone interested in using their RV for extended periods of time should consider becoming a member too. Besides receiving the wonderful magazine for free, members receive discounts of up to 50% at participating RV parks.
In addition, Escapees RV Club offers a wide range of overnight parking options at its own various RV parks, from overnight accommodations to seasonal stays to long term leases to ownership, and they offer a list of boondocking locations via the Days End Directory subscription.
Escapees also hosts a very informative online forum, RVnetwork.com. The participants in this forum are often very experienced RVers, and although non-members can read the forum, only Escapees members can join in the conversation or ask questions. For new RVers, Escapees hosts Boot Camp events where folks learn All Things RV, and each year Escapees puts on a huge rally called Escapade where members from every corner of the country come to share experiences, socialize and learn from each other. Younger Escapees also gather at Xscaper Convergences.
This coming summer, from July 24-29, there will be an Escapade Rally and Xscapers Convergence in Essex Junction, Vermont. Just before that, from July 21-23, there will be an Escapees Boot Camp for New RVers.
To learn more about Escapees and perhaps join the club (we highly recommend it), you can click here:
More of our Latest Posts are in the MENU.
New to this site?
Visit RVers Start Here to find where we keep all the good stuff. Also check out our COOL NEW GEAR STORE!!*** CLICK HERE *** to see it!
Defrosting an RV refrigerator is a surprisingly easy job. We’ve been living with a propane RV refrigerator for many years now, and they always need defrosting after a few weeks or months. Being meticulous about not leaving the refrigerator door open unnecessarily can help, but when you find yourself living in a hot and humid environment or if you have the refrigerator side of your trailer or motorhome facing the blazing hot summer sun all afternoon, the frost is going to build up over time.
Over the years, we’ve tried several different techniques for defrosting our RV fridge, and in the old days this was a big job that, with some methods, could take well over an hour. We now have it down to a super fast method that makes this pesky job a cinch. The last time we did it, I made a note of the time on the clock as we went through each step. From start to finish, it took 20 minutes.
The first step is to turn off the refrigerator and empty the contents of the freezer into cooler bags or a cooler of some kind. Since these things will be out of the freezer for just 20 minutes, they won’t defrost and the ice cream won’t melt. If your RV is hot inside, covering the cooler bags with blankets for extra insulation can help.
9:17 a.m. – Turn off fridge and unload freezer into cooler bags
We used to unload the whole refrigerator and empty it out completely, but that isn’t necessary and it takes a lot of time. An awful lot of what is in the refrigerator can handle warming up slightly as you keep the refrigerator door open to defrost it.
Instead, just unload the most temperature sensitive items — milk, yogurt, lunch meats, mayonaise, etc., into an insulated cooler bag or a cooler. Most of the fruits, veggies, bread, cheese, condiments, etc., can remain right where they are in the fridge for the 20 minutes it takes to defrost it.
Set the cooler bags aside. Covering them with blankets will keep everything even cooler.
Next, put a super absorbant chamois towel in the bottom of the freezer compartment to absorb the water from the melting ice, and use a hair dryer to thaw the walls of the freezer.
9:22 a.m. – Use a hair dryer to thaw out the freezer.
We put it on the high setting and keep a distance of about 8″ between the hair dryer and the walls of the freezer. A higher wattage hair dryer may need to be put on the low heat setting. Hold your hand about 8″ from the hair dryer and see how hot it feels.
Be sure you keep the hair dryer from heating up the plastic walls or they will crack from being cold and then getting hot. Keep the hair dryer moving and test the temp of the plastic walls with your hands.
After thawing the walls of the freezer a little, move down to the cooling fins in the refrigerator compartment. Keep the hair dryer in constant motion, sweeping it back and forth from side to side.
Slowly wave the hair dryer in front of the cooling fins.
Alternate working on the freezer compartment and the refrigerator compartment.
Alternate between the cooling fins in the refrigerator compartment and the freezer compartment.
At the beginning, when the cooling fins are caked in ice, the hair dryer can be closer to them.
Little ice sheets will begin to fall off the refrigerator cooling fins into the drip tray underneath. As the thawing process continues, increase the distance between the hair dryer and the cooling fins.
As ice drops and the cooling fins thaw, move the hair dryer back a little.
Don’t chisel the ice off the fins or the freezer walls with a tool. If you pierce the metal base behind the cooling fins or the walls of the freezer, the refrigerant (ammonia) will leak out. We don’t use any chiseling device. We simply assist the thawing process with the hair dryer.
Check beneath the cooling fins and you’ll see the bits of ice dropping into the drip tray.
Check below the cooling fins where the ice drops off in chunks.
If you go outside, on the back of the RV you’ll see water seeping out of the refrigerator vent.
Outside the rig, water will be seeping from the refrigerator vent.
A little trickle of water flows down.
Once all the ice has fallen off the cooling fins, pull out the drip tray and dump the ice in the sink.
9:34 a.m. – Once all the ice has dropped off the cooling fins, empty the tray of ice into the sink.
Up in the freezer compartment, the chamois towel is now fairly wet with water that has dripped down off the walls. Wring it out and use it to wipe down the freezer and the fridge.
9:35 a.m. – The chamois towel in the freezer is pretty wet. Use it to wipe down the fridge and freezer.
Load the food from the cooler bags back into the refrigerator and freezer compartments, and you’re done! Put the fridge at max temp for a few hours to help it cool back down, and then set it to the temperature setting you normally use.
9:37 a.m. – After loading the food back in the refrigerator, turn it back on. Done!
Other RV Refrigerator Tips
The key to having an RV refrigerator work optimally is having the air circulate inside well. Overstuffing the fridge with food makes this difficult for it. We have used a little RV refrigerator airator fan that’s designed to keep the air flowing. We’ve had mixed results with this, and when it died we didn’t replace it. I think this would work well if there were space between all the food, but our fridge is usually packed (the turf wars between the beer and the veggies can be brutal…sometimes we can hear them battling it out in there!).
As a maintenance item, we keep the door seals clean, wiping them down periodically.
We use simple refrigerator thermometers to monitor the temperatures in the fridge and freezer. It has a built in hook, and we hang it from one of the rungs in the top shelf in the refrigerator. The one in the freezer rests against one wall.
We were surprised to learn that RV refrigerators have an expected lifespan of about 8 to 10 years. A classic sign of impending failure is the appearance of yellow dust in the refrigerator vent area behind the fridge (go outside and take the vent cover off and look around with a flashlight). Click the following link to read the funny story of our RV refrigerator replacement and see how an RV fridge replacement is done.
Because of the shorter lifespan, higher price, and use of propane in RV refrigerators, many (most) “full-time” level fifth wheels and motorhomes are now being built with residential refrigerators that run on AC power only (a dedicated inverter is installed so it can run from the batteries while in transit). For folks that have plans to dry camp and boondock a lot in their RV life, a residential refrigerator will require a much bigger battery bank and solar panel array than would otherwise be needed. We discuss that in more detail at this link in our introductory solar power article.
If our hair dryer method of defrosting an RV fridge seems unorthodox to you, believe me, we have tried many other methods. We tried opening the fridge and freezer doors and letting the fridge thaw out on its own. We tried doing that and “helping it along” by chiseling the ice off with a small plastic scraper. We tried putting a bowl of hot water in the fridge to help it warm up.
All of these methods were adequate, but they were time consuming. We’ve been using our current method with the mini travel hair dryer for a few years now and really, really like it.
More of our Latest Posts are in the MENU.
New to this site?
Visit RVers Start Here to find where we keep all the good stuff. Also check out our COOL NEW GEAR STORE!!*** CLICK HERE *** to see it!
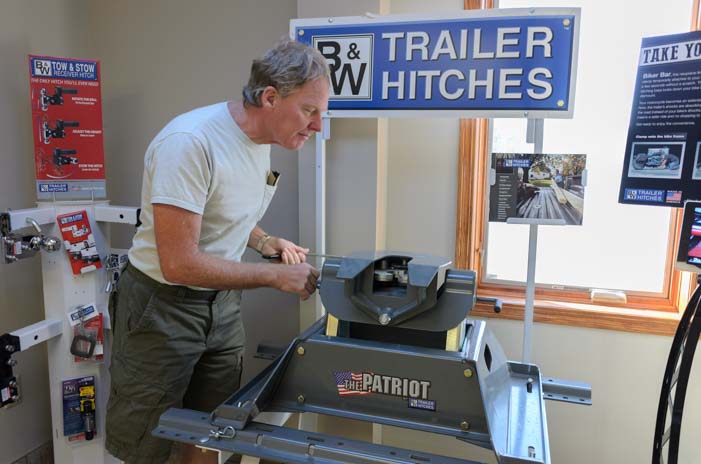
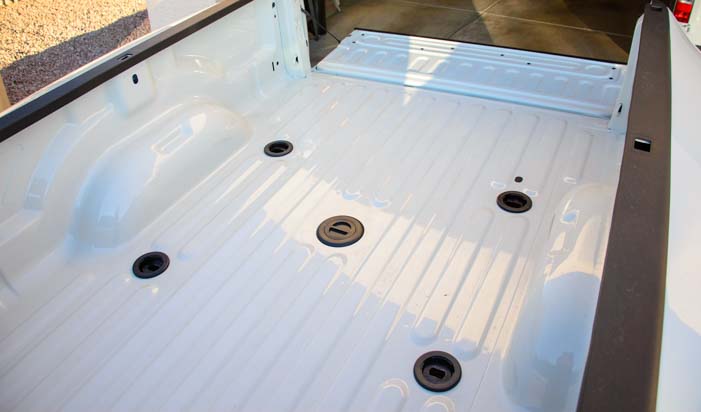
The B&W Companion OEM fifth wheel hitch uses the new and very clever puck hitch mounting system that can be ordered with Ram and Ford trucks in their fifth wheel and gooseneck towing prep packages. This truck option has five “pucks” installed in the bed of the truck: four in the corners to mount a fifth wheel hitch and one in the center for a gooseneck.
The new style fifth wheel hitches that are designed for these puck systems stand on four legs that each have a quarter turn locking mechanism at the foot to secure them into the four pucks in the bed of the truck. This allows the hitch to be installed or removed from the bed of the truck easily. When the hitch is removed, the truck bed floor is totally flat and free of obstacles, because there are no hitch rails to get in the way. Ford, GM and Ram have different puck layouts in the beds of their trucks.
When we were going through the process of buying a new Ram 3500 dually truck, we knew we wanted the best of breed fifth wheel hitch that incorporated this new design for our full-time RV lifestyle. After a factory tour of the B&W Trailer Hitches plant in Humboldt, Kansas, we were sold. You can navigate this page using the following links.:
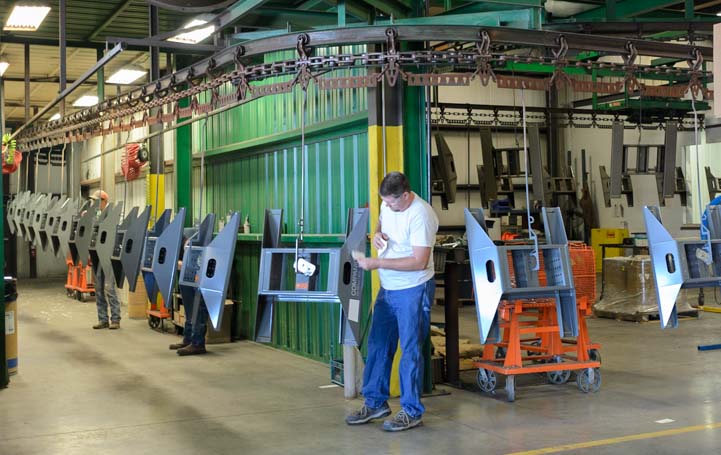
B&W hitches have long had a stellar reputation in the RV industry, and when our 36′ Hitchhiker fifth wheel trailer was getting a slew of big repairs done at the NuWa factory service center in Chanute, Kansas, (thank goodness for our RV warranty), we discovered B&W Trailer Hitches was just a ways down the road. So we took a factory tour of the plant.
All of the hitches manufactured by B&W Trailer Hitches are on display at the manufacturing plant.
What struck us more than anything is that B&W Trailer Hitches is a company that cares. They not only turn out a superior product, but they take take care of their employees.
When the RV manufacturing industry went into a steep nose dive in the years following the financial debacle of 2008, many of the employees that had worked at NuWa industries building fifth wheel trailers eventually found employment over at B&W Trailer Hitches as NuWa’s need for workers shrank. And when B&W didn’t have enough work for everyone to do, the company paid their employees to do city maintenance work in their hometown of Humboldt, Kansas.
How cool is that. And how RARE is that?!
Mark checks out one of the hitches on display at B&W.
We got a taste of just how deeply these community values run when we saw the Biblesta celebration and parade during our visit to Humboldt, Kansas. In an age of political correctness when many people are afraid to express their beliefs publicly, this is a town that has been openly celebrating Christianity in an annual festival for the past 52 years. All the churches in the area — as well as B&W Hitches — have a float in this extraordinary parade. Read our blog post about it here: America’s Heartland – Is It In Humboldt Kansas?
B&W Trailer Hitches sponsored a float in the Biblesta parade in their hometown of Humboldt, Kansas
.
Founded in 1987 by Joe Walker and Roger Baker as B&W Custom Truck Beds, the company long ago became B&W Trailer Hitches. They still build custom truck beds, but the company has grown and now manufactures many other products.
In 1991, B&W invented the clever turnover ball for gooseneck hitches, and that put them in the forefront of the towing industry. For trucks that have a gooseneck socket in the bed of the truck, the turnover ball gets inserted this socket and a fifth wheel hitch can be installed that latches onto the ball and also onto rails that are installed under the bed of the truck. When the fifth wheel hitch is removed, the turnover ball can be turned over to make the bed of the truck completely flat since the rails for the hitch are under the bed.
This makes the entire bed of the truck available for hauling when the fifth wheel hitch isn’t installed, and it also allows the truck to be set up for either gooseneck or fifth wheel towing really easily. This is handy out in ranch country where one truck might tow a variety of trailers, and also be used to haul big loads.
B&W hitches on the assembly line in Humboldt, Kansas.
The new puck style hitch mount offered by the truck manufacturers is a similar concept. Rather than just one connection point between the 5th wheel hitch and the truck bed in the center, there are four points of contact in the four corners. The four puck system also allows for an even heavier duty weight rating on the biggest fifth wheel hitches, so larger fifth wheel trailers can be towed.
B&W Trailer Hitches is into quality, and one of the things that sets their hitches apart is that they are made from American steel. Since we have dealt with axle and leaf spring problems on our trailer several times over the last year, we have come to realize just what a huge difference there is between Chinese made steel and American steel. When it comes to something that puts your life on the line because it is carrying heavy loads, American made steel is the only way to go.
Stacks of B&W fifth wheel hitch bases (these are not the new puck style base)
Another hallmark of quality in B&W hitches is that the nuts holding the hitch base to the truck are castle nuts. This means you can lock them with a sheer pin so they don’t back out.
Also, just about everything at B&W Trailer Hitches is done in-house. That way, they can retool the assembly line easily, as needed, for instance, if they improve the design or the puck layout is changed by the truck manufacturers.
Stacks of fifth wheel hitch couplers (the top part of the hitch).
Lots of metal shavings are generated in the production of hitches on the B&W assembly lines. We were impressed that B&W recycles all the metal shavings at Missouri Metals. Very green!
B&W recycles all the metal shavings from their production lines
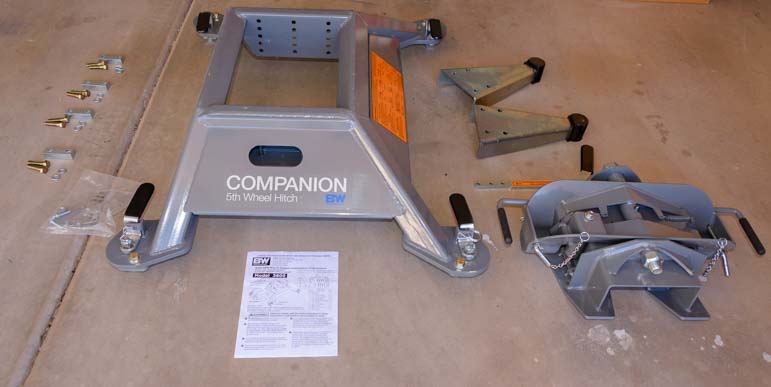
We chose the 25,000 lb. B&W Companion OEM fifth wheel hitch. This is way overkill for our 14,100 lb. trailer, but our goal in our whole truck-and-hitch upgrade was to be able to tow our fifth wheel effortlessly. It also gives us options down the road in case a day comes when we want to replace our trailer with something bigger or beefier.
The whole installation of the B&W Companion OEM 5th wheel hitch could easily be done right in the bed of the truck, but we we got the hitch before we got our truck! So, we did it in two stages. First we assembled the hitch in a friend’s garage. This took 40 minutes. Then, once we got our new truck, we installed the hitch in the bed of the truck. This second stage took 20 minutes because we needed to fine tune the mating of the four pucks and the four legs. In the future, lifting the hitch in and out of the truck bed will take just a few minutes.
So, it’s about a one hour DIY job to install a B&W Companion 5th wheel hitch right out of the box. That’s a huge improvement over paying the fifth wheel dealership to do a two hour installation like we did when we installed our first fifth wheel hitch in our first truck!
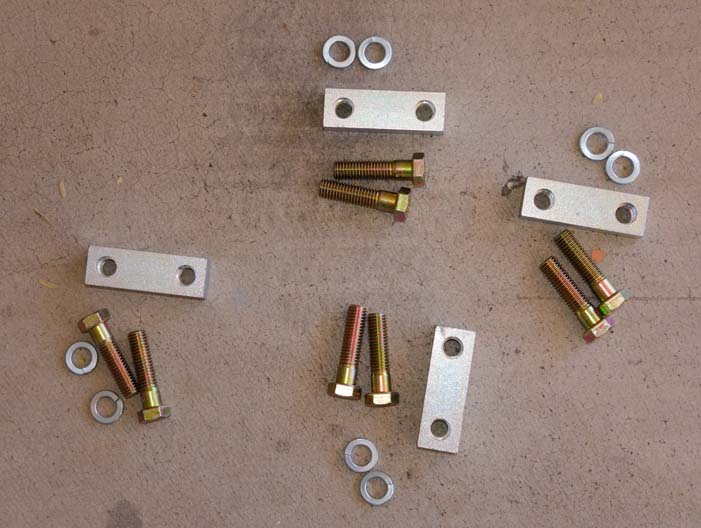
There is a base and a head (or coupler) and assorted parts. We laid them all out to get a look at them.
We lay out all the parts and the instructions.
There is a one page installation instruction sheet that comes with the kit (also available online here). There’s also a sticker on the hitch base with instructions for mounting the hitch’s two parts into the truck bed.
The orange sticker on the hitch base has instructions for mounting the hitch in the truck bed. The sticker faces the truck cab.
The first step is to install the big triangular pivot arms that support the hitch coupler (the top part of the hitch). The orientation of these triangular pieces depends on the placement of the hitch over the axles, which varies by truck model. In the case of the Ram 3500 dually long bed, they are oriented so the shallower slope goes towards the cab of the truck.
The hitch has a big orange sticker on the side that faces the cab, so the shallow slope of the pivot arms faces that sticker.
The shallow sloping side of the pivot arm faces the truck cab in our installation. The pivot arm orientation varies with the type of truck bed.
There are four pairs of lock washer and bolts, two for each pivot arm. There are five possible holes, so you can set the height of the pivot arm higher or lower, which will change the gap spacing between the overhang of the fifth wheel trailer and the sides of the truck bed. We chose the middle setting for starters.
The pivot arms are attached using these parts.
The bolts and lock washers screw into the threaded block an the back side of the pivot arms.
Use a socket and ratchet to tighten the bolts.
The bolts screw into a threaded block plate on the back side.
Mark bolts the pivot arm to the threaded block plate
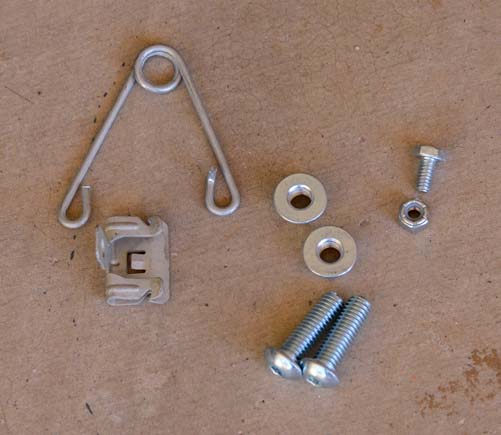
The next step is to install the wire torsion spring on the flange on the driver’s side pivot arm that is closest to the truck cab.
The wire torsion spring is next.
The mounting clip (below the spring in the photo above) is attached to the spring. Then the spring is installed so there is 1/2″ of clearance between the top of the spring and the bottom of the rubber bumper on the pivot arm. A few taps with a small hammer secured the clip onto the flange.
Tap the spring into place with a small hammer
The spring must be 1/2″ from the bottom of the rubber bumper on the pivot arm.
Now the pivot arms are fully installed on the hitch base.
The two pivot arms are in place (photo is prior to mounting the torsion spring).
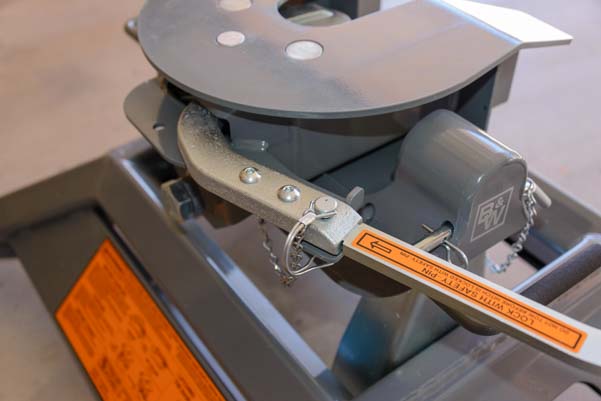
The next step was to put the hitch head — the coupler — onto the hitch base and install its handle and three safety pins.
The coupler (top of the hitch), seen upside down here, is next.
We lubricated the rubber bumpers on the tops of the pivot arms with CRC Lithium Grease.
Spray some grease onto the rubber bumpers
Then, holding the coupler by the two saddle handles on either side, Mark placed the coupler onto the hitch base. When you set the coupler down on the base, press down on the handles to secure it.
Set the coupler on the base and press down on the handles to secure it
The coupler rests on the hitch base. Saddle locking pins under the two saddle handles prevent it from lifting up. A “hairpin” holds the saddle locking pin in place.
A saddle locking pin prevents the coupler from lifting off the base. It’s held in place with a hairpin (cotter pin) that is under Mark’s fingers in this photo.
Next, the coupler cam handle gets installed onto the coupler.
Install the coupler cam handle onto the coupler
The handle is secured to the coupler with two button head cap screws (tightened with a 7/32″ allen wrench), and it is held closed (or open) with the coupler’s cam handle safety pin.
Two button head cap screws and a the cam handle safety pin do the trick.
As mentioned above, all of these assembly and installation steps could have been done in the truck bed, but we did not have our truck yet, and we were excited to get started and work on the hitch in the meantime.
The gooseneck / fifth wheel hitch tow prep package puck system in our Ram 3500 dually truck was ready for the hitch installation.
The gooseneck / fifth wheel tow prep package has five pucks in the bed of the truck. Fifth wheel hitches use the outer four pucks.
Mark and his buddy lifted the hitch base into the truck bed. Back in our article about our truck, a reader noted that he hoists his fifth wheel hitch in and out of his truck bed using a hydraulic lift table. If you are going to be moving the fifth wheel hitch in and out of your truck bed a lot, and you have the garage space, and you don’t have a strong, strapping friend at your beck and call to help you, this seems like a super idea.
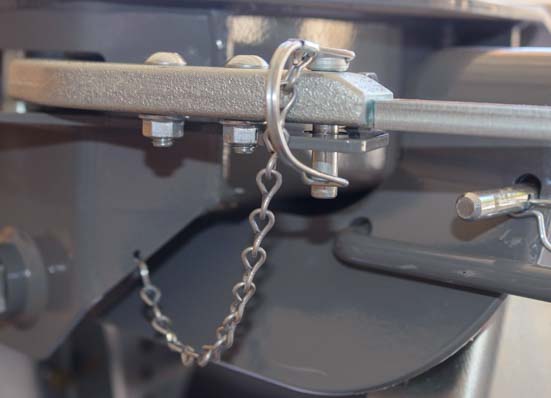
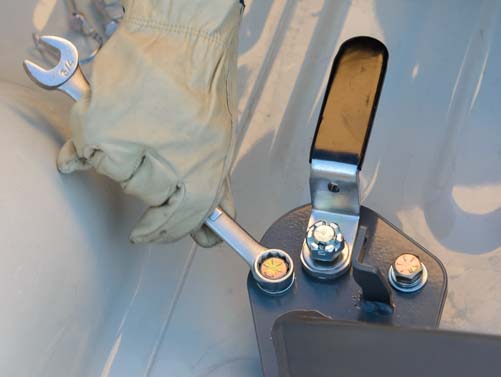
Each foot of the base required a little adjustment to fit properly into the truck’s pucks. This was done by loosening and tightening the cap screws on the pilot assemblies on each foot.
Each puck requires some small adjustments the first time.
Then the tension in the latch handle was set by adjusting the height of the castle nut. We used needle nose pliers to remove the cotter pin and then reinstall it and bend the end once the castle nut height adjustment was set.
A sheer pin prevents the castle nut from backing out.
It took a little pushing and shoving to get everything in place, but these are one-time adjustments. The latch handles could now be opened and closed easily.
Hitch latch handle in the open position.
Hitch latch handle in the closed position.
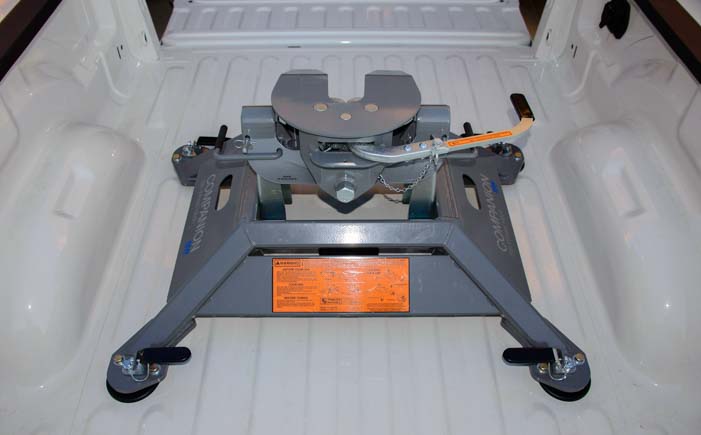
The B&W Companion hitch base was now installed in the bed of the truck.
The base is installed and all four latch handles have been adjusted to open and close easily.
Next, the hitch head (the “coupler”) was set on the hitch base. The two saddle handles were pushed down and the saddle lock pin was put in place.
The B&W Companion OEM 5th wheel hitch is completely installed! This view (above photo) is looking towards the tailgate.
This view is looking towards the truck cab.
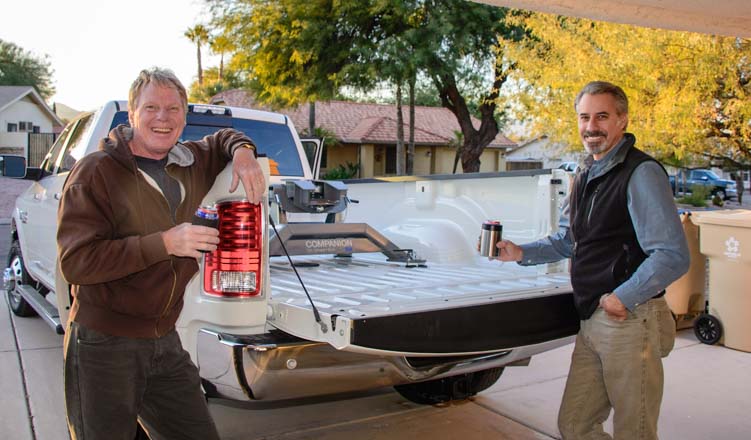
Great job, guys. Thanks!!
Hey, can I have a beer too?
Celebrations behind us, the next day we hitched the new truck up to our fifth wheel trailer and took our home on a joy ride up and down some nice long 7% grades nearby. What a combo!!!
Prior to hitching the truck to the trailer the first time, we cleaned the hitch plate on the trailer and lubed both that and the coupler plate on the B&W hitch with CRC silicone spray.
We ended up adjusting the pivot arms down one notch, and that seems right for our particular truck and trailer.
We adjusted the height of the pivot pins by one notch to get the distance between the sides of the truck and the fifth wheel overhang right.
After ten thousand miles of towing with the B&E Companion OEM hitch, we are happy to report that we have been very happy with this hitch. In early 2017 we heard of a case where this hitch performed extraordinarily well in a fifth wheel rollover accident. You can read about it here:
The following info is FYI for those whose truck does not have a Puck System in the bed.
The Gooseneck Turnover Ball hitch is one option which allows you to have a totally flat truck bed when the hitch is removed. The other option is to go with the traditional rail mounted Patriot fifth wheel hitch.
B&W Gooseneck Turnover Ball Hitches:
Unlike the Puck System hitches, the Gooseneck Turnover Ball hitches require installing the Gooseneck Turnover Ball in the bed of the truck with rails mounted underneath. So, each truck bed in each model year has a different kit. The B&W Companion Hitch that mounts onto the Gooseneck Turnover Ball in the bed of the truck comes in two flavors: long bed and short bed (slider hitch).
Gooseneck Turnover Ball Companion Hitches (these are the “couplers” or actual hitches):
More of our Latest Posts are in the MENU.
New to this site?
Visit RVers Start Here to find where we keep all the good stuff. Also check out our COOL NEW GEAR STORE!!*** CLICK HERE *** to see it!
Choosing a truck to pull a trailer is a critical decision for RVers, because getting there, and particularly getting there safely, is the first and most important part of enjoying the RV lifestyle! Towing specs and towing guidelines always give the outer limits of what a truck can safely tow. Too often, in towing situations, the trailer is a little too big for the truck, or the truck is a little too small for the trailer, pushing the truck right to its outer safety limits or beyond.
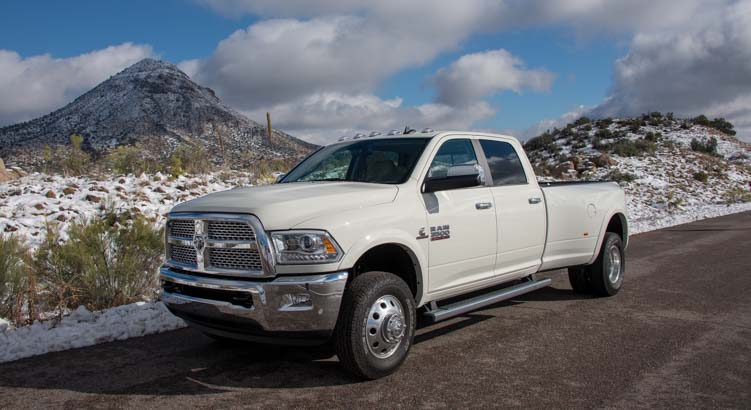
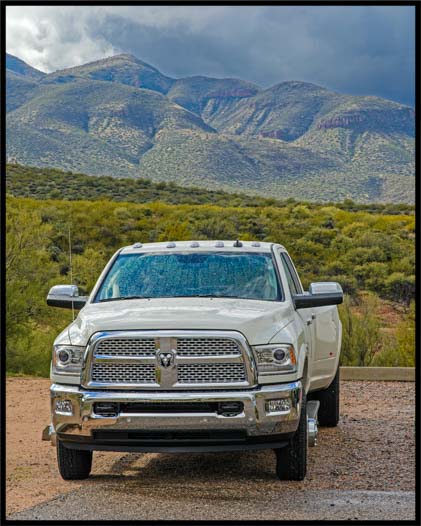
The 2016 Ram 3500 Dually is an awesomely powerful truck for towing big and heavy trailers
The truck-trailer combo may be just a little out of spec on paper, so it may seem okay, like you can get away with it, but it is a really unwise decision. Not only is it absolutely no fun to drive a truck that is screaming its little heart out to tow the load its tied to, but if you have an accident and it is determined your truck was towing a load that is beyond its safety limits, you will be liable.
Heaven forbid that there is a fatality in the accident — either yours or someone else’s. There are lots of horror stories out there of people’s lives that were transformed because someone decided not to get a truck that could tow their trailer safely.
Of course, truck and trailer salesmen don’t help. We have heard time and again, “That truck is fine for this trailer,” or “This trailer will be no problem for that truck.” Don’t listen to them! Trust your instincts and your gut feelings. If you are studying the specs and are nervous that your truck *might* be too small because your trailer puts it on the hairy edge of its specs, then you need a bigger truck or a smaller trailer.
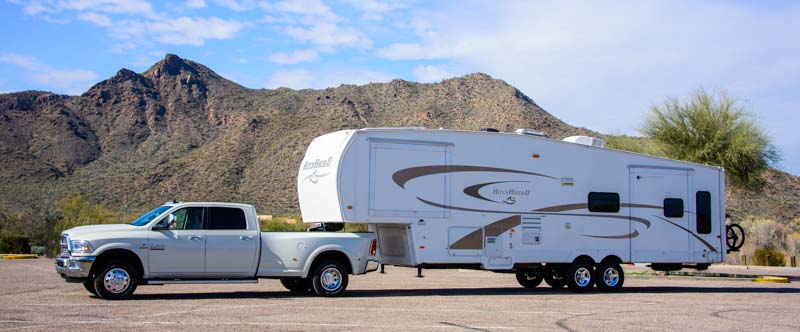
We have been amazed at the huge difference between our old 2007 Dodge Ram 3500 Single Rear Wheel and this new 2016 Ram 3500 dually
This article covers all the specifications we studied and were concerned about when we placed the order for our 2016 Ram 3500 truck to tow our 14,100 lb. 5th wheel trailer. You can navigate to the various sections with these links:
When we bought our 2007 Dodge Ram 3500 Single Rear Wheel long bed diesel truck with the 6.7 liter Cummins engine, its purpose was to tow a 7,000 lb. (fully loaded) 2007 Fleetwood Lynx travel trailer. Our 2004 Toyota Tundra (4.7 liter engine) had been okay to tow that trailer on paper, but when we took it on its first mountain excursion up and over Tioga Pass on the eastern side of Yosemite in California, it could not go faster than 28 mph with the gas pedal all the way to the floor. What a scary, white knuckle drive that was. Who needs that?
Our ’04 Toyota Tundra half-ton pickup rests as it tries to tow our 27′ travel trailer over Tioga Pass… sigh.
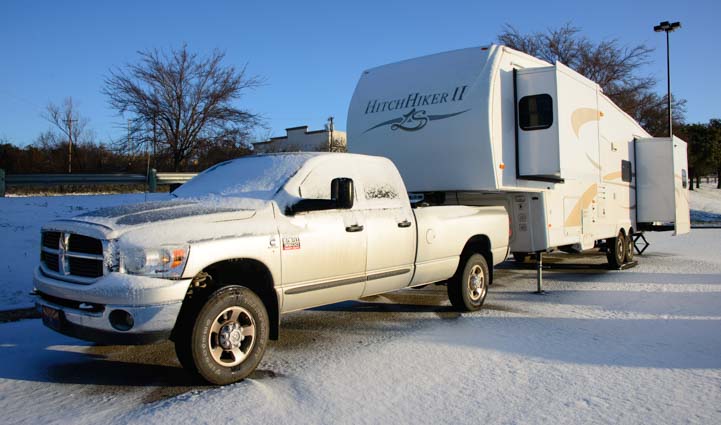
We replaced the Toyota Tundra with a 2007 Dodge Ram 3500 which was rated to tow much bigger trailers than the little Lynx travel trailer, so all was good with that small travel trailer. However, within a year, we upgraded our trailer from the lightweight Fleetwood Lynx to a full-time quality, four season, 36′ NuWa Hitchhiker LS II fifth wheel trailer that the scales told us was 14,100 lbs. fully loaded. Suddenly, our big beefy diesel truck was at its outer limits!
We drove our ’07 Dodge Ram 3500 and 36′ fifth wheel combo for seven years without a mishap, but it was not an ideal situation. The truck would strain in the mountains and would wander in strong cross winds on the highway. We installed a K&N Cold Air Intake Filter and an Edge Evolution Diesel tuner which helped the engine breathe better and increased its power (see our Edge Evolution Tuner Review), and we installed a Timbren Suspension Enhancement System to keep the truck from sagging when hitched to the trailer. But the frame of the truck and the transmission were still stressed by the heavy load on steep inclines.
We wanted a truck that was well within its towing limits and that could tow our trailer effortlessly.
The weight ratings for trucks and trailers are an alphabet soup of confusion that takes a little imagination to grasp. Here’s a synopsis:
UVW
Unloaded Vehicle Weight
The weight of the vehicle without fuel, people and stuff
GVWR
Gross Vehicle Weight Rating
The heaviest weight the vehicle can safely be when it is loaded up with fuel, people and stuff
GCWR
Gross Combined Weight Rating
The most a truck-and-trailer combo can safely weigh when hitched together and loaded up with people, fuel, food, etc
Payload
The GVWR less the UVW
The amount of weight the truck can safely carry. Compare to the trailer’s Pin Weight
PW
Pin Weight
The actual weight on the truck’s rear axle when a trailer is hitched up. Compare to the Payload
The Pin Weight is most easily visualized by first imagining yourself standing on a bathroom scale and making a note of your weight. Then your teenage kid walks up and puts his arms around your neck and hangs on your shoulder. The weight on the scale goes up a little bit, but not a huge amount, because your kid is still standing on the floor on his own two feet. The more he leans on you, the more weight the scale shows.
The difference between the weight the scale shows when your kid is hanging on your shoulder and the weight it shows when you’re by yourself is the “pin weight.” In the case of you and your kid, the “pin weight” might be 30 lbs.
The Pin Weight is the weight of the trailer at the hitch pin, a value that has to be calculated.
The following chart shows the factory safety weight ratings given by Chrysler and NuWa and the actual weights for our ’07 Dodge Ram 3500 truck and ’07 36′ NuWa Hitchhiker 5th Wheel trailer. We had our rig weighed by the Escapees Smart Weigh program at their North Ranch RV Park in Wickenburg, Arizona. This is a detailed, wheel by wheel, RV specific method of weighing.
Our truck, when loaded, carries fuel, 24 gallons of water, a generator and BBQ, the fifth wheel hitch, several leveling boards, two huge bins of “stuff” and ourselves, as well as the pin weight of the trailer. So, even though the pin weight itself was within tolerance on our ’07 Dodge 3500, all that other stuff made the truck way overweight. Moving those things to the trailer would clog our fifth wheel basement and would just make the trailer way overweight instead.
2007 Dodge Ram 3500 SRW (Single Rear Wheel) Truck
UVW
GVWR
GCWR
Payload/Pin Weight
Rating
7,147
10,100
21,000
2,953
Actual
8,025*
10,850
22,125
2,850
* LOADED with passengers, fuel and cargo but not towing
Besides the pin weight, our truck carries spare water, a heavy hitch, leveling boards, and generator. And there’s more stuff plus ourselves in the cab!
We improved our trailer’s cargo carrying capacity by upgrading from E rated tires to G rated tires and by revamping the suspension completely (I have not yet written about that project). So, even though some elements of the trailer frame are still at the spec limit, we have some leeway with our trailer in those places where the rubber meets the road.
The truck, however, was over its limit for both GVWR and GCWR, and it was pushed nearly to its max when towing.
The 2007 Ram 3500 towing guide is here: 2007 Dodge Ram Trucks Towing Guide. Our truck is on p. 20, on the 2nd to last line. Search for this text: “D1 8H42 (SRW)” (you can copy and paste it from here).
There are three brands of big diesel pickup trucks on the market: Chevy/GMC, Ford and Dodge. People have lots of brand loyalty when it comes to diesel trucks, and the bottom line is it’s pointless to get into a religious war over truck manufacturers. That said, the following are our personal opinions and there is no offense intended to anyone who loves a particular brand.
GMC makes the Chevy Silverado and GMC Sierra which both have the Chevy Duramax 6.6 liter engine and the Allison transmission. The Allison transmission is widely used throughout the commercial trucking industry and is considered to be the best.
FORD makes the Super Duty series of trucks which have Ford built engines and transmissions. Ford has modified its Power Stroke engine several times since the early 2000’s. The current engine is a 6.7 liter engine and it has performed well. Earlier models, the 6.0 liter engine and 6.4 liter engine, both had significant problems and were less reliable.
CHRYSLER makes the Ram series of trucks which have the Cummins 6.7 liter engine and Aisin transmission. The Cummins engine is widely used throughout the commercial trucking industry and is considered to be the best.
With the late model Ram trucks there are two models of 6 speed automatic transmissions to choose from. The 68RFE transmission was the only one available for our ’07 Dodge, and we found it developed problems over time (before our installation of the K&N Cold Air Intake and Edge tuner). It stuttered on climbs and didn’t always shift smoothly. The new (in 2013) Aisin AS69RC transmission is much more rugged and reliable and is now available as an option in the Ram Trucks lineup.
All three big diesel truck brands are good. After much research and many test drives, we chose the Ram 3500.
PICKUP TRUCK SIZES
All trucks are categorized into eight weight classes, from Class 1 (lightest) to Class 8 (heaviest) according to their GVWR. Pickup trucks fall into the smallest (lowest) three classes:
Class
GVWR
Class 1
0 – 6,000 lbs
Class 2
6,001 – 10,000 lbs
Class 3
10,001 – 14,000 lbs
All three classes of pickups are referred to as “light duty” trucks, as compared to dump trucks and semi tractor-trailers in the higher “medium duty” and “heavy duty” classes. Within the pickup truck market, however, they are referred to as “Pickups” (Class 1), “Full Size Pickups” (Class 2) and “Heavy Duty Pickups” (Class 3). So, even though a large diesel pickup is marketed as “heavy duty,” it is not technically a heavy duty truck. It’s just a heavy duty pickup. This may be obvious to many, but sure had me confused at first glance.
When we were first time truck buyers shopping for a truck to pull our popup tent trailer, the advertising made the ’04 Toyota Tundra look like it was a heavy duty towing monster that could pull a mountain right across a valley. But it is not so! Pickups come in all sizes.
Toyota Tundra and Ram 3500 — Which one is the towing monster?
Pickup truck sizes are referred to as “half-ton” “three-quarter ton” and “one ton,” and they are numbered accordingly:
Size
Ford
Chevy/Dodge
Half-ton
150
1500
Three-quarter ton
250
2500
One ton
350
3500
Ford also mass markets 450, 550 and larger pickups. Some people make custom Chevy and Dodge trucks in those sizes too, but they don’t come from the factories that way.
Ensuring the tow ratings of the truck are well beyond the actual weight of the trailer is essential.
For reference, a ton is 2,000 lbs. The truck naming convention comes from the original payloads these trucks could carry when they were first introduced decades ago. Back in those days, a half-ton truck could carry 1,000 lbs. (half a ton) in the bed of the truck. A three-quarter ton could carry 1,500 lbs and a big one ton truck could carry 2,000 lbs.
In 1918 Chevy had a very cute half-ton pickup that was basically a car with sturdy rear springs. By the mid-1930’s pickups came with factory installed box style beds, and a 1937 Chevy half-ton truck went on a 10,245 mile drive around the US with a 1,060 lb. load in the bed. It got 20.74 miles to the gallon!
As the payload capacities increased, the manufacturers assigned model numbers that corresponded to the weights the trucks could carry. But technology advances never quit!
Our 2016 Ram 3500 dually can tow this trailer with one hand tied behind its back.
Since those early times, truck and engine designs have improved dramatically, and the payloads modern trucks can carry now is significantly higher. For instance, the payload of a 2016 Toyota Tundra, a half-ton truck, is 1,430 to 2,060 lbs., depending on the options, making it essentially a “one ton” truck. The payload of a 2016 Dodge Ram diesel can be as high as 6,170 lbs. (and even higher for the gas HEMI version), making the 3500 model more of a “three ton” truck than a one ton.
In the modern trucks, the major difference between a three quarter ton 250/2500 truck and a one ton 350/3500 truck is the beefiness in the rear end suspension for supporting a heavy payload, that is, the number of leaf springs on the rear axle. In our opinion, if you are going to spend the money to buy a three quarter ton truck for towing purposes, you might as well spend the tiny incremental extra few bucks to buy a one ton.
Pickups come with more than one bed size. A “short bed” truck has a box that is a little over 6′ long and a “long bed” truck has a box that is around 8′ long. When a fifth wheel hitch is installed in the bed of a pickup, it is placed so the king pin of the fifth wheel will be over the rear axle. In a short bed truck this leaves less distance between the hitch and the back of the pickup cab than in a long bed truck.
The advantage of a short bed truck is that the two axles are closer together, so the truck can make tighter turns. This is really handy in parking lots and when making u-turns. The truck also takes up less space when it’s parked, again, a big advantage in parking lots.
A long bed truck is less maneuverable when it’s not towing but is preferable for towing a fifth wheel trailer
However, when towing a fifth wheel trailer, there is a risk that the front of the fifth wheel cap will hit the back of the pickup cab when making a tight turn. For this reason, there are special sliding fifth wheel hitches, and some 5th wheel manufacturers make the fifth wheel cap very pointy and even concave on the sides so there’s room enough to ensure the pickup cab doesn’t touch the fifth wheel cap on tight turns.
The advantage of a long bed truck is that not only can it carry more and bigger things in the bed of the truck, but when it is hitched to a fifth wheel trailer, doing a tight turn will not risk the front of the fifth wheel hitting the back of the truck cab.
Also, you can open and close the tailgate when the fifth wheel trailer is hitched up. We can actually walk from one side of our trailer to the other through the gap that’s between the open tailgate and the front of the trailer, even when the truck is cocked in a tight turn.
With a long bed, the truck can be at a sharp angle to the trailer and still have the tailgate open.
For folks that use their pickup primarily in non-towing situations and take their fiver out for just a few weekends a year (and stay close to home), a short bed truck is fine. However, in our opinion, if you are going to tow a large fifth wheel frequently, and especially if you are a seasonal or full-time RVer traveling longer distances, a long bed truck is the way to go.
We bought a long bed as our first diesel truck for our little travel trailer, knowing we might eventually get a fifth wheel, even though it takes much more real estate to back a travel trailer into a parking spot with a long bed truck that it does with a short bed truck (because the pivot point on a travel trailer is behind the bumper rather than over the truck axle, forcing the front end to swing exceedingly wide to make a turn).
When we use our truck as a daily driver, even though we always have to park away from the crowd and walk a little further, and we sometimes struggle making u-turns and maneuvering in tight spaces (it takes nearly four lanes to do a U-turn in a long bed pickup without the trailer attached), we have never once regretted having a long bed truck.
SINGLE REAR WHEEL vs. DUAL REAR WHEEL (DUALLY)
In the one ton class of trucks (Ford 350, Chevy/Dodge 3500), there is an additional consideration: single wheels on the rear axle of the truck (“single rear wheel”) or two pairs (“dual rear wheel” or “dually”).
The advantages of a single rear wheel truck are:
Only 4 tires to maintain instead of 6
Changing a flat will never involve accessing an inner tire under the truck
No wide rear fender to worry about at toll booths and drive-through bank windows and fast food windows
Easy to jump in and out of the bed of the truck from the side using the rear wheel as a foothold
Can handle rough two track roads better because the rear wheels fit neatly into the ruts
Gets traction on slick ice, snow and muddy roads better than a dually
The advantages of a dual rear wheel truck (“dually”) are:
Wider stance supporting the weight of the king pin (or bumper hitch)
Can carry a heavier payload — heavier trailer pin weight and/or bigger slide-in truck camper
Much safer if there’s a blowout on one of the rear wheels, and you can still drive (for a while)
A dually has a wider stance, providing more stability, and it can handle much more weight in the bed of the truck.
Why do you need to get in and out of the truck bed from the side? Climbing in on the tailgate is great, and there is a very handy foothold at the license plate mount on the 2016 model that is low enough for a short person to reach easily. However, when the truck is hitched to the fifth wheel, it’s not possible to climb in from the tailgate, and sometimes we need to get into the bed of the truck when the fiver is attached!
For instance, we keep 22 gallons of spare water in the bed of the truck in 5.5-gallon jerry jugs. I’m the one who holds the hose in the jugs while Mark goes to the other end of the hose and turns the water on or off at the spigot. We could switch roles, but I like that job!
When we’re hitched up, I have to get into the bed of the truck from the side to get to the water jugs. I plant one foot on the rear tire, and I hoist myself up and over the side. Getting over that fat fender is not so easy with the dually!
When hitching/unhitching, Mark also reaches over the side of the truck to loop the emergency break-away brake cable from the trailer onto the hitch in the truck bed. That way, if the trailer comes unhitched as we’re driving, the quick yank on the small cable (as the trailer breaks free) will engage the trailer’s own brakes as we wave it goodbye behind us.
Obviously, for both of these maneuvers, the width of the dually fender makes reaching into the bed of the truck a whole lot harder. Doing these things on a single rear wheel truck is trifling by comparison!
RESEARCHING SINGLE REAR WHEEL vs DUALLY TRUCKS
Our biggest debate was whether or not we should simply buy a new single rear wheel truck that had the latest engine and drive-train and chassis improvements or if we should take the plunge and get a dually. We do occasional research online, but our preferred method of learning about things in the RV world is to talk to experienced people in person, especially since we are out and about all day long and we enjoy meeting new people.
So, we interviewed every single dually truck owner that we ever saw. For two years! Whenever we saw a dually parked somewhere, we’d look around to see if the owner was anywhere nearby. If so, we’d walk up and ask him about his truck.
Did he like it? What did he tow with it? How long had he had it? Was it his first dually? Did he have trouble maneuvering in tight quarters? Had he towed that same trailer with a single rear wheel truck? How did they compare?
We asked lots of people how their dually performed compared to a one ton single rear wheel long bed truck towing the same heavy trailer.
To our astonishment, although we searched for two years for a person who had towed the same large fifth wheel trailer with both a dually and a single rear wheel truck, and we talked to dozens of dually truck owners who had towed all kinds of trailers, we found only one who had towed the same fifth wheel trailer with both styles of truck.
This guy was a rancher with several big cattle and horse trailers as well as a 40′ toy hauler fifth wheel. He’d been towing comparable trailers with single rear wheel long bed trucks for over twenty years. Three years ago he’d switched to a dually, and he said the difference for his toy hauler was night and day. He’d never go back.
Another fellow told us the ranch he worked on had both single rear wheel and dually trucks and that the duallies were used exclusively for the big trailers because they were better tow vehicles.
We LOVED the new, sleek styling on the Ram duallies.Our biggest questions: is the wide dually fender flare a pain? How does it do at toll booths and drive-through windows?
This was very convincing, but an interesting side tid-bit we learned is that many folks go either dually or single rear wheel when they buy their first diesel truck for a big trailer, and they stick with that type of truck when they replace it. Guys love their trucks, so we heard few complaints, but when folks raved about how their single rear wheel or dually was the ultimate towing machine and that they’d never switch, when pressed for details, we found they didn’t have first-hand experience using the two different types of trucks to tow the same large trailer.
For those looking to conduct their own research, in addition to talking with ranchers and horse owners, one of the best sources of information we found was the trailer transport drivers who drive their own personal trucks to tow both large RV and horse trailers from the manufacturers to the dealerships where they are sold..
Our questions would have all been answered in a heartbeat if we could have hitched our trailer onto a dually sitting in a truck dealership lot and towed it up a mountain and on a few back roads. However, that wasn’t possible.
Perhaps in the future, because of the fantastic new hitch puck systems that can be factory installed in pickups these days, dealerships will decide to keep one of the nifty B&W OEM fifth wheel hitches on hand for prospective customers to do just that (if they can sort out the liability and insurance issues).
Ultimately, we held out on the dually versus single rear wheel decision until the very end, but we knew inside that if we did buy a new truck it would probably be a dually. So every test drive we did was with a dually truck.
We took all three brands of pickups out on over 200 miles of test drives at 25 or so dealerships.
Going for test drives is lots of fun and is the best way to learn the product
Dealing with Slick Salesmen
A reader wrote me recently to say he was intimidated by the sales tactics at car dealerships, so he was reluctant to do many test drives or much dealership research. That is a real shame, because the only way to learn about trucks is to spend time with them, test drive them, sit in them, crawl underneath, study what’s under the hood, read the marketing literature, and hound the salesmen with questions.
After all, the salesmen are there to teach you what you need to know about the product, and if they don’t sell you a truck today, they are helping another salesman (or themselves) sell you a truck tomorrow. What goes around comes around, and any good salesman understands that. You can easily deflect the high pressure sales tactics by saying, “We are starting our search and just want to do a test drive today. We won’t be ready to buy for a few months.”
Where to Do a Test Drive? Where to Buy?
The best places to find knowledgeable diesel truck salesmen and buy big diesel trucks, especially duallies, is in cattle ranching country. As we scoured dealerships from San Diego to Maine and from Sarasota to the Tetons, we found urban areas generally have few big trucks on the lot and the salesmen know very little about diesel trucks. Cattle ranchers, horse owners and big commercial farmers know their trucks, and so do the salesmen they work with.
The most knowledgeable truck salesmen are in places where people need and use big trucks — a lot!
Our first test drives were focused on the turning radius and maneuverability of a dually truck as compared to the single rear wheel truck we knew so well. It was hard to tell, but the turning radius seemed to be the same or better (and we now feel the 2016 Ram dually definitely turns tighter) than our old 2007 single rear wheel Ram.
As for general maneuverability, Mark didn’t notice a whole lot of difference driving a dually versus our single wheel truck. Frankly, owning a long bed diesel truck period means you have to park in the back 40 and walk long distances anyway, so we soon realized that dealing with a dually in parking lots would be no different.
We did one round of comparative test drives on the uphill entrance ramp to an interstate in Baker City, Oregon. We visited each truck dealership in town, and when we did our test drives, we floored each dually truck on the incline to see how powerful it felt. The 2015 Chevy won by a long shot, against the Ford and Dodge 2015 models, but did not feel as powerful as our single rear wheel ’07 Dodge Ram (at that point our truck had the K&N Cold Air Intake and Timbrens but did not have the Edge Evolution Diesel tuner).
Our trailer snuggles up to its new companion, a 2016 Ram 3500 dually
Deciding Factor – The Cummins Engine
In the end, the deciding factor for us for choosing a brand was the Cummins engine. This was true when we were researching our ’07 single rear wheel truck and again when researching the 2013-2016 duallies. Lots of people wish they could buy a pickup with both the Cummins engine and an Allison transmission in one brand of truck, a combo that is on many commercial trucks. But that’s not possible.
For us, the simplicity of the inline 6 cylinder Cummins engine (as compared to the more complex V8 engines in the Chevy and Ford) along with the longer stroke (inherently higher torque) makes a lot of sense. Inline engines are used commercially in big rigs and tractors, and the 6.7 liter Cummins engine has a long and solid track record, not just in Ram trucks but in many commercial applications as well. The Cummins quality control and manufacturing seem to be top notch.
Here is a fantastic video showing a Cummins engine being built:
Amazingly, with each passing year, the payload and towing capacity of each brand of truck jumps higher. From the time we started test driving duallies in 2013 until we placed our order for our new 2016 Ram 3500, the horsepower and torque across all three brands increased, and the towing and payload capacities climbed too.
Built with the right options, the 2016 Ram 3500 diesel truck has an eye-popping, 385 horsepower and 900 ft-lbs. of torque with a GCWR of 39,100 lbs. It can tow a trailer weighing 31,210 lbs. and has a max payload of 6,720 lbs.
This is absolutely astonishing, and neither the Chevy nor the Ford trucks match that torque right now.
Accurate comparisons between brands are challenging within the same model classes, however, because there are different standards for making measurements. Ram Trucks uses the SAE J2807 standards, while other manufacturers don’t. Also, we were able to locate Ford’s towing and payload capacity charts online (see the links at the bottom of the page), but did not locate a similar chart for GM.
Some of the head-to-head tests between the brands that are posted online are also a little misleading, because, for instance, a Ram 3500 is pitted against a Ford F450. Even though both of those models are Class 3 trucks (10,001 to 14,000 lbs GVWR), one would expect the Ram 3500 to compete head to head with the Ford F350, not the Ford F450.
Best in Show
Here are the towing and payload capacities of the many models of Dodge Ram trucks:
As mentioned above, the Ram trucks are sold with two options for the transmission. After our troubles with the old 68RFE automatic transmission in our ’07 Dodge Ram 3500, we wanted the new and better one, the AISIN AS69RC automatic transmission. In the Ram Trucks marketing literature, the 6.7 liter Cummins engine is paired with the AISIN AS69RC transmission to make their “High Output Engine” because it delivers max torque at the low end for heavy towing situations. This combo became available in 2013.
“High Output” engines on Ram Trucks pair the Cummins 6.7 liter engine with the Aisin AS69RC transmission
The rear axle gearing on a pickup determines the GCWR for the truck (the maximum safe weight of truck and trailer hitched together and fully loaded) and the maximum weight trailer that the truck can tow safely. It also makes a huge difference in how the truck drives, both while towing and not towing.
Rear axle gear ratios are given as a ratio, for example “4.10” which means 4.10:1 or “3.73” which means 3.73:1. The ratio refers to the number of teeth on the axle ring gear as compared to the number of teeth on the driveshaft’s pinion gear. With a 4.10 rear end, the driveshaft has to turn 4.1 times in order to rotate the rear wheels one revolution. With a 3.73 rear end, the driveshaft must turn 3.73 times to rotate the rear wheels one revolution. So, with a 4.10 rear axle ratio the driveshaft’s pinion gear is spinning more quickly at a given speed than with a 3.73 rear axle ratio.
“Easier” Gears vs. “Harder” Gears
If you think of riding a bike, when you have the bike in a “hard” gear, it takes a lot of leg strength to turn the wheels, but one pedal stroke will cover a lot of distance. For example, going uphill in a “hard” gear would be especially hard. Your legs are turning really slowly and straining and you’re wishing you could put it in an “easier” gear! But when you descend in that same gear, you can hit high speeds easily. Back to trucks, this is like having the driveshaft turn a little to make the wheels turn a lot as it does with the 3.42 or 3.73 rear axle gear ratios found on Dodge Rams.
However, when the bike is in an “easy” gear, just a small amount of leg strength will turn the wheels, but one pedal stroke doesn’t get you very far. For example, going uphill isn’t so bad — you can inch up slowly — but once you began descending you’re spun out because your legs can’t pedal fast enough to hit super fast top speeds. In the truck world, this is like having the driveshaft turn a lot to make the wheels turn a little as it does with the 4.10 rear axle gear ratio.
Wide Load!! The highest tow ratings are achieved with a high rear axle gear ratio (like 4.10)
Towing Heavy Loads vs. Driving Fast on the Highway
So, on a truck, the higher ratio (4.10) is ideal for towing heavy loads. It takes more turns of the driveshaft to rotate the rear wheels of the truck, so the engine revs higher, putting it in the power band for RPMs, and the heavy load gets moved. But the top end speed and fuel economy get sacrificed a bit.
With a lower gear ratio (3.73 or 3.42) it takes fewer turns of the driveshaft to rotate the rear wheels of the truck. When the truck is zipping along at highway speeds, the gears are turning a little more slowly (lower RPMs) than they would with a 4.10 rear end, which saves on fuel efficiency and makes the fastest attainable speed a little higher.
The highest tow ratings are achieved with a 4.10 rear end, so the heaviest trailers will be best if towed by a truck with a 4.10 rear axle gear ratio. However, if most of your towing is with lighter weight trailers, and your driving will be primarily on interstates, and your personal preference is to drive fast, a 3.73 or 3.42 rear axle gear ratio may make more sense.
Our ’07 Dodge had a 3.73 rear end. The problem was that at the speeds we tended to drive — 55-65 — the engine would lug. Mark manually changed gears a lot to try to keep the RPMs up, but he found it fatiguing to have to monitor the gears so closely and to change gears all the time.
We also don’t drive on interstates very often, and when we do, we’re the grannies of the road, moseying along in the right lane.
We take life, and the open road, fairly slowly, so a 3.73 rear end, which is awesome a 75 mph, was not the right choice for us.
4.10 vs. 3.73 – RPMs at Different Speeds
We wanted a 4.10 rear end on our new truck, but we wanted to be 100% sure this would truly make the kind of difference we expected. So, on one Ram dually test drive we drove a stretch of highway in our ’07 Dodge at various speeds between 45 and 65 mph, noting the RPMs in a notebook, and then we took a 2015 Ram 3500 dually with a 4.10 rear end out on the same road at the same speeds. The salesman raised an eyebrow in surprise when we marched into the dealership and announced we wanted to do a test drive at various speeds to note the engine RPMs, but he went along with the idea!
On that test drive we found the 4.10 rear end shifts out of lower gears sooner than the 3.73 rear end, and generally keeps the engine RPMs about 100-200 RPMs higher at each speed. Our new truck bears out those findings.
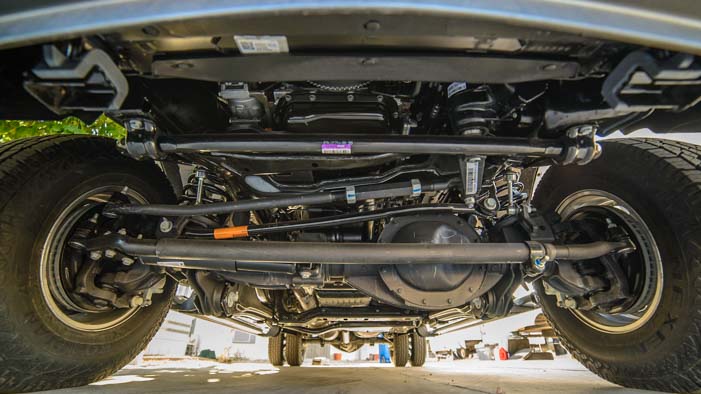
So, how can you tell if a truck on the dealer lot has a 4.10 rear end without peering at the window sticker? Check underneath the back end of the truck. The differential is the big round casing that hangs between the rear wheels. On trucks with a 4.10 rear end, the differential has a series of vertical cooling fins on it. These help keep it cool since the gears spin faster and it is designed for heavier towing loads, both of which make it heat up.
Looking under the rear end of the truck, the differential has cooling fins if the rear axle ratio is a 4.10
BEEFED UP FRAME
Besides the more powerful engine tuning and transmission, Ram has improved the truck frame on the dually considerable. Every aspect of the frame is more sturdy than it used to be, making the truck not only powerful enough to pull heavier loads but strong enough to withstand the multitude of forces as it hauls the load up a mountain.
Peering under the front end of the truck, the frame has been strengthened for heavy towing
We learned with our ’04 Toyota Tundra truck towing our 7,000 lb. 27′ travel trailer that four wheel drive is a necessity for us in our RV lifestyle. In our first weeks of full-timing, a small, wet grassy incline prohibited us from camping in a campground in Texas, because our truck kept slipping and couldn’t tow the trailer up over the short rise! From that moment on, we’ve felt that a four wheel drive is mandatory if you are going to tow a big trailer.
Also, while descending a really gnarly, skinny, twisty, single lane road on a mountain in Utah, with grades of 10% or more in places, we discovered that the safest way to drive DOWN a very steep descent is to put the truck in four wheel drive LOW gear, and creep down the mountain at 5-10 mph using the exhaust brake. This tactic was a lifesaver for us on that mountain with our ’07 Dodge truck and fifth wheel trailer. Without it, we would still be living at the summit of that mountain!
The new Dodge Ram and Ford Super Duty trucks have a really fantastic option for a factory installed puck system in the bed of the truck where you can mount either a fifth wheel or gooseneck hitch. During our truck search, GM did not have that option on their trucks. However, GM trucks now have the puck system as well.
B&W Trailer Hitches makes a fifth wheel hitch specifically for each truck brand’s puck system. We installed one and you can read about it at this link: B&W OEM Companion Fifth Wheel Hitch DIY Installation. The three hitches are shown below, Ram, Ford & GM:
This option has five holes in the bed of the pickup, one in the center for a gooseneck hitch and four outer ones to hold a fifth wheel hitch. The idea behind this mounting system is that rather than drilling holes in your brand new truck bed to install hitch rails to support a fifth wheel hitch — the method that was always used until this new system was devised — you can buy a hitch designed for these puck mounts and simply drop it in.
Looking towards the tailgate, there’s a gooseneck puck in the middle and four pucks in a square to mount a fifth wheel hitch. The bed is totally flat without the hitch in it.
If you want to use the bed of your truck for hauling, and you won’t be towing your fifth wheel, you can easily remove the fifth wheel hitch temporarily and have the entire bed of the truck available to you. Not only is it a snap to remove the hitch, but the bed of the truck will be flat and obstacle free because there won’t be any hitch rails installed in it.
The B&W Companion Fifth Wheel Hitch is easily installed and removed (facing the front of the truck)
Another huge benefit is that installing the hitch is an easy do-it-yourself job. We have a detailed pictorial step-by-step guide showing how to install a B&W Companion OEM Fifth Wheel Hitch here (it took just one hour from start to finish!):
Our 2007 Dodge Ram came with an exhaust brake built into the turbo. Mark LOVED this brake and used it all the time, both towing and not towing. The only thing that bugged him about it was that coming down mountains with our trailer hitched on, he often had to shift gears manually and feather the gas pedal to keep the truck going the speed he wanted.
The 2016 Ram trucks have an improved exhaust brake that has two modes: max braking power and constant speed braking. We definitely wanted that option!
BACKUP CAMERAS
Dodge Ram trucks have two backup cameras, one that aims at the bed of the truck (for hitching and unhitching) and one that aims behind the truck (for backing up). Beginning in 2016, both of these cameras could be set to display their image on the main touch screen display (in the 2015 model, one camera would display in the rear view mirror while the other would display on the touch screen display).
It’s nice to have a backup camera when backing the truck in next to the trailer!
AUTO-LEVEL SUSPENSION
An option on the 2016 Ram trucks is to have four leaf springs with computer controlled air bags to provide for auto-leveling of the rear suspension. This is instead of the standard six leaf springs without air bags that have a fixed height suspension.
Without the air bags — the standard configuration — the “rake” of the truck’s rear end is four inches, meaning that the rear end of the truck is raised four inches higher than the front to compensate for the weight of the trailer which will push it down when it’s hitched up. For a shorter person, this is quite high, and I was astonished how much higher the tailgate of a 2016 Ram truck sits than our old ’07 truck did.
With the air bags, the rear end is raked only one inch, making the whole back end of the truck much easier to access for those of us who aren’t that tall. In addition, there is an “Alt Ride Height” button that can be used to lower the back of the truck one more inch. Hurray for short people!
When the trailer is hitched onto the truck, pushing the truck down, the on-board compressor kicks on and pumps air into the air bags, raising the back end of the truck until it achieves its normal one inch rake. If you prefer to drive with the truck level, the “Alt Ride Height” button can be pressed to lower the back end one inch.
When we did our test drives, we found that the duallies with the auto-level suspension had a slightly smoother ride when not towing than the ordinary leaf spring only models did. This has proven true with our new truck too.
VENTED and HEATED LEATHER SEATS and STEERING WHEEL plus OTHER GOODIES
As we test drove different trim levels of trucks, we decided that if we were going to buy a new truck, we’d go all out and get the many little conveniences and options that are a “splurge” but that make using the truck a pleasure.
Let’s go for a ride!
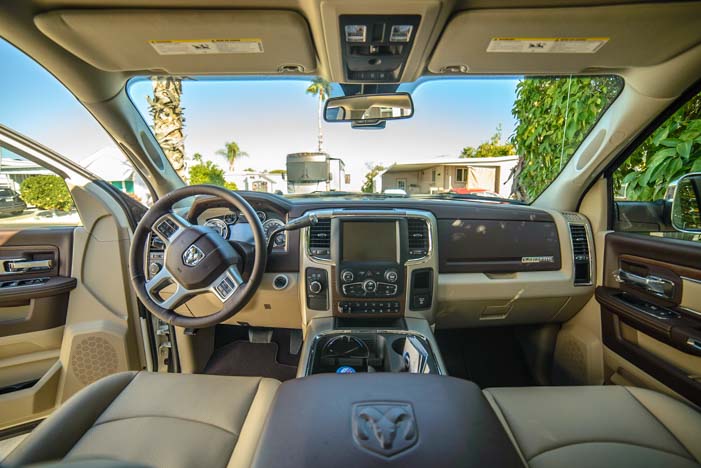
Heated and vented leather seats with power seat adjustments and lumbar support, a side step to make it easier to get in and out of the truck, independent climate control for driver and passenger, a CD player, OWL on/off-rad tires, the fancy electronics console with the big touch screen display and GPS nav system and power adjustable pedals were all on our list.
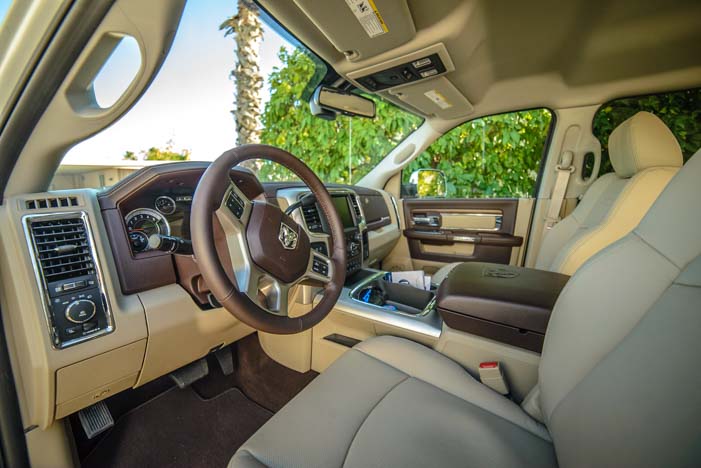
Most of these options are bundled into the Laramie model of the Ram 3500 trucks.
The Laramie comes with a beautiful interior that includes all the fancy stuff.
Top level Nav/GPS Display with voice activation and climate control
Tan colored Heated/Vented Leather Seats and Steering Wheel
The Tow and Payload Ratings for the 2016 Ram 3500 dually with the above options as compared to our 2007 Dodge Ram 3500 single rear wheel are the following:
Rating
2016 Dually
2007 SRW
Trailer
UVW
8,319
7,147
GVWR
14,000
10,100
GCWR
39,100
21,000 lbs.
Payload
5,565
2,953
2,850
Max Trailer Weight
30,200
13,700
14,100
Even though the make and model of these two trucks is the same, separated by just nine years, these numbers show that they are two radically different trucks!
After doing so many test drives, studying all the material and thinking about this truck for two years, there was no way we would give up any of the options we wanted, especially the ones that made the tow ratings and payload rating so high. But we never found a dealership that ordered this exact truck for their lot. Time and again, Mark would find a truck that was close, but there would be some things missing and other things we didn’t want.
So we decided to order the exact truck we wanted and wait 8 weeks for it to be built.
We had a ball ordering this truck through Airpark Dodge in Scottsdale, Arizona, where a marketing connection with Alice Cooper made one of Mark’s lifelong dreams come true. See our really fun blog post:
A significant difference between our 2007 Dodge Ram truck and our new 2016 Ram dually is that the new truck requires occasional refilling of the DEF (Diesel Exhaust Fluide) tank. Here are some tips we’ve discovered about DEF since we purchased our new truck:
Dodge Ram Truck Owners — Please note:
Late model Dodge Ram 1500, 2500 and 3500 trucks have been recalled (beginning 6/23/17) for side airbag problems in a rollover accident. See this article for details: Dodge Ram Side Airbag Recall
More info about Pickup Trucks, Ram Trucks, Tow Ratings, etc.:
2016 Ram Trucks Towing Guide – Ours is on p. 5, 2nd section, last line. Search for: “CREW CAB LONG BOX, 4X4, DRW”
Current Ram Trucks Model Specific Weight Ratings – Choose Heavy Duty / Crew / 8′ Box / 6.7 Liter Cummins / Auto / 4×4 / Premium Axle Ratio. The truck like ours is the first Laramie in the list. If you know a VIN number, click the red button “Look Up My Vehicle” to get the specs for that truck.
Note (July 2018): Folks have asked us if we like our truck now that we’ve driven it for two and a half years. We LOVE our truck. It now has about 40,000 miles on it, about half of that towing, and we couldn’t be happier with it.
Below are some of our most POPULAR POSTS(also in the MENUS above)
More of our Latest Posts are in the MENU.
New to this site?
Visit RVers Start Here to find where we keep all the good stuff. Also check out our COOL NEW GEAR STORE!!*** CLICK HERE *** to see it!
No matter how big an RV you get, if you live in it long enough, eventually you will begin to fill it up with stuff. This has happened to us and our 36′ fifth wheel trailer. When it was new and we first moved in years ago, it was so big that half our cabinets were empty.
Our old dining area – no storage and seating for two.
We began storing lenses in a drawer with dish towels (soft padding) and we had four camera bags that lived on our desk and under our dining room table. Camera bodies were always strewn across the sofa, fanny packs got piled on the desk, and tripods often got stuck on top of the subwoofer under our TV. Tucking everything away for safe passage while driving was a real pain. We needed to get this stuff organized!
Mark had a brilliant idea one morning — replace our dining room chairs with big storage ottoman benches!
Our new dining area – lots of storage and seating for four.
We began researching storage benches and ottomans and found the perfect thing from Simpli Home Furnishings. They are made of a nice faux leather, and there are no decorative buttons on the top, so the plush, padded top is very comfortable for sitting on (here’s more info).
These storage ottomans are 36″ wide by 18″ tall and 18″ deep.
The outside dimensions are 36′ long by 18″ high by 18″ deep. The inside dimensions are 33.25″ long by 11.5″ high by 15.5″ deep.
Our new storage ottomans have voluminous interior space.
We bought them sight unseen from Amazon and couldn’t be happier. They come with four short legs, with three screws each, which were easy to attach.
The only assembly is attaching the four legs.
Some customers have complained that the screws are too long and coming up through the floor of the box, but the legs simply need to be oriented correctly with the three screw holes aligned with the outside edges of the ottoman.
Be sure to align the screw holes with the outer edges of the ottoman.
The legs were attached in just a few minutes using our cordless drill.
A cordless drill makes this a quick job!
The end result is much more comfortable seating at our table and a whole bunch more storage space for our camera gear.
Ta da!
The tricky thing about storage space in an RV is that anything located behind the coach’s rear wheels is going to bounce around a whole lot as you drive down the road. That’s why most RVs don’t have the kitchen in the rear.
Our new storage ottomans sit just slightly forward of the trailer’s axles.
The box tops easily clear the table when they open.
Another tricky thing with storage space in an RV is that in many coaches, like ours, the shelving is very flimsy. We prefer not to put anything heavy into the wall cabinets (except in the kitchen where our cabinets are more sturdily built). But it doesn’t take long to run out of storage space down near the floor.
This new storage space is solid.
A few throw pillows makes these pretty darn comfortable for lounging!
We put some throw pillows on our new benches and now we’ve got not only a great place to keep our camera gear organized and a nice, new, clean look to our dining area, but we can kick back after a meal, prop our legs up on the benches and chit chat for a while. It’s fun to sit there together and get a new perspective on our little rolling home and on life!
We never used to hang out after meals on our old chairs… but this is fun!
These benches are ideal for us, but Amazon sells lots of other similar storage ottomans of different sizes and shapes too and you can find all kinds of storage benches for sale at Amazon at this link HERE).
If you find the benches are a little low, one good way to raise them up is with the plastic rug protectors made for furniture legs. We also removed the feet from our table to bring it down a smidge.
More of our Latest Posts are in the MENU.
New to this site?
Visit RVers Start Here to find where we keep all the good stuff. Also check out our COOL NEW GEAR STORE!!*** CLICK HERE *** to see it!
Winter RVing is loads of fun, but figuring out how to stay warm in an RV on those chilly winter mornings and long cold dark evenings makes all the difference between having a great time and wishing you were in a house. Going to a southern state is a good start, but it may not always fit with your overall full-time RVing itinerary. You might get caught in an early winter storm, like we did in one year in Colorado’s Rocky Mountains. Or you might get whipped by a blizzard on your way south, as has happened to some of our snowbirding friends who wanted to celebrate the holidays at home in Montana before trekking south to Arizona in January.
Here are some tips for ways we’ve found to stay warm in our RV in winter…
Brrr…How do you stay warm inside of this??
WINTER RV TIP #1 – STAY IN BED UNDER THE COVERS TIL SPRING!
One winter RVing tip is to go to bed and stay in bed until the spring wildflowers begin to bloom. Our two little RV companions, Chrissy the cockatoo and Weazie the ferret (named for former beloved pets) seem to have decided to go that route this year.
One solution – jump under the covers and stay there until Spring!!
WINTER RV TIP #2 – GET AN EFFICIENT SPACE HEATER!
A better option is to get a good and efficient heater. The factory installed propane furnaces that come with most RVs is very inefficient. The blower uses a lot of electricity. What’s worse, the heater goes through a lot of propane, because much of the hot air is exhausted outside the RV (just go outside on a cold day and put your hands by the RV furnace vent — they’ll be warm in a jiffy!).
If you will be plugging into electric hookups a lot, and staying for just a few days at a time in most of the places you travel to (with no metering on the electricity and unlimited power built into the overnight camping fee), then it makes sense to get a really great electric space heater.
WINTER RV TIP #3 – INSTALL A VENT-FREE PROPANE HEATER!
If you are going to be boondocking (or dry camping), out in the southwestern deserts — or even in Florida or Texas — then you will need an RV heater that is efficient both in its use of electricity and its use of propane. The best option is a vent-free propane heater.
We LOVE our vent-free propane heater.
We have been using ours since Mark installed it in 2008, both during the winter and the summer, and we love it. We have a whole blog post explaining how this kind of heater works, what the technologies are behind the different styles of vent-free propane heaters on the market, what kind of heat each type of heater produces, and how to install one here:
We have used this heater from sea level to 10,000′ altitude year round, and we share some tips for heating strategies we’ve used when we’ve camped on a lofty mountaintop as temps plummeted and a snowstorm rolled in:
WINTER RV TIP #4 – GET A PORTABLE VENT-FREE PROPANE HEATER!
A portable vent-free propane heater is an easy way to go.
If you love the idea of using an efficient propane heater that doesn’t use any electricity, but you’re not keen on doing a permanent installation, another great option is to get a portable propane heater.
WINTER RV TIP #5 – INSTALL A VENT-FREE PROPANE FIREPLACE!
How about a vent-free propane FIREPLACE?!!
On the other hand, if you are outfitting the RV of your dreams for a life of full-time RV travel or of winter snowbirding RV adventures, then you might consider installing a vent-free propane fireplace that is built into an elegant mantel. These heaters give off the same incredible heat as the more industrial looking vent-free propane heaters, but they have the cozy and inviting appearance of a fireplace and produce a beautiful (and mesmerizing) flame. What a great addition to an RV!!
WINTER RV TIP #6 – SHRINK-WRAP YOUR RV SCREEN DOOR!
One of the easiest ways to winterize an RV is to shrink-wrap the screen door. By covering the screen door with a thin layer of plastic, you can keep the big RV door open all day long, close the screen door, and let the sunshine fill your rig with light and warmth. It is really surprising that just a thin layer of plastic on the door is all it takes to keep the cold air out and let the warm air in (if you aren’t in sub-freezing temps!!).
Shrink-wrapping our RV screen door keeps the cold air out and lets the sun shine in!
We learned this trick from our RVing mentors, Bob and Donna Lea, in our first winter of RVing back in 2007-08. The beauty is that the installation of the shrink-wrap is less than a one hour job, and you can remove it in the springtime in just a few minutes.
Window shrink-film kit
We love having shrink-wrap on our screen door so much that we’ve gone through quite a few summers without removing it. Up in the mountains, it can be chilly in the summertime, with a brisk breeze blowing into the rig in the mornings, so the shrink-wrap can work its magic there too, and it also keeps the dust out.
This year, however, we took the shrink-wrap off our screen door when we got into the heat and humidity of the northeastern states in August, so we had to reinstall it just a few weeks ago.
All the tools we used to shrink-wrap our screen door.
The window shrink film kit comes with double-sided tape, and all you have to do is outline the door with the tape, remove the backing, press the plastic onto the tape, trim off the excess and then heat it up with a hair dryer to make the plastic taught. It is best to clean the frame of the door with alcohol or film remover first so the tape adheres well.
Press the double-sided tape along the frame of the door, going around the plastic sliding insert by the door handle.
Go around the little slider opening for the door handle, because you need to be able to slide this open and closed (the shrink-wrap is covering only the screened parts of the door!). Then peel the backing off the tape all the way around the door.
Remove the backing from the tape.
Press the plastic onto the sticky tape around the door frame.
Hang the shrink wrap around the door frame.
Then use a razor blade to trim off the excess all the way around the door. Get the plastic as taught as you can. It doesn’t have to be perfect, though, because all the wrinkles will be taken care of in the next step.
Use a razor blade or box cutters to trim off the excess plastic.
Using the hair dryer on the high setting, wave it gently back and forth over the edges of the door. The plastic will miraculously shrink up and become taught.
Use a hair dryer on the high setting to shrink up the plastic along the door frame.
Once you’ve gone around the frame of the door, wave the hair dryer across the middle to tighten that up too. Keep the hair dryer moving so it doesn’t melt the plastic in one spot.
Keep the hair dryer moving and wave it across the plastic to tighten it up.
If it’s cold out, you can always give yourself a blow dry too!
.
Once it is done, open the outer RV door open and close the screen door. The warm sun will pour in, but the cool breezes will stay outside!
Morning sunshine fills our kitchen
Note: Since publishing this post, we have refined our shrink-wrap system even further. We have found that it is easy to make this into a Dual Pane system but adding a second layer of shrink-wrap film on the INSIDE of the RV door. What a world of difference this second layer makes!!
WINTER RV TIP #7 – ORIENT THE RV WINDOWS (and DOOR) TOWARDS THE SUN
Every RV floorplan is different, with the largest windows and the door placed in various locations, depending on how long it is and whether it’s a trailer or a motorhome. Take a look at where your biggest windows are, and try to orient the rig so those windows are in the sun for most of the day.
Our biggest windows are in a big slideout on the curb side (passenger side) of the trailer and also in the rear of the coach. So, in the wintertime we are best off orienting our rig with the truck headed northeast. This places our biggest windows towards the southeast and southwest.
In the summertime, the opposite is true as we try to avoid having our windows facing the sun. Our best orientation in the summertime is for the truck to be headed northwest. This way, although we get blasted with some sun in the morning, our biggest windows are blissfully shaded during the long hours of blazing hot sun as it shines from the south and sets in the northwest.
This does place our RV refrigerator in direct sunlight during the hottest hours of the day in the summer, but we’ve never had trouble keeping our food cold with the fridge on the highest setting during those hot months (of course, our fridge died recently, but we discovered that that was to be expected because of its age!).
For our rig, it’s best to orient the truck to the northwest in summer and the northeast in winter.
Note that the sun doesn’t travel the same arc in the sky in the summer months as it does in the winter, as shown by the orange arrows in the graphic above.
In the dead of summer, the sun rises in the northeast and sets in the northwest. During the day it is high in the sky, almost directly overhead. In mid-winter, the sun rises in the southeast and sets in the southwest, traversing a very low arc in the sky. At its highest, the sun is only halfway up the sky. These low angles are advantageous for keeping an RV warm in winter, however, as the sun shines directly in the windows into the center of the coach.
WINTER RV TIP #8 – INSULATE THE HATCH VENTS
The RV roof may have some fabulously high R-rating that the manufacturer proudly touted when you bought it, but that applies only to the parts of the roof that are solid. Most RV vent hatch covers are thin pieces of plastic, and they don’t have much of an R-factor at all.
You can give the vent hatch covers a hand by using a hatch vent insulator. These have reflective insulation on one side to make them even more effective.
Another option is to cut styrofoam to the exact dimensions of the hatches. When we bought our fifth wheel trailer from the manufacturer NuWa Industries, we asked them to cut four pieces of the Blue Dow insulating styrofoam that they used in the walls to the exact dimensions of our four roof hatches.
The great thing about having insulation on the hatches is that they work both summer and winter. We often use ours in the summertime when we leave the rig for the daytime hours.
Another helpful benefit is that they block out all light. So, if you are parked under a bright light or there is a full moon that wakes you up as it shines right in your eyes, you can block out the light with an insulator in the bedroom hatch.
We use Blue Dow foam from the fifth wheel walls cut to the dimension of our hatches
WINTER RV TIP #9 – DEALING WITH CONDENSATION!
One of the biggest annoyances in cold, winter weather in an RV, is condensation. If you run a vent-free propane heater while boondocking, whether it’s a portable heater or one that is permanently installed, condensation will build up on the insides of the windows when the dew point is at a certain level.
Insulation on our windows – ugh!
You can minimize the condensation build-up by running the RV furnace for a while to blow out the moist air. You can also open a window a crack, or open the RV door for a bit.
Absorber towels sop up moisture with ease.
The fastest way to deal with the condensation is simply to wipe it off with an Absorber towel. As the name implies, these towels are incredibly absorbant. They are most effective when they are damp, so they come with a little plastic container that will keep them damp for months.
Simply wipe the window and then wring out the towel. And repeat. Once the window is dry, give it a final swipe with a soft microfiber towel. This gets rid of any streaks.
To make your life easier during the winter condensation season, remove the window screens and put them in a closet. This way, you aren’t fighting with the screens every time you wipe down the insides of the windows.
How much do we love our Absorber towels? We have two — blue for him and red for me!
WINTER RV TIP #10 – INSULATE THE WINDOWS AT NIGHT
Like the big roof insulation R-factor that doesn’t account for the hatch vents, the well advertised high R-factor in the walls doesn’t account for the windows, which is where much of the heat in a rig escapes, especially at night. Closing the blinds makes a difference. When we’re in a remote area with no one around, we prefer to keep the blinds open so the first light of morning fills the rig. But we can’t do this in the wintertime unless we want to wake up to a rig that is 5 degrees cooler than it could be.
Likewise, on the worst of the cold winter nights, covering the windows with Reflectix insulation makes a big difference. This aluminum foil insulation comes in a big roll, and you can cut it to the exact dimensions of each window. Just use a marker to write on each one which window it’s for.
To put one of these window insulators in place, simply hold it against the glass and then lower the blinds over it. In the case of our biggest one in the back of the rig, we rest the bottom of it on a spare pillow so it doesn’t slip down.
The window-sized piece of Reflectix Insulation is held in place by the window shade.
We keep all of them rolled up together in a closet and use them both summer and winter. In the summertime, they help immensely with keeping the heat out during the day.
WINTER RV TIP #11 – USE THE OVEN
One of our favorite ways of warming up the inside of our buggy is by baking. Mark is the Resident Baker in our household, and there is nothing like a batch of yummy muffins or a fresh loaf of banana bread coming out of the oven to warm us up inside and out!
On a brisk morning, there’s nothing like a fresh loaf of banana bread coming out of the oven!
After the baking is done and the oven is off, we keep the oven door open for a while so we can enjoy the residual warmth as it cools down. By the way, we recently discovered Chiquita banana bread mix, which is absolutely delicious and tastes just like a loaf made from scratch. It requires two bananas, and lately Mark has been adding raisins to it too.
On a cold afternoon, we’ll bake something in the oven for dinner. The longer it takes, the warmer the buggy will get during the baking process! Anything from frozen pot pies or lasagna to a whole chicken does the trick nicely.
WINTER RV TIP #12 – DO SOME EXERCISES
As soon as we wake up in the morning, we do some modest exercises. We might be shivering when we first turn on the vent-free heater, but a quickie round of 25 sit-ups and pushups always gets the blood flowing, and by the time we get in a few rounds with the hand weights, we’re sweating and turning the heater off!
This is also a great way to work off those extra calories from the tasty muffins, sweet breads and pies that keep coming out of our oven!
One way to take the chill off — do a set of sit-ups. Still cold? Roll over and do a set of push-ups!
WINTER RV TIP #13 – PLAY THE FIREPLACE DVD
Fireplace video.
This may sound a little goofy, but a video of a fire burning in a fireplace is really fun and makes the rig cozy. The video simply shows logs in a fireplace burning down to embers, accompanied by the crackling sound a fire makes. It is surprisingly realistic, and quite funky. The crazy thing is that whenever we play it, the person sitting in the recliner closest to the TV always feels a little warm on the side by the fire!
WINTER RV TIP #14 – INSULATE THE HOT WATER HEATER and HOT WATER PIPES
To conserve propane, we always heat the water just once a day, right before we take our showers. After we’re done, we have warm water for dishes, etc. By insulating the hot water heater, the water stays warmer longer. We also put insulating pipe foam on the hot water pipes that run from the heater to the shower and the vanity and kitchen sinks.
Taking a shower in an RV in the winter can be a numbing experience if temps got to freezing the night before, no matter how hot the water is in the hot water heater, because the cold water has to run through the pipes before the hot water reaches you in the shower.
If we are conserving water, we’ll bring a small cooking pot into the shower and run the cold water into it. Then we’ll warm that water up on the stove later for dishes or whatever. Even though it’s less than a quart of water, this way it’s not wasted on our bodies as we hop around in the shower shouting expletives and soaping up our goose bumps!
For more tips on heating an RV, see these articles:
Thank you for using any of our links to Amazon to shop online. When you access Amazon this way, anything you put in your shopping cart right after that results in a small commission to us at no cost to you (no matter what you buy) and helps us keep our site online. It’s a true win-win — THANKS!
Below are some of our most POPULAR POSTS(also in the MENUS above)
More of our Latest Posts are in the MENU.
New to this site?
Visit RVers Start Here to find where we keep all the good stuff. Also check out our COOL NEW GEAR STORE!!*** CLICK HERE *** to see it!
There are a lot of decisions to make when you install solar panels on an RV or boat. Some of the most basic are: what size solar panels to buy, whether to go with flexible solar panels or aluminum framed rigid panels, whether the solar cells should be monocrystalline or polycrystalline, and whether to install nominal 12 volt or 24 volt panels.
We have done several RV and marine solar panel installations, and we have used not only 12 volt and 24 volt panels of various sizes but we have also used both aluminum framed rigid solar panels and the newer semi-flexible solar panels. We have also worked with both monocrystalline and polycrystalline solar panels. This article outlines the pros and cons of the various types and sizes of solar panels and offers some things to think about when you are deciding which solar panels to buy for your RV or boat.
Once you decide on overall capacity for your solar panel array, the next thing to think about is solar panel placement and wiring. The panels should be a matched set of identical or nearly identical panels. If you have a lot of real estate on the RV roof, then you can get a few big panels. If you have a truck camper or your RV roof is cluttered with a lot of things on it already (hatches, vents, antennas, etc.), then you may need to go with smaller panels that can be squeezed in and around everything else.
Our fifth wheel trailer is powered by four 120 & 130 watt 12 volt rigid polycrystalline solar panels wired in series
WHAT VOLTAGE IS THAT SOLAR PANEL?
Solar panels are constructed internally with DC wiring, and they are sized to work on 12 or 24 volt circuits. So, they are commonly referred to as 12 or 24 volt solar panels. What’s confusing is that while the nominal voltage of a solar panel may be 12 or 24 volts, the open circuit voltage is higher. So, for a nominal 12 volt solar panel that is 100 watts, the open circuit voltage (“Voc“) will be 17 or 18 volts. Likewise, for a nominal 24 volt panel, the Voc will be 34 to 36 volts.
Also, smaller solar panels (both physically and in terms of watts) are typically nominal 12 volt panels while larger panels are typically 24 volts. Solar panels under about 150 watts in size are usually 12 volt panels. Solar panels over about 150 watts are usually 24 volt panels.
For nearly four years, we sailed our boat on Mexico’s coast relying on three 185 watt 24 volt polycrystalline rigid solar panels, wired in parallel, for all our electrical needs.
Solar panels work best when they are a matched set. The electrical characteristics of all the solar panels in the array need to be very similar, preferably identical. When upgrading a solar power array this can make things complicated as you try to mix and match old small panels with new big ones.
One technique for upgrading is to wire two 12 volt solar panels in series to work on a 24 volt circuit. For instance, if you have two 100 watt 12 volt panels and you are buying a 200 watt 24 volt panel, you can wire the two 100 watt panels in series and then wire that pair in parallel with the new 200 watt solar panel.
This will work as long as the electrical characteristics of the pair of solar panels in series match the electrical characteristics of the single panel that is wired in parallel with them.
THE EFFECT OF SHADE ON SOLAR PANELS
Shade is the biggest enemy of any solar power installation. Unbelievable as it seems, a tiny bit of shade will effectively shut down a solar panel. The impact is dramatic: a few square inches of shade can drop a solar panels current production down from 8 amps to 2 amps. A few more square inches of shade can drop the current production to 0.
Before deciding on the size of the panels, it is worthwhile to take some time to study the various things that might cast shade across them once they are in place. A closed hatch may cause little shade, but when it is open on a hot day, depending on where the sun is in the sky, it might cast a big shadow across a nearby solar panel. Satellite dishes, air conditioners and even holding tank vents can cast sizable shadows as well.
We put a book in one corner of a 120 watt 12 volt panel and discovered that even though it was a small percentage of the surface area of the panel, that 8.5″ x 11″ book was enough to knock down the current production of a 120 watt solar panel by 80%. Rather than producing 7 amps, it produced a measly 1.4 amps. Egads!
Just 8.5″ x 11″ of shade from this book reduced current production by 80%!
Similarly, shade wreaked havoc on our three185 watt 24 volt panels on our sailboat. The shade from our mast traveled across the panels as the boat swung at anchor, and the current production dropped by 1/3 and then by 2/3 as the shade first crossed one of the three panels and then straddled two of them. It did this over and over, with the current rising and falling repeatedly, as the boat slowly swung back and forth at anchor.
A line of shade from the mast on our sailboat reduced our solar panel array to 65% and then 35% of its capacity as it traveled across the panels and occasionally straddled two of them.
Shade is a huge concern in the solar power industry, and there are several white papers (here’e one) about the impact of shade on commercial solar panel installations. The gist is the importance of spacing the rows of commercial solar panel arrays in such a way that one row of panels doesn’t accidentally shade the bottom inch or so of the next row behind it when the sun is low in the sky.
If it does, the second row of panels shuts down. If there are rows and rows of solar panels spaced like this, none of the panels except the ones in the first row can function until the sun rises a little higher in the sky.
Solar panels are most sensitive to shade along the longest part of the panel, so in the case of our sailboat, when the sun was over our bow, the mast would shade the panels in a strip that had a maximum impact on current production (as you can see in the above photo)!
For RVers, besides rooftop obstructions, shade comes into play primarily if you park near a building or trees. Snowbirds boondocking in the southwest deserts of Arizona and California during the wintertime have little concern with shade from trees and buildings. But summertime RV travelers who boondock in wooded areas need to be cognizant of where the shade from the trees will fall during the course of the day.
WIRING SOLAR PANELS IN PARALLEL vs. IN SERIES
One of the big decisions for a solar power installation on an RV or boat is whether to wire the solar panels in series or in parallel. There are several things to consider when making this decision.
When the solar panels are wired in series, then the developed voltage across all the panels is additive while the current remains constant from panel to panel. That is, if there were four 120 watt 12 volt panels producing 7 amps each, then the developed voltage across all the panels would be 48 volts (12 x 4) while the current would be just 7 amps.
In contrast, when the solar panels are wired in parallel, then the voltage of the panels remains constant through the circuit while the current is additive from panel to panel. For instance, for those same four panels, the developed voltage across them would be 12 volts but the current would be 28 amps (7 x 4).
The solar charge controller takes care of balancing everything out by ensuring the circuit between it and the batteries is 12 volts. In the case of the above solar panels wired in series, the solar charge controller steps down the voltage from 48 volts to 12 volts (if they are 12 volt batteries). The current then increases from 7 amps to 28 amps in the wire run going between the solar charge controller and the batteries.
In the case of the above solar panels wired in parallel, the voltage is already 12 volts, so the solar charge controller does not need to step it down for the batteries.
SHADE EFFECTS on SOLAR PANELS WIRED IN SERIES vs. WIRED IN PARALLEL
When solar panels are wired in series, if shade hits one panel and shuts it down (caused by that solar panel’s internal circuitry building up a massive amount of resistance), then the entire string of solar panels shuts down. For instance, if a tree shaded 1/3 of one solar panel in the string of four panels given above, wired in series, the current production of the entire array of four panels would be reduced to to 0 amps, even though the three other solar panels were in full sun.
In contrast, if the panels are wired in parallel, when shade knocks one panel out, the other panels are unaffected. So, even if 1/3 of one solar panel were shaded, reducing it to 0 amps of current production, the other three would be working just fine. The total current production would be 3/4 of what it could be if that one panel were in full sun (in this case, 21 amps), rather than 0 amps.
So, it would seem that the best way to wire solar panels is in parallel.
Unfortunately, it’s not that easy, and here’s why:
CURRENT and WIRE SIZE in a SOLAR PANEL INSTALLATION
The more amps of current there are flowing in a circuit, the thicker the wire needs to be to ensure that no energy is lost to heat. Unfortunately, thicker, heavier gauge wire is a pain to work with. It’s stiff and doesn’t bend around corners easily. It is hard to tighten down in the solar charge controller connections and it’s hard to crimp ring terminals onto. It is also more expensive per foot.
So, when the solar panels are wired in series, a thinner gauge wire can be used for a given distance than when they are wired in parallel.
Of course, the thickness of the wire is also dependent on the length of the wire. The longer a wire is, the more energy is lost along its length. So, if you are installing the solar panels high on an arch off the aft end of a 50′ sailboat and the batteries are located at the bottom of the hull over the keel, the wire must be a lot heavier gauge than if you are installing the panels on an RV roof directly above the battery compartment.
What is the price difference in the cable? We like to use Ancor Marine Cable because it is tinned and it is very supple (the copper is fine stranded). Here are the price differences for 25′ of 2 gauge wire as compared to 25′ of 10 gauge wire.
Ultimately, there is a dilemma: Is it better to go for thinner, cheaper wire and an easier installation, and wire the panels in series, risking that the whole array will shut down whenever a corner of one panel is shaded by a nearby tree? Or is it better to pay the extra bucks for heavier gauge wire and endure a more challenging installation but have a system that will be more tolerant of partial shade?
What to do?
SOLAR PANEL VOLTAGE and WIRE SIZE
Luckily, there is another option: higher voltage solar panels can be wired with thinner gauge wire. Remember, Watts = Current x Voltage. So, for the same number of watts in a panel, a higher voltage panel will produce a smaller amount of current.
Rather than using four 120 watt 12 volt panels wired in parallel that would produce 28 amps at 12 volts, you can use two 240 watt 24 volt panels wired in parallel that produce 14 amps at 24 volts. The net effect on the battery bank will be the same, but the bigger panels can be wired with smaller gauge wire.
As mentioned above, the wiring that is most affected by these solar panel choices is the wiring that runs from the solar panels to the solar charge controller. The wiring from the solar charge controller to the batteries is the same in either configuration, as the same amount of current will be flowing in that wire regardless of how the solar panels are wired. In the case of solar panels wired in parallel, the voltage will be stepped down in the solar charge controller. So, in our example, the solar charge controller will step down the voltage from 48 volts to 12 volts, ensuring that the circuitry between the solar charge controller and the batteries is at operating at 12 volts.
CHOOSING THE OPTIMAL WIRE GAUGE
The thickness of the wire, or wire gauge, depends entirely on how long the wire is going to be. That is, the wire gauge is determined by how far apart the solar panels and the solar charge controller and the batteries are.
Why is this? The more current that flows in a wire, the more the conductor in the wire will warm up. The more it warms up, the more energy is lost to heat. Eventually, this becomes measurable as a voltage loss between the two end points.
When wiring solar power circuits, you can choose how much voltage loss you are willing to have. Somewhere between 2.5% and 5% is typically considered okay. There are voltage loss tables that will help you decide on the proper wire gauge size for the distance you are spanning between the solar panels and the solar charge controller and between there and the batteries. Here’s a good one:
An Example: 480 watts of solar power located 27′ from the batteries
Say we have four 120 watt 12 volt panels wired in series. If the distance is going to be 27′, then by looking at the third chart at the above link (the 12 volt chart) and going to the line for 8 amps flowing in the wire, it shows a wire run of up to 27′ can be done with 10 gauge wire.
Now, imagine putting those same panels in parallel. 32 amps will flow at 12 volts. For that same 27′ distance you’ll need 2 gauge wire.
Lastly, instead of using four 120 watt 12 volt panels, use two 240 watt 24 volt panels wired in parallel. For this you use the 2nd chart down (24 volt chart). There will be 16 amps flowing in the wire at 24 volts. You will be able use 8 gauge wire.
Of course, due to the nature of multi-stage battery charging and the changing position (and angle) of the sun in the sky, the solar panels will be operating at full tilt for a very short time each day. They may produce max current for 30 minutes near noon as they wrap up the Bulk Stage, however, as the Absorb stage takes over and continues in the afternoon, the solar charge controller will gradually hold the panels back so they produce far less than max current.
With less than peak current flowing in the wires, less energy will be lost to heat.
So, although it may seem dire that you’re wiring is on the hairy edge size-wise, it is only that way for a little while each day. Depending on the overall size of the solar power array, the size of the battery bank, and the state of discharge when the batteries wake up in the morning, your system may not even hit the theoretical maximum current production or even come close.
You must run more wires between the RV roof and the location in the coach where the solar charge controllers are installed (preferably next to the batteries), and so you must not only pay for additional solar charge controllers, but you must buy more wire and install it all. However, this design option does deserve mention and consideration.
TILTING THE SOLAR PANELS
Solar panels perform a whole lot better in the summer than in the winter. This is because the sun rides much higher in the sky and its rays hit the panels at a nearly perpendicular angle in the summertime. The days are also a whole lot longer. In the winter, the sun’s rays hit the panels at an angle and the sun is only out for a short while.
Tilting solar panels in winter can improve current production by 30% Or…install more panels and save yourself from climbing up and down the RV ladder!
To get around this, rather than using ordinary Z-brackets to mount their solar panels on the roof, many RVers use tilting brackets. By tilting the panels towards the sun at about a 45 degree angle (technically, at the angle of your latitude), then the sun’s rays hit the panels at a nice 90 degree angle if they are oriented to face south. This can increase the overall power production by about 30% on a sunny winter day.
The only problem is that you have to climb up on the roof to tilt the panels each time you set up camp and then climb up again later to lay them flat when you are packing up before you drive away. We’ve seen many a winter snowbird driving their RV around with the solar panels still raised.
An alternative is simply to install more solar panels and to keep them lying flat all the time. This is easy for a big RV that has a huge roof but is not so easy for a little trailer with a small roof. We have not installed tilting brackets on our trailers.
MONOCRYSTALLINE vs. POLYCRYSTALLINE SOLAR CELLS
Monocrystalline solar panel
There are lots of different kinds of solar panels on the market today. There are two primary types of solar cells used in the manufacture of solar panels: monocrystalline and polycrystalline.
Monocrystalline solar panels are more efficient and more expensive, but they are also extremely intolerant of shade. Polycrystalline panels are slightly less efficient and less expensive, but they handle partial shade just a smidge better.
The way to tell if a solar panel is monocrystalline or polycrystalline is to look at the pattern of rectangles on the panel itself.
If the circuitry between the rectangles has large silver diamond shapes, it is monocrystalline. If the pattern of rectangles is just intersecting lines, it is polycrystalline.
Polycrystalline solar panel
Examples of popular monocrystalline solar panels are here:
Flexible solar panels have several advantages over rigid panels. They are a little lighter than framed solar panels and you can glue them onto an RV roof using Dicor Lap Sealant, or something similar. This saves you from the complexity of drilling holes into a perfectly watertight roof and risking creating leaks. This is especially helpful with a fiberglass roof. It takes just a few minutes with a caulk gun to attach these panels to the RV roof.
Another nice feature is that on a rounded roof, like an Airstream travel trailer or Casita travel trailer, the panels can bend to follow the contour of the roof.
Mark uses Dicor Lap Sealant to affix flexible solar panels to a friend’s fiberglass roof.
One of the most important things for solar panels to work well is heat dissipation. Rigid aluminum framed solar panels stand up off the roof of the RV by about an inch, allowing air to flow underneath and for heat to dissipate. Air can’t flow underneath flexible solar panels. The aluminum substrate serves to dissipate the heat instead. This may or may not be as efficient a method of heat dissipation, and I have heard of a case where all the flexible solar panels on a sailboat had to be replaced after two years because they did not dissipate the heat sufficiently in the tropics and the panels self-destructed.
FLEXIBLE SOLAR PANEL CONSTRUCTION and INSTALLATION
Our RVing friends Dick & Katie asked us to install six 100 watt 12 volt flexible solar panels made by Eco-Worthy on the roof of their motorhome, along with all the other projects involved in an RV solar power installation. Ironically, the hardest part of the entire installation was removing the plastic protection from the aluminum substrate of each panel (it kept ripping!). We all ended up working on this together.
We had a tough time getting the plastic off the back of the Eco-Worthy flexible solar panels
With all of us working together, we got the job done!
Once we got up on the roof, and got past a cute warning from Winnebego, the installation was straight forward.
Hmmm…I wonder what sage advice the manual suggests for this problem?
Flexible solar panels are lighter than their rigid counterparts
The plastic protection needed to be removed from the face of the panels as well. Interestingly, at one point Mark found himself picking at the corner of the mylar that has the solar collection circuitry embedded in it and almost began to peel that whole layer off the aluminum substrate! But once he got a hold of just the most superficial layer of plastic, it came off easily.
Mark removes the plastic from the face of the flexible solar panels
He used Dicor Lap Sealant to tack down the corners of the panels and then ran a bead around each side of each panel.
FLEXIBLE SOLAR PANEL DISADVANTAGES
Flexible solar panels are less efficient than rigid aluminum framed solar panels, which means you may want to get a few more total watts of solar panels than you would if you were buying framed panels. Bendable panels also can’t be installed on tilting brackets. So, again, buying more total watts may be the best solution.
Flexible solar panels are not as rugged as rigid aluminum framed solar panels built with tempered glass. Overhanging branches can scratch them. This is important for anyone that will be boondocking or dry camping a lot on public lands and in rustic public campgrounds, as it is often impossible to get in or out of a site without ducking under some low lying tree branches.
Some RVers have found that flexible solar panels installed on flat motorhome roofs tend to pool water when it rains. This can lead to debris building up and taking root and damaging the panels.
Perhaps for all these reasons, flexible solar panels are sold with a much shorter warranty than rigid solar panels. Whereas many solar panel manufacturers warranty their tempered glass aluminum framed rigid solar panels for 25 or 30 years, bendable solar panel manufacturers generally warranty their panels for 5 years or less.
This may or may not be relevant for RVers, as the fine print in almost every solar panel manufacturer’s warranty states that their solar panels are not warrantied for use on mobile vehicles.
Also, there has been a huge problem across the entire solar power industry with rigid solar panels failing prematurely in large numbers in big commercial installations (see a May 2013 NY Times article here). Apparently, just because those lovely rigid solar panels are warrantied for decades doesn’t mean they will last that long. We have already had a failure of one of our framed solar panels that was warrantied for 25 years, and we discovered the manufacturer’s warranty did not apply to RV installations.
However, as a general rule, when manufacturers warranty a product for 5 years versus 30 years, it says something about how they think their product will hold up over time.
Nice job! (but don’t fall off that roof!)
CONCLUSION
There are many ways to go about installing solar power on an RV roof, and the solar panels that work best in one installation may not be the same as those that are best for another. Not only is every RV roof different, but every RVer’s needs are different.
If you have loads of space on a big motorhome roof or fifth wheel trailer roof, and you are setting it up for full-time use, you may be best off with three or four 200+ watt 24 volt rigid solar panels wired in parallel. If you have a little tear drop camper you use on weekends and store in the garage, a single flexible 100 watt 12 volt panel may be just the ticket for you.
There is a world of difference between wet cell batteries (also called flooded batteries) and AGM batteries for use in an RV or marine battery bank, because AGM batteries are totally sealed, maintenance free and keep the user from coming into contact with battery acid (electrolyte). In a nutshell, the advantages of AGM batteries over wet cell batteries are the following:
AGM batteries are maintenance free, which means:
They don’t need periodic equalizing to clean the internal plates and never need the electrolyte topped off with distilled water.
They do not release gasses during charging, so they don’t need special venting in the battery compartment.
Since gasses are not released, the terminals and battery cables do not corrode over time and don’t need to be cleaned.
AGM batteries discharge more slowly than wet cells, so an RV or boat can be stored for a few months without charging the batteries.
AGM batteries charge more quickly than flooded batteries because they can accept a higher current during the Bulk charging phase.
AGM batteries can be installed in any orientation, which is helpful if installation space is limited.
AGM batteries can’t spill battery acid if they are tipped over. This is especially important when a boat heels excessively or capsizes. (Not that you’d be too concerned about spilling electrolyte if your boat were upside down!)
.
OUR ORIGINAL BATTERY INSTALLATION
We used Trojan T-105 wet cell (flooded) batteries for nearly six years in our fifth wheel trailer, and they worked great. They were installed in our basement compartment, all lined up in a row. This was a custom installation that was done by H&K Camper Sales in Chanute, Kansas, when we purchased our trailer new from the NuWa factory in 2008.
Four 6 volt golf cart batteries installed in our fifth wheel basement
The original battery compartment was designed at the NuWa factory to hold two 12 volt Group 24 batteries. Group 24 batteries have the same footprint as 6 volt golf cart batteries but are about an inch shorter. We had 2″ angle iron bolted onto our fifth wheel frame so the four batteries could stand side by side in battery boxes.
2″ angle iron is bolted onto the fifth wheel frame to support the batteries.
There were four venting flex hoses that ran from the battery boxes to four individual louvered vents on the front of the basement on either side of the hatch door.
Each battery box is vented to the outside with flex hose going to a louvered vent cover.
These batteries worked well, but because we put our RV in covered storage for 4 to 20 months at a time during the four years we cruised Mexico’s Pacific coast on our sailboat, we were not actively present to take care of the the battery charging and maintenance duties. Despite our best efforts to have someone do this while we were gone, when we moved off of our boat and back into our fifth wheel, we found our four Trojan wet cell batteries were completely dead and unrecoverable.
We replaced these batteries with four inexpensive 6 volt golf cart flooded batteries from Costco. These new batteries did not last. Within 18 months, the internal plates had sulfated badly, they took forever to charge, and they discharged extremely quickly.
Upgrade time! We removed the old wet cell batteries and replaced them with AGMs.
In April, 2015, while staying in beautiful Sarasota, Florida, we replaced our wet cell batteries with four fabulous new Trojan Reliant T105-AGM batteries that Trojan had just begun manufacturing and selling. We replaced all the wiring as well.
CORROSION CAUSED BY WET CELL BATTERIES
One of the biggest problems with wet cell, or flooded, batteries is that the battery terminals and ring terminals on the battery cables get corroded easily due to the gassing that goes on when the batteries are being charged. When Mark removed the battery cables from our old batteries, he measured as much as 20 ohms of resistance from the end of each cable to its ring terminal.
We measured 20 ohms of resistance between the end of the cable and the end of the ring terminal.
Flooded batteries need to be held at 14.5 or more volts during the Absorption charging stage (depending on the battery), and at this voltage the electrolyte in the batteries begins to release gasses into the air. These gases are both explosive and corrosive, and venting them protects everything around them. However, inside the battery box these gases can corrode the battery terminals and wiring.
The best way to clean off the corrosion is with a solution of baking soda and distilled water. Put it in a disposable cup and then use a cheap paintbrush to paint it on and smooth it around the terminals and cable ends. Let it sit for a few minutes and then pour a little distilled water over it to rinse the baking soda and crud off. Dry it with paper towels.
Also, while driving down the road, the electrolyte can splash around inside the battery cells and drip out the vent holes. Dust can settle on the spilled electrolyte and can cause a minute trickle discharge across the top of the battery. So, it is important to wipe down the tops of the batteries regularly and keep them clean.
It’s a good idea to wear rubber gloves for all of this too!
These batteries did not hold up well and corroded badly every few weeks.
Watch out for drops of liquid settling on your clothes when messing with the batteries. It’s nearly impossible to avoid, and Mark has holes in some of his jeans from drops of battery acid landing on his pants while he either checked the state of charge of the batteries with a hydrometer or poured distilled water into the battery terminals or cleaned the corrosion from the battery terminals and cable connections.
Now that we have nifty new AGM batteries, we no longer need the hydrometer!
OUR NEW RV BATTERY INSTALLTION
We chose the new Trojan Reliant T105-AGM batteries to replace our old flooded batteries because these are a completely redesigned battery from one of the top battery manufacturers, Trojan Battery. Rather than being dual purpose batteries, like othe AGM batteries on the market, the new Trojan Reliant AGM batteries are single purpose deep cycle batteries.
Our new Trojan Reliant T105-AGM batteries ready to go.
TRUE “DEEP CYCLE” – START BATTERIES vs. HOUSE BATTERIES
Large RV and marine batteries can be used both to start big engines and to run household appliances. However, these functions are polar opposites of each other! A start battery gives a big but short blast of current to get an engine started and then does nothing. In contrast, a house battery provides a steady stream of current to power lights and household appliances for hours on end.
Most deep cycle AGM batteries on the market today are actually dual purpose start and deep cycle batteries, largely due to the history of how batteries have developed and what they have been used for. The new-to-market (in 2015) Trojan Reliant AGM batteries were engineered from the ground up to be strictly deep cycle batteries, and the design is not compromised with start battery characteristics.
Mark installs the new batteries in the old plastic battery boxes.
12 volt batteries come in many sizes: Group 24, Group 27, Group 31, 4D, 8D and more. As the battery sizes increase, they provide more and more amp-hour capacity. 6 volt batteries come in various sizes too, and the golf cart size is one of several.
The Trojan Reliant T105-AGM 6 volt golf cart style batteries (68 lbs. each) are rated to have a capacity of 217 amp-hours when two of them are wired in series to create a 12 volt battery bank. In comparison, our sailboat came with three Mastervolt 12 volt 4D AGM batteries (93 lbs. each), and we added a fourth. These batteries were rated to have a capacity of 160 amp-hours each.
The advantage of using two 6 volt golf cart batteries instead of enormous 4D or 8D 12 volt batteries is that they are smaller, lighter and easier to carry around and to put in place during the installation and easier to remove in the event of a failure.
BATTERY WIRING
We wired our four new 6 volt batteries in series and in parallel. We wired two pairs of batteries in series to create two virtual 12 volt battery banks. Then we wired those two 12 volt banks in parallel with each other.
Four 6 volt batteries: two pairs wired in series to make virtual 12 volt batteries. Those pairs are wired in parallel with each other (red / lavender circles explained below).
Trojan Battery recommended the following wire sizes for this battery configuration:
4 gauge wire between the batteries that are wired in series
2 gauge wire between the pairs of 12 volt battery banks wired in parallel
This is thicker wire than many RVers and sailors typically select for their battery banks.
Because we were wiring batteries that would be physically lined up in a row, we drew out a wiring diagram to be sure we got it right.
Same wiring but with the batteries lined up in a row (red and lavender circles explained below).
WIRING THE BATTERY CHARGERS and INVERTER
Because AGM batteries have a lower internal resistance, they can accept a higher bulk charging current than wet cell batteries.
Trojan Reliant AGM batteries can accept a bulk charge current of 20% of their 20 hour amp-hour rating. For the T105-AGM batteries, the 20 hour amp-hour rating is 217 amps per pair of batteries wired in series. So the max current the batteries can accept is 20% of 217 amps, or 43 amps, per pair. The wiring for each charging system should be sized for a max current flow of 43 amps.
In contrast, Trojan’s wet cell batteries can accept only 10%-13% of their 20 hour amp-hour rating. For the T105 battery, the 20 hour amp-hour rating is 220 amps per pair of batteries wired in series. So the max current the batteries can accept is 13% of 220 amps, or 28 amps.
If the charging systems are connected to the battery terminals of just one 12 volt battery, whether it’s an individual Group 24 or 4D battery or is a pair of 6 volt golf cart batteries wired in series, then the batteries in the system will not charge equally. Likewise, if only one battery of the parallel bank is wired to the DC side of the inverter, the batteries will not discharge equally.
In the above drawings, the two optimal connection points for the charging and inverter systems are shown in red and in lavender. Either pair of terminals works equally well.
We found that with individual devices for our converter, our inverter and our solar charge controller, there were a lot of ring terminals getting piled up on two of the battery terminals. So we chose the inner pair of battery terminals for the inverter and the outer pair for the converter and solar charge controller.
Since we dry camp 100% of the time and rarely use our converter except when we have to pull out our generator after days of storms or to run our air conditioning, this division means that our primary charging system spans the batteries one way while the inverter driving the AC household systems that discharge the batteries span the batteries the other way.
NOT ALL BATTERY CABLE IS CREATED EQUAL
We chose Ancor marine wire for our battery cables because it is very high quality cable. The individual strands of wire inside the casing are thin, which makes this cable very supple, despite being thick overall. It is easy to work with and to snake around tricky areas. The individual strands inside the cable are tinned as well.
We don’t own a crimper of that size, but West Marine Stores often have a crimper for heavy gauge wire that customers can use, and we got an excellent crimp from a workbench mounted crimper.
Crimping 2 and 4 gauge wire requires a large crimper.
With Mark hanging onto the ring terminal and me hanging onto the wire, we both pulled with all our might and we couldn’t pull the lug off the wire.
A good, solid crimp.
As these projects always go, we needed to return to West Marine for crimping a few days later when we wired in our solar charge controller. We went to a closer West Marine store this time, and they had a different crimper that wasn’t quite as nice.
This wire is so thick you need a huge wire cutter!
Mark wasn’t as confident that these crimps were as good electrically as the ones made with the first crimper, even though we couldn’t pull the lugs off the wire. So he fluxed the wire and used a propane torch to flow solder into the connection. This way we had not only a solid physical connection but an excellent electrical connection as well.
Mark flows solder into the connector to make a superior electrical connection.
Then he slipped shrink tubing over the connection and used a heat gun to shrink it in place.
Shrink tube covers the whole connection, and a heat gun tightens it up.
Back at the RV, Mark wired the batteries up. He placed the batteries in the battery box bottoms to keep them from sliding around and put the battery box tops on as well so that if anything fell over in the basement while we were driving, it wouldn’t accidentally land on the battery terminals and short something out. We keep that area clear, but you never know when you’ll hit a huge bump and things will go flying.
The batteries are ready for their battery box tops.
The AGM batteries do not need to be vented, so he removed all the vent flex hoses. This gave us much better access into the fifth wheel basement from the front hatch door.
The new batteries are installed, wired and labeled.
Without any flex hose behind the louvered vents, dust and road grime could now flow into the basement, so Mark removed the vent covers and placed a piece of solid plastic behind each one.
The louvered vents are open to the basement in the back and will let dust in.
Mark puts a thin plastic sheet behind each louvered vent to keep dust out.
The performance of these new batteries is nothing short of outstanding. We are floored everyday by how quickly they get charged, and not one bit of corrosion has appeared anywhere.
Mark is happy not to have to check the electrolyte levels in the batteries any more or to remember to equalize them every month. The new AGM batteries are winners all around.
Even though AGM batteries don’t have to be installed in battery boxes, ours are because our basement is large and open and we want to protect them from falling objects!
WHY WOULD ANYONE USE FLOODED BATTERIES?
Our Trojan T-105 wet cell batteries worked just fine for us for years, and flooded are actually advantageous over AGM batteries in two significant ways:
Flooded batteries are much cheaper than AGM batteries.
Well maintained wet call batteries can be cycled more times than AGM batteries
Flooded batteries cost 30% to 40% less than AGM batteries. This can add up to a savings of hundreds of dollars. Depending on the value of the RV or boat, it just may not make sense to have a huge investment in batteries on board.
Also, perfectly maintained wet cell batteries can be cycled more times than AGMs. “Perfectly maintained” means staying on top of equalizing the batteries to keep the battery plates clean and also checking each cell in each battery regularly to ensure that the electrolyte is completely topped off with distilled water at all times.
Under these ideal conditions in the laboratories at Trojan Battery, the Trojan T105 flooded batteries can survive 1,200 cycles where they are discharged to 50% (12.06 volts) and then fully recharged. The Trojan Reliant T105-AGM batteries can survive only 1,000 cycles.
Of course, battery cycling in real world conditions is very different than in laboratory conditions. The degree to which RV and boat batteries are discharged and recharged day to day is far from regular (partial discharging and partial recharging are common). Also, batteries on RVs and boats that are left in storage for any period of time can be difficult to maintain and may degrade despite good intentions (like ours did).
So, the ultimate performance and value of flooded versus AGM batteries is going to vary widely from one RVer or sailor to the next. However, for us, we will not be going back to wet cell batteries any time soon!
More of our Latest Posts are in the MENU.
New to this site?
Visit RVers Start Here to find where we keep all the good stuff. Also check out our COOL NEW GEAR STORE!!*** CLICK HERE *** to see it!
What happens when two RV or marine battery charging systems attempt to charge the batteries at the same time? The interactions between solar charge controllers, converters, inverter/chargers and engine alternators can be complex, and in our lives off the grid in a sailboat and RV, we have observed them working together in many different kinds of circumstances.
This page offers some insights into what goes on when two battery charging systems operate simultaneously, specifically: solar power and shore power, and solar power and an engine alternator. It is the fourth post in our series on RV and Marine Battery Charging Systems. The previous articles in this series are:
When two battery charging systems are working side by side simultaneously, each follows its own internal algorithms to get the job done. However, when this happens, and the two charging systems measure the battery voltage to determine which charging stage they should each be in, they don’t see a “real” value. They see an artificially elevated battery voltage due to the presence of the other charging system. This can throw one or the other or both systems off of their normal Bulk-Absorb-Float cycle.
Because solar charging systems operate 24/7, the most common scenario in which two charging systems work simultaneously is solar charging and some form of artificially powered charging, either a converter or inverter/charger when the RV or boat is plugged into shore power or the generator is turned on, or an engine alternator when the boat or motorhome is under way.
The bottom line with two charging systems working simultaneously is that each will do a little work, but one will do more work than the other. Higher end solar charge controllers are designed to ensure that the batteries are never overcharged. As explained in the previous post about solar charge controllers, they are the gate keepers for the solar panels and will reduce the current coming in from the panels to 0 amps if need be.
There are many factors to consider when running an artificially powered charging system alongside a solar charging system. And in reality, just letting the two systems do their thing without worrying about how they get along is probably fine. But for those who want to ponder the relationships, here are some things we’ve learned.
In order for all the charging systems on an RV or boat to work together truly harmoniously, it is helpful for the voltages at which the systems change charging stages to be the same across all the systems. For instance, each charging system should be set up with one common set of voltages similar to the following:
Obviously, these voltages should be whatever values you have determined are optimal for your battery type. Unfortunately, some charging systems don’t allow you to enter specific voltages, so you may be stuck with whatever defaults the manufacturer chose or whatever “set” of voltages they provide that is closest to the values you want.
Soaking up the sun: 600 watts of flexible solar panels we installed on a friend’s motorhome roof.
As you can see, if one system has an Absorb target voltage of 14.7 volts and another has an Absorb target voltage of 14.1 volts, there is going to be a conflict. What will happen is that the system that is aiming for the higher voltage will win out and raise the batteries to or towards the higher voltage. The reaction of the other system will depend on how it was designed to handle a situation where the battery voltage is higher than the stage it was in. This is true for all the target voltages (Bulk, Absorb and Float).
Similarly, all the charging systems on the RV or boat should be set up with the same algorithm for switching from one stage to the next. However, as shown in the posts about converters, inverter/chargers and engine Alternators and about solar charge controllers, this is not possible, because every product made by the many manufacturers who build these things has a unique charging algorithm.
There are some similarities, however. All multi-stage charging systems remain in the Bulk stage, pouring the maximum current they can into the batteries, until the Bulk voltage is reached. Then they switch to the Absorb stage. However, no two charging systems use the same criteria to exit the Absorb stage to go into Float. The Float stage is also handled differently by different chargers and manufacturers.
Every RV and marine battery multi-stage charging system monitors the battery voltage to decide which stage to be in. How and where this voltage is measured and how each device is internally calibrated can make quite a difference.
For instance, the solar charge controller in a sailboat may be located as much as 20′ from the battery bank if the batteries are strung out from bow to stern in the bottom of the bilge and the charge controller is mounted in an aft compartment. Unless the charge controller is connected to the batteries with fairly beefy wires, there will be some voltage loss between the batteries and the charge controller, and the charge controller will get inaccurate readings of what the battery voltage actually is.
This can happen even if the distance is just 10′ but the wire used is too small for that distance. It can also happen if the engine alternator or the converter or the inverter/charger is a long distance from the batteries. Wire gauge sizes, distances and percentages of voltage lost are given in the following chart:
Higher end solar charge controllers are complex pieces of electronic engineering that are likely to be calibrated pretty well coming out of the factory. However, a cheapie single stage converter, like the factory installed units that come with so many RVs, may not be calibrated as well, and may be off in its measurement of the battery voltage by a tenth of a volt or more. Likewise with a simplistic engine alternator.
It was a big surprise to me to read in the user manual for our boat’s engine alternator/regulator (a Balmar ARS-4 multi-stage regulator) that the voltages may be off by +/- 3%. That means that a target Bulk voltage of 14.4 volts could vary between 14.0 volts and 14.8 volts. Hmmm. Not a lot of precision there!
Our solar panels catch some tropical rays on the back of our sailboat during our cruise in Mexico.
If the two charging systems that are working simultaneously are detecting different voltages on the batteries — for instance, the solar charge controller is measuring the batteries to be 14.5 volts while the converter is measuring them to be 14.7 volts — they will each react according to their own internal charging algorthims.
For instance, say both the solar charge controller and converter are in Bulk mode, trying to attain a voltage of 14.7 volts before switching to Absorb. When the batteries reach 14.7 volts according to the converter, the converter will think they have achieved the Bulk voltage already and will switch to the Absorb stage, while the solar charge controller will remain in the Bulk stage because it sees only 14.5 volts, and it will continue aiming for 14.7 volts, according to its internal measurements and algorithm.
What does this mean? It simply means that the solar charge controller will continue to let as much current in from the solar panels as they can produce while the converter will already be backing off how much current it puts into the batteries to hold them steady at what it perceives to be 14.7 volts (and which the solar charge controller sees as 14.5 volts). Not a big deal. The solar charge controller will keep pushing while the converter keeps backing off, and the job will eventually get done.
LESSONS LEARNED FROM OUR ENGINE ALTERNATOR AND SOLAR CHARGE CONTROLLER
The most challenging relationship we’ve had between charging systems was on our sailboat, and it was the one that forced me to investigate this whole business more deeply and to learn how to program a solar charge controller — and to discover, in the process, the value of programming one!
The two systems were our Balmar ARS-4 engine alternator/regulator and our Xantrex XW-MPPT-60-150 solar charge controller. The charging algorithms for these systems are described in detail here (for the alternator) and here (for the solar charger).
When I first observed them working together, I noticed two things right away.
1) Whenever we turned on the engine, the solar charge controller went into the Float stage soon afterwards.
2) Once the solar charge controller was in the Float stage, if we turned the engine off, it remained in the Float stage, even if the batteries hadn’t been fully charged by the engine alternator.
For instance, if the solar charge controller had been in the Absorb stage when we turned the engine on, and then we ran the engine for just 15 minutes and turned it off (not nearly long enough to charge the batteries), the solar charge controller would wind up in the Float stage and remain there for the rest of the day, depriving the batteries of a proper charge.
Engine Alternator Causes the Solar Charge Controller to Switch from Absorb to Float
The thing about batteries in a complex vehicle like a motorhome or a boat is that they are running many different systems that are continually turning on and off. In the case of our boat, when we were underway, any or all of our big systems might be in use at any one time: fridge and freezer compressors, radar, chartplotter, autopilot, anchor windlass, and even the microwave.
100 amp Balmar diesel engine alternator
Worst case, all of those things might be on at once for several minutes as we raised or lowered 200′ of stainless steel anchor chain with a 60 lb. anchor attached to the end of it (well, maybe not the microwave!).
Plus, there was no guarantee we’d run the engine long enough for the alternator to go through its Bulk and Absorb stages and charge the batteries completely.
We might run it for as little as a few minutes while moving from one anchoring spot to another, or for half an hour while we motored out of the bay to go daysailing.
We wouldn’t want to idle the engine at anchor just to charge the batteries, because the engine RPMs have to be fairly high for the alternator to generate a good charging current. These high RPMs happen naturally while driving the boat, but unfortunately, conventional wisdom says that revving the engine to high RPMs while not in gear (i.e., without a load on it) risks glazing the cylinder walls.
Besides it being random as to how long we might run the engine, it was also random as to what state the solar charge controller would be in when we started the engine up.
We might start the engine in the dark to raise the anchor, and in that case the solar charge controller would be asleep. Or we might do it early in the morning when the solar charge controller was in the Bulk stage and gamely trying to get whatever current it could from the wimpy sun on the horizon. Or we might do it later in the day when the solar charge controller was in the Absorb stage and cranking away.
We used a clamp-on ammeter to find out exactly what was going on at various points in the system. We put it around the alternator’s battery cable to see how much current the alternator was putting into the batteries. We also used it on the solar charge controller’s battery cable to verify that the current it displayed on its LCD screen was correct (it was).
The alternator is pouring 77.9 amps into the batteries – WOW!!
Whenever we turned on the engine, regardless of what the solar charge controller was doing, the engine alternator would immediately go into the Bulk stage and dump as much current into the batteries as they needed to reach the alternator’s Bulk voltage.
If the solar charge controller had been in the Bulk stage already, its job would suddenly become much easier as it got a huge boost from the alternator.
If it had been putting 21 amps into the batteries and had been slowly raising the voltage towards 14.4 volts (the setting we had for the boat’s batteries), the engine alternator might contribute another 40 amps for a while, getting the batteries up to the Bulk voltage a whole lot faster than if the solar panels had continued working by themselves.
If the solar charge controller had been in the Absorb stage already, putting something like 18 amps into the batteries to hold the Absorb voltage of 14.4 volts, the engine alternator would begin its own Bulk stage regardless, and it would remain in the Bulk stage for 36 minutes as it followed its own internal algorithm.
The solar charge controller would react by backing off and delivering less current.
To make things more complicated, as these two systems worked through their charging stages, the loads on the batteries would be fluctuating widely as Mark and I went about our business of living on a boat.
If the fridge and freezer compressors were both running, and the autopilot was maintaining our course and the radar and chartplotter were on and we were making burritos in the microwave, the batteries would need a lot of current.
However, if neither compressor was on and someone was hand steering the boat, etc., then the batteries would need a whole lot less current. During those lulls in current demand, the solar charge controller would suddenly scale things way back and put just 8 or 9 amps from the panels into the batteries.
As soon as that happened, the solar charge controller would suddenly switch to the Float stage!
Huh?!
After some sleuthing, as described in the previous post, I realized that the charge controller was switching from Absorb to the Float stage because the current needed to maintain the Absorb voltage had dropped below 2% of the capacity of the battery bank.
In Tangolunda Bay (Huatulco, Mexico) we motored back and forth across the bay every few days to anchor out of the swell as it changed its flow.
Since I had entered the true value of the battery bank (710 amp-hours), the controller switched from Absorb to Float when the current dropped below 14 amps (2% of 710).
So, I lied to the controller and told it the battery bank was just 250 amp-hours. Then it would remain in Absorb down to 5 amps.
What I found (by trial and error) was that the solar charge controller pretty much always needed more than 5 amps when it was in Bulk or Absorb.
I don’t know why the alternator didn’t produce that last 5 or so amps on its own, but I suspect it was because the alternator’s Absorb voltage was set to 14.2 volts while the solar charge controller’s Absorb voltage was set to 14.4 volts (the alternator had “sets” of values for the three target voltages, and 14.2 volts for Absorb was in what I felt at the time was the most appropriate set).
The Solar Charge Controller Gets Stuck in the Float Stage
The second problem I encountered was that in the event that the solar charge controller went into the Float stage prematurely, then, after the engine was turned off it would remain there until the next morning.
Xantrex solar charge controller (bottom plate removed)
Yet the batteries may not have been fully charged by the alternator, and they may have really needed to remain in Absorb with the solar panels charging them at a fast clip for another hour or two.
In this case, the solar charge controller needed either to resume the Absorb stage or cycle back through the Bulk stage as soon as the engine was turned off.
The only way the Xantrex XW MPPT 60-150 would cycle back through the Bulk stage is if the battery voltage dropped below a certain level.
I experimented with different voltages. The Float voltage was 13.4 volts, so if I set the “ReBulk” voltage to be 13.5 volts or higher, then the charge controller would never get into the Float stage at all, because it would keep cycling back to Bulk.
According to the user manual, this is actually a valid way to operate this solar charge controller, and they even provide a programming parameter that sets the charge controller up to be a “two stage” charger that has no Float stage and has just the Bulk and Absorb stages.
I wasn’t comfortable with not having a Float stage (although in hindsight that probably would have been just fine given the intermittent heavy loads that were on the batteries all day long). In the end, I settled on a ReBulk value of 12.9 volts.
So, if the solar charge controller was in the Float stage after the engine was turned off, and a big load came on some time afterwards that drew the battery voltage down from 13.4 volts to below 12.9 volts (microwave plus fridge and freezer, for instance), then the solar charge controller would cycle back through the Bulk stage and start the charging cycle all over again.
Programming For Storage
Periodically, we left the boat for a month or several months at a time when we traveled inland or went back to our RV for hurricane season. Since the fridge and freezer would be turned off, and there would be no loads on the batteries at all, I would undo these two programming changes. I would reprogram the solar charge controller with the true size of the battery bank so it would switch from Absorb to Float at 14 amps rather than 5, and I would change the “ReBulk” voltage back to 12.5, the factory default.
Solar power is free, however, the electricity from shore power hookups may not be. If your shore power electricity is “free” (i.e., built into the overnight fee you are paying for your RV site or boat slip), then it doesn’t really matter which charging system is dominant.
If you have metered electricity (a common situation if you are renting your RV site or your boat slip on a monthly, seasonal or annual basis), and you are paying for your electricity, then you may want to ensure that your solar charger is running the show and doing the bulk of the work while your converter or inverter/charger is playing second fiddle.
One easy way to do this is just to flip off the electric switch on the shore power post. Flip it on only as needed when the batteries get low and need a boost.
We did this a lot when we lived on our sailboat. We lived at a slip in Paradise Village Marina in Puerto Vallarta, Mexico, as well as at slips at Hotel Coral and at Cruiseport Marina in Ensenada Mexico for months at a time without plugging in the shore power cord at all. During hurricane seasons, we also left our boat in a slip in Marina Chiapas for seven months without plugging it into shore power.
It was nice when we settled up the bills for these places at the end of each stay to have a big ol’ “$0” on the line item for electricity.
What Happens If You DO Plug In?
If your RV or boat is plugged into shore power, and the switch at the post is turned on, it is hard to get the solar power system to be dominant because its power source is flakey (as explained here).
We plugged our sailboat into shore power for several months while we lived aboard at Kona Kai Marina in San Diego at the end of our cruise.
Schneider Electric (Xantrex) 2500 watt Freedom inverter / charger
Our Xantrex inverter/charger went through the Bulk and Absorb stages the first time we plugged in, and then it remained in the Float stage forever after (except when we unplugged to go day sailing and plugged back in again upon returning)!
Each morning when our Xantrex solar charge controller woke up, it zipped through the charging stages and went into the Float stage after just a few minutes, because it saw the batteries were already fully charged.
In our RV, we plugged into shore power for 48 hours during rainy and stormy skies while we stayed at Narrows Too RV Resort in Maine. It was overcast when we plugged in. Our Outback solar charge controller was in the Bulk stage putting about 6 amps into the batteries at around 13.9 volts (it was aiming for 14.7 volts).
Ordinarily, since we live a solar power only lifestyle, our Outback solar charger is set up with Bulk and Absorb values of 14.7 volts, a minimum Absorb time of 2 hours and a maximum Absorb time of 4 hours. However, our Iota DLS-90 / IQ4 Converter has a fixed (non-modifiable) Bulk voltage of 14.6 volts and Absorb voltage of 14.2 volts and Absorb time of 8 hours.
I temporarily changed the solar charge controller to have Bulk and Absorb voltages that matched the converter, and minimum and maximum Absorb times of 0 hours so it would remain in Absorb only as long as it took to get to Bulk (the charging algorithm of the Outback solar charge controller is explained in detail here).
Iota DLS 90 IQ4 Converter and smart charger ready for installation in our RV
As soon as we plugged in, the converter began dumping 49 amps into the batteries which zoomed the battery voltage up to the converter’s Bulk stage value of 14.6 volts. Then it backed way off to 30 amps, then 20, then 15 as it held the converter’s and solar charger’s Absorb voltage of 14.2 volts (our new Trojan Reliant AGM 6 volt batteries charge up extraordinarily quickly!).
The Outback solar charge controller responded by putting in a few amps at first, but then it displayed “Bat Full” and went to sleep!
From there, the Outback solar charge controller went through its usual Sleeping and ZZZZ stages as the Iota DLS-90 / IQ4 Converter quietly slipped from Absorb (14.2 volts) to Float (13.6 volts). When the Outback solar charge controller went through its wakeup sequence after being in the ZZZZ stage for 3 hours, it saw the batteries were fully charged, so it rolled over and went back to sleep in the ZZZZ mode.
We catch our RV’s solar charge controller sleeping on the job at midday! The solar panels are in full sun and are at 68 voltsThe converter is in control and has elevated the batteries to 13.5v But the controller sleeps soundly as 0 amps go from the panels to the batteries!
In fact, the whole rest of the time we were plugged into shore power, the Outback solar charger stayed in the ZZZZ mode, even in bright afternoon sunshine. Every 3 hours it would lazily open its eyes, yawn, look at the state of the batteries, see that they were fully charged and go right back to dreamland in the ZZZZ mode.
To summarize, these are two examples of how different solar charge controllers handled the presence of full-time shore power:
No. On another occasion, while getting repairs done at an RV dealership, we plugged in our trailer for an afternoon while it was out on the lot next to the building on a cloudy day. The solar charge controller was putting in 6 amps at 13.8 volts in the Absorb stage (trying to keep the batteries at 14.7 volts) at mid-afternoon.
As soon as the shore power cord was plugged in, the converter began dumping 55 amps into the batteries and the battery voltage zoomed to 14.6 volts. The solar charge controller kept putting in around 6 amps.
For the next few minutes, the total current going into the batteries dropped from 61 amps to 33 amps and then settled there. If the solar charge controller could put in 8 amps, as the sky lightened, the converter put in 25 amps. If the solar charge controller could put in only 2 amps as the sky darkened, the converter put in 31 amps.
Suddenly, the converter switched to its Absorb stage where it holds the batteries at 14.2 volts, and the total current going into the batteries dropped to 20 amps. The solar charge controller was still in its own Absorb stage where it wanted to hold the batteries at 14.7 volts, so it kept putting in as much current as it could (5 to 8 amps and even as high as 12 when the sun came out for a few minutes) while the converter made up the difference, keeping the total at around 20 amps.
We didn’t stay plugged in long enough to see the solar charge controller switch to Float (the converter stays in Absorb for 8 hours), but at that point the converter would have held the batteries at 14.2 volts while the solar charge controller wanted them at 13.5 volts. It also would have been dark, so the converter would have been in complete control and the solar charge controller would have gone to sleep.
If you are using a generator to give the batteries a boost of charge because you’ve been in cloudy conditions or don’t have enough solar power to run everything on board indefinitely, then you’ll want the generator to charge the batteries as quickly as possible, saving you a few dollars in fuel (gas or diesel) and saving yourself from the loud noise and obnoxious fumes of the generator itself.
Yamaha 2400i generator — our backup
In essence, the goal with a generator is to run it for as short a time as possible to get the batteries charged up.
With solar power, at the end of the day, before nightfall, the batteries are in their most charged state.
During the evening and into the darkest hours of the night, the batteries get depleted from running the lights, the TV, the computers, the microwave and whatever else your household uses until bedtime.
By dawn, the batteries are at their lowest state of charge. This is also a time when the sun is low in the sky and the solar panels are operating weakly and producing minimal current.
Early morning is the ideal time to turn on the generator!
An Example of Generator Use at Midday versus Dawn
The first time we fired up our generator to charge our batteries via the Iota DLS-90 / IQ4 converter, we’d had several overcast days in a row. It was mid-afternoon, and the batteries were fairly depleted from days of cloudiness. However, they had already gotten about 25 amp-hours of charge during the morning and noon hour, so they weren’t as depleted as they had been at dawn.
The solar panels were limping along in the Bulk stage with the batteries at about 13.5 volts. The solar charge controller was aiming at a Bulk voltage of 14.7 volts and the panels were valiantly trying to produce enough current to get there, but all they could muster was about 6 amps. It wasn’t likely the batteries would reach the Float stage before dark.
As soon as we turned on the generator, the the Iota converter went into the Bulk stage and began delivering about 60 amps to the batteries. It quickly got them up to 14.6 volts and switched to Absorb, dropping to about 20 amps. Great! But this converter is capable of putting 90 amps into the batteries, so why run it when Bulk mode delivers just 20 amps?
We let the solar panels do their job during the day.
We decided turn off the generator and let the solar panels do whatever they could for the rest of the day.
Early the next morning when the batteries were depleted from several days of inadequate charging plus a night of activity in the RV (they were down to about 12.3 volts), we fired it up again.
I did not modify the settings on the Outback solar charge controller to match those of the converter because we were just going to run the generator for a few hours and probably wouldn’t need it again for a few months.
This time the converter rolled up its sleeves and got to work, pumping 67 amps into the batteries as it aimed for its target Bulk voltage of 14.6 volts. The solar charge controller was in Bulk mode too and was busy putting in 1-2 amps of its own (it was early morning), and with the converter’s assistance, it briefly hit 14.7 volt Bulk target and switched to Absorb.
With both the converter and solar charge controller operating in the Absorb stage, the converter dropped the current to maintain the target Absorb voltage. The solar charge controller could still bring only 1-2 amps to the party due to the low light, so the converter was in control and doing virtually all the work.
We shut off the generator off after about two hours and let the solar charge controller take over. Now that the batteries were partially charged up, the solar charge controller was able to get the batteries up to its Absorb voltage target and finish the job, even in the overcast conditions, getting the batteries through its Absorb stage and going into the Float stage for the first time in a few days.
So, you can see, there are many ways to charge RV and boat batteries and many things to consider. Of course, it’s easy enough to leave the various charging systems at their factory settings after installing them, and there is nothing wrong with that!
But if you want to understand your system and get the most out of it — especially if you are using solar power and end up running a second charging system in conjunction with your solar power system — you may want to dig into the nitty gritty details buried in the user manuals and figure out what the charging algorithms are and how to program each system with the parameters that make the most sense for you.
All battery charging systems for mobile installations like RVs and boats have become increasingly more sophisticated over the years. A quick review of the older systems described in detail in the previous posts here and here show how the engineers designing these systems have become more and more knowledgeable about the real world applications of their products and what conditions they might encounter as they interact with other charging systems.
As the years go by from here forward, more and more solar charge controllers, inverter/chargers, converters and engine alternators will be designed with the understanding that they may not be the only charging system operating in the RV or boat.
This was the last article in our series on RV and Marine Battery Charging:
More of our Latest Posts are in the top MENU above.
More of our Latest Posts are in the MENU.
New to this site?
Visit RVers Start Here to find where we keep all the good stuff. Also check out our COOL NEW GEAR STORE!!*** CLICK HERE *** to see it!