Trailer Life Feature Article – Sedona Arizona!

Sedona Arizona feature article Trailer Life Magazine

Trailer Life Magazine – December, 2014
“Arizona’s Red Rock Country” by Emily & Mark Fagan

The December, 2014, issue of Trailer Life magazine is featuring our article about the stunning red rock country of Sedona Arizona.

We spent a delightful few weeks there last spring, hiking, biking and soaking up the stunning views that fill the small northern Arizona town.

It is an enchanting area that you can’t help but fall in love with when you go, and there’s a little something for everyone, from cute boutique shops to elegant dining to glorious hikes to mysterious spiritual vortexes.

If you get bored in town (hard to imagine!), there are ancient Indian ruins and a true wild west town nearby too!

These are our blog posts from this gorgeous spot:

Trailer Life is a terrific magazine for all RV enthusiasts, offering tips and tricks about towing and towables and showcasing special places around the country that are worthy of an RV road trip. Right now, if you join Good Sam Club, you get four issues for free too! We’ve been subscribers for years and really enjoy each issue.

The December issue is on newsstands now, in either the travel section or the automotive section (I’ve seen it in both places). It can also be found at Camping World and other RV and camping supply stores.

Update December 12, 2014 – Trailer Life has published this article online on their website! Check it out at: Arizona’s Red Rock Country

New to this site? Visit our Home page to read more about our full-time traveling lifestyle and our Intro for RVers to find out where we keep all the good stuff. If you like what you see, we'd love for you to subscribe to receive our latest posts!

Subscribe

In the Spirit of Giving

Advertising is everywhere these days as we all frantically get into the Christmas spirit, and many RV and sailing blogs are posting wonderful Christmas shopping lists of fun goodies to buy for a beloved RVer or sailor. (See the bottom of this post for a few terrific shopping ideas from fellow bloggers).

In the spirit of giving, if you discover your favorite blogger has turned you on to the perfect gift for that hard-to-buy-for person, a wonderful way to give them a nod and say “thanks” for all the entertainment and info they have provided during the year is to buy the item right then and there online rather than running out to a store to get it later.

Why? Let me explain…

No not another blog post selling me stuff!

.

What is Affiliate Marketing? It is a method for websites and blogs to review or suggest products the authors find useful and to make a commission from selling them. The most popular program is with Amazon. You can sign up to be an Amazon Affiliate here. Once Amazon approves your site, they’ll give you tools for creating things like the Amazon search box below to put on your site.

Amazon Search Box

Amazon Search Box

The way affiliate marketing works is that when someone clicks on an affiliate link on a blog, they enter the affiliate website with a “cookie” from that blog. If the reader buys something, then the blog is credited with that purchase, and depending on the affiliate, the blogger may receive a commission. Amazon explains the details of their fee schedule here. There are strict guidelines that bloggers must follow, and each affiliate marketer has a different contract.

Amazon’s Operations Agreement for Affiliates is here.

Of course, the reports the blogger sees from various affiliates vary, and for privacy purposes, the information about the person making the purchase is never revealed. Only the products and services purchased go into the reports.  With that in mind, whenever I discover a cool product on a blog and buy it through their site, I drop the blogger a line to let them know I love their blog and that they inspired me to make a purchase.

As a blogger, it is a true thrill to find out that someone actually bought something, even if it is a 99 cent item! 

The first time we made a purchase through a website’s affilate links was in 2007 when we dropped some money on our Nikon D40 cameras before we started traveling (today’s equivalent camera, although far superior, is the Nikon D3300). Ken Rockwell had the best photography gear website at the time, and it helped us immensely in choosing what to buy. We were thrilled to correspond with Ken and, of course, he was very receptive to our many questions about how to operate the darn things when he knew we’d followed his product recommendations and bought our cameras through his site.

Is an RV or sailing blog a good way to make money? Heavens no! You can make FAR more money per hour by picking up any kind of minimum wage part-time job on the road or by work camping. Even if you volunteer your time in exchange for a free site at an RV park or campground, you will make more per hour of effort than by blogging.

So why do bloggers do this? Most bloggers become Amazon affiliates to help defray their blogging costs and hopefully earn a beer or two every now and then.

Everyone creates their blog for different reasons and with a different audience in mind. Rather than setting out to make money, most bloggers do what they do because they are excited to teach people what they’ve learned and to share their experiences. From offering tips about RV parks and campgrounds, to giving pointers for how to tackle certain repairs or upgrades, to venting and laughing about mishaps on the road, to simply sharing photos and travel guides for beautiful places, most bloggers do it out of a passion for their subject and to keep family and friends abreast of their travels.

I write my blog for those who dream of traveling but aren’t in a position to do it at the moment and for those who are planning their future escape. My intent is to inspire, to motivate and to offer a ray of hope that a fun life of adventure is achievable, once you are ready to go.

For years, I was stuck in a windowless cubicle in an office. I sat in miserable rush hour traffic, and I dreamed of a different life. The stories written by other travelers helped me keep my travel dreams alive. When I was finally within striking distance of running away, the handful of websites that shared details of how to do it (there weren’t very many back in 2005-06) were invaluable.

I blog now to pass on that gift. It also helps me process and crystallize my precious memories of all the incredible experiences we’ve had in this wonderful lifestyle.

How do you start a blog? The easiest way is to use either WordPress.com or Blogger, as they are designed for beginners and there is technical help available. Many of the most popular RV and sailing blogs were started on these platforms and had huge followings before they migrated to a self-hosted site using WordPress.org, which is technically more challenging but is much more flexible.

So where are those cool Christmas shopping lists I mentioned? Here you go:

Happy Christmas shopping, everyone, and enjoy these upcoming weeks of holiday preparations!


New to this site? Visit our Home page to read more about our full-time traveling lifestyle and our Intro for RVers to find out where we keep all the good stuff. If you like what you see, we'd love for you to subscribe to receive our latest posts!

Subscribe

RV Budget, Costs & Expenses – What does it cost to RV full-time?

The biggest question most people have before they run away to live in an RV full-time is: Can I afford it? To help you answer that question, this page outlines our living expenses for six months of RV travel in 2014, and it compares those costs to the costs we incurred during our first year of full-time RVing in 2007-08.

This is a long post. To read it in sections, the following links skip further down:

1. Is the Full-time RV Life Affordable?
2. Fixed Expenses
3. Variable Expenses
4. Cost Comparison: 2007 vs. 2014
5. Capital Costs & Depreciation

IS THE FULL-TIME RV LIFE AFFORDABLE?

Return to top

People enjoy the full-time RV lifestyle on all kinds of budgets, and the money full-timers have to work with comes in all kinds of forms. Some retirees have big pensions but not a lot of savings. Others have a nest egg of savings but no pension. Many younger full-time RVers work while they travel, either to cover all of their living expenses or to supplement other income streams.

The form your money is in makes a difference in how you RV and what your expenses will be. If you have a big income that comes from a limitless source (a pension and/or Social Security), then a large loan on a new luxury Class A motorhome may be just fine and the nightly expense of high-end RV parks won’t be a problem. However, if you are trying to make a small nest egg last to your dying day, and you are not even retirement age yet, you may be best off spending a portion of it to purchase your RV outright, rather than paying interest on a loan, and you will also be looking to save money on camping and overnight parking.

If you are planning to work camp in exchange for an RV campsite, or if you will be working part-time jobs as you travel, or working via the internet from your RV, your choice of overnight parking spots may be based more on your job’s requirements than on the whims of your travel interests, and your camping costs and the kind of work you do will subsequently be tightly linked.

The bottom line, however, is that if you can afford your current lifestyle in a stick-built home, you will probably be able to afford a more mobile lifestyle in an RV.

Full-time RV Costs are Very Personal, including ours!

Everyone has different priorities and lives differently, making budgeting a highly personal project. My numbers here reflect who we are. We have been frugal in our choices, and we have adjusted to a simple life.

In my former corporate life, I hit Starbucks most mornings and ate dinner out almost every night. We owned and maintained two cars, and we each had significant commutes. Now we eat dinner out very infrequently, and we limit our coffee shop splurges. We own just one vehicle and drive much less. Where we used to have property taxes, utilities and HOA fees, we have none of those things in our RV lifestyle. All in all, we spend about $500 less per month in our RV than we did in our house. But that huge savings is entirely a function of what our old lifestyle used to be and what our current lifestyle is now. Other full-time RVers might not see those same savings.

To cut to the chase, our living expenses for our six months of summer travel in 2014 came to $2,090 per month. But that’s a meaningless number until we uncover where it came from…

How We Travel

We have a 2007 Dodge RAM 3500 single wheel diesel truck that we bought new one month into our full-time RV lifestyle. It now has 84,000 miles on it. This truck tows a 2007 NuWa Hitchhiker 36′ fifth wheel trailer that we bought new at the end of our first year of full-timing in the spring of 2008.

We own our truck and trailer outright and do not carry any debt. This not only helps us keep our monthly expenses down but makes it easier to sleep at night. There is a lot to be said for the budget traveler’s creed: “Go cheap, go small, go now!”

To save money, we don’t have a cell phone. We estimate that since we started traveling this may have saved us about $50/month or as much as $4,500 all together. We have also equipped our trailer with solar panels and we camp for free virtually every night. These choices make us happy, but may not suit everyone. Here’s a description of our minimalist internet and communications solution and our tips for how to live off the grid in an RV.

What Will Your RV Budget Be?

Budgets for this lifestyle are both easy and difficult to anticipate. Your full-time RV lifestyle budget will be exactly what your stick-built-home budget is now, minus the expenses related to living in your current home, plus the expenses of living in your RV.

It’s that simple.

You already know what you typically spend at the supermarket, and that will stay the same when you travel in an RV. Look at your current bills and scratch off your mortgage/rent, utilities, property taxes, HOA, house maintenance costs and the gas/registration/insurance costs for your current vehicles that won’t be coming along on your adventure.

If you want help managing expenses and boosting rental income when your rig isn’t in use, RVManagement USA offers resources and support.

Then estimate your future lifestyle costs that you need to add in (the numbers we share below will help with that). These include your fuel costs and your vehicle insurance and registration fees for both vehicles that make up your rig, whether it is a motorhome/car combo or a truck/trailer combo. If you have chosen your domicile city/state, you can do very specific research to estimate your future vehicle insurance and registration fees. We have some notes on domicile selection on our full-time RVing page.

There are also maintenance, repair and upgrade costs for the rig and your own personal interests to consider as well.

Of course, the whims of the economy are beyond anyone’s control. In the spring of 2008 diesel fuel prices soared out of sight in just a few months. Half a year later the world economy fell apart. Yet, the full-time RVers that were on the road then just kept on going — like everyone else — finding ways to make the best of a grim situation. So, once you launch your full-time RV lifestyle, you will find yourself adapting as the world changes around you — just like you did at home.

A Look at our Expenses, Then and Now

Mickey Mouse Calculator

Mickey always makes this stuff more fun.

My plan before we started in 2007 was to spend about $1,800 per month. I estimated $500 per month for food and household items (which is what we had been spending at home); $500 per month for gas; $500 per month for campground fees; $100 per month for RV and truck insurance; and I left a slush of $200 per month for other things.

We ended up spending $1,672 per month during our first year on the road, beating our budget by a little. During those twelve months we saw diesel prices jump by almost 90% from $2.75 to $5.16 per gallon (in the places where we were buying diesel). At the same time, we also learned about boondocking and discovered that we didn’t need to spend anything on campgrounds. Those two unexpected events cancelled each other out!

Seven years later, we are now spending $2,090 a month. This is a 25% increase. Part of that is due to inflation which has raised consumer prices 14% between 2007 and 2014. The other reason for the increase is that we have changed our lifestyle a little bit, and we’ve become less stringent about splurging on things like eating out.

FULL-TIME RV EXPENSES BREAKDOWN

Return to top

RV Lifestyle expenses can be broken into “fixed costs” that you spend every month regardless of what happens worldwide or to you, and “variable costs” that depend on your activities.

FIXED COSTS – Six Months – May 1 to Oct 31, 2014

Our fixed costs for the six months between May and October of 2014 are shown in this chart. There is an explanation of what each category represents below that.

Expense Category Amount
Food & Household Items $582
Vehicle Insurance $135
Communications $88
Propane $50
Laundry $50
Miscellaneous $40
Mail & Postage $32
Vehicle Registration $29
Hair Care $15
RV Dumps $4
Health Insurance
Total $1,025

Food & Household Items – $582 / month
This item covers all supermarket purchases, including groceries, household cleansers, toiletries, laundry detergent, over-the-counter pharmaceuticals and anything else that can be found at Walmart, Safeway, Albertsons, Target and other places. Our rig is fully outfitted, but occasionally we get a small kitchen appliance or pick up a DVD. Those things get lumped into this number.

Vehicle Insurance – $135 / month
This includes both truck and full-time RV insurance for our 5th wheel trailer. We pay it annually, but the monthly cost is shown. If we had kept our Arizona home address, this line item would have been twice as much. There is more detailed info on the selection of a domicile (home address) and the implications that choice has on your vehicle insurance in the fulltiming section.

Communications – $88 / month
After five years of relying on free wifi signals for internet access and using pay phones for phone calls, we got a Verizon MiFi jetpack in 2012, and we now use it for all our communications, including phone calls. This figure includes both our Verizon account with 10 GB of data per month and our $2.99/month Skype account that lets us make unlimited phone calls to the US and Canada no matter where we are in the world (this was very helpful while we were on our sailboat in Mexico). We’ve gotten used to using the laptop as a phone on Skype. It’s a little weird because the person you are talking to ends up on speaker phone, which they may or may not appreciate, and some calls get dropped, but it works well enough.

Our complete communications strategy is described in detail HERE.

Propane – $50 / month
Prices for LP are all over the map, and we haven’t been very diligent about shopping around. We just buy it when we need it from whoever has it nearby. We’ve been paying anywhere from $2.59/gallon to a little over $4.00 a gallon in 2014. We use about 15 gallons per month: a little more in December/January/February when we use our vent-free propane heater to heat the trailer, and less in summer. RVers that stay in RV parks and campgrounds with electric hookups use a lot less propane than this, because they don’t run their refrigerator on propane 24/7. If you have hookups and don’t have metered electricity, you can save on propane costs in the winter by using an electric space heater.

Laundry – $50 / month
After a few years of messing with the little single-load washing machines at laundromats, we discovered that it is much better to use the biggest machines in the place because they are generally the newest machines, they do the best job, and they hold a heckuva lot. Dryers are usually 25 cents for a set period of time that ranges from 5 to 10 minutes, and we’ve found that most commercial dryers need about 35-40 minutes to get the job done. Washers and dryers at RV parks are usually much cheaper than those in the local laundromat.

Miscellaneous – $40 / month
My mom was a professional bookkeeper, and she taught me never to have a “miscellaneous” category because things get lost in there. However, I can’t ignore the $40 of cash we spend every month that is unaccounted for with receipts — little things like a coke and snacks from a convenience store on the road, or whatever.

Mail/Postage – $32 / month
This includes both our mail forwarding service and monthly mail delivery (discussed in more detail in the full-time RVing section) as well as postage we buy to send letters and packages.

Vehicle Registration – $29 / month
As with Vehicle Insurance, we pay this annually, but I show the monthly cost here. The cost is lessened by careful selection of a home address, discussed in more detail in the full-time RVing section.

Personal Care Services – $15 / month
For us, this is just hair cuts. Other full-timers may have other personal care services to consider like manicures, pedicures, massages, etc. (you never know!).

RV Dump – $4 / month
This item is here because it is a regular part of the boondocking lifestyle (you’ve gotta go every two to three weeks at a minimum). Many RV dump stations are free, but if you have to go to an RV park to dump the tanks because there aren’t any free ones nearby, it will generally cost anywhere from $5 to $15. Our RV dump station page has other tips and tricks related to managing the holding tanks.

Health Insurance —
Health insurance costs are totally individual, and the coverage for everyone is evolving. We do not have health insurance. Other younger full-time RVers have posted some terrific articles about health insurance and the impact on one’s choice of domicile state. Check out the excellent posts by Wheeling It and Interstellar Orchard. They both reference insurance agent Kyle Henson of RVer Health Insurance who is quickly becoming the go-to agent for all RVers’ health insurance needs.


VARIABLE COSTS – May 1 to Oct 31, 2014

Return to top

“Variable costs” are lifestyle expenses that are essentially optional — at least for a while. They can be deferred to a later month, foregone all together, or can make a fun splash in the current month. The great thing about these expenses is that they are controllable. If fuel costs skyrocket or you are short on funds, then stay put and save money! If you’ve got a more modest budget, consider staying in each location for a month or a full season to take advantage of the monthly or seasonal rates at RV parks. If you really want to skimp, boondock or at least stay in the dry camping sites at any RV park or campground that will allow it and has them available.

Expense Category Amount
Diesel $497
Upgrades* $163
Maintenance & Repair* $106
Restaurants $175
Entertainment $46
Clothes $37
Supplies & Tools $26
Memberships $15
Camping & Overnight Costs $0
Hobbies
Total $1,065
Grand Total Fixed + Variable $2,090

*These numbers are averaged since we started traveling. See descriptions below.

Diesel – $497 / month
Fuel costs are highly variable, both because they go up (and sometimes down) and also because you may drive more or less in any given month. Fuel can cost as little as $0 per month, if you stay in one place and ride your bike around town. Or fuel costs can dominate your budget if you decide to take your RV from Florida to Alaska and back via the scenic routes through New England and Southern California — in six months!

The figure here is our average monthly fuel cost for a six month summer season of travel. We drove a loop from Phoenix, Arizona through Nevada to Crater Lake in central Oregon and then went from northeastern Oregon to Sun Valley Idaho and Grand Teton National Park in Wyoming and finally dropping south through Ouray Colorado and into northern Arizona and back to Phoenix.

Our stats for this trip were as follow:

Total Driven: 9,092 miles Loop: AZ-OR-WY-AZ
Towing: 4,673 (47%)
Not Towing: 5,267 (53%)
Fuel Mileage: Towing: 10 mpg
Not Towing: 17 mpg
Gas Prices: Low: $3.59 (AZ)
High: $4.39 (NV)
Types of Roads: Interstates: 392 miles (3%)
State/Local: 9,573 miles (97%)
47 Stops Shortest Stay: 1 night (15 times)
Longest Stay: 22 nights
Average Stay: 4 nights

To show just how variable the fuel cost can be in the full-time RVing lifestyle, during the four months prior to this trip, from January to April of 2014, we stayed in the greater Phoenix, Arizona, area and had dramatically lower fuel costs. We towed the trailer very short distances (20-40 miles) every few weeks as we explored different places in a 50 mile radius of downtown. We drove the truck on its own only once every few days. During that time our average monthly fuel bill was $195. Our lowest fuel bill was $112 (in January). Diesel prices during that time ranged from $3.59 to $3.79 per gallon.

Maintenance & Repair – $106 / month

This item is hard to predict, but now that we have owned our truck and trailer all these years, we can provide an average of what we’ve spent so far on maintenance and repairs since we started full-timing.

This figure is an average of all our truck and trailer maintenance costs from 2007 to 2014 rather than being just the expenses we incurred over our six months of summer travels in 2014. We did not use the trailer when we lived on our sailboat, although we did use our truck when our boat was in San Diego and Ensenada at the beginning and end of our cruise, and all that is factored into this average.

Mark is very handy, and he does a lot of the maintenance work himself (not the oil changes, though). He replaced both of the fifth wheel’s front landing jack legs and landing jack motor while we boondocked in Arizona (absolutely amazing to witness — I will write a post with step-by-step procedures and pics eventually!).

A summary of our maintenance and repair expenditures since we started (totaling $5,830) is the following:

  • Oil changes: $75 or so every ~5,000 miles on the truck
  • New Tires: 2 sets of new tires on the truck, one set on the trailer, $800 per set
  • New Brakes: Replaced front brakes on truck
  • 5th Wheel Landing Legs: Replaced the landing jacks and motor on the front of the 5th wheel
  • Engine Maintenance: We have performed all the maintenance (and minor repairs) required on the truck
  • Wash/Wax: We wash the rig regularly and wax once or twice a year

For budgeting reference, the maintenance and repairs on our rig have cost 0.128% of the purchase price of our truck and trailer per month since we bought them. That may be applicable to other truck/trailer combos. I am not sure it would be applicable to a motorhome/car combo, as motorhomes are inherently more complicated and expensive to maintain.

Note: In 2015, although all of our expenses were about the same as in 2014, we had several MAJOR and UNEXPECTED repairs as shown below. Luckily, our RV Extended Warranty covered the repairs:

Here's a summary of what our four year RV warranty through Wholesale Warranties cost, what our repairs WOULD HAVE cost, and what our warranty reimbursements have been to date:

Cost of Warranty $1,904
Total Cost of Repairs we've had done $7,834
Total Out of Pocket Costs for those repairs $1,145
Repair Reimbursements:
Trailer Axle Replacement $1,036
RV Refrigerator Replacement $1,647
Plumbing Issues & Window Leak $1,142
Suspension Replacement $2,550
RV Toilet Replacement $314
Total Repair Reimbursements $6,689

Our trailer warranty has paid for itself 3.5 times over!
Confused about the nitty gritty fine print buried in RV Extended Warranties? Here's an excellent detailed explanation!!

Upgrades – $163 / month
Unlike Maintenance & Repair costs which must be done (although some can be put off until you have the funds to do them), upgrades to the rig are entirely optional. The figure here is the average of all our improvement and upgrade costs on our truck and trailer since we bought them rather than just the upgrade costs we incurred during our six months of summer travel in 2014.

The upgrades we have done total $8,235 and include the following:

Restaurants – $175 / month
This is a hugely variable cost that has changed a lot in our lives over the years. The figure for these six months of summer travel in 2014 is way higher than ever before. Our biggest “eating out” cost comes from getting coffee and muffins at coffee bistros (so nice!). The rest is a combination of beers at cute brewpubs and meals at Subway and other fast food joints. For comparison, in the first four months of 2014 before this trip, from January to April, our monthly restaurant bill was $70. In those months we weren’t camping near many inviting places!

Entertainment – $46 / month
We don’t pay for entertainment often because we find so much great entertainment that is free. However, we do miss out on some museums and events that charge an entrance fee.

Clothes – $37 / month
We have a two-week rotation of clothes for both warm and cold weather, and since we started traveling we have replaced almost all of these garments. Commercial washing machines are hard on clothes and they wear out. Our biggest clothing expense is shoes. We replace our hiking shoes and running shoes regularly, and we buy high quality, expensive shoes. As a side note, if you get a credit card from Cabellas, REI or another outdoors store, and put all your living expenses on it, and pay it off each month to avoid interest charges, you can use the points each year to get your hiking shoes or other camping gear for free.

Supplies & Tools – $26 / month
This category includes all the tools and supplies we use to keep the rig in good shape. Mark loves to try new products and has a growing collection of tools in his toolbox. Before we left, he made the mistake of selling almost all of his tools. If you are handy and can work on your rig, don’t make that mistake too! He tried to “make do” with the bare minimum of tools for the first year, which is why this category didn’t used to exist for us, but now he regularly buys little goodies that make his maintenance tasks easier.

Memberships – $15 / month
This includes both annual memberships and magazine subscriptions. We belong to Join Escapees RV Club and Good Sam Club and we purchase an America the Beautiful Federal Lands Pass to the national parks each year. We also subscribe to several magazines.

Camping – $0 / month
Camping fees and overnight costs are extremely variable from one RVer to the next, because this is the very essence of the lifestyle. In addition, full-time RVers are a broad mix of people with a wide variety of tastes and preferences.

From May to October, 2014, we did not pay for any overnight camping, and that is the norm for us. However, although we did not pay for camping over the summer season (or in January, 2014), the months of February, March and April, 2014, were unusually expensive for us. Those three months averaged $83/month because we spent time at three different campgrounds visiting friends and chasing wildflowers at a state park (we were a little late for the flowers — rats!).

Many people boondock to save money, and we started that way too. However, we have found that it is by far our preferred way to camp. If we couldn’t boondock, we wouldn’t live in an RV.

That said, it is not for everyone. We have met very few full-time RVers who boondock as much as we do. Most people who enjoy boondocking, or “free camping,” do it from 25% to 75% of the time, at most. For full-timers who work, it is hard to find a boondocking location near most jobs, and you have to pack up and go to the RV dump station every 10 days to 2 weeks, disrupting your life. Even if your work is location independent, and you work out of your RV, finding good boondocking locations that have adequate internet access to do that is not easy. During the summer of 2014 we spent 5 weeks camping in places that were 10 miles or more from the nearest internet access. Now things are a lot easier, as you can type in on Google terms like “internet services near me” and when you do, you’ll be given lots of hotspots to choose from that offer free WiFi. You can also install Starlink on your RV and have good internet access everywhere, including while driving.

Overnight campsite and RV park fees with hookups typically range from $30 to $50 per night or more. That is $900 to $1,500 per month. However, a lot of full-timers avoid paying anywhere near that much and average closer to $500 to $900 per month. There are many ways to save money on overnight camping costs, and those are covered on our Full-time RV Lifestyle Tips page.

As a budget figure, if you are a future full-timer, and you are excited by the $0 figure here, and you plan to boondock a lot but haven’t don’t it much yet, include a “slush” camping fee figure of $350 per month in your budget until you find out if you really like it. Some folks plan to “free camp” all the time but find it isn’t practical for their lifestyle once they hit the road.

Hobbies —

An area I completely overlooked before we started full-timing was the cost of our personal interests and hobbies. This was an important oversight that we came to recognize only after we had been on the road for a few years.

Before starting a life of adventure, it may be hard to imagine that you will need or want to have any hobbies. Sightseeing ought to be enough! But it isn’t. After a while, you will want to have pursuits that complement your travels in one way or another or that perhaps are not even related to your travels at all. Our hobbies are photography, writing and mountain biking, and these all cost money.

Since we started full-timing, we have upgraded both of our DSLR cameras twice and upgraded both of our pocket cameras twice. As for biking, we started out with cyclo-cross bikes but sold those when we found we were almost always camped near very rugged dirt roads. We replaced them with mountain bikes in March, 2014. Bike maintenance isn’t a huge cost, but it’s there. We also upgraded our bike rack a few years ago. And back in 2008 we splurged on a fabulous Hobie inflatable kayak that we loved for several years but eventually sold because we needed more room in the basement.

Mountain BIking

All smiles mountain biking in Bend, Oregon

Even my writing has its expenses. Keeping a blog can be free, but hosting, backup services, firewall services and other things add up. Writing also requires a computer. When we started out, Mark and I shared a single MacBook Pro laptop. After four years, this became impossible because we always wanted to use it at the same time. So, we replaced that one MacBook Pro with two newer ones in 2011 and 2012. Then, in 2014 we replaced the older one of those with yet another newer one.

All of these expenses hit the bank account with a resounding thwang and can’t be ignored or wished away. You may not know exactly what your hobbies will be when you start full-timing, but put some kind of figure into your budget that allows for replacing your computer and phone as often as you have in the past (if you plan to use them as much) and for buying the various things that will make your favorite pastimes possible.


EVALUATION – COST COMPARISONS – Year 1 and Year 8 – Lifestyle Changes and Inflation

Return to top

Budgets and actual expenditures vary over time. Most fulltimers find that they spend a lot more in the first few months of travel than they do once they have been out for a while. It takes some time, and quite a few purchases, to make an RV a home, and most of those costs come at the beginning. These are things like patio mats, camping chairs and grills, tools your suddenly discover you need, area rugs, throw pillows, kitchen gadgets, campground directories, travel guide books, and all those funky gismos they sell at Camping World that are just so perfect for the RV lifestyle.

When budgeting for a fulltime RV lifestyle, it is probably wise to assume that the first three months will cost about 50% more than the target monthly figure. Make room in the budget for this, and you won’t panic when it happens.

5th wheel RV camper in the woods

Peace.

Also, it takes a while to figure out how you want to live this lifestyle. What kinds of campgrounds do you like? Are you okay with overnighting in a parking lot? How much do you want to drive each day? How long do you want to stay put in one spot?

Most new fulltimers dash all over the country in the first year, and we were no exception. The exhilaration of having the whole continent to yourself, with no one tapping their watch and expecting you home, is such a thrill that we all run around and try to see as much as possible. Only when we are utterly exhausted do we start to slow down.

It also takes a long time to let go of old living patterns and establish new ones. When we first started fulltiming we were accustomed to one- and two-week vacations, and we lived as though we were on vacation. It was only after a few months on the road that we began to realize, deep inside, that we didn’t have to see all the sights in three days. We could stay three weeks and see them only when it was sunny and when we were in the mood for sightseeing.

This change in the rhythm of life ultimately affects how you spend your money. You begin to realize that this is not a vacation, so you can’t spend money as if it were. You begin to slow down and appreciate the truly priceless pleasures, like a quiet morning reading a book, or an afternoon hike that has no other purpose than to smell the fresh air.

Over time, both lifestyle changes and inflation have affected our monthly expenses. Inflation has hovered at around 2% a year (which compounds to a gross jump of 14% between 2007 and 2014 — here’s a graph showing inflation trends) and food prices have increased by 20% in the same time period.

FIXED COST Comparison

Studying the expenses we published on this page after our first year of RVing as compared to the costs for the current year (2014), it seems that, as expected, our fixed costs were most influenced by inflation.

Expense Category 2007-08 2014
Food & Household Items $477 $582
Vehicle Insurance $108 $135
Communications $88
Propane $42 $50
Laundry $40 $50
Miscellaneous $36 $42
Mail & Postage $30 $32
Vehicle Registration $15 $29
Hair Care $15
RV Dump Stations $4
Total $746 $1,025

VARIABLE COST Comparison

Our variable costs have changed more due to changes in our lifestyle than anything else.

Expense Category 2007-08 2014
Diesel $482 $497
Upgrades $140 $163
Restaurants $175
Clothes $8 $37
Supplies & Tools $26
Memberships $15 $15
Camping $145 $0
Total $926 $1,065
Grand Total Fixed + Variable $1,672 $2,090

What’s amazing (and a big relief!) is that our “Upgrade” and “Maintenance” costs didn’t bring any unwanted or nasty surprises during the years we have been on the road, and they have remained much the same as they were in the first year, although there were plenty of years without any upgrades or big maintenance projects. As mentioned above, we barely ate out in the beginning and we splurged this past summer. We had mostly new clothes when we started and have replaced almost all of them, and we now see the importance of having the right tools and supplies for little “RV Owner” projects.

CAPITAL COSTS & DEPRECIATION

Return to top

The biggest difference in costs between living in an RV full-time and living in your own stick-built house is that the RV will depreciate very quickly while the house will appreciate over time. The recent real estate collapse notwithstanding, housing prices always increase as the decades go by. In contrast, RVs, cars and trucks quietly make their way to a value of $0 and eventually breathe their last breath in the crushing facility.

In a five year period, a brand new rig (that is, a motorhome/car combo or truck/trailer combo) will typically lose 30% to 50% of its value, and by the end of a decade it will be down to 25% to 40% of its original MSRP. The only way to know what the full-time RVing lifestyle really costs is to know both what you paid for your RV at the beginning and what you sold it for at the end. The difference, divided but the number of months you lived in it, is the true cost of ownership.

That figure doesn’t show up in a regular living expenses budget. However, for a brand new $150,000 rig that reaches the ripe old age of 10 years, you may be looking at “losing” around $75,000 or $625 a month while you own it. Of course, that doesn’t include the additional cost of interest on a loan if you have one.

I’ve had several eager 20-something future full-timers email me saying they wanted to live in an RV after college because they didn’t want to throw away money on rent and they didn’t think buying a house would be a good investment. Unfortunately, an RV involves “throwing away” lots of money too. In the end, the cost of owning an RV — from purchase to sale and through the thick and thin of all the maintenance and repairs in between, not to mention the cost of campgrounds and RV parks — probably adds up to the same amount as renting an apartment or paying a mortgage/taxes plus utilities.

No one should ever give up their dream of RVing full-time because an RV is a bad investment. At the same time, no one should go into RVing full-time because buying an RV is a good investment.

SUMMARY

I hope all this info helps you out as you plan your full-time RV adventures. Despite all the words on this page, your future full-time RVing costs can be approximated fairly easily, and planning your budget involves just three steps:

  1. Write down all your expenses now
  2. Subtract the ones that won’t apply when you start full-timing
    (property taxes, utilities, car expenses for cars you won’t own and commutes you won’t make, HOA fees, etc.)
  3. Add the new expenses you’ll incur in your new lifestyle
    (motorhome/car or truck/trailer insurance and expenses, camping costs, “fun” – restaurants, hobbies, entertainment)

Quite a few RV bloggers share their budgets and their thoughts about the costs of the RV lifestyle on their blogs. The following links offer itemized expense lists and excellent insights into creating a full-time RVing budget:

  • WheelingIt – Personal budget and analysis
  • Technomadia – Personal budget and analysis
  • Gone with the Wynns – Personal budget and analysis (reported by quarter — divide by 3 for monthly!)
  • RV Dreams – Three tiers of hypothetical sample budgets

A final note — I posted this image in a Quick Pic post the other day, but I think it bears repeating here:

If you are lucky enough to find a way of life that you love, you have to find the courage to live it.

Words to live by.

Don’t stress out about the numbers too much.
Spice up your life, take the plunge, and go have an unforgettable RVing adventure!

Subscribe

Never miss a post — it’s free!

Below are some of our most POPULAR POSTS (also in the MENUS above)

Buddy - A Journey in Spirit - The story of an event that changed our lives forever.

ARTICLE INDEXES
  • RV Tech Tips Articles - A one page index of links to all our RV Tech Tips, RV Upgrades & RV Maintenance articles.
  • RV Lifestyle Tip Articles - An index of links to all our RV Lifestyle Tips (finances, boondocking, major repairs, work/jobs, etc.)
  • Solar Power Articles - Overview and tutorial articles for how to design and install solar power on an RV or boat
  • Product Reviews - An index of links to all of our Product Reviews
RV UPGRADES, SYSTEMS & TIPS MONEY FULL-TIME RV LIFESTYLE GEAR STORE
  • Gear Store - A list of the goodies, equipment and gear we've found useful in our RV lifestyle!
 

Our most recent posts:

More of our Latest Posts are in the MENU.   New to this site? Visit RVers Start Here to find where we keep all the good stuff. Also check out our COOL NEW GEAR STORE!! *** CLICK HERE *** to see it!

Life on the Hook in Mexico – What do you do all day when you’re cruising in the tropics?

cruising, sailing, living aboard in Mexico

Mark makes music on Groovy

Sailing off into the sunset is a dream a lot of people share, and some even get the crazy idea to go ahead and actually do it.  What’s it like?  Here’s a glimpse of some of the things we do each day in our cruising lifestyle — kind of a behind-the-scenes look at our life of leisure aboard a sailboat in the tropics.

snorkeling huatulco mexico cruising and living aboard

We have fun above and below water.

When we decided to cruise Mexico, we planned to anchor out pretty much 100% of the time.  That way we could put more of our budget into a comfortable, newer boat, while keeping the day-to-day expenses to a minimum.  Marinas in Pacific Mexico typically cost anywhere from $30-$50 a night or $600-$900 a month for a boat our size, so living “on the hook” at anchor can mean big savings.

But living on the hook has its ups and downs.  Literally!!  The Pacific swell keeps the boat in constant motion, frequently lurching it from side to side for hours, or even days, on end.  Also, the beautiful ocean is often held hostage by red tide — or algae blooms — that cloak it in an unpleasant color and odor, and fill it with debris, making swimming impossible and dropping the water temps as much as 10-15 degrees Fahrenheit.

87 degree water in Huatulco Mexico

Ahh… warm water!!!

For the past week, however, we have had one ideal day after another (November, 2012, in Huatulco).  The water has been turquoise and clear and in the high 80’s.  The air has been sunny and warm, and the swell has been modest, jolting us awake with a jerk only once or twice a night, if at all.  Our days have been spent swimming til our skin is wrinkled, kayaking in the bay, and walking the beach where the waves caress our feet with the warmest of sun-heated ripples.

Mexico cruising clear turquoise water

The water in Huatulco is gorgeous

Life on the hook, even during these heavenly days, is not exclusively about umbrella drinks in the cockpit, however.  Each day we have a few hours of work that needs to be done.  Mark keeps us on track with this stuff, making lists and making sure we stick to them.

I always find my interest in these things wandering quite a bit, though.  Left to my own devices, I’m afraid the list would soon be lost, and after a few weeks we’d be living in true squalor.

swimming in Huatulco Mexico (Tangolunda Bay) living aboard a sailboat

Who wants to quit swimming to do a bunch of boat chores??

Back when I lured Mark into this cruising lifestyle (well, let’s see, I think I dragged him into it by the ear!), we divvied up the responsibilities according to skill, inclination and interest, rather than going straight “pink” and “blue.”

Since I’ve worked with computers all my life and had cruised before, the chartplotter was easy for me to learn, and I became navigator and skipper while underway.

Cruising Mexico - living aboard a sailboat To Do List

Mark keeps us on track with our boat chores. Notice: “clean bilge” is not yet crossed off…

In our RVing life I never tow the trailer and rarely drive the truck.  Last time I tried parking the rig, I put us exactly perpendicular to the spot I was aiming for.  Mark’s last docking experience with the boat went just about as well.  So this division of labor has been a happy one.

I love technical things and understand the theory of many things on the boat, and I got a huge kick out of researching and specifying the boat’s major system upgrades.  But when it comes to holding a wrench I am still flustered by which end is which.  Mark was a professional service engineer for Xerox’s high speed (room sized) printers and grew up working on cars.  He is a master when it comes to electro-mechanical troubleshooting and installation.

Mexico cruising living aboard a sailboat and cleaning the bilge

I like using a kid’s bazooka water gun to clean the bilge!

So, in exchange for putting all the responsibility for all the boat’s systems squarely in his lap, I volunteered to keep the bilge clean.

Having a clean bilge makes it is easier to notice when something isn’t right.  Water in the bilge must be coming from somewhere.  Is it salt water or fresh water?  Guess who gets to find out!  Hopefully if a chemical is leaking into the bilge it isn’t lethal!!

In our earliest days in Huatulco, “clean bilge” went on the to-do list (our engine’s packing gland material is getting old, so it drips now).  Mark had the luxury of taking a snooze next to the open bilge compartment when he finished his items on the To Do list!  I dawdled as long as I could.

Cruising Mexico living aboard a sailboat

Boat work done? Take a snooze!

I’ve found the easiest way to get water out of the bilge is to use a kid’s bazooka water gun.  Ours has a pointy end that can get into the crevices, and it soaks up a good bit of water that can then be squirted in a pail.  Doing a final squeegee pull with fresh water before putting the toy away has kept it in good working order.

cruising mexico sailing mexico living aboard clean bilge

There, it’s done, and we have a clean bilge once again.

Living on the hook means that going ashore requires either a swim or a boat ride.  So taking out the trash requires loading it in the dinghy first, and then finding a trash barrel on shore somewhere to throw it away.

The kayak works for this task too.  The cool thing is that after the trash is gone you’re free to go exploring either on foot ashore or in the kayak.

cruising mexico living aboard a sailboat taking out the trash

Time to take out the trash!

Getting the laundry done also means loading it up in the dinghy and then lugging it to a laundromat — that is, if there is a laundromat somewhere nearby!  In most Mexican ports laundry service isn’t hard to find.

cruising life aboard a sailboat hand washing laundry

Everyday we wash yesterday’s clothes in the sink. We wear light clothing around here and it’s an easy task.

Here in Huatulco the laundromat is a cab ride away — in addition to the dinghy ride to shore.  Once you get there a woman washes and folds it for you (for 15 pesos per kilo, or about $4-$5 USD per load).  But you don’t get it back til the next day!!  (Ahem — that means another combo dinghy ride / cab ride to pick the laundry bags up…).  If you splurge and stay at the marina, you can have your laundry picked up and delivered back to the boat for 20 pesos a kilo…

liveaboard cruising mexico drying clothes in the rigging

Luckily there are lots of places to hang the laundry out to dry

So, to avoid the laundry hassle while living on the hook, we’ve found it’s easiest just to wash out yesterday’s clothes in the sink each morning and hang ’em out to dry.  Luckily our clothes down here consist of bathing suits, running shorts and light shirts. We haven’t worn shoes and socks since we got here.

I’ve learned that what gives our clothes that “clean” smell from a washer/dryer is the fact that they don’t get fully rinsed out.  So we always rinse our clothes to a point — but leave enough soap in them so they smell nice after hanging on the line.  Sheets and towels have to wait for real laundry service, however…

living aboard a sailboat cruising mexico changing zincs

Mark gets ready to install new zincs

cruising mexico living on a sailboat bottom cleaning

Tools for the bottom: scraper, new zincs, scotch brite pad…


We both keep the bottom of the hull as clean as possible.  In some places (like Zihuatanejo), the barnacles grow so fast you have to scrape the bottom with scrapers every few days.  In other places (like the Sea of Cortez and Huatulco), you can merely wipe the bottom with a towel to get the algae slime off.  It takes a lot of breath to get to the bottom of the keel, though, and Mark is much better at that than I am.  So I do the hull and he gets the keel and scrapes the prop.

Electrolysis in the water, especially at marinas, can eat a prop down to nothing in no time.  So we put sacrificial “zincs” on the prop and shaft that are made of that softer metal.

Living aboard cruising Mexico changing zincs

Screwdriver and zinc in hand, you gotta get down there and get it attached all in one breath.

Cruising on a sailboat in Mexico new zincs

A new zinc is installed on the prop shaft

Over time, these zincs get eaten away by the electrolysis instead, sparing the prop shaft and blades’ slightly harder metal.

However, the zincs are not that easy to install.  Mark makes it look like a piece of cake, completing the task in just a few free dives.  I would be spluttering and drowning and would probably drop the screw driver or the zinc in the sand deep below the boat, never to be found again…

Bountiful fresh water is critical to a comfortable life aboard, and we get our fresh water from a “watermaker” that converts ocean water into drinking water.

Cruising mexico making water with the watermaker underway

We go out to clean deep water to “make water”

This is a rather miraculous system, and our watermaker is enormous by cruising standards, converting 60 gallons of water an hour by pushing it through a strainer first (to remove the fish and sea creatures) then through two filters (to remove the algae) then through two 4′ long high pressure membranes (to remove the salt, bacteria and viruses).

Cruising mexico there is frequent red tide

Wow – clean water!! Such a special treat. Red tide is an unfortunate fact of life on Mexico’s Pacific coast.

The system is rated for 38 gallons an hour, but after the two membranes failed in our first season, the manufacturer (EchoTec) kindly replaced them with high capacity membranes, so now we fill a gallon jug in 63 seconds.  It’s quite thrilling to watch.  Shower water, toilet water and deck cleaning water all go into our holding tanks (140 gallons), but we keep our drinking water in gallon jugs as a habit held over from living in our trailer.

Mark hated the watermaker the first year.  It was a bear to install due to inaccurate manuals, incomplete parts shipped to us, and difficult positions for the various parts in the boat.  Plus, installation required fabricating a bracket to hang the high pressure pump from the engine.

To top it all off, the first membranes we received were dead on arrival.  Then the replacement set failed after four months!  Now, however, with great, working membranes, the watermaker is his pride and joy (“I want to keep it even if we sell the boat someday!” he joked recently).  It is his favorite part of the boat.

cruising mexico in a sailboat EchoTech watermaker

EchoTec’s main watermaker panel. At 800 psi the system pegs at 60 gph.

sailing mexico watermaker installation

Mark runs a hose to the deck to wash it down as we make water

The purity of the water is measured by a TDS meter (“total dissolved solids”), and we found the San Diego water supply at our son’s apartment got readings of 350, and the FDA limit is 500.  Our watermaker usually gives us readings between 75 and 95.

Most boats our size have systems that convert 6-13 gallons an hour.  However, we’ve found the 60-gallon-an-hour flow is fast enough to be able to wash the deck and cockpit with a hose run out a hatch.  This is a real boon at the end of a salty crossing or after sitting in a dusty area for a while.  So, making water and/or washing the cockpit/deck is often on our day’s to-do list.

sailing mexico watermaker 60 gph

60 gallons per hour gives a good flow

Then there’s food.  We are simple eaters, so our diet is pretty plain by most standards.  In Mexico we’ve discovered many familiar foods can be found on store shelves, even if the packaging is in Spanish.

The most common bread available in Mexico is “Bimbo Bread,” which is equivalent to our Wonder Bread.  But it turns out that Mexico’s Bimbo Bakeries actually owns the US brands Oroweat, Arnold, Thomas’s English Muffins and many others.

ex-pat living in mexico buying bread

Oroweat Bread is owned by Mexico’s Bimbo Bakeries

We’ve found Oroweat breads in most supermarkets in Mexico, and the price of around $3 to $3.50 USD is comparable to home.

Mexico cruising ex-pat living cereal

“Azucaradas” sounds & looks like kids’ sugar cereal

mexico cruising sailing blog living aboard quaker cereal


It helps to learn some of the basic food terms in Spanish: “avena” (oatmeal), “integral” (whole wheat), “grano entero” (whole grain), “pasas” (raisins) and “azucar” (sugar) are a few.  So when you see a cereal called “Azucaradas” with a crazy, wild zebra on it, you can tell it’s probably a sugar cereal for kids!

In this age of jet-setting food, we’re used to seeing tomatoes from Mexico in the supermarkets in the US, but what a surprise to find Washington apples here in Mexico as well as organically grown California spinach.


California organic Spinach is imported into Mexico

Did this spinach bring a passport?

This spinach was a bit wilted (it’s a long flight for a little leaf!), and the price was $6 USD a box. But it’s available.

Bean burritos are a common dinner aboard Groovy.  They’re yummy, easy to make and don’t take a lot of ingredients.  But I was amused when I asked our friend Andrés from southern Mexico if he’d like a bean burrito, and he responded, “Is that an American dish or a Mexican one?”  What we always thought of as being so very Mexican isn’t really…

cruising mexico sailing blog living aboard movies

Matt Damon & Scarlett Johansson – We’ll take it!

At night we often settle in with a movie.  TV reception is non-existent on the boat, but the bootleg DVD industry is alive and well in Mexico.  DVD’s are sold on the street for 20 to 30 pesos apiece ($1.60-$2.40 USD).  The titles often have no resemblance to the English titles, so you go by the actors’ names and hope for the best.  Who knows what this one is, but with Matt Damon and Scarlett Johansson, it oughtta be okay!

Mexico cruising living aboard a sailboat in Huatulco Mexico

Groovy is happily anchored off a lovely resort in Tangolunda Bay, Huatulco


So we live rather simply, floating in a tub on the ocean and washing our clothes in the sink!  It’s a crazy life, but lately it has been fabulous.


Subscribe
Never miss a post — it’s free!

Other blog posts that give a glimpse of what it’s like to live on a sailboat:

More funny stories from our Mexico cruise + Tips for planning your own sailing cruise

Our most recent posts:

More of our Latest Posts are in the MENU above.

A Mobile RV Service Directory – in a Free App!

Go Mechanic Home Page

Go Mechanic app home page

You just never know what will happen when you go to a bar. The other day Mark and I joined our friend Ron at a local favorite hangout for a beer, and suddenly the guy next to Ron said, “Hey, check out this app!”

We all leaned over to look at his smartphone. As he passed it around, he went on to explain: “It’s a mobile service app for cars, RVs and boats. If you need work done on your vehicle, or an oil change or detailing, or even new tires, you can get a mobile service guy to come out to you, wherever you are, with just one click.”

Wow. What a cool idea! It’s a speed dial directory for mobile service providers.

It turned out that this app is called Go Mechanic, and the guy showing it to us was Brent Stanphill, the visionary behind it.

Go Mechanic RV Mechanic

Find an RV Mechanic within 50 miles
based on either your phone’s GPS
or a zip code you enter.

He told us you can download the app for free at both Google Play and the iTunes Store, and before we knew it, everyone at the bar was downloading it!

The bartender was saying, “Man, I could have used this two weeks ago when my car died.”

A woman near me was asking Brent, “Can I really get someone to come to my office and do an oil change while I’m at work?”

Brent grinned, “Yes!”

Go Mechanic Select a Mobile RV Service Provider

RV Mechanic listing on speed dial!

The app locates all the mobile service providers within a 50 mile radius of either the GPS location of your phone or a zip code you enter.

This way, if you aren’t sure where you are, it doesn’t matter. However, if you need service and you aren’t standing next to your RV, you can simply enter the zip code of where the RV is located.

Mobile services are a growing trend, and this cool app is making it easy for service providers and customers to get together.

A few months ago I wrote an article about a couple of full-time RVers who have been providing mobile RV repair services for decades, and I was floored at the high level of professionalism in their business.

One look inside Phil’s mobile workshop proved that he was a skilled mechanic who had all the tools and spare parts necessary to tackle any RV repair job, from a broken awning to a finicky slide mechanism, to installing a complete solar power system on the roof of an RV.

Mobile RV Repair provider's mobile workshop

Phil & Ann Botnick have a fully stocked RV repair workshop on wheels.

Brent told us that many of the providers in his directory work from converted trucks (like Phil’s) that cost hundreds of thousands of dollars to construct.

Whether they are oil change providers, vehicle detailers, RV repair specialists or tire providers, these are serious businesses, not fly-by-night hacks.

Across the country, a growing group of quality mechanics is recognizing the need we all have in our busy lives to find service people who can bring their skills to us. They have set up their mobile workshops with everything they need to do excellent work.

Interior of a mobile oil change van

Inside the van of a mobile oil change provider

And as serious businessmen, they see the value in this app.

Rather than paying for old fashioned advertising in the Yellow Pages, they pay a nominal fee for a premium listing in the Go Mechanic directory that comes complete with a link to their web page and reviews from customers.

And that’s how Go Mechanic makes it possible for customers to download this app for free. How clever!

I instantly wanted to help Brent get the word out to the RVing community. This could be a real game changer for us!

Instead of hunting down an RV service repair shop and figuring out where to stay while your RV is in for repair, why not have the mechanics and detailers come to you?!

What could be better than having your rolling home detailed while you’re out sightseeing? Or getting that niggling problem with the generator fixed or the oil changed without having to drive the big beast to an RV repair shop somewhere?

Interior of a mobile mechanic van providing tire replacement service

Mobile tire service and sales (including balancing!) is a growing trend!

Besides the convenience of not having to take your RV in to the shop, it would be awesome to have this directory at your fingertips if you had a major problem that left you stranded on the side of the road.

As we chatted more about Go Mechanic, Brent told me that it is one of handful of companies selected to participate in the new LaunchPoint incubator program at Arizona State University for innovative technology startups.

Major media outlets have also taken notice, and the folks at Fox12 News in Phoenix Arizona jumped on the chance to do a segment about the app.

Watch this fun Fox12 News video clip here!

As one of the guys on Fox12 News said, “Brilliant!”

Mobile oil change repair service

Have your oil changed without sitting around in a waiting room!

I asked Brent how he got the idea for the Go Mechanic app.

He told me that a few years ago his parents were planning to drive across country in a used car they had just bought at auction.

Being a very good and concerned son, he assembled a list of all the mobile mechanics he could find along their route.

As he handed them the list, he suddenly realized what a valuable resource it was, not just to his parents but to anyone out on the road.

His ingenious idea has flourished since then, and the Go Mechanic app is being rolled out nationwide with special focus on the RV hot spots of Arizona, Florida and California.

Go Mechanic Mobile vehicle service provider app

A clever new app!

If you have a smartphone or a tablet, download it and check it out.  If you’ve never enjoyed the convenience of mobile service, give it a try!

For more information, visit these links:


New to this site? Visit our Home page to read more about our full-time traveling lifestyle and our Intro for RVers to find out where we keep all the good stuff. If you like what you see, we'd love for you to subscribe to receive our latest posts!

Learning the Ropes at J-World Sailing School

Caribbean Dinghy

Dreaming of the tropics…

We’ve recently enjoyed a bit of nostalgia, courtesy of J-World Sailing School.

Before we bought our sailboat Groovy and went cruising in Mexico — in fact, even before we bought our first travel trailer and drove off to a life of adventure on the road — we enrolled in two classes at J-World in San Diego that put us on the course to our new lifestyles.

We had both sailed before, Mark on Hobie catamarans on Michigan lakes, and I on boats of all sizes in the Atlantic Ocean.


Nonsuch 36 sailboat

A Nonsuch 36, sistership to “Magic Dragon,” my home for 4 years in Boston.

In fact, at one time I had lived aboard a wishbone-rigged Nonsuch 36 (something like an enormous windsurfer with an elegant cabin) in Boston Harbor for four years.

What a ride that was — 3 months a year of blissful weekend cruising in New England and 9 months a year of frozen fingers and toes!.

When we decided to leave convention behind and see something of this beautiful world, our initial dream was to do it by sea, and we both realized we needed to improve our boating skills if we were going to do that and come out alive.


Sailing a Hunter 44DS sailboat

Happy sailor!

There are many sailing schools in almost every state, and most follow one of two track systems for teaching sailing: the American Sailing Association system and the US Sailing system.

We looked into sailing schools in our area, but they were all just Learn to Sail classes on lakes. We needed instruction on handling a large cruising boat on the ocean too.

We also thought about flying to the Caribbean for a week or two of instruction, but as lovely as a class at Offshore Sailing School in the BVI can be, it was cost prohibitive.


Sailing at sunset near Acapulco Mexico

Underway aboard Groovy near Acapulco Mexico

Our solution was to take two back-to-back classes at J-World in San Diego, and what a great decision that turned out to be.

J-World teaches the US Sailing curriculum, and they offered a four day Learn to Sail class followed by a three day Liveaboard Cruising class.

Even though I had had formal sailing instruction before, I had no trouble going back to square one and learning it all again.

That way Mark and I would be on an even keel with each other, and we would both have heard the same words of wisdom and learned the same methods and techniques.

Sailing a Hunter 44DS in Mexico

We have great memories of our cruise in Mexico

Another draw for me was the kind of boat they used for their Liveaboard class. It was a J-120, a boat that intrigued me.

The biggest decision for most sailors before they cast off on their cruise is what kind of boat to buy.

This debate had rattled around in my own mind for decades (this cruising dream went back to my childhood).


On the deck of our Hunter 44DS sailboat

They didn’t teach this sailing technique at J-World,
but it’s easy to learn!

My very first boat had been a 5′ long plastic skiff when I was a little kid. Despite my mom’s insistance that I stay within her view from the beach, I had rowed that thing long distances.

I had taken it far from view, imagining myself a skipper on the vast ocean, fighting off pirates and communing with seabirds.

The conventional wisdom among old salts is that a big, heavy, solid, “seaworthy” boat is what you need for a proper cruising adventure.

But a yacht broker in Marblehead Massachusetts who had circumnavigated as a young adult had convinced me decades ago that a boat that sails well and sails fast in light air is a really great choice.

Of course, there is no “right” or “wrong” boat for cruising.

Friends of ours who sailed from San Diego to Mexico and on to the South Pacific have regaled us with tales of cruisers that are out there on all kinds of floating tubs.

Paradise Village Marina in Puerto Vallarta Mexicoat dawn

Paradise Village Marina at dawn.

From multi-million dollar yachts to the Norwegian couple who has no plumbing at all on their boat (which means, of course, no head since leaving Norway!!), sailors cruise in anything that floats.

But I like the idea of a boat that is a joy to sail in light air, and the J/Boats line of racing/cruising yachts had fascinated me for years.

When I lived on the Nonsuch I dreamed of a J-40.  When a newer model J/Boat in that size was built — the J-120 — my dream got an upgrade!

So, when I saw that J-World’s Liveaboard class was conducted on a J-120, that cinched the sailing class deal for me.

Not only did I get to see the boat in action, both under sail and as a living platform, but Mark and I both received absolutely top notch instruction from two different teachers.

One instructor made sure we could maneuver under sail on and off the docks and in and around a crowded anchorage, and the other ensured we understood the operation of a large cruising boat.

Sunrise in Santiago Bay Mexico

Sunrise in Santiago Bay near Manzanillo

Now that we are J-World alumni, we receive their newsletters. 

When one came a few weeks ago, Mark decided to reach out and let the school know how their classes had launched us into the cruising lifestyle.

They were delighted to hear from us and wanted to know more about our experiences in Mexico.

We exchanged a few emails, and then they decided to highlight our story on their blog. What fun!!

Thank you, J-World, for your terrific instruction and for being our first stepping stone into a life afloat!


New to this site? Visit our Home Page to learn more about us, and see our Intro for Cruisers to find out where we keep all the good stuff, including tips for planning your cruise to Mexico, our Solar Power pages, and our ideas for outfitting your boat.

Escapees Magazine Feature Article: “Flame On!”

Flame On and Install a Vent-free Propane Heater in your RV

Escapees Magazine – November/December 2014
“Flame On! – Installing a vent-free heater”
By: Emily & Mark Fagan

The November/December 2014 issue of Escapees Magazine is featuring our article, “Flame On! Installing a Vent-Free Heater.”

Followers of this site have seen our recent post about choosing a heater and installing it in an RV, and here we are writing about it again. Are these heaters really that great? In a word, Yes!

Even in a “warm” place like Arizona, it is very different living in an RV than in a house, and we were surprised by just how frozen we were our first winter.

An RV furnace can keep a lot of the chill off, but if you really want to be warm, a vent-free heater will give you even more heat while using less propane and less electricity.

Some folks worry about the safety of these gas appliances, and this article goes into some detail about why you shouldn’t be nervous. If you are handy, the installation is straight forward. If not, of if you don’t want a permanent installation, there are portable options as well. And if you want a cozy look, they even build them into fireplace mantels!

Escapees Magazine is a wonderful and very informative RV magazine geared towards people who live in RVs long term. It is the membership magazine for the Escapees RV Club which is unique among RV organizations because it offers such a wide variety of programs for its members.

From discount RV parks to mail forwarding services in three states to advocacy work on behalf of all RVers to bootcamp programs that teach new RVers how to live this lifestyle, it is a club that has something for everyone.  The Club even has special interest groups for RVers, nicknamed “Birds of a Feather” groups (BOFs).  These range from Photographers (a group we are part of) to Beaders to Birders to folks who like to RV in the Buff!!

Plus – they have kindly allowed us to share our article here:

Flame On! Installing a Vent-Free Heater

For more info and a step-by-step installation guide with photos, visit our blog post here:

How to Select and Install a Vent-Free Propane Heater

Feel like doing a little easy reading? Our other magazine feature articles and cover photos here:

Published Work by Emily & Mark Fagan


New to this site? Visit our Home page to read more about our full-time traveling lifestyle and our Intro for RVers to find out where we keep all the good stuff. If you like what you see, we'd love for you to subscribe to receive our latest posts!

Beautiful Full-time Fifth Wheel Trailer – SOLD

2002 33' Custom Automate Fifth Wheel Trailer

2002 33′ Custom Automate Fifth Wheel Trailer
for sale for $19,500 in Montana.

We’ve just heard about an incredibly unusual and wonderful opportunity for anyone that is in the market for a high quality, boondocking-ready, full-timer’s fifth wheel trailer.

NOTE: This trailer has been SOLD!

Our good friends and RVing mentors decided to sell their beautiful fifth wheel trailer — and it has been SOLD.

Two slide-outs on the driver's side

There are two slide-outs on the driver’s side, one in the Living area and one in the Bedroom.

In 2002, after 18 years of owning and living in a variety of fifth wheel trailers (mostly NuWa Hitchhikers) as winter snowbird RVers in the southwest, the owners had this trailer CUSTOM BUILT for them by the fifth wheel manufacturer Automate. They have cared for it meticulously and truly lovingly ever since.

Fifth wheel kitchen

The kitchen has custom cabinetry with extra wide drawers.

Automate was one of the highest quality trailer brands of a decade or so ago.

These RVers are extremely knowledgeable and savvy, and when they decided to buy a custom trailer, they knew exactly what was needed for comfortable long-term living in a fifth wheel.

Kitchen in a 2002 33' Custom Automate 5th Wheel RV

10 cubic foot fridge

They oversaw the design and construction of their fifth wheel at the Automate plant, visiting the factory every day for weeks on end to ensure that everything was completed to their high standards.

They used the trailer for five to six months each winter in the southwestern states through the winter of 2012-13.

5th wheel RV dining area

Dinner with a view!

Completely outfitted for long-term boondocking, it has four 6-volt wet cell batteries, 360 watts of solar panels on tilting brackets, a Heliotrope charge controller and 2500 watt inverter/charger. It also has a ceramic vent-free propane heater.

Fifth wheel RV interior

Boondocking-ready with solar panels and a vent-free heater.

There is also plenty of fresh water and holding tank capacity with 100 gallons of fresh water, two 50 gallon grey water tanks (kitchen/shower) and a 50 gallon black water holding tank.

5th wheel trailer bedroom and bathroom area

The layout has a separate shower/sink are and toilet room.

What we like most about this trailer is the light and airy feeling inside. Besides the plentiful and big white framed windows, there is a large skylight in the bedroom. The living room slide-out is very deep, and the rear end of the trailer has huge wrap-around windows.

5th wheel RV shower and vanity

Shower and vanity

Fifth wheel trailer cabinets, drawers and toilet room

Ample custom cabinets and toilet room

fifth wheel floorplan

This is the approximate floorplan (but NOT exact).
The main difference is the vanity is on the opposite side of the bedroom.


And here’s a fun little bonus — you’ll be buying a trailer that has been on the cover of Coast to Coast magazine (the Spring 2012 issue) !!

Coast to Coast Cover Spring 2012

Spring 2012 Issue: “Arizona’s Best Kept Secrets – Treasures of Tonto National Forest”


New to this site? Visit our Home page to read more about our full-time traveling lifestyle and our Intro for RVers to find out where we keep all the good stuff. If you like what you see, we'd love for you to subscribe to receive our latest posts!

RV Heater – How to Install a Vent-Free Propane Heater in Your RV

Installing a vent-free propane heater is one of the best upgrades you can do for your RV if you plan to be spending a lot of time in chilly places. This page reviews how ventless propane heaters operate in comparison to traditional RV furnaces, it discusses the different technologies used in the design of various types of vent-free gas heaters on the market today — including catalytic heaters, ceramic brick and plaque heaters, and blue flame heaters — and it presents a step-by-step guide for installing a vent-free propane heater in your RV or camper.

You can jump to the various sections of this page here:


This post was first written in January, 2009, but was completely overhauled and rewritten in October, 2014.

INTRODUCTION


Warming my hands over a vent-free blue flame propane heater in my 5th wheel camper RV

Happiness is… a vent-free propane heater!

We froze in our trailer during our first winter in Arizona. Morning temperatures in the kitchen were often 40+ degrees F, and although daytime temps could get as high as 70, as soon as evening came, the temps in our trailer dropped into the the 50’s.

Brrr! It’s hard to sit around in the evening in those kinds of temperatures. All modern motorhomes and campers (ours included) come equipped with a propane furnace. However, these loud, inefficient beasts use a lot of electricity, and can drain the batteries in one night.

During that first winter (2007-08) in our 27′ Fleetwood Travel Trailer, we discovered that the more experienced winter desert boondockers (both snowbird RVers and those living the full-time RV lifestyle) installed vent-free propane heaters in their rigs. These are wonderful little appliances that use far less propane than a furnace and no electricity at all. When we upgraded to our 36′ Hitchhiker 34.5 RLTG fifth wheel in May, 2008, we decided we would install one. All summer long we thought about the project, but never found ourselves in a town where there was a good selection of heaters to look at or anyone knowledgeable about installing them in RVs. So we dawdled.

As the nights got colder in late November, 2008, and we relied more and more on our trailer’s electricity-eating furnace, we found ourselves in the warm company of our good friends Bob and Donna Lea Jensen and their vent-free, electricity-free propane heater. Bob has installed quite a few of these little devils over the years, and he gave us some hints and loaned us two critical tools for the project: a pipe cutter and a flaring tool. We learned a lot through this process, and I thought it might be helpful, along with our other RV tips and tricks pages to include some notes here about our project.

There are several types of vent-free heaters on the market, and each has its pros and cons. In the end, we opted to buy a 20,000 BTU thermostatically controlled blue flame heater made by Vanguard. The night before the installation we laughed as we bundled ourselves into our recliners wearing multiple layers, buried under blankets for the last time. Mark’s face peaked out from under his hood as he read. The night after the installation, in shorts and t-shirt, I had to poke my nose out the window to get some cool air. In our excitement, we had inadvertently heated the bedroom to 85 degrees.

We have used and loved this heater year-round ever since, running it near sea-level in the southern states in the winter months and using in the cool mountains during the summer months!


COMPARISON OF RV FURNACES AND VENT-FREE HEATERS

RV PROPANE FURNACES

Propane uses oxygen as it burns and gives off moisture as a by-product. Therefore it has the potential to use up all the oxygen in an enclosed space and kill any living, breathing occupants while creating a layer of condensation on the insides of windows. Yikes! To accommodate these unpleasant aspects of propane heating, conventional RV propane furnaces use a large blower system to bring in outside, oxygen-rich air. In turn, they vent the moist, oxygen-depleted air from inside the rig to the outside. Circulating the air this way keeps the oxygen level in the air fairly constant and significantly reduces the build-up of condensation on the insides of the windows, as the moisture gets blown outside along with the exhausted air.

Atwood RV furnace
However, by blowing all this warm air outside, the furnace is effectively heating the outdoors. If you stand outside an RV next to the furnace vent on a really cold day, you can warm your hands and body quite nicely. Also, this blower requires electricity to run. RV furnaces are DC, so they do not require an inverter or generator in order to operate. However, the amount of power they use is astronomical (our 40,000 BTU furnace uses 11 amps DC). If you are boondocking, or dry camping in the desert as many winter Snowbird RVers do, you are then faced with a choice of either keeping the RV unacceptably cold, or using a generator to keep the batteries charged (even our big solar power installation on the Hitchhiker 5th wheel was not enough to keep up with the furnace blower during the winter).

Besides heating the outside air and running the batteries down, a major disadvantage of a standard RV propane furnaces is that the blower is really loud. There is nothing like being deeply absorbed in a really great movie and listening to some very profound dialog being exchanged in whispers, and having the furnace suddenly roar to life and drown out everything being said. Our furnace blower often woke us up out of a sound sleep too.

VENT-FREE PROPANE HEATERS

In contrast, vent-free propane heaters are silent and provide heat without using any battery power. This is because they rely on you to give them fresh air: you have to crack open a window while they run. All US-made vent-free heaters are built with an internal oxygen sensor that shuts off the heater if the oxygen level in the room becomes too depleted. In addition, most RVs come equipped with an LP gas detector that will sound alarms if the oxygen in the air drops too low or if an LP gas leak is detected and you can install a combo LP/CO detector as well to detect both LP gas and carbon monoxide. You may also need (or choose) to run a small fan to circulate the air. This will use some battery power, but you can decide how much or how little to use the fan.

Living without heat in an RV

Brrr… This was what life was like before we installed our vent-free propane heater!

So, in essence, when using a vent-free heater, you must find a happy balance between several variables. Determine which kind of heater will best suit your needs (see descriptions below), figure out where to place it in the RV, which window(s) to crack open, and how often to run a fan (if at all), and if so, which kind of fan to use (a little DC fan, like one used in a computer, a large AC ceiling fan that will require an inverter or generator to run, or an optional blower fan that can be purchased with the heater).

Heat rises, so in 5th wheel campers the heat tends to gather in the bedroom. Simply close the door to the bedroom, or crack it slightly open to control the movement of the warm air into that space. Likewise, if you use a ceiling fan, you can experiment with running it forward or backward, either to draw air up and move it out along the ceiling or to push the warm air down towards the floor.

Propane has a fixed capacity for providing heat. One gallon of propane contains 92,000 BTUs of potential heat, which means a 40,000 BTU RV furnace running full blast will burn through nearly a gallon of propane every two hours or so. During the coldest periods, it is a real pain in the neck to keep having to refill the propane tanks as you fly through propane trying to heat your rig.

Our Lynx travel trailer came with a 30,000 BTU furnace, and our Hitchhiker 5th wheel came with a 40,000 BTU furnace, both installed at the factory. These were sized appropriately for the square footage of each camper. However, we have found we can easily heat our big fifth wheel to higher temperatures in less time using our 20,000 BTU vent-free propane heater instead of the factory-installed 40k BTU RV furnace. So, a smaller vent-free heater that burns less propane per hour can effectively heat a given space more quickly than a traditional RV furnace that is twice its size.

Because of the inefficiency of RV furnaces in terms of propane use and battery power consumption, when we use the RV furnace alone for heat in 30+ degree F overnight temps and 40+ degree daytime temps, we find we have to keep our trailer at 50 degrees while sleeping at night and at just 60+ degrees during the day. Cold as that sounds, this uses up almost a gallon of propane a day and we can barely keep the batteries topped off using our 490 watts of solar panels alone. Worst of all, living like this is really uncomfortable.

Using our vent-free blue flame heater in the same conditions and burning the same one gallon of propane per day in those conditions, we can easily keep the 5th wheel at 76 degrees all day long. And we use almost no electricity.

To clarify, we have two 30 lb (7 gallon) propane tanks, and when outside highs are in the 50’s and lows are in the 20’s, we go through a tank of propane each week. When outside highs drop below freezing 24/7, we can go through a tank in 3 days.


WHICH IS THE BEST TYPE OF VENT-FREE HEATER?


When choosing a vent-free propane heater, there are a lot of products on the market. Catalytic and ceramic heaters produce infrared radiant heat which heats objects situated nearby much the same way the sun does. They create a warm, baking sensation on your skin, but if you move away (like moving into the shade outdoors), that sensation goes away. The air in the room warms up over time as the objects in the room warm up.

In contrast, blue flame heaters heat the air, rather than the objects in the room, providing a more even, uniform warmth. Gradually, the objects in the room heat up as the overall temperature of the air in the room rises.

All of these heaters come in different sizes, ranging from 5,000 to 30,000 BTUs, which are good for heating 100 square feet up to 1,000 square feet. Small ones can be hung on the wall, out of the way, while big ones that appear modest-sized in the show room suddenly become monster heat sources that dominate the floor space when you get them home to your RV.


CATALYTIC INFRARED RADIANT HEATERS

Olympian Wave-8 Catalytic infrared radiant heater for use in an RV
Catalytic heaters were the original vent-free heaters. The major brand is the Olympian Wave, manufactured by Camco, and their primary models are the Wave-3, Wave-6 and Wave-8 heaters. These provide 3,000, 6,000 and 8,000 BTUs of heat respectively.

Catalytic heaters provide infrared radiant heat by way of a large pad on the surface of the heater. A chemical reaction in the pad causes heat to radiate off the entire pad. If you stand in front of a catalytic heater, your skin will feel a nice baking warmth on it. The closer you sit, the more you will bake. This is a great feeling when you are chilled.

These heaters have been in use for years, and have an enthusiastic following. They are also quite expensive ($300-$430), often as much as double the cost per BTU as the other types of vent-free heaters. They do not have thermostats, just a “high” setting and a “low” setting, so you must manually turn them on and off or to high or low to regulate the temperature in the RV.

If the pad on these heaters becomes dirty, it is possible to replace it for about $100. A friend of ours tried to clean his by vacuuming it, and inadvertently ended up destroying the pad. Because the pads had changed slightly since he bought his unit five years earlier, he could not replace the pad and had to replace the entire heater instead.

You will need a brass elbow fitting from Camco for the installation. You may also want leg stands so the heater can stand on its own two feet and a dust cover to protect the catalytic pads when it is not in use.


CERAMIC (BRICK or PLAQUE) INFRARED RADIANT HEATERS

Mr. Heater Ceramic infrared radiant heater for use in an RV
Ceramic infrared heaters are a slightly newer technology that has been warming RVs for quite a few years. The most popular brand on the market is Mr. Heater. Other brands include Kozy World, Empire and ProCom. These are generally offered in one, two, three and five brick configurations providing 5,000, 10,000, 15,000/20,000 and 25,000/30,000 BTUs of heat.

Ceramic heaters provide the same infrared radiant heat as catalytic heaters. Across the front of the heater there are small ceramic “bricks” or “plaques” that heat up to a glowing orange/red color. Like a catalytic heater, standing in front of a brick (or plaque) ceramic heater will toast your toes to your thighs on the front of your legs. The heat from the bricks interacts with your skin and you will feel a wonderful tingly warmth.

These are extremely popular units and can be quite inexpensive ($130-$350). Most can be purchased with or without a thermostat. One big disadvantage is that the area directly in front of the bricks gets hot enough to burn things. Any flammable items that come too close to the bricks could catch on fire. If a cat or dog wanders past and flicks its tail against the bricks, it might get singed. If a toddler sticks its fingers in there, a trip to the hospital might ensue.


BLUE FLAME HEATERS

Mr. Heater Blue Flame vent-free propane heater for use in an RV
Blue flame heaters are the newest technology and provide a different kind of heat than the catalytic and ceramic heaters. Rather than radiating heat, blue flame heaters operate via convection (the principal that heat rises), drawing cool air in through vents at the bottom of the heater and emitting warm air out the vents in the top. This is a heating method that is much like central heating in a house. Once the air temperature has risen sufficiently, the objects warm up as well. If you keep your RV at a warm temperature all the time (especially at night), the objects in the room will never get cold.

Blue flame heaters draw cool air in from floor level through a row of vents at the bottom, heat it up, and emit the warm air out of vents at the top, relying on convection (the fact that heat rises) to move this air instead of using a blower. You can warm your hands and body by standing in front of one, but it is more of a warming sensation than a baking one. The area in front of the blue flame is covered by fireproof glass (it’s actually a ceramic material) and it is not burning hot. So, there is no risk of items immediately in front of the heater catching fire. Blue flame heaters are a good idea for people with pets or children.

The most popular brand is Mr. Heater. A few others include Empire Heating Systems and ProCom, the same makers of the ceramic brick heaters. These manufacturers produce both blue flame and brick heaters in the same chassis, so other than the appearance of the bricks or the flame, the unit itself has the same look whether it is the brick or blue flame version. The typical BTU range on these heaters is 5,000, 10,000, 20,000 and 30,000.

Blue flame heaters are as popular as the brick ceramic heaters, and are in the same price range of about $130-$350. They can also be purchased with or without a thermostat.

BLUE FLAME FIREPLACES !!

Pleasant Hearth Vent-Free Propane Fireplace 35 inch

.

There are some wonderful blue flame heaters that are designed to look like fireplaces, complete with logs, trim and beautiful wooden mantels. Manufacturers include Pleasant Hearth and ProCom.

These cost about $200-$300 more than the regular blue flame heaters, but what a beautiful addition to your RV. You can sit and watch the yellow flames dancing around the logs and warm your bones at the same time. I saw one of these units in an old travel trailer and was enchanted. The owner had built his own mantel out of an old coffee table, and it was lovely. I wanted one of those units so badly!!

The only place for a unit like that in our rig was along the backside of the “L” in the kitchen counter, which is just a few inches from the wall of the entertainment slide-out when it comes in. If we had the carpentry skills, we probably could have slipped a fireplace in there, recessed under the counter.

The only downside would have been that it might have gotten a little hot under the counter, and we would have had to be extra careful that the heater was fully cooled whenever we brought the slide-out in, or we would have cooked the gelcoat on the outer wall of the slide. Also, as it turned out, that particular location for the heater would not have provided the same warmth when we sat in our recliners as the heater does in its current spot in the kitchen in front of the oven (even though it would have been closer). It’s just the way the air flow circulates in our particular trailer.

PORTABLE HEATERS

Mr Buddy Portable vent-free propane heater

.

If you don’t want to hassle with installing a dedicated gas line for a vent-free propane heater in your RV, you can opt to get a portable unit instead. The portable ventless heaters are all infrared radiant heaters with bricks (plaques) that have air intake vents in the bottom for convection as well. They have built-in blowers that run on a 6 volt a/c adapter (sold separately) or on 4D batteries. They are very popular.

They are manufactured by Mr. Heater (with the brand name “Big Buddy”), and they come in sizes from 4,000 to 18,000 BTU. They run on the small Coleman style portable propane canisters but can also be connected to a larger BBQ style propane tank.

If you plan to run the heater from a large propane tank instead of the little propane canisters, Mr. Heater sells a companion flexible gas hose with a regulator and quick release connector on it for just that purpose. Mr. Heater make nice carrying cases for these heaters as well.


OPTIONAL EQUIPMENT for VENT-FREE PROPANE HEATERS

Thermostat

Usually this option is just $30-$50, and it is well worth the cost if you plan to be in your RV for extended periods of time. A manually controlled heater will have several heat settings (usually three), but you will need to monitor the heat in the room and adjust the settings as you get warmer or cooler. A thermostatically controlled heater will cycle on and off as its sensor detects changes in temperature. Ours typically cycles on and off in 5-10 minute increments, keeping the temperature within 2 degrees.

On our unit, the thermostat has a simple analog dial that can spin from “1” to “5.” These are arbitrary numbers rather than fixed fahrenheit degree markers. However, once you figure out how “1 1/4” or “2 1/2” relates to temperature, you can keep the temperature in the room tightly controlled by turning the dial to the setting you want. This is especially nice if you plan to keep the heater on all night, as the temperature in the RV will remain constant while the outside temperature drops.

Feet

Most units are designed to be hung on a wall, however most also have an optional stand so they can be placed on the floor. Most smaller units include the feet as an option (about $25) while most larger units come with the feet at no extra charge. The great advantage to hanging a unit on the wall is that it is always there, ready for use. If you use your RV during all four seasons, it is nice to know that if you suddenly find yourself in a chilly spot, you can simply flip the switch and have your heater working for you, rather than digging it out of the back of the closet (a lesson we learned after the fact!).

The advantage of having the unit standing on its own two feet is that you can move it around the rig. This is especially true if you don’t use a fan of some kind to move the warm air around the rig. If you go this route, make sure you have plenty of flexible gas hose so you get maximum range for placing the heater in different spots in the rig.

Blower

Most ventless gas heaters can be purchased with an optional blower. As soon as you start blowing the air around the RV, you are signing up to use the batteries to keep the rig warm, something the vent-free solution was aiming to avoid. However, the power consumption should be less overall than a furnace. Some blowers are thermostatically controlled, allowing them to cycle on and off as needed. This is efficient, as the blower and batteries won’t be in use all the time the heater is on. Rather than a built-in blower, many people opt to install a small DC fan which uses very little power. If your rig has a ceiling fan, that can also be an option, although it will require the inverter or generator to be turned on. In our case, our inverter is turned on from the moment we wake up until we go to bed, so running the ceiling fan when the heater is on during the day is no big deal.


HEATER PLACEMENT

When we installed our ventless propane heater, we tried placing it in several locations. We also tried turning our ceiling fan both on and off and running the fan both forwards and backwards (blowing towards the floor and towards the ceiling) before we settled on a final arrangement.

Kozy World Vent-Free Propane Heater connected to flexible gas hose

This ceramic heater has a flexible gas hose that allows it
to be moved around the RV.

We found that the best setup was to place the heater directly below our ceiling fan (in front of the oven at the base of the stairs in the kitchen) and to set the fan to blow towards the ceiling, drawing the warm air up and distributing it outwards throughout the RV. It was astonishing to find what a difference it made as we moved the heater to various places in the trailer and tried each placement with or without the ceiling fan, and blowing up versus blowing down.

Our RV is a “rear lounge” fifth wheel
, and we found that the area around the recliners was a significant cold air pocket. Doesn’t it figure! That’s where we like to be on cold evenings!! There are large windows surrounding the recliners, which make that area cold, while the warm air in the rig congregates high up on the ceiling just in front of the stairs leading to the bedroom (that is, if the bedroom door is closed. Otherwise the warm air settles in the bedroom itself).

We assumed that facing the heater towards the recliners just 5 feet in front of them would warm up this cold pocket. Wrong! No matter how high we set the thermostat, and no matter what we did with the ceiling fan (which is located 10 feet away right in front of the stairs leading to the bedroom), the recliners were still cold.

When we moved the heater to the base of the stairs leading to the bedroom, and turned the ceiling fan on “high” and set it to blow towards the ceiling, we could immediately feel the warm air encircling us as we sat in the recliners. Who woulda thunk??!!

Heater Sizes and Capacities

Most manufacturers state the square footage their various heaters are designed to heat. We decided that we’d rather buy a slightly larger unit (that is, one rated for a larger space than the interior of our fifth wheel), and simply keep the heater on a lower setting than to find ourselves unable to heat the buggy adequately. Our rig is 360 square feet, which put us somewhere between 10,000 and 20,000 BTUs. We ended up buying a 20,000 BTU heater, and we typically keep it set to 50% of maximum during the evenings/mornings and 25% of maximum at night when temps outside are in the 20’s and 30’s. If we had purchased a 10,000 BTU unit instead, I think it would have been cranking at max volume most of the time during the mornings and evenings and on stormy days. As a rough guide:

Vent-free heater BTU ratings and square footage
6,000 Up to 200 sf
10,000 Up to 300 sf
20,000 Up to 700 sf
30,000 Up to 1,000 sf

There are legal ratings for the sizes of vent-free heaters and the rooms they can be operated in. Less than 6,000 BTUs is okay for a bathroom, and less than 10,000 BTUs is okay for a bedroom. These are the ratings that are being referenced when you see a sticker on a larger unit saying “not designed to be used in a bedroom.” The idea is that a large unit operated at max volume in too small a space will use up too much oxygen in the room too quickly. Of course, such a scenario would have the occupants of the room running out the door because it would be way too hot for comfort.


SAFETY OF VENTLESS PROPANE HEATERS

Some people may worry that these kinds of ventless propane heaters aren’t safe, fearing that it might blow up the RV or suffocate them. These heaters are extraordinarily well regulated by various governing bodies, and designers have to meet stringent guidelines and submit their heaters to a battery of very challenging tests before they can be brought to market. Vent Free is the industry organization for all the vent-free gas heater manufacturers. Their website spells out all the testing, guidelines, state by state requirements, laws and safety record for these heaters. Through September 1, 2005, they claim that there had not been a documented death due to a vent-free propane heater (see that claim here). Visit their website at ventfree.org.

In addition, at the factory, RV manufacturers install a LP Gas Detector Alarm system (various brands are used) to detect LP gas leaks in the RV and alert anyone inside. These are installed because many RVs come equipped with propane-based appliances, including things like the stove, oven, hot water heater, refrigerator and RV furnace. All RV owners should be aware of where their LP gas detector is located. It is usually installed near the floor, as LP is a heavy gas that settles down low. Propane is found in highest concentrations near the floor.

Some RVers run their vent-free propane heater overnight as they sleep. We don’t do that. If the overnight low temps will be well below freezing (i.e., 25 degrees F or below), we run our RV furnace, set to 50 degrees, all night long to keep the plumbing from freezing, because the furnace is ducted throughout the basement.


OPERATION AT HIGH ELEVATION

Most of these heaters are sold with an official limit for operating altitude. The problem at higher altitudes is that there is not enough oxygen for the propane to burn properly. Some units are rated for use up to only 3,500 feet, while other manufacturers have a stated limit of as much as 5,000 feet.

Our blue flame vent-free propane heater is rated for use up to 4,500 feet, but we have used it extensively at altitudes up to 8,500 feet and have used three times for two week periods at 10,000 feet.

The key to operation at altitude is the Oxygen Detection Safety-pilot (ODS) sensor which has been standard equipment on all US-made vent-free heaters since the 1980’s. This sensor shuts off the gas to the heater when it detects the oxygen level has dropped to 18% (normal sea-level air is 21% oxygen). We find that whenever the ODS shuts our heater off, our stove and oven continue to run without a hitch. So, in reality, the stove and oven are actually more dangerous, as they do not have built-in ODS units to shut them off when the oxygen in the room gets too low.

5th wheel camper rv in the snow

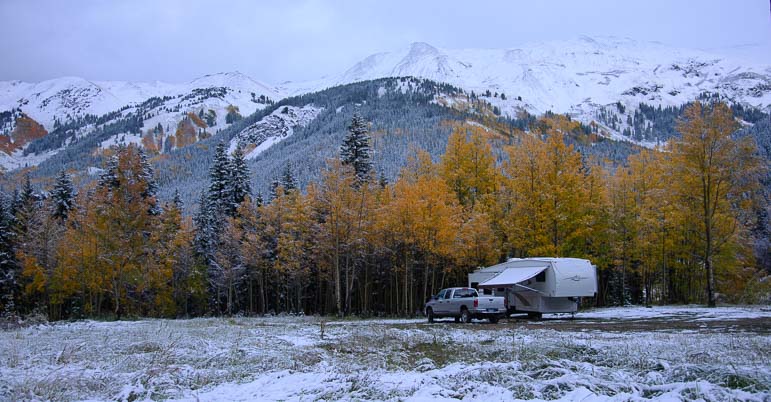
A surprise autumn snowstorm at 10,000 feet elevation in Colorado during a two week stay taught us a lot
about how vent-free heaters function at high altitudes.

We use our heater all summer long as we travel through the western mountain states. We find that it works very well at 6,000 to 9,000 feet, taking the chill off cold mornings and raising the temperature inside the RV from a brisk low to mid-40’s to 75 degrees within an hour.

We have spent months at these altitudes. On occasion, if we have been running the stove and oven as well as the heater, the heater will unceremoniously turn itself off. This is no problem. We simply open the RV door to let some oxygen-rich air into the rig.

We have also spent several periods of 10 days to two or three weeks at 10,000 feet. Here we had more difficulty with our vent-free heater when the outdoor temps dropped into the high 20’s overnight (and we got two inches of snow on our roof!) and daytime highs were in the 40’s. The heater needed some coaxing to make it work. We tried two methods of combining the RV furnace and the ventless propane heater at this altitude. Neither was ideal, but this will give you a sense of what to expect and what to try:

1. Run the RV furnace all night long to keep the rig at 50 degrees overnight, and then use the RV furnace to raise the temp to about 60 in the morning. We found that this method used gobs of electricity and propane and didn’t make us very warm. What’s worse, when we tried to use the vent-free blue flame heater after running the furnace, the furnace would not have sufficiently replaced the interior air with exterior oxygenated air, so the vent-free heater could not run very long before it shut off due to having insufficient oxygen around it. So, in essence, using the RV furnace meant we couldn’t use the vent-free heater. We found we could run the RV furnace all day long but the temps in the rig would never exceed 61-62 degrees (the high temps outside were in the 40’s, lows in the mid-20’s).

2. Leave the furnace off overnight and run the ventless propane heater in the morning to warm up the rig. The temps inside our bedroom typically stay about 10 degrees above the outside temps if we don’t heat the RV overnight, so we woke up on some mornings to interior temps in the high 30’s. (We close our bedroom door at night to help keep the bedroom warm). The vent-free heater miraculously heated our indoor RV temps to 70 degrees within an hour of turning it on. At this point, around 70+ degrees, the heater would shut off. We could coax it to run a little more by opening the RV door and fanning the outside air into the rig, but it would shut off again after another 10 minutes or so. So then we would turn on the RV furnace.

Any sensible person would have gone and gotten electric hookups at a campground and run an electric ceramic heater, but we aren’t always very sensible. Camping at 10,000 feet in snowy weather is rather extreme. Most of the boondocking spots we stay at in the summer months are down around 6,000 to 9,000 feet, as I mentioned above, and the heater works beautiful at those altitudes. During the winter months we are typically at elevations of under 1,500 feet and the heater works like a champ without missing a beat.

Note: Since publishing this article, we have enjoyed yet another year of toasty warm heat from our blue flame vent-free heater in the mountains from spring through fall and at low desert elevations in the winter. We were also caught in another even bigger snowstorm on a mountaintop at 10,000 altitude once again and tried a different heating strategy that kept us warmer and dryer. Our article about that experience is here:

How to Heat an RV in Cold Weather and Winter Snowstorms


WHERE CAN YOU BUY A VENT-FREE PROPANE HEATER?

We had the worst time trying to find places to look at these heaters and find people knowledgeable about installing and using them in RVs. In some states it is illegal to sell these kinds of heaters (here’s a link to the state-by-state regulations for vent-free gas heaters from ventfree.org), and in mountain towns they are scarce because of their issues with operating at high altitudes. In four months of summer travel when we were looking to buy, we found just two propane gas companies selling vent-free heaters, one in Jackson, MS and one in Kanab, UT. We ended up learning the most from fellow desert boondockers in Arizona, Nevada and California during the winter months and from salespeople in mom-and-pop hardware and RV parts stores in Yuma and Quartzsite, Arizona.

If you know what you want, you can get a much better deal buying online, and Amazon sells all the major brands and accessories. We paid $290 plus $25 tax for our heater, a Vanguard 20,000 BTU blue flame with a thermostat and no blower (it came with feet). After buying, we found the same unit online with free shipping and no sales tax for $175 (Vanguard heaters are no longer made). Ace Hardware told us they could order a similar unit for us, shipped to their store in a week, for $215. So we paid a premium for our unit, but we did talk to a lot of sales people in the process and we saw a lot of the units (and warmed our hands over them), and knew exactly what we were buying.

Cost of installing a vent-free heater

Our entire project cost $385. The heater was $315 (including tax), and parts totaled $70. We were able to borrow the tools, but found they cost only about $15 to buy. We were quoted between $60 and $100 for the labor for the installation. As stated above, we also could have saved about $140 on the heater if we had purchased it online.


INSTALLATION OF A VENT-FREE PROPANE HEATER IN AN RV

Following is a pictorial step-by-step guide showing how we installed our vent-free propane heater in our RV.

Installing fIttings on the vent-free propane heater

The installation begins with work on the heater itself…

Working under the kitchen cabinets to install the new gas line for the heater

…however, the bulk of the installation involves tapping into an existing copper gas line to connect a new flexible gas line that goes to the heater.

The first step is to do a little work on the heater itself…

Installing the feet on our ventless blue flame propane heater

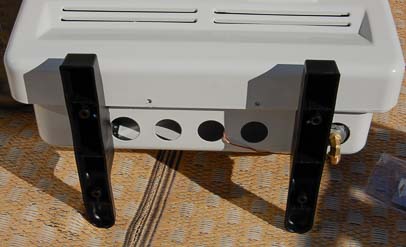
Attach the plastic feet so the unit can be freestanding and be moved around the trailer easily.

Installing the gas valve on the blue flame heater

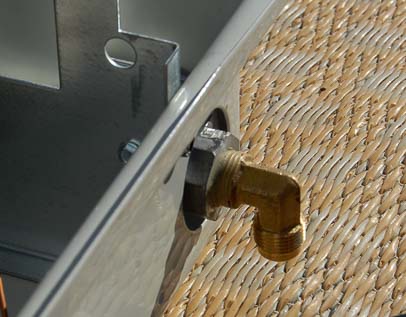
Attach a brass elbow fitting at the base of the heater.
A flexible gas hose will eventually connect to this elbow.

Installing the thermometer on our ventless blue flame propane heater

Attach a thermistor (an electrical resistor type of thermometer) for the internal thermostat. This went on the lower back corner of the heater.


Our heater came with feet so it could be freestanding, and it also came with a thermistor, or resistor based thermometer, for the thermostat. These were attached before beginning the actual installation of the new gas line in our trailer.

The brass elbow did not come with our unit, but we found one with the right pitch, thread and diameter at the gas and electric supply store where we bought the other fittings for our project.

Second Step — Turn off the gas and tap into an existing copper gas line

The gas hose for the heater will tap into an existing copper line in a kitchen cabinet

The new flexible gas line for the heater will connect into the existing copper line.

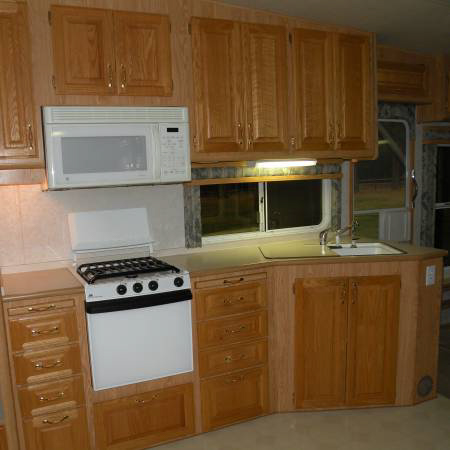
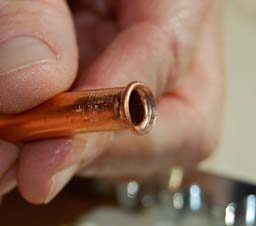
We decided to tap into the copper gas pipe that runs between the refrigerator and the stove at the back of one of our lower kitchen cabinets. Mark measured the pipe and found it was 3/8″.

The goal was to cut the existing pipe and insert a series of fittings that would allow us to attach a flexible gas hose at that point, effectively creating a new leg of flexible gas line. This hose would then run out through a hole drilled at the base of the cabinet and attach to the heater. All of this is low-pressure pipe and fixtures.

Layout of all the gas fittings for installing the vent-free blue flame propane heater in our fifth wheel trailer RV

To create a new leg of flexible hose gas line requires a T-connector (to rejoin the severed pipe), F-F gender changer, On/Off valve and flexible gas hose with a stopper at the other end.

At a gas and electric supply store we picked up a male-male T-connector that would be inserted into the cut copper pipe.

The base of the T would connect to a female-female gender changing connector, and then to an on-off valve (which has male fittings at either end), and finally to a female connector on the end of the flexible gas hose.

Most of the year the heater would not be in use, so we bought a stopper for the end of the hose that goes to the heater.

pipe cutter for cutting gas pipe

Specialty tool #1: Pipe cutter

When the heater is disconnected, this stopper would be screwed into the end of the hose and the heater would be put in a closet.

However, we later discovered we wanted easy access to our heater during all four seasons, so the stopper never gets used!


The existing gas line is cut

The existing gas line is cut.

A universal gas appliance hookup kit manufactured by Mr. Heater includes all these parts except the T-connector!

Flaring tool showing both parts

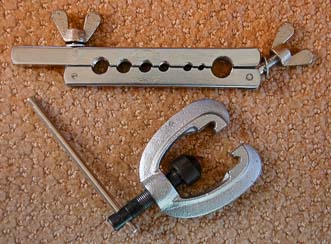
Specialty tool #2: Flaring Tool.

The first step, after turning off the gas, was to cut the pipe. This requires a pipe-cutter, a small, inexpensive tool.

Once the pipe was cut, the next step was to connect the T-connector between the two severed ends of the copper pipe.
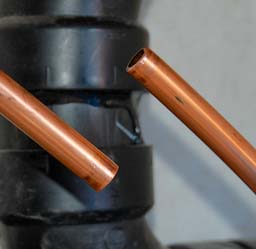
practice flare on scrap piece of copper pipe

Practice flare.

This would be done by first sliding a female connector onto each of the two pipe ends and then flaring the ends of the pipe with a flaring tool so the connectors couldn’t slide back off again.

The female connector is slid onto the pipe before the flare is done

The flare prevents the female connector from coming off the pipe.

The male-male T-connector would be screwed into this (and its companion) female fitting on either end of the pipe, rejoining the pipe and making a new connection available for the gas hose to go out to the heater.

flaring tool for flaring the end of a gas pipe

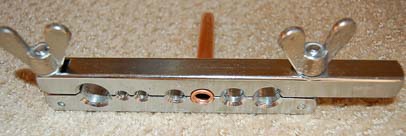
Flaring tool with scrap practice pipe in it.

Mark had never used a flaring tool to flare a pipe before, so he wanted to practice it first on a scrap piece of pipe.

Flaring the real pipe under the kitchen cabinet

Flaring the real pipe inside the cabinet.

He made the practice flare by inserting the scrap pipe into the appropriately sized hole in the tool and then screwing down both ends of the tool to snug the pipe into it — as if it were a bad guy in the old days having his head and hands put in the stocks in the town square!

One flare finished second flare beginning

One flare done, now do the other.

Then he inserted the pointed end of the flaring tool into the end of the pipe and twisted the crank, slowly flaring the end of the pipe as the point pressed further into it.

Two wrenches tighten T-connector in place

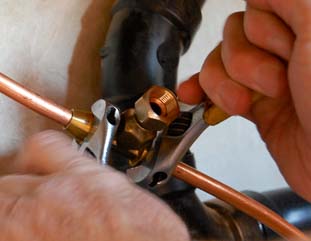
Tightening the T-connector with two wrenches

He slid the female connector onto a short piece of pipe and felt a snug fit between the pipe and the connector. The flare was just right. Now confident that he could flare a pipe properly, he contorted himself to get the flaring tool set up on the real copper pipe at the back of the cabinet.

T-connector with F-F gender changer

T-connector with F-F gender changer ready for the shut-off valve to be attached.

He began by sliding a female connector onto one end of the severed pipe under the cabinet and flaring the pipe’s end. Then he did the same thing to the other piece of the severed pipe. Then he screwed the male-male T-connector into the two female ends of the pipe to rejoin them, and he tightened the T-connector using two wrenches.

He attached a female-female connector to the base of the T, making it possible to screw the male-male valve into place. This valve would allow the gas to the heater to be turned on and off. After the valve, he attached the female end of the gas hose.

Connecting the flexible gas hose to the shut-off valve

The new flexible gas line connects to the shut-off valve.

Finally, he drilled a hole in the front base of the kitchen cabinet and ran the gas hose through the hole. The other end of the gas hose was attached to the elbow connector he had placed on the bottom of the heater.

Tightening all the connections with wrenches, and turning the gas to the trailer back on, the heater was now ready to be used.

Hole at base of the cabinet for the gas hose

The new flexible gas line will come through this hole and connect to the heater.

Mark checked for gas leaks using a tiny spritzer bottle filled with a few drops of Dawn dish soap and water. Spraying this mixture on each connection, he looked for bubbles to form which would indicate a gas leak.

To give us flexibility in moving the heater around the rig, we originally used two lengths of gas hose: a 3′ length for under the cabinet and a second 12′ length that attached to it with an inline male-male connector.

Vent-free blue flame propane heater installed in a 5th wheel trailer

What a great little heater!!

The idea was that the 12′ gas hose would give us lots of flexibility for moving the heater around the trailer. However, we found that it was too long and too bulky and the best position for the heater was close to the stove anyway. So we replaced the 12′ hose with a shorter 4′ one.

After the installation was finished, it didn’t seem like such a big project after all, and what a thrill it was to toast ourselves in our warm buggy. Our timing was perfect: the next week brought a big cold front, multiple days of rain, lows in the 30’s and highs in the fifties. We were snug as bugs in a rug while the winds howled outside.


There are tons of choices for installing a vent-free propane heater, but these four are among the most popular. If you buy a heater from Amazon, make sure it is PROPANE and not NATURAL GAS, as the pictures look the same. We receive a 4-6% commission for purchases made through any of our Amazon links (at no cost to you) which helps us maintain this site — thank you!

Good luck with your project, and stay warm!

Subscribe
Never miss a post — it’s free!

Disclaimer: This blog post describes our vent-free propane heater installation. We are not responsible for any installation other than the one in our own rig.

Below are some of our most POPULAR POSTS (also in the MENUS above)

Buddy - A Journey in Spirit - The story of an event that changed our lives forever.

ARTICLE INDEXES
  • RV Tech Tips Articles - A one page index of links to all our RV Tech Tips, RV Upgrades & RV Maintenance articles.
  • RV Lifestyle Tip Articles - An index of links to all our RV Lifestyle Tips (finances, boondocking, major repairs, work/jobs, etc.)
  • Solar Power Articles - Overview and tutorial articles for how to design and install solar power on an RV or boat
  • Product Reviews - An index of links to all of our Product Reviews
RV UPGRADES, SYSTEMS & TIPS MONEY FULL-TIME RV LIFESTYLE GEAR STORE
  • Gear Store - A list of the goodies, equipment and gear we've found useful in our RV lifestyle!
 

Our most recent posts:

More of our Latest Posts are in the MENU.   New to this site? Visit RVers Start Here to find where we keep all the good stuff. Also check out our COOL NEW GEAR STORE!! *** CLICK HERE *** to see it!

What is happening to our Public Lands?

Fifth Wheel Trailer RV near Vermillion Cliffs National Monument Arizona

Will photos taken on public lands like this beautiful spot on the Utah/Arizona border require an expensive permit in the future?

October 2014 – There have been some interesting and disturbing developments on America’s public lands lately. For the last month, photographers have been up in arms over a proposal put forth by the US Forest Service to charge big fees for permits to take pics on public land.

This news has gone viral since the USFS first announced the proposal in early September, and there have been oodles of irate blog posts and tweets from some of the biggest online news outlets.

Read More…