Selfie mania has taken the world by storm, and in our travels we are no exception.
Mark gets a selfie with a bear. Wow!
And selfie sticks are all the rage at every scenic overlook we go to.
The gear of choice in the National Parks is the selfie stick!
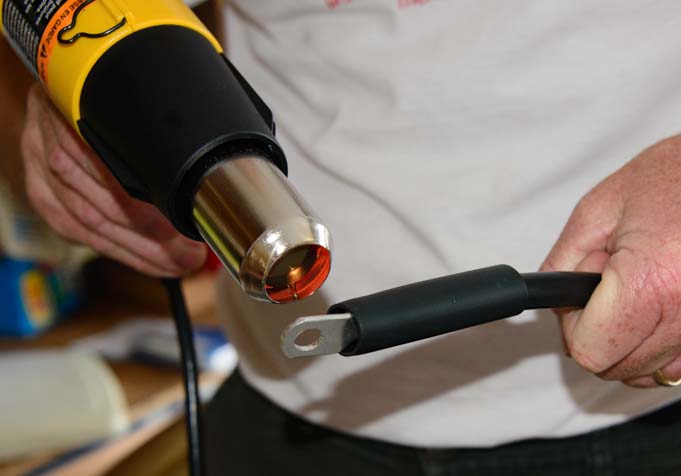
But there is a better way to hold a camera still, especially a big DSLR: a good quality tripod and ball head!
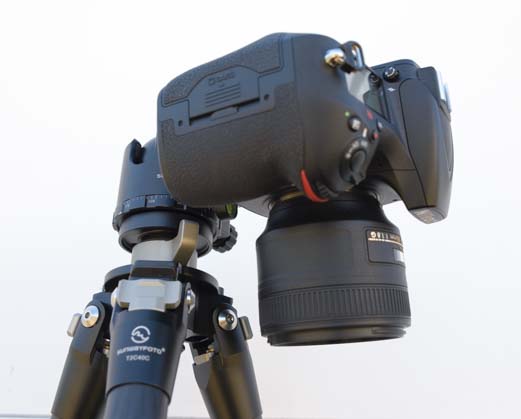
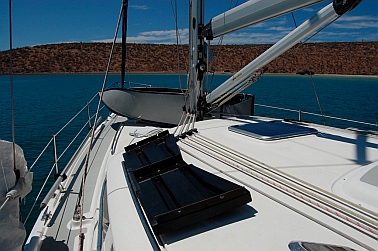
Sunwayfoto T2C40C Tripod and XB-52 Ballhead
Photography has become a major part of our lives and travels, and as our skills have improved, we have upgraded our camera equipment as well. In the following link we outline all of the gear we use, from cameras and lenses to accessories like flashes and tripods to software for post-processing (as well as explaining how we organize our photos), and we also provide links to all the resources we’ve used to learn how to take photos:
It is said that as a photographer improves, his or her biggest equipment concern goes from getting the right camera body to buying the most appropriate lenses to finding the best tripod. We are working our way along this progression, and soon after Mark purchased his Nikon D810 camera a few months ago, he began casting about to find a suitable tripod for it.
Because we have a lot of readers who are seeking to improve their photography as they travel, just like we are, we wanted to share our experiences with this new tripod kit.
Sunwayfoto DDC-60LR Quick Release Clamp atop an XB-52 Ballhead all sitting on a Sunwayfoto T2C40C Tripod
When we first became interested in photography, we couldn’t understand why tripods could be as cheap as $29 or as much as $1,500. But we have learned since then that the price/performance trade-off is very simple, and it all boils down to three things:
Sturdiness
Overall weight
Ease of use
Cheap tripods take precious time to set up, can be difficult to position the camera correctly to get the image you want, don’t necessarily hold the camera perfectly still (and sometimes even let it droop a little after you’ve got everything in place), and are often too short to put the camera at eye level. Expensive tripods do all those things with ease, and they are lightweight enough to carry comfortably.
When is a tripod handy to use? Whenever the shutter speed is so slow that hand-holding the camera will make the whole image blurry because your hand moves while taking the photo.
With a tripod, flowing water can be made to look silky smooth.
We use ours all the time for low light photography (sunrise and sunset), for night photography (shooting starry nights and the Milky Way), for long shutter speeds to reveal movement, like the flow of waterfalls, and for time-lapse sequences that show movement in a video format, like fast moving clouds and changing light.
The Sunwayfoto XB-52DL ball head is rated to support a whopping 132 lbs., far more than other comparable tripod ball heads.
Like most budding photographers, we’ve frittered away lots of good money on cheap tripods as we’ve learned these lessons. After all, when you’ve broken the bank buying a camera and lenses, who wants to dig deeper in their pockets to get a decent tripod?
As is his way, Mark did an exhaustive search with a few criteria in mind for what he wanted in his new tripod. It had to be:
Stable enough to hold the camera with our longest lens, which is a Tamron 150-600mm
The ball head had to be strong enough that the camera wouldn’t droop after it was tightened
The tripod legs had to be carbon fiber (i.e., strong and lightweight)
Mark began looking into the Sunwayfoto brand because we both used their L-Brackets on our Nikon D610 cameras and Mark now uses the Sunwafoto PNL-D810R L-Bracket on his new Nikon D810. We liked the craftsmanship of our L-brackets, and when we discovered Sunwayfoto makes tripods and ball heads, their tripod kits seemed worthy of a closer look.
Side note: an L-Bracket is a handy piece of gear that mounts on the camera so the camera can be slipped onto the tripod easily. Because the bracket is an L-shape, the camera can be switched from a landscape orientation to a portrait orientation quickly and easily.
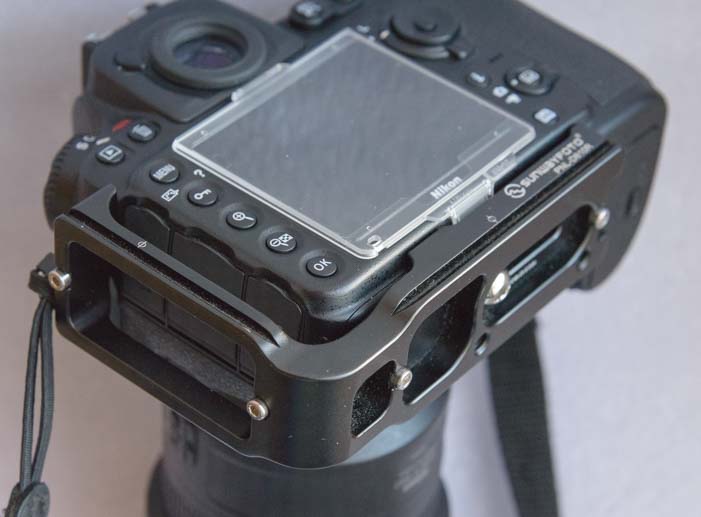
The Sunwafoto PNL-D810R L-bracket mounts on the camera to simplify the use of a tripod.
Nikon D810 camera with Sunwafoto L-bracket attached.
The L-bracket gets screwed into the bottom of the camera.
What’s neat about the Sunwayfoto L-brackets is that they fit the camera body perfectly, even when the plastic cover protecting the camera’s LCD display is in place. L-brackets made by other manufacturers don’t always fit properly when the plastic LCD protector is on. The Sunwayfoto L-brackets also provide lots of room to plug optional cables (like an external microphone) into the left side of the camera.
Sunwayfoto XB-52 “Low Profile” Ball Head
Getting a good, solid and easy to use ball head was the most important criteria for Mark’s new tripod. The Sunwayfoto XB-52DL “Low Profile” Ball Head is the biggest of Sunwayfoto’s ball head offerings, and it is truly unbelievable in craftsmanship and strength. It is beautifully machined and anodized from a solid piece of aluminum. It also has a geared locking mechanism that claims a Max Load of 132 lbs (60 kg)! That is 82 more pounds than top-of-the-line Really Right Stuff’s largest ball head.
Sunwayfot XB-52DL Ballhead
Sunwayfoto XB-52DL ballhead
When locked down, the camera does not budge on this ball head. Even when carrying the tripod on his shoulder, Mark has found the camera doesn’t droop like it did with his old tripod setup.
The ballhead holds the camera securely when walking around with the tripod on your shoulder.
The large locking knob on this ball head is made from solid metal and has an excellent feel to it. There is no rubber to wear out or come loose.
There are two adjustment knobs for the ball, a large outer knob and a smaller inner dial.
There are two knobs for adjusting the position of the camera, a larger knob for gross adjustments and a fine tuning dial within that knob that lets you set precisely how easily (loosely) the camera swivels on the ball head.
The smaller knob fine-tunes how easily the camera flops around on the ball when it is loose. The larger one tightens it down.
There are also two notches on the ball head body to allow the camera either to be dropped extra far forward (for images aimed towards the ground) or to be tilted sideways (for portrait oriented images).
There are two notches that allow the camera to be dropped down, rather than just a single one like many ball heads.
The notches in the ballhead allow the camera to be faced down.
.
The notches for setting up a portrait orientation are handy if you don’t want to use an L-bracket.
The notches allow the camera to be flopped on its side for a portrait shot.
We prefer using an L-bracket and not using the ball head notches for portrait shots because of the inherent stability of placing the camera on the top of the tripod for portrait orientations instead of having it hang off the side.
Using an L-bracket gives the option of either a landscape orientation…
…or portrait orientation Here the camera is on top of the tripod and not flopped to the side in one of the notches, a more balanced and secure setup.
For the weight conscious, the Sunwayfoto XB-44 ball head is slightly smaller and lighter than the XB-52 but can still support a whopping 88 lbs. It weighs just 483 grams as compared to the 685 grams of the bigger ballhead, a difference of over 7 ounces (nearly half a pound), which some folks would find makes a difference on a long hike.
“Quick Release” or “Lever Release” Clamps
One of the best things about the XB-52DL “Low Profile” Ball Head is the fast action of the quick release. Simply flip the quick release lever open and slip the camera into the Arca Swiss compatible slot and then close the lever, and you are ready to go.
The Sunwayfoto quick release clamp makes it super easy to lock the camera in position.
I was so impressed by Mark’s new tripod ball head, and especially the quick release mechanism, that I got one too. It replaced the Benro V2 ball head that had come with my Benro Travel Angel II tripod. The Benro ball head had a knob that had to be unscrewed and screwed back in each time the camera was mounted or dismounted on the tripod, something that got to be a real pain when I wanted to switch between portrait and landscape orientations quickly. It is also not nearly as finely crafted.
Like Mark, I absolutely LOVE the XB-52DL ball head. Even though it is almost 13 ounces heavier than my old Benro ball head, I find it is fast and easy and precise and worth the few extra ounces of carrying weight on a long hike. My tripod can still be strapped onto my Camelback H.A.W.G. hydration pack for those long days of hiking where I want 100 ounces of water along with a second lens, assorted filters, spare battery and SD cards.
The ultlra strong Sunwayfoto XB-52DL ball head fits comfortably on my Benro tripod legs and can be carried easily with my Camelbak H.A.W.G. hydration pack.
The quick release clamp locking lever has three positions: Open (right), Center, and Closed (left). There is a slide-lock on the lever so you can’t accidentally bump it and risk having your camera fall off the tripod.
The knob opposite the quick release clamp is used to fine-tune the tension, or grip, on the clamp holding the camera’s L-bracket in place. This is an important knob if you have more than one camera body and L-bracket (or other Arca Swiss style plate), because the widths vary ever so slightly.
In the “open” position, the camera slips onto the plate. The knob (top) adjusts the grip on the camera’s L-bracket or plate
When the lever is in the Center position, the locking mechanism is half open and allows the camera to slide from left to right within the range of the stops on the L-Bracket, but is still secure so the camera won’t slide out and fall to the ground.
In the “center” position the camera can be slid from side to side on the plate without falling off.
The camera can be slid about an inch to the left and right while everything else remains in place on the tripod.
When the lever is opened all the way, the camera can be removed for handheld shooting or for switching to the other orientation (portrait or landscape) quickly.
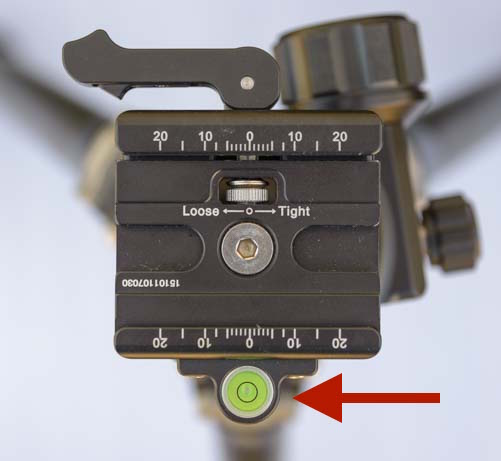
Sunwayfoto DDC-60LR Quick Release Clamp
Mark likes to do panorama shots, so he opted to replace the quick release clamp (or “Lever Release”) plate that comes with the XB-52DL ball head with the DDC-60LR Quick Release Clamp instead, because it has a bubble level that indicates whether the series of shots are going to be level with the horizon or are going so go sailing off on some kind of crazy diagonal, ruining the final, stitched image.
The optional DDC-60LR lever release has a bubble level which helps with stitching multiple images into one panorama shot.
This is another finely made product that not only makes mounting the camera on the tripod a snap and makes switching from landscape to portrait (with an L-bracket) an absolute breeze, but provides a mechanism for leveling as well.
The primary difference between this quick release clamp and the one that comes with the XB-52DL ball head is that the knob opposite the quick release clamp that is used to adjust the grip tension on the camera’s L-bracket (or other Arca Swiss style plate) is no longer there. It has been replaced by the bubble level. In the absence of this knob, there is a small dial on the plate for adjusting the grip tension instead.
The fine tuning grip tension knob is now a dial on the plate itself.
There is a spring that sits against the dial to hold it in place once you set it to your liking. Mark found the spring was a bit loose and the dial would turn a little on its own until he put a drop of Blue Loctite on the threads. In hindsight, he’s found that this has made it difficult to adjust the tension.
Another subtle difference between the Sunwayfoto DDC-60LR Quick Lever Release Clamp and the one that comes with the XB-52DL ball head is that the open/closed positions of the quick release lever can be reversed (for left handed people). Simply place the lever in the center position, pull it out slightly, and rotate it. Then the open and closed positions will be in the opposite directions (left to open and right to close).
Our overall impression is that the quick release clamp that comes with the Sunwayfoto XB-52DL Ball Head is easier to work with than the DDC-60LR Quick Release Clamp because the grip tension adjustment is done with a knob rather than a tiny dial. However, it also has a minor limitation, for those who want to stitch together lots of images for panoramas, that it doesn’t have a bubble level.
Sunwayfoto T2C40C Tripod
The tripod legs Mark chose are the Sunwayfoto T2C40C tripod legs. This tripod is a thing of beauty, with 8 layers of woven carbon fiber and a one piece CNC machined main structure.
The Sunwayfoto T2C40C tripod has carbon fiber legs.
The leg joints on this tripod have longer (40mm) friction tubes in them than are found on most comparable tripods, which makes a sturdier connection between the leg joints when they are extended. The tripod is rated at a max load of 12KG or 26.5 lbs. which isn’t the beefiest tripod out there, but the legs seem solid enough for the Nikon D810 and big Tamron 150-600 lens.
The legs extend and retract by rotating a knob at each joint.
The only drawback is that the tripod is only 52.5” tall (without the center column extended). Once the XB-52 ball head is attached, it stands 56” high, which is a few inches taller than Mark’s older tripod setup and is almost at eye level for him (he would love for it to be just a few inches taller!).
Another improvement would be to have some foam on at least one of the legs for carrying in cold weather, although foam might start to deteriorate over time, and this tripod looks like it will last a long time.
The tripod is just about at eye level for Mark, but not quite.
The Sunwayfoto T2C40C tripod also has a very innovative (patented) leg pivot mechanism. Instead of the typical hex head screw attachment to connect the legs, there is a connector which has a special anti-twisting boss design on one screw head while the other side screws into it with a torx type connecting screw (the Torx wrench is included with the tripod). This prevents the screws from twisting and loosening up inside the leg attachment as the legs are pivoted and moved back and forth to set up. Most Tripods legs need to be tightened frequently with two hex style wrenches.
Mark found that after using this tripod for about a month he actually needed to tighten those screws a bit. He removed the screws and put a drop of Blue Loctite on the threads which helped.
There are torx screws to keep the leg joints at the top stiff.
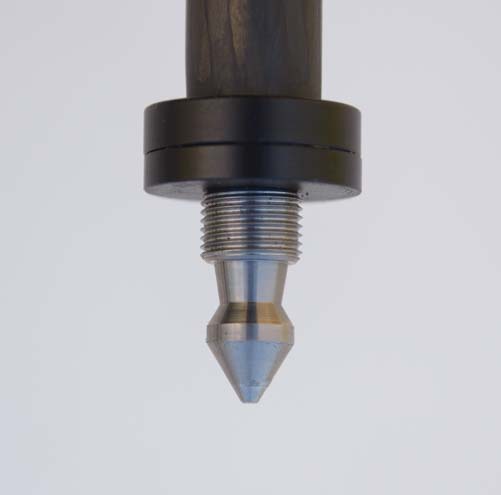
One neat feature of the Sunwayfoto T2C40C tripod is that the rubber feet on the bottoms of the legs can be unscrewed and removed to expose corrosion resistant Titanium spikes. These spikes plant the tripod firmly in loose conditions. Some of the other hardware used in this tripod is also made of Titanium, which very impressive indeed!
The rubber feet at the bottom of the tripod legs can be unscrewed.
Underneath the rubber protection booties, the tripod has titanium points for gripping loose soil.
The center column of the tripod can be removed and replaced with the included short column so you can splay the legs out all the way out for close-to-the-ground macro photography.
The center column is removable to allow for close-up photography that is low to the ground.
The Sunwayfoto T2C40C tripod also comes with a spring hook that can be put on the bottom of either the long or short center column tube to help weight it down in windy conditions. Mark likes to hang his gear bag on it to keep his pack off of the ground and help steady the tripod.
You can hang your gear bag on the center hook to weight the tripod down.
The Sunwayfoto T2C40C tripod comes packed in a high quality padded carry bag that has carry straps that can be attached to it for hiking. The kit even includes a nice lens cleaning cloth (a cleaning cloth is also provided with the Sunwayfoto XB ball heads).
The Sunwayfoto T2C40C tripod comes with a good quality padded carrying case.
The tripod carrying case has both a shoulder strap and a carrying handle as well as several pockets for small items like spare memory cards and battery.
Sunwayfoto is continuing to perfect their design of this tripod. When it was first introduced, it had only one anti-twist slot or groove in each of the legs, which made it prone to rotating and breaking. This resulted in some unfavorable online reviews of the tripod. The design has been upgraded and now has 2 slots in each leg.
If you are in the market for a quality tripod kit, the Sunwayfoto ball heads, quick release clamps, L-brackets and tripod legs are a good bang for the buck. All of these are mix-and-match, so if you already have tripod legs you like, as I did, you can simply upgrade the ball head and/or the quick release clamp. Or, go all out like Mark did, and get the whole darn kit!
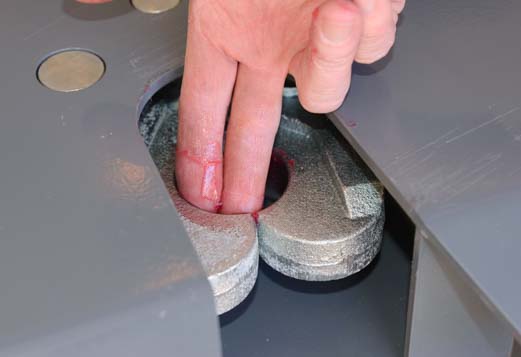
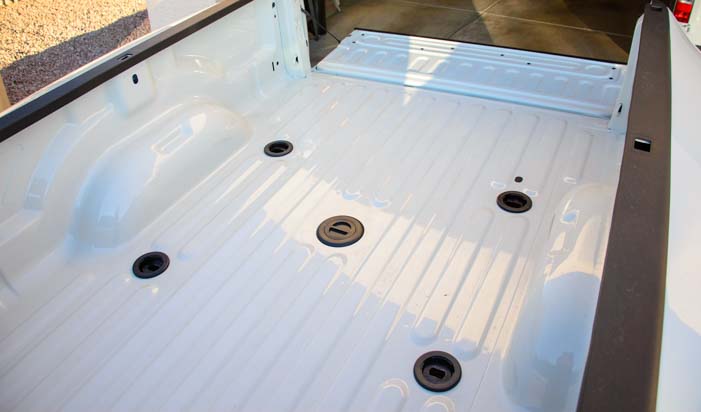
The B&W Companion OEM fifth wheel hitch uses the new and very clever puck hitch mounting system that can be ordered with Ram and Ford trucks in their fifth wheel and gooseneck towing prep packages. This truck option has five “pucks” installed in the bed of the truck: four in the corners to mount a fifth wheel hitch and one in the center for a gooseneck.
The new style fifth wheel hitches that are designed for these puck systems stand on four legs that each have a quarter turn locking mechanism at the foot to secure them into the four pucks in the bed of the truck. This allows the hitch to be installed or removed from the bed of the truck easily. When the hitch is removed, the truck bed floor is totally flat and free of obstacles, because there are no hitch rails to get in the way. Ford, GM and Ram have different puck layouts in the beds of their trucks.
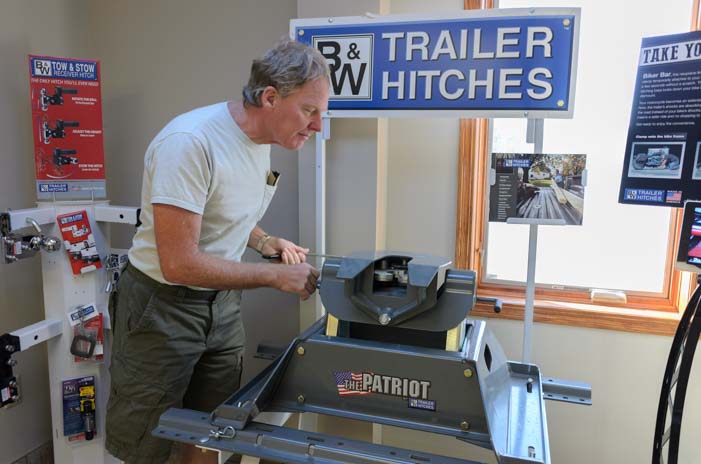
When we were going through the process of buying a new Ram 3500 dually truck, we knew we wanted the best of breed fifth wheel hitch that incorporated this new design for our full-time RV lifestyle. After a factory tour of the B&W Trailer Hitches plant in Humboldt, Kansas, we were sold. You can navigate this page using the following links.:
B&W hitches have long had a stellar reputation in the RV industry, and when our 36′ Hitchhiker fifth wheel trailer was getting a slew of big repairs done at the NuWa factory service center in Chanute, Kansas, (thank goodness for our RV warranty), we discovered B&W Trailer Hitches was just a ways down the road. So we took a factory tour of the plant.
All of the hitches manufactured by B&W Trailer Hitches are on display at the manufacturing plant.
What struck us more than anything is that B&W Trailer Hitches is a company that cares. They not only turn out a superior product, but they take take care of their employees.
When the RV manufacturing industry went into a steep nose dive in the years following the financial debacle of 2008, many of the employees that had worked at NuWa industries building fifth wheel trailers eventually found employment over at B&W Trailer Hitches as NuWa’s need for workers shrank. And when B&W didn’t have enough work for everyone to do, the company paid their employees to do city maintenance work in their hometown of Humboldt, Kansas.
How cool is that. And how RARE is that?!
Mark checks out one of the hitches on display at B&W.
We got a taste of just how deeply these community values run when we saw the Biblesta celebration and parade during our visit to Humboldt, Kansas. In an age of political correctness when many people are afraid to express their beliefs publicly, this is a town that has been openly celebrating Christianity in an annual festival for the past 52 years. All the churches in the area — as well as B&W Hitches — have a float in this extraordinary parade. Read our blog post about it here: America’s Heartland – Is It In Humboldt Kansas?
B&W Trailer Hitches sponsored a float in the Biblesta parade in their hometown of Humboldt, Kansas
.
Founded in 1987 by Joe Walker and Roger Baker as B&W Custom Truck Beds, the company long ago became B&W Trailer Hitches. They still build custom truck beds, but the company has grown and now manufactures many other products.
In 1991, B&W invented the clever turnover ball for gooseneck hitches, and that put them in the forefront of the towing industry. For trucks that have a gooseneck socket in the bed of the truck, the turnover ball gets inserted this socket and a fifth wheel hitch can be installed that latches onto the ball and also onto rails that are installed under the bed of the truck. When the fifth wheel hitch is removed, the turnover ball can be turned over to make the bed of the truck completely flat since the rails for the hitch are under the bed.
This makes the entire bed of the truck available for hauling when the fifth wheel hitch isn’t installed, and it also allows the truck to be set up for either gooseneck or fifth wheel towing really easily. This is handy out in ranch country where one truck might tow a variety of trailers, and also be used to haul big loads.
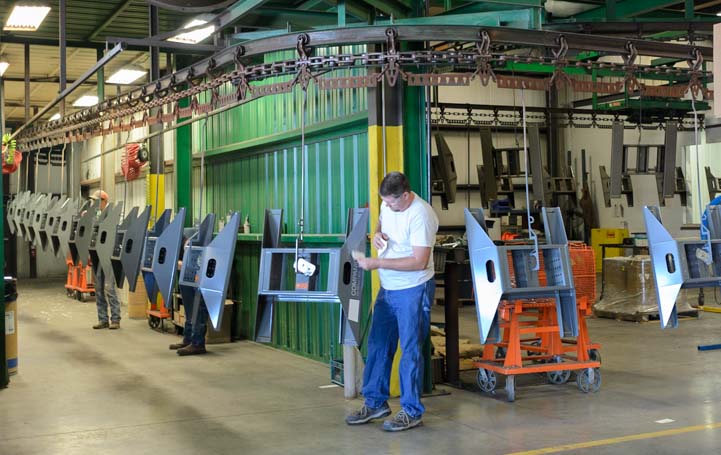
B&W hitches on the assembly line in Humboldt, Kansas.
The new puck style hitch mount offered by the truck manufacturers is a similar concept. Rather than just one connection point between the 5th wheel hitch and the truck bed in the center, there are four points of contact in the four corners. The four puck system also allows for an even heavier duty weight rating on the biggest fifth wheel hitches, so larger fifth wheel trailers can be towed.
B&W Trailer Hitches is into quality, and one of the things that sets their hitches apart is that they are made from American steel. Since we have dealt with axle and leaf spring problems on our trailer several times over the last year, we have come to realize just what a huge difference there is between Chinese made steel and American steel. When it comes to something that puts your life on the line because it is carrying heavy loads, American made steel is the only way to go.
Stacks of B&W fifth wheel hitch bases (these are not the new puck style base)
Another hallmark of quality in B&W hitches is that the nuts holding the hitch base to the truck are castle nuts. This means you can lock them with a sheer pin so they don’t back out.
Also, just about everything at B&W Trailer Hitches is done in-house. That way, they can retool the assembly line easily, as needed, for instance, if they improve the design or the puck layout is changed by the truck manufacturers.
Stacks of fifth wheel hitch couplers (the top part of the hitch).
Lots of metal shavings are generated in the production of hitches on the B&W assembly lines. We were impressed that B&W recycles all the metal shavings at Missouri Metals. Very green!
B&W recycles all the metal shavings from their production lines
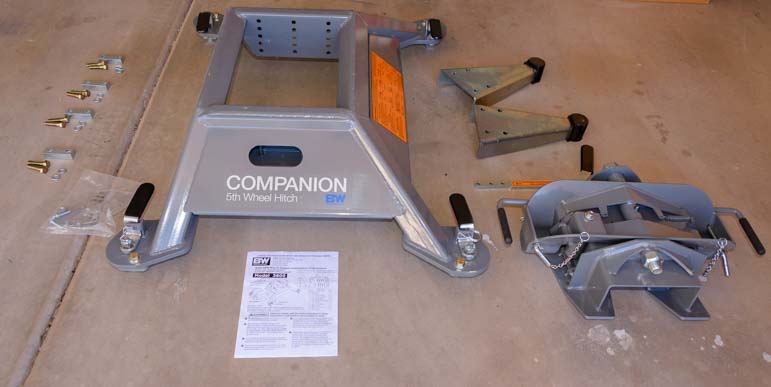
We chose the 25,000 lb. B&W Companion OEM fifth wheel hitch. This is way overkill for our 14,100 lb. trailer, but our goal in our whole truck-and-hitch upgrade was to be able to tow our fifth wheel effortlessly. It also gives us options down the road in case a day comes when we want to replace our trailer with something bigger or beefier.
The whole installation of the B&W Companion OEM 5th wheel hitch could easily be done right in the bed of the truck, but we we got the hitch before we got our truck! So, we did it in two stages. First we assembled the hitch in a friend’s garage. This took 40 minutes. Then, once we got our new truck, we installed the hitch in the bed of the truck. This second stage took 20 minutes because we needed to fine tune the mating of the four pucks and the four legs. In the future, lifting the hitch in and out of the truck bed will take just a few minutes.
So, it’s about a one hour DIY job to install a B&W Companion 5th wheel hitch right out of the box. That’s a huge improvement over paying the fifth wheel dealership to do a two hour installation like we did when we installed our first fifth wheel hitch in our first truck!
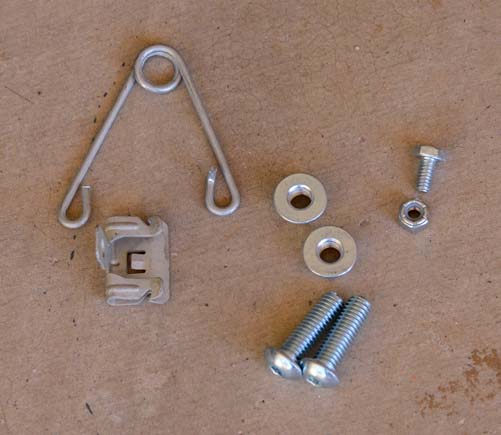
There is a base and a head (or coupler) and assorted parts. We laid them all out to get a look at them.
We lay out all the parts and the instructions.
There is a one page installation instruction sheet that comes with the kit (also available online here). There’s also a sticker on the hitch base with instructions for mounting the hitch’s two parts into the truck bed.
The orange sticker on the hitch base has instructions for mounting the hitch in the truck bed. The sticker faces the truck cab.
The first step is to install the big triangular pivot arms that support the hitch coupler (the top part of the hitch). The orientation of these triangular pieces depends on the placement of the hitch over the axles, which varies by truck model. In the case of the Ram 3500 dually long bed, they are oriented so the shallower slope goes towards the cab of the truck.
The hitch has a big orange sticker on the side that faces the cab, so the shallow slope of the pivot arms faces that sticker.
The shallow sloping side of the pivot arm faces the truck cab in our installation. The pivot arm orientation varies with the type of truck bed.
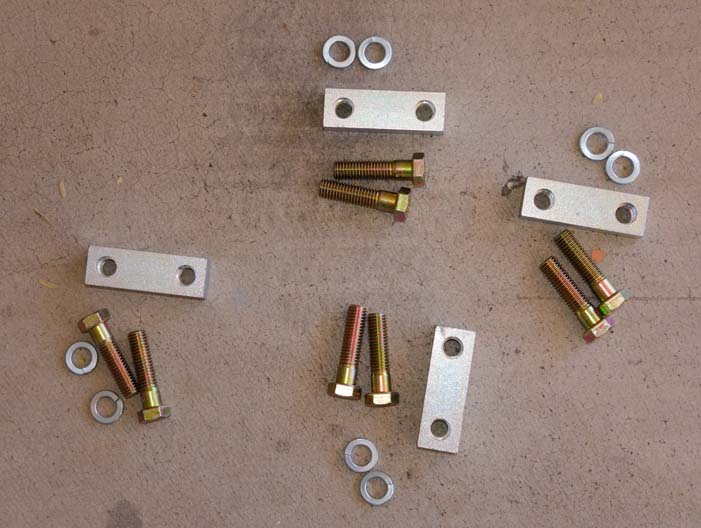
There are four pairs of lock washer and bolts, two for each pivot arm. There are five possible holes, so you can set the height of the pivot arm higher or lower, which will change the gap spacing between the overhang of the fifth wheel trailer and the sides of the truck bed. We chose the middle setting for starters.
The pivot arms are attached using these parts.
The bolts and lock washers screw into the threaded block an the back side of the pivot arms.
Use a socket and ratchet to tighten the bolts.
The bolts screw into a threaded block plate on the back side.
Mark bolts the pivot arm to the threaded block plate
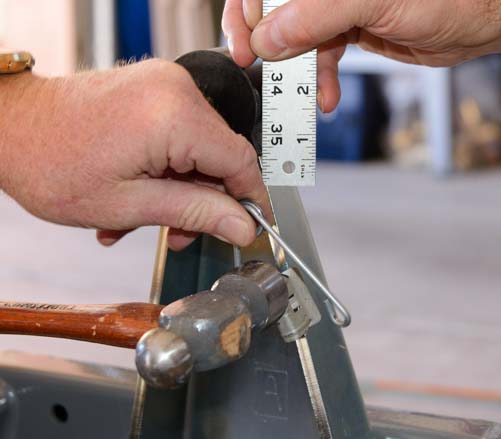
The next step is to install the wire torsion spring on the flange on the driver’s side pivot arm that is closest to the truck cab.
The wire torsion spring is next.
The mounting clip (below the spring in the photo above) is attached to the spring. Then the spring is installed so there is 1/2″ of clearance between the top of the spring and the bottom of the rubber bumper on the pivot arm. A few taps with a small hammer secured the clip onto the flange.
Tap the spring into place with a small hammer
The spring must be 1/2″ from the bottom of the rubber bumper on the pivot arm.
Now the pivot arms are fully installed on the hitch base.
The two pivot arms are in place (photo is prior to mounting the torsion spring).
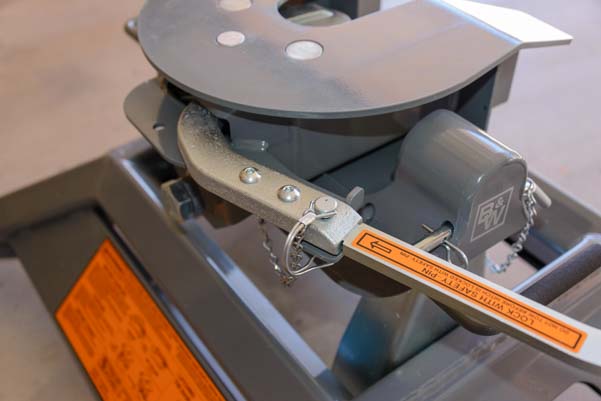
The next step was to put the hitch head — the coupler — onto the hitch base and install its handle and three safety pins.
The coupler (top of the hitch), seen upside down here, is next.
We lubricated the rubber bumpers on the tops of the pivot arms with CRC Lithium Grease.
Spray some grease onto the rubber bumpers
Then, holding the coupler by the two saddle handles on either side, Mark placed the coupler onto the hitch base. When you set the coupler down on the base, press down on the handles to secure it.
Set the coupler on the base and press down on the handles to secure it
The coupler rests on the hitch base. Saddle locking pins under the two saddle handles prevent it from lifting up. A “hairpin” holds the saddle locking pin in place.
A saddle locking pin prevents the coupler from lifting off the base. It’s held in place with a hairpin (cotter pin) that is under Mark’s fingers in this photo.
Next, the coupler cam handle gets installed onto the coupler.
Install the coupler cam handle onto the coupler
The handle is secured to the coupler with two button head cap screws (tightened with a 7/32″ allen wrench), and it is held closed (or open) with the coupler’s cam handle safety pin.
Two button head cap screws and a the cam handle safety pin do the trick.
As mentioned above, all of these assembly and installation steps could have been done in the truck bed, but we did not have our truck yet, and we were excited to get started and work on the hitch in the meantime.
The gooseneck / fifth wheel hitch tow prep package puck system in our Ram 3500 dually truck was ready for the hitch installation.
The gooseneck / fifth wheel tow prep package has five pucks in the bed of the truck. Fifth wheel hitches use the outer four pucks.
Mark and his buddy lifted the hitch base into the truck bed. Back in our article about our truck, a reader noted that he hoists his fifth wheel hitch in and out of his truck bed using a hydraulic lift table. If you are going to be moving the fifth wheel hitch in and out of your truck bed a lot, and you have the garage space, and you don’t have a strong, strapping friend at your beck and call to help you, this seems like a super idea.
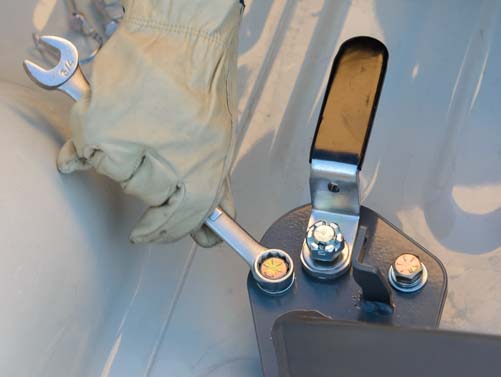
Each foot of the base required a little adjustment to fit properly into the truck’s pucks. This was done by loosening and tightening the cap screws on the pilot assemblies on each foot.
Each puck requires some small adjustments the first time.
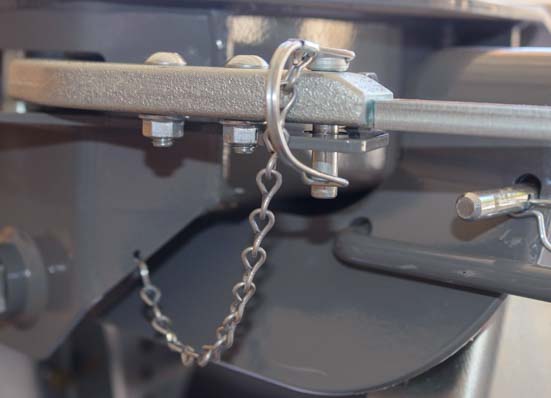
Then the tension in the latch handle was set by adjusting the height of the castle nut. We used needle nose pliers to remove the cotter pin and then reinstall it and bend the end once the castle nut height adjustment was set.
A sheer pin prevents the castle nut from backing out.
It took a little pushing and shoving to get everything in place, but these are one-time adjustments. The latch handles could now be opened and closed easily.
Hitch latch handle in the open position.
Hitch latch handle in the closed position.
The B&W Companion hitch base was now installed in the bed of the truck.
The base is installed and all four latch handles have been adjusted to open and close easily.
Next, the hitch head (the “coupler”) was set on the hitch base. The two saddle handles were pushed down and the saddle lock pin was put in place.
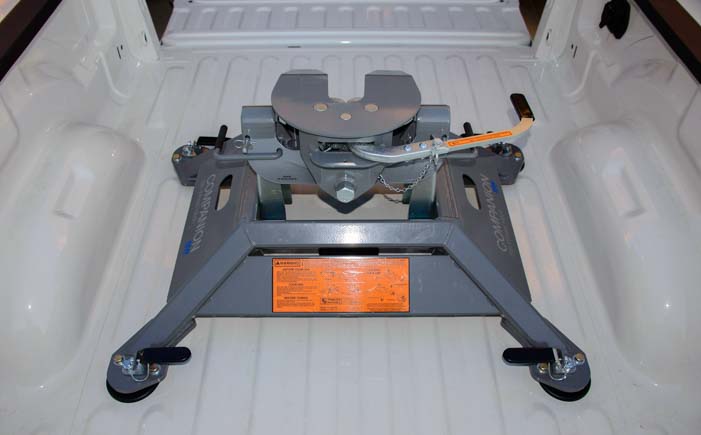
The B&W Companion OEM 5th wheel hitch is completely installed! This view (above photo) is looking towards the tailgate.
This view is looking towards the truck cab.
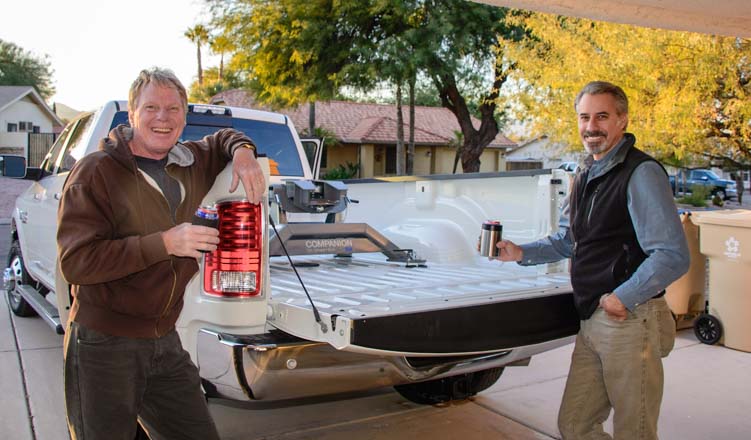
Great job, guys. Thanks!!
Hey, can I have a beer too?
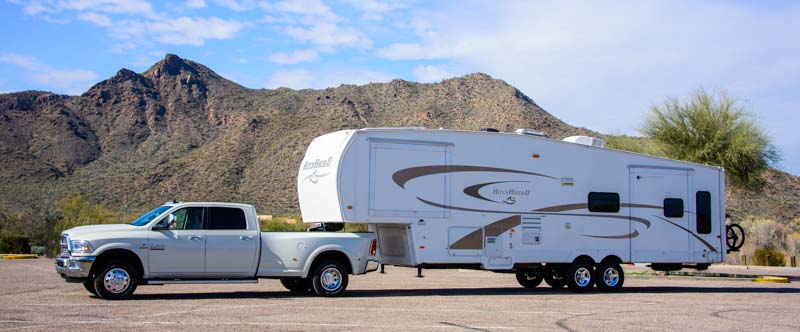
Celebrations behind us, the next day we hitched the new truck up to our fifth wheel trailer and took our home on a joy ride up and down some nice long 7% grades nearby. What a combo!!!
Prior to hitching the truck to the trailer the first time, we cleaned the hitch plate on the trailer and lubed both that and the coupler plate on the B&W hitch with CRC silicone spray.
We ended up adjusting the pivot arms down one notch, and that seems right for our particular truck and trailer.
We adjusted the height of the pivot pins by one notch to get the distance between the sides of the truck and the fifth wheel overhang right.
After ten thousand miles of towing with the B&E Companion OEM hitch, we are happy to report that we have been very happy with this hitch. In early 2017 we heard of a case where this hitch performed extraordinarily well in a fifth wheel rollover accident. You can read about it here:
The following info is FYI for those whose truck does not have a Puck System in the bed.
The Gooseneck Turnover Ball hitch is one option which allows you to have a totally flat truck bed when the hitch is removed. The other option is to go with the traditional rail mounted Patriot fifth wheel hitch.
B&W Gooseneck Turnover Ball Hitches:
Unlike the Puck System hitches, the Gooseneck Turnover Ball hitches require installing the Gooseneck Turnover Ball in the bed of the truck with rails mounted underneath. So, each truck bed in each model year has a different kit. The B&W Companion Hitch that mounts onto the Gooseneck Turnover Ball in the bed of the truck comes in two flavors: long bed and short bed (slider hitch).
Gooseneck Turnover Ball Companion Hitches (these are the “couplers” or actual hitches):
More of our Latest Posts are in the MENU.
New to this site?
Visit RVers Start Here to find where we keep all the good stuff. Also check out our COOL NEW GEAR STORE!!*** CLICK HERE *** to see it!
Choosing a truck to pull a trailer is a critical decision for RVers, because getting there, and particularly getting there safely, is the first and most important part of enjoying the RV lifestyle! Towing specs and towing guidelines always give the outer limits of what a truck can safely tow. Too often, in towing situations, the trailer is a little too big for the truck, or the truck is a little too small for the trailer, pushing the truck right to its outer safety limits or beyond.
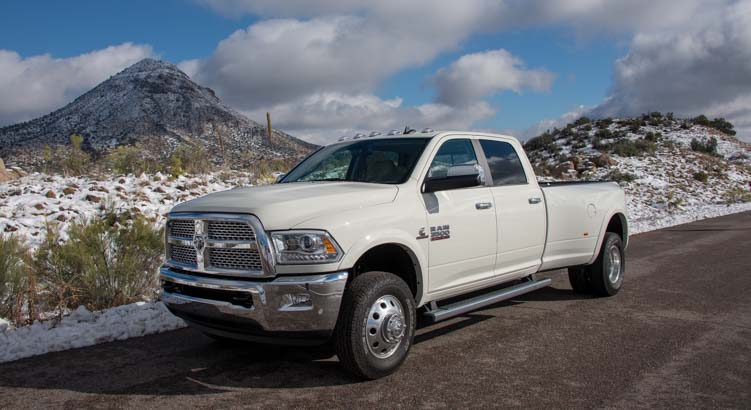
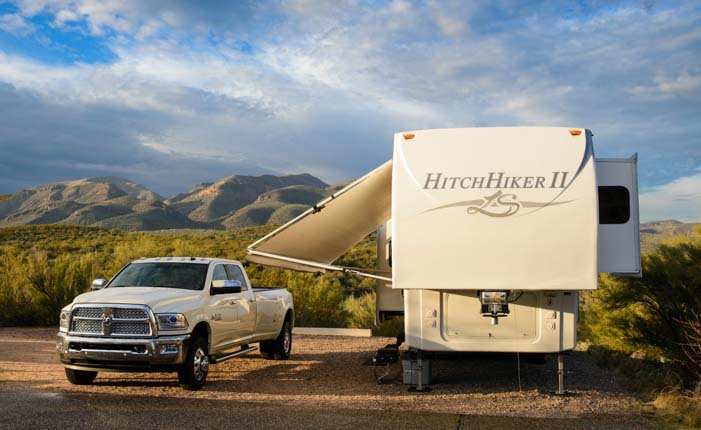
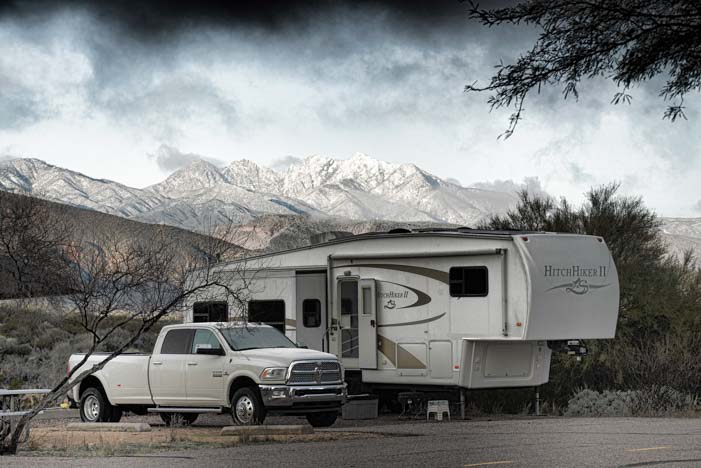
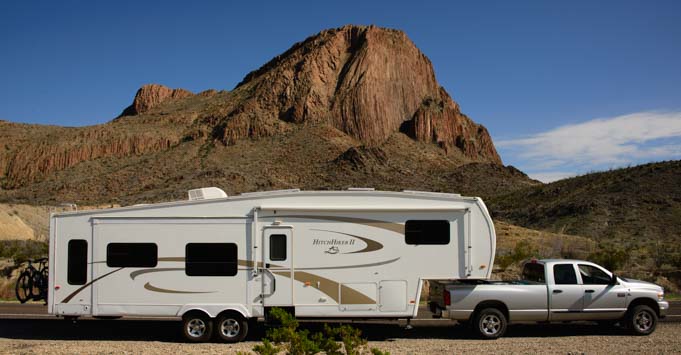
The 2016 Ram 3500 Dually is an awesomely powerful truck for towing big and heavy trailers
The truck-trailer combo may be just a little out of spec on paper, so it may seem okay, like you can get away with it, but it is a really unwise decision. Not only is it absolutely no fun to drive a truck that is screaming its little heart out to tow the load its tied to, but if you have an accident and it is determined your truck was towing a load that is beyond its safety limits, you will be liable.
Heaven forbid that there is a fatality in the accident — either yours or someone else’s. There are lots of horror stories out there of people’s lives that were transformed because someone decided not to get a truck that could tow their trailer safely.
Of course, truck and trailer salesmen don’t help. We have heard time and again, “That truck is fine for this trailer,” or “This trailer will be no problem for that truck.” Don’t listen to them! Trust your instincts and your gut feelings. If you are studying the specs and are nervous that your truck *might* be too small because your trailer puts it on the hairy edge of its specs, then you need a bigger truck or a smaller trailer.
We have been amazed at the huge difference between our old 2007 Dodge Ram 3500 Single Rear Wheel and this new 2016 Ram 3500 dually
This article covers all the specifications we studied and were concerned about when we placed the order for our 2016 Ram 3500 truck to tow our 14,100 lb. 5th wheel trailer. You can navigate to the various sections with these links:
When we bought our 2007 Dodge Ram 3500 Single Rear Wheel long bed diesel truck with the 6.7 liter Cummins engine, its purpose was to tow a 7,000 lb. (fully loaded) 2007 Fleetwood Lynx travel trailer. Our 2004 Toyota Tundra (4.7 liter engine) had been okay to tow that trailer on paper, but when we took it on its first mountain excursion up and over Tioga Pass on the eastern side of Yosemite in California, it could not go faster than 28 mph with the gas pedal all the way to the floor. What a scary, white knuckle drive that was. Who needs that?
Our ’04 Toyota Tundra half-ton pickup rests as it tries to tow our 27′ travel trailer over Tioga Pass… sigh.
We replaced the Toyota Tundra with a 2007 Dodge Ram 3500 which was rated to tow much bigger trailers than the little Lynx travel trailer, so all was good with that small travel trailer. However, within a year, we upgraded our trailer from the lightweight Fleetwood Lynx to a full-time quality, four season, 36′ NuWa Hitchhiker LS II fifth wheel trailer that the scales told us was 14,100 lbs. fully loaded. Suddenly, our big beefy diesel truck was at its outer limits!
We drove our ’07 Dodge Ram 3500 and 36′ fifth wheel combo for seven years without a mishap, but it was not an ideal situation. The truck would strain in the mountains and would wander in strong cross winds on the highway. We installed a K&N Cold Air Intake Filter and an Edge Evolution Diesel tuner which helped the engine breathe better and increased its power (see our Edge Evolution Tuner Review), and we installed a Timbren Suspension Enhancement System to keep the truck from sagging when hitched to the trailer. But the frame of the truck and the transmission were still stressed by the heavy load on steep inclines.
We wanted a truck that was well within its towing limits and that could tow our trailer effortlessly.
The weight ratings for trucks and trailers are an alphabet soup of confusion that takes a little imagination to grasp. Here’s a synopsis:
UVW
Unloaded Vehicle Weight
The weight of the vehicle without fuel, people and stuff
GVWR
Gross Vehicle Weight Rating
The heaviest weight the vehicle can safely be when it is loaded up with fuel, people and stuff
GCWR
Gross Combined Weight Rating
The most a truck-and-trailer combo can safely weigh when hitched together and loaded up with people, fuel, food, etc
Payload
The GVWR less the UVW
The amount of weight the truck can safely carry. Compare to the trailer’s Pin Weight
PW
Pin Weight
The actual weight on the truck’s rear axle when a trailer is hitched up. Compare to the Payload
The Pin Weight is most easily visualized by first imagining yourself standing on a bathroom scale and making a note of your weight. Then your teenage kid walks up and puts his arms around your neck and hangs on your shoulder. The weight on the scale goes up a little bit, but not a huge amount, because your kid is still standing on the floor on his own two feet. The more he leans on you, the more weight the scale shows.
The difference between the weight the scale shows when your kid is hanging on your shoulder and the weight it shows when you’re by yourself is the “pin weight.” In the case of you and your kid, the “pin weight” might be 30 lbs.
The Pin Weight is the weight of the trailer at the hitch pin, a value that has to be calculated.
The following chart shows the factory safety weight ratings given by Chrysler and NuWa and the actual weights for our ’07 Dodge Ram 3500 truck and ’07 36′ NuWa Hitchhiker 5th Wheel trailer. We had our rig weighed by the Escapees Smart Weigh program at their North Ranch RV Park in Wickenburg, Arizona. This is a detailed, wheel by wheel, RV specific method of weighing.
Our truck, when loaded, carries fuel, 24 gallons of water, a generator and BBQ, the fifth wheel hitch, several leveling boards, two huge bins of “stuff” and ourselves, as well as the pin weight of the trailer. So, even though the pin weight itself was within tolerance on our ’07 Dodge 3500, all that other stuff made the truck way overweight. Moving those things to the trailer would clog our fifth wheel basement and would just make the trailer way overweight instead.
2007 Dodge Ram 3500 SRW (Single Rear Wheel) Truck
UVW
GVWR
GCWR
Payload/Pin Weight
Rating
7,147
10,100
21,000
2,953
Actual
8,025*
10,850
22,125
2,850
* LOADED with passengers, fuel and cargo but not towing
Besides the pin weight, our truck carries spare water, a heavy hitch, leveling boards, and generator. And there’s more stuff plus ourselves in the cab!
We improved our trailer’s cargo carrying capacity by upgrading from E rated tires to G rated tires and by revamping the suspension completely (I have not yet written about that project). So, even though some elements of the trailer frame are still at the spec limit, we have some leeway with our trailer in those places where the rubber meets the road.
The truck, however, was over its limit for both GVWR and GCWR, and it was pushed nearly to its max when towing.
The 2007 Ram 3500 towing guide is here: 2007 Dodge Ram Trucks Towing Guide. Our truck is on p. 20, on the 2nd to last line. Search for this text: “D1 8H42 (SRW)” (you can copy and paste it from here).
There are three brands of big diesel pickup trucks on the market: Chevy/GMC, Ford and Dodge. People have lots of brand loyalty when it comes to diesel trucks, and the bottom line is it’s pointless to get into a religious war over truck manufacturers. That said, the following are our personal opinions and there is no offense intended to anyone who loves a particular brand.
GMC makes the Chevy Silverado and GMC Sierra which both have the Chevy Duramax 6.6 liter engine and the Allison transmission. The Allison transmission is widely used throughout the commercial trucking industry and is considered to be the best.
FORD makes the Super Duty series of trucks which have Ford built engines and transmissions. Ford has modified its Power Stroke engine several times since the early 2000’s. The current engine is a 6.7 liter engine and it has performed well. Earlier models, the 6.0 liter engine and 6.4 liter engine, both had significant problems and were less reliable.
CHRYSLER makes the Ram series of trucks which have the Cummins 6.7 liter engine and Aisin transmission. The Cummins engine is widely used throughout the commercial trucking industry and is considered to be the best.
With the late model Ram trucks there are two models of 6 speed automatic transmissions to choose from. The 68RFE transmission was the only one available for our ’07 Dodge, and we found it developed problems over time (before our installation of the K&N Cold Air Intake and Edge tuner). It stuttered on climbs and didn’t always shift smoothly. The new (in 2013) Aisin AS69RC transmission is much more rugged and reliable and is now available as an option in the Ram Trucks lineup.
All three big diesel truck brands are good. After much research and many test drives, we chose the Ram 3500.
PICKUP TRUCK SIZES
All trucks are categorized into eight weight classes, from Class 1 (lightest) to Class 8 (heaviest) according to their GVWR. Pickup trucks fall into the smallest (lowest) three classes:
Class
GVWR
Class 1
0 – 6,000 lbs
Class 2
6,001 – 10,000 lbs
Class 3
10,001 – 14,000 lbs
All three classes of pickups are referred to as “light duty” trucks, as compared to dump trucks and semi tractor-trailers in the higher “medium duty” and “heavy duty” classes. Within the pickup truck market, however, they are referred to as “Pickups” (Class 1), “Full Size Pickups” (Class 2) and “Heavy Duty Pickups” (Class 3). So, even though a large diesel pickup is marketed as “heavy duty,” it is not technically a heavy duty truck. It’s just a heavy duty pickup. This may be obvious to many, but sure had me confused at first glance.
When we were first time truck buyers shopping for a truck to pull our popup tent trailer, the advertising made the ’04 Toyota Tundra look like it was a heavy duty towing monster that could pull a mountain right across a valley. But it is not so! Pickups come in all sizes.
Toyota Tundra and Ram 3500 — Which one is the towing monster?
Pickup truck sizes are referred to as “half-ton” “three-quarter ton” and “one ton,” and they are numbered accordingly:
Size
Ford
Chevy/Dodge
Half-ton
150
1500
Three-quarter ton
250
2500
One ton
350
3500
Ford also mass markets 450, 550 and larger pickups. Some people make custom Chevy and Dodge trucks in those sizes too, but they don’t come from the factories that way.
Ensuring the tow ratings of the truck are well beyond the actual weight of the trailer is essential.
For reference, a ton is 2,000 lbs. The truck naming convention comes from the original payloads these trucks could carry when they were first introduced decades ago. Back in those days, a half-ton truck could carry 1,000 lbs. (half a ton) in the bed of the truck. A three-quarter ton could carry 1,500 lbs and a big one ton truck could carry 2,000 lbs.
In 1918 Chevy had a very cute half-ton pickup that was basically a car with sturdy rear springs. By the mid-1930’s pickups came with factory installed box style beds, and a 1937 Chevy half-ton truck went on a 10,245 mile drive around the US with a 1,060 lb. load in the bed. It got 20.74 miles to the gallon!
As the payload capacities increased, the manufacturers assigned model numbers that corresponded to the weights the trucks could carry. But technology advances never quit!
Our 2016 Ram 3500 dually can tow this trailer with one hand tied behind its back.
Since those early times, truck and engine designs have improved dramatically, and the payloads modern trucks can carry now is significantly higher. For instance, the payload of a 2016 Toyota Tundra, a half-ton truck, is 1,430 to 2,060 lbs., depending on the options, making it essentially a “one ton” truck. The payload of a 2016 Dodge Ram diesel can be as high as 6,170 lbs. (and even higher for the gas HEMI version), making the 3500 model more of a “three ton” truck than a one ton.
In the modern trucks, the major difference between a three quarter ton 250/2500 truck and a one ton 350/3500 truck is the beefiness in the rear end suspension for supporting a heavy payload, that is, the number of leaf springs on the rear axle. In our opinion, if you are going to spend the money to buy a three quarter ton truck for towing purposes, you might as well spend the tiny incremental extra few bucks to buy a one ton.
Pickups come with more than one bed size. A “short bed” truck has a box that is a little over 6′ long and a “long bed” truck has a box that is around 8′ long. When a fifth wheel hitch is installed in the bed of a pickup, it is placed so the king pin of the fifth wheel will be over the rear axle. In a short bed truck this leaves less distance between the hitch and the back of the pickup cab than in a long bed truck.
The advantage of a short bed truck is that the two axles are closer together, so the truck can make tighter turns. This is really handy in parking lots and when making u-turns. The truck also takes up less space when it’s parked, again, a big advantage in parking lots.
A long bed truck is less maneuverable when it’s not towing but is preferable for towing a fifth wheel trailer
However, when towing a fifth wheel trailer, there is a risk that the front of the fifth wheel cap will hit the back of the pickup cab when making a tight turn. For this reason, there are special sliding fifth wheel hitches, and some 5th wheel manufacturers make the fifth wheel cap very pointy and even concave on the sides so there’s room enough to ensure the pickup cab doesn’t touch the fifth wheel cap on tight turns.
The advantage of a long bed truck is that not only can it carry more and bigger things in the bed of the truck, but when it is hitched to a fifth wheel trailer, doing a tight turn will not risk the front of the fifth wheel hitting the back of the truck cab.
Also, you can open and close the tailgate when the fifth wheel trailer is hitched up. We can actually walk from one side of our trailer to the other through the gap that’s between the open tailgate and the front of the trailer, even when the truck is cocked in a tight turn.
With a long bed, the truck can be at a sharp angle to the trailer and still have the tailgate open.
For folks that use their pickup primarily in non-towing situations and take their fiver out for just a few weekends a year (and stay close to home), a short bed truck is fine. However, in our opinion, if you are going to tow a large fifth wheel frequently, and especially if you are a seasonal or full-time RVer traveling longer distances, a long bed truck is the way to go.
We bought a long bed as our first diesel truck for our little travel trailer, knowing we might eventually get a fifth wheel, even though it takes much more real estate to back a travel trailer into a parking spot with a long bed truck that it does with a short bed truck (because the pivot point on a travel trailer is behind the bumper rather than over the truck axle, forcing the front end to swing exceedingly wide to make a turn).
When we use our truck as a daily driver, even though we always have to park away from the crowd and walk a little further, and we sometimes struggle making u-turns and maneuvering in tight spaces (it takes nearly four lanes to do a U-turn in a long bed pickup without the trailer attached), we have never once regretted having a long bed truck.
SINGLE REAR WHEEL vs. DUAL REAR WHEEL (DUALLY)
In the one ton class of trucks (Ford 350, Chevy/Dodge 3500), there is an additional consideration: single wheels on the rear axle of the truck (“single rear wheel”) or two pairs (“dual rear wheel” or “dually”).
The advantages of a single rear wheel truck are:
Only 4 tires to maintain instead of 6
Changing a flat will never involve accessing an inner tire under the truck
No wide rear fender to worry about at toll booths and drive-through bank windows and fast food windows
Easy to jump in and out of the bed of the truck from the side using the rear wheel as a foothold
Can handle rough two track roads better because the rear wheels fit neatly into the ruts
Gets traction on slick ice, snow and muddy roads better than a dually
The advantages of a dual rear wheel truck (“dually”) are:
Wider stance supporting the weight of the king pin (or bumper hitch)
Can carry a heavier payload — heavier trailer pin weight and/or bigger slide-in truck camper
Much safer if there’s a blowout on one of the rear wheels, and you can still drive (for a while)
A dually has a wider stance, providing more stability, and it can handle much more weight in the bed of the truck.
Why do you need to get in and out of the truck bed from the side? Climbing in on the tailgate is great, and there is a very handy foothold at the license plate mount on the 2016 model that is low enough for a short person to reach easily. However, when the truck is hitched to the fifth wheel, it’s not possible to climb in from the tailgate, and sometimes we need to get into the bed of the truck when the fiver is attached!
For instance, we keep 22 gallons of spare water in the bed of the truck in 5.5-gallon jerry jugs. I’m the one who holds the hose in the jugs while Mark goes to the other end of the hose and turns the water on or off at the spigot. We could switch roles, but I like that job!
When we’re hitched up, I have to get into the bed of the truck from the side to get to the water jugs. I plant one foot on the rear tire, and I hoist myself up and over the side. Getting over that fat fender is not so easy with the dually!
When hitching/unhitching, Mark also reaches over the side of the truck to loop the emergency break-away brake cable from the trailer onto the hitch in the truck bed. That way, if the trailer comes unhitched as we’re driving, the quick yank on the small cable (as the trailer breaks free) will engage the trailer’s own brakes as we wave it goodbye behind us.
Obviously, for both of these maneuvers, the width of the dually fender makes reaching into the bed of the truck a whole lot harder. Doing these things on a single rear wheel truck is trifling by comparison!
RESEARCHING SINGLE REAR WHEEL vs DUALLY TRUCKS
Our biggest debate was whether or not we should simply buy a new single rear wheel truck that had the latest engine and drive-train and chassis improvements or if we should take the plunge and get a dually. We do occasional research online, but our preferred method of learning about things in the RV world is to talk to experienced people in person, especially since we are out and about all day long and we enjoy meeting new people.
So, we interviewed every single dually truck owner that we ever saw. For two years! Whenever we saw a dually parked somewhere, we’d look around to see if the owner was anywhere nearby. If so, we’d walk up and ask him about his truck.
Did he like it? What did he tow with it? How long had he had it? Was it his first dually? Did he have trouble maneuvering in tight quarters? Had he towed that same trailer with a single rear wheel truck? How did they compare?
We asked lots of people how their dually performed compared to a one ton single rear wheel long bed truck towing the same heavy trailer.
To our astonishment, although we searched for two years for a person who had towed the same large fifth wheel trailer with both a dually and a single rear wheel truck, and we talked to dozens of dually truck owners who had towed all kinds of trailers, we found only one who had towed the same fifth wheel trailer with both styles of truck.
This guy was a rancher with several big cattle and horse trailers as well as a 40′ toy hauler fifth wheel. He’d been towing comparable trailers with single rear wheel long bed trucks for over twenty years. Three years ago he’d switched to a dually, and he said the difference for his toy hauler was night and day. He’d never go back.
Another fellow told us the ranch he worked on had both single rear wheel and dually trucks and that the duallies were used exclusively for the big trailers because they were better tow vehicles.
We LOVED the new, sleek styling on the Ram duallies.Our biggest questions: is the wide dually fender flare a pain? How does it do at toll booths and drive-through windows?
This was very convincing, but an interesting side tid-bit we learned is that many folks go either dually or single rear wheel when they buy their first diesel truck for a big trailer, and they stick with that type of truck when they replace it. Guys love their trucks, so we heard few complaints, but when folks raved about how their single rear wheel or dually was the ultimate towing machine and that they’d never switch, when pressed for details, we found they didn’t have first-hand experience using the two different types of trucks to tow the same large trailer.
For those looking to conduct their own research, in addition to talking with ranchers and horse owners, one of the best sources of information we found was the trailer transport drivers who drive their own personal trucks to tow both large RV and horse trailers from the manufacturers to the dealerships where they are sold..
Our questions would have all been answered in a heartbeat if we could have hitched our trailer onto a dually sitting in a truck dealership lot and towed it up a mountain and on a few back roads. However, that wasn’t possible.
Perhaps in the future, because of the fantastic new hitch puck systems that can be factory installed in pickups these days, dealerships will decide to keep one of the nifty B&W OEM fifth wheel hitches on hand for prospective customers to do just that (if they can sort out the liability and insurance issues).
Ultimately, we held out on the dually versus single rear wheel decision until the very end, but we knew inside that if we did buy a new truck it would probably be a dually. So every test drive we did was with a dually truck.
We took all three brands of pickups out on over 200 miles of test drives at 25 or so dealerships.
Going for test drives is lots of fun and is the best way to learn the product
Dealing with Slick Salesmen
A reader wrote me recently to say he was intimidated by the sales tactics at car dealerships, so he was reluctant to do many test drives or much dealership research. That is a real shame, because the only way to learn about trucks is to spend time with them, test drive them, sit in them, crawl underneath, study what’s under the hood, read the marketing literature, and hound the salesmen with questions.
After all, the salesmen are there to teach you what you need to know about the product, and if they don’t sell you a truck today, they are helping another salesman (or themselves) sell you a truck tomorrow. What goes around comes around, and any good salesman understands that. You can easily deflect the high pressure sales tactics by saying, “We are starting our search and just want to do a test drive today. We won’t be ready to buy for a few months.”
Where to Do a Test Drive? Where to Buy?
The best places to find knowledgeable diesel truck salesmen and buy big diesel trucks, especially duallies, is in cattle ranching country. As we scoured dealerships from San Diego to Maine and from Sarasota to the Tetons, we found urban areas generally have few big trucks on the lot and the salesmen know very little about diesel trucks. Cattle ranchers, horse owners and big commercial farmers know their trucks, and so do the salesmen they work with.
The most knowledgeable truck salesmen are in places where people need and use big trucks — a lot!
Our first test drives were focused on the turning radius and maneuverability of a dually truck as compared to the single rear wheel truck we knew so well. It was hard to tell, but the turning radius seemed to be the same or better (and we now feel the 2016 Ram dually definitely turns tighter) than our old 2007 single rear wheel Ram.
As for general maneuverability, Mark didn’t notice a whole lot of difference driving a dually versus our single wheel truck. Frankly, owning a long bed diesel truck period means you have to park in the back 40 and walk long distances anyway, so we soon realized that dealing with a dually in parking lots would be no different.
We did one round of comparative test drives on the uphill entrance ramp to an interstate in Baker City, Oregon. We visited each truck dealership in town, and when we did our test drives, we floored each dually truck on the incline to see how powerful it felt. The 2015 Chevy won by a long shot, against the Ford and Dodge 2015 models, but did not feel as powerful as our single rear wheel ’07 Dodge Ram (at that point our truck had the K&N Cold Air Intake and Timbrens but did not have the Edge Evolution Diesel tuner).
Our trailer snuggles up to its new companion, a 2016 Ram 3500 dually
Deciding Factor – The Cummins Engine
In the end, the deciding factor for us for choosing a brand was the Cummins engine. This was true when we were researching our ’07 single rear wheel truck and again when researching the 2013-2016 duallies. Lots of people wish they could buy a pickup with both the Cummins engine and an Allison transmission in one brand of truck, a combo that is on many commercial trucks. But that’s not possible.
For us, the simplicity of the inline 6 cylinder Cummins engine (as compared to the more complex V8 engines in the Chevy and Ford) along with the longer stroke (inherently higher torque) makes a lot of sense. Inline engines are used commercially in big rigs and tractors, and the 6.7 liter Cummins engine has a long and solid track record, not just in Ram trucks but in many commercial applications as well. The Cummins quality control and manufacturing seem to be top notch.
Here is a fantastic video showing a Cummins engine being built:
Amazingly, with each passing year, the payload and towing capacity of each brand of truck jumps higher. From the time we started test driving duallies in 2013 until we placed our order for our new 2016 Ram 3500, the horsepower and torque across all three brands increased, and the towing and payload capacities climbed too.
Built with the right options, the 2016 Ram 3500 diesel truck has an eye-popping, 385 horsepower and 900 ft-lbs. of torque with a GCWR of 39,100 lbs. It can tow a trailer weighing 31,210 lbs. and has a max payload of 6,720 lbs.
This is absolutely astonishing, and neither the Chevy nor the Ford trucks match that torque right now.
Accurate comparisons between brands are challenging within the same model classes, however, because there are different standards for making measurements. Ram Trucks uses the SAE J2807 standards, while other manufacturers don’t. Also, we were able to locate Ford’s towing and payload capacity charts online (see the links at the bottom of the page), but did not locate a similar chart for GM.
Some of the head-to-head tests between the brands that are posted online are also a little misleading, because, for instance, a Ram 3500 is pitted against a Ford F450. Even though both of those models are Class 3 trucks (10,001 to 14,000 lbs GVWR), one would expect the Ram 3500 to compete head to head with the Ford F350, not the Ford F450.
Best in Show
Here are the towing and payload capacities of the many models of Dodge Ram trucks:
As mentioned above, the Ram trucks are sold with two options for the transmission. After our troubles with the old 68RFE automatic transmission in our ’07 Dodge Ram 3500, we wanted the new and better one, the AISIN AS69RC automatic transmission. In the Ram Trucks marketing literature, the 6.7 liter Cummins engine is paired with the AISIN AS69RC transmission to make their “High Output Engine” because it delivers max torque at the low end for heavy towing situations. This combo became available in 2013.
“High Output” engines on Ram Trucks pair the Cummins 6.7 liter engine with the Aisin AS69RC transmission
The rear axle gearing on a pickup determines the GCWR for the truck (the maximum safe weight of truck and trailer hitched together and fully loaded) and the maximum weight trailer that the truck can tow safely. It also makes a huge difference in how the truck drives, both while towing and not towing.
Rear axle gear ratios are given as a ratio, for example “4.10” which means 4.10:1 or “3.73” which means 3.73:1. The ratio refers to the number of teeth on the axle ring gear as compared to the number of teeth on the driveshaft’s pinion gear. With a 4.10 rear end, the driveshaft has to turn 4.1 times in order to rotate the rear wheels one revolution. With a 3.73 rear end, the driveshaft must turn 3.73 times to rotate the rear wheels one revolution. So, with a 4.10 rear axle ratio the driveshaft’s pinion gear is spinning more quickly at a given speed than with a 3.73 rear axle ratio.
“Easier” Gears vs. “Harder” Gears
If you think of riding a bike, when you have the bike in a “hard” gear, it takes a lot of leg strength to turn the wheels, but one pedal stroke will cover a lot of distance. For example, going uphill in a “hard” gear would be especially hard. Your legs are turning really slowly and straining and you’re wishing you could put it in an “easier” gear! But when you descend in that same gear, you can hit high speeds easily. Back to trucks, this is like having the driveshaft turn a little to make the wheels turn a lot as it does with the 3.42 or 3.73 rear axle gear ratios found on Dodge Rams.
However, when the bike is in an “easy” gear, just a small amount of leg strength will turn the wheels, but one pedal stroke doesn’t get you very far. For example, going uphill isn’t so bad — you can inch up slowly — but once you began descending you’re spun out because your legs can’t pedal fast enough to hit super fast top speeds. In the truck world, this is like having the driveshaft turn a lot to make the wheels turn a little as it does with the 4.10 rear axle gear ratio.
Wide Load!! The highest tow ratings are achieved with a high rear axle gear ratio (like 4.10)
Towing Heavy Loads vs. Driving Fast on the Highway
So, on a truck, the higher ratio (4.10) is ideal for towing heavy loads. It takes more turns of the driveshaft to rotate the rear wheels of the truck, so the engine revs higher, putting it in the power band for RPMs, and the heavy load gets moved. But the top end speed and fuel economy get sacrificed a bit.
With a lower gear ratio (3.73 or 3.42) it takes fewer turns of the driveshaft to rotate the rear wheels of the truck. When the truck is zipping along at highway speeds, the gears are turning a little more slowly (lower RPMs) than they would with a 4.10 rear end, which saves on fuel efficiency and makes the fastest attainable speed a little higher.
The highest tow ratings are achieved with a 4.10 rear end, so the heaviest trailers will be best if towed by a truck with a 4.10 rear axle gear ratio. However, if most of your towing is with lighter weight trailers, and your driving will be primarily on interstates, and your personal preference is to drive fast, a 3.73 or 3.42 rear axle gear ratio may make more sense.
Our ’07 Dodge had a 3.73 rear end. The problem was that at the speeds we tended to drive — 55-65 — the engine would lug. Mark manually changed gears a lot to try to keep the RPMs up, but he found it fatiguing to have to monitor the gears so closely and to change gears all the time.
We also don’t drive on interstates very often, and when we do, we’re the grannies of the road, moseying along in the right lane.
We take life, and the open road, fairly slowly, so a 3.73 rear end, which is awesome a 75 mph, was not the right choice for us.
4.10 vs. 3.73 – RPMs at Different Speeds
We wanted a 4.10 rear end on our new truck, but we wanted to be 100% sure this would truly make the kind of difference we expected. So, on one Ram dually test drive we drove a stretch of highway in our ’07 Dodge at various speeds between 45 and 65 mph, noting the RPMs in a notebook, and then we took a 2015 Ram 3500 dually with a 4.10 rear end out on the same road at the same speeds. The salesman raised an eyebrow in surprise when we marched into the dealership and announced we wanted to do a test drive at various speeds to note the engine RPMs, but he went along with the idea!
On that test drive we found the 4.10 rear end shifts out of lower gears sooner than the 3.73 rear end, and generally keeps the engine RPMs about 100-200 RPMs higher at each speed. Our new truck bears out those findings.
So, how can you tell if a truck on the dealer lot has a 4.10 rear end without peering at the window sticker? Check underneath the back end of the truck. The differential is the big round casing that hangs between the rear wheels. On trucks with a 4.10 rear end, the differential has a series of vertical cooling fins on it. These help keep it cool since the gears spin faster and it is designed for heavier towing loads, both of which make it heat up.
Looking under the rear end of the truck, the differential has cooling fins if the rear axle ratio is a 4.10
BEEFED UP FRAME
Besides the more powerful engine tuning and transmission, Ram has improved the truck frame on the dually considerable. Every aspect of the frame is more sturdy than it used to be, making the truck not only powerful enough to pull heavier loads but strong enough to withstand the multitude of forces as it hauls the load up a mountain.
Peering under the front end of the truck, the frame has been strengthened for heavy towing
We learned with our ’04 Toyota Tundra truck towing our 7,000 lb. 27′ travel trailer that four wheel drive is a necessity for us in our RV lifestyle. In our first weeks of full-timing, a small, wet grassy incline prohibited us from camping in a campground in Texas, because our truck kept slipping and couldn’t tow the trailer up over the short rise! From that moment on, we’ve felt that a four wheel drive is mandatory if you are going to tow a big trailer.
Also, while descending a really gnarly, skinny, twisty, single lane road on a mountain in Utah, with grades of 10% or more in places, we discovered that the safest way to drive DOWN a very steep descent is to put the truck in four wheel drive LOW gear, and creep down the mountain at 5-10 mph using the exhaust brake. This tactic was a lifesaver for us on that mountain with our ’07 Dodge truck and fifth wheel trailer. Without it, we would still be living at the summit of that mountain!
The new Dodge Ram and Ford Super Duty trucks have a really fantastic option for a factory installed puck system in the bed of the truck where you can mount either a fifth wheel or gooseneck hitch. During our truck search, GM did not have that option on their trucks. However, GM trucks now have the puck system as well.
B&W Trailer Hitches makes a fifth wheel hitch specifically for each truck brand’s puck system. We installed one and you can read about it at this link: B&W OEM Companion Fifth Wheel Hitch DIY Installation. The three hitches are shown below, Ram, Ford & GM:
This option has five holes in the bed of the pickup, one in the center for a gooseneck hitch and four outer ones to hold a fifth wheel hitch. The idea behind this mounting system is that rather than drilling holes in your brand new truck bed to install hitch rails to support a fifth wheel hitch — the method that was always used until this new system was devised — you can buy a hitch designed for these puck mounts and simply drop it in.
Looking towards the tailgate, there’s a gooseneck puck in the middle and four pucks in a square to mount a fifth wheel hitch. The bed is totally flat without the hitch in it.
If you want to use the bed of your truck for hauling, and you won’t be towing your fifth wheel, you can easily remove the fifth wheel hitch temporarily and have the entire bed of the truck available to you. Not only is it a snap to remove the hitch, but the bed of the truck will be flat and obstacle free because there won’t be any hitch rails installed in it.
The B&W Companion Fifth Wheel Hitch is easily installed and removed (facing the front of the truck)
Another huge benefit is that installing the hitch is an easy do-it-yourself job. We have a detailed pictorial step-by-step guide showing how to install a B&W Companion OEM Fifth Wheel Hitch here (it took just one hour from start to finish!):
Our 2007 Dodge Ram came with an exhaust brake built into the turbo. Mark LOVED this brake and used it all the time, both towing and not towing. The only thing that bugged him about it was that coming down mountains with our trailer hitched on, he often had to shift gears manually and feather the gas pedal to keep the truck going the speed he wanted.
The 2016 Ram trucks have an improved exhaust brake that has two modes: max braking power and constant speed braking. We definitely wanted that option!
BACKUP CAMERAS
Dodge Ram trucks have two backup cameras, one that aims at the bed of the truck (for hitching and unhitching) and one that aims behind the truck (for backing up). Beginning in 2016, both of these cameras could be set to display their image on the main touch screen display (in the 2015 model, one camera would display in the rear view mirror while the other would display on the touch screen display).
It’s nice to have a backup camera when backing the truck in next to the trailer!
AUTO-LEVEL SUSPENSION
An option on the 2016 Ram trucks is to have four leaf springs with computer controlled air bags to provide for auto-leveling of the rear suspension. This is instead of the standard six leaf springs without air bags that have a fixed height suspension.
Without the air bags — the standard configuration — the “rake” of the truck’s rear end is four inches, meaning that the rear end of the truck is raised four inches higher than the front to compensate for the weight of the trailer which will push it down when it’s hitched up. For a shorter person, this is quite high, and I was astonished how much higher the tailgate of a 2016 Ram truck sits than our old ’07 truck did.
With the air bags, the rear end is raked only one inch, making the whole back end of the truck much easier to access for those of us who aren’t that tall. In addition, there is an “Alt Ride Height” button that can be used to lower the back of the truck one more inch. Hurray for short people!
When the trailer is hitched onto the truck, pushing the truck down, the on-board compressor kicks on and pumps air into the air bags, raising the back end of the truck until it achieves its normal one inch rake. If you prefer to drive with the truck level, the “Alt Ride Height” button can be pressed to lower the back end one inch.
When we did our test drives, we found that the duallies with the auto-level suspension had a slightly smoother ride when not towing than the ordinary leaf spring only models did. This has proven true with our new truck too.
VENTED and HEATED LEATHER SEATS and STEERING WHEEL plus OTHER GOODIES
As we test drove different trim levels of trucks, we decided that if we were going to buy a new truck, we’d go all out and get the many little conveniences and options that are a “splurge” but that make using the truck a pleasure.
Let’s go for a ride!
Heated and vented leather seats with power seat adjustments and lumbar support, a side step to make it easier to get in and out of the truck, independent climate control for driver and passenger, a CD player, OWL on/off-rad tires, the fancy electronics console with the big touch screen display and GPS nav system and power adjustable pedals were all on our list.
Most of these options are bundled into the Laramie model of the Ram 3500 trucks.
The Laramie comes with a beautiful interior that includes all the fancy stuff.
Top level Nav/GPS Display with voice activation and climate control
Tan colored Heated/Vented Leather Seats and Steering Wheel
The Tow and Payload Ratings for the 2016 Ram 3500 dually with the above options as compared to our 2007 Dodge Ram 3500 single rear wheel are the following:
Rating
2016 Dually
2007 SRW
Trailer
UVW
8,319
7,147
GVWR
14,000
10,100
GCWR
39,100
21,000 lbs.
Payload
5,565
2,953
2,850
Max Trailer Weight
30,200
13,700
14,100
Even though the make and model of these two trucks is the same, separated by just nine years, these numbers show that they are two radically different trucks!
After doing so many test drives, studying all the material and thinking about this truck for two years, there was no way we would give up any of the options we wanted, especially the ones that made the tow ratings and payload rating so high. But we never found a dealership that ordered this exact truck for their lot. Time and again, Mark would find a truck that was close, but there would be some things missing and other things we didn’t want.
So we decided to order the exact truck we wanted and wait 8 weeks for it to be built.
We had a ball ordering this truck through Airpark Dodge in Scottsdale, Arizona, where a marketing connection with Alice Cooper made one of Mark’s lifelong dreams come true. See our really fun blog post:
A significant difference between our 2007 Dodge Ram truck and our new 2016 Ram dually is that the new truck requires occasional refilling of the DEF (Diesel Exhaust Fluide) tank. Here are some tips we’ve discovered about DEF since we purchased our new truck:
Dodge Ram Truck Owners — Please note:
Late model Dodge Ram 1500, 2500 and 3500 trucks have been recalled (beginning 6/23/17) for side airbag problems in a rollover accident. See this article for details: Dodge Ram Side Airbag Recall
More info about Pickup Trucks, Ram Trucks, Tow Ratings, etc.:
2016 Ram Trucks Towing Guide – Ours is on p. 5, 2nd section, last line. Search for: “CREW CAB LONG BOX, 4X4, DRW”
Current Ram Trucks Model Specific Weight Ratings – Choose Heavy Duty / Crew / 8′ Box / 6.7 Liter Cummins / Auto / 4×4 / Premium Axle Ratio. The truck like ours is the first Laramie in the list. If you know a VIN number, click the red button “Look Up My Vehicle” to get the specs for that truck.
Note (July 2018): Folks have asked us if we like our truck now that we’ve driven it for two and a half years. We LOVE our truck. It now has about 40,000 miles on it, about half of that towing, and we couldn’t be happier with it.
Below are some of our most POPULAR POSTS(also in the MENUS above)
More of our Latest Posts are in the MENU.
New to this site?
Visit RVers Start Here to find where we keep all the good stuff. Also check out our COOL NEW GEAR STORE!!*** CLICK HERE *** to see it!
There is a world of difference between wet cell batteries (also called flooded batteries) and AGM batteries for use in an RV or marine battery bank, because AGM batteries are totally sealed, maintenance free and keep the user from coming into contact with battery acid (electrolyte). In a nutshell, the advantages of AGM batteries over wet cell batteries are the following:
AGM batteries are maintenance free, which means:
They don’t need periodic equalizing to clean the internal plates and never need the electrolyte topped off with distilled water.
They do not release gasses during charging, so they don’t need special venting in the battery compartment.
Since gasses are not released, the terminals and battery cables do not corrode over time and don’t need to be cleaned.
AGM batteries discharge more slowly than wet cells, so an RV or boat can be stored for a few months without charging the batteries.
AGM batteries charge more quickly than flooded batteries because they can accept a higher current during the Bulk charging phase.
AGM batteries can be installed in any orientation, which is helpful if installation space is limited.
AGM batteries can’t spill battery acid if they are tipped over. This is especially important when a boat heels excessively or capsizes. (Not that you’d be too concerned about spilling electrolyte if your boat were upside down!)
.
OUR ORIGINAL BATTERY INSTALLATION
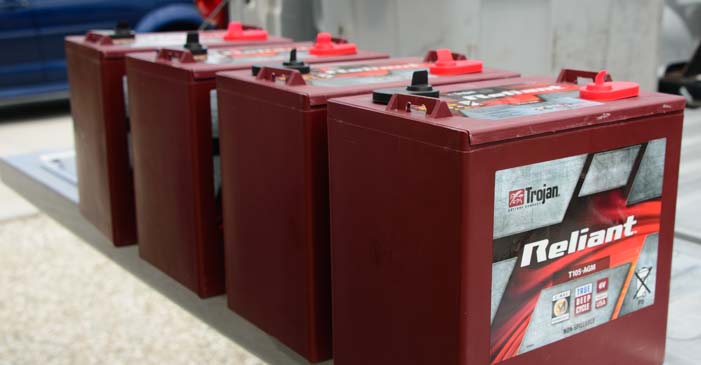
We used Trojan T-105 wet cell (flooded) batteries for nearly six years in our fifth wheel trailer, and they worked great. They were installed in our basement compartment, all lined up in a row. This was a custom installation that was done by H&K Camper Sales in Chanute, Kansas, when we purchased our trailer new from the NuWa factory in 2008.
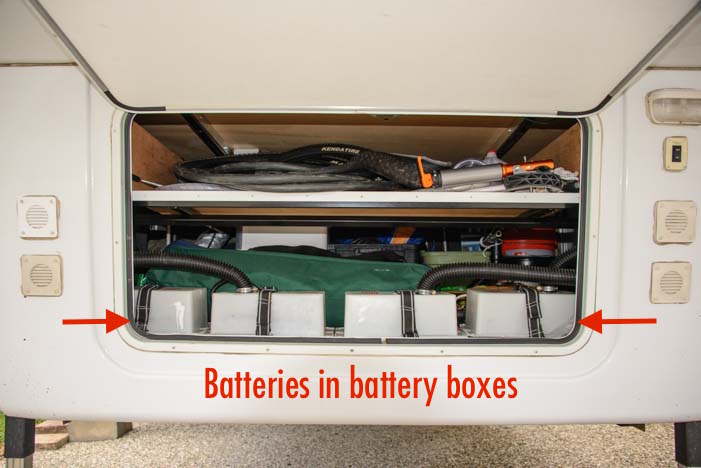
Four 6 volt golf cart batteries installed in our fifth wheel basement
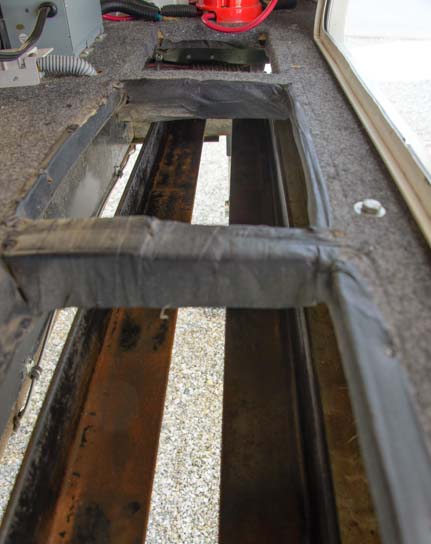
The original battery compartment was designed at the NuWa factory to hold two 12 volt Group 24 batteries. Group 24 batteries have the same footprint as 6 volt golf cart batteries but are about an inch shorter. We had 2″ angle iron bolted onto our fifth wheel frame so the four batteries could stand side by side in battery boxes.
2″ angle iron is bolted onto the fifth wheel frame to support the batteries.
There were four venting flex hoses that ran from the battery boxes to four individual louvered vents on the front of the basement on either side of the hatch door.
Each battery box is vented to the outside with flex hose going to a louvered vent cover.
These batteries worked well, but because we put our RV in covered storage for 4 to 20 months at a time during the four years we cruised Mexico’s Pacific coast on our sailboat, we were not actively present to take care of the the battery charging and maintenance duties. Despite our best efforts to have someone do this while we were gone, when we moved off of our boat and back into our fifth wheel, we found our four Trojan wet cell batteries were completely dead and unrecoverable.
We replaced these batteries with four inexpensive 6 volt golf cart flooded batteries from Costco. These new batteries did not last. Within 18 months, the internal plates had sulfated badly, they took forever to charge, and they discharged extremely quickly.
Upgrade time! We removed the old wet cell batteries and replaced them with AGMs.
In April, 2015, while staying in beautiful Sarasota, Florida, we replaced our wet cell batteries with four fabulous new Trojan Reliant T105-AGM batteries that Trojan had just begun manufacturing and selling. We replaced all the wiring as well.
CORROSION CAUSED BY WET CELL BATTERIES
One of the biggest problems with wet cell, or flooded, batteries is that the battery terminals and ring terminals on the battery cables get corroded easily due to the gassing that goes on when the batteries are being charged. When Mark removed the battery cables from our old batteries, he measured as much as 20 ohms of resistance from the end of each cable to its ring terminal.
We measured 20 ohms of resistance between the end of the cable and the end of the ring terminal.
Flooded batteries need to be held at 14.5 or more volts during the Absorption charging stage (depending on the battery), and at this voltage the electrolyte in the batteries begins to release gasses into the air. These gases are both explosive and corrosive, and venting them protects everything around them. However, inside the battery box these gases can corrode the battery terminals and wiring.
The best way to clean off the corrosion is with a solution of baking soda and distilled water. Put it in a disposable cup and then use a cheap paintbrush to paint it on and smooth it around the terminals and cable ends. Let it sit for a few minutes and then pour a little distilled water over it to rinse the baking soda and crud off. Dry it with paper towels.
Also, while driving down the road, the electrolyte can splash around inside the battery cells and drip out the vent holes. Dust can settle on the spilled electrolyte and can cause a minute trickle discharge across the top of the battery. So, it is important to wipe down the tops of the batteries regularly and keep them clean.
It’s a good idea to wear rubber gloves for all of this too!
These batteries did not hold up well and corroded badly every few weeks.
Watch out for drops of liquid settling on your clothes when messing with the batteries. It’s nearly impossible to avoid, and Mark has holes in some of his jeans from drops of battery acid landing on his pants while he either checked the state of charge of the batteries with a hydrometer or poured distilled water into the battery terminals or cleaned the corrosion from the battery terminals and cable connections.
Now that we have nifty new AGM batteries, we no longer need the hydrometer!
OUR NEW RV BATTERY INSTALLTION
We chose the new Trojan Reliant T105-AGM batteries to replace our old flooded batteries because these are a completely redesigned battery from one of the top battery manufacturers, Trojan Battery. Rather than being dual purpose batteries, like othe AGM batteries on the market, the new Trojan Reliant AGM batteries are single purpose deep cycle batteries.
Our new Trojan Reliant T105-AGM batteries ready to go.
TRUE “DEEP CYCLE” – START BATTERIES vs. HOUSE BATTERIES
Large RV and marine batteries can be used both to start big engines and to run household appliances. However, these functions are polar opposites of each other! A start battery gives a big but short blast of current to get an engine started and then does nothing. In contrast, a house battery provides a steady stream of current to power lights and household appliances for hours on end.
Most deep cycle AGM batteries on the market today are actually dual purpose start and deep cycle batteries, largely due to the history of how batteries have developed and what they have been used for. The new-to-market (in 2015) Trojan Reliant AGM batteries were engineered from the ground up to be strictly deep cycle batteries, and the design is not compromised with start battery characteristics.
Mark installs the new batteries in the old plastic battery boxes.
12 volt batteries come in many sizes: Group 24, Group 27, Group 31, 4D, 8D and more. As the battery sizes increase, they provide more and more amp-hour capacity. 6 volt batteries come in various sizes too, and the golf cart size is one of several.
The Trojan Reliant T105-AGM 6 volt golf cart style batteries (68 lbs. each) are rated to have a capacity of 217 amp-hours when two of them are wired in series to create a 12 volt battery bank. In comparison, our sailboat came with three Mastervolt 12 volt 4D AGM batteries (93 lbs. each), and we added a fourth. These batteries were rated to have a capacity of 160 amp-hours each.
The advantage of using two 6 volt golf cart batteries instead of enormous 4D or 8D 12 volt batteries is that they are smaller, lighter and easier to carry around and to put in place during the installation and easier to remove in the event of a failure.
BATTERY WIRING
We wired our four new 6 volt batteries in series and in parallel. We wired two pairs of batteries in series to create two virtual 12 volt battery banks. Then we wired those two 12 volt banks in parallel with each other.
Four 6 volt batteries: two pairs wired in series to make virtual 12 volt batteries. Those pairs are wired in parallel with each other (red / lavender circles explained below).
Trojan Battery recommended the following wire sizes for this battery configuration:
4 gauge wire between the batteries that are wired in series
2 gauge wire between the pairs of 12 volt battery banks wired in parallel
This is thicker wire than many RVers and sailors typically select for their battery banks.
Because we were wiring batteries that would be physically lined up in a row, we drew out a wiring diagram to be sure we got it right.
Same wiring but with the batteries lined up in a row (red and lavender circles explained below).
WIRING THE BATTERY CHARGERS and INVERTER
Because AGM batteries have a lower internal resistance, they can accept a higher bulk charging current than wet cell batteries.
Trojan Reliant AGM batteries can accept a bulk charge current of 20% of their 20 hour amp-hour rating. For the T105-AGM batteries, the 20 hour amp-hour rating is 217 amps per pair of batteries wired in series. So the max current the batteries can accept is 20% of 217 amps, or 43 amps, per pair. The wiring for each charging system should be sized for a max current flow of 43 amps.
In contrast, Trojan’s wet cell batteries can accept only 10%-13% of their 20 hour amp-hour rating. For the T105 battery, the 20 hour amp-hour rating is 220 amps per pair of batteries wired in series. So the max current the batteries can accept is 13% of 220 amps, or 28 amps.
If the charging systems are connected to the battery terminals of just one 12 volt battery, whether it’s an individual Group 24 or 4D battery or is a pair of 6 volt golf cart batteries wired in series, then the batteries in the system will not charge equally. Likewise, if only one battery of the parallel bank is wired to the DC side of the inverter, the batteries will not discharge equally.
In the above drawings, the two optimal connection points for the charging and inverter systems are shown in red and in lavender. Either pair of terminals works equally well.
We found that with individual devices for our converter, our inverter and our solar charge controller, there were a lot of ring terminals getting piled up on two of the battery terminals. So we chose the inner pair of battery terminals for the inverter and the outer pair for the converter and solar charge controller.
Since we dry camp 100% of the time and rarely use our converter except when we have to pull out our generator after days of storms or to run our air conditioning, this division means that our primary charging system spans the batteries one way while the inverter driving the AC household systems that discharge the batteries span the batteries the other way.
NOT ALL BATTERY CABLE IS CREATED EQUAL
We chose Ancor marine wire for our battery cables because it is very high quality cable. The individual strands of wire inside the casing are thin, which makes this cable very supple, despite being thick overall. It is easy to work with and to snake around tricky areas. The individual strands inside the cable are tinned as well.
We don’t own a crimper of that size, but West Marine Stores often have a crimper for heavy gauge wire that customers can use, and we got an excellent crimp from a workbench mounted crimper.
Crimping 2 and 4 gauge wire requires a large crimper.
With Mark hanging onto the ring terminal and me hanging onto the wire, we both pulled with all our might and we couldn’t pull the lug off the wire.
A good, solid crimp.
As these projects always go, we needed to return to West Marine for crimping a few days later when we wired in our solar charge controller. We went to a closer West Marine store this time, and they had a different crimper that wasn’t quite as nice.
This wire is so thick you need a huge wire cutter!
Mark wasn’t as confident that these crimps were as good electrically as the ones made with the first crimper, even though we couldn’t pull the lugs off the wire. So he fluxed the wire and used a propane torch to flow solder into the connection. This way we had not only a solid physical connection but an excellent electrical connection as well.
Mark flows solder into the connector to make a superior electrical connection.
Then he slipped shrink tubing over the connection and used a heat gun to shrink it in place.
Shrink tube covers the whole connection, and a heat gun tightens it up.
Back at the RV, Mark wired the batteries up. He placed the batteries in the battery box bottoms to keep them from sliding around and put the battery box tops on as well so that if anything fell over in the basement while we were driving, it wouldn’t accidentally land on the battery terminals and short something out. We keep that area clear, but you never know when you’ll hit a huge bump and things will go flying.
The batteries are ready for their battery box tops.
The AGM batteries do not need to be vented, so he removed all the vent flex hoses. This gave us much better access into the fifth wheel basement from the front hatch door.
The new batteries are installed, wired and labeled.
Without any flex hose behind the louvered vents, dust and road grime could now flow into the basement, so Mark removed the vent covers and placed a piece of solid plastic behind each one.
The louvered vents are open to the basement in the back and will let dust in.
Mark puts a thin plastic sheet behind each louvered vent to keep dust out.
The performance of these new batteries is nothing short of outstanding. We are floored everyday by how quickly they get charged, and not one bit of corrosion has appeared anywhere.
Mark is happy not to have to check the electrolyte levels in the batteries any more or to remember to equalize them every month. The new AGM batteries are winners all around.
Even though AGM batteries don’t have to be installed in battery boxes, ours are because our basement is large and open and we want to protect them from falling objects!
WHY WOULD ANYONE USE FLOODED BATTERIES?
Our Trojan T-105 wet cell batteries worked just fine for us for years, and flooded are actually advantageous over AGM batteries in two significant ways:
Flooded batteries are much cheaper than AGM batteries.
Well maintained wet call batteries can be cycled more times than AGM batteries
Flooded batteries cost 30% to 40% less than AGM batteries. This can add up to a savings of hundreds of dollars. Depending on the value of the RV or boat, it just may not make sense to have a huge investment in batteries on board.
Also, perfectly maintained wet cell batteries can be cycled more times than AGMs. “Perfectly maintained” means staying on top of equalizing the batteries to keep the battery plates clean and also checking each cell in each battery regularly to ensure that the electrolyte is completely topped off with distilled water at all times.
Under these ideal conditions in the laboratories at Trojan Battery, the Trojan T105 flooded batteries can survive 1,200 cycles where they are discharged to 50% (12.06 volts) and then fully recharged. The Trojan Reliant T105-AGM batteries can survive only 1,000 cycles.
Of course, battery cycling in real world conditions is very different than in laboratory conditions. The degree to which RV and boat batteries are discharged and recharged day to day is far from regular (partial discharging and partial recharging are common). Also, batteries on RVs and boats that are left in storage for any period of time can be difficult to maintain and may degrade despite good intentions (like ours did).
So, the ultimate performance and value of flooded versus AGM batteries is going to vary widely from one RVer or sailor to the next. However, for us, we will not be going back to wet cell batteries any time soon!
More of our Latest Posts are in the MENU.
New to this site?
Visit RVers Start Here to find where we keep all the good stuff. Also check out our COOL NEW GEAR STORE!!*** CLICK HERE *** to see it!
This page is a review of the 10′ Porta-bote operated with a 6 hp Suzuki 4-stroke outboard. The Porta-bote’s overall design is terrific, and it worked very well for us as a cruising dinghy during our nearly 4 year cruise of Mexico’s Pacific coast aboard our Hunter 44DS sailboat named Groovy.
We initially posted this review in 2012 after we had owned and used the Porta-bote for a year.
10′ Porta-bote with 6 hp outboard.
Since that time, the Porta-bote design has been completely overhauled and revamped.
The new Alpha series models being sold today are much improved over the older models. Many of the problems we had with our Porta-Bote have been eliminated by the new design.
In the end, we used the Porta-bote as our cruising dinghy for nearly four years and we were very happy with it. This review has been updated to indicate the areas in which the new Alpha series Porta-botes outshine the older models like ours.
The most notable improvements are:
The transom is an integral part of the hull and not a separate component
The seats have been completely redesigned
The plastic that the rub-rail is made of does not leave marks on white fiberglass motherships
The Porta-bote rows beautifully
We learned, after the fact, that the design engineers read and used this Porta-bote review to pinpoint aspects of the design that needed improvement when they did the Alpha redesign. I am really thrilled that our notes proved useful to them and gave them some good ideas.
The things we loved most about the Porta-bote were:
Easy and swift movement, whether rowing or motoring
Enormous capacity for carrying groceries, laundry, scuba gear and propane tanks to and from shore in the cruising lifestyle
Incredible ruggedness when dragging it up on shore or tying it to a pier covered with barnacles
Imperviousness to tropical UV rays, even when left in the sun for years on end
Excellent tracking in the water when towed behind a large cruising sailboat
We made a wonderful system for carrying the Porta-bote along our lifelines while on passage, and we found that the Porta-bote fit perfectly into our sailboat’s swim step.
The Porta-bote was light enough, even with the engine mounted on the transom, that I (an able bodied woman) could hoist it by hand to put it on our swimstep for the night without needing to winch it.
The notes below are offered for anyone considering using a Porta-bote as a cruising dinghy. It details how we used the boat and the custom modifications we made. Any criticisms we had of the boat that have been fixed in the new Alpha series are clearly noted in the review.
Would we consider a Porta-bote for a future tropical cruise? Absolutely!!
1 Hull
3 Seats
1 Transom (transom is integral to the Alpha series hull)
3 pairs eyebolts/washers for seats
2 pairs wingnuts/washers for transom
1 pair aluminum collapsible oars
There’s enough room to take a snooze!
Following is a summary of what we have found to be Porta-bote’s best and worst qualities when used as a cruising dinghy:
Porta-bote Strengths
Lightweight enough to hoist in davits effortlessly, even with the outboard
Lightweight enough to drag high onto the beach without dinghy wheels
Tows easily, with or without the outboard mounted (best without)
Rows beautifully — truly a pleasure to row
Planes quickly with a 55 lb. 6 hp outboard and two adults
Huge interior volume for hauling stuff
No worries about running it up on rocks
No need for a sunbrella cover to protect the hull from UV rays
Half the price of a comparable RIB dinghy
Porta-bote Weaknesses
No built-in system to attach a bridle for lifting the boat in davits
No “drain hole” in the hull to drain water when boat is out of the water **
Seats take up storage space and the long middle & rear seats can be awkward to carry
Black plastic seats get untouchably hot in the tropical sun
** We did not know this at the time, but if you want a drain plug, Porta-bote recommends installing a Ronstan RF294 Drain Plug on the side of the boat just in front of the transom and above the black tube.
Issues with OLDER MODEL Porta-botes (NOT applicable to the new Alpha series)
Some of the construction materials are not appropriate for tropical, salt water use
Transom is heavy, awkward to carry and takes up a lot of storage space
The flotation foam disintegrates in the sun and leaves black flecks on the floor
Black plastic seams along the length of the hull leave scuff marks on Groovy’s white gelcoat
Our overall assessment after nearly four years of using the Porta-bote in anchorages from San Diego to Zihuatanejo, Mexico is that it is a great little cruising dinghy, especially once a few modifications have been made.
Here are some details about its strengths and weaknesses along with descriptions of the upgrades we did to make it work better.
PORTA-BOTE STOWAGE LOCATIONS on a CRUISING SAILBOAT
The Porta-bote is not as compact a boat as you might think because it is not just a folding hull. It is a hull, three large seats and a big transom Note: in the Alpha series the transom is not a separate component as it was in the older Porta-botes.
The 8′ version is a hull, two seats and a transom, and is reportedly “just as difficult to set up” according to a singlehanding friend of ours who has cruised 10,000 miles, first with a 10′ Porta-bote and then, after he lost it, with an 8 footer. “I liked my 10 footer better,” he claimed. “Smaller doesn’t mean easier, and you lose all that interior space with the 8′ model.”
The Porta-bote planes easily with two adults on board
All the pieces of the Porta-bote are big and awkward to carry. For longer passages we disassemble the Porta-bote and store the hull in kayak-style racks outboard of Groovy’s starboard deck, so it is tucked out of the way without having to hang in davits off the back or lie upside down on the foredeck as most cruising dinghies do. Because of their length, we store the longest seat and the transom in the master stateroom (ugh!). We store the other two seats in our big cockpit locker, standing on end for easy retrieval.
For overnights at anchor we lift the dinghy in retractable davits that are built into our solar panel support arch. The Porta-bote fits perfectly into our sugar-scoop transom, resting neatly on the swim platform and held in place by the shape of Groovy’s hull.
We leave the outboard mounted on the Porta-bote. The boat and outboard are light enough that each of us can hoist the dinghy unassisted (our davit system has a simple 4-to-1 purchase and no winches). Splashing the boat in the morning is just a matter of lowering it a foot or so back into the water, which each of us can also do unassisted.
PORTA-BOTE SEATS and SEAT STOWAGE
The seats on the new Alpha series Porta-botes have been completely redesigned, and the transom is integral to the hull and not a separate component, so the following notes pertain strictly to older Porta-botes.
Porta-bote hull mounted on the lifelines of our sailboat
The three seats and transom are all large, heavy components made of plastic and metal. Each one has some swinging legs that hang off of it, making each piece quite a challenge to carry on a pitching boat. Each of the three seats has two (or three) metal U-shaped rods attached underneath that flip out and become the seat legs once the seat is installed in the Porta-bote. These metal loops are only loosely attached to the seats, relying on spring tension to keep them in place.
The first time I carried a seat forward on Groovy’s deck, one of the metal pieces detached itself from the seat and vanished over the side, never to be seen again. Fortunately Porta-bote replaced the piece free of charge. We now use duct tape to keep tension on the open part of the U-shaped rods so these crazy loops don’t fall off when we carry the seats to and from the foredeck. The metal loops fold back against the bottom of the seats.
Porta-bote rests on foredeck of our 44′ Hunter 44DS sailboat
Actually, they swing freely and independently of each other, flopping all over the place. However, with some coordination they can be held against the seat while carrying it, still leaving a hand free “for the boat.” Unfortunately the loops don’t fold flat to the seat and there are no clips to hold them in place, so they flop around until you get a grip on them as you carry the seat. Also, when folded, at least one of the loops on each seat sticks out an inch or two beyond the end of the seat. So in the stored position the seat becomes even longer due to this metal bracket sticking out the end.
The design of the seats and legs could be infinitely improved. The seats could be designed to fold in half, shortening them considerably for stowage. The legs could fold into the seats and clip into place so they don’t flop around.
There is a myriad of possibilities for designing solid functional seats that are easy to carry and store. However, the current seats are very awkward, and the black plastic will singe your hand when you touch it after the boat has been sitting in the tropical sun for a few minutes. Simply making the seats of white plastic would be an immeasurable improvement.
We use towels to cover the seats, or in very hot places rely on flotation cushions (which slide around under you). We have heard of cruisers making sunbrella seat covers for the seats too. In the hottest places a towel is not sufficient and you will still burn your backside while sitting on the seats.
The biggest problem with the seats, besides being so difficult to lug around on a rolling boat, is that they are too big to stow easily. Some cruisers lash them on deck, but we have neither found a good place on deck for them nor come up with a quick way to tie them down securely. Many cruisers simply tow their Porta-bote instead of hassling with assembly and disassembly.
Groovy in Tangolunda Bay (Huatulco, Mexico) The porta-bote is snug in its perch on the starboard side.
We met a couple that towed theirs thousands of miles up and down the Mexican coast. I consider this risky if the seas get out of hand, and it also seems to defeat the purpose of the folding “portable” nature of the boat.
On our boat the transom and middle seat are too long to fit in a cockpit locker in a way that is easily accessible, so we store them alongside our bed.
The other two seats fit in our large aft cockpit locker standing on end. In order to get a grip on these big floppy seats, we use several large Navy-issue canvas bags, storing two seats to a bag and putting a second bag over the other end so the whole seat is covered (they are salty and dirty when removed from the boat, and who wants that next to their bed?).
A tidier solution would be to have custom canvas bags made to fit the seats with a large rugged handle on the side. It would be awesome if these bags came with the Porta-bote right from the factory!
PORTA-BOTE TRANSOM and TRANSOM STOWAGE
The transom on the new Alpha series Porta-botes has been completely redesigned and is integral to the hull rather than being a separate component
The transom is not only long, wide and heavy, it has a big flopping plastic piece that folds over the hull when the transom is installed in the Porta-bote to provide a support for the outboard to clamp onto. This heavy piece is held to the transom by a thin piece of plastic that acts as a hinge and looks very prone to tearing.
Transom lies on the foredeck
When we tow the Porta-bote, we remove the outboard, and then the plastic outboard support piece flaps as the Porta-bote goes over the waves, threatening to rip the hinge piece. To stop the flapping and wear and tear on that thin hinge, we use a large clamp to clamp the outboard support piece to the Porta-bote’s hull.
The transom also has two long metal L-brackets along each side. These are the supports that hold the transom in place: two pairs of wing nuts and washers secure the metal L-bracket to the side of the hull. These L-brackets are major ankle-biters and interior cabin wood-gougers when carrying the transom around.
Therefore, we load the transom and the longest seat into a canvas bag before lugging them anywhere — the flopping legs on the seat are held in place, the flopping outboard engine mounting piece is held in place, and the sharp metal edges of the L-brackets are somewhat protected by the heavy canvas.
Some clever engineers at Porta-bote could surely devise a way to secure the transom without requiring large metal L-brackets (or tiny wing nuts and washers, for that matter), and the outboard engine mount could definitely be designed to fold into the transom so it lies flush and is held in place with a clip system that keeps it from flopping around.
Please note that the new Alpha series Porta-botes have the transom integrated into the hull which eliminates the problems associated with carrying the transom around and attaching it to the hull!
PORTA-BOTE ASSEMBLY
Step 1: The hull is opened
We have tried several methods of assembling the Porta-bote on Groovy’s deck, and the best system we have found is described below. It takes us about 15 minutes, including retrieving the many parts from the cabin and the cockpit locker.
When the hull is in its stowed position, it is folded lengthwise twice: first the sides fold into the middle, then the (new) sides are folded in towards each other.
The end result looks like a small surfboard, 10′ long and about 4″ wide. Our first task is to remove the hull from its stowed position outboard of Groovy’s starboard side deck. Then:
Center seat is installed
1. Carry the hull to the foredeck and open it up. The plastic is rigid and you have to use a lot of force to get the sides to open.
Porta-bote provides a specially cut board to assist with this: you stand on one side of the hull and push against the other, wedging the board between the two. Eventually the board is positioned to hold the hull open.
2. Insert the middle seat. The ends of the seats are inserted into metal supports that are riveted on either side of the interior of the hull.
The seats don’t fit in the supports all that well. There is some wiggle room up and down and the angle of the supports is perpendicular to the hull, which is not ultimately in line with the seat’s horizontal orientation, because the hulls’ sides flair outward.
Note: The seats have been totally redesigned in the Alpha series!
Eyebolt / wingnut / washer combo for attaching the seats to the Porta-bote hull
3. Secure the middle seat with wing nuts and washers. The Porta-bote ships with long thin cotter pins that are tied to the seats with thin string so they don’t get lost.
The cotter pins are intended to hold the seats in place against the metal hull supports, however they fly all over the place when you are carrying the seats, and they don’t hold the seats securely.
Bolt-wingnut-washer combo for attaching the transom to the hull
Therefore, we replaced the cotter pins with long stainless steel eyebolts held in place with large stainless steel washers, both above and below the seat, and with a stainless steel lock washer underneath to keep everything tight despite the jiggling and jostling of the hull when the Porta-bote is driven over the waves.
The eyebolt is slid through a hole in the upper part of the metal support, then through a hole in the seat and then through a hole in the lower part of the metal support, and a wingnut is screwed on from underneath.
Note: The mechanism for attaching the seats to the hull has been upgraded in the Alpha series of Porta-botes, however we found the eyebolts useful…
Bolt/wingnut attaching transom’s L-bracket to the hull
The eyebolts also come in very handy for holding the dink in place behind Groovy’s swim platform. We have two lines rigged on either side of the swim platform with clips on the ends that clip into the Porta-bote’s eyebolts on the forward and aft seats. This keeps the Porta- bote parallel to Groovy’s transom and keeps it snug to the swim platform for easy boarding.
4. Install the transom. The outboard mounting flap goes over the hull, and the metal L-brackets are attached to holes in the hull using bolts, wing nuts and washers.
The Porta-bote ships with non-stainless bolts, nuts and washers, which are probably fine for the once-in-a-while lake fishing that the Porta-bote is built for. We replaced all these little pieces with stainless steel bolts, nuts and washers and added a lock washer to the set.
The sizes of these pieces that Porta-bote ships are non-standard (I searched high and low for stainless components that would match the originals). Instead, we simply used replacement bolts, washers and nuts that would fit the holes rather than trying to match the thread pitch, bolt length and width of the ones from the factory.
Attaching the transom to the hull with wingnuts
The lower wing nut / washer set on each side of the transom includes a rubber washer to keep that part of the boat watertight since that part sits below the waterline. The rubber washers last about 6 months in the salt water environment.
We keep several spare rubber washers to use as replacements each time they wear out. In addition, we have a complete duplicate set of all the eyebolts, straight bolts, wing nuts and washers that we use for the Porta-bote, as it is all too easy to drop one of these tiny pieces overboard while assembling or disassembling the Porta-bote on deck.
Porta-bote is hoisted on spare halyard
The worst aspect of the Porta-bote design for use as a cruising dinghy prior to the new Alpha series, is that you are fumbling with the very large pieces of a 10′ long hull, several wide seats that don’t fit into their supports very well, and a big heavy transom, all while screwing the whole thing together with tiny wing nuts.
The bottom of the boat is a black plastic “hinge” that acts as something of a keel, so the boat doesn’t sit flat on deck but pivots about on this round tube of plastic.
So when Groovy rolls in the swell, the porta-bote pivots on its keel, and you are hanging onto the boat in one hand with a fist full of wing nuts and washers in the other, all while trying to mate the threads of the wing nuts to the bolts.
Porta-bote is lowered into the water
5. Raise the Porta-bote up and over the lifelines and lower it into the water using the spare halyard.
We have an electric halyard winch that works really well but also works quite hard during this process (of course it would be a great upper body workout to winch it by hand).
When the boat rises up in the air, the outboard mounting bracket flops down unless we clip it in place with a large clip before raising the boat. Note: This has been remedied in the new Alpha transom design.
This part of the process can be tricky in a large swell or in high winds, as the boat is difficult for the guy on deck (Mark!) to control as it swings around on the halyard.
6. Move the boat to the swim platform, clip middle and rear seats’ eyebolts to two lines on Groovy’s transom to keep the Porta-bote parallel to Groovy’s swim platform for easy access, and install the other two seats.
7. Lower the outboard engine onto the mountain bracket on the transom (using one of the dinghy davits) and secure it in place.
Porta-bote is brought back to the swim platform for the rest of the assembly
Front seat is installed
Rear seat is ready for installation. Note the 3 u-shaped metal legs.
Porta-bote is clipped to swim platform to keep it parallel to Groovy.
Outboard is installed on transom
TOWING the PORTA-BOTE
Painter is tied at two points on Groovy’s transom to create a 3-point bridle. A second line is tied to Groovy’s transom “just in case.”
The Porta-bote tows beautifully, and we have towed it (without the engine mounted), for hundreds of miles, a few times in some rather large and lumpy seas.
We have towed it with the outboard mounted too, and that works just fine, but we wouldn’t want to go more than a few very sheltered miles towing it that way.
We tie the Porta-bote’s painter to two points on Groovy’s transom, making a bridle. We usually tie a second line to Groovy as well, just in case. There’s nothing like trying to find and retrieve a lost dinghy in big seas (been there, done that!).
We have tried towing the Porta-bote far behind Groovy, but have found it behaves much better when it is snugged up close behind.
We keep it about a foot or so off of Groovy’s transom. Sometimes when we are sailing slowly in lumpy, following seas it has a tendency to run into the back of Groovy.
HOISTING the PORTA-BOTE in DAVITS
We had a custom made stainless steel arch extension built for our boat to support our 555 watts of solar panels and to provide telescoping davits to hoist the Porta-bote.
We drilled two holes on the stern end of the Porta-bote just forward of the transom, one on each side of the hull. We had four stainless steel plates made to reinforce these holes, and those are bolted in place (with stainless bolts), one plate on the inside and one on the outside of each hole, sandwiching the plastic hull in between. To create a davit bridle, we simply run a line between those two holes in the hull’s stern and run another line between the two factory-installed holes in the bow of the boat to make a two-point hoisting system for our davits.
Because the lifting points are at the top of the hull, it is not possible to snug the Porta-bote tightly into the davits. Instead, it always swings a little, no matter how high you hoist it. If the lifting points were in the bottom of the boat, the top edges of the hull could be pulled flush to the davit arms. However, I am not sure how to install lifting points in the boat’s floor. So we don’t travel with the Porta-bote in the davit system.
We raise the Porta-bote out of the water onto the swim platform at night.
The davits are ideal for getting the boat out of the water at night when we are at anchor, as the Porta-bote sits snugly on the swim platform and we secure it with lines tied to the seats’ eyebolts to keep it perfectly still.
Also, if it rains (which it doesn’t do in Mexico’s winter cruising season) or if there is a lot of dew, the boat doesn’t have a drain hole to release the water. Water also collects in the bottom of the boat when we drive it hard, as waves splash in and water jumps over the transom. So there is occasional light bailing to be done, but not more than a sponge or towel can handle.
One thing we discovered is that the Porta-bote’s black plastic seam tubes that run along the length of the hull are made of a plastic that leaves scuff marks on Groovy’s white fiberglass gelcoat.
When we hoist the dinghy in the davits, it invariably bumps along Groovy’s transom a bit, and over time it leaves a lot of marks. They come off with a little elbow grease and polish, but there are plastics out there that are non-marking, and if Porta-bote used that kind of plastic it would be a huge improvement.
Note: The black plastic seam tubes in the new Alpha series does not leave scuff marks
FLOTATION
Just beneath the black plastic lip at the top of the Porta-bote hull there is a strip of foam rivited to the hull. This provides enough flotation to keep the boat afloat if it fills with water — as long as there is no outboard engine mounted on the boat. The foam material deteriorates in the sun and flakes off, constantly leaving little black flecks all over the Porta-bote’s floor. I have heard of cruisers covering this foam with Sunbrella to keep it intact and prevent its total disintegration. I haven’t gotten to that project yet… This foam provides a little flotation, but the Porta-bote will definitely sink if it is swamped while an outboard engine is mounted on its transom.
Note: The flotation material in the new Alpha series Porta-botes does not disintegrate in the sun
USING the PORTA-BOTE
A lot of this description so far includes many negatives and short-comings of the Porta-bote, simply because [the older models were] not designed to be a cruising dinghy and is rather carelessly engineered and cheaply manufactured. However, the great qualities of this dinghy show up once it has been assembled and is out on the water. We have found ways to work around its portability limitations, and feel that because of its good traits on the water it is an excellent choice as a cruising dinghy. We would buy it again, and here’s why:
Our Porta-bote lines up with inflatable dinghies on wheels in Santiago Bay, Manzanillo, Mexico
The interior volume is enormous. We have packed it with a month’s worth of groceries (at the supermarket the provisions were mounded way above the top of the shopping cart) along with three weeks worth of laundry (in two huge laundry bags), plus ourselves, and we still had space leftover.
We have also loaded it with five adults and putted along at a good clip. I think six adults would be pushing it. There is plenty of space on the seats for six adults, but the boat would sink too low in the water. It is a fast boat that planes easily with both of us aboard using just a lightweight 6 hp 4-stroke outboard. We raced a traditional RIB dinghy driven by a 15 hp outboard and carrying two adults. They barely pulled away from us as we reached about the quarter mile mark.
The Porta-bote is lots of fun.
I love rowing, and the Porta-bote is a lot of fun to row. It tracks well and moves nicely through the water. For the passionate rower the oars are totally inadequate and should be replaced.
The oarlocks in the hull also seem a little flimsy to me and I wonder how long they will hold up, as they flex ominously with every pull on the oars. The oars themselves are made for very light, occasional use. They are aluminum and they split into two halves for stowage, the handle half and the paddle half. The two halves are joined with a plastic pin-through-a-hole system, but the pin doesn’t actually go through the hole very well because the plastic spring mechanism is flimsy and weak.
So, the oars are prone to coming apart if you don’t keep an eye on them. Each oar has an aluminum pin that fits into the hole in the Porta-bote’s oarlock. The pin is held in place on the oar with a sleeve around the oar that is fastened with an aluminum bolt and wing nut.
On our fifth time out rowing, the bolt on one of our oars crumbled mid-stroke. We replaced the bolts and wing nuts on both oars with stainless steel, and they have been fine ever since. Over our four year cruise, we did not end up rowing the Porta-bote but used the outboard all the time instead.
Whether rowing or motoring, it takes a while to get used to the Porta-bote’s flexible floor. You can feel every wave and bump under your feet, and it is a very moveable platform, nothing like a hard dinghy or a RIB. However, the movement is just part of the package, and once you are accustomed to it, it’s kinda neat.
The Porta-bote is a great cruising dinghy.
All-in-all we are very happy with the Porta-bote. No cruising dinghy is ideal, each type being a pain in the neck in at least a few ways. We like the lightweight nature of the Porta-bote and being able to get most of it off the deck and out of the davits and out of the way while on a long passage.
We like its good manners while towing, its speed under power and its voluminous interior space for provisioning runs. The compromises and required upgrades are okay with us in return for its many good qualities. If Porta-bote ever went back to the drawing board and studied its plans and re-engineered the boat for use as a cruising dinghy, they could create a truly superior dink that surpassed everything else on the market.
As noted above, Porta-bote did just that, and the result is the new Alpha series!
Travel Photography Tips! - All the cameras, gear, books, blogs and tools we used to learn to take great pics!
GEAR STORE
Gear Store - A list of the goodies, equipment and gear we've found useful in our RV lifestyle!
More of our Latest Posts are in the MENU.
New to this site?
Visit RVers Start Here to find where we keep all the good stuff. Also check out our COOL NEW GEAR STORE!!*** CLICK HERE *** to see it!
The engines in most cars and trucks are computer driven these days, but the installation of an engine tuner puts the driver in the driver’s seat instead. An engine tuner, or programmer, gives the driver the ability to fine tune the engine’s efficiency and performance by manipulating the computer’s input parameters to suit the driving task at hand.
Since 2007, we have lived year-round in a 14,100 lb, 36′ 2007 NuWa Hitchhiker fifth wheel trailer. For eight years, the truck we used to tow this big trailer was a 2007 Dodge Ram 3500 Single Rear Wheel Long Bed truck. Half of our miles driven, we towed the trailer. The other half, we drove it around town with nothing in tow and a few hundred pounds of cargo the bed of the truck. Once in a while we threw in an off-road adventure just for fun.
Our 2007 Dodge RAM 3500 single rear wheel truck
When the truck had 85,000 miles on it, we installed an Edge Diesel Evolution CS tuner, and what a world of difference that made to our driving experience, not only when we were towing but also when we were driving the truck around without the trailer attached.
In a nutshell, it has:
Increased our truck’s power
Improved our gas mileage
Given us a readout for the transmission temperature.
And it was an easy installation to boot.
We also installed an optional companion product, the Edge EAS Exhaust Gas Temp sensor which gives us another piece of crucial temperature data when we are towing under heavy load. This is not a mandatory installation.
We first became interested in the idea of installing the Edge Evolution CS tuner when Mark saw an article in the October 2014 issue of Diesel Power Magazine (“Tested, Proven, Validated — Edge’s DPF-On Tuner Walks the Walk”). This article discusses the improvements the tuner had made on our exact model truck (well, a 2009 rather than a 2007, but with everything else virtually the same, including the mileage!).
The Edge Diesel Evolution Tuner works on Ford, GM/Chevy and Dodge RAM.
The Edge Tuner is mounted on the windshield, low enough not to restrict visibility but still easy to see.
Why install a tuner? It lets the driver fine tune the engine performance and boost power when needed
The beauty of the Edge programmer is that it doesn’t change anything in the engine permanently. It simply gives the driver the ability to fine tune the engine for its specific job at the moment, whether that is towing a big trailer, carrying a heavy load in the bed, racing off-road, or driving around town.
Light duty diesel trucks (i.e., Ford 250/350, Chevy 2500/3500 and Dodge RAM 2500/3500) are built for many uses, from towing heavy horse and RV trailers, to off-road racing, to driving across town and across country carrying big loads.
The on-board computer of every model truck is programmed at the factory to be able to do each of these things pretty well. However, it is impossible to program the computer to operate the engine at peak performance in all conditions. To make things worse, the truck manufacturers don’t provide the driver with a way to optimize the engine’s performance or to monitor some of the data the computer has already gathered.
Much of the truck computer’s capabilities and data remain inaccessible to the driver.
This is where the Edge tuner comes in, because it allows the driver to fine tune the engine for the immediate job at hand.
The idea behind the Edge tuner is to put the programming power into the hands of the driver, and to provide gauges for monitoring much of the data that the engine’s sensors detect. The Edge tuner can program the truck’s computer to maximize towing power or maximize non-towing fuel efficiency, depending on the kind of driving you are doing that day. It can also set the truck’s computer back to the stock factory settings, which is important if the truck is going into the shop for repair.
Because nothing mechanical is modified or tampered with, this means that nothing whatsoever is lost by installing the Edge tuner, but a whole lot is gained.
Why install a tuner? It gives the driver more detailed engine & transmission temperature data
We were intrigued by the Edge tuner because the installation appeared to be very easy, and the results were absolutely terrific. We tow our big fifth wheel trailer over huge, nasty mountain passes in the western states on a regular basis in the summertime, often tackling 10% and 15% grades on secondary roads. A little more towing power would be awesome!
What’s more, the tuner displays temperature data that the truck’s computer already has but that the truck manufacturer doesn’t display on the dashboard gauges. All this data is readily available via the OBD-II port (“On Board Diagnostic”) under the dashboard, you just have to plug into it. This is what the Edge programmer does — it is totally “plug-and-play.”
In this image, the tuner is set up to display three different types of temperature data: Engine Coolant Temp (left), Exhaust Gas Temp (middle bar), Transmission Fluid Temp (right). From the factory, most trucks display ONLY the Engine Coolant Temperature.
So, the Edge tuner would allow us to monitor the transmission temperature as we drove over mountain passes. This is vital data that is not accessible with our standard engine temp gauges.
Installing a companion product, the Edge Products EAS Exhaust Gas Temp sensor would let us monitor the exhaust gas temperature as well. Data from this optional sensor is shown in the middle gauge in the above image.
Having this extra information would allow us take action if something other than the engine coolant temperature overheated. It would also keep us better in touch with what was going on in the engine, in the event that the engine coolant temp was within an acceptable range but some other part of the truck’s propulsion were overheating. That scenario doesn’t seem possible, but read on…
You see, the factory installed engine coolant temp gauge in the truck cab tells only part of the story!
Why install a tuner? It improves the truck’s Fuel Efficiency (MPG)
We’ve always wished for a little better fuel mileage, both towing and when we are driving around town without our house attached. The tuner’s Level 2 programming mode promised improved fuel efficiency in non-towing conditions.
As it turned out, the tuner has increased our truck’s fuel efficiency in all situations.
What about the truck’s warranty?
A tuner (or “programmer”) does not permanently modify the truck’s computer or engine. There are “chips” on the market that make a permanent modification, but tuners and programmers don’t fall into that category.
We have called a few Dodge dealerships, and they have all assured us that if we had a truck that was in warranty (ours is not), they would service the truck even if it had an Edge tuner installed in it. Their recommendation to us was to reset the Edge tuner to “Stock” and then unplug it from the OBD-II port under the dashboard before bringing it in for service so they could properly analyze the engine (they use OBD-II port for their diagnostics).
The dealerships did say that if they found service was needed because of the presence of the Edge tuner (for instance, the tuner failed and shorted something out), they wouldn’t warranty that work, but they said the Edge tuner itself would not void any warranties.
2. Edge Diesel Evolution Tuner – Tested and Validated!
It’s easy enough for manufacturers to offer a bunch of sales hype and fake claims about a product like this, but the aspect of the magazine article that really got our attention was that the folks at Diesel Power did a controlled experiment to measure both the horsepower and torque that this tuner generates. First, they put a stock 2009 Dodge RAM 3500 on a dynamometer and took horsepower and torque measurements. Then they installed the Edge tuner on the same truck, put it back on the dynomometer, and did the measurements a second time.
With the Edge tuner set to its lowest setting (Evolution Level 1), the results were:
Stock (no tuner)
With Edge Tuner
Horsepower:
321 @ 2,900 rpm
362 @ 2,900 rpm
Torque:
605 ft-lb @ 2,350 rpm
711 ft-lb @ 2,300 rpm
Peak Exhaust Gas Temp:
1,266 degrees
1,200 degrees
So, they saw a jump of 41 hp, 106 ft-lb torque and a drop in peak exhaust gas temperatures. Wow!!
The Edge Tuner suddenly became a “must have” for us.
The installation took a total of 90 minutes, from opening the box, to sitting down and reading the manual, to getting the unit installed in the truck. Very easy. In fact, it was so darned quick that Mark had completely finished the installation before I got my camera out to get pics of the unit going in.
Edge Diesel Evolution Tuner Package Contents
The package contents include:
The user manual
The display unit
A windshield mounting bracket
Two wire/plug assemblies
Tie wraps
You just mount the display unit on the windshield with the suction cup mounting bracket, plug the unit to the OBD-II port, use the tie wraps to dress it all up, and you’re done. So I guess I didn’t miss much!
When we installed the Edge tuner on our truck, we just happened to be staying at the base of one of the biggest mountain passes we have ever traversed with our truck and trailer, the Million Dollar Highway that runs through the Colorado Rocky Mountains between Ouray, Silverton and Durango, on US Route 550.
This hair-raising, 70 mile stretch of road winds through dozens of 10 mph, 15 mph and 20 mph hairpin turns, going up and down grades that the Colorado Department of Transportation rates at “7% or more,” with some folks claiming a few are in the 9% range.
To add a little excitement to the drive, this is a fairly narrow two lane road with steep, unprotected drop-offs.
The views are divine, but it can be a white knuckle ride. The drive begins in Ouray at an altitude of 7,800′ and then climbs and descends over three major passes:
After finishing the Edge tuner installation, we took the truck up and down the first part of this road between Ouray and Red Mountain Pass about a dozen times. Mark set the tuner to Evolution Level 1, and he felt the difference in performance immediately.
He hit the gas pedal on a steep incline and his eyebrows shot up as he said to me, “This feels like a race truck!”
Once he was comfortably familiar with the road and the mountain passes, and once we were ready to leave Ouray, we hitched the trailer to the truck and drove the entire Million Dollar Highway — Route 550 — over those three mountain passes from Ouray through Silverton to Durango.
20 mph switchback ahead.
Mark was impressed that the truck had plenty of power at all times and made it up and over the passes without straining. He kept the engine torque in its power band of 2,200 to 2,600 rpm, and he never had to depress the gas pedal all the way to the floor to maintain a safe speed.
You can set up the Edge tuner display to show whatever data interests you most.
On the CS model (which we installed), there are two large analog displays with accompanying digital readouts and a smaller digital display in between them.
The CTS model (which is slightly more expensive) has three analog displays with accompanying digital readouts.
Mark had set up our tuner to show the Engine Coolant Temp (ECT) and the Transmission Fluid Temp (TFT) on the two large semi-circular analog gauges to the left and right.
The ECT is a measure of the antifreeze temperature in the radiator, and is the “engine temperature” reading that is given in an analog gauge on the truck’s dashboard. It is also the temperature that most manufacturer’s use to indicate that the engine has overheated, usually displaying a big red light on the dash.
Despite the hairpin turns and sheer drop-offs, semi-tractor trailers and RVs traverse this highway all the time.
The TFT is a measure of the transmission fluid temp, and it is not a value that is tied into any of the dashboard instrumentation on most trucks.
In general, both the ECT and TFT temps should be kept below 225 degrees, although newer trucks can run slightly hotter than older trucks.
The digital readouts on the Edge tuner display unit are big numbers that are easy for both the driver (and passenger) to read.
Getting into the Red Zone
What a shock it was to begin our first big ascent on Red Mountain Pass and to see that while the Engine Coolant Temp was in the normal range, according to both the factory-installed in-dash gauge and the Edge tuner (which showed 215 degrees), the Transmission Fluid Temp went into the red zone, climbing past the safe zone of 225 degrees up to 237 degrees.
The ascent was almost over when we hit this max, and both temps quickly dropped back down as we descended towards Silverton. The ECT cooled down to 198 degrees and the TFT cooled way down to 163 degrees.
On the next ascent, Molas Pass, (10,970′), the Engine Coolant Temp climbed back up to 215 degrees (still in the safe zone) while the Transmission Fluid Temp topped out at 244 degrees.
The truck’s temp gauge (and Edge ECT data) said we were not overheating, but that’s just the antifreeze. The transmission fluid temp (right) was 19 degrees too high.
In the next valley, the temps dropped back down again, and on the last ascent, Coal Bank Pass (10,640′), the temps climbed again, but this time the Transmission Fluid Temp stayed below 235 degrees.
Insights
We were both amazed that the truck never overheated, according to the dashboard Engine Temp gauge, but in fact, the transmission had exceeded its limits by as much as 19 degrees, or 8%. We never would have known that without the Edge tuner, and it made us wonder just how hot the transmission fluid would be in the event that the engine coolant temp actually went into red alert.
If the transmission stays over 225 degrees for too many minutes, the transmission fluid breaks down permanently, and the transmission can be irreparably damaged.
Steep grade ahead — prepare for a 10 mph turn
You can set up alerts in the Edge tuner display so that buzzers sound and/or the display flashes when any of the data being monitored exceeds its maximum. However, by default, the alert system is turned off. This makes sense, as it could be annoying to have a buzzer going when you are already nervously looking for a way to safely pull over to let the engine cool.
For anyone installing the Edge tuner, just keep the magic number 225 in mind, and you will easily see when you have exceeded that value on the tuner’s display, as the numbers are nice and large. There is also a “red zone” on the analog display, but we found it was so faint that we did not notice it until we studied our photos of the gauge afterwards!
When we tow, we set the Edge tuner to Level 1. When we are not towing, we set the Edge tuner to Level 2.
Increased MPG – Towing – Improves by 2 MPG!
Before we installed the Edge tuner, we typically got somewhere between 9.7 and 10.5 mpg while towing for long distances, according to the electronic gauge in the truck. This gauge has its limitations, because it is somehow averaging the most recent miles driven, but I have not been able to find exactly how the average is calculated or how many miles back it goes — is it the most recent 100 miles? 500? 1,000?
Measuring the MPG from one full tank of diesel to the next is a more accurate method, but it is still fallible because one tank may be filled slightly more than another, and if the tank of gas includes both towing and non-towing miles, then the numbers are thrown off.
So, I can’t offer scientifically collected numbers here, but I can say that after we installed the Edge tuner, the gauge in our truck now typically shows numbers between 11.7 and 12.5 when we are towing consistently for distances of 250 miles or more.
In essence, the truck is saving 2 miles per gallon while producing more power. Very impressive!
Increased MPG – Not Towing – Improves by 3 MPG!
Our truck always used to get somewhere in the 16-18 MPG range when we weren’t towing, better on highways and less in town.
Now, if we travel 100 miles or more without the trailer, we see an MPG in the 19-21 range. That is an improvement of 3 MPG!
What a shock it was the first time we drove 130 highway miles at 65 mph and saw 21.6 MPG on our truck’s mileage gauge!!
Return on Investment
If this fuel savings alone were used to justify the cost of a new Edge Evolution tuner, how many miles would we have to drive for the unit to pay for itself?
If we assume the tuner costs ~$450 and diesel costs ~$3/gallon (both rough but reasonable estimates given prices in the last year), and we assume a conservative savings of 2 MPG, whether towing or not, and we tow for half the total miles driven, we will have saved approximately $450 in fuel once we have driven about 15,500 miles.
Of course, the tuner does a lot more than save a little fuel…
7. Additional Exhaust Gas Temperature Sensor Installation
A month after installing the Edge Evolution CS tuner, Mark installed a companion product, the Expandable Accessory System (EAS – product #98603) Exhaust Gas Temperature sensor. This product measures the temperature of the exhaust gases in the exhaust manifold, giving the driver yet more insight — beyond just the antifreeze temp and the transmission fluid temp — into how hot the engine is running.
This was an optional installation, but after seeing the value of knowing the transmission fluid temperature, we wanted to be able to monitor our exhaust gas temperature readings as well.
This installation was quite a bit more complicated than the Edge programmer, as the probe had to be inserted into the exhaust manifold. This required drilling a hole in the exhaust manifold, tapping the hole, screwing the probe into the newly tapped hole, and running the wires through the engine firewall back to the Edge Evolution tuner where they plugged into the back of the display unit.
The hardest part of this installation was drilling and tapping the hole, in part because the exhaust manifold is not super easy access to with a large drill, and in part because the metal of the exhuast manifold is very thick and hard.
The most important thing is that the tap handle be big and solid to give you lots of leverage, because the solid cast iron on the exhaust manifold is very thick and very hard. This will make the difference between an easy installation and a miserably hard one.
As always, Mark got the project underway before I got my camera going, so I don’t have a “before” photo. However, the “after” photo below shows what you’re gunning for and what stands in the way between you and the exhaust manifold.
Completed installation with only the braided stainless cable for the probe showing.
First, unscrew the bolt holding the two black tubes in place so they can be pushed aside.
Remove the bolt to free up the tubes that are blocking the exhaust manifold
The probe will be inserted here.
Location for the Edge Products EAS Exhaust gas temp probe in the exhaust manifold
Space is tight, so a 90 degree right angle drill is necessary. Drill a pilot hole first. Then drill the real hole for the probe.
In order to avoid getting metal filings in the wrong places, grease the drill bit first. Drill a little, then wipe the drill bit down, re-grease it, and drill a little further. Do this for both the pilot hole and the real hole.
Use a 90 degree right angle drill
Hole drilled in exhaust manifold
Now the hole is ready to be tapped. Grease or oil the tapping tool well, and work it in and out a quarter turn at a time. As before, after a few turns, back it all the way out and wipe off the metal filings, and re-grease it.
As mentioned above, a small tap handle will not give you enough leverage for the thick, hard cast iron of the exhaust manifold.
An undersized tap handle will make the job very difficult. Get a big, sturdy one!
Once the hole is drilled and tapped, the probe can be screwed in. Grease the probe’s threads with <strong>Permatex Anti-Seize Lubricant first. Then, a cable connecting the probe to the Edge tuner is run from the exhaust manifold back through the engine firewall between the engine and the cab, and on up to the tuner.
Edge Products EAS exhaust temperature probe screws into the exhaust manifold
Wires run through the engine firewall between the engine compartment and the truck cab
Mark opted to put the display for the exhaust gas temperatures in the middle display area between the Engine Coolant Temp and the Transmission Fluid Temp. Of course, you can choose to display any data in any of the three display areas, and Mark experimented a little before settling on ECT on the left, EGT in the middle and TFT on the right.
Engine Coolant (left), Exhaust Gas (middle bar), Transmission Fluid (right)
The more expensive Edge Evolution CTS tuner has three large displays with both analog and digital readouts rather than the two large displays and one small one on the Edge Evolution CS tuner.
Results
We installed the Exhaust Gas Temperature probe after we had done all of our mountain driving for the season, so we have yet to test it in the mountains. The “overtemp” magic number for the EGT is 1350. Typical temps we have seen driving around town are in the mid-900’s, and climbing a long 5% grade while towing our fifth wheel, we’ve seen the mid-1100’s. However, these have just been the long, gradual grades of Arizona and not the steep switchbacks typical of Rocky Mountain passes.
We will report our findings about the exhaust gas temperature readings once we have taken our RV over a big mountain pass!
The Edge tuner has a ton of other things it can do, because it essentially opens up the truck’s computer so the driver can access the data and temporarily modify the input parameters for the current driving conditions. (Obviosuly, you must be parked to mess with the menus on the tuner.)
Our only interest in the tuner has been the improved power while towing, improved fuel economy while not towing and the additional temperature data that is made available when towing over big mountain passes.
Maintenance and Diagnostic Trouble Codes
There is a Maintenance Manager mode where you can establish a reminder system for standard maintenance items like changing the transmission fluid, checking the trans case fluid level, inspecting the brake pads, lubing the tie rod ends and rotating the tires. Simply get it started with your current odometer reading, and the reminders will alert you at your chosen intervals.
If you are really concerned about fuel economy, there is a Mileage Coach that can show you how to vary your foot’s pressure on the gas pedal to maximize fuel economy as you drive. You can also find out the fuel cost per mile of a particular trip if you enter the price of the fuel you buy!
In addition, the Edge tuner can reveal the Diagnostic Trouble Codes that are present when the truck’s Check Engine light goes on. Most codes can be looked up on the internet, so this might save some head scratching before heading off to a mechanic to get the problem looked at.
For racers
We have used only Levels 1 and 2 (for towing and around town driving), however there are two more levels beyond that for increased power performance, if you find your truck on the starting line of a racecourse. These modes adjust the fuel injection and timing to be more aggressive. In addition, the CTS model can be interfaced to a backup camera and it can also monitor the pitch, roll and G-forces!! For those with racing in mind who find themselves at a drag strip, there are also 0 to 60 mph performance tests and quarter mile tests, and the record highest values of these tests are maintained.
Studying the Data
You can also connect the Edge tuner to a computer using the USB port. You can retrieve all the data from the Edge programmer into an Excel-readable .csv file. using the downloadable Windows software called MyStyle (instructions given in the manual).
For us, however, we are content with just the basics!
More of our Latest Posts are in the MENU.
New to this site?
Visit RVers Start Here to find where we keep all the good stuff. Also check out our COOL NEW GEAR STORE!!*** CLICK HERE *** to see it!
More of our Latest Posts are in the MENU.
New to this site?
Visit RVers Start Here to find where we keep all the good stuff. Also check out our COOL NEW GEAR STORE!!*** CLICK HERE *** to see it!
Below are some of our most POPULAR POSTS(also in the MENUS above)