
Our most recent RV solar power installation was the fifth solar power system we’d installed on an RV or sailboat. We used Renogy Shadowflux solar panels that are designed to be partial shade tolerant, and before completing the installation we had a chance to take a close look at the impact partial shade has on both conventional and Shadowflux solar panels. The results were very interesting!
A little background about our experience with solar power: as of November 2026 we’ve spent over 4,800 days living off-grid (without hookups) in our RVs and sailboat (yes, we’ve kept track since 2007!). When we purchased our 23-foot-long 2024 Forest River Alpha Wolf 17CB travel trailer in 2025, we wanted to install a solar power system that would keep us comfortable for a few months at a time in our seasonal wanderings. We successfully completed the installation and have now relied on it for two full summers.
Designing this new system took some thought because the trailer came with a factory installed solar power system that was too small. It worked, though, and was brand new. So we were tempted to keep it and incorporate it into our design.
This post walks through our thought process as we planned for our new solar power system and shows our very informal tests (observations, really) of just how “shade tolerant” the new Renogy Shadowflux panels really are.
Since other RVers may face similar issues when designing a solar power system for their new RV that is already equipped with solar power, we thought it might be helpful to share how our thinking evolved and what we learned about the effects of partial shade (which is especially relevant for shorter RVs and vans).
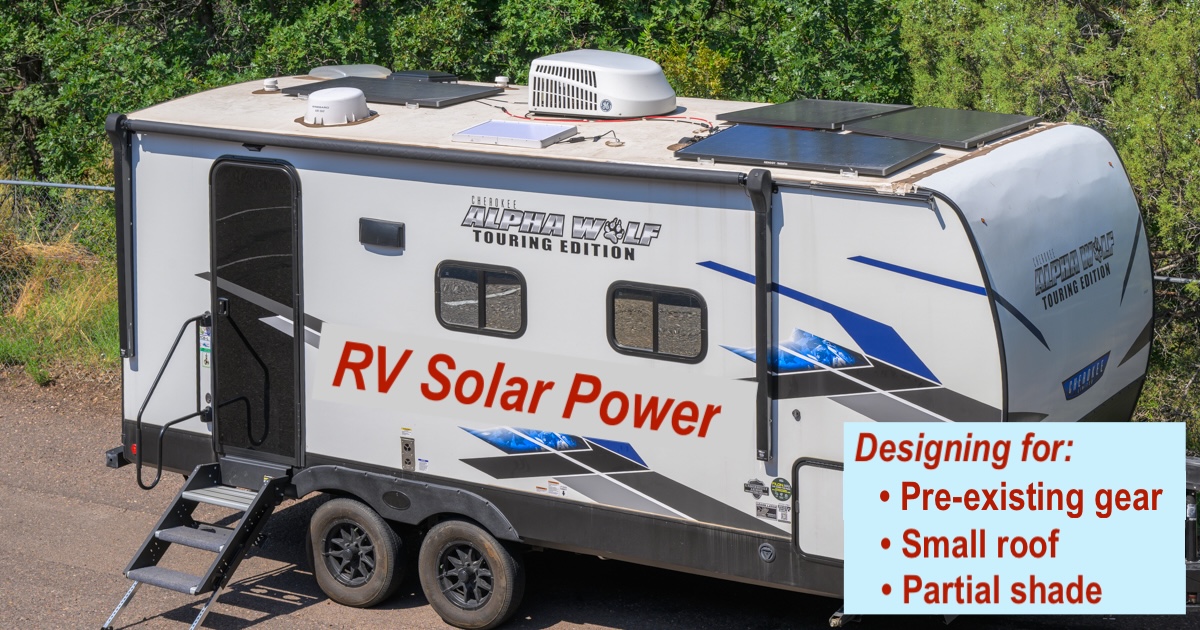
When designing an RV solar power system there are lots of things to consider, from roof space limitations to gear that’s already installed on the rig to dealing with the potential effects of partial shade on the panels.
Leading up to this latest installation, we’d lived in our fifth wheel trailer full-time, boondocking most nights for 13 years with 490 watts of solar panels charging 440 amp-hours of AGM batteries. For nearly four of those years we parked the RV in storage for most of the year except during hurricane season, and we cruised Mexico’s Pacific Coast and Sea of Cortez on a sailboat we’d equipped with 555 watts of solar panels charging 640 amp-hours of AGM batteries, anchoring out every night (i.e., no hookups).
Then, during our first two seasons of part-time RV travel in the summertime, we put 600 watts of solar panels on the roof of our fifth wheel toy hauler to charge its factory installed 320 amp-hours of wet cell batteries. We also installed a 600 watt solar power system on a friend’s motorhome.
All of those systems had worked very well. But you can always use a little more power! So, we decided to install an 800-watt solar-power system charging a 300 amp-hour LiFePo4 battery on our new little travel trailer.
We faced several design constraints, however. The three most important were:
1) Deciding whether to keep the small factory installed solar-power system that came with the trailer
2) The lack of roof space for the panels
3) The shade cast by the tall air-conditioning unit when the sun wasn’t high overhead.
Mixing and Matching Solar Panels
The trailer came with two factory-installed 100-watt panels, a 30 amp PWM charge controller and two Group 24 wet cell batteries. We planned to replace the charge controller and batteries, but we figured we’d keep the two solar panels.
Unfortunately, these panels were positioned smack in the middle of the best and most open part of the roof.
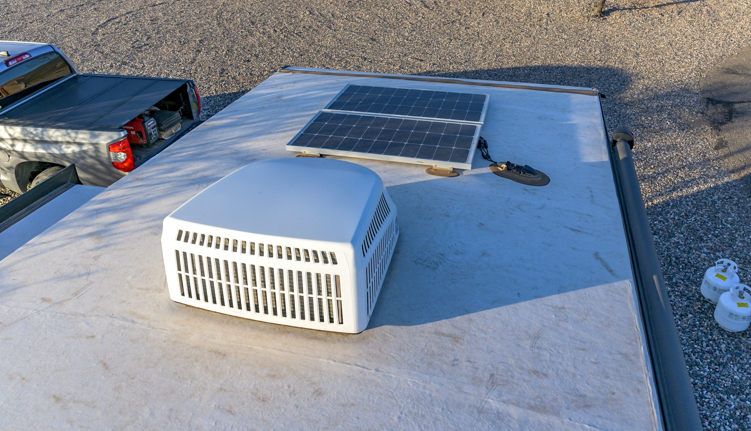
The factory installed panels were in the most open part of the roof.
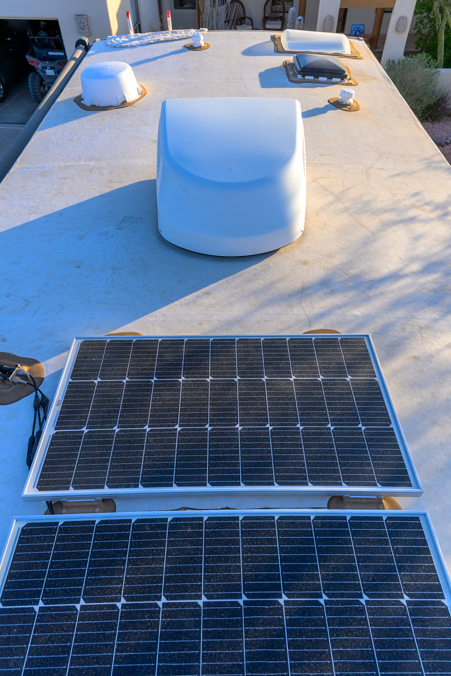
The other end of the roof was pretty cluttered.
We didn’t really want to remove the panels. They worked, after all. Also, if we pulled the panels off the roof there would be lots of little holes and potential roof leaks left behind, and then we’d put even more holes in the roof when we screwed in new panels!
Unfortunately, finding space for more panels and matching the electrical characteristics of the existing panels would be complicated.
Solar Panel Ratings
One of the most basic “rough guidelines” for solar power installations is to keep the sizes and capacities of all the solar panels similar to each other, preferably identical.
When solar panels of different sizes are wired together, the larger panels effectively shrink to produce the same amount of power as the smallest panel in the group. The capacity of the big panels is reduced and a lot of power production is lost.
So, how do you “size” solar panels to make their electrical characteristics match?
Solar panels are rated with three different voltage measurements and two current measurements which is very confusing!
The Nominal Voltage is a marketing term (not a formal specification) that indicates the voltage of the battery bank that will work with the panel. A “nominal 12 volt panel” works with a 12 volt battery bank. A “nominal 24 volt panel” works with a 24 volt battery bank.
This isn’t a hard and fast rule, however. A sophisticated solar charge controller can accept 24 volts from the panels but then step down the voltage to 12 volts in order to charge a 12 volt battery bank, making it possible to pair nominal 24 volt panels with a 12 volt battery bank, or utilize other mismatched combos.
The official voltage and current specifications for solar panels include these ratings:
Vmp (“Voltage at Maximum Power”) which is the highest voltage the panel will operate at when wired to a charge controller and battery bank
Imp (“Current at Maximum Power”) which is the highest current the panel can produce.
Multiplying Vmp by Imp gives the panel’s Wattage rating: Watts Rating = Vmp x Imp
Voc (“Open Current Voltage”) occurs when the panel is in full sun but not wired to anything
Isc (“Short Circuit Current”) is the current produced when the panel’s terminals are connected to each other.
Common voltage ratings for nominal 12 volt panels are:
Vmp ≈ 18 to 22 volts
Voc ≈ 22 to 30 volts.
Common voltage ratings for nominal 24 volt panels are:
Vmp ≈ 31 to 36 volts
Voc ≈ 36 to 43 volts.
We had to decide whether to use 12 volt panels or 24 volt panels in our system. When shopping around, the above voltage and current definitions were helpful because some brands of panels were unclear as to whether they were Nominal 12 volt or Nominal 24 volt panels. However, if we dug into the specs we could find the Vmp, Voc and Imp and figure it out.
Wiring Solar Panels in Parallel vs. Series and the Impact on Other Components
Choosing whether to wire solar panels in parallel or in series actually impacts the gear you choose in other parts of the system because of the resultant voltage and current.
Parallel Wiring — When solar panels are wired in parallel, the voltage of the resulting array remains the same as the lowest voltage panel. The current produced by the panels is added together.
This means the array’s voltage is low but the current is high. A high current in the system will require wiring the panels with thicker gauge wire that can handle the higher current. Thicker cable is harder to work with and is more expensive than narrower gauge cable.
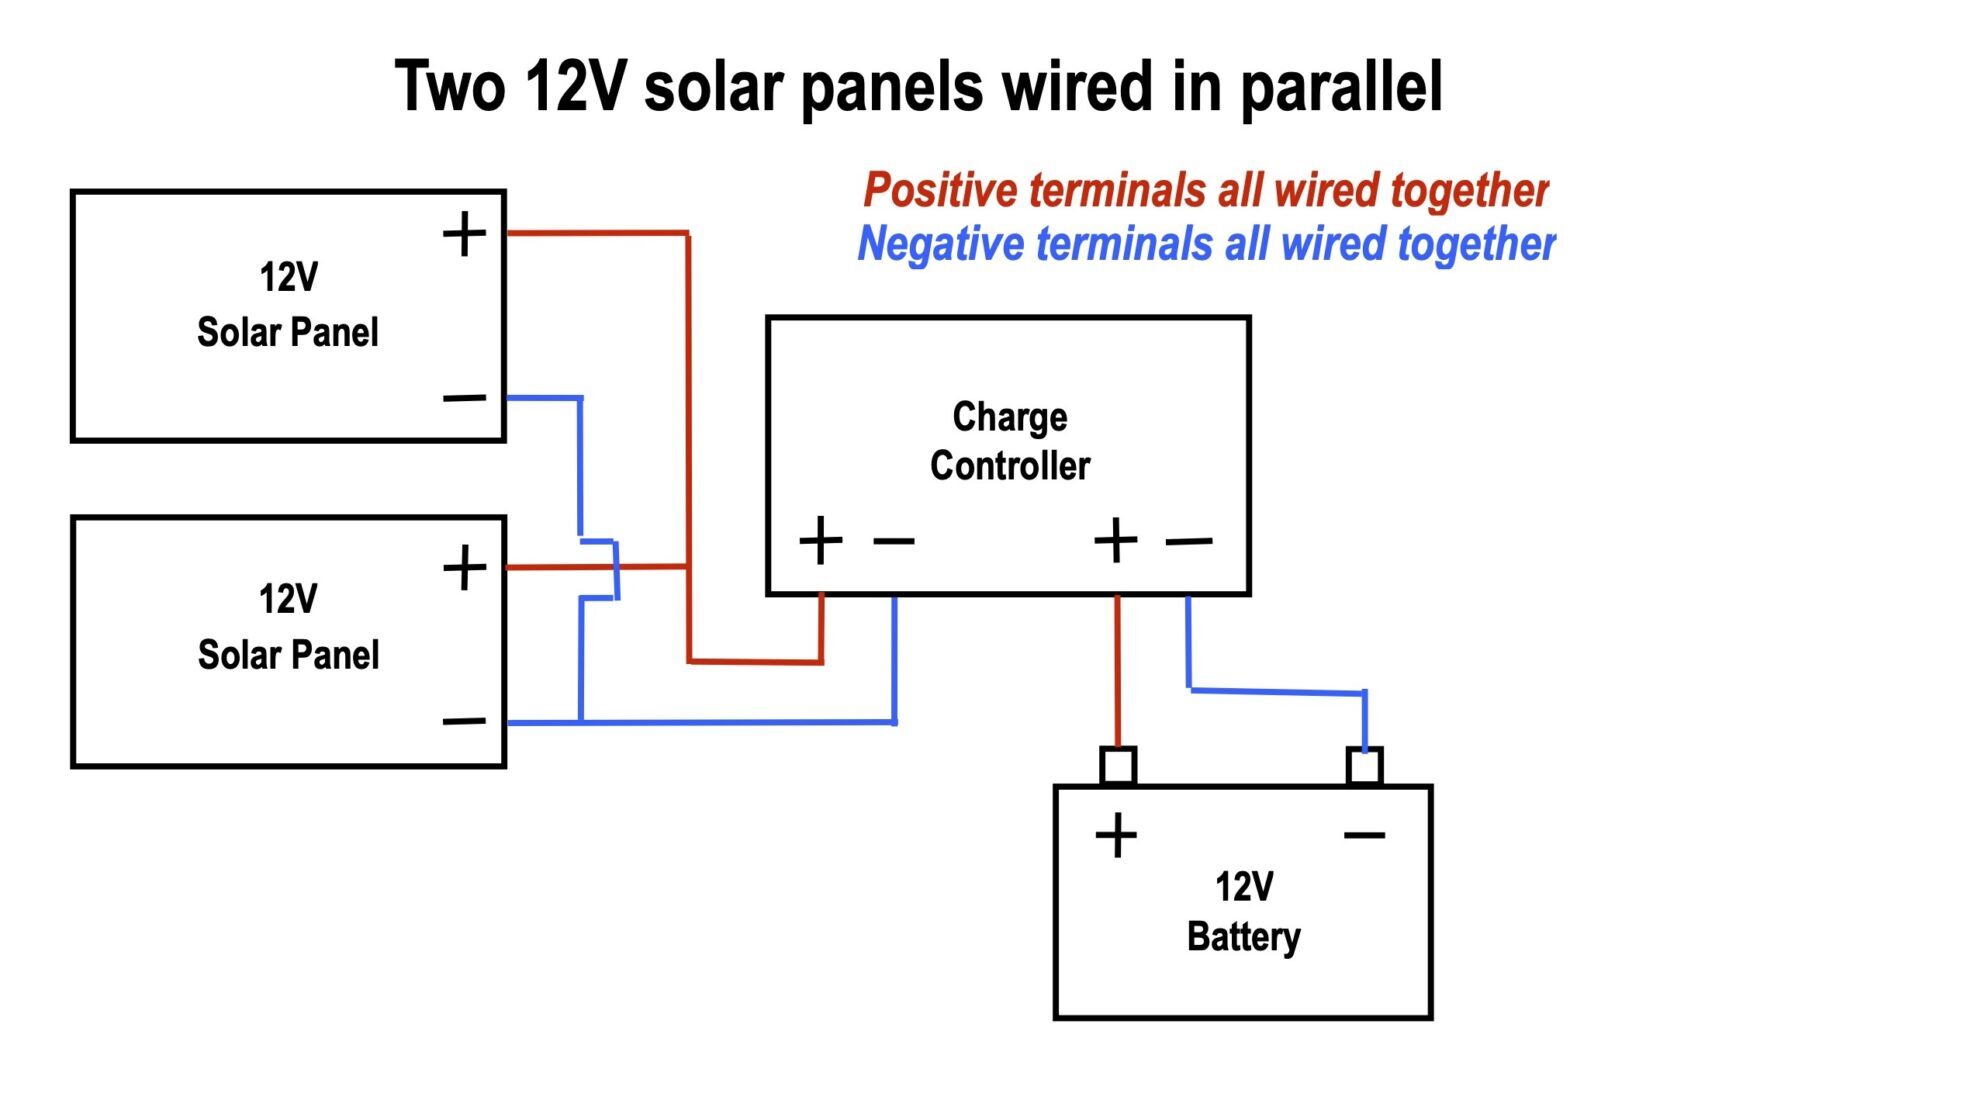
.
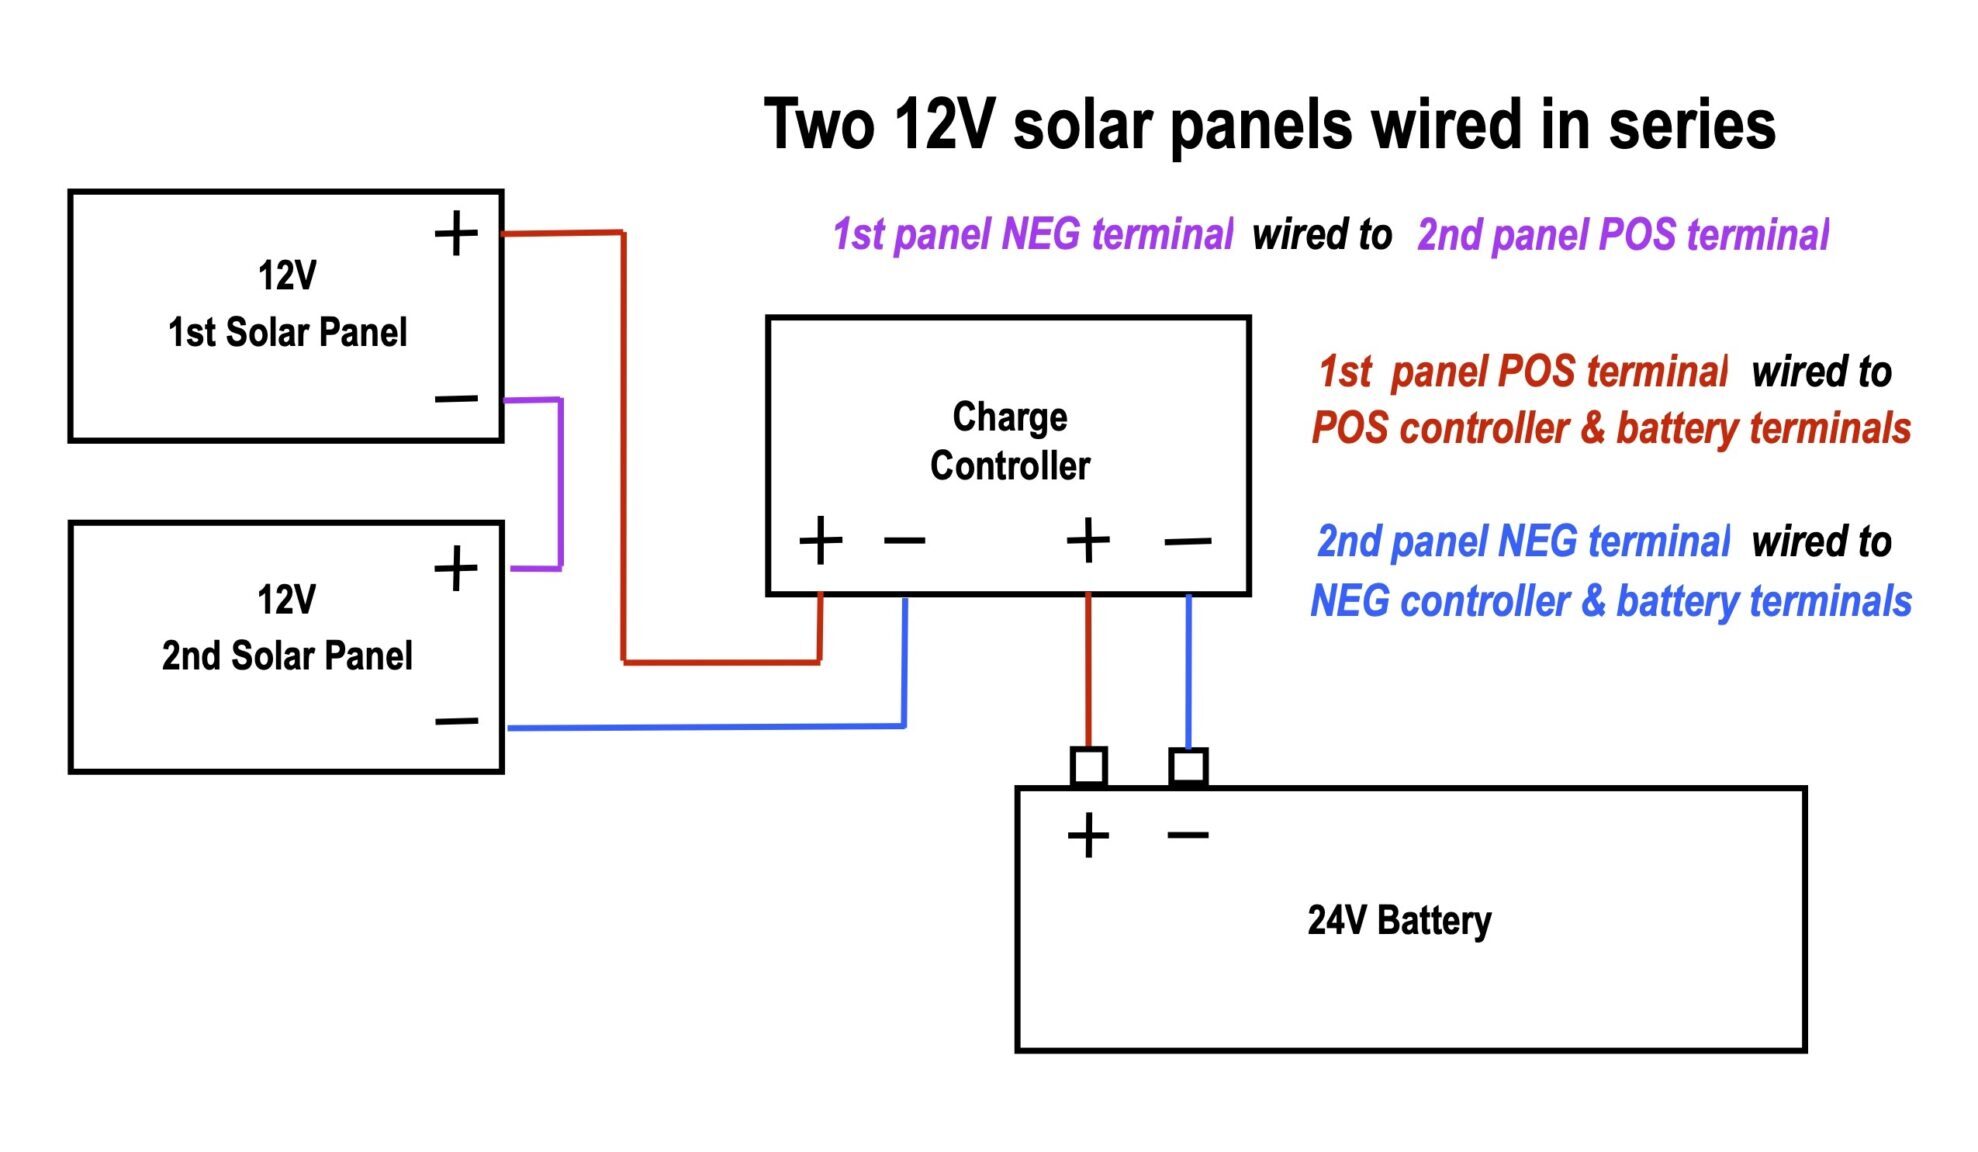
Series Wiring — When solar panels are wired in series, the current produced by the array remains the same as the lowest current panel in the group while the voltages of all the panels gets added together.
This means the array’s current is low but the voltage is high. A high voltage will require installing a bigger charge controller than might have been used if the panels were in series. Also, if the nominal voltage of the panels is larger than the voltage of the battery bank, then you’ll need a more sophisticated and more expensive charge controller that can not only accept the higher panel voltage but can also step its charging voltage down to match the lower voltage of the battery bank.
.
Our factory installed nominal 12 volt solar panels were wired in parallel, so the cabling was suitable for 12 volts.
Design Strategies and Roof Space
There were three possible design strategies for us to get 800 watts of solar panels onto our new trailer’s roof without removing the 200 watts of factory installed panels that were already there.
1) We could install six additional nominal 12 volt 100 watt panels, wired in parallel, to make a total eight identical panels producing a 800 watts. The resulting array would be nominal 12 volts but the current produced would be eight times that of a single panel. The cabling would have to be quite thick! So, we rejected this idea.
2) We could rewire the two 100 watt panels in series, creating a virtual nominal 24 volt panel, and place that series-pair of panels in parallel with three new 200 watt panels. However, this would require that the new 200 watt panels be nominal 24 volt panels instead of 12 volt panels. The toy hauler we’d used for the two previous summer had had three 200 watt 12 volt panels: two from Renogy we’d purchased and installed and one from Go Power that came with that trailer. The panels had worked well, so we figured we’d get the same model of 12 volt 200 watt Renogy panels this time too. But this strategy would require the new 200 watt panels be nominal 24 volt.
3) We could keep the two factory installed 100 watt panels in parallel wired to the existing charge controller, and then wire three new 200 watt 12 volt panels in parallel to each other and wire that 3-panel array to a separate charge controller. It might seem weird having two charge controllers, but it’s actually no different than charging the batteries with both an engine alternator and solar charge controller (which we did on our sailboat), or charging the batteries using both shore/generator power and solar power as we did on our previous fifth wheel trailers whenever we dragged out the genny or plugged into electrical hookups.
While Designs #2 and #3 were workable in theory, the only way to install three additional 200-watt panels onto our small RV roof was to squeeze two of them onto either side of the air conditioner. There just wasn’t room to place them elsewhere on the roof. Unfortunately, each panel would fill the entire space between the edge of the air conditioner and the edge of the trailer roof, so one panel or the other would be partially shaded by the air conditioner all day long.
Ugh! Start Fresh!
In the end, we decided to remove all the factory installed components, sell them on Craigslist, and start fresh, thereby avoiding any and all constraints the pre-existing equipment would impose on our design.
All the gear sold quickly and easily and we were happy we were now working with a clean slate!
Partial Shading of Solar Panels
The nemesis of solar power systems is shade, and the most sneaky culprit is partial shade. Partial shade can come from a tree branch or something sticking up from the roof itself or a leaf stuck on the panel.
With limited roof space on our short travel trailer, we knew we’d have to place all the panels as far from the air conditioner and roof vent as possible, and despite that we’d still be dealing with partial shade early and late in the day.
So, how much does partial shade really impact a solar panel?
Although it’s hard to believe, just a small amount of shade on a conventional solar panel knocks the panel completely out of commission so it doesn’t function at all!
What’s worse, if this panel is wired in series with other panels, when it quits working it takes all the other panels down with it! So, that small amount of shade on just one panel effectively knocks all the other panels in the array out of commission too.
The reason a small amount of shade can shut down a solar panel (and then shut down the rest of the array if the array of panels is wired in series) is because all the solar cells within a solar panel are wired to each other in series. If one cell gets shaded, it creates resistance in the panel’s circuitry and reduces the amount of current flowing through the entire panel.
The resistance at this one spot in the panel creates heat at that location, and this hot spot then further increases the resistance which further reduces the current flow. It becomes a big downward spiral, and pretty soon current can’t flow at all and the solar panel stops producing power.
Solar panel designers place bypass diodes on their solar panels so current can flow around a hotspot when one develops and still keep functioning. However, most conventional 200 watt solar panels have just three bypass diodes, so a small hotspot reduces the panel’s power output significantly.
Testing Partial Shade Conditions on Conventional Solar Panels
We knew all this in theory but we’d never studied it in action because we couldn’t easily isolate our panels on any of our rigs to take a close look at the effects of partial shade on just one individual panel.
Now, however, since we were going to remove the brand new factory installed 12-volt 100-watt panels from our trailer, we had an ideal opportunity set up a test configuration and do some informal partial shade testing and see how the panels reacted.
This wasn’t a formal lab setup, so these were really “observations” more than true “tests.” The results were dramatic, though, and we retested quite a few times to make sure we weren’t seeing things.
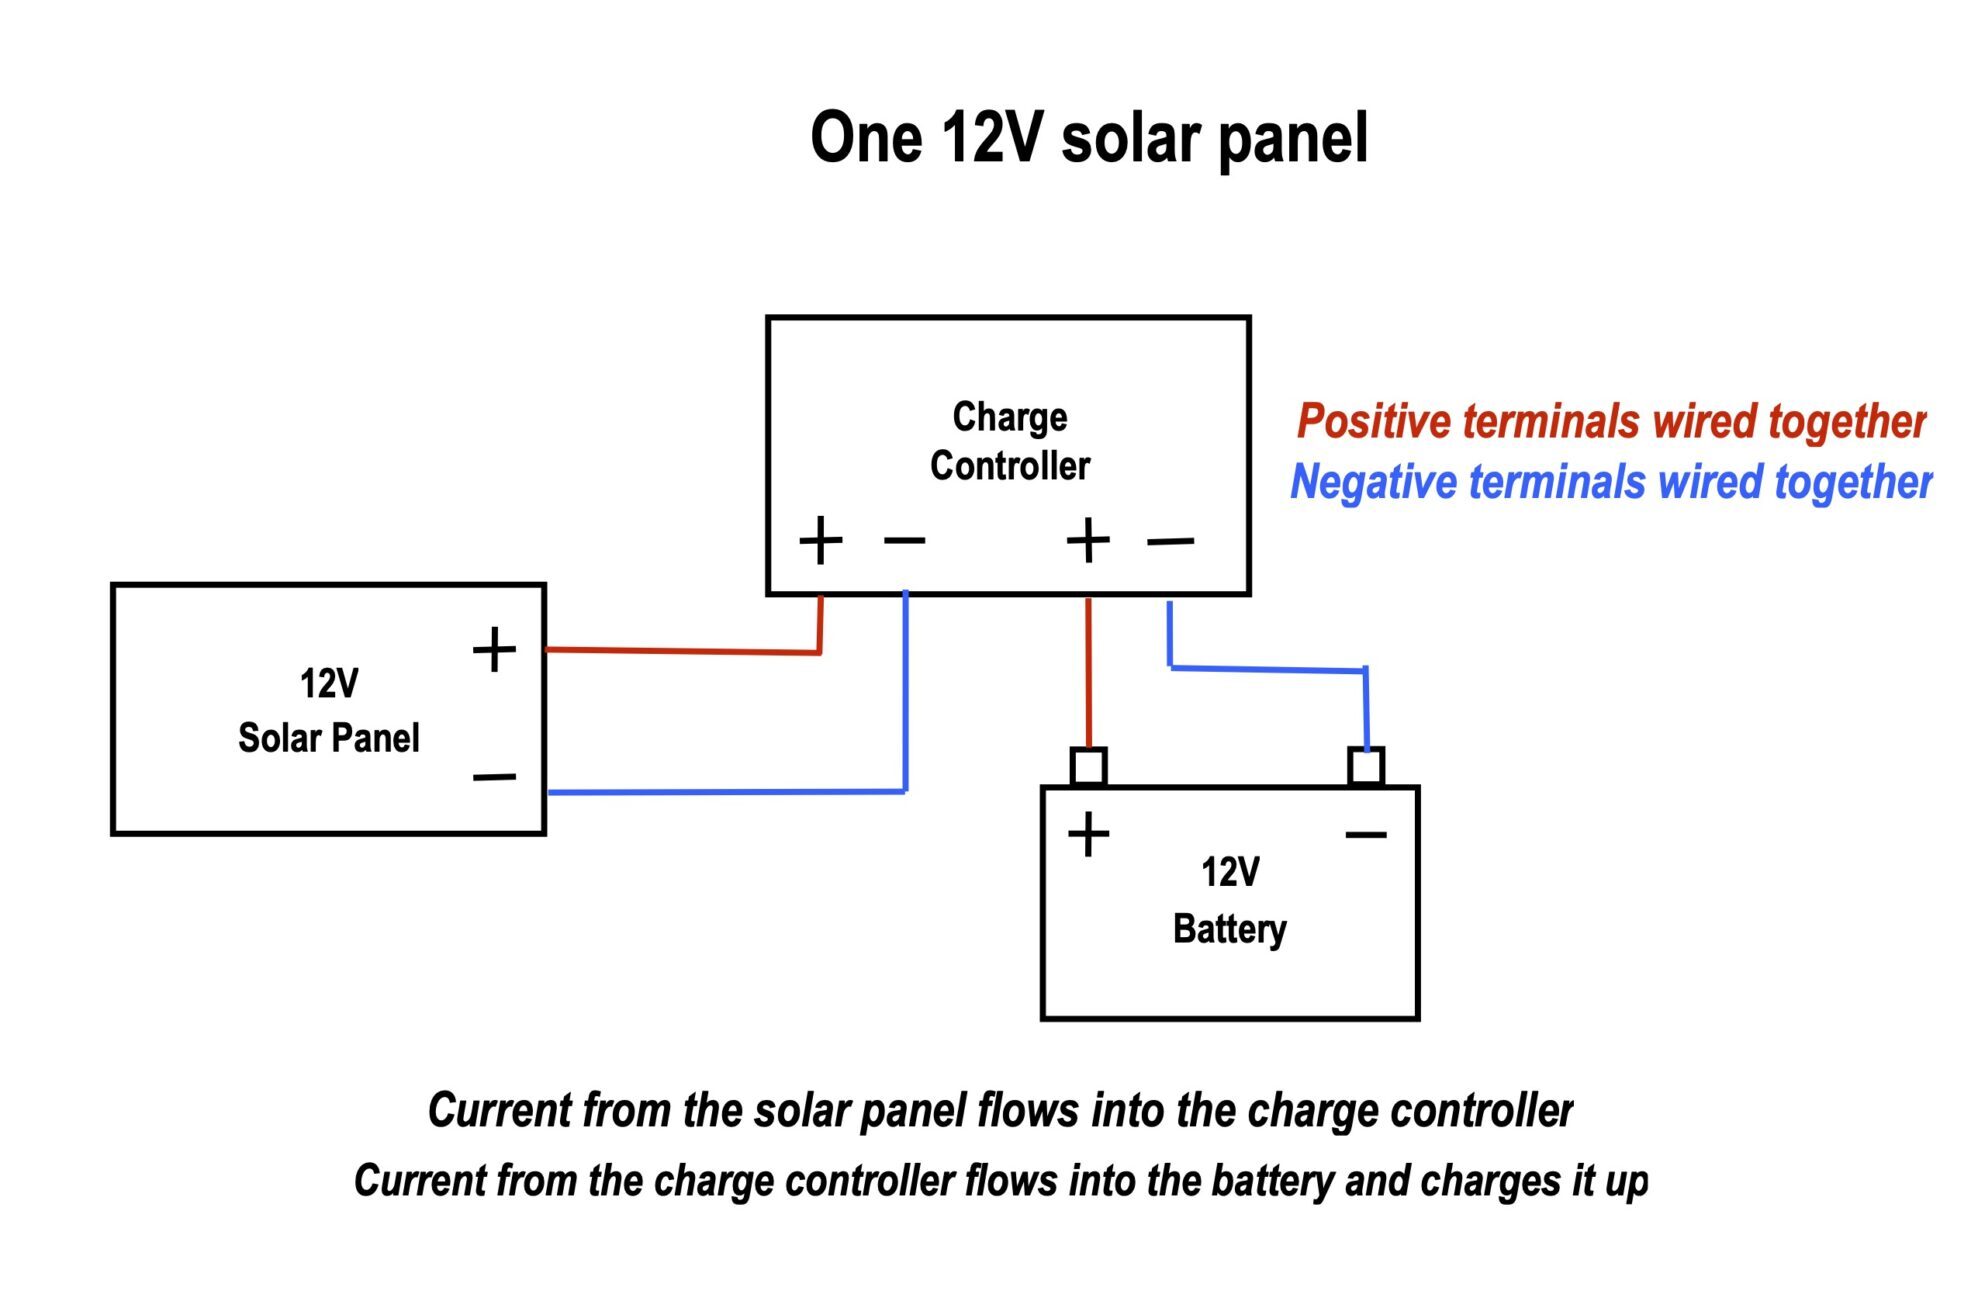
We wired a single 100-watt solar panel to the Renogy Rover Lite 60-amp charge controller we’d gotten for our new solar power installation. Then we wired that same panel to one of the brand new Group 24 wet cell batteries that had come with our trailer.
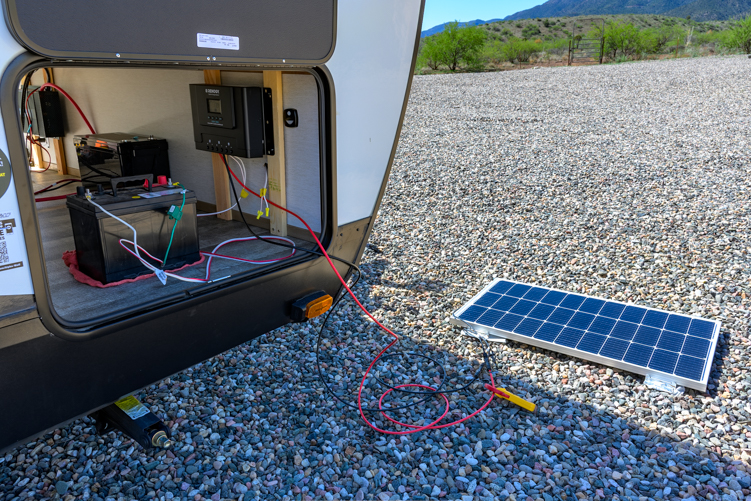
We wired the 100 watt solar panel to a 60 amp Renogy charge controller and to a Group 24 wet cell battery.
.
We placed a clamp volt meter around one of the solar panel cables to measure the current flowing from the panel to the controller. Then we shaded the cells with pieces of cardboard in various sizes from 5% to 50% of the total area of the panel.
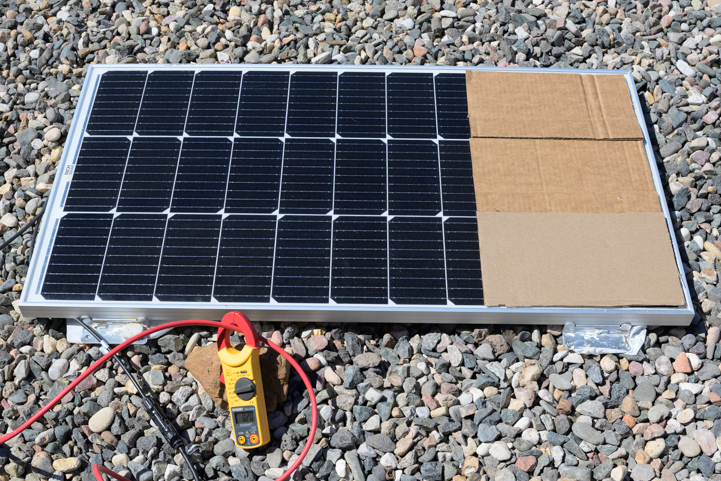
Approximately 30% of the panel is shaded.
After placing the cardboard on the panel, we noted the current and voltage and then repeated the process with increasing amounts of shade.
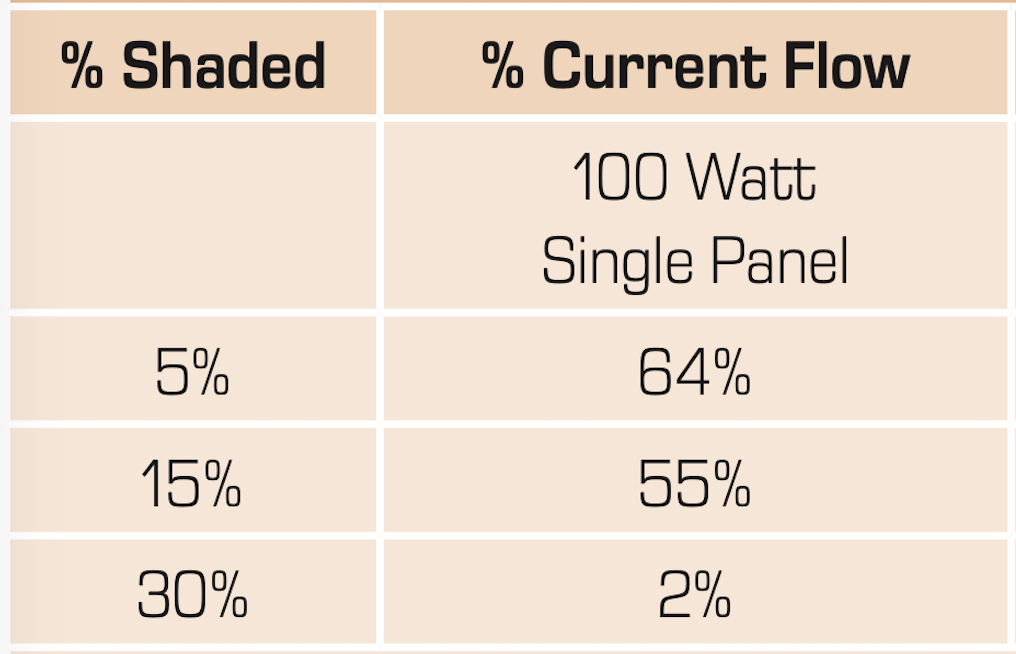
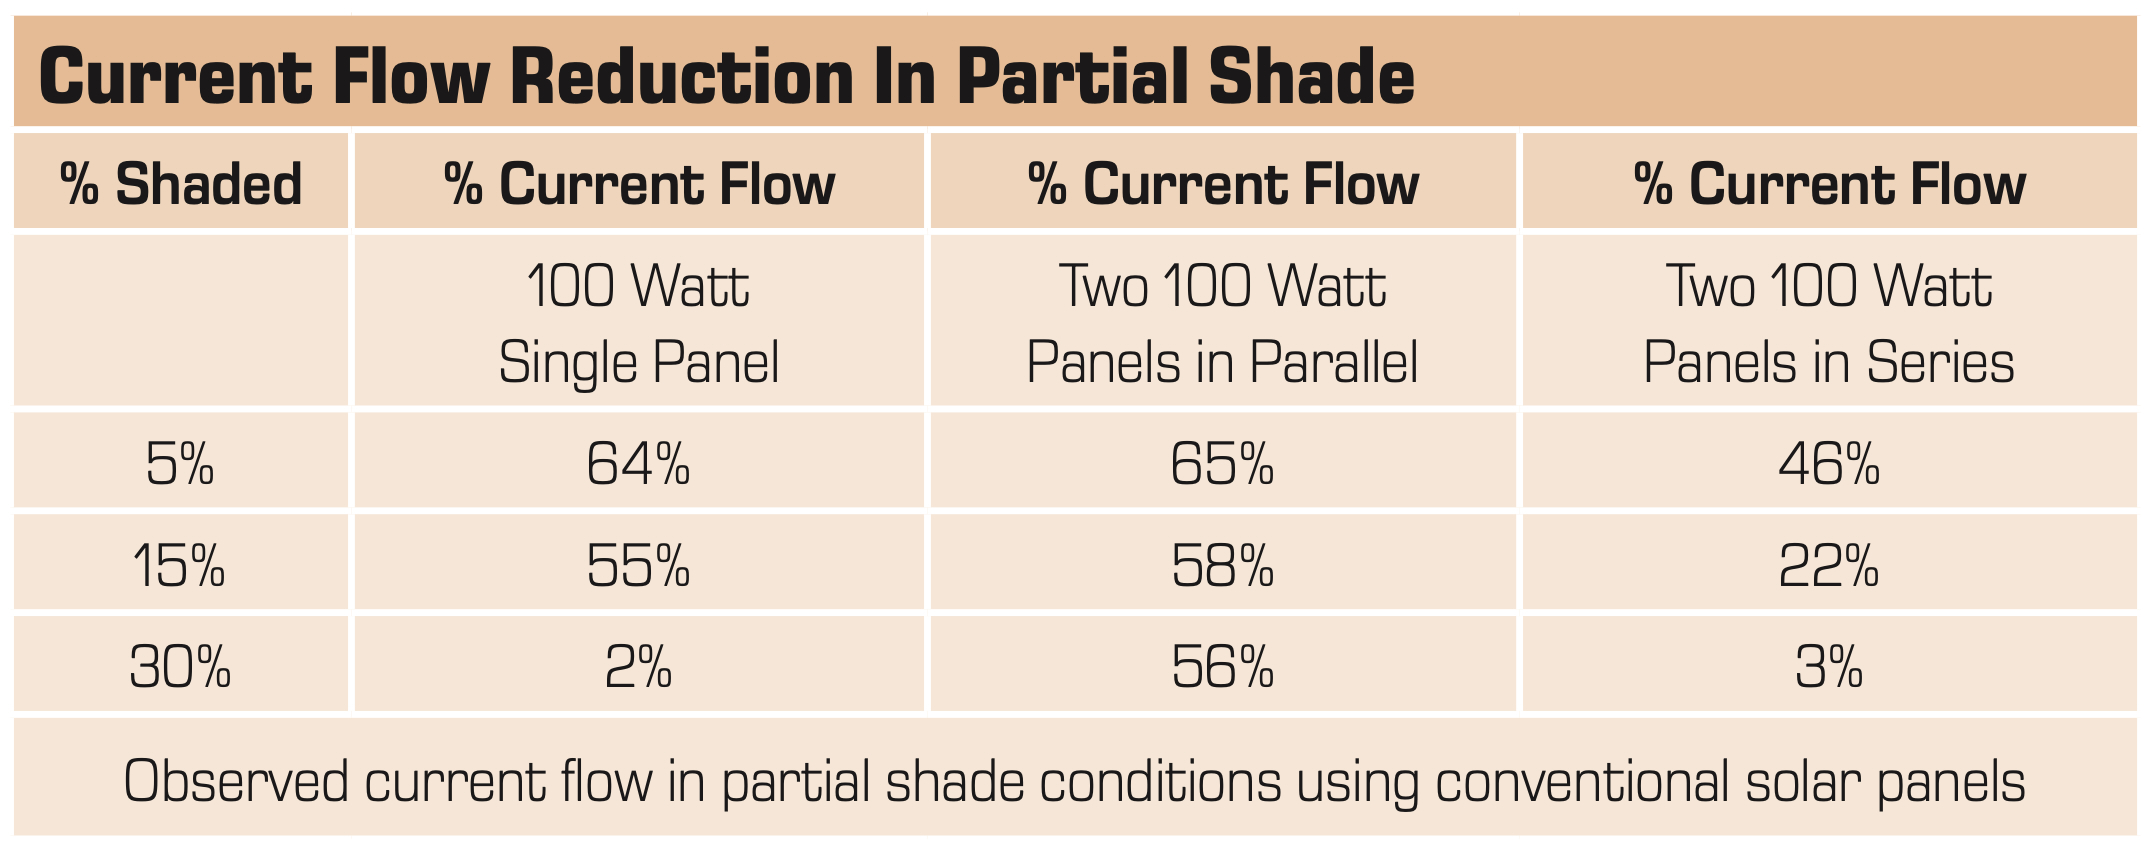
On average, shading just 5% of the conventional solar panel reduced the current it produced by 36%. That is, with 5% of its surface shaded, the panel produced just 64% of what it did when it was in full sun.
With 15% of the panel shaded the power production dropped to just over half of what it was in full sun.
By the time the shade covered 30% of the panel, the panel was no longer producing any current at all!
.
We were astonished! This meant that when a large tree branch or the mast and/or boom on a sailboat shaded 1/3 of a panel, that panel would stop functioning. What’s worse, if that panel was part of an array that was wired in series, then the entire array would stop functioning!
We wanted to see that shading effect in real life too, so now it was time to test two panels working together as an array with only one of those two panels subjected to partial shade while the other was in full sun.
We wired the two 100 watt panels in parallel and repeated the tests, placing cardboard on just one of the panels to create partial shade on it ranging from 5% to 30%.
As expected, shading one panel made that panel begin to shut down. However, because the panels were wired in parallel, current could still flow through the other panel. So, the current flow never got below 50% of normal since the second panel was still functioning normally.
Then we wired the two 100 watt conventional solar panels in series and again placed cardboard on just one panel to create partial shade on it ranging 5% to 30% on one panel.
As expected, shading one panel made that panel begin to shut down, and because the two panels were wired in series, the second panel began to shut down too. Ultimately, with only 30% of one panel shaded, both panels quit working.
.
Testing Partial Shade Conditions on Renogy Shadowflux Solar Panels
Although we’d originally thought we’d use Renogy’s conventional 12 volt 200 watt panels, we discovered Renogy had a new “partial-shade tolerant” panel called the Shadowflux.
This model solar panel is “shade tolerant” because it has something like 10 times as many bypass diodes as conventional panels. This means fewer solar cells are bypassed when one cell is shaded which allows more cells to contribute to the overall power production and dramatically improve the panel’s performance in partial shade conditions.
Cool!
We got four 200 watt 24 volt Renogy Shadowflux solar panels for our new solar power installation, and we repeated our shading observations on one of them before installing them all on our roof.
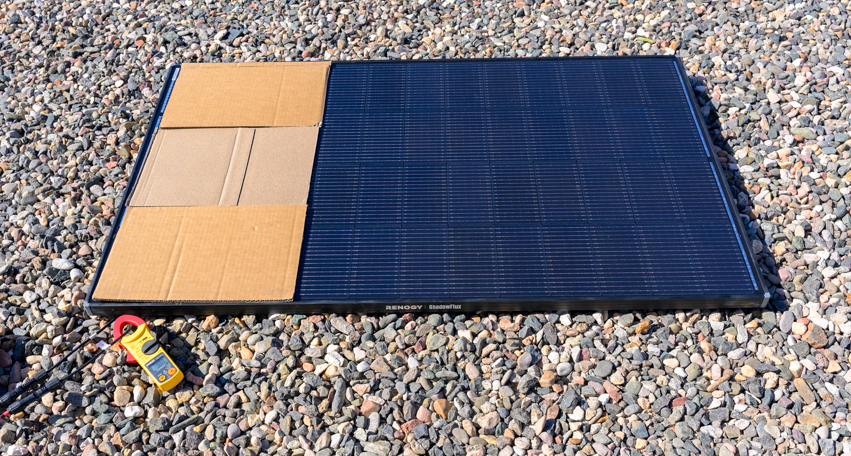
About 30% of the Renogy Shadowflux 200 Watt solar panel is shaded.
The results were impressive.
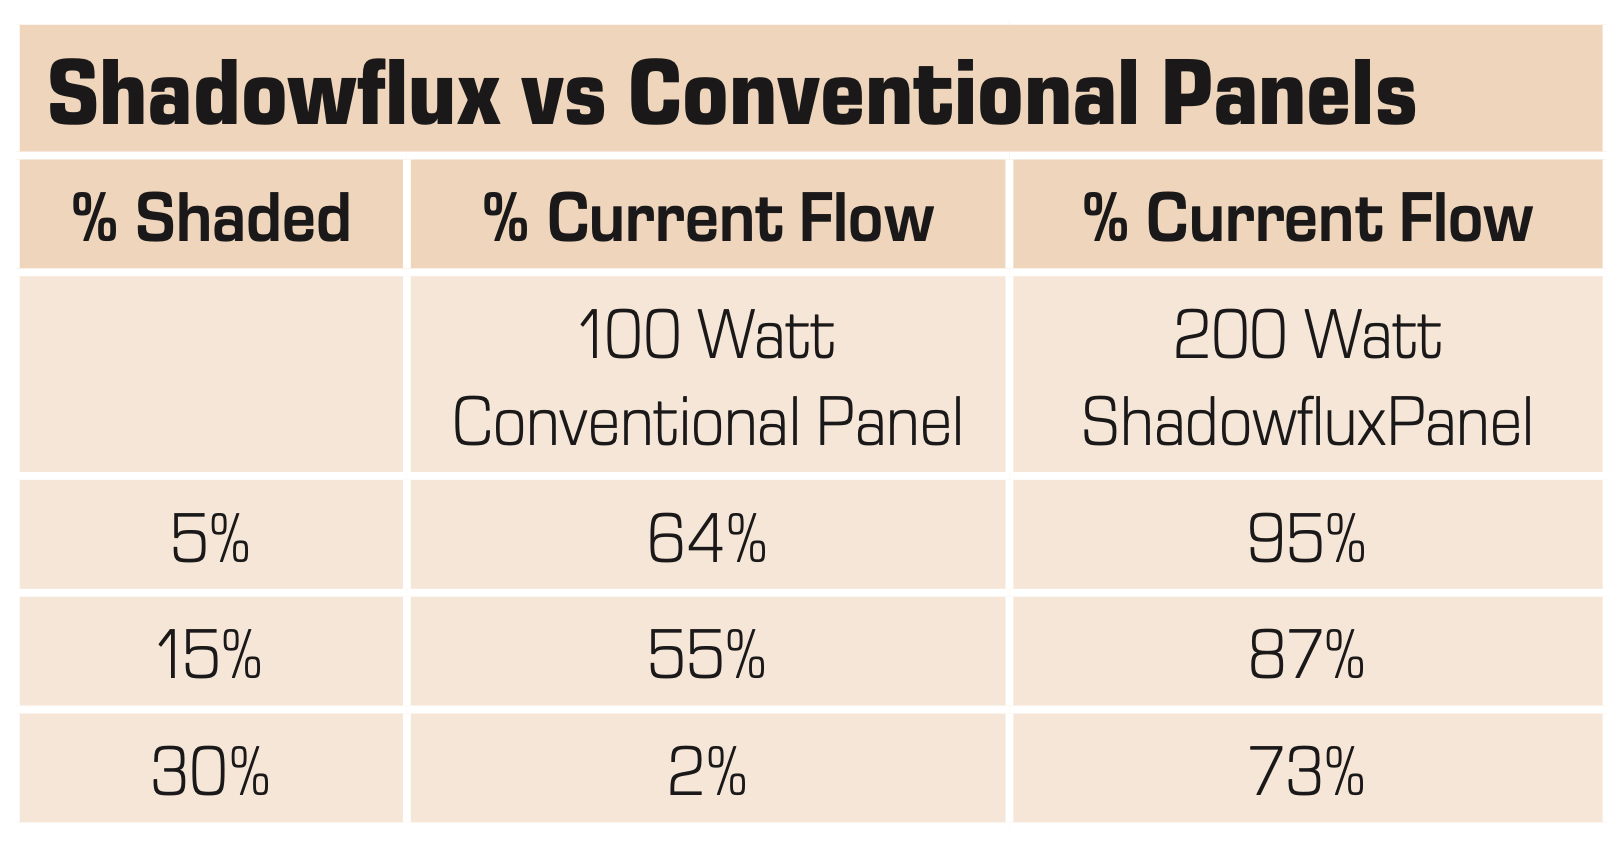
Whereas the conventional solar panel shut down completely when it was 30% shaded, the Shadowflux panel was still producing an average of 73% of its rated current when it was 30% shaded!
73% power production with the Shadowflux solar panel in 30% partial shade conditions is a huge improvement the over 2% power production we saw with a conventional panel in the same amount of shade. Even better, this improvement is multiplied if the panel is part of a series-wired array because the whole array will continue producing lots of power even when that one panel is 30% shaded. In contrast, an entire array of conventional panels would be out of commission at that point.
In our very informal observations, the Shadowflux panel didn’t shut down until it was 50% shaded.
.
Renogy’s Tests of their Conventional and Shadowflux Panels
We have since learned that official lab tests at Renogy show the new Shadowflux 200 watt panels produce 60% of their power when 30% shaded. That’s not the 73% we saw, but it’s still astonishingly good compared to shutting down all together.
The Renogy lab tests also revealed that smaller panels are proportionally more affected by partial shade than larger panels. So, an installation of 100 watt panels would be more affected by partial shade than an installation of 200 watt panels.
This difference in the impact of partial shading meant our observations compared apples to oranges because we were comparing 100-watt conventional panels to 200-watt Shadowflux 200 watt panels panels.
However, the bottom line is that in the real world all those extra bypass diodes make a huge difference and Renogy Shadowflux panels significantly outperform conventional panels in partial shade conditions.
Where we landed after all this
Our last minute decision to use 24 volt panels instead of 12 volt meant we could have kept the two 100-watt factory-installed panels and rewired them in series and put that series pair in parallel with three new 200 watt Shadowflux panels instead of installing four new ones.
However, the partial shade tolerance of these new Shadowflux panels is so superior we’re glad we did a clean installation with four Shadowflux panels and got rid of the conventional panels that came with the trailer.
There were other decisions involved in our solar power project, from the wiring configuration and cable sizing to battery selection to mounting and wiring everything together, but we’ll save all that for another post!
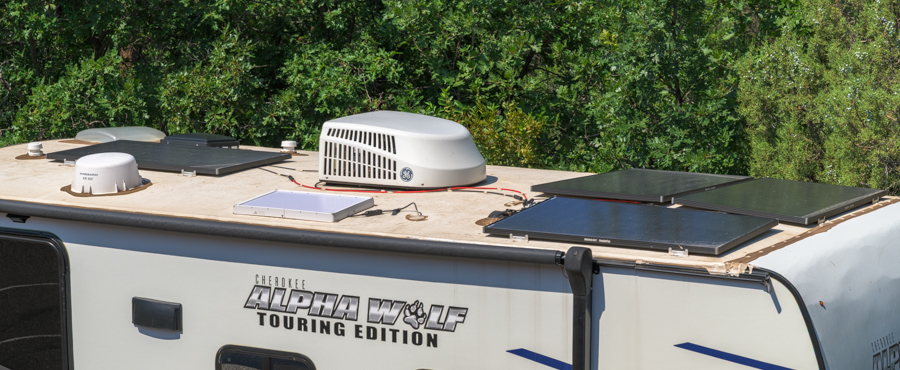
Our 4 new 200-watt panels are as far from the air conditioner as possible and the small Starlink Gen 3 dish fit neatly in the space between the a/c unit and the edge of the trailer.
Related Links:
- Solar Panel Series vs. Parallel Wiring – An excellent explanation
- Using Mismatched Solar Panels – Same site as above, very clearly explained
Where to Buy?
Black Friday sales are going on from now through November 30, 2026!
- Renogy 200 Watt Shadowflux Solar Panels
- Renogy 300 Ah Core Mini Battery at Renogy
- Renogy 60 amp Rover Lite Solar Charge Controller
From Renogy:
From Amazon:

Never miss a post -- it's free!
SOLAR POWER OVERVIEW and TUTORIAL
- RV (and Marine) Solar Power Made Simple - An overview of how solar power works on an RV or boat
- Which Solar Panels To Buy? - What's Best: Flexible or Rigid Panels? 12 or 24 volt? Mono- or Polycrystalline? And WHY?
- Is RV Solar Power Affordable? - 3 solar power solutions for RVs and boats, including parts lists and actual costs
- Installing Solar Power on a Sailboat - How to overcome the unique challenges of solar power on a sailboat
- RV Solar UPGRADE that TRIPLED our Power - An EASY upgrade to a factory-installed baseline RV solar power system
- Solar Power Tutorial 1 - Basics - What makes up a solar power system and how does it work?
- Solar Power Tutorial 2 - Weekend/Vacation Systems - Everything needed for small "Weekending" and "Vacation" systems
- Solar Power Tutorial 3 - Full-time Systems - Describes the design of a "Full-time" system
- Solar Power Tutorial 4 - Solar Panel Selection & Wiring - Design considerations for choosing solar panels PLUS wiring tips
BATTERIES and BATTERY CHARGING SYSTEMS
- RV and Marine Battery Charging Basics - How do batteries get charged and what is the best charging method?
- Converters, Inverter/Chargers and Engine Alternators - No two battery charging systems do the job the same way.
- Solar Charge Controllers - How to optimize battery charging from the sun
- Solar Power and Shore Power Combined! - What happens when you're on solar and you plug into shore power?
- Wet Cell vs. AGM Batteries in an RV or Boat - Why we upgraded our RV house battery bank from flooded to AGM!
LIVING ON 12 VOLTS
- Inverter Selection & Installation - Choosing and installing the best inverter to support all our lifestyle's 120 volt AC needs
- RV Electrical System Upgrade - Which converter, inverter and batteries we upgraded to after 8 years off the grid, and WHY!
- How Much Inverter is Enough? - What happened when we accidentally killed our big inverter
- Clean Technica: Solar Power Installation on Sailboat Groovy - An analysis of our boat's solar power setup
- Kyocera Solar Showcases our Sailboat's Solar Power Setup - Sailing Groovy on Kyocera Solar Power!
Our most recent posts:
- Buckskin Mountain State Park – Fun on the Colorado River! 01/31/26
- How to Install Starlink Gen 3 in an RV? Use the Speedmount! 08/07/25
- Escape to Paradise – Rocky Mountain Magic! 08/01/25
- Is Forest River a Good RV? Well Built? Here’s Our Experience 06/20/25
- Sunset Crater Nat’l Monument – Lava & Camels at Bonito CG! 06/06/25
More of our Latest Posts are in the MENU.
New to this site?
Visit RVers Start Here to find where we keep all the good stuff. Also check out our COOL NEW GEAR STORE!! *** CLICK HERE *** to see it!
<-Previous || Next->