RV Refrigerator Management Tip – Winning the Turf Wars!

June 2019 – One of the biggest surprises for us when we began our search for a new fifth wheel RV to be our full-time home was the gargantuan sizes of modern day RV refrigerators. When we last searched for a full-time fifth wheel in 2007-08, most upscale rigs had a modest 10 cubic foot refrigerator in the base model.

In those days, many of the manufacturers of higher quality rigs offered an upgrade to a 12 or 14 cubic foot fridge. Also, a lot of the entry level units being built back then by those same (now non-existent) manufacturers had an 8 cubic foot fridge with an upgrade to a 10 footer available.

Our Hitchhiker was a “budget” model that we bought right off the back lot at the factory, so we ended up with the smaller 8 cubic foot fridge.

Fifth wheel RV kitchen with 8 cubic foot RV refrigerator

Our 2007 Hitchhiker fifth wheel has an 8 cubic foot refrigerator. This now “tiny” fridge has served us well since we moved into our trailer in 2008.

This was an upgrade for us anyway. Our first year of full-timing in 2007 was spent in a 27′ travel trailer that had a 6 cubic foot fridge. So, moving to a bigger fridge in 2008 was terrific.

The 8 cubic foot model has been fine for us ever since then, although our ears do sometimes perk up when we hear the turf wars breaking out between the veggies and the beer.

Neither the beer nor the veggies has emerged a consistent winner over the years, but we have found a way to keep the battles from spreading onto every shelf in the fridge.

Even though most owners of late model higher end RVs have either a residential 110 volt a/c refrigerator or an 18 cubic foot two-way “RV refrigerator” that runs on either propane or household 110v electricity, modest sized RV fridges still appear in many smaller RVs and truck campers. So, I thought I’d share our tactic for keeping those big unwieldy bags of vegetables under control.

RV refrigerator 8 cubic foot size-min

RV two-way propane/electric refrigerators do best when stuffed full.
There’s actually lots of room for goodies even in this small model.
This isn’t even full!

I like to buy all the veggies we’ll be eating for the next week or so at once and then cut them up and store them in a single container all together. I cut them in large chunks and then layer them into the container so they are nicely mixed rather than segregated.

I’ve found about six to nine veggies will fill a half-gallon size plastic tub. I have a taller thinner size container with a snap-on top that disappears inconspicuously into a corner of the fridge. I mix up the types of vegetables I put in it with each supermarket run.

Fresh veegetables ready to be cut and stored in an RV refrigerator-min

All these colorful fresh veggies used to take up a lot of room in the fridge. Their plastic bags were everywhere!

Sure, this method means that we eat the same basic veggie mix until it’s all gone, but I love being able to grab the veggie bin and whip up something without having to take each individual vegetable out of the fridge, get it out of its plastic bag, and chop off what I need for that meal.

If I want the veggies diced smaller, I just grab the chunks I want from the bin and cut them into smaller pieces.

Vegetables cut and stored for RV refrigerator-min

All those veggies fit in this small half-gallon snap-top container!

The veggies seem to last quite well in this snap-top tub, usually a week to ten days. Starting with super fresh veggies helps.

We have our own favorite vegetables, but depending on what is popular in your RV, any or all of these work well:

  • Bell peppers (pretty colors)
  • Zucchini and/or summer squash
  • Broccoli and/or cauliflower
  • Green beans
  • Snap peas
  • Baby carrots
  • Grape tomatoes
  • Celery
  • Red onion
Veggie storage in 8 cubic foot RV refrigerator-min

The veggie container is tucked away in a corner!

Things we do with them (sometimes diced smaller) have included:

  • Served raw with a veggie dip made from plain yogurt and a ranch style powdered dressing mix
  • Served on a bed of spinach and/or romaine lettuce as a salad
  • Stir-fried in olive oil in a skillet
  • Cooked in a covered, salted skillet on medium heat with a splash of water thrown in one minute before serving for quick steaming
  • Steamed/boiled in a pot
  • Lined up on a skewer and grilled on our BBQ grill (best if segregated due to different cooking times)
  • Tossed into an omelet with meat and cheese
  • Rolled into a tortilla and microwaved with leftover steak/burgers/chicken topped with a little cheese
Vegetable stir-fry in an RV-min

There are lots of ways to make veggies yummy.

I’ve managed quite a few small refrigerators over the years as I’ve lived on various sailboats and in RVs.

For sailors who come across this article, the best way I found to deal with the big, deep, dark refrigerators on older boats that require a veritable deep dive — feet in the air — to be able to reach the bottom is to put everything in large tupperware containers, segregating the meat, veggies, cheeses and even the condiments. This way, it’s easy to find the items you want because you are handling only a few big containers that are well labeled rather than digging around for that small jar of mustard you know is buried at the bottom in the wet mess somewhere.

Likewise with the tiny 3.5 cubic foot under-counter RV fridge that we had on our sailboat in Mexico. The plastic tubs were smaller and didn’t have covers (so the contents could mound up above the sides a bit as necessary), but the important items were grouped together into two or three bins, and when mealtime prep began, all the bins were taken out of the fridge at once and laid out so it was easy to locate the individual bits and pieces.

One of the unfortunate side effects of RV manufacturers moving towards ever larger refrigerators is that they cost a lot in terms of usable space in the kitchen. An 18 cubic foot RV refrigerator is 36″ wide while an 8 or 10 cubic foot RV refrigerator is only 24″ wide.

I measured out the 12″ we would have lost if our Hitchhiker fifth wheel had been built to accommodate an 18 cubic foot RV refrigerator the way all modern larger fifth wheels are built nowadays. We would have lost an important section of counter space, an upper cabinet that houses three shelves and a lower cabinet that contains a drawer and two shelves underneath. That is a lot of nicely partitioned storage to give up!

RV refrigerator 8 cubic foot size

Modern higher end RVs have 18 cubic foot propane/electric refrigerators that eat up other kitchen counter and cabinet space.

RV refrigerators don’t get the Energy Star rating that many residential refrigerators do. They are inefficient and they operate best when they are packed to the gills with lots of cold stuff inside.

After we do a big shopping spree, we usually have two levels of goodies on every shelf and all the cold stuff is squeezed in pretty tight. As the days go on it loosens up a bit.

Given the RV propane refrigerator quirk of needing a very full fridge to operate well, I can’t imagine having enough cold food to keep an 18 cubic foot refrigerator continuously stuffed in a household with just two people. We would have to chill 24-packs of beer and multiple gallons of fresh water. Frankly, I think I’d be chilling our canned goods too!

That is all fine and dandy, but where space is at a premium — especially in the tiny living quarters of a toy hauler — it seems silly to give up precious cabinets and counter space to have a fridge that is difficult for two people to keep properly stocked (to overflowing) all the time.

Not only does it take a lot of propane to run an RV fridge when shorepower isn’t available, but RV refrigerators are expected to fail after about 8 years. We replaced our RV fridge under warranty right at the 8 year mark when it died unexpectedly.

An 18 cubic foot RV refrigerator costs somewhere around $4,000 whereas our little 8 cubic footer was just $1,500 or so in 2015. We didn’t have to pay out of pocket for it because we had an excellent RV extended warranty.

However, built into the cost of any extended RV warranty is the cost of replacing the major appliances, including the RV refrigerator. So, the price of an extended warranty for an RV with an 18 cubic foot RV refrigerator is going to be a whole lot more than the price of an extended warranty for an RV with an 8 cubic foot RV refrigerator.

The bottom line that isn’t so obvious on the RV showroom floor is that RVers get hit with the exorbitant cost of replacing a huge two-way propane/electric RV fridge either way. Wouldn’t it be awesome if RVers were given a choice on a $100k (or more) RV to have a more modest sized RV fridge?

Of course, an 18 cubic foot residential 110 volt refrigerator is a fraction of the cost of an equivalent propane/electric RV refrigerator, along the lines of $2,000 versus $4,000, but powering such a beast without shorepower is a big ol’ can of worms unto itself. This is likely the reason why the National Sales Director at one of the major mass market RV manufacturers told us “The industry is getting away from residential refrigerators and going with the new 18 cubic foot RV refrigerators instead.”

Ironically, requesting a 10 cubic foot RV refrigerator from the custom manufacturers was met with the head scratching concern that their units are built to a certain very high standard and a modest RV refrigerator is not really up to that standard. In the end, they would prefer not to have their name on a fifth wheel roaming around the country sporting a smaller RV fridge. Undoubtedly, that issue could be pressed, but our initial request was not met with the expected enthusiasm of, “Oh, of course we can do that. We’d be glad to!”

Now, these are all very personal preferences, and there’s no right or wrong way to live the RV lifestyle. Our RV search has been an interesting journey through the maze of the modern day fifth wheel market, and this crazy refrigerator issue has been just one odd stumbling block in the whole process.

I just finished writing a detailed article for Trailer Life magazine about what we’ve learned and seen in our search. The article will be appearing in the September 2019 issue. If you subscribe to Trailer Life, keep an eye out for it!

In the meantime, give the veggie pre-prep idea a try. I like handling our veggies this way so much that I’d probably do it no matter how big a fridge we had, whether in a rolling home or in a stick-built house!

Subscribe
Never miss a post — it’s free!

More blog posts about RV refrigerators:

More blog posts about choosing an RV:

Our most recent posts:

More of our Latest Posts are in the MENU.   New to this site? Visit RVers Start Here to find where we keep all the good stuff. Also check out our COOL NEW GEAR STORE!! *** CLICK HERE *** to see it!

How to Defrost an RV Refrigerator in 20 Minutes!

Defrosting an RV refrigerator is a surprisingly easy job. We’ve been living with a propane RV refrigerator for many years now, and they always need defrosting after a few weeks or months. Being meticulous about not leaving the refrigerator door open unnecessarily can help, but when you find yourself living in a hot and humid environment or if you have the refrigerator side of your trailer or motorhome facing the blazing hot summer sun all afternoon, the frost is going to build up over time.

All you need to defrost an RV refrigerator is:

Over the years, we’ve tried several different techniques for defrosting our RV fridge, and in the old days this was a big job that, with some methods, could take well over an hour. We now have it down to a super fast method that makes this pesky job a cinch. The last time we did it, I made a note of the time on the clock as we went through each step. From start to finish, it took 20 minutes.

The first step is to turn off the refrigerator and empty the contents of the freezer into cooler bags or a cooler of some kind. Since these things will be out of the freezer for just 20 minutes, they won’t defrost and the ice cream won’t melt. If your RV is hot inside, covering the cooler bags with blankets for extra insulation can help.

Defrost RV refrigerator remove food from freezer

9:17 a.m. – Turn off fridge and unload freezer into cooler bags

We used to unload the whole refrigerator and empty it out completely, but that isn’t necessary and it takes a lot of time. An awful lot of what is in the refrigerator can handle warming up slightly as you keep the refrigerator door open to defrost it.

Instead, just unload the most temperature sensitive items — milk, yogurt, lunch meats, mayonaise, etc., into an insulated cooler bag or a cooler. Most of the fruits, veggies, bread, cheese, condiments, etc., can remain right where they are in the fridge for the 20 minutes it takes to defrost it.

How to defrost an RV fridge with food in cooler bag

Set the cooler bags aside. Covering them with blankets will keep everything even cooler.

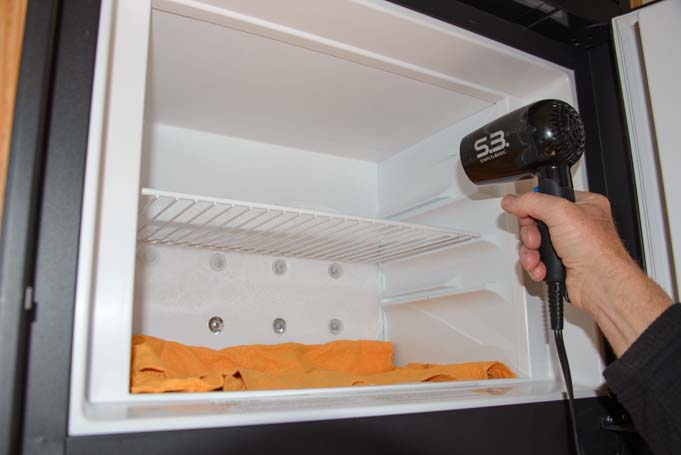
Next, put a super absorbant chamois towel in the bottom of the freezer compartment to absorb the water from the melting ice, and use a hair dryer to thaw the walls of the freezer.

Defrosting RV refrigerator hair dryer on freezer with towels

9:22 a.m. – Use a hair dryer to thaw out the freezer.

We live exclusively on solar power, and our 2,000 watt pure sine wave inverter is what powers all our AC appliances, including the hair dryer. So, we have a low wattage travel hair dryer that draws just 800 watts (available here).

We put it on the high setting and keep a distance of about 8″ between the hair dryer and the walls of the freezer. A higher wattage hair dryer may need to be put on the low heat setting. Hold your hand about 8″ from the hair dryer and see how hot it feels.

Be sure you keep the hair dryer from heating up the plastic walls or they will crack from being cold and then getting hot. Keep the hair dryer moving and test the temp of the plastic walls with your hands.

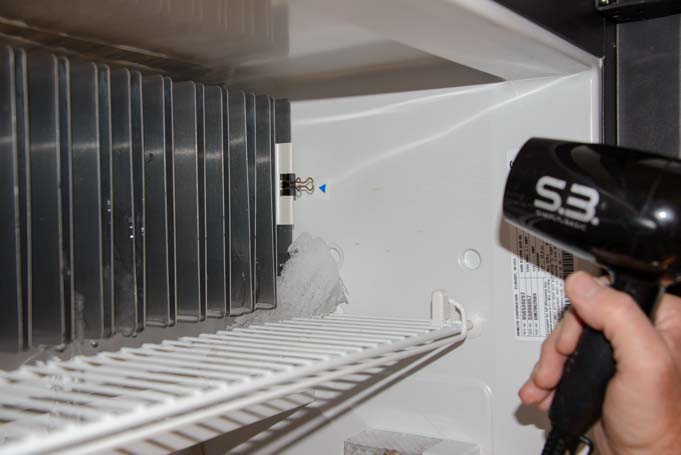
After thawing the walls of the freezer a little, move down to the cooling fins in the refrigerator compartment. Keep the hair dryer in constant motion, sweeping it back and forth from side to side.

Defrost RV refrigerator hair dryer on cooling fins

Slowly wave the hair dryer in front of the cooling fins.

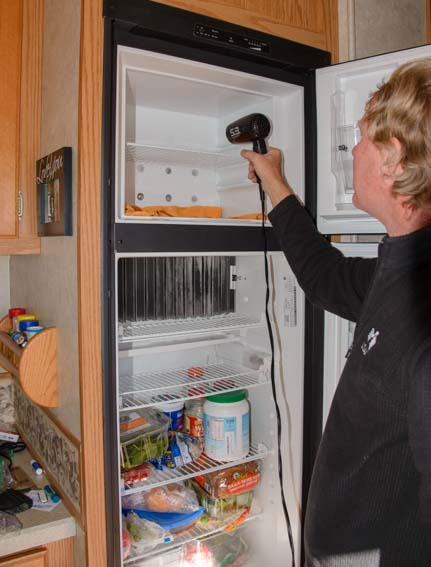
Alternate working on the freezer compartment and the refrigerator compartment.

How to defrost an RV refrigerator hair dryer in freezer

Alternate between the cooling fins in the refrigerator compartment and the freezer compartment.

Defrosting RV refrigerator hair dryer on fridge cooling fins

At the beginning, when the cooling fins are caked in ice, the hair dryer can be closer to them.

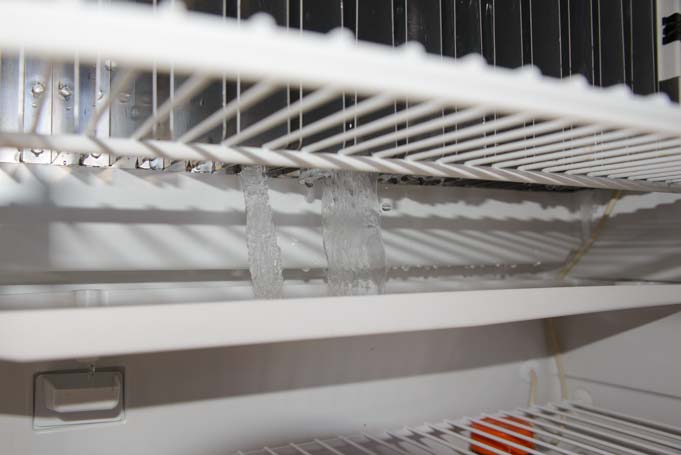
Little ice sheets will begin to fall off the refrigerator cooling fins into the drip tray underneath. As the thawing process continues, increase the distance between the hair dryer and the cooling fins.

How to defrost an RV fridge melting ice with hair dryer

As ice drops and the cooling fins thaw, move the hair dryer back a little.

Don’t chisel the ice off the fins or the freezer walls with a tool. If you pierce the metal base behind the cooling fins or the walls of the freezer, the refrigerant (ammonia) will leak out. We don’t use any chiseling device. We simply assist the thawing process with the hair dryer.

Check beneath the cooling fins and you’ll see the bits of ice dropping into the drip tray.

How to defrost an RV refrigerator ice dropping from fridge cooling fins

Check below the cooling fins where the ice drops off in chunks.

If you go outside, on the back of the RV you’ll see water seeping out of the refrigerator vent.

How to defrost an RV fridge water dripping from refrigerator vent on outside of trailer

Outside the rig, water will be seeping from the refrigerator vent.

How to defrost an RV refrigerator water dripping down fridge vent outside trailer

A little trickle of water flows down.

Once all the ice has fallen off the cooling fins, pull out the drip tray and dump the ice in the sink.

Ice in RV refrigerator drip tray

9:34 a.m. – Once all the ice has dropped off the cooling fins, empty the tray of ice into the sink.

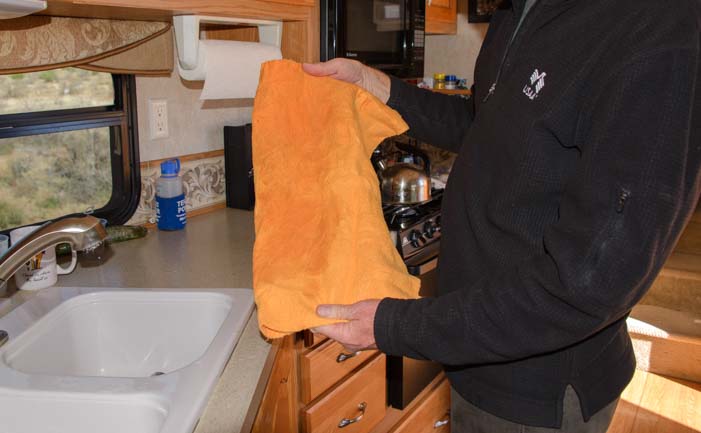
Up in the freezer compartment, the chamois towel is now fairly wet with water that has dripped down off the walls. Wring it out and use it to wipe down the freezer and the fridge.

Wet Chamois towel from defrosting RV refrigerator

9:35 a.m. – The chamois towel in the freezer is pretty wet. Use it to wipe down the fridge and freezer.

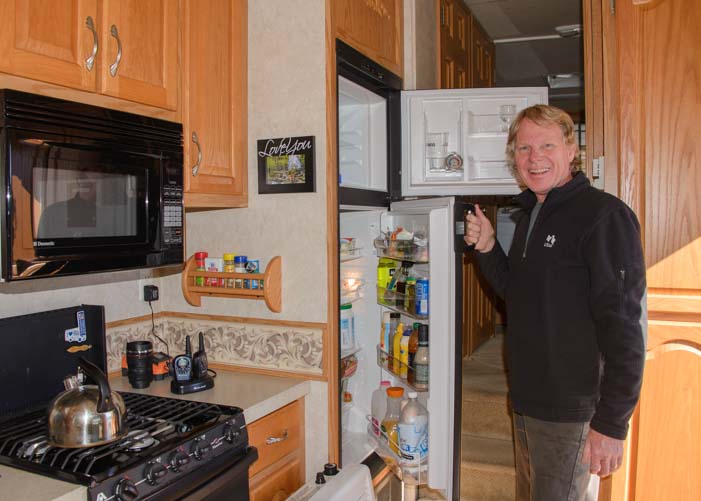
Load the food from the cooler bags back into the refrigerator and freezer compartments, and you’re done! Put the fridge at max temp for a few hours to help it cool back down, and then set it to the temperature setting you normally use.

Defrosted RV refrigerator

9:37 a.m. – After loading the food back in the refrigerator, turn it back on. Done!

Other RV Refrigerator Tips

The key to having an RV refrigerator work optimally is having the air circulate inside well. Overstuffing the fridge with food makes this difficult for it. We have used a little RV refrigerator airator fan that’s designed to keep the air flowing. We’ve had mixed results with this, and when it died we didn’t replace it. I think this would work well if there were space between all the food, but our fridge is usually packed (the turf wars between the beer and the veggies can be brutal…sometimes we can hear them battling it out in there!).

As a maintenance item, we keep the door seals clean, wiping them down periodically.

We use simple refrigerator thermometers to monitor the temperatures in the fridge and freezer. It has a built in hook, and we hang it from one of the rungs in the top shelf in the refrigerator. The one in the freezer rests against one wall.

We were surprised to learn that RV refrigerators have an expected lifespan of about 8 to 10 years. A classic sign of impending failure is the appearance of yellow dust in the refrigerator vent area behind the fridge (go outside and take the vent cover off and look around with a flashlight). Click the following link to read the funny story of our RV refrigerator replacement and see how an RV fridge replacement is done.

Because of the shorter lifespan, higher price, and use of propane in RV refrigerators, many (most) “full-time” level fifth wheels and motorhomes are now being built with residential refrigerators that run on AC power only (a dedicated inverter is installed so it can run from the batteries while in transit). For folks that have plans to dry camp and boondock a lot in their RV life, a residential refrigerator will require a much bigger battery bank and solar panel array than would otherwise be needed. We discuss that in more detail at this link in our introductory solar power article.

If our hair dryer method of defrosting an RV fridge seems unorthodox to you, believe me, we have tried many other methods. We tried opening the fridge and freezer doors and letting the fridge thaw out on its own. We tried doing that and “helping it along” by chiseling the ice off with a small plastic scraper. We tried putting a bowl of hot water in the fridge to help it warm up.

All of these methods were adequate, but they were time consuming. We’ve been using our current method with the mini travel hair dryer for a few years now and really, really like it.

Subscribe
Never miss a post — it’s free!

Below are some of our most POPULAR POSTS (also in the MENUS above)

Buddy - A Journey in Spirit - The story of an event that changed our lives forever.

ARTICLE INDEXES
  • RV Tech Tips Articles - A one page index of links to all our RV Tech Tips, RV Upgrades & RV Maintenance articles.
  • RV Lifestyle Tip Articles - An index of links to all our RV Lifestyle Tips (finances, boondocking, major repairs, work/jobs, etc.)
  • Solar Power Articles - Overview and tutorial articles for how to design and install solar power on an RV or boat
  • Product Reviews - An index of links to all of our Product Reviews
RV UPGRADES, SYSTEMS & TIPS MONEY FULL-TIME RV LIFESTYLE GEAR STORE
  • Gear Store - A list of the goodies, equipment and gear we've found useful in our RV lifestyle!
 

Our most recent posts:

More of our Latest Posts are in the MENU.   New to this site? Visit RVers Start Here to find where we keep all the good stuff. Also check out our COOL NEW GEAR STORE!! *** CLICK HERE *** to see it!

RV Refrigerator Replacement – How an RV Warranty Saved Our Bacon!

We’ve been reporting on whether or not an RV warranty is a good investment for RVers, and this page — the second of four installments — presents our latest findings.
(Hint: the answer is a resounding YES!)

Ten days ago, after a fabulous two weeks in Maysville, Kentucky, and a long day of driving, we set up camp, grabbed a beer, and kicked back to enjoy a cold one. But to our dismay, the beer was kinda warm. We ratcheted the RV refrigerator up a notch and went about our business. After dinner and a movie in our RV, we decided to have a bowl of ice cream. When Mark lifted the lid on the Haagen Dazs, what he found inside could only be described as cool chocolate soup.

Oh no! Our 8 year old RV refrigerator had died.

RV extended warranty repair RV refrigerator replacement

Do something quick! We’re going to lose everything in the fridge and freezer!!

As the clock neared midnight, we began a frantic search for RV repair shops in the area. We put together a list of them, went to bed quite distressed, and first thing the next morning we started making phone calls. Mark threw bags of ice in the fridge and freezer and we didn’t dare open either door after that. We lamented sadly that all our frozen meats — all those nice burgers and steaks, and even our bacon, darn it — were quickly defrosting.

After about 15 phone calls, we were still nowhere. Everyone told us it would be a two week wait to get a fridge and that it would probably cost upwards of $1,500. Finally, we called Camping World just south of Indianapolis. They had an identical unit in stock and they could squeeze us in for service the next morning. They told us they always try to make an extra effort for desperate travelers passing through.

Well, we weren’t exactly passing through. We were in Kentucky driving west towards Tennessee, and they were 150 miles to the north in the totally wrong direction. But what can you do? We were absolutely thrilled to find an RV repair facility that had an RV refrigerator in stock and could install it quickly, so a 150 mile detour was not a problem!

This would be our second major repair in just over a month. We had just had our 36′ fifth wheel trailer axle replaced. What’s worse, we were actually on our way to an RV repair appointment in Kansas to fix a leak in our fresh water tank. What kind of luck was that?

As it turns out, Lady Luck was following us very closely. Our RV extended warranty had covered the bulk of the trailer axle repair, and we were pretty sure it would cover this one too.

Where we stood on our trailer warranty at this point was the following:


We were 11 months into a 4 year RV extended warranty
Cost of RV warranty: $1,904
Reimbursements (less deductibles) to date: $1,036
Remaining Reimbursements to Break Even: $868

You can see the current status of our warranty HERE.

It looked like this RV warranty repair would not only bring our total reimbursements to the point of covering the original cost of the RV extended warranty but would go well beyond that.

18 hours after we’d discovered our fridge was dead, Camping World service manager Rick Helvey was in our trailer examining its hulking carcass. He told us that propane RV refrigerators typically last only 10 years.

What??!!

It was no surprise to him that our 8 year old unit had kicked the bucket. He opened the fridge vent on the outside of the trailer and showed us the telltale signs of a dying RV refrigerator: greenish or yellowish dust.

The presence of this dust meant the ammonia was leaking out and the cooling unit had given up the ghost. The crazy thing is that the price of a cooling unit is nearly the same as the price of a new RV refrigerator — Not Cheap!

RV warranty repair on a refrigerator - inside the vent

Yellowish dust in the fridge vent area is proof positive that the fridge is dying.

RV warranty repair RV refrigerator installation

Here is a closer look at the greenish – yellowish dust.

He called our warranty provider, Portfolio Protection, to get approval to proceed with the repair the next morning. To his astonishment (and ours), they said they wouldn’t reimburse us for a replacement refrigerator. They would reimburse us only for the replacement of the cooling unit to save themselves a little money. Here’s the breakdown:

Install New RV Refrigerator Parts: $1,389.99
Labor: $267.00
Tax: $97.00
Total: $1,753.99
Replace Cooling Unit Only Parts: $1,049.00
Labor: $356.00
Tax: $73.43
Shipping: $100.00
Total: $1,578.43

DIFFERENCE IN OVERALL COST: $175.56

This was a problem — for us and for Camping World!!

If we got our refrigerator replaced, we would be in and out of Camping World in 3 hours the next morning and they could go back to business as usual with their local customers. If we had to have the cooling unit replaced, we would have to wait a week or two for the part to come in and Camping World would have to reshuffle their appointments the next morning, once again, because our appointment was already on the books. We had all assumed the approval of a replacement refrigerator would be a slam-dunk.

New RV fridge ready for installation

Our new refrigerator is ready and waiting — all we need is approval to install it!

What to do?

Well, here’s one reason we are becoming more and more enamored of our RV extended warranty through Wholesale Warranties. Unlike most warranty brokers who wash their hands of the deal once you’ve purchased the contract and signed on the dotted line, they are willing to go to bat for you if the warranty reimbursement process isn’t going as smoothly as it should.

We called Wholesale Warranties and told them what was going on. The difference in cost between repairing and replacing was not astronomical. Couldn’t the warranty company allow us to go ahead with the refrigerator replacement?

Within an hour they had called our warranty company, Portfolio Protection, explained to them why it made more sense for everyone involved to install the new fridge Camping World had in stock and, magically, our refrigerator replacement had been approved. We were floored that Wholesale Warranties would do this and that they could be such effective facilitators. Yet it turns out that making these calls is business-as-usual and is routine customer support for them.

Early the next morning we parked the fifth wheel in front of Camping World, and service technician Raymond and his assistant José got started on it right away. Unfortunately, our old refrigerator was 1/4″ too wide and could not fit through our front door. RV refrigerators are installed at the factory before the doors and windows are in place!

RV warranty repair Removing RV refrigerator from fifth wheel trailer

Good heavens, the old fridge can’t go out the front door!

So, the dining room window had to come out!

RV extended warranty Removing an RV window from fifth wheel trailer

The dining room window has to be removed
so the refrigerators can be hoisted in and out.

RV extended warranty repair RV window removed

It would have been so much easier if the refrigerators could have gone through the door!

RV warranty refrigerator replacement gets through window

The new fridge is ready for some strong person to pick it up!

A forklift was used to remove the old fridge and hoist up the new one. It was at this point that I realized just what a challenging DIY project this would have been for Mark!

RV warranty refrigerator replacement New RV fridge on forklift

Thank goodness for fork lifts! This is not an easy DIY installation for one guy!

Then the new RV refrigerator was put in place.

RV warranty repair New RV refrigerator installed in fifth wheel trailer

Raymond settles the new refrigerator into place.

The pretty oak panels from our old refrigerator were slipped into place on the new door.

Under warranty Oak panel installed on RV refrigerator door

Our oak panels from the old fridge slide neatly into place.

Then Raymond ran around back to hook everything up in the refrigerator vent.

RV extended warranty repair new RV refrigerator installation

The back of the new fridge is exposed in the vent area where Raymond hooks it all up.

Meanwhile, his assistant José removed the silicone remnants from the wall around the window opening using a scraper and wiping the wall down with Acrysol

Removing silicone seal on RV window

José scrapes the old silicone sealant off the outside wall
around the window opening.

Removing silicone from RV window

The wall has to be completely clean for a good seal on the window.

Raymond lifted the window into place, and he and José screwed it in place.

RV warranty refrigerator replacement Installing RV window

Raymond puts the window back in place.

Installing RV window on fifth wheel trailer

The guys work together to get the window screwed into place.

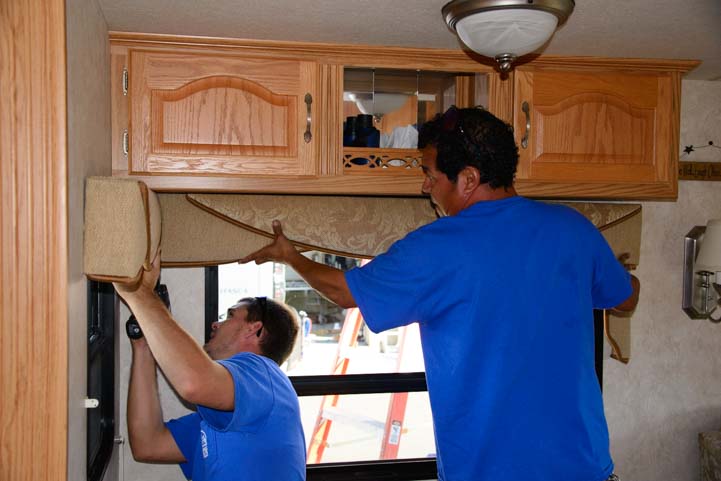
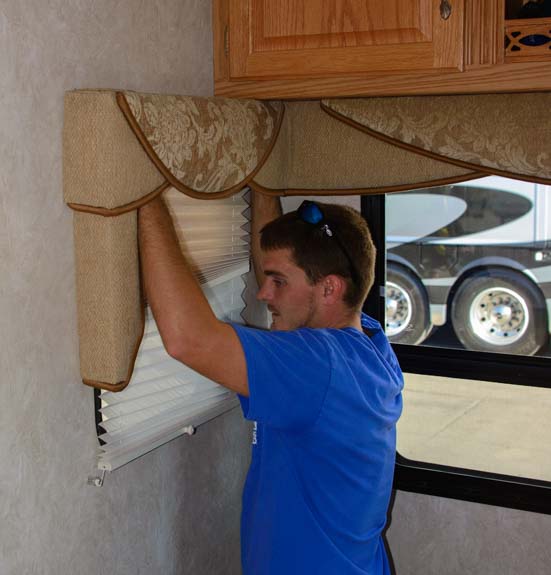
Then they remounted the window valence and reinstalled the day-night shades.

Installing valence on RV window

The window valences are reinstalled over the windows.

Installing day-night shades on RV window

The day-night shades are reinstalled on both windows.

Raymond gave us instructions not to put a bead of silicone around the window frame for about a week because he had used caulk tape that would ooze a little for the next few days.

We were impressed with how quickly these guys worked and got the job done, and we were really grateful to Rick for making an opening for us. In just 36 hours from the time we had soup for ice cream, we had a brand new RV refrigerator up and running. Now we just had to wait for it to cool down (about 9 hours).

In the meantime, our frozen meats had fully defrosted but were still cold. We couldn’t re-freeze any of them when the refrigerator finally cooled down. Arghhh!

As we hitched up the fifth wheel, I noticed Mark had a twinkle in his eye as he drove it around to the back lot. He hopped out and instantly set up the barbecue, right there in the Camping World parking lot. He happily began grilling burgers, hot dogs, steaks, chicken and brats.

“We can’t let all this good meat go to waste!” He said to me as he handed me the bacon and sent me inside to fry it up.

It turned out he’d invited the service guys to come on over to our place for a barbecue lunch, and when the yummy smells from our grill began to waft across the Camping World parking lot, they quickly showed up in a golf cart and began chowing down.

The crew enjoys a barbecue lunch

The Camping World service team stops by for an impromptu barbecue. Thank you guys for a super job!

At last it was time to settle up the bill with the service manager, Rick. Our RV warranty deductible was $100. Indiana charges sales tax on deductibles, so our total out of pocket cost for this phenomenal repair was only $107. Wow!!

Our RV warranty (less our $107 deductible + tax) covered $1,647 on this one repair alone — that is nearly the cost of the entire four year RV extended warranty itself!

Shockingly, this RV refrigerator replacement was just one of a slew of major repairs our trailer needed in a four month period in 2015:

Here's a summary of what our four year RV warranty through Wholesale Warranties cost, what our repairs WOULD HAVE cost, and what our warranty reimbursements have been to date:

Cost of Warranty $1,904
Total Cost of Repairs we've had done $7,834
Total Out of Pocket Costs for those repairs $1,145
Repair Reimbursements:
Trailer Axle Replacement $1,036
RV Refrigerator Replacement $1,647
Plumbing Issues & Window Leak $1,142
Suspension Replacement $2,550
RV Toilet Replacement $314
Total Repair Reimbursements $6,689

Our trailer warranty has paid for itself 3.5 times over!
Confused about the nitty gritty fine print buried in RV Extended Warranties? Here's an excellent detailed explanation!!

Are we happy with our extended trailer warranty? OMG Yes!!

Having suffered four major repairs in four months, we have come to the conclusion that anyone with an RV older than four or five years should seriously consider getting an RV extended warranty, especially if they don’t like unexpected financial surprises.

What a shock it was to find out that RV refrigerators are expected to fail by their tenth year of service. All you need is that one repair plus another one or two (air conditioner, water heater, furnace, slide-out mechanism, hydraulic leveling system, etc.) to cover the cost of a four year warranty and even wind up ahead.

Do I sound enthusiastic and excited about our trailer warranty? I am!! I was hugely skeptical about RV warranties before our trailer axle and RV refrigerator replacements, and all I can say is that this has been an amazing process!!

If you want to find out what a warranty would cost for your rig, Wholesale Warranties is offering a $50 discount to our readers. Call our contact, Missi Emmett at (800) 939-2806 or email her at missi@wholesalewarranties.com. Or go to this link:

Wholesale Warranties Quote Form

The discount comes off of the quoted price at the time of purchase — just be sure to ask!

To learn how RV warranties work and how they differ from RV insurance, see this article:

What Is An RV Warranty and Is It A Good Investment?

If propane RV refrigerators are so prone to failure, why don’t we have a residential refrigerator? — It takes a huge solar panel array and big (heavy) battery bank to power a residential refrigerator along with everything else in an RV. See the following:

Can a Residential Refrigerator Run on Solar Power in an RV?

Subscribe
Never miss a post — it’s free!

The Full Case History of our RV Extended Warranty:

Below are some of our most POPULAR POSTS (also in the MENUS above)

Buddy - A Journey in Spirit - The story of an event that changed our lives forever.

ARTICLE INDEXES
  • RV Tech Tips Articles - A one page index of links to all our RV Tech Tips, RV Upgrades & RV Maintenance articles.
  • RV Lifestyle Tip Articles - An index of links to all our RV Lifestyle Tips (finances, boondocking, major repairs, work/jobs, etc.)
  • Solar Power Articles - Overview and tutorial articles for how to design and install solar power on an RV or boat
  • Product Reviews - An index of links to all of our Product Reviews
RV UPGRADES, SYSTEMS & TIPS MONEY FULL-TIME RV LIFESTYLE GEAR STORE
  • Gear Store - A list of the goodies, equipment and gear we've found useful in our RV lifestyle!
 

Our most recent posts:

More of our Latest Posts are in the MENU.   New to this site? Visit RVers Start Here to find where we keep all the good stuff. Also check out our COOL NEW GEAR STORE!! *** CLICK HERE *** to see it!