Edge Evolution CS Tuner Review – Peak Truck Performance!

The engines in most cars and trucks are computer driven these days, but the installation of an engine tuner puts the driver in the driver’s seat instead. An engine tuner, or programmer, gives the driver the ability to fine tune the engine’s efficiency and performance by manipulating the computer’s input parameters to suit the driving task at hand.

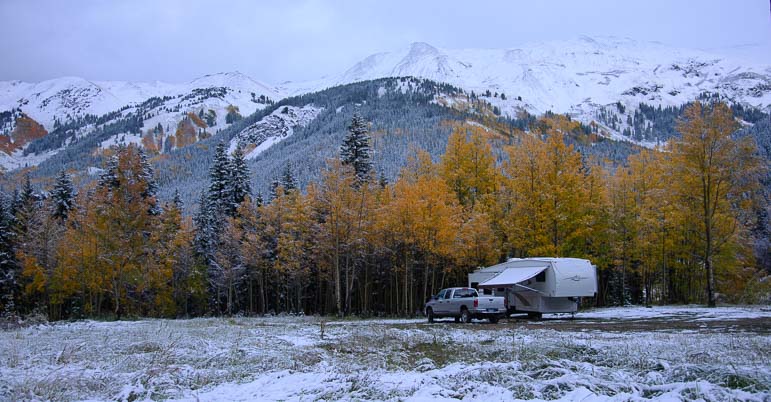
Since 2007, we have lived year-round in a 14,100 lb, 36′ 2007 NuWa Hitchhiker fifth wheel trailer. For eight years, the truck we used to tow this big trailer was a 2007 Dodge Ram 3500 Single Rear Wheel Long Bed truck. Half of our miles driven, we towed the trailer. The other half, we drove it around town with nothing in tow and a few hundred pounds of cargo the bed of the truck. Once in a while we threw in an off-road adventure just for fun.

2007 Dodge RAM 3500

Our 2007 Dodge RAM 3500 single rear wheel truck

When the truck had 85,000 miles on it, we installed an Edge Diesel Evolution CS tuner, and what a world of difference that made to our driving experience, not only when we were towing but also when we were driving the truck around without the trailer attached.

In a nutshell, it has:

  • Increased our truck’s power
  • Improved our gas mileage
  • Given us a readout for the transmission temperature.

And it was an easy installation to boot.

We also installed an optional companion product, the Edge EAS Exhaust Gas Temp sensor which gives us another piece of crucial temperature data when we are towing under heavy load. This is not a mandatory installation.

We couldn’t be more pleased with these upgrades!

Big Bend Texas Bound

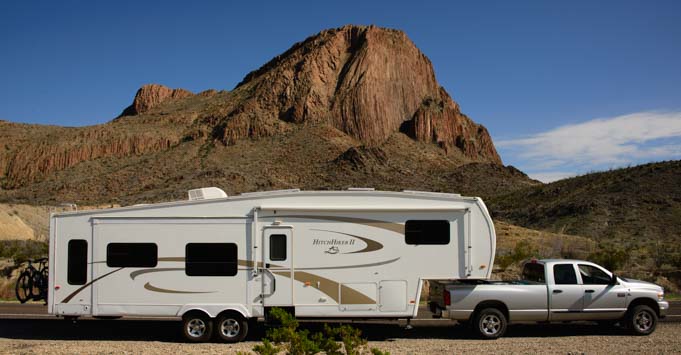
Our truck with our fifth wheel trailer attached.

This is a long post, and you can skip down the page to the following sections:

1. Why Install an Engine Tuner?
2. Edge Evolution CS Tuner – Tested and Validated
3. Installing the Edge Tuner
4. More POWER Driving in the Rocky Mountains
5. More TEMP DATA Towing in the Rockies
6. Better MPG – Fuel Efficiency Improvements, Towing and Not Towing
7. Additional Exhaust Gas Temperature Sensor Installation
8. Other features of the Edge Evolution CS tuner

1. Why Install an Engine Tuner?

We first became interested in the idea of installing the Edge Evolution CS tuner when Mark saw an article in the October 2014 issue of Diesel Power Magazine (“Tested, Proven, Validated — Edge’s DPF-On Tuner Walks the Walk”). This article discusses the improvements the tuner had made on our exact model truck (well, a 2009 rather than a 2007, but with everything else virtually the same, including the mileage!).

The Edge Diesel Evolution Tuner works on Ford, GM/Chevy and Dodge RAM.

Edge Evolution CS Tuner mounted on the dashboard of a Dodge RAM 3500 truck

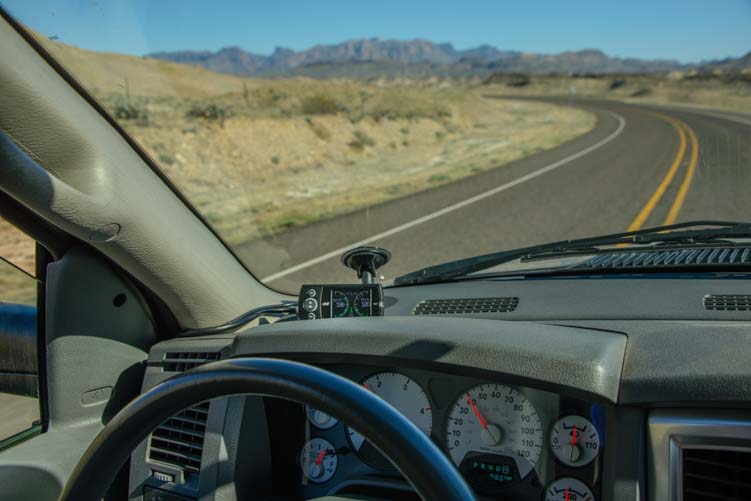
The Edge Tuner is mounted on the windshield, low enough not to restrict visibility but still easy to see.

Why install a tuner? It lets the driver fine tune the engine performance and boost power when needed

The beauty of the Edge programmer is that it doesn’t change anything in the engine permanently. It simply gives the driver the ability to fine tune the engine for its specific job at the moment, whether that is towing a big trailer, carrying a heavy load in the bed, racing off-road, or driving around town.

Light duty diesel trucks (i.e., Ford 250/350, Chevy 2500/3500 and Dodge RAM 2500/3500) are built for many uses, from towing heavy horse and RV trailers, to off-road racing, to driving across town and across country carrying big loads.

The on-board computer of every model truck is programmed at the factory to be able to do each of these things pretty well. However, it is impossible to program the computer to operate the engine at peak performance in all conditions. To make things worse, the truck manufacturers don’t provide the driver with a way to optimize the engine’s performance or to monitor some of the data the computer has already gathered.

Much of the truck computer’s capabilities and data remain inaccessible to the driver.

This is where the Edge tuner comes in, because it allows the driver to fine tune the engine for the immediate job at hand.

The idea behind the Edge tuner is to put the programming power into the hands of the driver, and to provide gauges for monitoring much of the data that the engine’s sensors detect. The Edge tuner can program the truck’s computer to maximize towing power or maximize non-towing fuel efficiency, depending on the kind of driving you are doing that day. It can also set the truck’s computer back to the stock factory settings, which is important if the truck is going into the shop for repair.

Because nothing mechanical is modified or tampered with, this means that nothing whatsoever is lost by installing the Edge tuner, but a whole lot is gained.

Why install a tuner? It gives the driver more detailed engine & transmission temperature data

We were intrigued by the Edge tuner because the installation appeared to be very easy, and the results were absolutely terrific. We tow our big fifth wheel trailer over huge, nasty mountain passes in the western states on a regular basis in the summertime, often tackling 10% and 15% grades on secondary roads. A little more towing power would be awesome!

What’s more, the tuner displays temperature data that the truck’s computer already has but that the truck manufacturer doesn’t display on the dashboard gauges. All this data is readily available via the OBD-II port (“On Board Diagnostic”) under the dashboard, you just have to plug into it. This is what the Edge programmer does — it is totally “plug-and-play.”

Edge Evolution CS Tuner programmer for diesel trucks

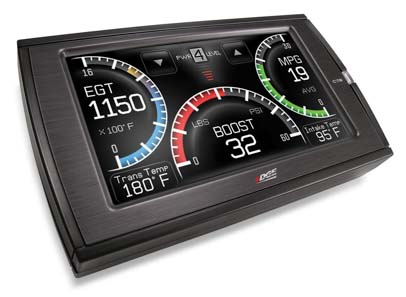
In this image, the tuner is set up to display three different types of temperature data:
Engine Coolant Temp (left), Exhaust Gas Temp (middle bar), Transmission Fluid Temp (right).
From the factory, most trucks display ONLY the Engine Coolant Temperature.

So, the Edge tuner would allow us to monitor the transmission temperature as we drove over mountain passes. This is vital data that is not accessible with our standard engine temp gauges.

Installing a companion product, the Edge Products EAS Exhaust Gas Temp sensor would let us monitor the exhaust gas temperature as well. Data from this optional sensor is shown in the middle gauge in the above image.

Having this extra information would allow us take action if something other than the engine coolant temperature overheated. It would also keep us better in touch with what was going on in the engine, in the event that the engine coolant temp was within an acceptable range but some other part of the truck’s propulsion were overheating. That scenario doesn’t seem possible, but read on…

You see, the factory installed engine coolant temp gauge in the truck cab tells only part of the story!

Why install a tuner? It improves the truck’s Fuel Efficiency (MPG)

We’ve always wished for a little better fuel mileage, both towing and when we are driving around town without our house attached. The tuner’s Level 2 programming mode promised improved fuel efficiency in non-towing conditions.

As it turned out, the tuner has increased our truck’s fuel efficiency in all situations.

What about the truck’s warranty?

A tuner (or “programmer”) does not permanently modify the truck’s computer or engine. There are “chips” on the market that make a permanent modification, but tuners and programmers don’t fall into that category.

We have called a few Dodge dealerships, and they have all assured us that if we had a truck that was in warranty (ours is not), they would service the truck even if it had an Edge tuner installed in it. Their recommendation to us was to reset the Edge tuner to “Stock” and then unplug it from the OBD-II port under the dashboard before bringing it in for service so they could properly analyze the engine (they use OBD-II port for their diagnostics).

The dealerships did say that if they found service was needed because of the presence of the Edge tuner (for instance, the tuner failed and shorted something out), they wouldn’t warranty that work, but they said the Edge tuner itself would not void any warranties.


2. Edge Diesel Evolution Tuner – Tested and Validated!

Return to top

It’s easy enough for manufacturers to offer a bunch of sales hype and fake claims about a product like this, but the aspect of the magazine article that really got our attention was that the folks at Diesel Power did a controlled experiment to measure both the horsepower and torque that this tuner generates. First, they put a stock 2009 Dodge RAM 3500 on a dynamometer and took horsepower and torque measurements. Then they installed the Edge tuner on the same truck, put it back on the dynomometer, and did the measurements a second time.

With the Edge tuner set to its lowest setting (Evolution Level 1), the results were:

Stock (no tuner) With Edge Tuner
Horsepower: 321 @ 2,900 rpm 362 @ 2,900 rpm
Torque: 605 ft-lb @ 2,350 rpm 711 ft-lb @ 2,300 rpm
Peak Exhaust Gas Temp: 1,266 degrees 1,200 degrees

So, they saw a jump of 41 hp, 106 ft-lb torque and a drop in peak exhaust gas temperatures. Wow!!

The Edge Tuner suddenly became a “must have” for us.

3. Installing the Edge Evolution CS Tuner

Return to top

The installation took a total of 90 minutes, from opening the box, to sitting down and reading the manual, to getting the unit installed in the truck. Very easy. In fact, it was so darned quick that Mark had completely finished the installation before I got my camera out to get pics of the unit going in.

Edge Products Diesel Evolution Programmer Package Contents

Edge Diesel Evolution Tuner Package Contents

The package contents include:

  • The user manual
  • The display unit
  • A windshield mounting bracket
  • Two wire/plug assemblies
  • Tie wraps

You just mount the display unit on the windshield with the suction cup mounting bracket, plug the unit to the OBD-II port, use the tie wraps to dress it all up, and you’re done. So I guess I didn’t miss much!


4. More POWER!! Driving in the Rocky Mountains

Return to top

15 mph grade in the Colorado Rocky Mountains

The switchbacks are 180 degree
hairpin turns

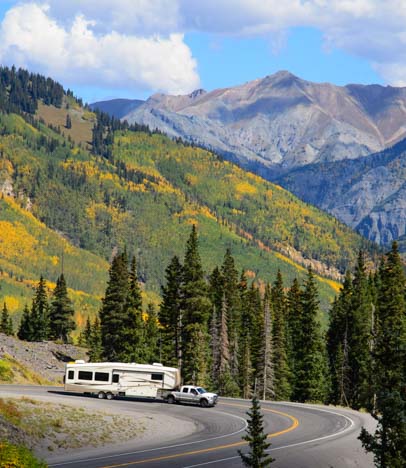
When we installed the Edge tuner on our truck, we just happened to be staying at the base of one of the biggest mountain passes we have ever traversed with our truck and trailer, the Million Dollar Highway that runs through the Colorado Rocky Mountains between Ouray, Silverton and Durango, on US Route 550.

This hair-raising, 70 mile stretch of road winds through dozens of 10 mph, 15 mph and 20 mph hairpin turns, going up and down grades that the Colorado Department of Transportation rates at “7% or more,” with some folks claiming a few are in the 9% range.

To add a little excitement to the drive, this is a fairly narrow two lane road with steep, unprotected drop-offs.

The views are divine, but it can be a white knuckle ride. The drive begins in Ouray at an altitude of 7,800′ and then climbs and descends over three major passes:

After finishing the Edge tuner installation, we took the truck up and down the first part of this road between Ouray and Red Mountain Pass about a dozen times. Mark set the tuner to Evolution Level 1, and he felt the difference in performance immediately.

He hit the gas pedal on a steep incline and his eyebrows shot up as he said to me, “This feels like a race truck!”

Steep 10 mph switchback on Red Mountain Pass on Route 550 the Million Dollar Highway between Ouray and Silverton Colorado

Steep 10 mph grades climbing Red Mountain Pass


5. More TEMP DATA!! Towing in the Rockies

Return to top

Once he was comfortably familiar with the road and the mountain passes, and once we were ready to leave Ouray, we hitched the trailer to the truck and drove the entire Million Dollar Highway — Route 550 — over those three mountain passes from Ouray through Silverton to Durango.

20 mph grade on the Million Dollar Highway in Colorado's Rock Mountains

20 mph switchback ahead.

Mark was impressed that the truck had plenty of power at all times and made it up and over the passes without straining. He kept the engine torque in its power band of 2,200 to 2,600 rpm, and he never had to depress the gas pedal all the way to the floor to maintain a safe speed.

You can set up the Edge tuner display to show whatever data interests you most.

On the CS model (which we installed), there are two large analog displays with accompanying digital readouts and a smaller digital display in between them.

The CTS model (which is slightly more expensive) has three analog displays with accompanying digital readouts.

Mark had set up our tuner to show the Engine Coolant Temp (ECT) and the Transmission Fluid Temp (TFT) on the two large semi-circular analog gauges to the left and right.

The ECT is a measure of the antifreeze temperature in the radiator, and is the “engine temperature” reading that is given in an analog gauge on the truck’s dashboard. It is also the temperature that most manufacturer’s use to indicate that the engine has overheated, usually displaying a big red light on the dash.

Fifth wheel trailer in the Colorado Rocky mountains_

Despite the hairpin turns and sheer drop-offs, semi-tractor trailers and RVs traverse this highway all the time.

The TFT is a measure of the transmission fluid temp, and it is not a value that is tied into any of the dashboard instrumentation on most trucks.

In general, both the ECT and TFT temps should be kept below 225 degrees, although newer trucks can run slightly hotter than older trucks.

The digital readouts on the Edge tuner display unit are big numbers that are easy for both the driver (and passenger) to read.

Getting into the Red Zone

What a shock it was to begin our first big ascent on Red Mountain Pass and to see that while the Engine Coolant Temp was in the normal range, according to both the factory-installed in-dash gauge and the Edge tuner (which showed 215 degrees), the Transmission Fluid Temp went into the red zone, climbing past the safe zone of 225 degrees up to 237 degrees.

The ascent was almost over when we hit this max, and both temps quickly dropped back down as we descended towards Silverton. The ECT cooled down to 198 degrees and the TFT cooled way down to 163 degrees.

On the next ascent, Molas Pass, (10,970′), the Engine Coolant Temp climbed back up to 215 degrees (still in the safe zone) while the Transmission Fluid Temp topped out at 244 degrees.

Edge Diesel Evolution CS Tuner showing high transmission fluid temperature

The truck’s temp gauge (and Edge ECT data) said we were not overheating, but
that’s just the antifreeze. The transmission fluid temp (right) was 19 degrees too high.

In the next valley, the temps dropped back down again, and on the last ascent, Coal Bank Pass (10,640′), the temps climbed again, but this time the Transmission Fluid Temp stayed below 235 degrees.

Insights

We were both amazed that the truck never overheated, according to the dashboard Engine Temp gauge, but in fact, the transmission had exceeded its limits by as much as 19 degrees, or 8%. We never would have known that without the Edge tuner, and it made us wonder just how hot the transmission fluid would be in the event that the engine coolant temp actually went into red alert.

If the transmission stays over 225 degrees for too many minutes, the transmission fluid breaks down permanently, and the transmission can be irreparably damaged.

10 mph grade on steep Red Mountain Pass switchback on Route 550 the Million Dollar Highway in Colorado

Steep grade ahead — prepare for a 10 mph turn

You can set up alerts in the Edge tuner display so that buzzers sound and/or the display flashes when any of the data being monitored exceeds its maximum. However, by default, the alert system is turned off. This makes sense, as it could be annoying to have a buzzer going when you are already nervously looking for a way to safely pull over to let the engine cool.

For anyone installing the Edge tuner, just keep the magic number 225 in mind, and you will easily see when you have exceeded that value on the tuner’s display, as the numbers are nice and large. There is also a “red zone” on the analog display, but we found it was so faint that we did not notice it until we studied our photos of the gauge afterwards!


6. Better MPG – Fuel Efficiency Improvements

Return to top

When we tow, we set the Edge tuner to Level 1.
When we are not towing, we set the Edge tuner to Level 2.

Increased MPG – Towing – Improves by 2 MPG!

Before we installed the Edge tuner, we typically got somewhere between 9.7 and 10.5 mpg while towing for long distances, according to the electronic gauge in the truck. This gauge has its limitations, because it is somehow averaging the most recent miles driven, but I have not been able to find exactly how the average is calculated or how many miles back it goes — is it the most recent 100 miles? 500? 1,000?

Measuring the MPG from one full tank of diesel to the next is a more accurate method, but it is still fallible because one tank may be filled slightly more than another, and if the tank of gas includes both towing and non-towing miles, then the numbers are thrown off.

So, I can’t offer scientifically collected numbers here, but I can say that after we installed the Edge tuner, the gauge in our truck now typically shows numbers between 11.7 and 12.5 when we are towing consistently for distances of 250 miles or more.

In essence, the truck is saving 2 miles per gallon while producing more power. Very impressive!

Increased MPG – Not Towing – Improves by 3 MPG!

Our truck always used to get somewhere in the 16-18 MPG range when we weren’t towing, better on highways and less in town.

Now, if we travel 100 miles or more without the trailer, we see an MPG in the 19-21 range. That is an improvement of 3 MPG!

What a shock it was the first time we drove 130 highway miles at 65 mph and saw 21.6 MPG on our truck’s mileage gauge!!

Return on Investment

If this fuel savings alone were used to justify the cost of a new Edge Evolution tuner, how many miles would we have to drive for the unit to pay for itself?

If we assume the tuner costs ~$450 and diesel costs ~$3/gallon (both rough but reasonable estimates given prices in the last year), and we assume a conservative savings of 2 MPG, whether towing or not, and we tow for half the total miles driven, we will have saved approximately $450 in fuel once we have driven about 15,500 miles.

Of course, the tuner does a lot more than save a little fuel…


7. Additional Exhaust Gas Temperature Sensor Installation

Return to top

A month after installing the Edge Evolution CS tuner, Mark installed a companion product, the Expandable Accessory System (EAS – product #98603) Exhaust Gas Temperature sensor. This product measures the temperature of the exhaust gases in the exhaust manifold, giving the driver yet more insight — beyond just the antifreeze temp and the transmission fluid temp — into how hot the engine is running.

This was an optional installation, but after seeing the value of knowing the transmission fluid temperature, we wanted to be able to monitor our exhaust gas temperature readings as well.

This installation was quite a bit more complicated than the Edge programmer, as the probe had to be inserted into the exhaust manifold. This required drilling a hole in the exhaust manifold, tapping the hole, screwing the probe into the newly tapped hole, and running the wires through the engine firewall back to the Edge Evolution tuner where they plugged into the back of the display unit.

The hardest part of this installation was drilling and tapping the hole, in part because the exhaust manifold is not super easy access to with a large drill, and in part because the metal of the exhuast manifold is very thick and hard.

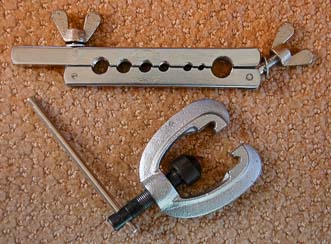
The instructions in the manual called for:

The most important thing is that the tap handle be big and solid to give you lots of leverage, because the solid cast iron on the exhaust manifold is very thick and very hard. This will make the difference between an easy installation and a miserably hard one.

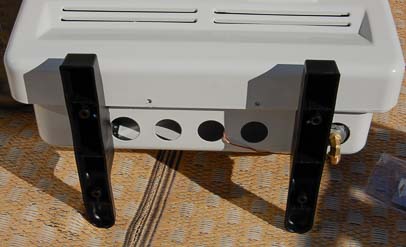
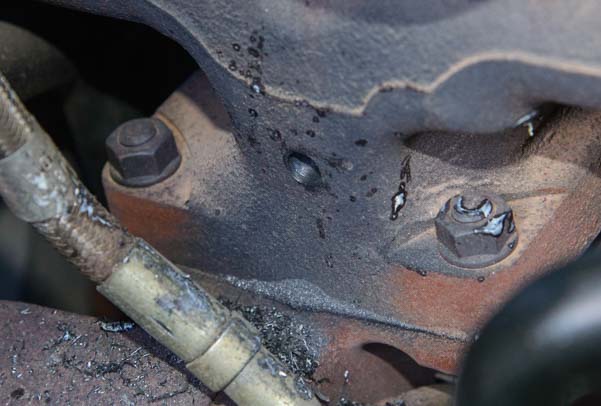
As always, Mark got the project underway before I got my camera going, so I don’t have a “before” photo. However, the “after” photo below shows what you’re gunning for and what stands in the way between you and the exhaust manifold.

Edge Products Evolution Programmer Installed on a 2007 Dodge RAM 3500 truck

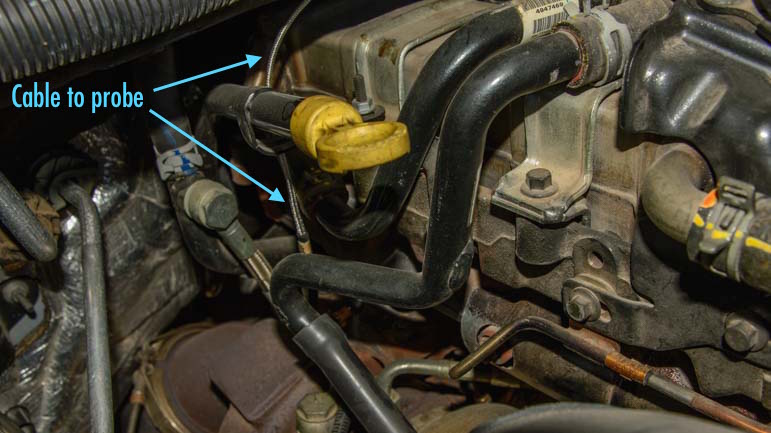
Completed installation with only the braided stainless cable for the probe showing.

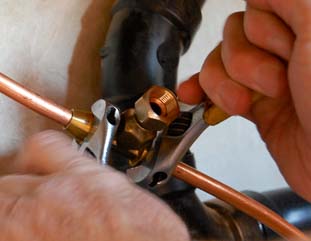
First, unscrew the bolt holding the two black tubes in place so they can be pushed aside.

Remove the bracket for access to the exhaust manifold

Remove the bolt to free up the tubes that are blocking the exhaust manifold

The probe will be inserted here.

Location for inserting the Edge Products EAS Exhaust gas temperature probe in the exhaust manifold

Location for the Edge Products EAS Exhaust gas temp probe in the exhaust manifold

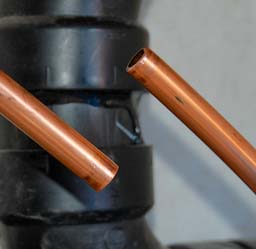
Space is tight, so a 90 degree right angle drill is necessary. Drill a pilot hole first. Then drill the real hole for the probe.

In order to avoid getting metal filings in the wrong places, grease the drill bit first. Drill a little, then wipe the drill bit down, re-grease it, and drill a little further. Do this for both the pilot hole and the real hole.

Use a 90 degree right angle drill

Use a 90 degree right angle drill

Hole drilled in the exhaust manifold

Hole drilled in exhaust manifold

Now the hole is ready to be tapped. Grease or oil the tapping tool well, and work it in and out a quarter turn at a time. As before, after a few turns, back it all the way out and wipe off the metal filings, and re-grease it.

As mentioned above, a small tap handle will not give you enough leverage for the thick, hard cast iron of the exhaust manifold.

Preparing to tap the hole in the exhaust manifold

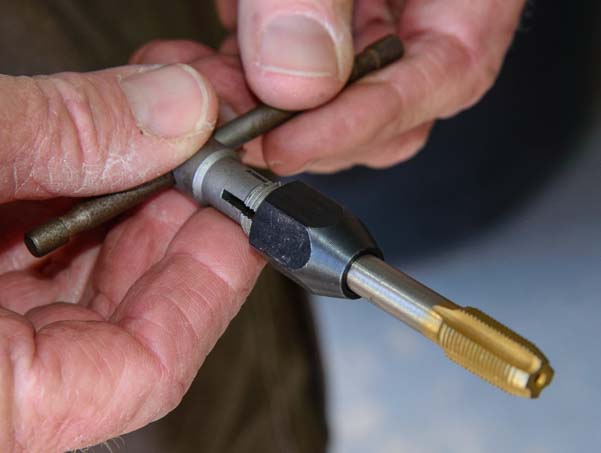
An undersized tap handle will make the job very difficult. Get a big, sturdy one!

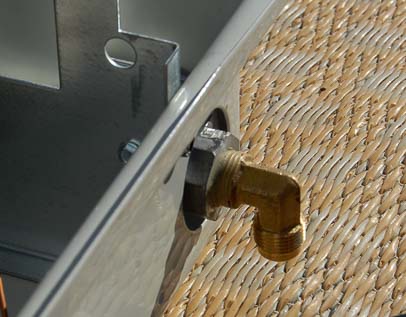
Once the hole is drilled and tapped, the probe can be screwed in. Grease the probe’s threads with <strong>Permatex Anti-Seize Lubricant first. Then, a cable connecting the probe to the Edge tuner is run from the exhaust manifold back through the engine firewall between the engine and the cab, and on up to the tuner.

Edge Products EAS exhaust temperature probe screwed into the exhaust manifold

Edge Products EAS exhaust temperature probe screws into the exhaust manifold

Wires run through the engine firewall between the engine compartment and the truck cab

Wires run through the engine firewall between the engine compartment and the truck cab


Mark opted to put the display for the exhaust gas temperatures in the middle display area between the Engine Coolant Temp and the Transmission Fluid Temp. Of course, you can choose to display any data in any of the three display areas, and Mark experimented a little before settling on ECT on the left, EGT in the middle and TFT on the right.

Edge Evolution CS Tuner programmer for diesel trucks

Engine Coolant (left), Exhaust Gas (middle bar), Transmission Fluid (right)

The more expensive Edge Evolution CTS tuner has three large displays with both analog and digital readouts rather than the two large displays and one small one on the Edge Evolution CS tuner.

Results

We installed the Exhaust Gas Temperature probe after we had done all of our mountain driving for the season, so we have yet to test it in the mountains. The “overtemp” magic number for the EGT is 1350. Typical temps we have seen driving around town are in the mid-900’s, and climbing a long 5% grade while towing our fifth wheel, we’ve seen the mid-1100’s. However, these have just been the long, gradual grades of Arizona and not the steep switchbacks typical of Rocky Mountain passes.

We will report our findings about the exhaust gas temperature readings once we have taken our RV over a big mountain pass!


8. Other Features of the Edge Tuner

Return to top

The Edge tuner has a ton of other things it can do, because it essentially opens up the truck’s computer so the driver can access the data and temporarily modify the input parameters for the current driving conditions. (Obviosuly, you must be parked to mess with the menus on the tuner.)

Our only interest in the tuner has been the improved power while towing, improved fuel economy while not towing and the additional temperature data that is made available when towing over big mountain passes.

Maintenance and Diagnostic Trouble Codes

There is a Maintenance Manager mode where you can establish a reminder system for standard maintenance items like changing the transmission fluid, checking the trans case fluid level, inspecting the brake pads, lubing the tie rod ends and rotating the tires. Simply get it started with your current odometer reading, and the reminders will alert you at your chosen intervals.

If you are really concerned about fuel economy, there is a Mileage Coach that can show you how to vary your foot’s pressure on the gas pedal to maximize fuel economy as you drive. You can also find out the fuel cost per mile of a particular trip if you enter the price of the fuel you buy!

In addition, the Edge tuner can reveal the Diagnostic Trouble Codes that are present when the truck’s Check Engine light goes on. Most codes can be looked up on the internet, so this might save some head scratching before heading off to a mechanic to get the problem looked at.

For racers

We have used only Levels 1 and 2 (for towing and around town driving), however there are two more levels beyond that for increased power performance, if you find your truck on the starting line of a racecourse. These modes adjust the fuel injection and timing to be more aggressive. In addition, the CTS model can be interfaced to a backup camera and it can also monitor the pitch, roll and G-forces!! For those with racing in mind who find themselves at a drag strip, there are also 0 to 60 mph performance tests and quarter mile tests, and the record highest values of these tests are maintained.

Studying the Data

You can also connect the Edge tuner to a computer using the USB port. You can retrieve all the data from the Edge programmer into an Excel-readable .csv file. using the downloadable Windows software called MyStyle (instructions given in the manual).

For us, however, we are content with just the basics!

Product info:

For fun:

After 20,000 very happy miles with this engine tuner, we replaced our ’07 Dodge Ram 3500 with a 2016 Ram 3500 dually. A detailed description of our buying process and options on the new truck can be found here: Which Are the BEST Ram 3500 Options for Towing a 14K lb. 5th Wheel Trailer? A fun story is that rocker Alice Cooper Sold Us Our Truck! For those that are curious, we put a fabulous “puck” based B&W Fifth Wheel Hitch in the bed of our new truck, and we’re getting another Edge tuner!

Subscribe
Never miss a post — it’s free!

Below are some of our most POPULAR POSTS (also in the MENUS above)

Buddy - A Journey in Spirit - The story of an event that changed our lives forever.

ARTICLE INDEXES
  • RV Tech Tips Articles - A one page index of links to all our RV Tech Tips, RV Upgrades & RV Maintenance articles.
  • RV Lifestyle Tip Articles - An index of links to all our RV Lifestyle Tips (finances, boondocking, major repairs, work/jobs, etc.)
  • Solar Power Articles - Overview and tutorial articles for how to design and install solar power on an RV or boat
  • Product Reviews - An index of links to all of our Product Reviews
RV UPGRADES, SYSTEMS & TIPS MONEY FULL-TIME RV LIFESTYLE GEAR STORE
  • Gear Store - A list of the goodies, equipment and gear we've found useful in our RV lifestyle!
 

Our most recent posts:

More of our Latest Posts are in the MENU.   New to this site? Visit RVers Start Here to find where we keep all the good stuff. Also check out our COOL NEW GEAR STORE!! *** CLICK HERE *** to see it!

RV Heater – How to Install a Vent-Free Propane Heater in Your RV

Installing a vent-free propane heater is one of the best upgrades you can do for your RV if you plan to be spending a lot of time in chilly places. This page reviews how ventless propane heaters operate in comparison to traditional RV furnaces, it discusses the different technologies used in the design of various types of vent-free gas heaters on the market today — including catalytic heaters, ceramic brick and plaque heaters, and blue flame heaters — and it presents a step-by-step guide for installing a vent-free propane heater in your RV or camper.

You can jump to the various sections of this page here:


This post was first written in January, 2009, but was completely overhauled and rewritten in October, 2014.

INTRODUCTION


Warming my hands over a vent-free blue flame propane heater in my 5th wheel camper RV

Happiness is… a vent-free propane heater!

We froze in our trailer during our first winter in Arizona. Morning temperatures in the kitchen were often 40+ degrees F, and although daytime temps could get as high as 70, as soon as evening came, the temps in our trailer dropped into the the 50’s.

Brrr! It’s hard to sit around in the evening in those kinds of temperatures. All modern motorhomes and campers (ours included) come equipped with a propane furnace. However, these loud, inefficient beasts use a lot of electricity, and can drain the batteries in one night.

During that first winter (2007-08) in our 27′ Fleetwood Travel Trailer, we discovered that the more experienced winter desert boondockers (both snowbird RVers and those living the full-time RV lifestyle) installed vent-free propane heaters in their rigs. These are wonderful little appliances that use far less propane than a furnace and no electricity at all. When we upgraded to our 36′ Hitchhiker 34.5 RLTG fifth wheel in May, 2008, we decided we would install one. All summer long we thought about the project, but never found ourselves in a town where there was a good selection of heaters to look at or anyone knowledgeable about installing them in RVs. So we dawdled.

As the nights got colder in late November, 2008, and we relied more and more on our trailer’s electricity-eating furnace, we found ourselves in the warm company of our good friends Bob and Donna Lea Jensen and their vent-free, electricity-free propane heater. Bob has installed quite a few of these little devils over the years, and he gave us some hints and loaned us two critical tools for the project: a pipe cutter and a flaring tool. We learned a lot through this process, and I thought it might be helpful, along with our other RV tips and tricks pages to include some notes here about our project.

There are several types of vent-free heaters on the market, and each has its pros and cons. In the end, we opted to buy a 20,000 BTU thermostatically controlled blue flame heater made by Vanguard. The night before the installation we laughed as we bundled ourselves into our recliners wearing multiple layers, buried under blankets for the last time. Mark’s face peaked out from under his hood as he read. The night after the installation, in shorts and t-shirt, I had to poke my nose out the window to get some cool air. In our excitement, we had inadvertently heated the bedroom to 85 degrees.

We have used and loved this heater year-round ever since, running it near sea-level in the southern states in the winter months and using in the cool mountains during the summer months!


COMPARISON OF RV FURNACES AND VENT-FREE HEATERS

RV PROPANE FURNACES

Propane uses oxygen as it burns and gives off moisture as a by-product. Therefore it has the potential to use up all the oxygen in an enclosed space and kill any living, breathing occupants while creating a layer of condensation on the insides of windows. Yikes! To accommodate these unpleasant aspects of propane heating, conventional RV propane furnaces use a large blower system to bring in outside, oxygen-rich air. In turn, they vent the moist, oxygen-depleted air from inside the rig to the outside. Circulating the air this way keeps the oxygen level in the air fairly constant and significantly reduces the build-up of condensation on the insides of the windows, as the moisture gets blown outside along with the exhausted air.

Atwood RV furnace
However, by blowing all this warm air outside, the furnace is effectively heating the outdoors. If you stand outside an RV next to the furnace vent on a really cold day, you can warm your hands and body quite nicely. Also, this blower requires electricity to run. RV furnaces are DC, so they do not require an inverter or generator in order to operate. However, the amount of power they use is astronomical (our 40,000 BTU furnace uses 11 amps DC). If you are boondocking, or dry camping in the desert as many winter Snowbird RVers do, you are then faced with a choice of either keeping the RV unacceptably cold, or using a generator to keep the batteries charged (even our big solar power installation on the Hitchhiker 5th wheel was not enough to keep up with the furnace blower during the winter).

Besides heating the outside air and running the batteries down, a major disadvantage of a standard RV propane furnaces is that the blower is really loud. There is nothing like being deeply absorbed in a really great movie and listening to some very profound dialog being exchanged in whispers, and having the furnace suddenly roar to life and drown out everything being said. Our furnace blower often woke us up out of a sound sleep too.

VENT-FREE PROPANE HEATERS

In contrast, vent-free propane heaters are silent and provide heat without using any battery power. This is because they rely on you to give them fresh air: you have to crack open a window while they run. All US-made vent-free heaters are built with an internal oxygen sensor that shuts off the heater if the oxygen level in the room becomes too depleted. In addition, most RVs come equipped with an LP gas detector that will sound alarms if the oxygen in the air drops too low or if an LP gas leak is detected and you can install a combo LP/CO detector as well to detect both LP gas and carbon monoxide. You may also need (or choose) to run a small fan to circulate the air. This will use some battery power, but you can decide how much or how little to use the fan.

Living without heat in an RV

Brrr… This was what life was like before we installed our vent-free propane heater!

So, in essence, when using a vent-free heater, you must find a happy balance between several variables. Determine which kind of heater will best suit your needs (see descriptions below), figure out where to place it in the RV, which window(s) to crack open, and how often to run a fan (if at all), and if so, which kind of fan to use (a little DC fan, like one used in a computer, a large AC ceiling fan that will require an inverter or generator to run, or an optional blower fan that can be purchased with the heater).

Heat rises, so in 5th wheel campers the heat tends to gather in the bedroom. Simply close the door to the bedroom, or crack it slightly open to control the movement of the warm air into that space. Likewise, if you use a ceiling fan, you can experiment with running it forward or backward, either to draw air up and move it out along the ceiling or to push the warm air down towards the floor.

Propane has a fixed capacity for providing heat. One gallon of propane contains 92,000 BTUs of potential heat, which means a 40,000 BTU RV furnace running full blast will burn through nearly a gallon of propane every two hours or so. During the coldest periods, it is a real pain in the neck to keep having to refill the propane tanks as you fly through propane trying to heat your rig.

Our Lynx travel trailer came with a 30,000 BTU furnace, and our Hitchhiker 5th wheel came with a 40,000 BTU furnace, both installed at the factory. These were sized appropriately for the square footage of each camper. However, we have found we can easily heat our big fifth wheel to higher temperatures in less time using our 20,000 BTU vent-free propane heater instead of the factory-installed 40k BTU RV furnace. So, a smaller vent-free heater that burns less propane per hour can effectively heat a given space more quickly than a traditional RV furnace that is twice its size.

Because of the inefficiency of RV furnaces in terms of propane use and battery power consumption, when we use the RV furnace alone for heat in 30+ degree F overnight temps and 40+ degree daytime temps, we find we have to keep our trailer at 50 degrees while sleeping at night and at just 60+ degrees during the day. Cold as that sounds, this uses up almost a gallon of propane a day and we can barely keep the batteries topped off using our 490 watts of solar panels alone. Worst of all, living like this is really uncomfortable.

Using our vent-free blue flame heater in the same conditions and burning the same one gallon of propane per day in those conditions, we can easily keep the 5th wheel at 76 degrees all day long. And we use almost no electricity.

To clarify, we have two 30 lb (7 gallon) propane tanks, and when outside highs are in the 50’s and lows are in the 20’s, we go through a tank of propane each week. When outside highs drop below freezing 24/7, we can go through a tank in 3 days.


WHICH IS THE BEST TYPE OF VENT-FREE HEATER?


When choosing a vent-free propane heater, there are a lot of products on the market. Catalytic and ceramic heaters produce infrared radiant heat which heats objects situated nearby much the same way the sun does. They create a warm, baking sensation on your skin, but if you move away (like moving into the shade outdoors), that sensation goes away. The air in the room warms up over time as the objects in the room warm up.

In contrast, blue flame heaters heat the air, rather than the objects in the room, providing a more even, uniform warmth. Gradually, the objects in the room heat up as the overall temperature of the air in the room rises.

All of these heaters come in different sizes, ranging from 5,000 to 30,000 BTUs, which are good for heating 100 square feet up to 1,000 square feet. Small ones can be hung on the wall, out of the way, while big ones that appear modest-sized in the show room suddenly become monster heat sources that dominate the floor space when you get them home to your RV.


CATALYTIC INFRARED RADIANT HEATERS

Olympian Wave-8 Catalytic infrared radiant heater for use in an RV
Catalytic heaters were the original vent-free heaters. The major brand is the Olympian Wave, manufactured by Camco, and their primary models are the Wave-3, Wave-6 and Wave-8 heaters. These provide 3,000, 6,000 and 8,000 BTUs of heat respectively.

Catalytic heaters provide infrared radiant heat by way of a large pad on the surface of the heater. A chemical reaction in the pad causes heat to radiate off the entire pad. If you stand in front of a catalytic heater, your skin will feel a nice baking warmth on it. The closer you sit, the more you will bake. This is a great feeling when you are chilled.

These heaters have been in use for years, and have an enthusiastic following. They are also quite expensive ($300-$430), often as much as double the cost per BTU as the other types of vent-free heaters. They do not have thermostats, just a “high” setting and a “low” setting, so you must manually turn them on and off or to high or low to regulate the temperature in the RV.

If the pad on these heaters becomes dirty, it is possible to replace it for about $100. A friend of ours tried to clean his by vacuuming it, and inadvertently ended up destroying the pad. Because the pads had changed slightly since he bought his unit five years earlier, he could not replace the pad and had to replace the entire heater instead.

You will need a brass elbow fitting from Camco for the installation. You may also want leg stands so the heater can stand on its own two feet and a dust cover to protect the catalytic pads when it is not in use.


CERAMIC (BRICK or PLAQUE) INFRARED RADIANT HEATERS

Mr. Heater Ceramic infrared radiant heater for use in an RV
Ceramic infrared heaters are a slightly newer technology that has been warming RVs for quite a few years. The most popular brand on the market is Mr. Heater. Other brands include Kozy World, Empire and ProCom. These are generally offered in one, two, three and five brick configurations providing 5,000, 10,000, 15,000/20,000 and 25,000/30,000 BTUs of heat.

Ceramic heaters provide the same infrared radiant heat as catalytic heaters. Across the front of the heater there are small ceramic “bricks” or “plaques” that heat up to a glowing orange/red color. Like a catalytic heater, standing in front of a brick (or plaque) ceramic heater will toast your toes to your thighs on the front of your legs. The heat from the bricks interacts with your skin and you will feel a wonderful tingly warmth.

These are extremely popular units and can be quite inexpensive ($130-$350). Most can be purchased with or without a thermostat. One big disadvantage is that the area directly in front of the bricks gets hot enough to burn things. Any flammable items that come too close to the bricks could catch on fire. If a cat or dog wanders past and flicks its tail against the bricks, it might get singed. If a toddler sticks its fingers in there, a trip to the hospital might ensue.


BLUE FLAME HEATERS

Mr. Heater Blue Flame vent-free propane heater for use in an RV
Blue flame heaters are the newest technology and provide a different kind of heat than the catalytic and ceramic heaters. Rather than radiating heat, blue flame heaters operate via convection (the principal that heat rises), drawing cool air in through vents at the bottom of the heater and emitting warm air out the vents in the top. This is a heating method that is much like central heating in a house. Once the air temperature has risen sufficiently, the objects warm up as well. If you keep your RV at a warm temperature all the time (especially at night), the objects in the room will never get cold.

Blue flame heaters draw cool air in from floor level through a row of vents at the bottom, heat it up, and emit the warm air out of vents at the top, relying on convection (the fact that heat rises) to move this air instead of using a blower. You can warm your hands and body by standing in front of one, but it is more of a warming sensation than a baking one. The area in front of the blue flame is covered by fireproof glass (it’s actually a ceramic material) and it is not burning hot. So, there is no risk of items immediately in front of the heater catching fire. Blue flame heaters are a good idea for people with pets or children.

The most popular brand is Mr. Heater. A few others include Empire Heating Systems and ProCom, the same makers of the ceramic brick heaters. These manufacturers produce both blue flame and brick heaters in the same chassis, so other than the appearance of the bricks or the flame, the unit itself has the same look whether it is the brick or blue flame version. The typical BTU range on these heaters is 5,000, 10,000, 20,000 and 30,000.

Blue flame heaters are as popular as the brick ceramic heaters, and are in the same price range of about $130-$350. They can also be purchased with or without a thermostat.

BLUE FLAME FIREPLACES !!

Pleasant Hearth Vent-Free Propane Fireplace 35 inch

.

There are some wonderful blue flame heaters that are designed to look like fireplaces, complete with logs, trim and beautiful wooden mantels. Manufacturers include Pleasant Hearth and ProCom.

These cost about $200-$300 more than the regular blue flame heaters, but what a beautiful addition to your RV. You can sit and watch the yellow flames dancing around the logs and warm your bones at the same time. I saw one of these units in an old travel trailer and was enchanted. The owner had built his own mantel out of an old coffee table, and it was lovely. I wanted one of those units so badly!!

The only place for a unit like that in our rig was along the backside of the “L” in the kitchen counter, which is just a few inches from the wall of the entertainment slide-out when it comes in. If we had the carpentry skills, we probably could have slipped a fireplace in there, recessed under the counter.

The only downside would have been that it might have gotten a little hot under the counter, and we would have had to be extra careful that the heater was fully cooled whenever we brought the slide-out in, or we would have cooked the gelcoat on the outer wall of the slide. Also, as it turned out, that particular location for the heater would not have provided the same warmth when we sat in our recliners as the heater does in its current spot in the kitchen in front of the oven (even though it would have been closer). It’s just the way the air flow circulates in our particular trailer.

PORTABLE HEATERS

Mr Buddy Portable vent-free propane heater

.

If you don’t want to hassle with installing a dedicated gas line for a vent-free propane heater in your RV, you can opt to get a portable unit instead. The portable ventless heaters are all infrared radiant heaters with bricks (plaques) that have air intake vents in the bottom for convection as well. They have built-in blowers that run on a 6 volt a/c adapter (sold separately) or on 4D batteries. They are very popular.

They are manufactured by Mr. Heater (with the brand name “Big Buddy”), and they come in sizes from 4,000 to 18,000 BTU. They run on the small Coleman style portable propane canisters but can also be connected to a larger BBQ style propane tank.

If you plan to run the heater from a large propane tank instead of the little propane canisters, Mr. Heater sells a companion flexible gas hose with a regulator and quick release connector on it for just that purpose. Mr. Heater make nice carrying cases for these heaters as well.


OPTIONAL EQUIPMENT for VENT-FREE PROPANE HEATERS

Thermostat

Usually this option is just $30-$50, and it is well worth the cost if you plan to be in your RV for extended periods of time. A manually controlled heater will have several heat settings (usually three), but you will need to monitor the heat in the room and adjust the settings as you get warmer or cooler. A thermostatically controlled heater will cycle on and off as its sensor detects changes in temperature. Ours typically cycles on and off in 5-10 minute increments, keeping the temperature within 2 degrees.

On our unit, the thermostat has a simple analog dial that can spin from “1” to “5.” These are arbitrary numbers rather than fixed fahrenheit degree markers. However, once you figure out how “1 1/4” or “2 1/2” relates to temperature, you can keep the temperature in the room tightly controlled by turning the dial to the setting you want. This is especially nice if you plan to keep the heater on all night, as the temperature in the RV will remain constant while the outside temperature drops.

Feet

Most units are designed to be hung on a wall, however most also have an optional stand so they can be placed on the floor. Most smaller units include the feet as an option (about $25) while most larger units come with the feet at no extra charge. The great advantage to hanging a unit on the wall is that it is always there, ready for use. If you use your RV during all four seasons, it is nice to know that if you suddenly find yourself in a chilly spot, you can simply flip the switch and have your heater working for you, rather than digging it out of the back of the closet (a lesson we learned after the fact!).

The advantage of having the unit standing on its own two feet is that you can move it around the rig. This is especially true if you don’t use a fan of some kind to move the warm air around the rig. If you go this route, make sure you have plenty of flexible gas hose so you get maximum range for placing the heater in different spots in the rig.

Blower

Most ventless gas heaters can be purchased with an optional blower. As soon as you start blowing the air around the RV, you are signing up to use the batteries to keep the rig warm, something the vent-free solution was aiming to avoid. However, the power consumption should be less overall than a furnace. Some blowers are thermostatically controlled, allowing them to cycle on and off as needed. This is efficient, as the blower and batteries won’t be in use all the time the heater is on. Rather than a built-in blower, many people opt to install a small DC fan which uses very little power. If your rig has a ceiling fan, that can also be an option, although it will require the inverter or generator to be turned on. In our case, our inverter is turned on from the moment we wake up until we go to bed, so running the ceiling fan when the heater is on during the day is no big deal.


HEATER PLACEMENT

When we installed our ventless propane heater, we tried placing it in several locations. We also tried turning our ceiling fan both on and off and running the fan both forwards and backwards (blowing towards the floor and towards the ceiling) before we settled on a final arrangement.

Kozy World Vent-Free Propane Heater connected to flexible gas hose

This ceramic heater has a flexible gas hose that allows it
to be moved around the RV.

We found that the best setup was to place the heater directly below our ceiling fan (in front of the oven at the base of the stairs in the kitchen) and to set the fan to blow towards the ceiling, drawing the warm air up and distributing it outwards throughout the RV. It was astonishing to find what a difference it made as we moved the heater to various places in the trailer and tried each placement with or without the ceiling fan, and blowing up versus blowing down.

Our RV is a “rear lounge” fifth wheel
, and we found that the area around the recliners was a significant cold air pocket. Doesn’t it figure! That’s where we like to be on cold evenings!! There are large windows surrounding the recliners, which make that area cold, while the warm air in the rig congregates high up on the ceiling just in front of the stairs leading to the bedroom (that is, if the bedroom door is closed. Otherwise the warm air settles in the bedroom itself).

We assumed that facing the heater towards the recliners just 5 feet in front of them would warm up this cold pocket. Wrong! No matter how high we set the thermostat, and no matter what we did with the ceiling fan (which is located 10 feet away right in front of the stairs leading to the bedroom), the recliners were still cold.

When we moved the heater to the base of the stairs leading to the bedroom, and turned the ceiling fan on “high” and set it to blow towards the ceiling, we could immediately feel the warm air encircling us as we sat in the recliners. Who woulda thunk??!!

Heater Sizes and Capacities

Most manufacturers state the square footage their various heaters are designed to heat. We decided that we’d rather buy a slightly larger unit (that is, one rated for a larger space than the interior of our fifth wheel), and simply keep the heater on a lower setting than to find ourselves unable to heat the buggy adequately. Our rig is 360 square feet, which put us somewhere between 10,000 and 20,000 BTUs. We ended up buying a 20,000 BTU heater, and we typically keep it set to 50% of maximum during the evenings/mornings and 25% of maximum at night when temps outside are in the 20’s and 30’s. If we had purchased a 10,000 BTU unit instead, I think it would have been cranking at max volume most of the time during the mornings and evenings and on stormy days. As a rough guide:

Vent-free heater BTU ratings and square footage
6,000 Up to 200 sf
10,000 Up to 300 sf
20,000 Up to 700 sf
30,000 Up to 1,000 sf

There are legal ratings for the sizes of vent-free heaters and the rooms they can be operated in. Less than 6,000 BTUs is okay for a bathroom, and less than 10,000 BTUs is okay for a bedroom. These are the ratings that are being referenced when you see a sticker on a larger unit saying “not designed to be used in a bedroom.” The idea is that a large unit operated at max volume in too small a space will use up too much oxygen in the room too quickly. Of course, such a scenario would have the occupants of the room running out the door because it would be way too hot for comfort.


SAFETY OF VENTLESS PROPANE HEATERS

Some people may worry that these kinds of ventless propane heaters aren’t safe, fearing that it might blow up the RV or suffocate them. These heaters are extraordinarily well regulated by various governing bodies, and designers have to meet stringent guidelines and submit their heaters to a battery of very challenging tests before they can be brought to market. Vent Free is the industry organization for all the vent-free gas heater manufacturers. Their website spells out all the testing, guidelines, state by state requirements, laws and safety record for these heaters. Through September 1, 2005, they claim that there had not been a documented death due to a vent-free propane heater (see that claim here). Visit their website at ventfree.org.

In addition, at the factory, RV manufacturers install a LP Gas Detector Alarm system (various brands are used) to detect LP gas leaks in the RV and alert anyone inside. These are installed because many RVs come equipped with propane-based appliances, including things like the stove, oven, hot water heater, refrigerator and RV furnace. All RV owners should be aware of where their LP gas detector is located. It is usually installed near the floor, as LP is a heavy gas that settles down low. Propane is found in highest concentrations near the floor.

Some RVers run their vent-free propane heater overnight as they sleep. We don’t do that. If the overnight low temps will be well below freezing (i.e., 25 degrees F or below), we run our RV furnace, set to 50 degrees, all night long to keep the plumbing from freezing, because the furnace is ducted throughout the basement.


OPERATION AT HIGH ELEVATION

Most of these heaters are sold with an official limit for operating altitude. The problem at higher altitudes is that there is not enough oxygen for the propane to burn properly. Some units are rated for use up to only 3,500 feet, while other manufacturers have a stated limit of as much as 5,000 feet.

Our blue flame vent-free propane heater is rated for use up to 4,500 feet, but we have used it extensively at altitudes up to 8,500 feet and have used three times for two week periods at 10,000 feet.

The key to operation at altitude is the Oxygen Detection Safety-pilot (ODS) sensor which has been standard equipment on all US-made vent-free heaters since the 1980’s. This sensor shuts off the gas to the heater when it detects the oxygen level has dropped to 18% (normal sea-level air is 21% oxygen). We find that whenever the ODS shuts our heater off, our stove and oven continue to run without a hitch. So, in reality, the stove and oven are actually more dangerous, as they do not have built-in ODS units to shut them off when the oxygen in the room gets too low.

5th wheel camper rv in the snow

A surprise autumn snowstorm at 10,000 feet elevation in Colorado during a two week stay taught us a lot
about how vent-free heaters function at high altitudes.

We use our heater all summer long as we travel through the western mountain states. We find that it works very well at 6,000 to 9,000 feet, taking the chill off cold mornings and raising the temperature inside the RV from a brisk low to mid-40’s to 75 degrees within an hour.

We have spent months at these altitudes. On occasion, if we have been running the stove and oven as well as the heater, the heater will unceremoniously turn itself off. This is no problem. We simply open the RV door to let some oxygen-rich air into the rig.

We have also spent several periods of 10 days to two or three weeks at 10,000 feet. Here we had more difficulty with our vent-free heater when the outdoor temps dropped into the high 20’s overnight (and we got two inches of snow on our roof!) and daytime highs were in the 40’s. The heater needed some coaxing to make it work. We tried two methods of combining the RV furnace and the ventless propane heater at this altitude. Neither was ideal, but this will give you a sense of what to expect and what to try:

1. Run the RV furnace all night long to keep the rig at 50 degrees overnight, and then use the RV furnace to raise the temp to about 60 in the morning. We found that this method used gobs of electricity and propane and didn’t make us very warm. What’s worse, when we tried to use the vent-free blue flame heater after running the furnace, the furnace would not have sufficiently replaced the interior air with exterior oxygenated air, so the vent-free heater could not run very long before it shut off due to having insufficient oxygen around it. So, in essence, using the RV furnace meant we couldn’t use the vent-free heater. We found we could run the RV furnace all day long but the temps in the rig would never exceed 61-62 degrees (the high temps outside were in the 40’s, lows in the mid-20’s).

2. Leave the furnace off overnight and run the ventless propane heater in the morning to warm up the rig. The temps inside our bedroom typically stay about 10 degrees above the outside temps if we don’t heat the RV overnight, so we woke up on some mornings to interior temps in the high 30’s. (We close our bedroom door at night to help keep the bedroom warm). The vent-free heater miraculously heated our indoor RV temps to 70 degrees within an hour of turning it on. At this point, around 70+ degrees, the heater would shut off. We could coax it to run a little more by opening the RV door and fanning the outside air into the rig, but it would shut off again after another 10 minutes or so. So then we would turn on the RV furnace.

Any sensible person would have gone and gotten electric hookups at a campground and run an electric ceramic heater, but we aren’t always very sensible. Camping at 10,000 feet in snowy weather is rather extreme. Most of the boondocking spots we stay at in the summer months are down around 6,000 to 9,000 feet, as I mentioned above, and the heater works beautiful at those altitudes. During the winter months we are typically at elevations of under 1,500 feet and the heater works like a champ without missing a beat.

Note: Since publishing this article, we have enjoyed yet another year of toasty warm heat from our blue flame vent-free heater in the mountains from spring through fall and at low desert elevations in the winter. We were also caught in another even bigger snowstorm on a mountaintop at 10,000 altitude once again and tried a different heating strategy that kept us warmer and dryer. Our article about that experience is here:

How to Heat an RV in Cold Weather and Winter Snowstorms


WHERE CAN YOU BUY A VENT-FREE PROPANE HEATER?

We had the worst time trying to find places to look at these heaters and find people knowledgeable about installing and using them in RVs. In some states it is illegal to sell these kinds of heaters (here’s a link to the state-by-state regulations for vent-free gas heaters from ventfree.org), and in mountain towns they are scarce because of their issues with operating at high altitudes. In four months of summer travel when we were looking to buy, we found just two propane gas companies selling vent-free heaters, one in Jackson, MS and one in Kanab, UT. We ended up learning the most from fellow desert boondockers in Arizona, Nevada and California during the winter months and from salespeople in mom-and-pop hardware and RV parts stores in Yuma and Quartzsite, Arizona.

If you know what you want, you can get a much better deal buying online, and Amazon sells all the major brands and accessories. We paid $290 plus $25 tax for our heater, a Vanguard 20,000 BTU blue flame with a thermostat and no blower (it came with feet). After buying, we found the same unit online with free shipping and no sales tax for $175 (Vanguard heaters are no longer made). Ace Hardware told us they could order a similar unit for us, shipped to their store in a week, for $215. So we paid a premium for our unit, but we did talk to a lot of sales people in the process and we saw a lot of the units (and warmed our hands over them), and knew exactly what we were buying.

Cost of installing a vent-free heater

Our entire project cost $385. The heater was $315 (including tax), and parts totaled $70. We were able to borrow the tools, but found they cost only about $15 to buy. We were quoted between $60 and $100 for the labor for the installation. As stated above, we also could have saved about $140 on the heater if we had purchased it online.


INSTALLATION OF A VENT-FREE PROPANE HEATER IN AN RV

Following is a pictorial step-by-step guide showing how we installed our vent-free propane heater in our RV.

Installing fIttings on the vent-free propane heater

The installation begins with work on the heater itself…

Working under the kitchen cabinets to install the new gas line for the heater

…however, the bulk of the installation involves tapping into an existing copper gas line to connect a new flexible gas line that goes to the heater.

The first step is to do a little work on the heater itself…

Installing the feet on our ventless blue flame propane heater

Attach the plastic feet so the unit can be freestanding and be moved around the trailer easily.

Installing the gas valve on the blue flame heater

Attach a brass elbow fitting at the base of the heater.
A flexible gas hose will eventually connect to this elbow.

Installing the thermometer on our ventless blue flame propane heater

Attach a thermistor (an electrical resistor type of thermometer) for the internal thermostat. This went on the lower back corner of the heater.


Our heater came with feet so it could be freestanding, and it also came with a thermistor, or resistor based thermometer, for the thermostat. These were attached before beginning the actual installation of the new gas line in our trailer.

The brass elbow did not come with our unit, but we found one with the right pitch, thread and diameter at the gas and electric supply store where we bought the other fittings for our project.

Second Step — Turn off the gas and tap into an existing copper gas line

The gas hose for the heater will tap into an existing copper line in a kitchen cabinet

The new flexible gas line for the heater will connect into the existing copper line.

We decided to tap into the copper gas pipe that runs between the refrigerator and the stove at the back of one of our lower kitchen cabinets. Mark measured the pipe and found it was 3/8″.

The goal was to cut the existing pipe and insert a series of fittings that would allow us to attach a flexible gas hose at that point, effectively creating a new leg of flexible gas line. This hose would then run out through a hole drilled at the base of the cabinet and attach to the heater. All of this is low-pressure pipe and fixtures.

Layout of all the gas fittings for installing the vent-free blue flame propane heater in our fifth wheel trailer RV

To create a new leg of flexible hose gas line requires a T-connector (to rejoin the severed pipe), F-F gender changer, On/Off valve and flexible gas hose with a stopper at the other end.

At a gas and electric supply store we picked up a male-male T-connector that would be inserted into the cut copper pipe.

The base of the T would connect to a female-female gender changing connector, and then to an on-off valve (which has male fittings at either end), and finally to a female connector on the end of the flexible gas hose.

Most of the year the heater would not be in use, so we bought a stopper for the end of the hose that goes to the heater.

pipe cutter for cutting gas pipe

Specialty tool #1: Pipe cutter

When the heater is disconnected, this stopper would be screwed into the end of the hose and the heater would be put in a closet.

However, we later discovered we wanted easy access to our heater during all four seasons, so the stopper never gets used!


The existing gas line is cut

The existing gas line is cut.

A universal gas appliance hookup kit manufactured by Mr. Heater includes all these parts except the T-connector!

Flaring tool showing both parts

Specialty tool #2: Flaring Tool.

The first step, after turning off the gas, was to cut the pipe. This requires a pipe-cutter, a small, inexpensive tool.

Once the pipe was cut, the next step was to connect the T-connector between the two severed ends of the copper pipe.

practice flare on scrap piece of copper pipe

Practice flare.

This would be done by first sliding a female connector onto each of the two pipe ends and then flaring the ends of the pipe with a flaring tool so the connectors couldn’t slide back off again.

The female connector is slid onto the pipe before the flare is done

The flare prevents the female connector from coming off the pipe.

The male-male T-connector would be screwed into this (and its companion) female fitting on either end of the pipe, rejoining the pipe and making a new connection available for the gas hose to go out to the heater.

flaring tool for flaring the end of a gas pipe

Flaring tool with scrap practice pipe in it.

Mark had never used a flaring tool to flare a pipe before, so he wanted to practice it first on a scrap piece of pipe.

Flaring the real pipe under the kitchen cabinet

Flaring the real pipe inside the cabinet.

He made the practice flare by inserting the scrap pipe into the appropriately sized hole in the tool and then screwing down both ends of the tool to snug the pipe into it — as if it were a bad guy in the old days having his head and hands put in the stocks in the town square!

One flare finished second flare beginning

One flare done, now do the other.

Then he inserted the pointed end of the flaring tool into the end of the pipe and twisted the crank, slowly flaring the end of the pipe as the point pressed further into it.

Two wrenches tighten T-connector in place

Tightening the T-connector with two wrenches

He slid the female connector onto a short piece of pipe and felt a snug fit between the pipe and the connector. The flare was just right. Now confident that he could flare a pipe properly, he contorted himself to get the flaring tool set up on the real copper pipe at the back of the cabinet.

T-connector with F-F gender changer

T-connector with F-F gender changer ready for the shut-off valve to be attached.

He began by sliding a female connector onto one end of the severed pipe under the cabinet and flaring the pipe’s end. Then he did the same thing to the other piece of the severed pipe. Then he screwed the male-male T-connector into the two female ends of the pipe to rejoin them, and he tightened the T-connector using two wrenches.

He attached a female-female connector to the base of the T, making it possible to screw the male-male valve into place. This valve would allow the gas to the heater to be turned on and off. After the valve, he attached the female end of the gas hose.

Connecting the flexible gas hose to the shut-off valve

The new flexible gas line connects to the shut-off valve.

Finally, he drilled a hole in the front base of the kitchen cabinet and ran the gas hose through the hole. The other end of the gas hose was attached to the elbow connector he had placed on the bottom of the heater.

Tightening all the connections with wrenches, and turning the gas to the trailer back on, the heater was now ready to be used.

Hole at base of the cabinet for the gas hose

The new flexible gas line will come through this hole and connect to the heater.

Mark checked for gas leaks using a tiny spritzer bottle filled with a few drops of Dawn dish soap and water. Spraying this mixture on each connection, he looked for bubbles to form which would indicate a gas leak.

To give us flexibility in moving the heater around the rig, we originally used two lengths of gas hose: a 3′ length for under the cabinet and a second 12′ length that attached to it with an inline male-male connector.

Vent-free blue flame propane heater installed in a 5th wheel trailer

What a great little heater!!

The idea was that the 12′ gas hose would give us lots of flexibility for moving the heater around the trailer. However, we found that it was too long and too bulky and the best position for the heater was close to the stove anyway. So we replaced the 12′ hose with a shorter 4′ one.

After the installation was finished, it didn’t seem like such a big project after all, and what a thrill it was to toast ourselves in our warm buggy. Our timing was perfect: the next week brought a big cold front, multiple days of rain, lows in the 30’s and highs in the fifties. We were snug as bugs in a rug while the winds howled outside.


There are tons of choices for installing a vent-free propane heater, but these four are among the most popular. If you buy a heater from Amazon, make sure it is PROPANE and not NATURAL GAS, as the pictures look the same. We receive a 4-6% commission for purchases made through any of our Amazon links (at no cost to you) which helps us maintain this site — thank you!

Good luck with your project, and stay warm!

Subscribe
Never miss a post — it’s free!

Disclaimer: This blog post describes our vent-free propane heater installation. We are not responsible for any installation other than the one in our own rig.

Below are some of our most POPULAR POSTS (also in the MENUS above)

Buddy - A Journey in Spirit - The story of an event that changed our lives forever.

ARTICLE INDEXES
  • RV Tech Tips Articles - A one page index of links to all our RV Tech Tips, RV Upgrades & RV Maintenance articles.
  • RV Lifestyle Tip Articles - An index of links to all our RV Lifestyle Tips (finances, boondocking, major repairs, work/jobs, etc.)
  • Solar Power Articles - Overview and tutorial articles for how to design and install solar power on an RV or boat
  • Product Reviews - An index of links to all of our Product Reviews
RV UPGRADES, SYSTEMS & TIPS MONEY FULL-TIME RV LIFESTYLE GEAR STORE
  • Gear Store - A list of the goodies, equipment and gear we've found useful in our RV lifestyle!
 

Our most recent posts:

More of our Latest Posts are in the MENU.   New to this site? Visit RVers Start Here to find where we keep all the good stuff. Also check out our COOL NEW GEAR STORE!! *** CLICK HERE *** to see it!