Solar Tutorial Part II – Small Upgradeable RV Solar Power Systems

<– Solar Tutorial Part I – Basic Concepts
Solar Tutorial Part III – Full-timer Kits –>

Designing a solar power system for your RV depends entirely on how you plan to use your RV.  Are you RVing in summer or winter, or both?  Are you staying in it for a week or two at a time or for several months at a time?  Do you want to use a laptop for an hour or so a day, or do you need to camp out on it for 4-8 hours at a time?  Do you hit the sack after an hour or so of watching TV or do you want to plunk down in front of it with a cocktail and stay planted there until after midnight?

RV solar panel on the ground

We didn’t install the panel on the roof at first. Silliness! Install it on the roof so you don’t have to think about it!

As a general rule, more solar power is better.  It is really awesome to have so much power that you never need to think about it.  If you are planning to live in your RV for extended periods of time, want to use big appliances a lot and don’t want to be dependent on electrical hookups, get a big full-timer’s system right off the bat.

However, if you are just weekending, vacationing, and living largely outdoors, get a small system.  You’ll quickly learn what you can and can’t do.  It is very easy to upgrade if you find you need more.  Upgrading is mostly a matter of adding more and bigger parts.  Not too many parts have to be swapped out.

RV solar panel installation - wiring the panel's junction box

Mark connected the cable to the panel’s junction box before hoisting the panel onto the roof.

This page describes a “starter solar setup” which is good enough for heading off into the woods for a month or two of simple living in the summer.  We used a system of this size for a full year, boondocking (dry camping) for months on end.  We typically used the laptop or TV or stereo just 1-2 hours a day.  We went to bed 2-3 hours after sunset.

In the summer it was fully adequate for those kinds of light electrical needs.  In the winter there was so little sun that we had to be very conservative.  We used oil lamps at night, and we supplied extra charging for laptop, toothbrush, camera batteries etc. by charging them in the truck while driving around, using a portable inverter plugged into the cigarette lighter in the truck.

A Small Solar Setup:  150 watts of solar power with portable 150 & 300 watt inverters

If you are going to dry camp in your RV in the summer, you don’t need an big solar power system.  You will be busy around the campfire at night rather than watching hours and hours of TV.  You will be using your RV when there is abundant sunshine, and you probably won’t spend too many hours on your computer.  Here is a very simple solution that will be sufficient for as much as a few months of simple living in summertime:

1 150 watt solar panel ($220)
1 Morningstar 10 amp charge controller ($60)
1 Portable 150-300 watt modified sign wave inverter ($30)
10 gauge wire that is rated for outdoor use ($150)
2 12-volt batteries wired in parallel ($150 for that second battery, as your RV should have a battery already)

Total cost:  ~$650
Wild guess at an installer’s fee:  ~$400

Installation

RV solar panel installation on a fifth wheel

Cardboard covers the panels (shown here on our big full-timer’s installation) so they aren’t live

Installation isn’t too difficult if you are willing to scramble around on the roof a bit:

(1)  Install the solar panel on the roof.

While working with the panel, keep it covered so it isn’t producing electricity.  One easy way to cover it is to cut part of its cardboard packaging to size and tape it on.

Mark drilled holes in the roof and used anchors for the screws in places where the panel couldn’t be screwed into a roof truss.  He jammed Dicor lap sealant into the holes before putting the anchors in, then ran the wire and then put more Dicor on the whole works after it was screwed down.

RV solar panel installation on a travel trailer

Mark used lots of Dicor roofing lap sealant

If there is a chance you might eventually want to use your RV in winter, install the panel on tilting brackets so you can tilt the panel towards the sun.  It isn’t necessary to tilt the panel in the summertime, but it can be a huge help in the winter when the sun rides very low in the sky and doesn’t shine down on the panel but actually shines kind of across it from just above the horizon.  Tilting the panel towards the sun might give you an extra 25% of total charge for the day in the wintertime.

When you have tilting brackets, you have to climb up on the roof to tilt the panel each time you set up camp — and you have to remember to climb back up again to lower it down before you drive off.  If you don’t think you want to do all that scrambling around on the roof, skip the brackets (and consider getting two panels instead, described in Part III of this tutorial).

(2)  Install the charge controller inside a hatch near the battery compartment.

(3)  Run the wires from the panel to the charge controller

Connect one end of the wire to the panel (there are screws in the junction box on the panel that you screw the wire to).  You can use duplex wire or two runs of single conductor wire for the positive and negative leads. If the refrigerator is not in a slide-out, run the wire down through the refrigerator vent to the battery compartment.  Otherwise, run the wire down along the outside of the grey or black water vent pipe.

Taping the wire to a metal snake and snaking it down behind the fridge really helps.  We snaked ours down inside a piece of PVC pipe that we used as a kind of conduit to keep the wire away from the back of the fridge.  If you do that, make sure the PVC pipe is quite a bit bigger than the thickness of the wire so you can get it through easily.

RV solar panel installation crawling on the roof

Our lightweight Lynx trailer did not have a “walk-on” roof, but Mark used a telescoping ladder and crawled around to install the panel

You can also use the MC4 connectors in the solar panel’s junction box and use solar power cable that has MC4 connectors pre-installed

At the charge controller, connect the wire coming down from the solar panel to the input side.  Run a second wire from the output side of the charge controller to the batteries.  It is best to crimp eyes on the ends of the cables.

(4)  Remove the cardboard from the panel.


You should see an LED light on the charge controller turn green to indicate that it is charging.

300 watt inverter for an RV solar panel installation

Use small, portable inverters plugged into the RV’s cigarette lighters for the TV, laptop, etc.

Now your panel will start charging your batteries all day every day.  It might even start charging them before you get out of bed in the morning!  They will charge faster if you are in full sun.  Just a little shade on the panel (like a single tree branch across one corner) will cause them to charge much more slowly.

(5)  Use your AC appliances

Plug your portable inverters into whatever available cigarette lighter outlets there are inside the RV.

Whenever you want to watch TV, DVD’s or use your laptop or charge your camera batteries or toothbrush or whatever, plug the appliance into an inverter, turn the inverter on, and use the appliance as you would at home!!

RV solar panel installation on a travel trailer - completed

A successful morning’s work – the panel is permanently installed!

(6)  Add a second 12-volt battery to your battery box (this could also be Step 1, it doesn’t matter). 

The battery is your energy storehouse.  You add energy to it when you charge the batteries and you remove energy from it when you use your appliances and lights.  Think of your batteries as being a big kitchen sink.  You fill the sink with water (charge the batteries) by turning on the faucet.  You drain the sink (when you use your appliances and lights) by removing the drain plug.  The goal is to keep the sink at least 2/3 full all the time.  After a day of sunshine, as the sun is setting, your sink should be full.  After an evening of watching TV and computer work, your sink should not be less than 2/3 full (batteries don’t like to be drained until they are empty).

Group 24 deep cycle 12 volt battery for use in an RV solar power system

Add a second Group 24 12-volt battery in parallel

So you have to balance the size of your faucet (the total wattage of the solar panels), the size of your sink (the total amp-hour capacity of your batteries) and your appliance usage (how often and for how long you remove the drain plug) to make sure you don’t drain out more than you can fill up on a sunny day.

Most RVs come with a single Group 24 12-volt battery.  These typically store about 70 amp-hours of energy.  Adding a second Group 24 12-volt battery will double the size of your “sink” to about 140 amp-hours of energy.  As a very general rule of thumb, the total watts of your solar panels should be comparable to the total amp-hour capacity of your batteries.  With 140 watts of solar panels in this system, it makes sense to have two 12-volt batteries to give you 140 amp-hours of battery capacity.

Make sure there is room in the battery compartment for a second battery, as some RVs don’t have room for one.  When shopping for an RV, if you plan to dry camp a lot, make sure the battery box can hold two 12-volt batteries.  Wire the two batteries together in parallel.

 To learn more about batteries and battery charging, read this article:

RV and Marine Battery Charging Basics

And that’s it for this whole system.  Very very simple.  The only limitation to this system is that you need to keep your TV/laptop usage fairly light and you cannot use your microwave, toaster, hair dryer, vacuum or air conditioning unit.  However, it is a great starter setup to get your feet wet and learn to live in a solar driven home on the road.

Monitoring Your Batteries

Fluke snap-on multimeter voltmeter

A multimeter can help you monitor the batteries

The easiest way to see how your batteries are faring is to use a multimeter and measure the voltage.  We use a Sperry clamp-on meter that has jaws that can wrap around wire so you can measure the amperage flowing through the wires, if need be. The Fluke meter is an even better unit because it is true RMS.

Monitoring the battery voltage with a multimeter is not scientifically accurate, because batteries have personalities and memories and only tell the truth about themselves when they have not been under load for a long time and have been cleaned of their surface charge.  However, checking your batteries’ health with a multimeter can still give you a good indication of how they are doing.

Early in the morning, before the sun has gotten over the horizon, measure the voltage between the battery terminals.  If it is 12.3 or higher, you’re okay.  If it is lower than that, go outside and play and leave the indoor appliances alone for a day or two (and hope for sunshine).  If that’s not possible, start thinking about finding a place to plug in.

Likewise, check out the voltage sometime right after sunset before you get the TV or laptop going.  If it is 12.6 or more, you are golden.  If not, then rethink your evening’s activities a bit.

A Portable Solution with NO INSTALLATION NEEDED!!

Folding RV 12 volt solar panel suitcase for_

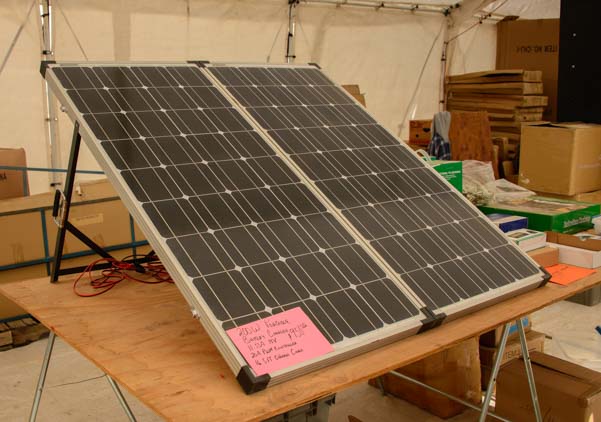
Portable solar panel kit that folds into a hard shell suitcase!

One very slick option for adding a small solar power system to your RV without going through the trouble of installing the panels on the roof is to get a folding portable solar panel kit. These wonderful kits are pairs of panels that are hinged together on the long side, and they fold together to form a hard shell suitcase that has a handle for easy carrying.

The beauty is that the panels are naturally protected when you store them away, and they have built-in stands that support the panels at a tilted angle when they are set up, so you can aim them south for maximum efficiency.

They come with a small solar charge controller so the batteries don’t get overcharged, and they have alligator clips that make it easy to clip the leads onto the battery terminals.

This is not an upgradeable system, but if you are simply looking to enjoy some dry camping and boondocking in your RV and want a little solar boost for your batteries, this is an all-in-one 120 watt system that will get the job done!

Most portable suitcase kits don’t come with an inverter, so remember to buy that too!

Most of the components for an RV or marine solar power installation can be purchased at Amazon.

Shown here is a complete "weekender/vacationer" kit (far left), a small charge controller (middle) and a small inverter (right). More comprehensive listings of each component type can be found at the following links:

Purchases at any of our Amazon links help keep us going. But don't buy anything yet. Finish the tutorial first!


Part III of this tutorial describes ways this starter system can be upgraded to get a little more power. Return to Part I here.

Solar Tutorial Part III – Full-timer Systems –>

Subscribe
Never miss a post — it’s free!

FURTHER READING – RELATED ARTICLES

SOLAR POWER OVERVIEW and TUTORIAL

BATTERIES and BATTERY CHARGING SYSTEMS

LIVING ON 12 VOLTS


Our most recent posts:

More of our Latest Posts are in the MENU.   New to this site? Visit RVers Start Here to find where we keep all the good stuff. Also check out our COOL NEW GEAR STORE!! *** CLICK HERE *** to see it!

Solar Tutorial Part I – Understanding the Basics of RV & Marine Solar Power

This page is the first in a series of four posts that explain the nitty gritty details of RV (and sailboat) solar power. The intention is to demystify the subject of marine and RV solar power and make it understandable for all, regardless of how technical you are or how much you know about electricity. The pages are linked together with arrows at the bottom of each page.

Since we started traveling full-time in 2007, we have been living almost exclusively on solar power, first in a travel trailer, then a fifth wheel trailer and also in a sailboat.  We don’t stay in RV parks or campgrounds or marinas, and on the rare occasions that we do, we don’t hook up to shore power.  As of June 2019, we’ve spent over 4,000 nights living off the grid without electrical hookups in our rolling and floating homes.

A solar power installation in an RV gives you the freedom to have full electrical power anywhere and at any time: at a rest area, in a parking lot, or at a National Forest campground.  Likewise on a boat, you can anchor out for an unlimited time in bays and coves.  Solar power runs without using any gas, is silent, doesn’t smell, and doesn’t require any setup (those shore power cords are mighty ungainly).  Although we do have a gas generator in our trailer, we use it only when we want to run our 15,000 btu air conditioner, not for charging the batteries.  It is a Yamaha 2400i.

Wrapping your brain around solar power for a rolling or floating home can be confusing, but it is actually quite straight forward.  Here’s the whole thing in a nutshell (wherever it says “RV” you can also think “sailboat,” as the principles are the same).

RV Solar power instalation on a fifth wheel trailer

Mark finishes three days of installing our fifth wheel’s solar power system while boondocked in Flagstaff, AZ.

There are 2 functions that your rig needs to have if you want to live without electrical hookups:  

  •  A system to charge the batteries
  •  A system to create AC power for the rig so you can watch TV and use a vacuum

There are 3 components (or “parts”) used in an RV solar power installation to accomplish the two objectives listed above:

Now put it all together…

  1. To charge the batteries you need:  Solar Panels and a Charge Controller
  2. To use your batteries to generate AC power for your TV, computer, etc., you need:  An Inverter

That’s it!!   Very simple.  To flush it all out a little, here it is in more depth:

Solar Power Function #1 – Charging the Batteries

When an RV comes from the dealership, it usually has either a Converter or an Inverter/Charger in it so it can charge the batteries when it is plugged into shore power (via “hookups” or gas generator).  Converters are cheaper and are factory installed on most trailers.  Inverter/Chargers are expensive (because they are dual-purpose, see below) and are factory installed on higher-end motorhomes.

These appliances take the AC power coming in from the external source (hookups/generator) and use it to charge the batteries.  They usually have a 3-stage charge cycle that charges the batteries quickly at first and then drops to a trickle charge once the batteries are close to fully charged.

morningstar sunsaver 10 charge controller

A $45 charge controller for a small solar power installation

How do you charge the batteries when you don’t have shore power?  That is where solar power comes in.

When you install a solar power system in an RV, you add two things:  Solar Panels and a Charge Controller.  The solar panels are installed on the roof and they gather energy from the sun and pump it down to the charge controller.  The charge controller keeps an eye on the batteries and takes only as much power coming from the solar panels as the batteries can handle.

Outback Flex 60 MPPT Charge Controller

A $500 charge controller for a big solar power installation

Early in the day, the batteries are hungry and the charge controller passes everything it can to the batteries.  As the day wears on, the batteries become more fully charged and require less and less power.  By afternoon, if the system is sized right for the way the RV is being used, the batteries throw up their hands and say, “No More!!” and the charge controller puts them into “Float” mode, a fancy term for a trickle charge.

None of this has anything to do with running your TV or computer.  It is only about charging the batteries up after they become depleted from use the night before.

The solar panels will charge the batteries no matter where your RV is parked.  If you are out hiking, or shopping at Walmart, or taking a nap inside, the batteries will be getting charged all day long.  If you are at an RV park or marina with metered electricity, you can save a few dollars by not plugging in!!

If you park under a tree, and the panels are shaded, you will get dramatically less power from the sun.  A tiny bit of shade results in a huge decrease in how much the charge the batteries can get.  We always park in full sun.

Sailboats have a terrible time with unwanted shade from the mast and boom.  When at anchor, pulling the boom over with the traveler and forcing it further out with a preventer helps a lot, but the mast is always a problem when the sun comes from forward of the beam.  If you are sailing and heeled away from the sun or the panels are shaded by the sails, too bad!!  So, on a sailboat, install more solar panels (more total watts) than you think you’ll need!

100 watt portable inverter from Walmart

A 100 watt portable inverter ($15). Plugs into a cigarette lighter and has one AC outlet

Solar Power Function #2 — Generating AC Power to run the TV

When an RV comes from the dealership, it usually has a shore power cable so you can plug the rig into electrical hookups or into a gas generator.  The shore power cable takes the AC power from the source (“hookups” or generator) and passes it straight through to your AC outlets. 

In other words, when the rig is plugged in like this, all the AC outlets, including “built-ins” like the microwave, become “live,” and you can run your AC appliances like the TV, computer, toothbrush charger, electric razor, hair dryer, vacuum, etc.

If you want to have AC power without plugging into shore power, you have to have an Inverter.  An Inverter converts the DC power that is stored in the batteries into AC power so you can run your AC appliances like the TV and computer. 

However, the Inverter is not technically part of the RV solar power installation.  That is, it doesn’t connect to the solar panels in any way.  You can use an inverter and not have any solar panels installed.  However, unless you plug into shore power, your batteries will get run down by watching all that TV!  That is why Inverters are lumped into the overall notion of RV solar power installations.  They are a vital component if you want to dry camp.

You can buy small, portable inverters for under $25 that will run your laptop from a cigarette lighter.  These work on the cigarette lighters inside an RV just the same as they work on the cigarette lighter in a car.  No difference.  If you are puzzled by all this, get a little power inverter and try it out.  I was totally enlightened the first time I turned on a small inverter in a car and saw the “charging” light on my laptop light up.

300 watt portable inverter

A 300 watt portable inverter ($20) with cigarette lighter plug and 2 AC outlets

A small 300 watt portable Inverters can run small 19″ LED TV too.  Anywhere from 300-500 watts is fine for pretty much everything in an RV except the microwave, hair dryer, vacuum and air conditioner.  You need an inverter of 1000 watts or more to run a small microwave, hair dryer or vacuum.  You can’t run an air conditioning unit from an inverter unless you have a boatload of batteries, something that few RVs can support because of the weight. To run our air conditioning, we use a Yamaha 2400i generator.

A 2000 watt inverter is fine for most things you might use.  You just can’t run the big appliances (microwave, vacuum and hair dryer) simultaneously.  If you are content using these appliances one at a time, don’t bother with an inverter larger than 2000 watts.  We power everything on the boat except the microwave with a 600 watt inverter.  We power everything in the fifth wheel, including the microwave, with a 2000 watt inverter.

Some higher end motorhomes come with an Inverter/Charger (see above), so they don’t need to have an Inverter installed – they already have one.  Turn on the Inverter/Charger, and shazam – all the AC outlets in the rig are “live.”

Atwood converter

A converter – this was factory installed on our fifth wheel

Most trailers do not come with an Inverter/Charger.  They come with a Converter instead.  So if you have a trailer, you will need to get an Inverter to watch TV.

This terminology is unfortunate, as “Inverter” and “Converter” sound so much the same.  However, they are almost the opposite of each other.

  • A Converter charges the batteries, i.e., it takes AC power from an external source — hookups or generator — and puts that energy into the DC batteries to charge them up.
  •  

  • An Inverter takes the DC power from the batteries and creates AC power so you can watch TV.


Wait, what was all that, again??

So, to recap:  when you install Solar Power in your RV, you are tackling two problems:  ( 1 ) Charging the batteries, and ( 2 ) Generating AC power from your DC batteries so you can watch TV, surf the internet, and charge your camera batteries.

You need three types of components or “parts” to do all this:

  •  An Inverter to create AC power out of the DC power that is stored in your batteries so you can use the TV and computer.  You can use little portable ones that plug into cigarette lighter outlets and/or you can install a big one.

If your rig came with an Inverter/Charger, you are halfway there and need only to add the components for charging the batteries (Solar Panels and Charge Controller).

Next Up: What you need for a small RV solar installation that’s good enough for summer weekends, vacations, and simple living on an extended tour.

Solar Tutorial Part II – A “Starter” Installation –>

FURTHER READING and RELATED ARTICLES

SOLAR POWER OVERVIEW and TUTORIAL

BATTERIES and BATTERY CHARGING SYSTEMS

LIVING ON 12 VOLTS


Most of the components for an RV or marine solar power installation can be purchased at Amazon.

Shown here is a complete "weekender/vacationer" kit (far left), a small charge controller (middle) and a small inverter (right). More comprehensive listings of each component type can be found at the following links:

Purchases at any of our Amazon links help keep us going. But don't buy anything yet. Finish the tutorial first!


Subscribe
Never miss a post — it’s free!

Our most recent posts:

More of our Latest Posts are in the MENU.   New to this site? Visit RVers Start Here to find where we keep all the good stuff. Also check out our COOL NEW GEAR STORE!! *** CLICK HERE *** to see it!

Sailboat Solar – Installing Solar Power & a Solar Panel Arch on a Boat

This page describes our solar panel installation on our sailboat, a Hunter 44DS.  This setup has allowed us to anchor out almost exclusively.

Groovy's solar panels.

Boat solar panel arch installation

Happy panels in full sun, Sea of Cortez.

Marine solar mount installation

Full sun & no shade (3 panels working):   22.5 amps

Boat solar mount

One panel partially shaded (2 panels working):  15 amps.

Boat Solar panel partial shade problems

Shade straddles two panels (only 1 panel working):  9.5 amps.

Boat solar arch for panels

Polished welds and drilled/tapped/screwed joints.

sv Groovy's solar panel arch welds. sv Groovy - sailboat solar panel arch.

Liquid Metal

boat solar power mount on a sailboat

Comparison: Factory weld on our Hunter arch.

Sailboat solar panel arch

The arch extension arrives for a fitting.

marine solar panel mount extension.

Alejandro tie-wraps it in place.

Sailboat solar panel installation

Mark helps hold it up.

Boat solar power Marine solar installation

The extension is in place -- without its legs yet.

Boat solar mount installed on a sailboat

Jose checks if it's level.

Sailboat solar arch extension

The arch extension returns -- now with support legs.

Marine solar panel arch support

It's maneuvered into place.

Boat Solar arch on a sailboat Telescoping davits on a solar panel arch

Telescoping davit arm (marine solar panel arch)

Boat solar installation with solar panel arch.

Held in place with tie-downs.

Boat solar power arch installation

Looking good!

Marine solar power

Alejandro drills and taps holes in the arch.

The boat's solar panels are ready!

The solar panels are ready!

Boat's solar panel arch extension removed while Alejandro taps and drills.

Arch extension removed from Groovy while Alejandro drills

and taps the arch on the boat.

Installing solar panels on a sailboat

Heave ho!!

Installation of marine solar power system Marine solar power system installation

The second panel is installed.

Boat solar installation with solar arch

Three panels - yay!

Sailboat Solar power setup

Alejandro and Mark test the strength of the arch extension.

Boat solar powert

Mark begins the big job of wiring it all up.

Marine solar power system diagram

Component layout:  3 panels, combiner

box, controller & 4 batteries

Sailboat solar power design

Combiner box (upper left) and controller (lower right).

Boat solar power design and installation

Wiring the panels.

Sailboat solar panel system design and installation

All done.

Solar panels on our Hunter 44DS Groovy.

In use 18 months later in Puerto Vallarta.

Marine solar power system and design

Sailing in Huatulco.

Sailboat Solar Power & Solar Panel Arch Installation

This page describes the solar power setup we installed on Groovy, our Hunter 44DS

sailboat.  This was our third solar installation.  Our two RV solar installations are described

here: RV Solar Installations, and we have a boatload of info here: Mobile Solar Power

.

We learned a lot from those installations, and have written lots of details about solar power on

this website, including a multi-part Solar Power Installation Tutorial for beginners. Going

into far more detail, we have a 4-part primer on battery charging which includes:

-- The basics of multi-stage charging

-- How converters, inverter/chargers and engine alternators REALLY work

-- How to optimize a solar charge controller

-- What happens when TWO systems (like solar/alternator) operate at once?.

The company Kyocera

Solar liked our solar

panel installation so

much, they featured

Groovy on their website.

OVERVIEW

For comparison, our solar power installations have consisted of

the following:

Lynx Travel Trailer

(1) 130 watt/12 volt Kyocera solar panel

(1) Morningstar 10 amp charge controller

Various 150 watt to 800 watt portable and

semi-portable modified sine wave inverters

(2) Energizer 6 volt batteries in series (220 amp-hours).

Hitchhiker Fifth Wheel

(1) 130 watt/12 volt Kyocera and (3) 120 watt/12 volt Misubishi solar panels (490 watts total), wired in series

(1) Outback 60 amp MPPT charge controller

(1) 2,000 watt pure sine wave inverter permanently mounted

(4) Trojan 105 6 volt batteries wired in series and in parallel (440 amp hours).

Hunter 44DS sailboat

(3) 185 watt/24 volt Kyocera solar panels (555 watts total), wired in parallel

(1) Combiner box (combines 3 panel wires into 1 going to the charge controller)

(1) Xantrex 60 amp MPPT charge controller

(1) 600 watt pure sine wave inverter

(1) Xantrex 2500 watt modified sine wave inverter/charger

(4) Mastervolt AGM 4D batteries, (1) Group 27 AGM battery (710 amp-hours)

Notes:  (1) Our odd collection of panels on the Hitchhiker was due to the Kyocera 130 panels not being available at the time of

our installation (we brought one over from the Lynx).  (2) Our switch from the Outback to the Xantrex charge controllers between

the Hitchhiker and the boat was due to the Xantrex being cooled by non-moving fins rather than a fan.  In hindsight I would

probably use the Outback charge controller in the future only because it displays more information on its screen rather than

having to scroll through multiple screens to get the voltage, amperage, watts and charging stage.  (3) Our Group 27 start battery

on the boat is isolated from the set of 4D house batteries only when the voltage of the bank drops too low.

The boat has a DC refrigerator and a DC freezer which together eat up some 100-130 amps or more every 24 hours, depending

on ambient temperature.  In addition we listen to music on the stereo with multiple speakers and a large subwoofer, we watch

DVD's many nights on a 22" TV, we use two laptops for several hours everyday.  We also have a water pump, electric flush

heads and VHF radio which we use at anchor.  Our cabin lighting is a combination of fluorescent and LED, and our anchor light is

LED.  So our typical daily amperage use at anchor is between 180 and 250 amps.

In December, around the winter solstice, on the southern mainland of Mexico (Zihuatanejo) our solar setup collected about 170

amp-hours per day.  In June, around the summer solstice, in the middle of the Sea of Cortez (San Carlos) our solar setup

collected about 250 amp-hours per day.  In hindsight, it would be nice to have at least 750 watts of solar power to meet our

power demands in winter.

PARTIAL SHADE KILLS SOLAR POWER PRODUCTION

The biggest problem with installing solar power on a sailboat is accidentally getting a little shade on the panels.  While swinging at

anchor, the mast, boom, radome and other things high up all conspire to throw pockets of shade on the solar panels and make

them quit working.  It is quite shocking to find out just how little shade is needed to reduce the panels to zero output.  We had

experimented a bit with partial shading issues on our fifth wheel solar installation (see bottom of Solar Setup), but we never park

near shading objects so it is not a problem on that moveable home.  A sailboat is a whole different story.

An interesting paper Shade Effects on Conventional PV (5th article down) from the Physics Department at the University of

Arizona describes how shading just half of one row of "squares" on a solar panel -- as often happens in the morning or afternoon

hours on a commercial installation if the rows of panels are placed too close together -- the panels shut down or reduce their

output significantly.  The opening sentence says it all:  A panel that is 8% shaded loses 94% of its productivity."  Deep down in the

meat of this paper the math lost me (sigh), but for a layman's explanation of just how devastating shade can be on solar panels,

this website delivers the skinny.

We placed our panels as high and as far back from the boom as we could.  We also pull the boom aside while at anchor, but the

panels still get shaded by the mast/forestay/radome when the sun is forward of the shrouds and they get shaded by the sails

when sailing.  As an experiment, we took some notes about how partial shade affects our panels.  This data was taken on

February 3rd at 10:00 a.m.  The shade was caused by the mast, forestay and radome (affixed to the front of the mast).  The

shade moved slowly back and forth across the panels as the boat swung at anchor.

Panels in full sun:

22.5 amps

One panel partly shaded:

15.5 amps

Two panels slightly shaded:

9.5 amps

As another experiment we sailed and noted the amperage

produced by the solar panels as we sailed on two different

tacks.  On one tack the mainsail shaded one entire end panel

and half of the middle panel.  On the other tack the boat was

heeled away from the sun but there was no shade on any of

the panels.  It was far better to be heeling away from the sun

than to have the panels shaded.  This data was taken at 11

a.m. on January 31.

1½ panels fully shaded by sails:

10 amps

No shade, tilted away from sun:

24.5 amps

So it seems to me that shade is the number one enemy of solar panel power production on a sailboat, and orientation towards

the sun is a lot less important.  If the solar panels are installed in such a way that a nearby radome or wind generator is always

partly shading one panel in the array, as too often happens in solar panel installations on sailboats, the result will be dramatically

reduced power production.

THE ARCH EXTENSION

Our boat came with a fantastic arch that supports the traveler.  We used it as a base for an elegant stainless steel extension that

supports the three panels.  We hired Allejandro Ulloa of Ensenada, Mexico to create this arch extensions.  Alejandro is an artist

and a master craftsman.  And he is extremely professional.  We gave him a sketch of what we were looking for, he responded

with a written quote for half of what it would have cost in San Diego, and we were off and running.

Alejandro prides himself on the beauty of his work.  He polishes the welds and installs tubing that

seems to flow like liquid metal as it rounds corners and changes thicknesses.  In our opinion, his

arch extension dramatically increased the esthetics of our boat.  It also added functionality

besides just supporting the panels.  It makes a great spot for hanging on when you're sitting in

the rear jump seats, it has a

telescoping davit system,

and the panels provide

much needed shade.

If you need to have an arch

or any kind of stainless steel

structure fabricated for your

boat and you are heading to

Mexico from the US or

Canada, spend some time in

Ensenada and look up

Allejandro Ulloa (email:

alejandrossw [at] hotmail [dot] com,

Mexican phone: (646) 171-5207).  He can

be contacted through the excellent Baja

Naval boatyard as well.  There are other

stainless steel fabricators in Mexico but we

haven't seen anyone nearly as skilled or

as professional in their approach.

Alejandro built the extension in his workshop and then brought it

to the boat to size its supporting legs.  This was a thrilling process

for us, as we began to see it taking shape on the boat.  The entire

arch extension was wrapped in plastic for this phase to protect

the finish.

Mark helped wherever he could and I took endless photos.

Alejandro returned on another day with the finished arch extension.

Now it had tabs for the solar panels, and the supporting legs had

been cut and welded at the right length.

We wanted the arch extension to double as a davit system.

Alejandro designed clever telescoping tubes that snap into place in

an extended or contracted position, and he fabricated two beautiful

cleats.  We have found that we use the davits in the contracted

position most often because they hold the porta-bote tight to the

swim platform where it fits perfectly into the swim step cutout in the

transom.

We anticipated

mounting the solar

panels ourselves,

as the quote

Alejandro provided

was for building

and installing an

arch extension,

not for installing

panels.  We

weren't sure how

we'd get them mounted, but we knew

we'd figure it out.

Meticulously adhering to the

"measure twice cut once"

philosophy, Alejandro

dismantled the whole thing

for some adjustments and

then mounted it one last

time for the final installation,

tapping and drilling and

screwing each of the arch's

feet into place in a bed of

3M-4200.

Then, to our amazement,

Alejandro and his assistant

began mounting each of

the panels.  Mark quickly

jumped in.  These are not

light panels, and it was

quite a stretch to get them

in position.  Alejandro was

concerned about possible

corrosion due to the

dissimilar metals of the

panels' aluminum frames

and the stainless steel arch

extension, so he placed a

plastic insulator in each

attachment point.

When it was all

finished, Alejandro

wanted us to be

confident that the arch

could support a dinghy

and engine.  He and

Mark swung from the

davits.  Both are

lightweights, but they

were still twice the

weight of our

dinghy and

outboard.

WIRING

Alejandro's work was done, but we still had a big project ahead.  We ran the wiring

inside the arch so it wouldn't show (it wasn't easy snaking it through!!), and we placed

the combiner box and charge controller in a transom locker.

The installation

looked beautiful

and it worked, but it did not work as efficiently as it

could have.  The whole system produced about

20% less power each day than it was capable of

doing.  We learned we'd made two vital mistakes.

One advantage of using 24 volt solar panels is that

we had half as much current in the wires as we

would have had if we'd used 12 volt panels.  Rather

than 36 amps (at 12 volts) at peak production we

had just 18 amps  (at 24 volts).  This allowed for a

smaller wire size, which is much easier to work with

as it is a lot more pliable, and it's cheaper to boot

(marine grade electrical wire is exorbitant).  Our

salesman at Northern Arizona Wind and Sun had recommended we use 10

gauge wire throughout the system.  This turned out to be inadequate

because the distance between the panels and the batteries is so long --

about 50'.  For wire gauge sizes, amps and

distances, see this chart.

Our second mistake was placing the charge

controller in an aft transom locker.  Our batteries

are next to the centerline of the boat at the lowest

point above the keel in the main salon.  The

charge controller needs to be close to the batteries

as possible.  The distance from the charge

controller in the transom locker to the batteries

was about 30' -- too far.    The combiner box was

fine back there, but the charge controller had to be

moved.

Although most of our circuit runs at 24 volts -- from

the panels to the combiner box to the charge

controller -- allowing for smaller wire, the portion

between the charge controller and the

batteries runs at 12 volts.  Therefore, the

cable between the charge

controller and the batteries

needs to be not only as short as

possible but very large as well.

We moved the charge controller

into the cabin in a hanging

locker about 10' from the

batteries and and switched to 8

guage wire to connect it, and we

saw a dramatic improvement.

When the distance between the

charge controller and the

batteries was 30' and we were

using just 10 gauge wire, the

resulting resistance in the wire created a large

voltage drop between the charge controller and the

batteries, artificially raising the voltage at which it

thought the batteries were operating.  The charge

controller would see the batteries at 14.4 volts whereas when we measured the batteries with a volt meter

they were actually at 13.2 volts.  This threw everything in the system way off, and ultimately resulted in a

daily loss of some 10-30 amp-hours that never made it from the panels to the batteries.  Once we moved the

charge controller to within 10' of the batteries and installed bigger wire, the resistance dropped.  The

controller saw the batteries within 0.2 volts of their actual voltage, and our daily power production increased.

Note: In three years of cruising Mexico, our boat was plugged into shore power for a total of 6 weeks

while it was in in-water storage in San Carlos. It was never plugged in while we lived aboard (even during

the 3 months we stayed at Paradise Village Marina in Puerto Vallarta).


Subscribe
Never miss a post — it’s free!

In addition to living off the grid on solar power on our sailboat, we have also lived on solar power in our RV since 2007. As of February, 2016, we have now installed solar power on two trailers and a motorhome as well as our sailboat, as described here. We have a huge library of solar power and battery charging articles on this website that draw on all of our experience:

SOLAR POWER OVERVIEW and TUTORIAL

BATTERIES and BATTERY CHARGING SYSTEMS

LIVING ON 12 VOLTS

The solar power setup aboard Groovy has inspired stories and articles all over the internet.  Here are a few of the websites and online magazines that have featured stories about Groovy and our marine solar power installation:

Where do you buy solar panels, charge controllers, inverters and such? Surprisingly, Amazon offers solar power kits and more. Click the following links for a wider selection of:

If you click through to Amazon from anywhere on this website, anything you put in your shopping cart or wish list immediately after that results in a small commission to us at no cost to you, no matter what you search for and no matter when you finalize the purchase. This is a wonderful way that you can "help us help you" with detailed and carefully researched articles. Thank you!


New to this site?  We have more info on Solar Power and tons of other great stuff for cruisers. Please check out our Home page and our Intro Page for Cruisers to learn more about us and discover what’s where on our site.

Our most recent posts:

More of our Latest Posts are in the top MENU above.