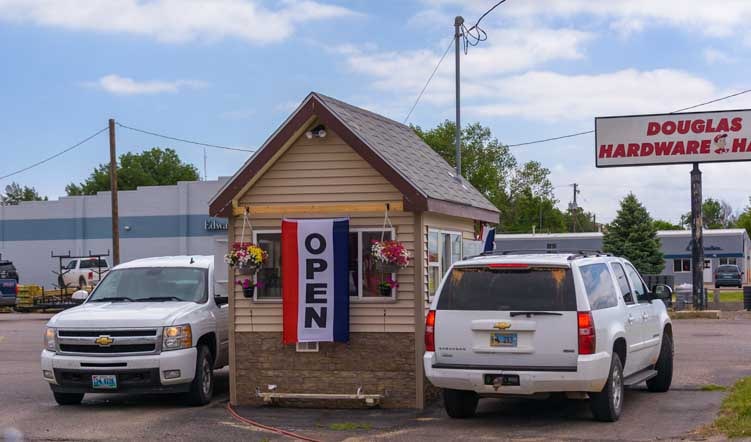
February 2019 – One of our favorite sightings in our RV travels is the cute little coffee kiosks and coffee huts we find tucked into parking lots and standing on street corners all around the West. As America’s quest for the perfect cuppa joe has become more refined and exotic over the years, these adorable little coffee pit stops have been sprouting all over the place.
Drive-up (and walk-up) coffee kiosks can be found all over the American West!
When we got to Oregon a few years back they were everywhere. And no wonder. Starbucks is headquartered in Washington, and it seems that America’s demand for fancy, fluffy coffee spreads out from there!
De La Bean Coffee in Bend, Oregon
Some of the little coffee kiosks serve more than just coffee too.
Hot Shots and Smoothies in Oregon
As we’ve taken our RV from one small town to another we’fve found that many of these cute coffee joints are marked by a big “Espresso” flag flying out front.
Java Rock Coffee Shop, Terrebonne Oregon
Along with bearing whimsical names, many of these coffee kiosks have all kinds of amusing displays and props too.
Blue Banana Coffee Shop in Lostine, Oregon
These coffee shacks are usually simple little buildings, just big enough for a barista or two inside, and they often have an inviting porch or patio area decorated with flowers out front.
Coffee Corral in Baker City Oregon
Java Rock in Terrebonne, Oregon
Besides being cute and serving great coffee, what I love about these little coffee kiosks is that they are all mom-and-pop shops.
Rather than being part of an impersonal international corporate behemoth, they are locally run and the owners have often put everything they own on the line to try to make their venture a success.
Bare Naked Beans (now called Cricket Flat Coffee) in Elgin, Oregon
When I visited one coffee kiosk a very little girl appeared at the window to take my order. Her mom was busy with another customer, and she was helping out.
I hung around a while afterwards to enjoy my coffee, and the mom told me this was the perfect enterprise for her. She could walk to work, she was with her two small children all day long, and she was building a business at the same time.
Longhorn Espresso in Enterprise, Oregon
Coffee Depot in Redmond, Oregon
One of the first coffee kiosks we ever encountered was Wicked Brew in Moab, Utah. We discovered it before we began RVing, and it was so neat to see it was still going strong years later when we returned to visit the area with our fifth wheel.
This classy little coffee hut serves each cup with a chocolate covered coffee bean perched on the lid!
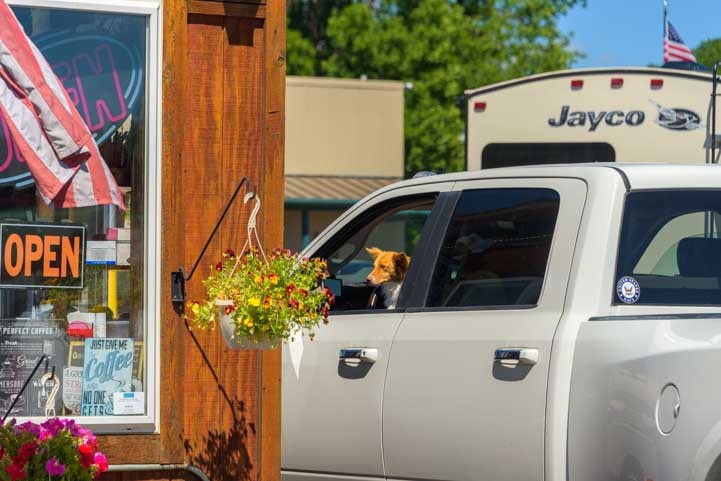
Usually, these coffee kiosks are drive-thru shacks with windows on both sides of the building.
Drivers pulled up at both sides in Douglas, Wyoming
However, we often walk up to them instead. It only took two or three walk-ups for Buddy to realize that the smell of coffee, the sound of the milk being steamed, and a patient wait at a window might add up to a doggie treat!
Now he sits expectantly looking up at the window and licking his lips.
City Brew Coffee in Red Lodge Montana
Although the frequency of coffee kiosks diminishes as you go east and south from the Pacific Northwest, they are still plentiful in Wyoming.
At Rawhide Coffee in Cody, Wyoming, Buddy decided to do the ordering for us.
Rawhide Coffee in Cody, Wyoming
He’s a smart little guy, and he knew this clever stunt could win him two doggie treats instead of just one!
Buddy puts in his order.
On our first trip through Newcastle, Wyoming, we visited the Kaffee Klatsch several times, so we were looking forward to a return trip the next year. But the Kaffee Klatsch wasn’t there any more! After a brief hunt around town we found it in a new location.
The owner explained that they owned the building but leased the land it sat on. Happily, the new location has made their business grow exponentially. How cool is that?!
We don’t have a photo of that shop, but we do have a few others from South Dakota.
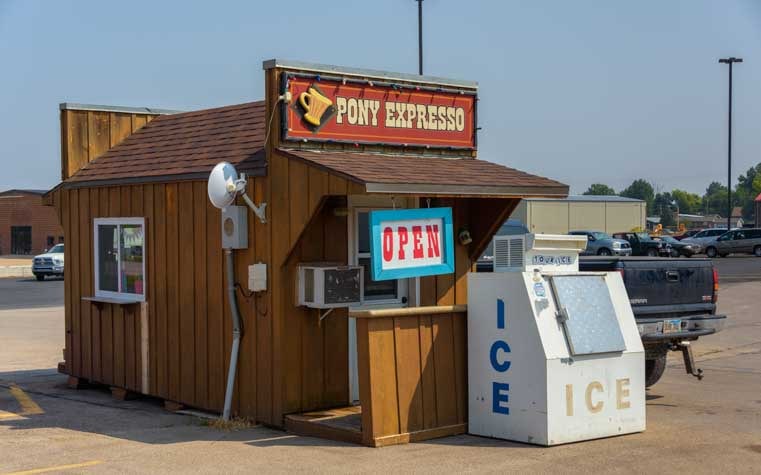
Pony Expresso in Belle Fourche, South Dakota
Hot Springs Coffee Kiosk in Hot Springs, South Dakota
Of course some of our favorite coffee shops are in ordinary buildings. One is the Calamity Jane Coffee Shop in Custer, South Dakota, where we’ve spent many mornings sipping a latte, munching a muffin and chatting with the owners, Jim and Deb.
This enterprising couple had a camera shop in this location for many years. Deb is a photographer, and Custer is located in a popular tourist area surrounded by tons of gorgeous scenery and almost-tame wild animals to photograph.
Mark and owner Jim ham it up at Calamity Jane Coffee Shop & Winery in Custer, South Dakota
But the rise of the internet and digital photography n eput and to film sales and retail camera sales at their shop. Rather than throw in the towel, they thought about what modern day tourists are looking for when they come to a small historic town, and they realized gourmet coffee would be the perfect thing.
The addition of a wine tasting room out back and a huge wine selection was another clever idea, and their store is as busy as can be.
This former camera shop is now thriving as a coffee shop and winery in downtown Custer, South Dakota.
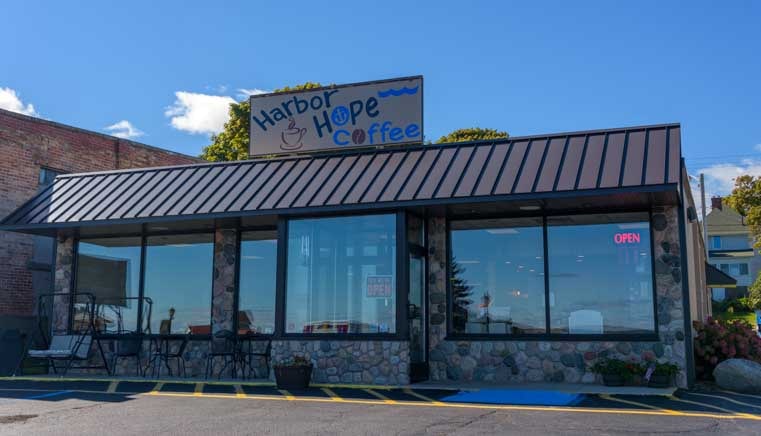
East of the Dakotas the little coffee huts disappear for the most part, but that doesn’t mean great coffee can’t be found. In the small town of St. Ignace in Michigan’s Upper Peninsula of Michigan we came across Harbor Hope Coffee.
Harbor Hope Coffee Shop in St. Ignace, Michigan.
This unusual coffee shop is home to a church group that gathers to worship in the back of the shop each week, and the profits from the coffee sales go to charitable causes. We were astonished to hear the volunteer barista tell us the story behind this unique coffee shop, but what made Buddy’s ears really perk up was when she ased, “Does your puppy want a puppaccino?”
A what?
She grabbed a whipped cream dispenser from the fridge, filled a small bowl with homemade whipped cream and put it on the floor in front of Buddy.
He went crazy!! I have never seen him lap up a bowl of anything so quickly. He got it on his whiskers and all over his muzzle.
The next day, the moment we parked in front of Harbor Hope Coffee Buddy just about jumped through the window to get inside. I knew I was addicted to hazlenut lattes, but Buddy was absolutely bonkers over puppaccinos!
Buddy tastes his first puppaccino. Yum!
Unfortunately, although dogs are warmly welcomed at most coffee kiosks and they are usually offered a treat to boot, some coffee shops with inside seating have strict rules for dogs relating to food service and unexpected visits from the Health Inspector.
So, Buddy has learned that not every “Open” sign at a coffee shop is actually an invitation for his four paws to head in.
Sometimes our four-legged friend has to wait outside.
In Wisconsin he had to wait outside several coffee shops. Fortunately, he is a patient pup.
Buddy watches my every move through a crack in the front door.
At one coffee shop there was a bucket of chalk outside, so we marked his special waiting spot.
This time he got a specially marked spot to wait on outside.
In Hot Springs, South Dakota, before Buddy joined us, we found another shop with a bucket of chalk outside, so we added a bit of sidewalk art there too!
More of our Latest Posts are in the MENU.
New to this site?
Visit RVers Start Here to find where we keep all the good stuff. Also check out our COOL NEW GEAR STORE!!*** CLICK HERE *** to see it!
While I’ve been typing away during this past year to bring you a glimpse of our travels on America’s less traveled roads, roaming about with a little pup in tow, I had no idea that Buddy was working on his own pet project for his canine RVing friends.
Buddy explains to Mark what it’s like to live a Dog’s Life!
I thought he was just licking his paws over there or maybe surfing the web for better dog treats. I had no idea that he’d created a popular dog magazine…!
K9 Publishing by Puppy Chow
It turns out that for the past year our friend Bob (a PhotoShop and photography expert) has been working with our little Buddy (whom he affectionately calls Puppy Chow), and together they have created quite a library of magazines for RVing pups and their owners.
I had seen the first issue last year and had shared it on the blog post where I introduced our new furry roommate:
.
Since then I’ve seen a few of these unusual magazine covers float by every once in a while, but I didn’t realize just how many there were until recently when I noticed there was quite a collection.
For a change of pace from our ordinary blogging fare, here are a few covers from these fun magazines. Hopefully they’ll put a smile on your face today!
.
Each issue reflected a bit of what was happening in our lives at the time, so when Camping World brought a camera crew out to make a video about our RV lifestyle, that special event was highlighted…
.
.
.
.
When we got out into the snow-capped mountains and had some wintry feeling spring mornings where we could see our breath in the air before we got out of bed, that unique tid-bit of RV life made it onto the cover…
.
Buddy’s mouth was too small to grasp a baseball at first, but when he grew a little bigger he could hang onto a baseball in his teeth just fine. This was just in time, too, because he’d found one under a tree near our campsite…
.
.
Despite spending a lot of months in very buggy places last year, we avoided getting too bitten until we got to Missouri where Buddy got four tick bites in a week and I got one too! Apparently, after that bout with those nasty little biters, Buddy came up with some tips for avoiding them…
.
Now, “Dog’s Life” isn’t the only publishing project that Buddy and Bob have been working on. They’ve put together a few other periodicals too, from “Trailer Dog” to “Gun Dog” to our very own Roads Less Traveled magazine.
The first “Trailer Dog” issue came out when Buddy was very young just shortly after he’d found a very old dead bird and made a meal of it…only to have the meal come right back up again a few minutes later…
.
.
.
The movie reviews were lots of fun, and we were especially tickled when Buddy reviewed the all time classic, “Old Yeller.”
.
.
The arrival of our new RZR made the cover (yay!)…and Buddy solved a very important mystery that has been puzzling a lot of folks!
.
.
.
And that’s it for today from the Buddy-and-Bob K9 Publishing team. Hopefully they’ll keep ’em coming!
More of our Latest Posts are in the MENU.
New to this site?
Visit RVers Start Here to find where we keep all the good stuff. Also check out our COOL NEW GEAR STORE!!*** CLICK HERE *** to see it!
How do you stay in touch when living on the road full-time in an RV? What kind of internet access is best? Which phone plans make the most sense for a full-time RVer? These are some of the questions that RVers face, and there is a huge array of possible solutions available for every need and lifestyle.
Because we have taken an unconventional route with our own communications solution (as we have done with everything in our traveling lifestyle since we started 10 years ago), I thought a few notes here about what we do might be useful.
For starters, we don’t have a phone.
What, No Phone?! How Can You DO THAT?!
After several decades of being “on call” in our professions, bound to our customers by electronic leashes, we ditched our cell phones when we started traveling full-time in 2007. At first, this was a money-savings tactic, but since then it is in many ways a small act of defiance against a world that is increasingly held in electronic bondage.
We have managed just fine without a phone all these years. We’ve been able to meet up with friends at appointed hours, find our way to remote and stunning locations without a GPS-enabled electronic map. We’ve even bought and sold large assets like our sailboat and truck, all without a phone. Lower on this page there are lots of details explaining how we make and receive phone calls.
If you are looking to shave a few dollars off your full-time RVing budget, or if you are just curious how this is possible, here’s what we do.
Internet Access – Verizon MiFi Jetpack
Verizon MiFi Jetpack 6620L
We have a Verizon MiFi 6620L Jetpack hotspot that is the basis of all our communications. It operates on the Verizon cell phone towers, has a cell phone number itself, provides password protected WiFi inside and near the rig, and can theoretically support 15 devices connected to the internet.
A little back-story on — For three years we had a Verizon MiFi 4620 jetpack, but in October, 2014, its tiny charging receptacle broke and it could no longer get charged. Mark tried to nurse it back to life by soldering its lifeless receptacle to the charger permanently, but the problem was internal and it was dead.
We tried soldering wires from the MiFi to its charger, but it still wouldn’t charge.
The old 4620 Jetpack always had problems charging and holding a charge. The MiFi 6620L Jetpack can theoretically run on battery power for 20 hours and support up to 15 simultaneous connections. It can definitely run longer than the old one, but 20 hours is an overstatement. 6 to 7 hours with two users is more like it in our household.
There is a new 7730L Jetpack from Novatel that has a theoretical battery life of 24 hours. The WiFi signal strength it broadcasts is stronger, so you can connect to it from further away. However, the signal strength coming from the cell tower is the same in both units. We haven’t upgraded yet.
Our old 6620L Jetpack has the annoying habit of falling asleep when nothing is happening between us and the internet. For us to resume using the internet after a period of doing nothing, we have to wake it up manually by tapping on its power button. Then the computer has to reconnect to the Jetpack as well.
The New Verizon Plan
As of July, 2017, our MiFi Jetpack is the single device on a 30 GB talk/text/data “New Verizon Plan.”
A few months prior to this switch, Verizon began offering its “New Verizon Plan” and pushing an “Unlimited” plan for data. The “Unlimited” plan sounded great, but it has limitations.
After many hours on the phone with Verizon, I learned that if you have a Smartphone or Tablet, the new Unlimited plan runs at 4G speeds for the first 22GB each month when you use the internet based apps on the phone or tablet. After that, there will be a 1-2 second delay when you first connect to the nearest cell tower, but once connected, the speed will still be a nifty 4G.
HOWEVER — and this was critical for us — if you are using your Smartphone or Tablet as a mobile hotspot, or if you are using a Jetpack, the Unlimited plan will run at 4G speeds for only the first 10 GB of each month. After that it will drop to 3G speeds.
This was not properly explained to me when I talked to Verizon reps the first few times, so we tried the Unlimited plan for a month. For us, it was unusable after it dropped to 3G. With today’s bandwidth intensive websites, 3G is painfully slow. At times during the one month we had the Unlimited plan, we had to walk away and do something else as we waited for something basic like the Google search page to come up.
Yesterday, after a few more hours on the phone with several Verizon reps, we learned that there are high GB plans available that remain at 4G speeds all month long. The question for us was: which one? Not all of these “New Verizon Plans” are advertised on the website in obvious places, and not all the salespeople know the various options either.
We use anywhere from 20 to 30 GB of data a month these day, so we wanted a 30GB plan. The first plan that was offered to me was a 30GB data-only plan for $185 per month.
Verizon’s first offer for a 30 GB plan that would run at 4G all month long was the “New Verizon Plan” that is Data Only and is intended for Jetpacks and phones/tablets operated as Mobile Hotspots
This was crazy expensive and I complained loudly.
Eventually, I was transferred to a rep who offered me a 30 GB talk/text/data plan for $135 per month. That was more like it! I highly recommend being extremely persistent and asking to speak to supervisors when you get on the phone with Verizon!
Our “New Verizon Plan” for our Jetpack is a talk/text/data plan with 30GB of data for $135/month
This 30 GB talk/text/data plan has these features:
Carryover of unused data from this month to next month (if not used, it doesn’t carry over beyond that)
The fee for the Jetpack connection itself is $10/month
There is no surcharge for using the Jetpack in Canada or Mexico (see below)
Unlimited talk/text (but our Jetpack can’t do that so we don’t use that feature)
Changing Plans? Cut to the Chase & Call Verizon!
I always dread calling Verizon (I had terrible experiences with them with a fleet of corproate phones in the mid-1990’s), but in recent years, I’ve found that talking to their sales people has always helped us find a better deal than if I just poked around on their website.
Also, I’ve found that the reps are very reasonable when it comes to crediting erroneous charges. We were shocked when we were charged $80 for switching from our old 24GB talk/text/data plan to the New Unlimited plan, because no one had told us this would happen. Verizon later refunded the charge.
Text messages from Verizon come into the Messages page on the Jetpack, including the code necessary for verifying your account online.
In my experience, Verizon is becoming harder and harder to reach by phone because they require using a handset to send magic codes and text messages before connecting you to a rep.
As noted above, any text message they send can be found on the Admin/Messages page of the JetPack. Also, some portions of the Verizon website require you to authenticate your account. To do this, Verizon sends a code via text message to the Jetpack that you then enter into the website.
One neat trick I found is that if you initiate an online chat with a Chat Rep on the Verizon website, you can give the rep your phone number and ask them to have a Phone Rep call you.
For me, this proved to be a lot easier than trying to get through on the phone by calling the customer service number and punching numbers and talking to the Verizon phone menu system computer.
Studying the Verizon web page today, I noticed that talk/text/data plans are not offered for Jetpacks and mobile hotspots, so we may have been given that plan instead of the Data Only plan because I made such a fuss on the phone (very politely, of course).
Saving Data by Using Free WiFi Signals
When we want to save data on our plan, we put off our big download operations, like operating systems upgrades that download as much as 1.5 GB of data at once. We do those things when we have access to a free WiFi signal at a library or coffee shop or elsewhere.
We also use Clipgrab on free WiFi signals to download videos so we can watch them from our laptop hard drives later.
Verizon MiFi Jetpack – International Use
The new Verizon talk/text/data plans now allow you to use the MiFi Jetpack in both Canada and Mexico — if you get a big (or unlimited) data plan — without paying a surcharge. Using our MiFi Jetpack came in very handy during our travels to the Canadian Rockies in the summer of 2016.
HOWEVER — and this is important — when you are in Mexico and Canada your data will operate at 4G speeds for only the first 512MB of use each day. At midnight each night the speed will revert to 4G, but as soon as you hit 512MB in the next 24 hours your speed will drop to 2G. That’s 2G, not 3G! So think through your access needs each day!
ALSO — and this is very important too — if, during a 60 day period, you have used your device more than 50% of the time in Mexico or Canada, you will get a text message (or email or phone call) warning you that you are going to be put on a pay-as-you-go plan until you return to the US. Text messages arrive on the Admin/Messages page of your Jetpack.
Despite 30 minutes of conversation with the Verizon rep, I never got to the very bottom of this issue (we aren’t planning to go to Canada or Mexico in the immediate future, so I didn’t press the issue!!), but I want you to know that the fee she mentioned for this “pay as you go” feature was $2.05 per MB.
That doesn’t seem possible because it would be over $1,000 for 500MB!!
The reason for this draconian fee structure is that Verizon doesn’t want to provide US-based services and charges to ex-pats who are living in Canada and Mexico.
I highly recommend if you plan to travel to Canada or Mexico for more than two weeks that you call Verizon and discuss your plans. After an initial round of questions, ask for a supervisor if necessary, of course.
Internet access on a boat at sea in a foreign country is a trip! Here I hold up my laptop to get a much needed internet weather report while crossing Mexico’s notorious Gulf of Tehuantepec. It took 21 minutes to download a 604 KB file!!
Putting a Verizon Data Plan on Hold
One handy aspect of Verizon’s plans is that you can put them on hold. We used this feature a lot when we spent months at a time sailing in Mexico because Verizon didn’t offer Mexico access for Jetpacks back in those days.
Seasonal RV travelers may find this comes in handy, as they may not want to use the MiFi Jetpack when they are at home and not out traveling in their RV.
You can put the plan on hold for up to 90 days, at no charge. If you call in again before 90 days is up, you can put it on hold for another 90 days, and so on, indefinitely.
All the days that you put the plan on hold get tacked onto the end of your contract. So, for us, our two year contract during our Mexico travels took nearly three years to fulfill. When you decide to resume the contract, a simple phone call is all it takes and you are back online immediately. There is a nominal charge for re-instating the contract.
Phone Access – Skype
We use a Skype account for all of our phone needs. Skype is best known for making it possible to make free video calls between people who have Skype accounts. Similar to Apple’s FaceTime, this is a fun way to communicate. It also requires a pretty strong internet signal. If the call begins to falter due to a sketchy internet connection, turning off the video will often perk it back up again.
That’s not generally how we use Skype, however. Instead, we use it to call people on their cell phones and land lines. For $2.99 a month we have an annual subscription service with Skype to call any cell phone or landline in the US or Canada for unlimited minutes. These are outbound phone calls only.
To receive incoming calls requires another step: For $2.50 a month, Skype assigned a phone number to our account that accepts voicemail and appears on our friends’ phones when we call them. Skype sends us an email when a new voicemail comes in. If we are on our computer and it is connected to the internet, we receive incoming phone calls just like a regular phone (the computer’s speaker rings, and you click a button to pick up the call). Skype has an app for mobile devices too, so you can do all this with a tablet, iPad or iPod too.
If you don’t sign up for that service, Skype calls will come into your friends’ phones with a mystifying number that is unrecognizable. We did this for four years, and it was okay. It was a little awkward not having a call-back number when calling a business, but we let them know that we checked our email frequently, and most companies were happy to get back to us via email instead of a phone call. Our friends eventually knew that if a weird number came in on their phone, it was probably us calling!
Tricks for Making Skype Calls
Skype is pretty good for phone calls, but the connection is not always perfect. We’ve gotten used to tipping our MacBook Pro laptops so the microphone is a little closer to our mouths than when it’s down in our lap. The person on the other end is on speaker phone, which can be nice for calling family and friends, if they don’t mind. However, when making an important call to a company, using earbuds makes it easier to hear the other person and takes them off speaker phone if you are in a somewhat public place.
In general, our internet download speed is faster and better than our upload speed, and this affects Skype. Oftentimes, we can hear the person on the other end of the phone much better than they can hear us. One way to improve things is to make sure only one device is on the internet via the MiFi jetpack. So, if Mark wants to make a call, I have to do something local on my laptop and stop using the internet, and vice versa.
It’s also important that no other internet applications are running on the computer that is making the call. That means turning off the email application, shutting down all browsers and quitting out of anything else that might unexpectedly access the internet and disrupt the phone call.
WeBoost Drive 4G-X RV – Getting More from our Internet Signal? Or Not!
In January 2018 we were given a WeBoost Drive 4G-X RV cellular signal booster to test. We were excited because we had not had good luck with our Wilson Booster several years prior (our experiences are described in the ARCHIVE section below).
We explained to the good people at Wilson Electronics that the older product had not worked for us, but that we would be overjoyed to let our readers know if the new product were better.
The WeBoost Drive 4G-X RV booster can be powered by either 12v DC or 120v AC and it consists of three major components that get wired together:
An External Antenna that goes on the ladder of the RV
A Booster that is installed inside the RV
An Internal Antenna that communicates with the Verizon MiFi Jetpack
The external antenna must be installed as high as possible on the RV. While driving it must be lower than highway requirements for vehicles (generally 13′ 6″). While parked it could be raised higher. It must also be installed as far from the Booster as possible (a 20′ cable is supplied).
The Internal Antenna must be installed inside the RV as close to the Verizon MiFi Jetpack as possible.
A full installation consists of mounting each item in a permanent location, running a cable from inside the RV to outside (likely near the ladder so the external antenna can be mounted to the top of the ladder) and dressing the wires between all three components. We decided that prior to doing a full installation and mounting the components and dressing the wires, we would do a test installation to see how the booster improved our internet signal.
We test the booster by positioning the External Antenna in two locations. The first position was above the crown molding of a slide-out inside the trailer (not a good spot at all, but adequate for a dry run). The second position was outside, where the External Antenna is supposed to be. Mark stood on the roof of the trailer and held the External Antenna above his head. This positioned it more than 7′ above the RV roof, higher than we would be able to position it with a permanent installation.
The Booster rested on the dining table.
The Internal Antenna sat next to the Verizon MiFi Jetpack which was positioned in a window.
We had a 3G signal that was a steady 4 bars. We had been working with this internet connection for a few days, surfing the web, sending and receiving email, listening to internet radio, downloading YouTube videos, making Skype calls (without video) and updating this blog.
The signal was adequate, but a faster speed would have been awesome.
Using a very pedestrian and low tech method of testing the booster, we ran several speed tests using the website speedtest.net. We tested these situations:
Test 1: Booster off
Test 2: External Antenna positioned on top of a slide-out INSIDE the RV (not the recommended placement)
Test 3: External Antenna held overhead while standing on the roof of the RV (higher than it would be if we installed it permanently)
The results can be seen in the following three screenshots.
The speed did not change significantly and, in our opinion, the changes were probably within the margin of error.
Booster turned off.
External antenna positioned in a high place inside the RV.
External antenna positioned 7′ above the roof of the RV
For the non-tech folks out there who don’t have a feeling for “how fast” a particular Mbps upload or download speed is, the following image shows the numbers for a “blindingly fast” signal we got on our Verizon MiFi Jetpack in a completely different location without a booster.
In numbers the difference is 16+ versus 1+ Mbps for download speeds and 17+ versus 0.3 Mbps for upload speeds. That is pretty dramatic!
So, this is the “feeling” difference between “Wow, this is FAST” and “Hmmmm…I can do what I’ve gotta do if I drink a cuppa joe while I wait, but I sure wish there were a way to make it faster.”
A “blindingly Fast” signal while we were camped in a completely different state. This is for comparison to give you a feel for the numbers just in case Mbps aren’t your thing.
As a final test, while Mark patiently stood on the roof holding the external antenna overhead, I tested using the internet for basic surfing, email, modifying our website and video downloading, the things we typically do on the internet. The difference in speed was not noticeable.
This is not scientific testing and we did not measure decibels or anything fancy. However, the bottom line for us when we use the internet is how fast it FEELS as we do whatever we are doing, not how fast some numbers tell us it is. What this showed us is that even a 100% improvement of Really Lousy may turn out to be just A Little Less Lousy. What you really need is a rock solid 1,000% improvement or more.
In the end, we decided that rather than do a permanent installation we would simply return the unit. So, as of the conclusion of this booster test, we still access the internet using our MiFi Jetpack without using any kind of booster.
ARCHIVE – Wilson Booster – Getting More from our Internet Signal – Kinda
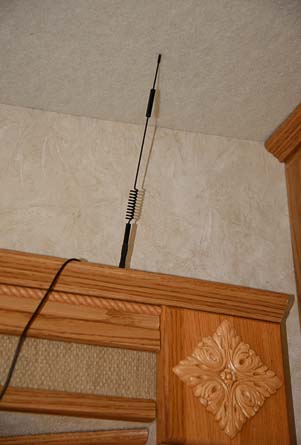
The higher the antenna, the better.
For about a year (in 2014) we used a Wilson Sleek 4G Cell Phone Boosterwhich we have permanently mounted in a cabinet alongside a cigarette lighter outlet. We haven’t used it at all for the past few years and we haven’t missed it. However to keep this page complete, our experiences with it are described below.
The Wilson Booster connects to a Wilson 800/1900 Magnet Mount Antenna. This combo works okay, however, these signal boosters do much more for 4G signals than they do for 3G signals, and we have 3G signals quite a bit of the time. One note: according to Wilson, the number of bars on the MiFi unit doesn’t necessarily increase even though the signal is improved by the booster. A fun way to see how fast your internet signal is and to keep track of the speeds in different places is to use SpeedTest.Net.
It’s “grounded” as per Wilson’s recommendation, but the signal isn’t as good this low down.
The folks at Wilson told us it was very important to have the antenna sitting on a piece of metal for grounding purposes, so we bought their suction cup mounted Accessory Kit for Grounding. Unfortunately, we haven’t found a good place to mount the antenna with this suction cup plate because the wires are so short. Someday Mark might replace our outside (and rarely used) radio antenna with the Wilson antenna, but we haven’t done that yet.
Wilson also told us that simply placing the antenna on a 5″ x 5″ sheet of ferrous metal would do the trick, and we searched around for something and discovered our cast iron skillet fit the bill.
We did tests with the antenna to see how much having a grounding plate seemed to matter. We placed the antenna near the ceiling above our slide-out without a metallic plate under it, then set it on our big frying pan on our kitchen counter, and lastly set it on the roof of our truck.
We found having the antenna higher in the air near the ceiling above our slide-out was much more important than placing it on metal.
Internet Portability – Driving Tactics and Electronic Maps
Siri — ahhhh. Although we don’t have an iAnything, I am in love with the little Apple genie, Siri, who lives inside iPhones and iPads. However, after lots of soul searching about whether Siri’s companionship would make me happier in our travels, so far I’ve decided that it wouldn’t.
Instead, I get to be Mark’s Siri as he drives, and that’s not a bad gig. He does all the driving in our family (I did almost all the helmsman duty on our boat, so it’s pretty fair). To help out with the RV navigation, I bring the MiFi jetpack and laptop with me into the truck’s passenger’s seat, and I use Google Maps to figure out where we’re going. I don’t get the nifty icon that shows me where we are, so sometimes I have some frantic moments trying to deduce our exact location, but once I’ve got it, I call out the instructions for how to get from here to there.
Our 2016 Ram 3500 truck has a factory installed dash-mounted GPS, but its user friendliness pales by comparison. Occasionally when I’m confused/lost, I use it to get the GPS coordinates for where we are and then plug those into Google Maps.
So, the overall functionality of a smartphone or tablet is there for us on the road, it’s just a whole lot more clunky.
Using a SmartPhone or Tablet as a Hotspot and More
When our Mifi Jetpack died, I thought the only solution was to get another one. Not so. I have since learned that we could have taken the SIM card out of our old jetpack and put it into a glistening new iPad. We wouldn’t have had to sign up for another 2 years with Verizon when we replaced our dead MiFi jetpack either (which we did when we upgraded to the new MiFi jetpack), since our contract was tied to the SIM card. We could have simply continued on our old plan until it ran out four months later and then reassessed our situation.
Internet Access Resources for RVers
The Internet Bible for RVers
For us — for now — we’ll keep doing what we’ve been doing since it works just fine. In all likelihood, however, our simplistic and minimalistic methods are not getting you fired up with excitement.
As I mentioned above, the Mobile Internet Handbook (available on Kindle and in Paperback) by Chris Dunphy and Cherie Ve Ard is the most thorough resource available and is an absolute necessity for anyone that wants to get technical on the road. Prior to starting their full-time RV adventures, Chris was a mobile technology expert, working as Director of Competitive Analysis for Palm and PalmSource (the companies behind the Palm Pilot and Treo). He studied every aspect of mobile phone and tablet technologies and is using that expertise to help RVers today.
The detail this book goes to is staggering. From explaining nationwide versus regional cellular data carriers to getting into the nitty gritty of what “roaming” is all about, and what hotspots and routers really are, to discussing cellular frequency bands and the all important topic of security, this book covers it all.
What’s better, Chris and Cherie continue the discussion and keep it current at their RV Mobile Internet Resource Center, with an accompanying public Facebook discussion group. They are also keeping a list of RV internet strategy blog posts that describe various real-life technology setups that RVers are using. They even offer personal advising sessions where you can find out what the best solution is for your unique situation.
Of course, all of this technology is changing daily. When we started RVing full-time in 2007, we got by with pay phone cards and free WiFi at coffee shops. We were unaware in those days (although we had our suspicions) that cell phones weren’t nearly as smart as their progeny would soon be, and we had no idea just how far the industry would come.
In just a few scant years everything has changed, and who knows where the future will take us!
More of our Latest Posts are in the MENU.
New to this site?
Visit RVers Start Here to find where we keep all the good stuff. Also check out our COOL NEW GEAR STORE!!*** CLICK HERE *** to see it!
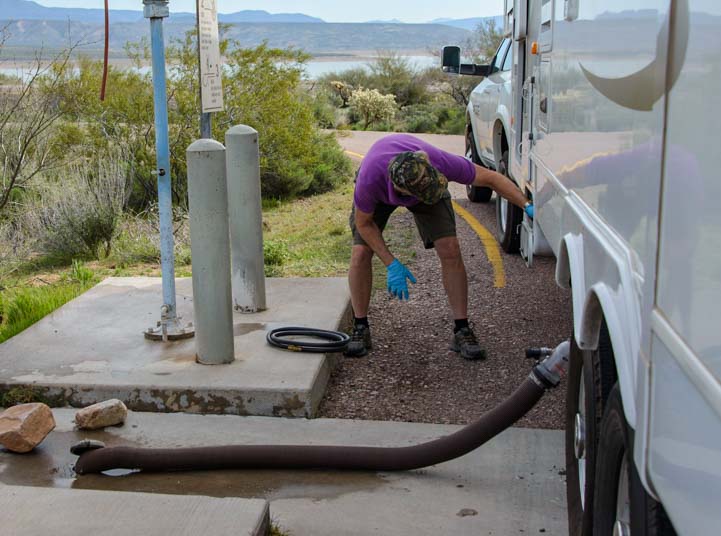
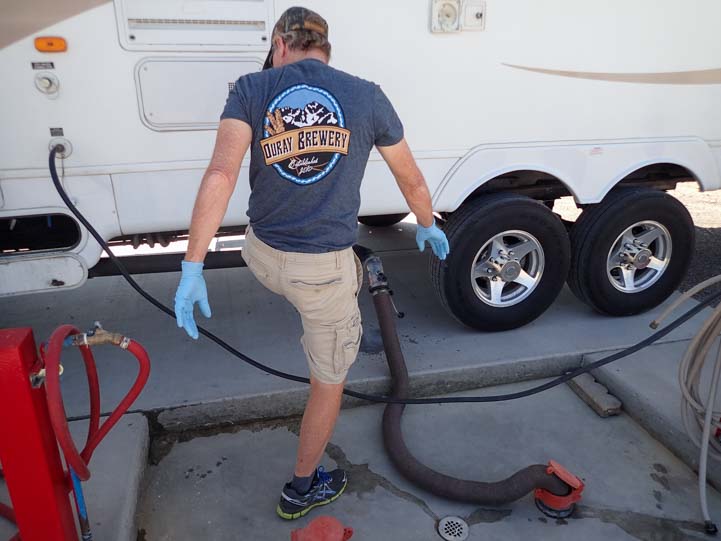
Dumping the RV holding tanks is a nasty little job, but it’s part of the fun of traveling around in an RV, and we’ve all gotta do it. It’s really not all that bad when it’s a shared job, but of course that’s easy for us gals to say, because it’s usually our male partners-in-love-and-life who get to do the bulk of the dirty work.
Despite lots of progress over the years for the types of work women can do, emptying an RV’s waste water holding tanks is a job many women are just as happy to leave to their better half.
Sometimes, when we go to an RV dump station, I am amazed to see a woman remain in the passenger’s seat of her truck or motorhome for the whole duration of the job. I’m not sure how these women have negotiated that arrangement with their significant other, but I figure they must be incredibly good cooks to be able to chat with a friend on the phone or check the latest on Facebook while their hubby is grinding it out with the sewer hose, the splashing water, and all that muck and mire.
Mark looks like he’s having so much fun. Can I get away with doing nothing?
I wish my skills were so awesome in the kitchen that I could be exempt from doing anything at the RV dump station. But alas, in our marriage, I need to be a participant in this dirtiest of deeds to win brownie points for other aspects of our life together. Nonetheless, it took me a few years to find things to do while we were at the RV dump station that were truly useful and helpful.
We have a full set of “blue” RV dump station procedural tips below — but they don’t say much about the “pink” side of the job:
Too often at the beginning of our RVing lives I found my best efforts to help with setting up the RV sewer hose or screwing in the water hose ended up with me underfoot and in the way of the general flow of things. Mark had his methods, and I couldn’t read his mind as to what came next.
Few people are in truly sunny and radiant moods when they don their rubber gloves at the RV dump, and too often I found that my most valiant attempts to be helpful resulted in tensions rising between us.
I think he’s trying to tell me something.
Then one day I discovered a way that I can be of significant help and get some important jobs done at the same time.
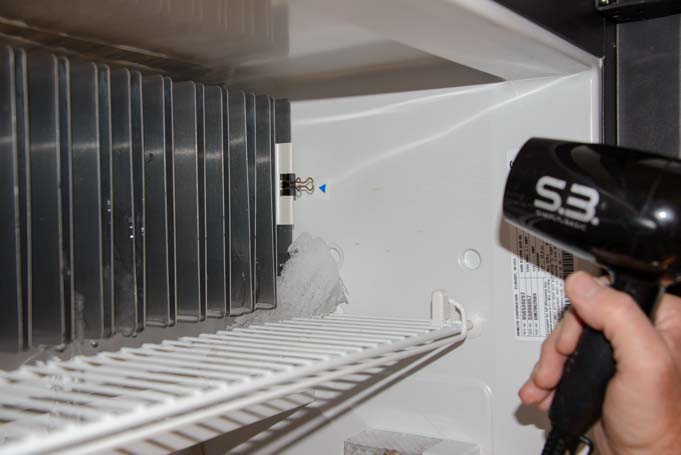
GIVE THE BLACK TANK A BOOST FLUSH
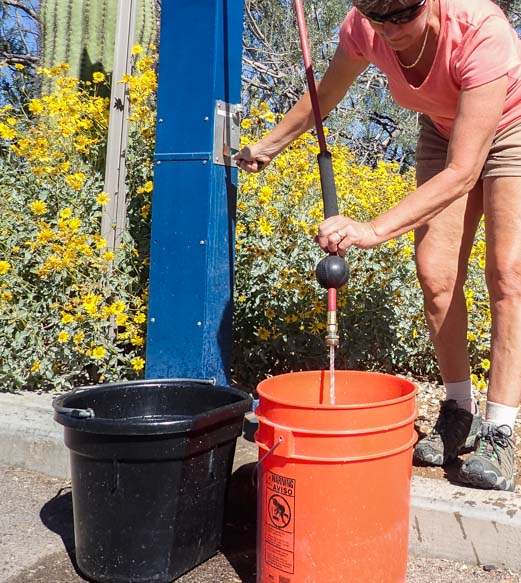
For starters, I fill two 5-gallon water buckets with water and carry them into the rig to dump them down the toilet after the black tank has been emptied. Even if an RV has a black water flush system like ours does, it is still surprising just how many little bits of gunk and human waste solids get flushed out when two 5-gallon buckets of water are poured down the toilet.
I fill the buckets while Mark gets the sewer hose out and attaches the clear elbow so he can see when the holding tanks are fully drained. Then I can scoot out of the way and carry the buckets around to our RV’s door before he begins attaching the black water flush hose between the rig and the water spigot. This way we don’t end up stepping on each when we first start working at the RV dump station.
We have two buckets and I fill each one with water to give the toilet and sewer pipes an extra flush.
The buckets are heavy to carry around to our trailer’s front door, but I don’t mind a little bit of a shoulder and arm workout, and I take them one at a time. Maneuvering a heavy bucket of water up stairs is excellent exercise for both balance and strength.
I grab the inside of the doorway with my left hand for extra balance, tighten my abs so I don’t throw my back out with the uneven weight distribution of carrying a heavy bucket, and I leverage myself up and set the pails down inside in the kitchen.
The buckets are heavy, but I take my time and grab the door frame to keep my balance as I go up the stairs.
For those who can’t carry the buckets, your partner will likely be happy to carry them for you since this really helps ensure the black tank and toilet get a complete flush. Also, filling the buckets only half way or three quarters of the way can help not only lighten the load but keep the water from splashing all over the place and all over you.
CLEAN THE BATHROOM
The other task I tackle is cleaning the toilet room from top to bottom and cleaning the bathroom vanity and kitchen sink. I figure that if my sweet hubby is dealing with the darker side of RVing outside at the RV dump station, I can deal with the same stuff on the inside..
This insures the bathroom gets cleaned on a regular basis and also means that when we arrive at our next campsite not only are the holding tanks empty but our bathroom is sparkling clean and smells fresh.
So, once I get the water buckets inside the rig, I begin assembling the things I will need to clean the toilet and the bathroom. When I hear Mark’s knock on the wall, I know he has finished emptying the black tank and it is time to dump the buckets of water down the toilet.
I pour one bucket at a time and Mark watches the flow in the sewer hose to make sure the water eventually runs clear.
Since the buckets are just inside the RV door, it takes me a minute to grab one and empty it. Then it takes a few minutes more to go grab the other one and empty it too. Having a few minutes between flushes is helpful because then Mark can monitor whether the water from the second bucket is running clear or is still flushing solids out. If there are still chunks coming out, then, depending on whether anyone is waiting to use the RV dump after us, I’ll fill another bucket or two with water and dump them down the toilet.
Sometimes I have the water pump turned on as I dump the buckets of water down the toilet and sometimes it’s turned off. Having it turned on means even more water flushes down, which is great, but it also uses up water from the fresh water tank. So, whether or not I have the water pump turned on depends on whether there are people waiting behind us at the dump station, as it will take a little longer for us to fill the fresh water tank if we flush a few extra gallons down the toilet as part of the dumping process.
Now that the black tank is completely flushed, Mark begins emptying our kitchen gray tank. We have two gray tanks, one for the kitchen and one for the shower. We empty the kitchen tank first because it is dirtier and has more things in it (like broccoli bits) than the shower gray tank which is just sudsy water.
While he works on emptying the two gray tanks, I get to work cleaning the toilet.
If Mark is mucking around in gross stuff outside, the least I can do is muck around in gross stuff inside. This also gives us a clean bathroom when we set up camp.
Since we have a hatch in the toilet room that we leave open a lot, the toilet lid and the floor often get dusty in just a few days. So I remove everything from the toilet room and clean everything, including the floor.
Over the years we’ve found that the toilet bowl — more so than the black tank itself — can be a big source of foul odors. Unlike household toilets, RV toilet bowls are basically dry except during flushing, so urine can end up drying in the bowl and producing an odor.
Also, the flow of the flushing water doesn’t necessarily rinse every inch of the bowl, so some areas simply don’t get rinsed all that well, even when using the toilet’s spray nozzle. So, I go to town on the inside of the bowl as well as everything else.
We use two enzyme/bacteria based RV holding tank treatment products: Happy Campers RV holding tank treatment has worked best for us in extreme temperatures (very cold and very hot) and for controlling tank odors. RV Digest-It holding tank treatment has worked best for us in moderate temperatures to break down the solids in the tank.
Because these are both basically solutions of living critters, the toilet cleaning products we use can’t be too toxic or the colonies of feces-eating bacteria can’t get established and become self-perpetuating. I’ve been using Murphy’s Oil Soap for the last few years with good results.
This is the soap that is recommended for cleaning the rubber roofs on the tops of RV’s, which is why we had it on hand to try on the toilet a few years ago. In addition to being biodegradable, what we like about it for cleaning the toilet is that it assists in keeping both the seals in the toilet bowl and on the black holding tank valve lubricated. I used white vinegar for cleaning the toilet for a while, and after a few months the black tank valve got really sticky. Since switching to Murphy’s Oil Soap a few years ago, that valve hasn’t gotten gummed up.
Periodically, we’ve found the seals in the toilet bowl have stopped holding water which meant the bowl drained completely dry between flushes. This allowed foul odors to come up from the black water tank. This problem is usually due to mineral and gunk build-ups on the seal.
So, I give that seal a really good cleaning too. The critical areas are on both the top and bottom surfaces of the rubber seal, that is, between the seal and the toilet bowl (the top side) and underneath the seal where the dome flapper (the “waste ball”) closes up against it.
A disassembled RV toilet shows what the rubber toilet seal looks like without the toilet bowl sitting on it. To prevent it from leaking and draining the toilet between flushes, I scrub both top and bottom of the rubber seal.
I make sure the water pump is off at this point and hold the toilet flush lever down so I can get at the underside of the seal.
Often, the build-up is due to having hard water in the fresh water tanks which is very common in Arizona and other western states where the fresh water comes from deep, mineral rich aquifers.
The seal needs to be completely free of mineral deposits on both the top and bottom, so I clean the area between the seal and the bowl on the top (red arrow) and below the seal on the bottom (the backside of the seal in this view).
At this point, depending on what Mark is up to outside, I’ll move on to other cleaning projects. If we have nearly emptied our fresh water tanks prior to coming to the RV dump station, it may take 10 minutes to refill them. Also, sometimes the potable water spigot is a little ways beyond the waste water dump area, requiring Mark to move the whole rig a few feet forward.
So, if there is time, I will clean the bathroom vanity sink and then move on to the kitchen sink. Depending on our plans for the next few days and depending on how much time I have at the RV dump, I may also add the holding tank treatment to the black tank, via the toilet, and add it to the gray tanks via the bathroom sink, shower and kitchen sink.
Sometimes, however, I prefer to wait two or three days until those tanks have some liquids in them before adding the holding tank treatment. And sometimes I add just a half tank’s worth of holding tank treatment at the RV dump station and then add the other half a few days later once the holding tanks have become partially full.
Of course, we add a capful of bleach to our fresh water tanks every few months, and that totally obliterates any colonies of anything that have started to grow in any of the holding tanks (including the fresh water tank) as the bleach water works its way through our plumbing system from the fresh water tank to the gray and black waste water tanks.
So, for us, creating fully self-sustaining communities of healthy organisms in any waste water tank is not 100% doable. But by using non-toxic cleansers we can help them along in between bleach blasts.
So, all in all, there is a LOT a girl can do at the RV dump station. We find we are both much happier about the whole process when we each have a set of tasks to do when we get there that are not only similarly grungy but are equally important and that take place in different parts of the RV.
The best part is that when we leave the RV dump station to go set up camp in a new, beautiful location, not only do we have empty waste water tanks but our bathroom is clean and fresh too.
Heating an RV in cold weather during the winter, especially in a snow storm, is quite different than heating a house, and it often requires utilizing different kinds of heaters and a little creativity too.
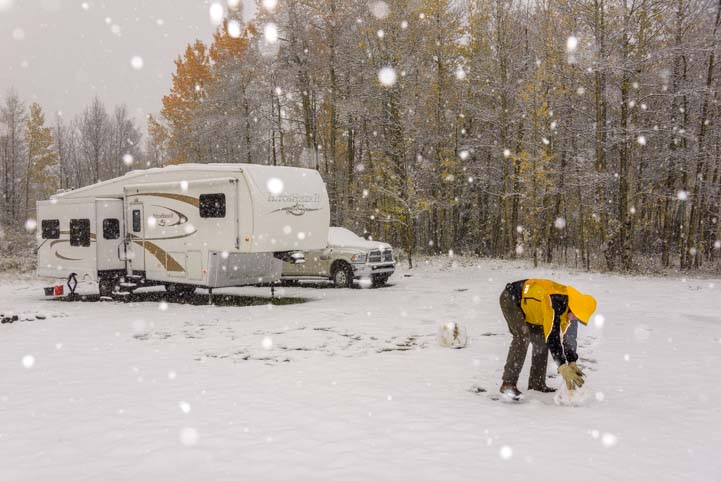
Is that SNOW??!! We sure didn’t expect THAT!!!
A few weeks ago, at the end of September, we woke up to find ourselves in a beautiful snowstorm at 10,000′ elevation in Colorado.
We had to pull out all the stops to make sure we were cozy warm in our RV even though overnight lows were in the 20’s and daytime highs didn’t get out of the 40’s for a week.
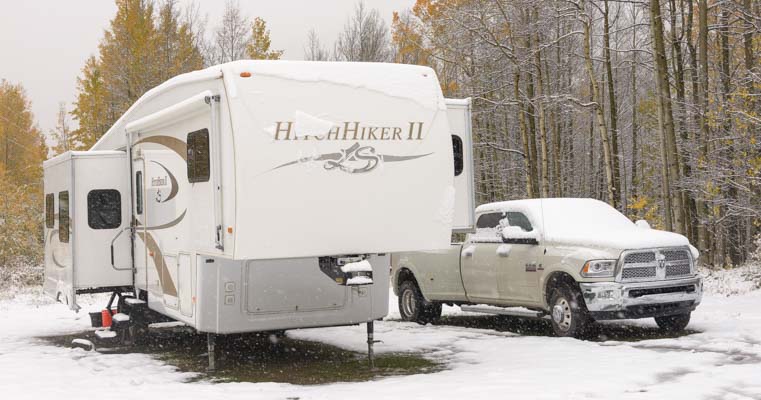
We looked out our back window and saw snow covering our bikes!
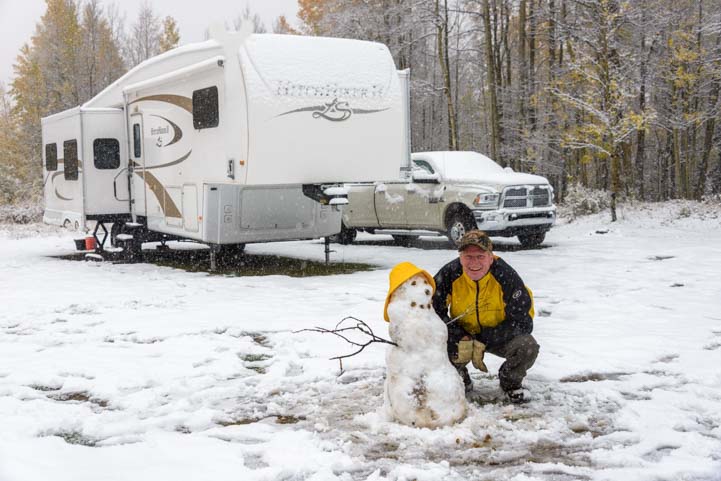
The first order of business was to go outside and build a snowman, and Mark got right to it.
It’s snowing!!! Let’s make a snowman!!!
While he’s busy getting that snowman together, I wanted to share with you the strategies we’ve used for heating our RV without electrical hookups, because we use different heating appliances in different situations.
But in in “extreme” conditions, like this recent snowstorm on a mountaintop in Colorado, we use a different strategy and rely more on our RV furnace that was factory installed in our trailer.
We have tried different strategies in very cold weather at very high altitudes like this in the past, and this most recent cold spell was our most comfortable, despite the wet gloppy mess of snowy covered jackets, hats, mittens and boots and the sullen gray skies that persisted for several days. So, we seem to have gotten it right this time.
Of course, “lows in the 20’s” is far from “extreme” for North Americans living in houses with central heating, but it definitely feels extreme when living in an RV off the grid. In reality, RVs are most comfortable in temperatures that stay above freezing.
The snowman gets sticks for his arms…
Even though high end RVs are marketed as being “four season” coaches, boasting high R-factors in the walls, ceiling and floor, you just can’t compare 1.5″ styrofoam walls that have a thin layer of gelcoat and wallpaper board to a residential house wall that’s made of 3.5″ fiberglass insulation covered with a half-inch of drywall, half-inch of plywood, Tyvek and exterior siding.
Besides the skimpy walls, we find that the RV windows are the biggest reasons for the poor insulation. The metal window frames are extremely cold to the touch when temps outside are in the 20’s, and all that metal around our many windows conducts the cold right into the rig.
Some folks like to have thermopane (dual pane) RV windows, but if moisture gets between the two panes, which can happen more easily in an RV that rattles down the road all the time than in a house that stands still on its foundation, the moisture is likely to remain there permanently, no matter what the weather does outside or how many years go by.
RV windows don’t seal all that well either. Our top quality, four season fifth wheel trailer is downright drafty inside, with a definite breeze that can, at times, flutter a tissue by the “escape” windows. You don’t notice it so much when it is 70 degrees both outside and inside with no wind blowing. But when it is a blustery18 degrees outside and we are trying to heat the rig to 65 degrees inside, the breeze by those windows is a shock.
The microwave vent is another drafty spot, and if the wind is howling outside and blowing directly on that wall of the RV, it blows right into the kitchen through the vent holes on the top of the microwave. One solution for that, of course, is to tape over the vent on the outside of the rig and not use the microwave for the duration of the cold snap (we haven’t done that, however).
The snowman gets a hat!
So, in our experience, keeping an RV and everything in it toasty warm when it is snowing out can require a little creativity.
Back in our house living days in snow country, we would set the thermostat to our preferred indoor temperature and keep it there 24/7, perhaps raising it slightly at the breakfast and dinner hours and lowering it slightly while we were at work or asleep.
When a blizzard blows into our RV lifestyle nowadays, we can have that kind of stable heat in our rig if we plug into shorepower with access to unlimited electricity. Portable electric heaters can back up the RV furnace, and RVs that have an air conditioner with a heat pump can use that (ours doesn’t).
However, it is possible to stay warm without hookups, even when it starts snowing.
What fun!!
We rely on our vent-free propane heater for 95% of our heat year round. These little heaters use propane very efficiently, don’t need any electricity to run, and can be installed in an RV permanently to run off the RV’s propane tanks.
There are also handy portable models that can be stored in a closet when not in use and then placed anywhere in the rig where you want a little heat. These run on disposable propane bottles, so it isn’t necessary to plumb the heater to the RV’s big propane tanks.
We found fresh animal tracks in the snow.
We have a detailed article describing the different kinds of vent-free propane heaters on the market, the pros and cons of each type and the type of heat they generate, plus a step-by-step guide for how to install one in an RV at this link:
These heaters heat the rig amazingly quickly. We find that our 20k BTU blue flame heater warms our rig at a rate of about one degree every two minutes. So, in twenty minutes we can warm up our home by 10 degrees, and in an hour we can raise the inside temp by 30 degrees.
The best part is that we can hover over it and warm our hands, bodies and clothes, just like standing in front of a woodstove or fireplace. We do that a LOT and totally love our little heater for the terrific blast of instant hot air it provides!!!
When you’re chilled, there’s nothing like hovering over this heater!
We use our blue flame heater year round, and we have used it at elevations ranging from sea level to 10,000′.
This past year we traveled primarily in cold places where overnight lows were in the 30’s and 40’s. We went north through Utah, Idaho and Montana in March and April and spent May and early June in the Canadian Rockies. Consequently, we saw quite a bit of snow and hail, and during those months we used our heater almost every day.
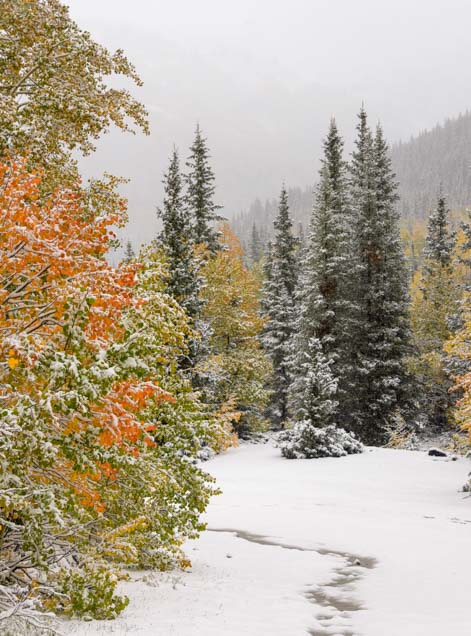
The snow in Colorado fell for hours and gave us a beautiful winter wonderland — in September!
Fall colors with snow – Magic!
We thawed out in July long enough to get overheated and write a blog post: “How to Beat the Heat in an RV.” Then it was back to the high elevations of Utah and Colorado in mid-August where we saw more hail and overnight lows in 30’s once again.
Our vent-free blue flame heater has been keeping us warm during all four seasons like this since Mark installed it in 2008!!
.
It was really cold, but it was so beautiful we didn’t mind!!
RV furnace – Uses a lot of electricity, uses propane inefficiently, brings fresh air into the rig (because it’s vented)
Vent-free propane heater – Doesn’t use electricity, burns propane efficiently, uses up oxygen in the RV
So each has its place under certain circumstances. In a nutshell:
— The ventless propane heater is awesome as long as there is sufficient oxygen for it to run. We like to use it in the mornings and evenings, and since we are in and out of the rig a lot, there is a lot of air exchange inside our RV from opening and closing the front door all day long as well as from all the drafts and breezes that blow in the RV windows and microwave vent.
— The RV furnace is best for other scenarios: in cases where there is a risk of the water pipes freezing (the hot air ducts keep the basement and water lines warm), at very high elevations in extreme cold, and at night, because it is vented and continually circulates the air in the rig. The RV furnace is very loud and tends to wake us up at night, however, so we don’t use it overnight very often.
So, we use our vent-free blue flame heater for 95% of our RV heating, and we turn to our RV furnace on rare occasions.
Fall colors and snow — a gorgeous combinations!
This snowfall was definitely sticking around a while!
Vented vs. Ventless Propane Heaters and Propane RV Stoves & Ovens – Safety Concerns
An RV furnace is a vented system, meaning that it releases warm, moist air from inside the RV to the outside, and it brings cold air from outside to the inside of the rig. This makes it very inefficient in its use of propane, because it is essentially heating the outdoors as well as the indoors. Put your hands by the RV furnace vent outside, and they will get nice and warm and a bit damp too!
While RV furnaces are safely vented yet very inefficient, vent-free gas heaters are very efficient and are required by law to have an automatic shutoff when the available oxygen goes below a certain threshold (there is a built-in sensor that triggers the shut-off). We know when ours is about to shut off because the flame begins to sputter and make noise. Once it has shut itself off, it won’t turn on again until we air out the RV a little by opening the door or windows for a while.
Ironically, propane RV stoves and ovens are not required to shut off automatically when the available oxygen is depleted. To me, this makes them inherently quite a bit more dangerous than vent-free propane heaters.
Of course, an RV fitted with propane tanks is basically a rolling bomb, so it’s a very unsafe place to call home (I say this with a smile, because we wouldn’t trade our 9 years on the road for anything)!
Every time we have seen our blue flame heater shut itself off (probably 30+ times), the RV stove and/or oven has kept right on a-cookin’ without any hint that our supply of oxygen inside the rig was running out. We could easily have baked something in our factory installed propane RV oven and simmered something on our factory installed propane RV stove for hours while camped at 10,000′ with no inkling that the oxygen in our rig had dipped below safe levels!
Welcome home…. Brrrrr!
Which Heater is Best Under Which Conditions?
For most of this year as we traveled in cold country, the lowest temperatures we saw were in the low to mid 30’s overnight. Daytime highs were in the mid-60’s to mid-70’s. These kinds of conditions are very similar to what we see in the southwestern deserts in the winter months (except January, which can be colder). These conditions are ideal for a vent-free propane heater.
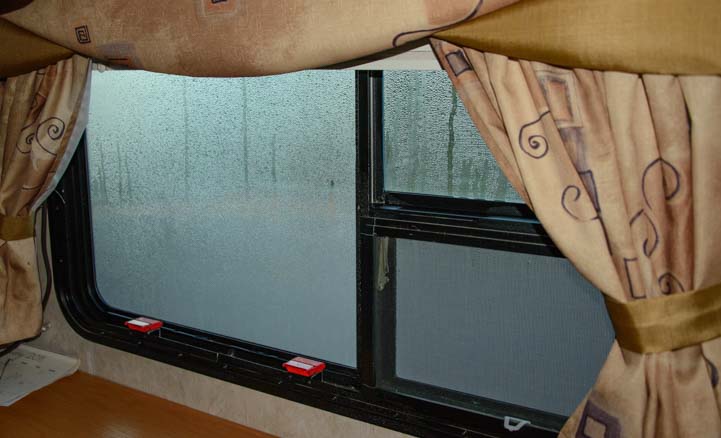
We usually run our vent-free propane heater every morning until the rig is 60 to 75 degrees inside (depending on our mood) and then again in the evening if the temperature inside has dipped below 65. If the windows have fogged up from condensation (about 5% of the time, usually only in the winter), we run the RV furnace too to help dry the air out.
In general, we don’t heat our RV overnight in this kind of climate. We prefer to bundle up with down comforters instead. If we do run the heat at night, we use the RV furnace and set it to 50 degrees. If outdoor temps drop into the 30’s overnight, the RV furnace will come on once or twice in the pre-dawn hours.
Golden aspen leaves in snow.
Ironically, if the outside temps dip really low — into the 20’s or teens — and daytime highs don’t get much past 50 degrees, then the RV furnace will start coming on before midnight and will come on every hour for 15-20 minutes as it struggles to keep the rig at 50 degrees.
Since we are light sleepers, this is extremely annoying. So, at the times we would want to run the RV furnace most — overnight when it’s really cold — we opt not to!
On overnights that we don’t heat the rig, when we wake up in the morning our bedroom is around 10-12 degrees warmer than the outside air (bedroom door closed all night) and our living area is around 5-7 degrees warmer than the outside air.
It is routine for us to wake up to temps in our trailer that are between 37 and 42 degrees. For us, that is a small price to pay for living off the grid, however, for many RVers it is good reason to get electric hookups and have more substantial and consistent heat in the rig overnight.
The colors of Fall in Colorado.
There is a lot of debate about whether you can operate a ventless propane heater at high elevations. By the time we got caught in that September snow storm in Colorado two weeks ago, we had been living at elevations between 8,000′ and 10,000′ for 5 straight weeks, running our vent-free propane blue flame heater every morning and evening without a hitch.
Along with many weeks spent heating our rig at high elevations in previous years, including 8 weeks or so at 6,000′ or higher this past spring, our 5 weeks at 8 to 10 thousand feet this fall kind of proved the point for us: it’s no problem to run a vent-free propane heater at high altitudes in cool weather.
But in sub-freezing overnight temperatures and daytime highs in the 40’s under stormy skies at 10,000′ elevation, we’ve found a vent-free propane heater is best used in combination with the RV furnace.
Well, we won’t be biking any time soon!!
Until the the snowstorm came to our mountaintop spot in the Colorado Rockies at 10,000′, we hadn’t been using the RV furnace at all. But once the temps dropped to the 20’s (lows) to 40’s (highs) at that elevation, we couldn’t rely on our blue flame heater exclusively any more and had to change our heating strategy for three reasons.
1) There is less available oxygen at 10,000′ than at lower elevations, and once the oxygen in the rig dipped below a certain level, the blue flame heater would shut itself off automatically. Because it was so cold outside, we weren’t thrilled about opening the windows and doors to let in more air just so we could turn on the blue flame heater again. It was time to use the RV furnace.
2) Our RV roof and ladder — along with our solar panels — was covered with snow and ice. Mark wasn’t jumping up and down with excitement to climb up there to clear off the solar panels, and I wasn’t about to get up on that slippery roof either. So, our batteries were no longer getting charged by the sun and wouldn’t have enough juice to run the RV furnace.
3) Vent-free propane heaters emit a lot of moisture. We had just had several days of torrential rain, and everything in our rig was wet. Our shower was filled with raincoats and rain hats hung up to dry, our boots and socks were wet and muddy by the door, our pants were wet and hanging in the bathroom and our bath towels refused to dry. While our blue flame vent-free heater would exacerbate the moisture problem, our RV furnace would help dry out the air inside our buggy.
Doing all these things gave us a nice dry and toasty warm environment to live in during this cold spell in snowy conditions at 10,000 feet.
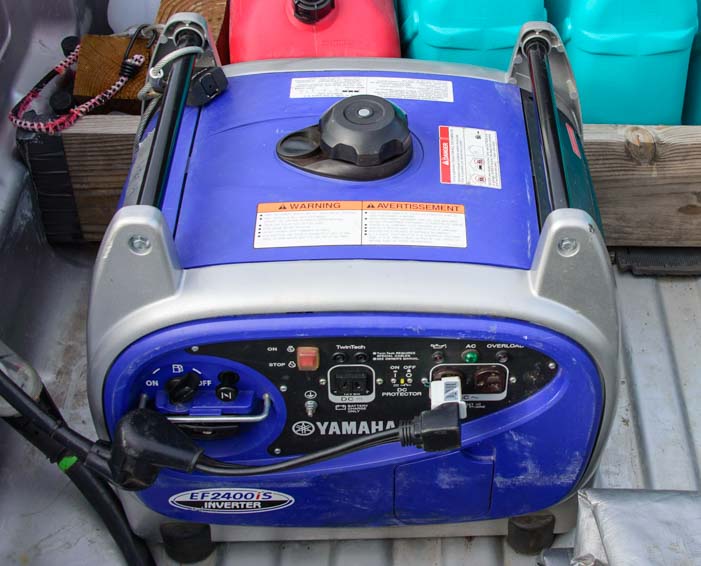
To implement this heating strategy, we did two things. We stocked up on gasoline and propane and ran our Yamaha 2400i generator and RV furnace a lot. Sometimes we also ran the blue flame heater alongside the furnace.
Our Yamaha generator got a good hard workout for over a week.
The generator ensured that the batteries got fully charged. Because we were running our RV furnace so much, which burned up lots of electricity, the batteries were being depleted much faster than normal. So, not only did we need the generator because the solar panels were snoozing under the snow and ice, we also needed it because of running the RV furnace.
A few weeks prior we had been roasting in the summer heat. What a crazy life we live in this RV!!
In general, we ran the RV furnace every morning until the rig was 65 degrees inside and then ran it on and off during the day and in the evening. If the air wasn’t too moist, we also ran blue flame vent-free heater alongside the furnace to warm things up faster. The vent-free propane heater never shut itself off, so the RV furnace was doing its job of circulating the air.
Getting creative heating our RV made it possible to enjoy views like this as it snowed.
Using the RV furnace also lessened the possibility of the water pipes freezing. The heater is ducted through the belly of the rig, and the warm air passing through the ducts helps warm the nearby water and sewer pipes. If the temps had gotten below 20 degrees, we would have run the RV furnace once or twice overnight as well just to be sure no ice formed in the pipes.
If we had had brilliantly sunny days every day, we may or may not have needed the generator. Our 490 watt solar panel array may have been able to charge the batteries fully, despite the additional load from the RV furnace.
Also, we probably wouldn’t have needed to use the RV furnace so much because the sun would have warmed up our rig and dried it out a bit during the day.
See how flexible and variable all this is??!!
This is why we came to Colorado at this season… Wow!!!
We have descended out of the clouds now and have been living at elevations between 5,000′ and 6,500′ for the past few weeks. The RV furnace is back on vacation and our trusty blue flame heater has taken over all the RV heating duties. Our generator is on break for another 6 months or year, and the shore power cord is buried somewhere in the basement once again.
Snug as a bug in a rug!!
If you are going to be using your RV in cold weather this winter, we have another post full of tips for keeping warm that you might enjoy:
And if you think a vent-free propane heater is something you’d like to get, have a look at our detailed article that discusses the different types of heaters and shows how we installed ours:
There are a lot of ways to beat the heat in summertime when you’re traveling in an RV. The most obvious is simply to head to a cool place when a heat wave hits. Afterall, your home has wheels!
.
But there are other things you can do to prevent the sun from baking the interior of your home, even if you don’t have electrical hookups to run the air conditioner. And if it does get unbearably sultry, and you do need to run the A/C from a portable gas generator, there are some tricks we’ve learned to make it possible…
GO SOMEWHERE COOL – In the MOUNTAINS, FAR NORTH and/or NEAR WATER
Cooler places are located either in high elevations, and/or up north, and/or by a big body of water — the ocean or a lake.
Moraine Lake in Banff National Park is a cool place, even mid-summer.
In the west, the key to temperature is elevation. Many folks who are new to the western states are surprised to find out that there can be a 20 degree difference in temperature between two places that are just 150 miles apart.
For instance, Phoenix,Arizona (1,100′ elevation), is 20 degrees hotter than Flagstaff, Arizona (6,900′ elevation). And the North Rim of the Grand Canyon (9,000′ elevation), (about 200 miles further away) can easily be another 10 degrees cooler than that.
Likewise, Stanley,Idaho is about 15 degrees cooler than Boise, Idaho. It is just a few hours north but is 3,500′ higher up.
Similarly, the coasts enjoy wonderfully cool sea breezes. The whole west coast, from San Diego to the Olympic Peninsula in Washington is much much cooler than the communities that lie directly inland (over the coastal mountains), 150 miles from the coast.
Life is definitely cool at the beach (Lake Pend Oreille, Sandpoint, Idaho)!
Bandon, Oregon, on the Pacific coast is 15 degrees cooler than Bend,Oregon, which is in the inland desert, baking away behind the range of coastal mountains that stop the flow of cool air coming in from the Pacific.
If the ocean isn’t easily accessible, spending time near a big lake can do the trick.
Want to get cool? Find your inner child and play in the water with a toy wagon.
Large lakes offer “sea breezes” in the afternoons, and many lakeside towns have fantastic waterfronts, like Seneca Falls,New York, in the Finger Lakes, and McCall, Idaho, on Payette Lake.
GO SOMEWHERE COOL IN TOWN
The worst part of the day is the late afternoon and evening, and that’s a great time to get out of the rig. A late afternoon or early evening outdoor picnic under a shady tree in a place with a breeze or cool grassy lawn will work wonders. A trip to the air conditioned library or bookstore with a little cafe inside can be a delightful change of pace.
A hot afternoon is a perfect time to take in a matinee at the local cinema. If the laundromat is air conditioned, the heat of the afternoon might be the time to get that chore done, or if your laundry is already clean, doing the week’s grocery shopping could give you an hour or two of air conditioned respite at the supermarket.
HOW TO RUN a 15K BTU RV AIR CONDITIONER with a YAMAHA 2400i GENERATOR
Sometimes, it’s just too darned hot to survive without air conditioning, and in that case it’s really nice to turn it on.
Some folks say this can’t be done, but we’ve been doing it for years.
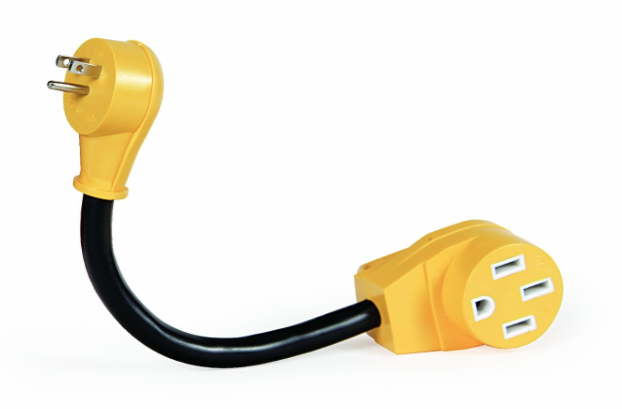
We use a variety of adapters to plug the generator into the shore power outlet on the outside of the rig.
To get from the 15 amp outlet on the generator to our shore power outlet on the outside of our trailer, we could use one adapter plus the shore power cord:
15 amp Male to 50 amp Female dogbone adapter (15 amp Male plugs into generator)
50 amp 125-250 volt RV shore power cord (50 amp Male plugs into dogbone above)
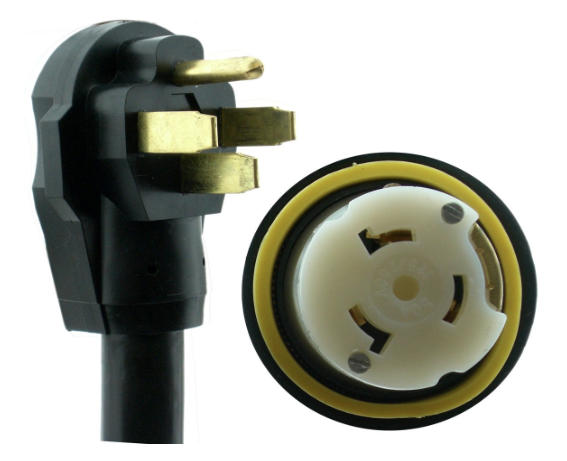
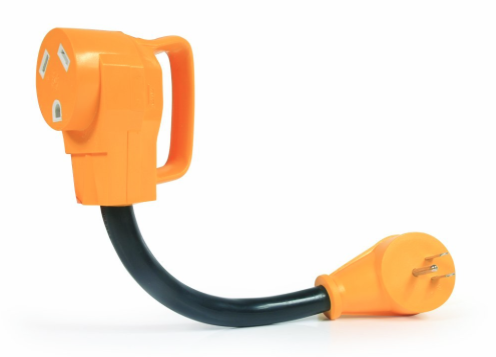
However, when we first bought our trailer, we stayed at an RV park that had a 30 amp pedestal that didn’t match our 50 amp shore power cord, so we had to buy an adapter. Making good use of that adapter with our generator now, we use two adapters plus our shore power cord when we connect to the generator:
Our 2400 watt generator is able to power our 15K BTU air conditioner just fine. However it sometimes takes a little coaxing to get it to fire up because there is a big spike when the air conditioner’s compressor first turns on. Over the years, we’ve learned that the trick to persuading it to run is the following:
Run the generator for a few minutes with no load and make sure it is warmed up
(also make sure the hot water heater and fridge are set to “gas” and no other electrical appliances are running)
On the air/heat control unit, set the Fan button to High On
Set the System button to Fan and let it run for a few minutes
Set the System button to Cool and listen to the compressor come on
Make sure the genny is warm and let it power the fan on high for a while first… THEN switch on the A/C.
Keeps the gas in the genny fresh
If the last step trips the breaker on the generator, set the System button back to Off, restart the generator and try again.
On a few occasions it has taken us 2-3 tries to get the air conditioner going. However, most of the time it fires up on the first try.
We always run it for 4-6 hours when we turn it on, and it purrs along just fine. However, we run the air conditioning just a few days each year. The rest of the time we stay cool using other means.
To keep the gas in the generator (and in the gas can) fresh and to ensure quick starts after storage and to prevent gumming and varnish, Mark puts the stabilizer Sta-Bil Gas stabilizer in the gas.
POSITION THE RV
— BIGGEST WINDOWS FACE NORTH and SMALLEST WINDOWS FACE WEST
The toughest time of day is the afternoon when the sun is in the southwest and western sky and is slowly baking the RV. Sometimes it seems to take forever for the sun to set while everything inside the rig quietly fries!
No matter what the wall and roof insulation R-factor is for an RV, the windows are where all the heat comes in. So, keeping them shaded as much as possible throughout the day makes all the difference in the world.
Every rig has a different arrangement of windows, but if you can position the biggest ones to face north or east and the smallest ones (or the wall with no windows if you have one) towards the west and southwest, the difference to the interior temperature will be astonishing.
If there is a way to block the afternoon sun entirely by parking next to shade trees or a building, that is even better.
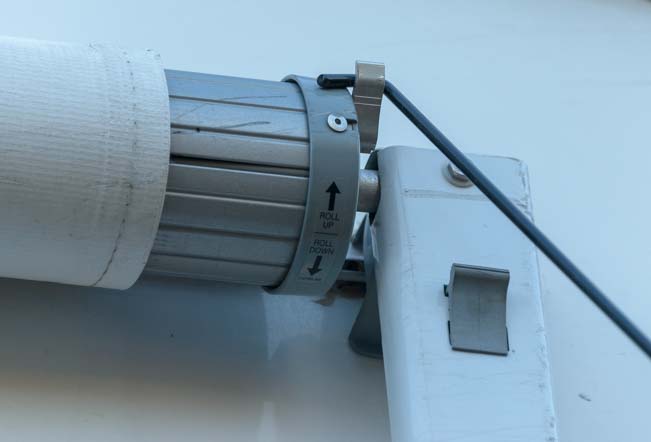
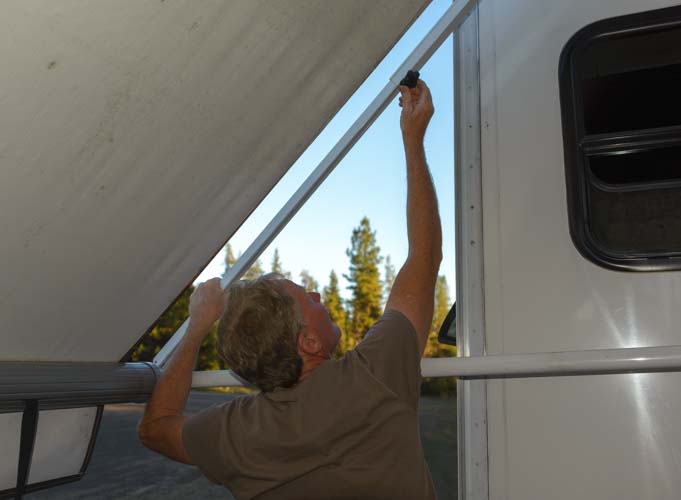
SET UP THE RV AWNING
Even if the awning will only shade a small part of the RV’s walls and windows for a few hours of the day, this is still helpful! When an RV wall gets hot, you can feel the warmth on the inside of the rig. And you can especially feel it in the cabinets. There’s nothing like a hot bottle of olive oil in the kitchen pantry!
Even though it’s shading just one small window, the awning is keeping the whole wall cool.
Modern rigs have wonderful powered awnings, but ours is the old fashioned manual crank type of awning. The other day we heard two RVers complaining about how putting these old awnings out was really difficult and was a two man job.
It’s actually not that bad, and Mark does it by himself in just a few minutes. Here are the steps:
1. Unscrew the knob on the back of each awning arm.
2. Open the clip right above the knob on each awning arm
3. Use the awning tool to open the lever on the roller
4. Pull down on the lever to open it.
The roller lever is now in the down position.
5. Use the awning tool to pull out the awning by grabbing the webbing loop
6. Pull the awning part way out with the awning tool
7. Grab the webbing and pull the awning out the rest of the way
8. Close the RV door handle to get it out of the way
9. Slide out the awning arm in its track
10. Pushing down on the awning arm to keep the canvas taught, tighten the knob.
Do this on both sides
11. Open the big awning handle to raise the awning up.
If it looks like it might rain, position one side of the awning a little lower than the other so the water will drain off of the awning.
When Mark closes up the awning for travel, he puts velcro straps around the arms to keep them from accidentally opening as we travel.
Another neat awning trick is to get an awning shade extension that drops from the edge of the awning to the ground. This provides shade from touching the rig even when the sun is at a low angle.
INSULATE THE WINDOWS and HATCHES INSIDE
The day/night shades in most RVs are great for reducing sunshine in the rig, but do little for eliminating the heat that pours in through the glass and metal frame.
Pulling down our night shades doesn’t block much direct sunlight.
We cut Reflectix, which is a bubble wrap kind of aluminum foil that comes in a huge roll, to fit each window (a pair of scissors is all you need). We labeled each piece for the window it fits into.
Reflectix picks up where RV insulation leaves off…
We raise the RV’s day/night shades, press the piece of Reflectix against the window, and then lower the shade to hold the Reflectix in place.
A layer of Reflectix behind the shade blocks all the sun!
When leaving the trailer, we close the hatches and put vent insulators in them.
In our big rear window we jam a pillow under the large piece of Reflectix to hold it up. Otherwise it would drop to the floor.
If we are going to leave the rig for a while, we close all the windows and put an RV Vent Insulator in each of the roof vents. It is amazing to come home after many hours of running around to find that the rig is still fairly cool inside.
However, if we are planning to stay home, we don’t like to live in a tomb, so we have another strategy using fans and open windows that allows us to have some ambient light coming in…
STAY COOL WITH FANS
We rely on two different types of fans to stay cool.
Vent Fans
We have a Fan-tastic Vent Fan in two of our trailer’s four roof hatches. These are designed to push a maximum amount of air in or out of the rig. We set them to push the air out of the rig, and then we open the windows on the shaded side of the trailer to let the cool air from outside come in.
Fan-tastic Fan in an RV hatch
If we were to replace our Fan-tastic Fans, or if we wanted to upgrade another hatch to one of these or a similar type of vent fan, we would choose a very simple model that does just the basics.
Our Fan-tastic Fans are whiz-bang models with remote control, rain-sensing, auto-opening, auto-closing, slicing and dicing and who knows what else. Unfortunately, they have minds of their own, and they won’t listen to reason.
They auto open and auto close at the weirdest times, they don’t necessarily know when it’s raining, and they make it impossible for the mechanically challenged (ahem…me) to turn them on or off or to open and close them. There are way too many buttons that do way too many different things.
Also, Mark has had to rebuild various parts of both of these fans, and by the colorful flow of expletives I heard him let loose on these jobs, I would gather that it was not easy.
Portable Fans
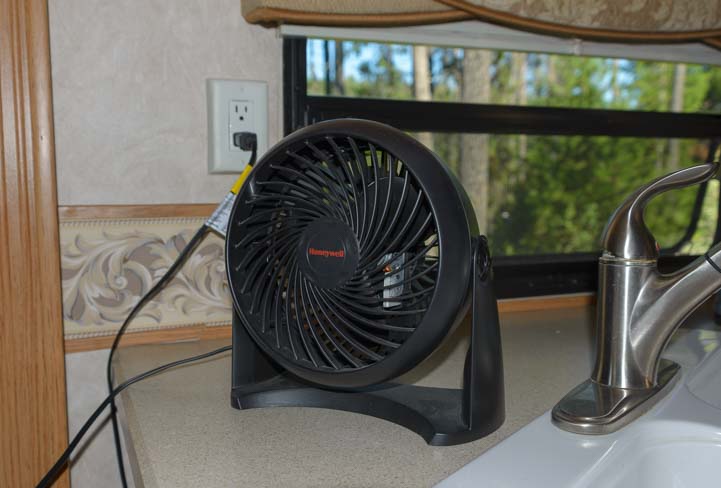
While vent fans help move fresh air through the rig by forcing hot air out the vents and pulling cool air in through the windows, portable fans are a godsend to aim right at you when you start reaching the boiling point.
We got this fan in Quartzsite one year for our (not yet purchased) sailboat and we’ve used it a lot in the years since then. But it is extremely noisy. Forget trying to sleep with it running nearby! It’s also kind of silly to spend so much money on a 12 volt fan when a smaller and quieter 120 volt fan will do just as good a job, if not better, for a fraction of the cost. All you need is an inverter.
…A small, quiet, cheap portable fan will run on an inverter just fine!
Last of all, there’s nothing that can cool down your body temp like an ice cold drink. A smoothie in a blender tastes wonderful and can bring your core temp down quite a bit. We make ice using old fashioned ice cube trays in our freezer, and we use a few cubes and frozen fruit in our smoothies to ensure they are as cold as possible.
Smoothie time – Get cool with lots of ice and frozen fruit!!
Those are a few of our tips for surviving the dog days of summer in our RV without hookups. It can take a little finagling and strategy, but these things have kept us cool in our trailer for ten summers now!
Defrosting an RV refrigerator is a surprisingly easy job. We’ve been living with a propane RV refrigerator for many years now, and they always need defrosting after a few weeks or months. Being meticulous about not leaving the refrigerator door open unnecessarily can help, but when you find yourself living in a hot and humid environment or if you have the refrigerator side of your trailer or motorhome facing the blazing hot summer sun all afternoon, the frost is going to build up over time.
Over the years, we’ve tried several different techniques for defrosting our RV fridge, and in the old days this was a big job that, with some methods, could take well over an hour. We now have it down to a super fast method that makes this pesky job a cinch. The last time we did it, I made a note of the time on the clock as we went through each step. From start to finish, it took 20 minutes.
The first step is to turn off the refrigerator and empty the contents of the freezer into cooler bags or a cooler of some kind. Since these things will be out of the freezer for just 20 minutes, they won’t defrost and the ice cream won’t melt. If your RV is hot inside, covering the cooler bags with blankets for extra insulation can help.
9:17 a.m. – Turn off fridge and unload freezer into cooler bags
We used to unload the whole refrigerator and empty it out completely, but that isn’t necessary and it takes a lot of time. An awful lot of what is in the refrigerator can handle warming up slightly as you keep the refrigerator door open to defrost it.
Instead, just unload the most temperature sensitive items — milk, yogurt, lunch meats, mayonaise, etc., into an insulated cooler bag or a cooler. Most of the fruits, veggies, bread, cheese, condiments, etc., can remain right where they are in the fridge for the 20 minutes it takes to defrost it.
Set the cooler bags aside. Covering them with blankets will keep everything even cooler.
Next, put a super absorbant chamois towel in the bottom of the freezer compartment to absorb the water from the melting ice, and use a hair dryer to thaw the walls of the freezer.
9:22 a.m. – Use a hair dryer to thaw out the freezer.
We put it on the high setting and keep a distance of about 8″ between the hair dryer and the walls of the freezer. A higher wattage hair dryer may need to be put on the low heat setting. Hold your hand about 8″ from the hair dryer and see how hot it feels.
Be sure you keep the hair dryer from heating up the plastic walls or they will crack from being cold and then getting hot. Keep the hair dryer moving and test the temp of the plastic walls with your hands.
After thawing the walls of the freezer a little, move down to the cooling fins in the refrigerator compartment. Keep the hair dryer in constant motion, sweeping it back and forth from side to side.
Slowly wave the hair dryer in front of the cooling fins.
Alternate working on the freezer compartment and the refrigerator compartment.
Alternate between the cooling fins in the refrigerator compartment and the freezer compartment.
At the beginning, when the cooling fins are caked in ice, the hair dryer can be closer to them.
Little ice sheets will begin to fall off the refrigerator cooling fins into the drip tray underneath. As the thawing process continues, increase the distance between the hair dryer and the cooling fins.
As ice drops and the cooling fins thaw, move the hair dryer back a little.
Don’t chisel the ice off the fins or the freezer walls with a tool. If you pierce the metal base behind the cooling fins or the walls of the freezer, the refrigerant (ammonia) will leak out. We don’t use any chiseling device. We simply assist the thawing process with the hair dryer.
Check beneath the cooling fins and you’ll see the bits of ice dropping into the drip tray.
Check below the cooling fins where the ice drops off in chunks.
If you go outside, on the back of the RV you’ll see water seeping out of the refrigerator vent.
Outside the rig, water will be seeping from the refrigerator vent.
A little trickle of water flows down.
Once all the ice has fallen off the cooling fins, pull out the drip tray and dump the ice in the sink.
9:34 a.m. – Once all the ice has dropped off the cooling fins, empty the tray of ice into the sink.
Up in the freezer compartment, the chamois towel is now fairly wet with water that has dripped down off the walls. Wring it out and use it to wipe down the freezer and the fridge.
9:35 a.m. – The chamois towel in the freezer is pretty wet. Use it to wipe down the fridge and freezer.
Load the food from the cooler bags back into the refrigerator and freezer compartments, and you’re done! Put the fridge at max temp for a few hours to help it cool back down, and then set it to the temperature setting you normally use.
9:37 a.m. – After loading the food back in the refrigerator, turn it back on. Done!
Other RV Refrigerator Tips
The key to having an RV refrigerator work optimally is having the air circulate inside well. Overstuffing the fridge with food makes this difficult for it. We have used a little RV refrigerator airator fan that’s designed to keep the air flowing. We’ve had mixed results with this, and when it died we didn’t replace it. I think this would work well if there were space between all the food, but our fridge is usually packed (the turf wars between the beer and the veggies can be brutal…sometimes we can hear them battling it out in there!).
As a maintenance item, we keep the door seals clean, wiping them down periodically.
We use simple refrigerator thermometers to monitor the temperatures in the fridge and freezer. It has a built in hook, and we hang it from one of the rungs in the top shelf in the refrigerator. The one in the freezer rests against one wall.
We were surprised to learn that RV refrigerators have an expected lifespan of about 8 to 10 years. A classic sign of impending failure is the appearance of yellow dust in the refrigerator vent area behind the fridge (go outside and take the vent cover off and look around with a flashlight). Click the following link to read the funny story of our RV refrigerator replacement and see how an RV fridge replacement is done.
Because of the shorter lifespan, higher price, and use of propane in RV refrigerators, many (most) “full-time” level fifth wheels and motorhomes are now being built with residential refrigerators that run on AC power only (a dedicated inverter is installed so it can run from the batteries while in transit). For folks that have plans to dry camp and boondock a lot in their RV life, a residential refrigerator will require a much bigger battery bank and solar panel array than would otherwise be needed. We discuss that in more detail at this link in our introductory solar power article.
If our hair dryer method of defrosting an RV fridge seems unorthodox to you, believe me, we have tried many other methods. We tried opening the fridge and freezer doors and letting the fridge thaw out on its own. We tried doing that and “helping it along” by chiseling the ice off with a small plastic scraper. We tried putting a bowl of hot water in the fridge to help it warm up.
All of these methods were adequate, but they were time consuming. We’ve been using our current method with the mini travel hair dryer for a few years now and really, really like it.
More of our Latest Posts are in the MENU.
New to this site?
Visit RVers Start Here to find where we keep all the good stuff. Also check out our COOL NEW GEAR STORE!!*** CLICK HERE *** to see it!
A trip to the dentist’s office isn’t fun for anyone anywhere, but Mexican dentists do terrific work, and we have received outstanding and very affordable dental care in our travels throughout Mexico, both on our sailboat and in our RV.
This page offers a glimpse of what a trip to a Mexican dentist’s office is like, what to expect when crossing the border to get dental work done, which dentists we’ve been to and recommend, and what various dental procedures have cost us. There’s a ton of info on Mexican dentistry here, and if you don’t want to read it all in one sitting, these quick links will get where you want to go:
Our first experience with a Mexican dentist, and the one that totally changed our attitude towards Mexican dentistry in general, was in San Luis Mexico, just a little south of Yuma, Arizona, back in 2008.
Getting a Mexican Crown was quite an adventure for us back in the day.
We walked over the border and continued on for half a block to the office of Dr. Sergio Bernal at 4:00 on a Friday afternoon. We did not have an appointment, but we wanted to see what could be done about a baby tooth of Mark’s that had never fallen out but had suddenly started bothering him.
After two minutes in the chair, Dr. Bernal recommended he get a crown. We weren’t sure about getting something complicated like this done in Mexico, and were also unsure whether a gold crown or porcelain crown would be preferable. We walked around the streets of San Luis for an hour debating whether to go for it, and if so, what kind of crown to get.
When we returned to Dr. Bernal’s office, we met a group of Americans from Las Vegas in the waiting room. A big friendly guy in the group told us he gathered up his friends and family every year, rented a car, and drove down to San Luis to get their teeth checked and worked on by Dr. Bernal. He’d had extensive bridge work done by Dr. Bernal 10 years prior, and he had been so impressed by the quality and affordable cost of the job that he’d been going back ever since.
Mark decided to go for it, and in no time Dr. Bernal had ground down his tooth, made an impression of it and made arrangements for a porcelain crown to be delivered to his office by noon the next day. Because the permanent crown would be installed so soon, there was no need for a temporary crown (how nice!).
As we walked out the door (without having paid a cent for the diagnosis, the tooth grinding or the impression), Dr. Bernal asked Mark his name, scribbled it on a yellow sticky pad and put it on the impression. He waved to us as we left to walk back over the border and said, “See you tomorrow!”
Despite the next day being a Saturday (we later learned Mexicans work six days a week), we walked across the border again at noon, and Dr. Bernal quickly cemented the crown in place.
The cost? $130 US.
Best of all, it was a perfect color match and was the best fitting crown Mark had ever had. It has been fine ever since.
From that moment on, we have entrusted our teeth to Mexican dentists throughout the country without a moment’s hesitation.
The Dentist Chair… yikes!
During our nearly four year cruise of Mexico on our sailboat, we visited dentists (and doctors) up and down the Pacific coast and in the Sea of Cortez. The dental care was always top quality, very caring, and very affordable. We have never had unnecessary work recommended (as happened to me 15 years ago in the US when an unscrupulous dentist recommended I get five crowns immediately, only one of which I actually needed).
I always feel like going to the dentist in Mexico is basically like going to the barber. You walk in off the street without an appointment, talk to the dentist directly, hop in the chair for him or her to assess what you need, get it done right away or return the next day, and walk out with everything completed at a fraction of what it would cost in the US.
Where Are Mexican Dentists Trained?
There are some urban myths about Mexican dentistry. I’ve heard people say, “The best Mexican dentists get their training in the US.”
In our experience, that is not true. Of the ten excellent dentists and doctors we have been to in Mexico, none received their training in an American university.
Usually, Mexican dentists and doctors hang their diplomas on the wall. Whether the diplomas are hand calligraphed in Latin or typed up in Spanish, it is pretty easy to tell if the university was in Guadalajara, Mexico City or Baja California (the three areas for medical and dental schools we’ve seen on diplomas).
Do Mexican Dentists Speak English?
In our experience, most speak at least a little, especially in tourist areas and in the border towns where a lot of Americans come specifically to receive dental care.
Why Are Mexican Dentists So Cheap?
People also wonder how it is that Mexican dental (and medical) professionals can charge so little for their services if they are really as good as (or better than) their counterparts in the US. The reasons are complex, but in a nutshell, the American and Mexican economies and cultures are totally different. Even more important, the business models for the dental and medical professions are not at all alike in the two countries.
A Lower Wage Scale in Mexico
The average DAILY wage for an unskilled Mexican worker is around $5 per DAY. Obviously, skilled workers make more, but the entire spectrum of wages, from professionals to janitors, is scaled down much lower than the US. In many cases, like that of a city employed street sweeper we met in Huatulco, the employee provides the equipment for their job. This industrious city worker we met had fashioned his brooms for his government job from tree branches and twigs himself.
Cheaper Office Space
Commercial property rental is also much cheaper. A friend of mine who owns a store in the popular seaside tourist town of Zihuatanejo pays $30 a MONTH to rent the space. Office space for Mexican dentists and doctors may not be quite that low, but even if it is double the price, it is still negligible by American standards.
Very Little or No Staff
Mexican dentists and doctors also don’t employ much staff, if any. Some dentists have an assistant, but many of the best ones we’ve been to don’t. Also, there is no one dedicated to answering the phone and making appointments. Any time we have had our teeth cleaned, it was done by the dentist and not by a hygienist. One very conscientious dentist spent an HOUR cleaning my teeth and then spent another HOUR on Mark’s, for $45 US each.
Little or No Malpractice Insurance and Marketing
Unlike their American counterparts, Mexican dentists and doctors don’t have to carry massive amounts malpractice insurance. Also, they don’t invest in marketing. None of the dentists we’ve been to have websites, and it is very difficult to find information about any of them on the internet. The few Mexican dentists that do have websites cater primarily to Americans, and we found that their fees are often adjusted upwards accordingly.
No Third Party Relationships
Mexican dentists and doctors also set their fees according to the market demands of their patients. There is no insurance company operating as a middle man. Patients pay their medical providers directly rather than paying an insurance company who, in turn, then pays the dentist or doctor, as happens in the US.
This keeps the patient/doctor relationship very pure. The doctor or dentist is employed by the patient, not by a third party insurance company. Fees for unexpected issues that come up requiring return visits, extra x-rays, additional prescriptions, etc., can be discussed between doctor/dentist and patient. In our experience, though, those little extras have been free because the dentist/doctor is managing the relationship with the patient/customer and wants to provide good value.
Getting A Root Canal in Mexico — Our Experience in San Luis south of Yuma, AZ
A few weeks ago one of my teeth began to bother me, so we decided to return to our dentist, Dr. Sergio Bernal, in San Luis, Mexico, who had done such a fine job with Mark’s crown years ago. We took our rig to Yuma, drove our truck to the Mexican border and parked it in a parking lot on the American side right next to the border crossing area. The parking fee was $4 for 24 hours (in 2017 it is $5 for 24 hours).
The parking lot on the American side of the border at San Luis, Arizona. $4 for 24 hours.
It was 8:45 in the morning on a Tuesday, and we followed signs that walked us through the border crossing. We saw a few Mexican border agents, but none asked for our passports. Then we emerged on the other side and saw a soldier dressed in desert camo holding an automatic weapon.
The soldier smiled broadly at us when we said “buenos días” to him as we passed by, and he said “buenos días” to us in return.
Having lived in Mexico for a few years, we learned that Mexicans always greet each other with a warm “buenos días” (before noon), or “buenas tardes” (after 12:00 p.m. – sharp), whether they are passing in the street, or standing in front of a store clerk about to pay for something, or boarding a crowded bus (everyone on the bus responds!). Mustering the guts to say that phrase in Mexico will always get you a smiling response, and it is heartwarming and fun to give it a try.
We also learned that the presence of soldiers is just standard procedure at Mexico’s borders (we’ve seen them at the US and Guatemala borders). It is also standard procedure when the Mexican Navy boards boats at sea.
Our sailboat was boarded 8 times during our cruise, either to to check our papers, to check for weapons and drugs, or to make sure we had proper safety gear on board. Each time the inspectors couldn’t have been nicer or more polite. In one case, when they brought aboard a drug-sniffing dog, they put booties on his feet so he wouldn’t scratch the boat. Another time we were given a performance evaluation form to fill out for the boss!
I touch on three of the Mexican Navy boardings we experienced in these blog posts:
Moments after crossing the border, we emerged onto a lively and busy street in the town of San Luis Rio Colorado, the Mexican sister city of San Luis, Arizona.
After emerging from the border complex, we walked straight down the street, crossing a small intersection and looking to our left towards the opposite side of the street as we walked.
Mark crosses a small intersection after crossing the border. Dr. Bernal’s office is on the left just beyond the lavender “Genesis” sign (center of photo).
We were walking south on First Street (“Calle 1”). Dr. Bernal’s office is in an alcove on east side of the street (the opposite side…the left side in the above photo) about halfway between the first intersection we had just crossed and the street light at the next intersection.
The shops are small and tightly packed with colorful but faded signs overhead.
Walking down Calle 1 (1st Street), and looking left, these shops are just before Dr. Bernal’s alcove.
Catching sight of the lavender “Genesis” sign on the left side (east side) of the street, we spotted the alcove where Dr. Bernal’s office is located just beyond that sign (to the right of the sign while facing that side of the street (facing east)).
Inside Dr. Bernal’s alcove, we saw a large grinning tooth out in front of his office door. A sign overhead and a sign on the roof both said, “Family Dental.”
Dr. Bernal’s office is in this alcove. The door is on the right.
We head in!
Even though it had been 7 years since we had been here, back in 2008, memories flooded back as soon as we walked in. We had known nothing about Mexico back then, and we had been quite overwhelmed by the differences on the two sides of the border.
Things are not as spiffy or glam in Mexico as they are in much of America, and this dentist’s office wasn’t in fancy Class A office space like we were used to back home. That had been a little off-putting to us back then. But during those early days of full-time travel we had yet to learn that you can’t judge a book by its cover.
The waiting room.
When we walked into Dr. Bernal’s office with all these memories swirling around, he greeted us with a big smile. I explained (in English) that he had done a crown for Mark way back when and that we had come back because I had a toothache.
“Oh yes, I remember….” He said.
“You remember us???!!” I asked, incredulously.
“Of course I do…” he said, “Gold crown or porcelain… you couldn’t decide.”
Wow.
We were the only patients there at the moment, so I hopped in the chair right away and he tapped my teeth and said I needed a root canal. Darn! I was afraid of that.
Dr. Sergio Bernal tells me I need a root canal. Oof!
Mark got in the chair and was given a clean bill of health. No problems, no need for work, no need even for a cleaning. “Come back when you have a problem,” Dr. Bernal said. I should only be so lucky!!
Wasting no time on my behalf, Dr. Bernal got on the phone to an endodontist across town, Dr. Horacio Avila, to make sure he was available to see me right away. Then he walked us out to the corner and hailed a cab for us. He handed the cabbie a business card for the endodontist, and we climbed in the cab.
Dr. Bernal puts us in a cab to go to endodontist Dr. Horacio Avila across town.
The cabbie swung the car around and then let another guy in too. The cabs in San Luis are shared cabs, and it is normal to have the cabbie pick up someone else who is headed in the same general direction.
A few minutes later he dropped us off at Dr. Horacio Avila’s office. The cabbie wanted 40 pesos or $2, whichever we had. We happened to have some pesos we wanted to get rid of, so we paid in pesos. Back when we got those pesos in 2013, the exchange rate had been less than 13 pesos to a dollar. What a shock it was to find that the exchange rate is now 19+ to the dollar!
Dr. Avila’s office at Calle 13 (13th Street) and Madero
Dr. Avila’s office was nice inside, and like all dentists and doctors we’ve been to in Mexico, his diplomas hung on his wall. He had earned his dental degrees at the University of Baja California. Dr. Bernal had earned his degrees at the University of Guadalajara.
Dr. Avila’s diplomas. He was trained at the University of Baja California.
I was blown away by Dr. Avila’s equipment. A quickie x-ray yielded an image on a computer screen in seconds, and he explained (in English) that the root canal would take about 45 minutes. He said it would normally cost $180 US, but because it was in a tooth that already had a crown on it, the extra work of drilling through the crown to perform the root canal would raise the cost to $230 US.
I leaned back, he numbed me up, and in no time the root canal was finished.
Dr. Avila had very modern equipment with x-rays that went directly to a computer screen, etc., etc.
When I got out of the chair, he explained that I needed anitbiotics and anti-inflammatory meds. He described how to take them and wrote up a prescription, handed me an envelope containing prints of my x-rays as well as the images of my root canal in progress, and then he led us to the door.
His assistant asked me my name and wrote it down on a pad. I gave her $230 in American dollars in cash, and she asked me whether I wanted a receipt. Then she took us out to her car and drove us to Liquis Farmacia, a big pharmacy back near the border crossing area. (“Farmacia” is pronounced “far-MAH-seeya” even though it doesn’t look like it).
Liquis Pharmacy (“Farmacia”) is a block away from the border.
She took us through the drive-through lane, placed the order for the meds at the window for us, and passed our cash through to the clerk (we paid in pesos, but dollars would have been fine too). It was about $10 for a supply of amoxicillan (Ampliron) and anti-inflammatory Supradol. Then she drove us to Dr. Bernal’s office.
We tipped her $5 in American dollars for driving us around town and making sure we had the right meds in hand before we left the country.
Dr. Avila’s assistant drove us to the drive-through window and ordered my meds for me.
We walked over to Dr. Bernal’s office and I climbed back in his dentist chair (gosh so many times in and out of dentist’s chairs in one morning!!). He took a look at Dr. Avila’s work and said he would complete the job by putting a filling in the crown where Dr. Avila had drilled through to do the root canal. But he didn’t want to do it until a few days had passed and the tooth was totally pain free.
So he sent us on our way (and again, did not charge us a cent).
It was 10:00 in the morning when we crossed back over the border into the US and got back in our truck.
The pedestrian crossing going back into the US
The whole thing had taken an hour and a quarter — with no appointment. In that short span of time we received two check-ups, a diagnosis, a root canal, x-rays and meds.
Including the cab ride from the dentist to the endodontist, a tip for the assistant who drove us to the pharmacy in her own personal car, and the parking fee for our truck that was waiting for us on the American side of the border, it all came to a grand total of $241 US.
So far, we hadn’t paid Dr. Bernal a dime, yet he had masterminded the whole thing.
Does this sound like American dentistry?
We returned a few days later to check in with Dr. Bernal (no appointment, we just walked in). My tooth was still a little tender, so he told me I wasn’t ready for him to do the filling in the crown yet yet. So I was in and out of the chair once again! And again, he didn’t charge me for the checkup.
Finally my tooth was back in action and pain free, so we crossed over the border to Mexico again. This time we went to the endodontist, Dr. Avila, first to get a final x-ray of the root canal and verify that everything was A-okay. He was happy to see me and said everything looked great and sent me on my way. He didn’t charge me for the x-ray or the office visit.
Dr. Avila explains to me about teeth and roots. The x-ray is on the computer screen on the wall.
Then we stopped in at Dr. Bernal’s office. He had a line of patients waiting this time, so we took a seat and waited with them. I got chatting with an American woman next to me, and she told me she and her family had been coming down from Phoenix to see Dr. Bernal for 25 years.
“He must have been just out kid out of dental school back then!” I said.
“We were all a lot younger back then,” she laughed.
Suddenly, an old, hunched Mexican woman came in clutching her mouth. She was moaning as she took a seat. Mark asked her in broken Spanish if she was in pain, and she nodded and rubbed her fingers along her whole lower jaw, obviously in agony.
We were next in line now, but we got up and stuck our heads into Dr. Bernal’s office where he was working on a patient and told him we’d be back later and to please take care of this old woman first.
We wandered around town for a while, and when we returned the woman was gone and Dr. Bernal was free again. I hopped in the chair, and after a few quick zips with the drill, he was done filling the hole in the crown. Then he did a full check on the rest of my teeth and polished some of my white fillings that had started to leach and turn a darker color.
Back in The Chair with Dr. Bernal.
He charged me $40 US. This $40 fee covered the three times I had sat in his dentist’s chair over the past few days since we first crossed the border as well as putting a filling in the crown where the root canal was and polishing me teeth. We handed him the cash, and went back to the border half a block away.
Easy peasy!!
So, my entire procedure involved sitting in dentist’s chairs five times for check-ups and procedures, x-rays, a root canal performed by an endodontist, a filling performed by a general dentist, cab rides between dentist’s offices, antibiotics and pain medications, a tip for the dental assistant who drove us across town and took us to the pharmacy, and the parking fee for our truck waiting for us on the American side of the border.
The grand total for my root canal plus all that other stuff was $281
Yuma is 23 miles north of the US/Mexican border, so it is very easy for RV travelers to get dental work done in Mexico at the San Luis border south of Yuma, AZ. Allow about 35 to 45 minutes to get to the border (it’s mostly highway).
There are loads of RV parks of every description in and around Yuma, and Yuma is a fun town to visit anyway. There are some pretty buildings in the Old Town neighborhood, a really funky burger/bar scene in town at Lutes Casino, and an interesting glimpse of how the Wild West used to be for the bad guys at the Territorial Prison.
For RVers who want to be a little closer to the border and don’t mind dry camping in their trailer or motorhome, Cocopah Casino is 16 miles from the border and has a paved parking area out back that is striped for RVs. As of January 2016 the cost to stay there was $10 for 3 nights. It was very busy when we were there in late January, and I imagine the place is quite packed through the winter season.
There are tons of RV park options in Yuma. At Cocopah Casino there is dry camping as well.
In Mexico’s border towns like San Luis, you can do all financial transactions in US dollars. Some businesses, like Liquis Farmacia (the pharmacy Dr. Avila’s assistant drove us to), will take a credit card, but in our experience most dentists and doctors prefer to be paid in cash (some don’t even have credit card machines in their offices).
If you want to get some Mexican pesos, there are money exchange shops on both sides of the border. But you certainly don’t need to.
There are money changing shops on both sides of the border, but US dollars work just fine. Take lots of $1 bills for cabs and tips.
Walking over the border is easy, and if you are finished in San Luis early in the day, the walk back over the border is easy too. There was no one in the pedestrian line going back into the US when we got there at 10 a.m.
Later in the day, the border crossing into the US gets much busier. Walking back over the border late in the afternoon can involve a long wait in line for pedestrians (and much much longer for cars). Riding our bikes, we never saw anyone in line at the Sentri Gate.
For us, in all our travels and dental office visits in Mexico over the past eight years, figuring out which dentists to go to has been a matter of talking to the locals and to fellow travelers and to ex-pats who live in the area.
We first heard of Dr. Bernal from RVers staying at the Escapees Kofa RV park in Yuma. Some places with lots of ex-pats have online forums where local dentists are discussed and referred, and that’s how we found two of our favorite dentists in southern Mexico.
Some quick tips:
You need a passport to return to the US from Mexico
Take lots of $1 bills for tips and cabs just in case you want or need to be driven around town
Change will not be made with American coins, just bills. Take a variety of bills to avoid making change in general.
Some dentists and doctors will take credit cards, but not all. We carried about $350 in cash.
Bigger pharmacies will take a credit card. Unlike most stores in the US, Liquis was set up for the new chip style credit cards!
To save on currency exchange fees, get a credit card from Capital One. They waive the standard 3% currency exchange fee
If you bike over the border, you can save a lot of time getting back into the US because no one uses the Sentri pass / bike gate
Make a day of it. Go to El Parianchi (10th St. and Obregon) for some awesome food and a truly authentic Mexican experience, especially on a busy Saturday
Here is a Google Maps link for the locations of things in San Luis, Mexico. In this map link, the locations are:
Dr. Sergio Bernal – showing as “Calle 1 115”
Liquis Pharmacy – showing as “Calle 1 7”
Dr. Horacio Avila – showing as “Madero 1307”
El Parianchi restaurant – showing as “El Parianchi” at 10th St. and the border road.
You can see the location of the town square “Plaza Benito Juarez” too.
Here are some of the dentists we have been to and that we would return to. One thing that can be confusing about Mexican names is that the Spanish convention is to give your mother’s maiden name as part of your own name, at the end. So, you state your name like this:
Dr. Sergio Bernal does general dentistry and is located about 1/2 block over the San Luis Arizona/Mexico border on the left hand side in an alcove marked with a large sculpture of a tooth under a sign, “Family Dental” on 1st Street (“Calle 1”) just north of Obregon as described in detail above in this article. Call him directly from the US by dialing this number: 011 52 653 534 6651
Address: First St. #118-9 San Luis Rio Colorado, Mexico. Open Monday-Friday 9-5, Saturday 9-2, Sunday 9-11
Dr. Horacio Avila is an endodontist located at 13th Street (“Calle 13”) and Madero (address is 1305 Madero). He did a root canal for me in 2016 as described above in this article.
Dr. Aldo Velásquez works with his father Dr. Eduardo Velásquez at #53 Benito Juarez Street in downtown Loreto. In 2011 Dr. Aldo Velazquez filled a cavity in one of my teeth and checked Mark’s teeth for 450 pesos. At the exchange rate of the time, this was about $40. We went to his office because we passed it on the street while out walking and it appeared well kept and attractive. Later we found out that Aldo and his father are very highly regarded in town. I wrote about our experience in HERE at this link
In 2013 Dr. Oliverio Soberanis (#210-E 5 de Mayo Ave.) replaced several large fillings in my teeth and fixed some work that had been poorly done by an American dentist long ago. See some pics HERE at this link. I found him by reading an ex-pat forum for Zihuatanejo. He had brand new equipment with TV screens showing the work in progress. I had a cruising friend who is a retired dentist check his work afterwards, and he was very impressed that he took the time to polish the fillings, something many American dentists don’t do because it takes extra time.
In 2012 Dr. Francisco Hernandez (Sierra de Ixtlan, Edificio B Dept 101, Conjunto Residential Los Mangos) did 2 cleanings for us (550 pesos, or about $45, each) and 3 replacement fillings (450 pesos, or about $35, pesos each) for us as well. The cleanings were the most thorough we’ve ever had, taking about an hour each. He was gentle and very conscientious. We went to him because the dentist that had been recommended in an ex-pat forum was on vacation, and she had left a note on her door giving Dr. Hernandez’ name and address. Another cruising friend (whose boat appears at the top of all our blog posts from Huatulco had an excellent experience with getting some fillings replaced by Dr. Hernandez as well.
If you have been enjoying your RV down near the Mexican border this winter and have been on the fence about whether or not to get some dental work done south of the border, hopefully our stories and info here will help you decide to give it a try.
Typical Costs of Mexican Dentistry and Where It’s Cheapest
Mexico has lots of dentists and doctors practicing all over the country. After all, Mexico’s population is nearly 1/2 of America’s population, and all those people need medical and dental care, just like Americans do!
Because of the big difference in the cost of living between the two countries, Mexican dentists are well aware that their services are sought after by Americans because it’s cheap.
Mexican Dentists Whose Practices Serve Primarily Mexicans Are The Cheapest
Most Mexican dentists set up practices in predominantly Mexican communities, and they charge prices their patients can afford. Their prices are typically 10% to 15% of the costs for identical dental procedures done in America.
San Luis is such a community, even though it is a border town. A few Americans cross the border to get dental work and medical procedures done in San Luis, but they are a smaller percentage of the dentists’ and doctors’ total patient base than in other locations.
In San Luis, Mark’s porcelain crown cost $130 US in 2008. At that time, in America, the cost for a porcelain crown was typically $1,000. My root canal in 2016 plus medications, cab fees and parking fees cost $281. At that time, in America, the cost of a root canal in a tooth that had a crown on it already was typically $2,000 or more.
Mexican Dentists Whose Practices Serve Primarily Americans Are More Expensive
In contrast, dentists that are located in places where Americans tend to congregate often establish their practices specifically to serve Americans. After all, they can make a lot more money that way than by serving Mexicans. This means that they have flashier office space, they have marketing geared towards Americans that is in English, both of which Americans appreciate, and they have higher prices.
Their services may not be any better than the Mexican dentists who focus on Mexican patients, but it will feel more like dentistry “back home” in America. They may require that you make an appointment in advance, they may accept a credit card for payment, and they may speak very fluent English.
The prices in these kinds of places are typically 40% to 50% of the costs of equivalent procedures in America.
One area that is extremely oriented towards Americans is Los Algodones near the border of Yuma, Arizona. Los Algodones is a tiny handful of tightly packed streets that are wall-to-wall dental and medical offices that serve an entirely American clientele. Few, if any, Mexicans go to these dentists and doctors for care. It is way too expensive for them.
Likewise, we found in our cruise along Mexico’s west coast that the dentists who operated in the more central and touristy parts of any town tended to have more American style facilities and higher prices.
In Ensenada, a cruise ship destination 70 miles south of San Diego, a dentist on the “front side” of town greeted us wearing scrubs (you rarely see that in more Mexican-oriented dental offices). He spoke perfect English and gave us a quote for a very American sounding price for a simple cleaning and a filling.
We decided to pass on his services. However, during our stay in Ensenada, we got to know the affluent looking owner of an ice cream shop in town and asked him for a recommendation for a dentist. He sent us to a totally different part of town where a very skilled dentist in a much simpler office took care of us at the typical 10% to 15% of American prices that “Mexican dentists for Mexicans” charge.
So, when looking for a dentist in Mexico, keep in mind that dentists whose patients are primarily American will charge you prices that are much higher than dentists whose patients are primarily Mexican. Whether the actual dental care they provide is any different is truly debatable. It’s just more expensive and feels more familiar because of the outer trappings of the office space itself and the way they run their business.
Crossing the border on foot forced us to rely on taxis to get to the more distant locations on the other side, so after our first visit, we decided for future trips it would be a whole lot easier and more interesting to ride our bikes over the border instead. We simply parked our new truck on the American side for the day, unloaded the bikes, and walked them across.
Once on the other side we could get around town quickly and easily.
We found riding our bikes around San Luis was much more fun and made the border crossing back to the US easier.
And that’s when we really started to have some fun too.
Mexico is a vibrant country with really exuberant, fun-loving people. Everybody is outgoing and friendly and warm, and we have always found it really enjoyable to chat with people on the street, whether in our halting Spanish or in their typically very good English.
Like all Mexican towns, there is a town square in San Luis that is lined with palm trees and has a bandstand at the center. It wasn’t quite as festive as the one in Guanajuato or the town square in Oaxaca, but it we enjoyed wandering through it.
The town square/park named for Benito Juarez has a small band stand.
We really enjoyed seeing San Luis beyond the dentist’s office. There’s plenty of security too — we saw police riding around on Segways (how fun!). They very kindly came over to offer assistance when we looked a little lost at one point.
Now there’s a great way to get around town!
There are lots of places to eat, and if you find yourself in town waiting between dentist or doctor visits and need a bite, there is a Subway that makes sandwiches exactly the way we’re all accustomed to. The only difference is the menu is in Spanish. But don’t worry, the workers will take your order in English — and if they struggle, sign language and pointing at what you want always helps.
Subway has a shop in town, and the only difference we found was the Spanish words on the menu. Pointing and smiling works fine if you can’t make out the Spanish words.
If you have a little more time, check out El Parianchi, a fabulous restaurant that is the Real Deal for Mexican food, Mexican flair and Mexican fun. We LOVED it there.
We found El Parianchi one day when we were looking for the other top restaurant in town, El Herradero where we had enjoyed some chips and salsa and beer on an earlier visit. We were a little lost, though, and we found ourselves in front of El Parianchi instead. When we asked the parking lot attendant, Fernando, for directions to El Herradero, he talked us into staying at El Parianchi, because the food there was truly delicious.
“I’ll put your bikes in here,” he said, pointing to a locked shed in the back of the restaurant. “They’ll be safe.” Deal! We rolled them in between the rakes and shovels and barrels, and went on in.
We had been noticing that we were the only gringos in the whole town. And now we were very definitely the only gringos in this restaurant. We were also the only people dressed in cycling clothes.
Talk about standing out!
It was a Saturday afternoon, and the place was hopping. Waiters rushed here and there, grabbing extra tables and chairs for people, and the food was flying out of the kitchen at a wild rate.
The servers were hustling at El Parianchi on Saturday afternoon!
Two big parties — what looked like a baptism party and an engagement party — were in full swing at long tables on either side of the restaurant, and a Mariachi harp player was singing and strumming his heart out in a corner.
People were laughing and eating and have a grand time while the waiters ran at top speed from one end of the room to the other.
Gringos in cycling jerseys. Sure…we blend right in!
We were seated to one side, and in an instant, a waiter was at our table welcoming us.
We both ordered Corona with a lime, and Mark got a bottled water and I ordered a Jamaica water as well. Jamaica water is an absolutely delicious drink make of hibiscus flowers that has a tartness like cranberry juice (and is about that color) but is much sweeter. Jamaica is pronounced “Hamikah” with a long “i” (even though it doesn’t look like it), and it is a refreshing drink I enjoyed repeatedly throughout our Mexico cruise.
The drinks arrived along with tortilla chips and a bean dip that was to die for. If only I could make beans like that!
Suddenly the harp Mariachi player appeared at our table. Mark handed him a few dollars and asked for a song.
A harp playing Mariachi sang some songs for us — what total fun!!!
“What song do you want?” the harpist asked.
After racking our brains to remember the name of a Mexican folk song, we came up with “Alla En El Rancho Grande!”
He proceeded to play a great rendition of it. I don’t have a video of him singing, but I do have a special video of another Mariachi singing this exact same song for us when we were in Huatulco Mexico at a little beach bar in the sand. Our sailboat Groovy was anchored just out of sight.
When he finished the song, the folks at the tables around us clapped. He wanted to sing a second song for us, so we asked for Mariachi Loco. This is a really cute song we first heard on a day charter catamaran called Picante that used to circle past our boat at anchor in Zihuatanejo.
We were having so much fun in this restaurant, we hadn’t even looked at the menu yet!
Suddenly, the manager, Jose, came over and asked if we were having any trouble understanding the menu. We told him we wanted a beef and bean burrito, and he recommended one of the “percherones.” We’d never had one before, but the “Sonorense” was absolutely scrumptious. It was so good, in fact, that we came back another day just to sample it again!!
For a genuine Mexican culinary experience, check out El Parianchi on 10th Street and the street along the US/Mexico border by the international boundary wall.
When the bill came, it was $17.73 US including our 20% tip — and we had plowed through four beers, a bottle of water, my Jamaica water, our chips and bean dip plus the huge percheron burrito we had split.
We got up to go, rubbing our aching tummies, and suddenly a waiter was carrying over two huge sombreros for us.
We put them on and cracked up.
The harp player placed his harp in front of us, and Jose took pics of us while everyone at the big party at the long table clapped and laughed. How fun!
Olé!!
Then someone handed Mark a guitar and he strummed a few chords.
What a total blast this was!
Mark finds a guitar in his hands and a sombrero on his head!!
We left to a chorus of cheers and found Fernando waiting in the parking lot. He unlocked the shed door and helped us disentangle our bikes from the rakes and shovels and buckets inside. We tipped him a dollar for his efforts.
Rolling back to the border on our bikes, we passed dozens and dozens of cars lined up to cross into the US. By now the pedestrian line was really long too.
In San Luis, bicycles go through the Sentri Pass gate (a special gate for people who cross the US border on a regular basis). This was awesome because there was never anyone in line at that gate!!
What a fabulous day… and no line for bikes at the border!
Our smiles went from ear to ear when we settled back in our little buggy after a great day in Mexico.
Note: We returned to San Luis to see Dr. Bernal and Dr. Avila for more dental work a year later in October 2016. Read the blog post here:
More of our Latest Posts are in the top MENU above.
For more info from other RVers who have gone over the border to get dental care, see the following two blog posts by Nina Fussing of WheelingIt HERE and HERE.
No matter how big an RV you get, if you live in it long enough, eventually you will begin to fill it up with stuff. This has happened to us and our 36′ fifth wheel trailer. When it was new and we first moved in years ago, it was so big that half our cabinets were empty.
Our old dining area – no storage and seating for two.
We began storing lenses in a drawer with dish towels (soft padding) and we had four camera bags that lived on our desk and under our dining room table. Camera bodies were always strewn across the sofa, fanny packs got piled on the desk, and tripods often got stuck on top of the subwoofer under our TV. Tucking everything away for safe passage while driving was a real pain. We needed to get this stuff organized!
Mark had a brilliant idea one morning — replace our dining room chairs with big storage ottoman benches!
Our new dining area – lots of storage and seating for four.
We began researching storage benches and ottomans and found the perfect thing from Simpli Home Furnishings. They are made of a nice faux leather, and there are no decorative buttons on the top, so the plush, padded top is very comfortable for sitting on (here’s more info).
These storage ottomans are 36″ wide by 18″ tall and 18″ deep.
The outside dimensions are 36′ long by 18″ high by 18″ deep. The inside dimensions are 33.25″ long by 11.5″ high by 15.5″ deep.
Our new storage ottomans have voluminous interior space.
We bought them sight unseen from Amazon and couldn’t be happier. They come with four short legs, with three screws each, which were easy to attach.
The only assembly is attaching the four legs.
Some customers have complained that the screws are too long and coming up through the floor of the box, but the legs simply need to be oriented correctly with the three screw holes aligned with the outside edges of the ottoman.
Be sure to align the screw holes with the outer edges of the ottoman.
The legs were attached in just a few minutes using our cordless drill.
A cordless drill makes this a quick job!
The end result is much more comfortable seating at our table and a whole bunch more storage space for our camera gear.
Ta da!
The tricky thing about storage space in an RV is that anything located behind the coach’s rear wheels is going to bounce around a whole lot as you drive down the road. That’s why most RVs don’t have the kitchen in the rear.
Our new storage ottomans sit just slightly forward of the trailer’s axles.
The box tops easily clear the table when they open.
Another tricky thing with storage space in an RV is that in many coaches, like ours, the shelving is very flimsy. We prefer not to put anything heavy into the wall cabinets (except in the kitchen where our cabinets are more sturdily built). But it doesn’t take long to run out of storage space down near the floor.
This new storage space is solid.
A few throw pillows makes these pretty darn comfortable for lounging!
We put some throw pillows on our new benches and now we’ve got not only a great place to keep our camera gear organized and a nice, new, clean look to our dining area, but we can kick back after a meal, prop our legs up on the benches and chit chat for a while. It’s fun to sit there together and get a new perspective on our little rolling home and on life!
We never used to hang out after meals on our old chairs… but this is fun!
These benches are ideal for us, but Amazon sells lots of other similar storage ottomans of different sizes and shapes too and you can find all kinds of storage benches for sale at Amazon at this link HERE).
If you find the benches are a little low, one good way to raise them up is with the plastic rug protectors made for furniture legs. We also removed the feet from our table to bring it down a smidge.
More of our Latest Posts are in the MENU.
New to this site?
Visit RVers Start Here to find where we keep all the good stuff. Also check out our COOL NEW GEAR STORE!!*** CLICK HERE *** to see it!
Winter RVing is loads of fun, but figuring out how to stay warm in an RV on those chilly winter mornings and long cold dark evenings makes all the difference between having a great time and wishing you were in a house. Going to a southern state is a good start, but it may not always fit with your overall full-time RVing itinerary. You might get caught in an early winter storm, like we did in one year in Colorado’s Rocky Mountains. Or you might get whipped by a blizzard on your way south, as has happened to some of our snowbirding friends who wanted to celebrate the holidays at home in Montana before trekking south to Arizona in January.
Here are some tips for ways we’ve found to stay warm in our RV in winter…
Brrr…How do you stay warm inside of this??
WINTER RV TIP #1 – STAY IN BED UNDER THE COVERS TIL SPRING!
One winter RVing tip is to go to bed and stay in bed until the spring wildflowers begin to bloom. Our two little RV companions, Chrissy the cockatoo and Weazie the ferret (named for former beloved pets) seem to have decided to go that route this year.
One solution – jump under the covers and stay there until Spring!!
WINTER RV TIP #2 – GET AN EFFICIENT SPACE HEATER!
A better option is to get a good and efficient heater. The factory installed propane furnaces that come with most RVs is very inefficient. The blower uses a lot of electricity. What’s worse, the heater goes through a lot of propane, because much of the hot air is exhausted outside the RV (just go outside on a cold day and put your hands by the RV furnace vent — they’ll be warm in a jiffy!).
If you will be plugging into electric hookups a lot, and staying for just a few days at a time in most of the places you travel to (with no metering on the electricity and unlimited power built into the overnight camping fee), then it makes sense to get a really great electric space heater.
WINTER RV TIP #3 – INSTALL A VENT-FREE PROPANE HEATER!
If you are going to be boondocking (or dry camping), out in the southwestern deserts — or even in Florida or Texas — then you will need an RV heater that is efficient both in its use of electricity and its use of propane. The best option is a vent-free propane heater.
We LOVE our vent-free propane heater.
We have been using ours since Mark installed it in 2008, both during the winter and the summer, and we love it. We have a whole blog post explaining how this kind of heater works, what the technologies are behind the different styles of vent-free propane heaters on the market, what kind of heat each type of heater produces, and how to install one here:
We have used this heater from sea level to 10,000′ altitude year round, and we share some tips for heating strategies we’ve used when we’ve camped on a lofty mountaintop as temps plummeted and a snowstorm rolled in:
WINTER RV TIP #4 – GET A PORTABLE VENT-FREE PROPANE HEATER!
A portable vent-free propane heater is an easy way to go.
If you love the idea of using an efficient propane heater that doesn’t use any electricity, but you’re not keen on doing a permanent installation, another great option is to get a portable propane heater.
WINTER RV TIP #5 – INSTALL A VENT-FREE PROPANE FIREPLACE!
How about a vent-free propane FIREPLACE?!!
On the other hand, if you are outfitting the RV of your dreams for a life of full-time RV travel or of winter snowbirding RV adventures, then you might consider installing a vent-free propane fireplace that is built into an elegant mantel. These heaters give off the same incredible heat as the more industrial looking vent-free propane heaters, but they have the cozy and inviting appearance of a fireplace and produce a beautiful (and mesmerizing) flame. What a great addition to an RV!!
WINTER RV TIP #6 – SHRINK-WRAP YOUR RV SCREEN DOOR!
One of the easiest ways to winterize an RV is to shrink-wrap the screen door. By covering the screen door with a thin layer of plastic, you can keep the big RV door open all day long, close the screen door, and let the sunshine fill your rig with light and warmth. It is really surprising that just a thin layer of plastic on the door is all it takes to keep the cold air out and let the warm air in (if you aren’t in sub-freezing temps!!).
Shrink-wrapping our RV screen door keeps the cold air out and lets the sun shine in!
We learned this trick from our RVing mentors, Bob and Donna Lea, in our first winter of RVing back in 2007-08. The beauty is that the installation of the shrink-wrap is less than a one hour job, and you can remove it in the springtime in just a few minutes.
Window shrink-film kit
We love having shrink-wrap on our screen door so much that we’ve gone through quite a few summers without removing it. Up in the mountains, it can be chilly in the summertime, with a brisk breeze blowing into the rig in the mornings, so the shrink-wrap can work its magic there too, and it also keeps the dust out.
This year, however, we took the shrink-wrap off our screen door when we got into the heat and humidity of the northeastern states in August, so we had to reinstall it just a few weeks ago.
All the tools we used to shrink-wrap our screen door.
The window shrink film kit comes with double-sided tape, and all you have to do is outline the door with the tape, remove the backing, press the plastic onto the tape, trim off the excess and then heat it up with a hair dryer to make the plastic taught. It is best to clean the frame of the door with alcohol or film remover first so the tape adheres well.
Press the double-sided tape along the frame of the door, going around the plastic sliding insert by the door handle.
Go around the little slider opening for the door handle, because you need to be able to slide this open and closed (the shrink-wrap is covering only the screened parts of the door!). Then peel the backing off the tape all the way around the door.
Remove the backing from the tape.
Press the plastic onto the sticky tape around the door frame.
Hang the shrink wrap around the door frame.
Then use a razor blade to trim off the excess all the way around the door. Get the plastic as taught as you can. It doesn’t have to be perfect, though, because all the wrinkles will be taken care of in the next step.
Use a razor blade or box cutters to trim off the excess plastic.
Using the hair dryer on the high setting, wave it gently back and forth over the edges of the door. The plastic will miraculously shrink up and become taught.
Use a hair dryer on the high setting to shrink up the plastic along the door frame.
Once you’ve gone around the frame of the door, wave the hair dryer across the middle to tighten that up too. Keep the hair dryer moving so it doesn’t melt the plastic in one spot.
Keep the hair dryer moving and wave it across the plastic to tighten it up.
If it’s cold out, you can always give yourself a blow dry too!
.
Once it is done, open the outer RV door open and close the screen door. The warm sun will pour in, but the cool breezes will stay outside!
Morning sunshine fills our kitchen
Note: Since publishing this post, we have refined our shrink-wrap system even further. We have found that it is easy to make this into a Dual Pane system but adding a second layer of shrink-wrap film on the INSIDE of the RV door. What a world of difference this second layer makes!!
WINTER RV TIP #7 – ORIENT THE RV WINDOWS (and DOOR) TOWARDS THE SUN
Every RV floorplan is different, with the largest windows and the door placed in various locations, depending on how long it is and whether it’s a trailer or a motorhome. Take a look at where your biggest windows are, and try to orient the rig so those windows are in the sun for most of the day.
Our biggest windows are in a big slideout on the curb side (passenger side) of the trailer and also in the rear of the coach. So, in the wintertime we are best off orienting our rig with the truck headed northeast. This places our biggest windows towards the southeast and southwest.
In the summertime, the opposite is true as we try to avoid having our windows facing the sun. Our best orientation in the summertime is for the truck to be headed northwest. This way, although we get blasted with some sun in the morning, our biggest windows are blissfully shaded during the long hours of blazing hot sun as it shines from the south and sets in the northwest.
This does place our RV refrigerator in direct sunlight during the hottest hours of the day in the summer, but we’ve never had trouble keeping our food cold with the fridge on the highest setting during those hot months (of course, our fridge died recently, but we discovered that that was to be expected because of its age!).
For our rig, it’s best to orient the truck to the northwest in summer and the northeast in winter.
Note that the sun doesn’t travel the same arc in the sky in the summer months as it does in the winter, as shown by the orange arrows in the graphic above.
In the dead of summer, the sun rises in the northeast and sets in the northwest. During the day it is high in the sky, almost directly overhead. In mid-winter, the sun rises in the southeast and sets in the southwest, traversing a very low arc in the sky. At its highest, the sun is only halfway up the sky. These low angles are advantageous for keeping an RV warm in winter, however, as the sun shines directly in the windows into the center of the coach.
WINTER RV TIP #8 – INSULATE THE HATCH VENTS
The RV roof may have some fabulously high R-rating that the manufacturer proudly touted when you bought it, but that applies only to the parts of the roof that are solid. Most RV vent hatch covers are thin pieces of plastic, and they don’t have much of an R-factor at all.
You can give the vent hatch covers a hand by using a hatch vent insulator. These have reflective insulation on one side to make them even more effective.
Another option is to cut styrofoam to the exact dimensions of the hatches. When we bought our fifth wheel trailer from the manufacturer NuWa Industries, we asked them to cut four pieces of the Blue Dow insulating styrofoam that they used in the walls to the exact dimensions of our four roof hatches.
The great thing about having insulation on the hatches is that they work both summer and winter. We often use ours in the summertime when we leave the rig for the daytime hours.
Another helpful benefit is that they block out all light. So, if you are parked under a bright light or there is a full moon that wakes you up as it shines right in your eyes, you can block out the light with an insulator in the bedroom hatch.
We use Blue Dow foam from the fifth wheel walls cut to the dimension of our hatches
WINTER RV TIP #9 – DEALING WITH CONDENSATION!
One of the biggest annoyances in cold, winter weather in an RV, is condensation. If you run a vent-free propane heater while boondocking, whether it’s a portable heater or one that is permanently installed, condensation will build up on the insides of the windows when the dew point is at a certain level.
Insulation on our windows – ugh!
You can minimize the condensation build-up by running the RV furnace for a while to blow out the moist air. You can also open a window a crack, or open the RV door for a bit.
Absorber towels sop up moisture with ease.
The fastest way to deal with the condensation is simply to wipe it off with an Absorber towel. As the name implies, these towels are incredibly absorbant. They are most effective when they are damp, so they come with a little plastic container that will keep them damp for months.
Simply wipe the window and then wring out the towel. And repeat. Once the window is dry, give it a final swipe with a soft microfiber towel. This gets rid of any streaks.
To make your life easier during the winter condensation season, remove the window screens and put them in a closet. This way, you aren’t fighting with the screens every time you wipe down the insides of the windows.
How much do we love our Absorber towels? We have two — blue for him and red for me!
WINTER RV TIP #10 – INSULATE THE WINDOWS AT NIGHT
Like the big roof insulation R-factor that doesn’t account for the hatch vents, the well advertised high R-factor in the walls doesn’t account for the windows, which is where much of the heat in a rig escapes, especially at night. Closing the blinds makes a difference. When we’re in a remote area with no one around, we prefer to keep the blinds open so the first light of morning fills the rig. But we can’t do this in the wintertime unless we want to wake up to a rig that is 5 degrees cooler than it could be.
Likewise, on the worst of the cold winter nights, covering the windows with Reflectix insulation makes a big difference. This aluminum foil insulation comes in a big roll, and you can cut it to the exact dimensions of each window. Just use a marker to write on each one which window it’s for.
To put one of these window insulators in place, simply hold it against the glass and then lower the blinds over it. In the case of our biggest one in the back of the rig, we rest the bottom of it on a spare pillow so it doesn’t slip down.
The window-sized piece of Reflectix Insulation is held in place by the window shade.
We keep all of them rolled up together in a closet and use them both summer and winter. In the summertime, they help immensely with keeping the heat out during the day.
WINTER RV TIP #11 – USE THE OVEN
One of our favorite ways of warming up the inside of our buggy is by baking. Mark is the Resident Baker in our household, and there is nothing like a batch of yummy muffins or a fresh loaf of banana bread coming out of the oven to warm us up inside and out!
On a brisk morning, there’s nothing like a fresh loaf of banana bread coming out of the oven!
After the baking is done and the oven is off, we keep the oven door open for a while so we can enjoy the residual warmth as it cools down. By the way, we recently discovered Chiquita banana bread mix, which is absolutely delicious and tastes just like a loaf made from scratch. It requires two bananas, and lately Mark has been adding raisins to it too.
On a cold afternoon, we’ll bake something in the oven for dinner. The longer it takes, the warmer the buggy will get during the baking process! Anything from frozen pot pies or lasagna to a whole chicken does the trick nicely.
WINTER RV TIP #12 – DO SOME EXERCISES
As soon as we wake up in the morning, we do some modest exercises. We might be shivering when we first turn on the vent-free heater, but a quickie round of 25 sit-ups and pushups always gets the blood flowing, and by the time we get in a few rounds with the hand weights, we’re sweating and turning the heater off!
This is also a great way to work off those extra calories from the tasty muffins, sweet breads and pies that keep coming out of our oven!
One way to take the chill off — do a set of sit-ups. Still cold? Roll over and do a set of push-ups!
WINTER RV TIP #13 – PLAY THE FIREPLACE DVD
Fireplace video.
This may sound a little goofy, but a video of a fire burning in a fireplace is really fun and makes the rig cozy. The video simply shows logs in a fireplace burning down to embers, accompanied by the crackling sound a fire makes. It is surprisingly realistic, and quite funky. The crazy thing is that whenever we play it, the person sitting in the recliner closest to the TV always feels a little warm on the side by the fire!
WINTER RV TIP #14 – INSULATE THE HOT WATER HEATER and HOT WATER PIPES
To conserve propane, we always heat the water just once a day, right before we take our showers. After we’re done, we have warm water for dishes, etc. By insulating the hot water heater, the water stays warmer longer. We also put insulating pipe foam on the hot water pipes that run from the heater to the shower and the vanity and kitchen sinks.
Taking a shower in an RV in the winter can be a numbing experience if temps got to freezing the night before, no matter how hot the water is in the hot water heater, because the cold water has to run through the pipes before the hot water reaches you in the shower.
If we are conserving water, we’ll bring a small cooking pot into the shower and run the cold water into it. Then we’ll warm that water up on the stove later for dishes or whatever. Even though it’s less than a quart of water, this way it’s not wasted on our bodies as we hop around in the shower shouting expletives and soaping up our goose bumps!
For more tips on heating an RV, see these articles:
Thank you for using any of our links to Amazon to shop online. When you access Amazon this way, anything you put in your shopping cart right after that results in a small commission to us at no cost to you (no matter what you buy) and helps us keep our site online. It’s a true win-win — THANKS!
Below are some of our most POPULAR POSTS(also in the MENUS above)
More of our Latest Posts are in the MENU.
New to this site?
Visit RVers Start Here to find where we keep all the good stuff. Also check out our COOL NEW GEAR STORE!!*** CLICK HERE *** to see it!