
There is nothing like the feeling of freedom of setting up camp in an ideal, secluded, picturesque RV campsite out in the hinterlands somewhere, and that’s why many RVers love to go boondocking and why we’ve done it almost every night for over ten years.
Rather than camping in a campground or an RV park, finding an RV campsite somewhere on the gorgeous public lands that have been set aside by the government for recreational purposes can make for a thrilling and fulfilling getaway.

Boondocking in Utah
“Boondocking” refers to this kind of camping which is also more officially known as “dispersed camping” or “primitive camping.” Many RVers also call it “free camping” or even “wild camping” because it usually doesn’t cost anything and many sites are far out in nature somewhere.
Whatever name you give it, it falls under the category of “dry camping” because you are living in your RV without hooking it up to city water, sewer or electricity.

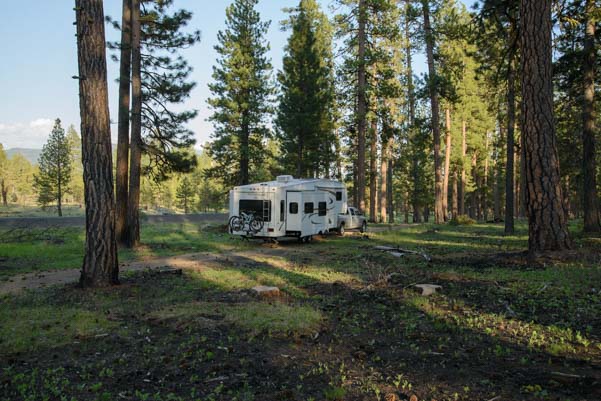
Boondocking in Idaho
This post describes the different kinds of boondocking spots that are available and how to locate them.
If you are interested in tips for how to live off the grid in an RV (i.e., tips for how to save electricity, how to conserve water & propane, how to boondock safely, etc.), see this page: RV Boondocking – Tips for Living Off the Grid in an RV
WHAT IS RV BOONDOCKING ALL ABOUT?
Generally, boondocking is a very different way of traveling than staying in RV parks and campgrounds, because it is very free spirited and spontaneous. Nothing can be reserved in advance, and often you have no idea what kind of site you might find.

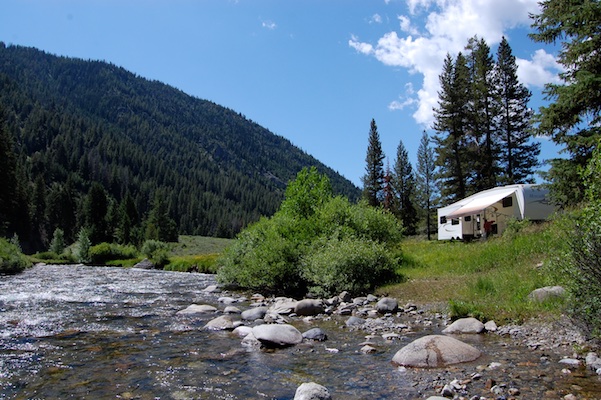
Boondocking in Montana
Many days we have no idea where we will be staying until late in the afternoon. Learning to be this flexible takes time, especially after years spent in structured, workaday routines, and not everyone ends up liking it.
We find the freedom from rules and restrictions and the beauty of the public lands is intoxicating, and we wouldn’t travel in our RV any other way.
We have been camping this way every night since we started full-timing in 2007, and as of June 2019, we have boondocked in our RV for a total of nearly 3,200 nights.
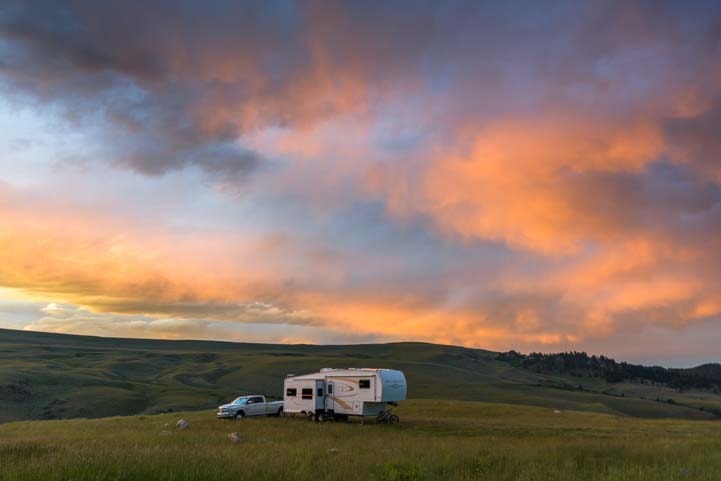
Boondocking in Wyoming.
PUBLIC LAND
The US Forest Service (USFS) and Bureau of Land Management (BLM) and other government agencies (Army Corps of Engineers among others) all manage vast tracts of public land.
The USFS (National Forests) is part of the Department of Agriculture, while the BLM (Bureau of Land Management) is part of the Department of the Interior (as is the National Park Service).
Both the USFS and BLM have a mission “to sustain the health, diversity, and productivity of America’s public lands for the use and enjoyment of present and future generations.”
As a result, both of these entities manage two kinds of activities on their land: recreational use (camping, hunting, fishing, hiking, biking) and productive use (cattle grazing, mining, logging, etc.).
For this reason, the USFS and BLM generally allow “dispersed camping” on their land. That is, you can camp wherever you find a spot that seems suitable and is accessible.
In stark contrast to the USFS and BLM, the mission of the National Park Service, which manages both America’s National Parks and National Monuments, is to preserve America’s natural and historical treasures. For this reason, the whole notion of dispersed camping runs contrary to their charter, which is preservation (i.e., “don’t touch”). Therefore:
America’s National Parks do not allow dispersed camping in an RV (boondocking)
Some ranger districts and specific locations within the USFS and BLM lands do not allow dispersed camping either. If overnight camping is not allowed, a “No Overnight Camping” sign will be posted at the site or in an otherwise obvious place.
The idea behind dispersed camping is to allow people to enjoy the beauty of nature without the ordinary restrictions of a campground. However, campers have a responsibility not to harm the site and to leave it in good condition for the next person.
That is why there are rules for boondocking about packing trash out, burying human waste deeply, and not making new campfire rings.
In general, the rules for boondocking are very simple:
- Stay in a site that already has a campfire ring or other evidence of being a campsite, and don’t build a new one
- Observe fire restrictions (sometimes fires are not allowed due to the ease of starting a wildfire)
- Pack out the trash you create (and don’t leave it in the fire ring)
- Bury any human waste under at least 6″ of dirt
- Enjoy a stay of 14 days or less (sometimes 16 days) and then move on

Sunset in Oregon
The reason behind the 14 day stay limit for dispersed camping is that the government agencies don’t want people moving onto public land and making it their home. The idea is: get in, enjoy the place, and get out. The idea is not to turn public land into little RV homesteads.
In some places the rangers will monitor the campers on their land and will ensure campers leave when their 14 days are up. Even when no one is monitoring how long campers stay, it is important to respect the rules and leave when you’ve reached the time limit.
There is a ranger’s office for each district within each of these agencies, and a stop at the ranger’s office is often worthwhile to pick up maps and to ask about dispersed camping opportunities, local rules and regulations.

Lakeside in Utah
Note added May, 2017: A reader recently emailed me to express her distress that when I discussed “our” public land, I referred to it as “their” land, meaning land “belonging to” the federal agencies that manage it (USFS, BLM, etc.). For anyone that is puzzled or put off by this reference, please read my post Copper Mining, Not Camping, In Tonto National Forest which explains in detail one way (of many) that land management agencies control public land.
It takes just a few hours for any land management agency to erect a permanent “Road Closed” sign on any tract of public land to keep the public out — indefinitely — until the road grows over with weeds and fades into oblivion. We’ve seen it happen many times. Public land is “our” land in many ways, but our access to it and the things we can do on it are tightly controlled (and have been tightly controlled for as much as a century in some places).
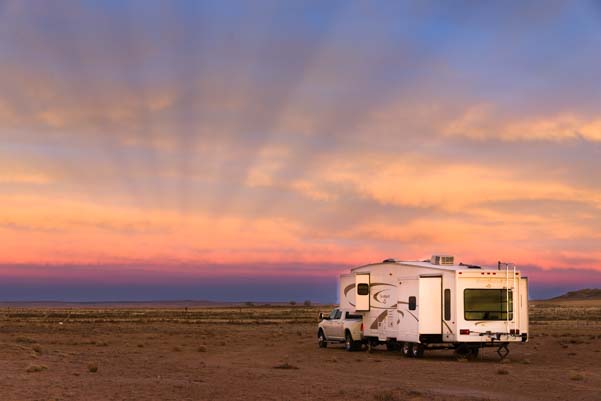
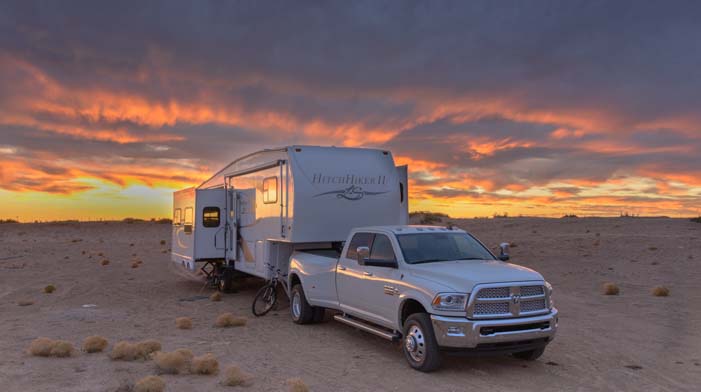
Arizona
As noted above, the USFS and BLM generally allow boondocking while the National Park Service (NPS) does not.
This means that famous places like Grand Canyon, Yosemite, Yellowstone, etc., are off limits to boondocking.
The one exception for boondocking in the National Park system is at Big Bend National Park in Texas where a very controlled kind of boondocking is possible, as explained here: Boondocking at Big Bend National Park – Tips & Tricks.
Many National Parks are located near National Forests. If you don’t mind a 10 mile or more drive to get to the National Park you are visiting, you can boondock in the National Forest and drive in.
In every western state public land campgrounds and dispersed camping areas are closing at an alarming rate.
Some shocking public land changes we have seen in our years of RVing full-time are described in these two blog posts:
- Copper Mining (NOT CAMPING!) at Tonto National Forest
– The 2015 Defense Bill under Obama gave away the world’s largest copper vein (in Arizona) to British/Australian mining interests. Surprisingly, after 50 years of national debate about this land (including a decree by President Eisenhower that it never be mined), it was given away to foreigners rather than sold to an American corporation at a massive profit — with huge royalties on extraction — as it could have been. - What is Happening to our Public Land? – Changes at the Grand Canyon
– Private Italian owned commercial developments have taken place in the National Forest just outside Grand Canyon National Park. Is that an appropriate use of National Forest “public” land?
While there has been a huge outcry recently about reducing the size of several National Monuments, in our experience, RV boondocking is generally not allowed on National Monument property. Also, the creation of a National Monument brings a deluge of tourists and requires building visitors centers, roads, parking lots and other tourist oriented features.
Much of the land in those National Monuments was already managed by federal land agencies prior to becoming a National Monument, and it is slated to return to BLM and USFS control now. The National Monument designation not only restricted how the public could enjoy the land (like boondocking) but dramatically increased the tourist traffic as well.
During a very long conversation with a ranger at Grand Staircase Escalante National Monument, we learned that he and another ranger had spent an arduous 14 hour day the previous day cleaning up human poop and toilet paper from a popular spot on the National Monument that is too remote for toilet facilities. In the past, that place was not known to the public and saw very little visitation, but because it is now in all the tourist literature for the National Monument, lots of folks go there.
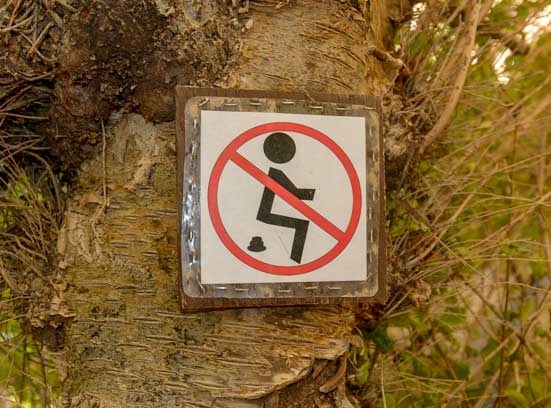
Increased tourism with “National Monument” designation has its downside.
We saw this sign in Grand Staircase Escalante National Monument.
We were also very surprised on a long back road trip to find that much of Grand Staircase Escalante was, in our opinion, very nondescript and featureless land — nothing like the truly stunning and dramatic canyon that was bisected by busy US-89 highway north of Kanab decades ago!
Perhaps the most disturbing development is the deliberate blocking of public land by wealthy people with a political agenda. In the past, ranchers generally allowed the public to have easement access to inaccessible public land next door to their property. Now, as old ranch land is sold, folks are buying it to block access to neighboring public land.
We met a fellow who told us with glee about his recent land acquisition. “When I close the gate to my property I block public access to 88,000 acres of public land!” he said with sheer delight. Another way of looking at it is that he has taken 137 square miles of public land away from the public and made it his own.
In several cases, private landowners who continued to allow public access across their property were murdered by their neighbors who wanted to shut down access to the public land all together: Class War in the American West.
We are not hunters or fishermen, but hunters and anglers are much better organized around the public land debate than RVers are, and they have gathered resources to ensure they retain access to hunting and fishing grounds: SportsmensAccess.org.
The bottom line is that the public land debate has been ongoing for over a century and it is complex. It’s worth noting that beloved photographer Ansel Adams vehemently opposed the National Park Service nearly a century ago. He discussed his opinions and actions at length in his terrific autobiography here.

BOONDOCKING ETIQUETTE
Respect The Neighbors – Give Them Space!
Boondocking campsites vary a lot in size. Some are large enough for several big rigs and some can fit only a single van or truck camper.
If you arrive at a campsite and find someone is already set up there, move on to another site unless you can set up your rig in such a way that you won’t be intruding on their space.
Even though rigs can easily park in very close proximity in RV parks, people who are boondocking on their own generally don’t want to have neighbors move in close by.
There’s no hard and fast rule on “how close is too close,” but for us, if we can’t give the campers a few rig lengths of privacy, we leave them in peace and continue our search for a different site.
Respect The Neighbors – Keep The Noise Down!
Most people boondock to get away from it all, and if you do end up within sight of neighbors, respecting their quest for peace and quiet is simply common courtesy.
Whether it’s loud music or a loud generator, nature is not nearly as tranquil when a neighbor is making a lot of noise.
Respect The Neighbors – Don’t Search For Campsites After Dark!
It is very difficult to find your way around in the boonies on small dirt roads in the pitch dark, but there are folks out there who do their campsite scouting after sunset.
This is most common with people in small driveable RVs without a car who spent the day sightseeing and are now looking for a place to crash.
Just because you have GPS coordinates or directions to a campsite in hand doesn’t mean it will be vacant and available for you when you arrive. There may be sleeping people in RVs there, and they may be surrounded by large obstacles like bushes, rocks, trees and fire pits.
It is quite a jolt to be woken up at midnight by someone driving over small bushes and boulders with their headlights flashing in all directions as they circle around your bedroom trying to find a place to camp for the night!
If you have a small RV without a car, try to finish your sightseeing before sunset so you can find a campsite and set up camp in the boonies without waking up the neighbors. Or, if you want to be out at night, stay in a campground in a well marked site that you can find easily when you return in the dark.

View from our window in Utah
Leave Your Campsite Cleaner Than You Found It!
In the olden days of 50 years ago, this motto — “Leave your campsite cleaner than you found it” — was drilled into camping kids by their parents. Lots of older campers today remember hearing that refrain from stern parents when they were young. Even if it is not commonly heard any more, it is still great advice that is well worth following.
– Pick Up Other People’s Trash
The land management agencies ask that campers “pack it in and pack it out.” This means: don’t leave the place a mess. Generally an RV won’t leave a footprint behind, but sometimes we arrive at a site and end up filling several grocery bags with trash.
I’d rather pack out someone else’s trash than leave that legacy for our grandchildren to find when they go camping with their RVs decades from now. Sadly, there is LOTS of trash on our public land, and we pack out bags of other people’s trash all the time.
Our feeling is that if we can stay for free for two weeks on a gorgeous piece of property, surrounded by hundreds of acres of natural beauty, with a multi-million dollar view out our windows, the least we can do is to pick up a little trash.
This makes the campsite nice for the next visitor!
We also want to keep the USFS, BLM and other land management agencies happy with RVers so they continue to allow boondocking on their land.
In Arizona, many Tonto National Forest boondocking areas have been closed because it was too expensive for the USFS to clean up after winter RVers and others who trashed the places. What a shame that those thoughtless people ruined it for everyone else.
– Clean Out the Campfire Ring
Many campers like to leave some of their trash in the campfire ring, thinking that the next camper will burn it for them. They seem not to realize that the next camper may not want to sit down in front of their wonderful campfire on their first night out only to spend an hour burning someone else’s trash!
Also, lots of folks don’t do campfires. Who wants to see a pile of trash in the front yard while they’re camping?
Here’s a photo of the things I pulled out of a campfire ring in gorgeous Sedona Arizona one time:
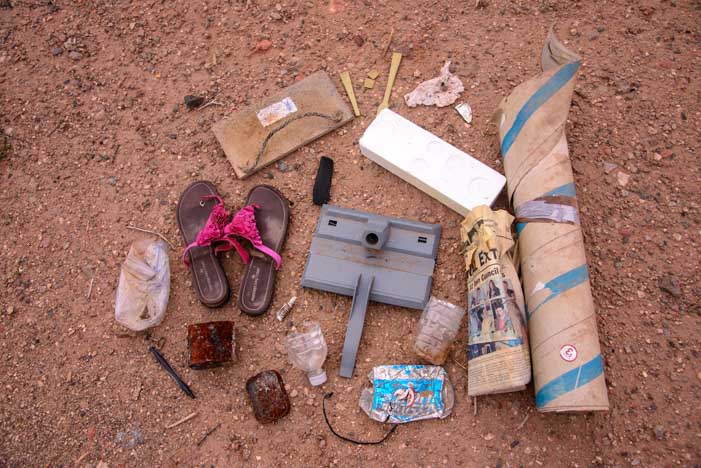
We arrived to find all this piled up in the campfire ring.
Who wants to start their camping getaway by burning the junk left by the previous camper?
– More about Poop on our Public Land
Many conservation oriented people who plan to do a lot of boondocking ask us if they should get a composting toilet for their RV. Keeping campsite cleanliness etiquette in mind, and remembering the public land managers’ important and common sense rule about burying human waste under at least 6″ of dirt, we’ve summarized our thoughts at this link: Is a composting toilet a good idea in an RV?

HOW TO LOCATE BOONDOCKING SITES
The Delorme State Atlas Books and the Benchmark Atlas Books show where the public lands are in each state, and we have one for every state we travel in (and for a few states we have two, one from each publisher!).
These atlases also have a section in the front that describes the various outings, scenic drives, historic spots and unusual natural landmarks that can be found within the state. With those attractions in mind, we have an idea of where we want to go and which secondary roads will get us there.

Camping under a big open sky in Idaho
Each state also produces a free paper road map, and visitors centers usually stock them for all the states in the region, so it’s easy to get your hands on a road map when you arrive (and sometimes even before you arrive) in a new state. Note that the big state visitors centers are generally located on the interstates, so if you are crossing into a new state and want a map, arriving via an interstate highway is a good idea.
Tucked into the woods in Oregon
We like these paper road maps because they give an overview of the layout of the state and they usually show where the scenic drives are too. You see, where there are scenic roads, there are beautiful things to see, and sometimes there are nice places to boondock too!
That’s why, between the atlas map books and the road maps, we are always on the lookout for scenic areas.
Another super resource is the wonderfully detailed National Geographic maps of America’s public lands. These take the atlas books one step further, giving finer detail (but covering less area). We turn to these when we want to zero in on a particular national forest or BLM area. These maps are especially useful for:
The National Geographic maps are also excellent for these states:
Arizona, California, Colorado, Oregon, Montana, Nevada, South Dakota, Utah, Washington, Wyoming
We usually aim for a particular area, and once we arrive, we find a place to park the rig temporarily so we can get our bearings and do some scouting in person. Then we unhitch our truck or unload the bikes, and we go scouting to see if there are any good campsites.
Usually, the first night or two we are in a temporary spot that is okay but is not somewhere we’d want to spend a long time. If we like the area and want to stay longer, we then do an all out search to find a better place. Sometimes we get lucky and find a great campsite. Sometimes it’s impossible and we just move on.

A rainbow crosses the sky in Wyoming
We incorporate our search for boondocking spots into our overall travels and sightseeing in each area we visit. Because of this, unlike most RV campers, for us searching for boondocking locations is an integral part of our lives and is the very fabric of our RV lifestyle.
Our biggest concern in scouting out a boondocking campsite is whether or not our rig will fit, both on the road getting there, and also once we are in the campsite. Overhanging branches and insufficient room to turn around can make a great spot impossible for us to use.

Secondary concerns are the potential that the place will get really muddy if it rains or really dusty if it gets windy. We also debate how long a drive it is from the campsite to wherever we want to visit. Sometimes it’s not worth staying if we’re going to be driving excessively to see whatever we came to see. However, in popular places we do frequently boondock in places that are as much as 20 to 50 miles from wherever we plan to be sightseeing.
It may sound funny, but we frequently don’t unhitch our trailer when we stay somewhere, especially if we know we won’t be staying more than a few days. If the area is bike friendly, and we’re caught up on our chores (laundry and grocery shopping), we won’t be using the truck anyways. So, we save ourselves a few minutes while setting up and breaking down camp by keeping the truck and trailer attached.

Full moon at dusk in Arizona
There are listings of boondocking sites on various websites and some folks sell books with boondocking locations in them.
However, in all our years of living off the grid and boondocking, we have found that going scouting in person is by far the best way to find places to stay.
Ultimately, RV boondocking is all about adventure, and for us, the true joy of boondocking is exploring the wonderful public lands in America and discovering special campsites that are relatively unknown.

One of our earliest boondocking experiences in Washington
Besides the thrill of discovery, another reason we like to find our campsites on our own rather than relying on lists of boondocking locations given by other people is that, in general, the quality of the reports in those lists is unreliable.
If the person reporting the site is traveling in a van, or in a car with a tent, or small RV, and has never driven a big RV, their “fabulous” campsite that is “good for any size RV” may be totally inappropriate for a truly big rig.
In addition, not only is one person’s definition of a “good dirt road” different than another’s, the site may have become unusable since the report was made.

Exotic skies in Oregon
Boondocking locations are being closed all the time.
Unfortunately, the places that allow RVers to boondock are shrinking in number all the time.
As communities grow in areas next to tracts of public land, residents don’t want to look out the windows of their new home to see RVs camping, and they get the public land management agencies to close the sites. Nearby RV parks and other fee based campgrounds also don’t like the competition from free campsites nearby, so they campaign to close dispersed camping sites to encourage RVers to stay in their campgrounds instead.
Also, the public land management agencies close roads to former boondocking sites every day for various reasons, frequently converting them to “Day Use Only.” All it takes to eliminate a stunning dispersed camping location is a “Road Closed” or “No Camping” sign on the road leading to it. These are becoming more and more common on America’s public lands.
Many places we stayed early in our travels are now off limits, and RVers who started out 10 or 20 years before us have told us of favorite campsites they lost before we even knew what boondocking was.

There are over a dozen fantastic former boondocking campsites behind this sign in Colorado.
PARKING OVERNIGHT at COMMERCIAL PARKING LOTS, TRUCK STOPS and CASINOS
Walmart is famous for being very RV-friendly, and they sell a Rand McNally Atlas that lists all the addresses of every Walmart in the US as well as its interstate exit number, if it is near one. However Walmart is not always in control of their land, so staying overnight in their lot is not always legal.
Although most Walmarts would allow RV overnight parking if they could, when the building is on leased land with a landlord that forbids it, or when it is located within city limits that have an ordinance against overnight parking, then you can’t stay there.
Usually there are signs in the parking lot if overnight parking is not allowed. It is advisable to check with the store’s security department to find out whether or not they allow overnight parking, and if they do, where they want you to park.
Here is a list of No Overnight Parking Walmarts. Of course, sometimes rules are flagrantly ignored, and we have arrived at Walmarts where RVs and semi-tractor trailers were lined up between the signs prohibiting overnight parking!
Even more-so than on public land, the boondocking etiquette at a commercial parking lot like Walmart is really important.
We try to keep a low profile, usually remaining hitched to the truck and often not even putting the slides out. Obviously, camp chairs, patio mats, grills and other outdoor paraphernalia is strictly forbidden.

Surrounded by gold in Colorado
We have seen people treat a Walmart parking lot like a campground, grilling steaks, enjoying cocktails in their camp chairs, and playing ball with their kids in the parking lot (and hitting car windshields with the ball!). No wonder city ordinances against overnight parking in commercial lots are on the rise!
How serious is this business of polite overnight parking etiquette?
Years ago, when we first started full-timing, we stayed at a casino that was very popular among snowbird RVers migrating down I-15 to Arizona for the winter.
While walking around the parking lot at sunset, we saw lots of of RVers setting up a big circle of camping chairs right in the parking lot. These more experienced RVers told us “it was fine” to have cocktail hour in the parking lot and that they did it whenever they came through on their north-south migration in spring and fall.

Camping on a lake in Wyoming
“The casino management doesn’t care if we do this…” these RVers told us. So we accepted their invitation to join them. It looked like fun! Well, apparently management did care, because now overnight parking is prohibited, not only in that particular casino parking lot but at most of the others in town too.
Along with this casino, we have seen quite a few other commercial parking lots that were once popular overnight spots close their lots to RVers. So again, be respectful of the special places that still allow it so others can enjoy it in the future!

Camping amid the cactus in Arizona
Cracker Barrel allows overnight parking at many locations, and they have a map that lists the addresses of their stores. However, we have yet to see a Cracker Barrel with a parking space big enough for our rig!
Camping World allows overnight parking in some of their lots. They list their store locations online and you can give them a call to find out which ones allow it.
Casino Camper gives descriptions of casinos that offer overnight RV parking, either in RV parks for a fee, or in a back lot for free.
Truck stops are another option in a pinch, although that rarely makes for a good night’s sleep.
Small businesses will sometimes allow an RV to stay in a back lot if you patronize them and ask permission. Some visitors centers allow it too, but generally only the ones in less busy areas.
GETTING A GOOD NIGHT’S SLEEP in a COMMERCIAL LOT
Most commercial lots are very well lit, so it’s almost impossible to find a spot in the parking lot where the street lights won’t be shining in the windows or down the bedroom hatch.
Using a vent hatch insulator in the bedroom roof hatch and putting Reflectix in the windows will block the light and make it easier to sleep. Choosing a spot that is far away from any trucks is important too, as they tend to come and go all night long. Refrigerated trucks run loud generators to keep their contents cold. Parking next to one overnight is no fun at all!
Our own private Idaho
REST AREAS and PULL-OUTS
Some Interstate rest areas allow overnighting and some don’t. Generally, if it is not allowed, then there are signs that say so. Like truck stops, finding a spot away from the trucks is vital.
Vermont doesn’t allow sleeping in their rest areas between 7 pm and 7 am (apparently “resting” at a rest stop is a very short duration activity in Vermont), while at one time Texas offered free wifi at all of theirs! One rest area in Mississippi is set up like a campground with individual campsites and a water spigot at each site!
Many secondary roads have large pull-outs where you can be far off the highway and get a good night’s sleep.
ASK AROUND
The best boondocking resources are often fellow RVers and other people we meet in our travels. However, as with the online and printed reports of campsites, it helps to verify that the person has actually been there and done it.
Many forest rangers will say there is dispersed camping in their district, yet despite being “legal,” it is totally impractical. Find out if the ranger you are talking to is an RVer with a rig your size.

Beach camping in Arizona
Also, whoever you talk to, find out what kind of rig they actually took to the campsite they are describing and when they last went. They may own a big rig now, but if they took a Jeep and a tent to this site twenty years ago, it doesn’t count.
Lastly, size up the person and their thirst for adventure as compared to your own. We have several RVing friends who happily take their big motorhomes to places we’d hesitate to go.
Most of all — have fun with it. For us, half of the excitement of boondocking is in the searching. We always have an eye out for prospective camping sites as we drive around, and when we find a really good one it’s a total thrill.

Red rock camping in Utah
WHY DON’T WE SHARE OUR BOONDOCKING LOCATIONS?
Many people ask us why we don’t give GPS coordinates or directions to the boondocking locations we find. Very simply, boondocking is all about adventure — not knowing what might lie around the corner or where you might sleep tonight. We don’t want to spoil that adventure for you!
More importantly, the essence of boondocking is being able to experience true independence, freedom and self-reliance, things that are rare in today’s world.
One of the greatest thrills of boondocking is suddenly coming across a campsite that is ideal for you, somewhere you would just LOVE to stay for a few days. If you simply drive to the GPS coordinates somebody else has given you, you are missing out on the most exciting aspects of boondocking: exploration and discovery.
Our boondocking locations work well for us, but they might not work for you. Our trailer sports a lot of pin stripes along its sides from scraping against tree branches when we’ve squeezed down a narrow road, and our truck already has a dent in the side from a tree branch falling on it when we shoe-horned ourselves into a tight spot.
We are willing to commute as much as 50 miles between our campsite and the areas where we sightsee. So, many of the stunning photos of our rig on this blog are not anywhere near the areas we were visiting at the time.
We also spend many hours each week searching for good campsites by driving our truck or riding our bikes down tiny dirt roads to see what’s there. This is an integral part of our daily lives and is not only a fundamental part of our travels but is something we really enjoy doing.
For those that are willing to make this kind of effort, all of the beautiful places you see in this blog are waiting for you to find. Relish the search — we do!
When we cruised in our sailboat, a popular cruising guide had just been published. It gave the GPS coordinates where the authors had anchored in every anchorage. Everywhere we went, boats were crammed around those coordinates. Even if the anchorage was a mile wide, 20 boats would be on top of each other where the authors of the book had dropped their anchor.
That kind of “paint-by-numbers” cruising (or boondocking) is easy, but I think all those sailors were missing out on something priceless: exploring and finding a little corner of their own that was away from it all and that was “theirs” for a few nights.
A classic sunset
Also, like everything on the Internet, this blog is read worldwide. I have seen our RV articles and our blog links being discussed on RVing forums from France to The Netherlands to Romania and have received emails from South American and Australian readers as well!
I love corresponding with American service people who are stationed overseas in the war-torn parts of the world, especially when they tell me that this blog is a source of inspiration for them as they begin to plan for a different life after their service is over.
However, there is little reason for people on the other side of the planet to get detailed directions to or GPS coordinates for priceless camping spots on America’s public land.
If boondocking and anchoring out all these years have taught us anything, it is that these places are precious. Anchorages are disappearing as they are turned into mooring fields and then get built up into marinas. Public land boondocking locations are also disappearing at an alarming rate, often because it’s much cheaper for the land management agencies to prohibit dispersed camping all together than to pay to pick up the trash that careless campers and partiers have left behind.
We love our life in an RV off the grid, and we hope others with a similar passion for the natural world will approach it with the same kind of adventurous spirit as we do, and will find it as thrilling and fulfilling as we have.
However, going out and having a thrilling adventure of your own is an exercise we leave up to the reader!!

Want to learn more about RV boondocking? We have loads of articles on this website:
- How to live off the grid in in an RV – Tips and tricks for living on limited water and electricity
- All about RV Solar Power – A library of articles about installing solar power on your RV
- How to stay WARM in wintertime – Survival tips for winter RVing
- How to install a vent-free propane heater – Get massive cozy warm heat without relying on electricity
- How to stay COOL in summertime – Tips for living without depending on electricity hogging air conditioning
Index pages with links to our many articles about RVing:
- RV Tech Tips – RV Upgrades, Maintenance Tips, Buying an RV, Truck and Trailer Tips and more.
- RV Lifestyle Tips – Full-time RVing tips, Off-grid living, RV Repairs, Workamping, How to Live the Dream and more.
Official websites of the Public Land Agencies and Bureaus:
- US Forest Service – The USFS manages America’s many National Forests under the Department of Agriculture
- Bureau of Land Management – The BLM manages vast tracts of land in the west under the Department of the Interior
- US Army Corps of Engineers – Among many other things, manages America’s watershed areas, largely in the east
- National Park Service – Oversees and protects America’s natural and historic treasures, under the Department of the Interior
Subscribe
Never miss a post — it’s free!
Below are some of our most POPULAR POSTS (also in the MENUS above)
Buddy - A Journey in Spirit - The story of an event that changed our lives forever. ARTICLE INDEXES- RV Tech Tips Articles - A one page index of links to all our RV Tech Tips, RV Upgrades & RV Maintenance articles.
- RV Lifestyle Tip Articles - An index of links to all our RV Lifestyle Tips (finances, boondocking, major repairs, work/jobs, etc.)
- Solar Power Articles - Overview and tutorial articles for how to design and install solar power on an RV or boat
- Product Reviews - An index of links to all of our Product Reviews
- Basic RV Tool Kit - What tools do RVers need? Here's a list of essentials, from tire changing to electricity, plumbing & more
- RVing Tips & Tricks - Tips and tricks to make RVing easy
- Reese Goose Box - Reclaim your TRUCK BED with air ride smooth towing + How to hitch and unhitch!
- RV Heater Installation - Step-by-step guide for how to select and install a vent-free propane heater
- CargoBuckle Ratchet Straps - These retractable straps make it a CINCH to tie down a side-by-side, motorcycle or ATV
- How to change a dually truck's inner rear tire - Tips for changing the inner rear tire on a dually truck.
- EASY SOLAR POWER UPGRADE - We TRIPLED our factory installed solar power output for CHEAP
- B&W Fifth Wheel Hitch - Why we chose this hitch for our fiver plus an easy 5th Wheel Hitch Installation Guide.
- Demco 21k Recon Fifth Wheel Hitch - This fifth wheel hitch mounts on a gooseneck ball in the truck bed!
- Increase Your RV Storage Space - Add precious storage space at the RV dinette with storage benches!
- Buying a Truck - Which options turn an ordinary diesel pickup into a massive TOWING MACHINE?
- Battery Charging Primer - The low-down on RV and marine batteries and how to charge them effectively.
- Which Solar Panels are Best? - Which is better: FLEXIBLE or RIGID?? 12 or 24 volt?? monocrystalline or polycrystalline???
- RV Solar Power Made Simple - An overview of how solar power works on an RV
- Trailer Disc Brake Conversion - Massively improve trailer stopping power with electric over hydraulic disc brakes
- Truck Engine Upgrade - How we improved performance, towing power and fuel economy with an engine tuner
- How to Defrost an RV Refrigerator in 20 Minutes - It is actually a cinch to defrost an RV fridge!
- Solar Charge Controllers - Understand and OPTIMIZE your RV / marine battery solar charging
- Wet Cell vs. AGM Batteries - Which is better, why we upgraded, PLUS wiring tips to optimize battery life
- Suspension Overhaul on a 5th Wheel - A Total Re-design for our Suspension: Hangers, springs, shocks & more!
- Can you run SOLAR POWER and SHORE POWER together? - What happens when you're on solar and you plug in?
- Converters, Inverter/Chargers and Engine Alternators - How do these battery charging systems REALLY work?
- RV Budget, Costs and Expenses - A detailed analysis of RVing expenses over 7 years of RVing full-time
- RV Extended Warranties - Is an RV warranty a good investment or a waste of money? Our personal case history.
- Working and Living on the Road - How do you make money on the road and who lives this nomadic lifestyle?
- Sell or Lease the House? - Is it better to SELL or LEASE your house when you start a life on the road?
- Mexican Dentists - Are the Dentists in Mexico any good? Just how cheap are they? Here are our PERSONAL experiences.
- How An RV Warranty Saved Our Bacon - Literally! - One repair on our RV practically paid for our RV Extended Warranty
- Still Smiling After 3 Days at the RV Repair Shop - Why? Our RV Warranty put us $2,000 ahead of the game!
- 5th Wheel Suspension Replacement - When our trailer's suspension failed, we $aved $$$ Thousands getting it replaced.
- RV Toilet Replacement - Our RV toilet quit flushing (ugh!) but our RV warranty saved us again. Now we're $6,700 ahead!
- RV Boondocking - Tips for how to live in an RV off the grid
- Which RV Is Best for Full-Time Living? - Transitioning from a house to an RV - Which RV makes the best home?
- Truck Camper Pros and Cons - The GOOD, the BAD and the UGLY!
- Full-time RV Lifestyle Tips - Full-time RVing Logistics - Mail, Domicile, Insurance, Warranties, Saving Money at RV Parks
- Toy Hauler Life - What's it like to live in an OPEN BOX Toy Hauler?
- What are the MOST IMPORTANT FEATURES in a Full-time Fifth Wheel? - For anyone planning to live in an RV!
- Internet & Phone Access for RVers - An inexpensive, minimalist solution for internet access on the road
- RV Dump Stations & Composting Toilets - How to do the dirty deed at the RV dump PLUS RV Composting Toilet tips
- Choosing a Trailer for Full-time RVing - Why the payload capacity is so important
- Learn RVing the Fun Way!! - Go Cheap, Go Small, Go NOW and have a blast in little RV!
- Free RV Campsites - Resources for locating campsites for boondocking
- Glimpses of the Full-time RV Life - Anecdotes from the road and essays about living the RV dream.
- Travel Photography Tips! - All the cameras, gear, books, blogs and tools we used to learn to take great pics!
- Gear Store - A list of the goodies, equipment and gear we've found useful in our RV lifestyle!
Our most recent posts:
- Buckskin Mountain State Park – Fun on the Colorado River! 01/31/26
- How to Install Starlink Gen 3 in an RV? Use the Speedmount! 08/07/25
- Escape to Paradise – Rocky Mountain Magic! 08/01/25
- Is Forest River a Good RV? Well Built? Here’s Our Experience 06/20/25
- Sunset Crater Nat’l Monument – Lava & Camels at Bonito CG! 06/06/25
Thanks for the great post! We will be heading out from our kids’ in Idaho soon, headed for Arizona and Utah, and are hoping to do as much boondocking as possible, so the timing is perfect.
I’m glad this helps. Have fun boondocking in the red rocks and the desert!!
Can’t wait to hit the road when we retire! Liked your ice skater reference :))
They’re my idols…I’m tickled you picked up on it! Happy retirement when it comes!!
Thank you for your useful leads for Motorhoming in USA. We are longtime motorhome free campers in Australia. We are very fortunate in Australia because we have a wonderful book titled CAMPS7. It list over 3,900 free or near free campsites. Each listing is marked with a site number (shown on their map) satnav/GPS coordinates, a rout description and road condition. Then unique symbols are attached covering everything that is available at each site like Toilets, Disabled toilets, Shade, Fireplace, Big Rigs, Powered, Outlook or Vista, Mobile Phone, Pets, No Pets, Dry Weather Access, Showers, Water, Non Potable Water, Picnic Tables, BBQ, Max Stay, Dump Point, Public Phone, Close To Road, Tents, Caravans, Campers/Motorhomes, Boat Ramp, Day Use Only, Overnight Camping/Parking. This book is locally called “The Bible” and is also available with a photograph of of about 80% of the listed sites.
We will be Motorhoming in Canada and the USA mid 2015, is there any similar publication for us? Regards, Kevin and Kathleen.
How nice to hear from campers Down Under. We just spent 5 wonderful days boondocking with a pair of Aussies who have also camped all over your beautiful country before crossing the Pacific to check out the sites here in North America. Someday we hope to be using your Bible on a daily basis as we explore Australia in a camper. I spent 3 months there in 1991, and that was the biggest tease imaginable — I’ve been wanting to get back ever since!!
As I mention in this post, the only Bible we use is the Days End directory from Escapees RV Club. You could join Escapees now and get access to the directory so you can start your planning before you arrive in the US. Good luck with your travels and have a blast in our pretty outback!!
Hi there, thanks for this enormously helpful article. I’m travelling on my own in a 2 berth camper van for one month in August. Any advice about Boondocking in peak season? I imagine it is difficult to find seclusion and isolation during the summer months? Some of the pictures you posted in the article is exactly what I’m looking for! I want to be totally alone in the wilderness…
ps: I’m starting in Los Angeles and am planning on visiting Arizona, Colorado, Wyoming, Montana (time permitting), Utah and Nevada. I know that rather ambitious in one month!
Sounds like a great trip, David. I would recommend you do the things outlined in this article, as that is what we do. Being peak season shouldn’t be a problem. Go exploring and have fun!
I just discovered your blog this morning on Escapees. We have been following Wheeling it for quite some time now and have picked up a lot of ideas. I sure wish you had a list of the sites by state where you have boondocked. We have sold our house and are heading out the 1st of the month to start our full timing experience. Our trailer is about the same size as yours and from past experiences we know that can be a problem sometimes. We do camp hosting for different NW states and that has been a good way to visit an area with the idea of exploring. Thank you for all the useful ideas and time that you have spent sharing with the rest of us.
Congratulations on selling your house and starting your full-time RV travels. What a thrill for you! There are many ways to live this lifestyle, and you will find what works best for you, whether it is work camping or other methods. I’m delighted you found our blog and hope you will enjoy reading more here. We are active participants in Days End and many of the sites we stay in can be found there.
Great, informative article!
hey by the way do you know the etymology of the word ‘boondock?’ It actually is a Filipino term for ‘mountain.’ It’s ‘bundok’ originally but when adapted to the English language, it became boondock 🙂
Love it!
We live in Greenwood, about two miles from where you are at Camping World. We spent eight winters on our sailboat, Sunshine, cruising the waters of the Bahamas and Central America. We have just purchased a 36′ fifth wheel and are preparing to begin traveling. If you are still in this area, would you like to get together? (P.S., our driveway might hold two RV’s…I am going to measure it. If so, you are welcome to camp out here.)
Sounds wonderful! I sent you an email..
My wife and I are just getting ready to take this plunge. We too want to travel the U.S. Was wondering how you handle your water/waste tanks when boondocking so much???
We have tips for how we live our boondocking lifestyle (including water/waste tank tips) here: https://roadslesstraveled.us/rv-boondocking-tips-for-living-off-the-grid-in-an-rv/ and we have tips for how to dump the holding tanks here: https://roadslesstraveled.us/dirty-little-secrets-rv-dump-station/ Have fun with your travels!!
Just a quick question. When you boondock is it ok to leave your rig there while you see the sites or run an errand?
Legally, it’s fine. As far as security goes, it depends on where you are and how safe you feel your rig will be left on its own. Sometimes it’s okay and sometimes not.
Thank you so much…this has made my decision final.
Great post – thank yo so much! I see tons of info (here and other sites) about western states. Do you know if there are similar places on the east coast?
Sadly, there is almost no public land in the eastern states, so there is almost no boondocking.
I just read your post. Thank you for all the great information. I can’t wait to explore the area and hope to find a site as beautiful as your photos.
Thank you.
You are welcome, Ilse. Thank you for reading. There are beautiful places waiting for you to discover them, and the best part is that OMG moment when you find a spot that will be a true delight for a few days.
Good morning,thank you so much for all the info , I have been following your journey for a few months. My husband and I are going to retire early next year and we are going to sell our home and rv full time. I’m so looking forward to it . getting rid of all our stuff is one of the most freeing things I have ever done . Have a wonderful day !!
Downsizing is tough but feels great afterwards. Have fun in your travels and welcome to the full-timing lifestyle!!
Hi Guys:
I’m new to this as many I have read here. I have put together a truck camper on a flatbed to pull my race car trailer, but have found I have an interest of being alone away from everything. Have not found any spots yet in Ohio, but I’m looking.
Your site has good info and will read it over a few more times. I see you have been doing this a long time out west and it must be breathtaking at times.
I go to the salt flats rack year for the past 6 years with high school buddy’s that race their, and the surroundings are majestic, but I’m not in to driving that far yet as I still work.
The boondocking idea appeals to me so I will be doing more to look into this… thanks again for a good site.
You’re welcome. Happy reading!
Always look forward to your next posting! Like you two, my wife an I both are photo enthusiasts. I was wondering if you ever get Bored? Neither one of us have a talent (that were aware of) that will eat up the clock i.e an “on the road job” etc. With the exception my wife can clean most anything to death:)
33 yrs together and time for a new chapter!
Thanks Again!
Rory B.
You’re a lucky man, Rory, to have lived a spotless life for 33 years thanks to your wife. You made us both laugh with that comment!
We never get bored, at least not to the point of being stuck in a rut. In fact, we find it nearly impossible to squeeze everything we want and need to do into the 24 hours we have each day.
We didn’t have any talents when we started either, and I’m not sure my cleaning skills could keep up with your wife. But once we were out on the road and free, we suddenly discovered we had the time to indulge our interests. Those interests happened to be writing (me) and photography (both of us), but they could just as well have been history or archaeology or the flora and fauna or geology of our beautiful country.
I think the thing is just to enjoy the freedom first, and then see what happens.
In our first year we loved to sleep til noon and tease each other as we lounged around that the grownups were going to show up at any moment and tell us we had to go do something. We were soon back to our early bird morning habits, but having the luxury to do anything we wanted at any pace we wanted really opened up our creativity.
Whenever we do run the risk of getting bored, we shake it all up. That’s how we ended up buying a sailboat and exploring Mexico, and that’s also how we ended up at the Angkor Wat ruins of Cambodia last year.
The key for us is to keep going to new places and doing new things, even when the prospect of whatever it is scares the living daylights out of us. The wonderful thing is that the longer you live this lifestyle, the wider the variety of sweetly familiar things you can fall back on after you shake it up. We love returning to old places and feeling that warm sense of familiarity, especially after doing something new and outlandish…
Have fun with your travels and keep surprising yourself!
My husband and I will be free within the next year but we’ll be adjusting to the “fixed income” lifestyle. Dry camping is so appealing to me because in my younger days we did a lot of camping under the stars on the granite rocks of the Sierra Nevada’s. Also just hanging our in the logging camps while my dad worked. All I can think of is a fishing license, a good book and maybe a kayak , all with no one else around…. Your photos mostly show that you park alone. Have you ever experienced any theft while your away from camp? Or intrusions in the middle of the night? What precautions do you take? I’d like to be able to sleep under the stars again and I’m not concerned about the wildlife.
Thanks for all of your tips as I have been searching All stays, RV parky, etc with little luck finding labeled public lands. The Parks are labeled but I’ve found very little BLM . So the map suggestions were just what I was looking for…….. Thank You so much
I you did a lot of camping under the stars as a kid, you’ll take to boondocking like a fish to water. We camp alone because we like solitude. Some folks camp in groups, especially in Quartzsite, Arizona, in the winter, but most boondockers do it to get away on their own. We have not experienced theft and have not felt unsafe in all these years of boondocking. If you haven’t yet read our detailed article on “how to boondock” with tips on everything, including safety, it is here.
I really liked your article about scouting for places to stay instead of reading about them in a book, boks can’t describe the real beauty and downfalls of a site. Thanks keep up the good work.
Scouting is a lot more fun than other kinds of research and is far more accurate too. Happy travels!
I have no problem finding a overnight or free campsite when I am west of the Mississippi river but back east they have made it a real problem do do so. No parking anywhere no stopping no resting,just keep going! that’s the signs you see everywhere back east and no city likes visitors who don’t like being charged 50- 150 dollars for a less then a full day jammed up besides a another loud camper. I wish the east had so kind of free or even small fee camping. i never found it if they do.
Very true. There is very little public land in the eastern states, and the little that exists prohibits dispersed camping.
Great article. We are full time rvers in a class A with an toad. Our Youtube channel is one you may want to check out. Thanks for the great information.
I’m glad this info is helpful to you. Good luck with your YT channel — looks great! — and happy trails.